
Asset preparation involves creating or obtaining all the individual media elements of a title that are specified on the asset list, and converting those elements into the form needed to integrate them into a DVD title.
Asset preparation is always a major concern in the DVD production process, but the size of the job varies depending on the number of elements involved and in what form they are available. In some cases a DVD’s content will largely be re-purposed from elements already created for use in other contexts, while in other situations all the elements may be created entirely from scratch.
In a typical scenario, different aspects of production are often handled in different facilities: the video is edited at a post production house, the sound is mixed in a recording studio, and the background graphics for menus are designed by a graphic designer. It is crucial that the production professionals at each of these various facilities understand the specific requirements that the materials they prepare will have to meet in order to be useable for DVD. Otherwise it is quite possible that significant time and money will be needed to redo elements that are not compatible with, or optimized for inclusion in, a DVD project.
Video assets
Video is the core media type of DVD-Video, and it also plays an important role in DVD-Audio, where it is used to display still pictures, menus and optional motion video. Much of the preparation of video assets for DVD involves tasks commonly associated with video production and post production. These may include editing for home video release, transfer from film to video (telecine), standards conversion (NTSC to PAL or vice versa), or even shooting interviews and other documentary material for small features included as value-added content.
A discussion of post production techniques is beyond the scope of this book, but it is important to realize that every operation performed on the video material carries with it the risk of degradation of signal quality or the introduction of noise. Undesirable in any context, signal degradation and noise can be especially problematic in terms of maintaining the image quality of material that will undergo video compression. Thus it is crucial to use the best available equipment and techniques at every step in the production of a master that will be used for DVD.
Ideally, video destined for DVD should be of master quality and delivered in a component broadcast format such as D1 or Digital Betacam, which will yield much better results than a composite video format. Alternatively, if the video has been prepared on a non-linear editing (NLE) system, best results may be obtained by direct digital transcoding into MPEG-2 from video files, without first laying the material to tape. (All of Sonic’s DVD authoring applications support this mode of importing and encoding video and audio which have been prepared on popular NLE packages from Avid, Media 100, and other QuickTime-based video editing systems.)
MPEG compression
High-quality MPEG video compression – developed by the Motion Picture Experts Group – is the enabling technology for video on DVD. While MPEG compression is a very complicated topic, a basic overview here should be helpful in understanding video preparation for DVD.
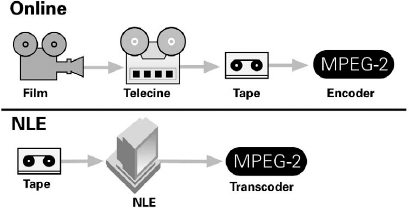
Figure 7.1 Video encoded to MPEG-2 may result from either of two different video production chains.
Video compression is used in DVD because uncompressed digital video demands huge amounts of data bandwidth and storage. Uncompressed ‘studio-quality’ video (ITU-R BT.601–5, 4:4:2 sampling at 10 bits) generates data at a rate of over 200 Mbps, meaning that a two-hour program would consume over 200 GB of storage space (without accounting for audio), vastly exceeding the storage available on any DVD disc (4.7–17 GB).
MPEG compression is based largely on the observation that in motion pictures there is typically a high degree of redundancy – both spatial (within a given image) and temporal (between successive images). In part, MPEG reduces the amount of data by minimizing the extent to which this redundant information is stored during encoding. Assuming that the decoding system is able to accurately recreate that information during playback, data bandwidth and storage requirements can be significantly reduced with little or no impact on perceived image quality.
In brief, the encoding process begins with intra-frame compression, which operates on each video frame individually. The picture is broken into a grid of small blocks, and the colour information present in each block is re-coded to express redundant information more efficiently.

Figure 7.2 In intra-frame compression, areas of a given video picture that have the same colour value are re-coded to express redundant values more efficiently.
Depending on the target bit-rate, intra-frame compression may also involve coding adjacent colours that are similar to one another as if they are the same colour. This increases redundancy and thereby decreases data-rate requirements, but it also results in some loss of detail. The extent to which this loss is noticeable depends on both the amount of compression used and the specific program being compressed.
Intra-frame compression is followed by inter-frame compression, in which a series of adjacent frames are compared and only the information necessary to describe the differences between successive frames is retained. When the encoded material is played back, a decoder extrapolates from the stored information to re-create a complete set of discrete frames.
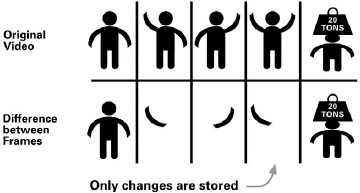
Figure 7.3 Rather than storing every frame in its entirety inter-frame compression stores a series of frames as information about frame-to-frame changes.
Note that the effectiveness of MPEG video compression is highly dependent on the video material being compressed. For example, a fast-paced, visually complex action sequence has comparatively little frame-to-frame redundant information. That makes it more difficult to compress than other material, meaning that it will require a higher bit-rate to re-create it accurately.
Frame types and GOPs
An MPEG-2 video stream is normally made up of three types of pictures, defined as I-pictures, B-pictures, and P-pictures. I-pictures (intra) are compressed using intra-frame techniques only, meaning that the information stored is complete enough to decode the picture without reference to any adjacent frames. B (bi-directional) and P (predictive) pictures, on the other hand, are encoded using inter-frame compression to store ‘difference information’ (frame-to-frame changes). B- and P-pictures require much less data capacity to store, but they can only be reconstructed by referring to the I-pictures around them.
Table 7.1 The three types of MPEG-2 pictures.
| Picture type | Definition |
| I | I-pictures are encoded using intra-frame compression, and contain all the information needed to reconstruct an individual frame of video. |
| P | P-pictures (predictive) are more compressed than I-pictures. They are reconstructed based on the nearest previous I- or P-picture, and provide a reference for the calculation of B-pictures. |
| B | B-pictures (bi-directional) use the least amount of data. They are reconstructed by referring to information in both a previous and a subsequent frame. |
In an MPEG stream, the I-, B-, and P-pictures created during encoding occur in a specific sequence referred to as a ‘Group of Pictures’ (GOP), the smallest addressable unit of MPEG video. The I-pictures serve as reference points that allow the decoder to interpret the difference information representing the B- and P-pictures. MPEG supports the use of a variety of different GOP structures in the same stream, and each GOP includes a ‘header’ with information about the structure that follows. A typical DVDVideo stream might be made up primarily of GOPs with a size of 15, using a picture sequence of I-B-B-P-B-B-P-B-B-P-B-B-P-B-B-I.
GOP structures are of more than academic interest in DVD production. For example, a common technique used to improve subjective compressed image quality is to impose or ‘force’ I-pictures at points where there are large differences between successive frames (e.g. scene changes). Also, chapter points and cell boundaries must align on GOP boundaries for video decoding to work smoothly when jumping to an entry point. This may require re-encoding some portion of the material at these locations using a different GOP structure. (Advanced DVD packages that support segment-based re-encoding will avert the need to re-encode an entire program.)
VBR encoding
DVD supports the use of both Constant Bit-rate (CBR) and Variable Bit-rate (VBR) MPEG video encoding. VBR is used extensively, particularly for programs such as feature films which are more than one hour long. As we learned earlier, video source material can vary dramatically in its complexity, and hence in the difficulty of achieving substantial savings in bit-rate without degrading image quality. VBR addresses this problem by allocating fewer bits to those sequences which are comparatively easy to compress, and more bits to those which are harder to compress.
If artfully done, VBR can greatly improve the image quality that may be achieved at a given bit-rate, or, alternatively, substantially increase the amount of video that may be stored on a given disc. As always, the exact benefits vary depending on the specific program material, but in general the application of VBR techniques may result in a reduction of 50 per cent in the space utilized.
Consider, for example, a two-hour movie to be released on DVD-5. All told, audio, subtitles and overhead might take 0.8 Mbps of bandwidth and 0.9 GB of disc space. For video, that leaves approximately 3.8 GB of space (4.7 – 0.9) and a maximum bit-rate of 9 Mbps (9.8 – 0.8). With VBR, the video encoding parameters could be set to produce an average bit-rate of 4.22 Mbps, and a peak bit-rate of 9 Mbps. Using CBR, the entire movie would have to be encoded at 4.22 Mbps, without the benefit of the 9 Mbps peak rate for difficult scenes.
Inverse telecine and pre-processing
We know that MPEG video encoding achieves its high compression ratios by eliminating redundant information, and that the more redundancy can be eliminated, the more bits will be available to accurately capture the remaining picture information. That is the motivation for using both inverse telecine and video pre-processing.
Inverse telecine removes redundancy introduced into NTSC video during the film-to-video (telecine) transfer process. Because film runs at 24 frames per second and NTSC video runs at 30 frames (or 60 interlaced fields) per second, the conventional telecine process assigns successive film frames first to two and then to three video fields. This means that every fifth video field resulting from the transfer contains completely redundant information. Detecting and extracting this redundant field yields an overall gain of 20 per cent in compression (or better image quality at the same data-rate).
A nice side-benefit of inverse telecine is that when stepping frame-by-frame through a sequence the viewer will see precisely 24 full frames for each second of video material (if the process has been performed accurately).
In real-world production, material that originates on film is often edited after transfer to video, so one can rarely assume that video retains the constant
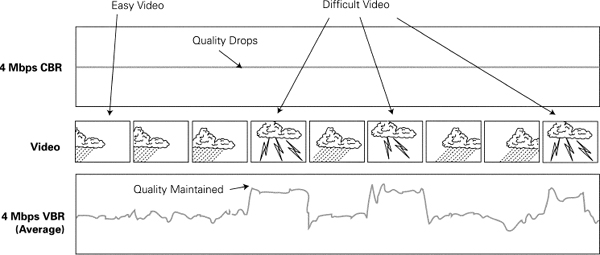
Figure 7.4 Variable Bit-rate encoding allocates fewer bits to easy video and more bits to complex video.
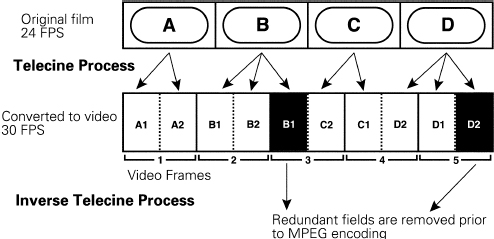
Figure 7.5 Inverse telecine removes redundant frames introduced in telecine (NTSC).
3-2-3-2 cadence of the original telecine transfer. This is what makes inverse telecine a demanding process for an MPEG compression system. It is important that an advanced encoding package is used, one that automatically examines every successive video field to spot changes in the cadence.
In video pre-processing, a digital noise reducer or low-pass filter is used to reduce high-energy noise in the video signal prior to encoding. Noise may be introduced into the video signal by equipment used upstream from the compression process which is not aligned or functioning properly. Alternatively, it may result from the nature of the source image itself: grainy film, dust, snowfall, or textured surfaces such as a white stucco wall. Such noise tends to be random rather than consistent from frame to frame.
When random noise is reduced by pre-processing, the video signal has greater frame-to-frame consistency. The more redundancy, the easier it is for the MPEG encoder to maintain image quality at a given bit-rate.
The encoding process
Encoding high-quality video for DVD requires powerful MPEG-2 compression technology. These encoders must be able to handle VBR encoding, inverse telecine and video at multiple aspect ratios. At the same time, effective tools will be designed to make the compression process easy and intuitive for the operator.
The quality of the source material directly affects the quality of the final MPEG-2 stream. Good results will be achieved from video that either originates (is shot) in a CCIR-601 digital video format such as D1, Digital Betacam, or DCT tape, or is transferred from film directly to these formats. A higher-resolution source such as an HDTV master is even better. The highest possible resolution should be maintained at each step that the video goes through before MPEG encoding.
In theory, VBR encoding may be carried out in a single pass. In practice, however, that approach would offer little opportunity for the encoding system to gather the information it needs to analyse the program material and optimize the allocation of bits. While VBR may be performed in three passes, an advanced video encoding package will be capable of achieving optimum quality in only two passes. In Sonic DVD Creator, for example, the VBR encoding process works as follows:
Pass 1 |
A preliminary analysis is performed of the video program, resulting in initial I-picture placement, and a profile of the program. If the user has engaged SmartCheck™, an analysis is performed that adjusts the compression algorithm to match closely the complexity of the video program. Also at this stage, ‘thumbnail’ pictures are generated for DVD Creator’s highly graphical user interface. |
Pass 2 |
The actual encoding is performed and an MPEG stream is deposited on the system’s hard disk. |
Each pass in the VBR process is done in real-time, allowing the operator to view the results of the compression process as it takes place. In a real-time networked production environment with guaranteed bandwidth, the MPEG-2 video stream can be recorded directly to a shared hard disk so that an encoded stream may be accessed across the network by other DVD production systems while it is still being encoded.
Segment-based re-encoding
Although an MPEG-2 VBR encoder can be designed to use the best overall encoding parameters for a given video source, small segments of MPEG-2 video will usually benefit from being modified manually for maximum quality. Additionally, decisions made during the DVD production process may involve changes to the project’s Bit Budget after the movie has been encoded, necessitating bit-rate changes to the MPEG-2 video stream.
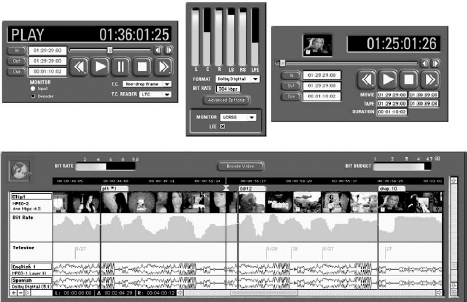
Figure 7.6 A segment-based re-encode in Sonic DVD Creator.
The re-encoding process is analogous to the pre-mastering stage in the record industry, where changes in dynamics and equalization are applied to polish the finished program. In both cases, this fine tuning is critical to achieve professional quality output.
In DVD production, it is very important that the MPEG-2 encoding system supports the ability to select specific segments of video and re-encode them. The lack of this capability will often force users of unsophisticated MPEG-2 encoders to re-analyse and re-encode an entire movie just to implement a small change in a GOP structure or a bit-rate level. In a professional production setting, where throughput is critical, considerations of deadlines and productivity make segment-based re-encoding a virtual necessity.
Audio preparation
The range and flexibility of audio support in both DVD-Video and DVDAudio makes audio perhaps the most intricate area of asset preparation to cover in detail. This complexity stems not only from the encoding processes used, but also from the number and variety of simultaneous streams that may be used in a single title. We will start by looking at audio as it is used in DVD-Video and in the video content on DVD-Audio. Then we will discuss some of the additional audio considerations introduced by DVD-Audio’s high-resolution and multichannel capabilities.
Audio formats
As described earlier, PCM and Dolby Digital are the primary audio formats used in DVD, while support for additional formats is an option included in some players. In DVD-Audio, up to two simultaneous user-selected audio streams may be supplied in any given program, one of which must be PCM (linear or MLP). In DVD-Video, a video program may be accompanied by up to eight simultaneous audio streams.
In DVD-Video, Dolby Digital is supported in both NTSC and PAL countries. The use of this compressed format is not required as long as a stereo PCM track is included instead, and extensive support (described earlier) is included in the DVD-Video specification for both stereo and multichannel PCM (although player manufacturers are just now starting to show interest in the multichannel possibilities). However, because compression allows acceptable audio quality at a bit-rate far below that of PCM – thus leaving more bits available for the video – compressed audio is very widely used with video content. This means that an effective DVD-Video production package must be able to capture audio in both PCM and Dolby Digital formats.
Both Dolby Digital and MPEG audio, sometimes included as an option in PAL markets, use perceptual coding techniques to reduce the amount of data needed to represent the audio signal. These formats employ compression algorithms that discard sound from frequency bands which contain limited signal energy. They also use noise-shaping techniques to remove audio information in frequency areas where humans are least likely to notice missing sound.
As we saw during bit budgeting, each audio stream used is allocated a portion of the overall data-rate depending on its format and, in some cases, the compression settings used during audio capture. Audio streams in Dolby Digital format, for instance, use 192 Kbps for stereo and 384 to 448 Kbps for surround. Once set, the data-rate for each Dolby Digital stream is constant, meaning that the number of bits allocated to a given stream remains the same throughout the program, without regard to the complexity of the program material.
MPEG-2 audio (an extension of MPEG-1 layer II audio) may also be encoded at a constant rate, but optionally allows use of a variable bit-rate (for the same reasons that VBR is used on video). In practice, VBR audio has yet to find wide acceptance, in part because of the risk that audio and video peaks will occur simultaneously, thus pushing the overall bit-rate beyond allowable limits.
Compressed surround sound
Either Dolby Digital or MPEG may be used to deliver audio in both stereo or surround. Dolby Digital may be used for mono, stereo or multichannel audio for up to 5.1 channels, and MPEG for up to 7.1 channels. The term ‘5.1 channels’ means five full-range channels (left front, centre, right front, left rear, right rear) and a limited bandwidth low-frequency-effects (LFE) channel (the ‘.1’ channel) that is frequently thought of as a sub-woofer channel.
Most DVD-Video titles today that include a surround soundtrack do so in a Dolby format, because of the large population of Dolby surround decoders in the hands of consumers. However, it is important to be aware of the distinction between Dolby Digital and Dolby Surround.
Dolby Surround is the home theatre version of the Dolby Stereo audio configuration introduced in 1976 for theatrical films. In Dolby Stereo, four audio channels (left, centre, right and surround) are matrixed (encoded) in the analog domain into a two-channel ‘Left-total, Right-total’ (Lt/Rt) signal. When delivered on a consumer format such as a VHS tape, this audio signal is referred to as being in Dolby Surround. With a Dolby Pro Logic decoder (stand-alone or in a receiver) the Lt/Rt signal is decoded to its original four channels; without a decoder the two-channel signal is used for stereo playback. While Dolby Surround has been popular in the home theatre context, achieving accurate playback at home with no matrixing artifacts can be tricky.
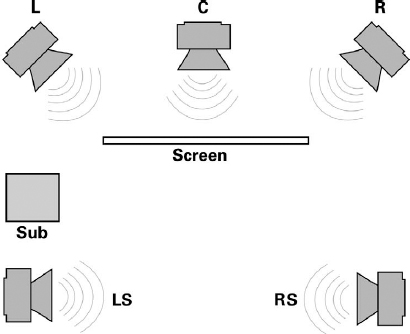
Figure 7.7 A surround sound listening environment.
In some cases confusion may arise because a two-channel Dolby Digital stream may be used to deliver a Dolby Surround signal that will play back through a Pro Logic decoder (a two-channel PCM stream may be used in the same way). This is not the same as a 5.1 channel Dolby Digital surround soundtrack.
An alternative compressed digital audio format for surround sound is DTS from Digital Theatre Systems. Although DTS is supported in DVD as an ‘optional’ audio format, the company has been successful in obtaining support from a number of consumer electronics manufacturers who include DTS decoders in their DVD players or A/V processors. It is important that a full-featured DVD authoring package be able to handle DTS files.
In concert with the perceptual coding techniques discussed earlier, compressed surround formats use a cross-correlation scheme to avoid storing information that is redundant amongst the channels. The systems also use ‘fold down’ mechanisms to permit a surround stream to be presented in a stereo environment (much like the SMART Content feature of DVD-Audio).
In DVD-Audio, the question of whether or not audio in a compressed surround format may be included on a given disc depends on the type of disc. Pure Audio titles currently may contain audio only in PCM format (linear or MLP); optional audio formats (if any) for these titles have not yet been defined. However, in other DVD-Audio title types (those which utilize AVTT/AOTT or AVTT-only navigation), Dolby Digital, MPEG and DTS are ‘optional’ formats that may be present in addition to the mandatory PCM program.
The advantage of Dolby Digital, MPEG and DTS from a DVD-Audio perspective is the relatively limited bandwidth required to support surround playback. For example, Dolby Digital 5.1 requires only about a quarter of the bandwidth needed to store 16-bit stereo PCM at 44.1 or 48 kHz. Given the population of surround decoders already in the hands of consumers, it is not unlikely that some DVD-Audio producers will choose to include surround material in one or another of these compressed formats.
Table 7.2 Comparative bit-rates for various 5.1-channel audio formats. Six channels of 20 bit/88.2 kHz or 24 bit/96 kHz PCM would require MLP to fit within the maximum DVD-Audio bit-rate.
| Audio format | Bit-rate for 5.1 channels |
| Dolby Digital | 0.384–0.448 Mbps |
| DTS | 1.536 Mbps |
| PCM: 16 bit/44.1 kHz (CD resolution) Six channels, no MLP |
4.234 Mbps |
| PCM: 16 bit/48 kHz Six channels, no MLP |
4.608 Mbps |
| PCM: 20 bit/88.2 kHz Six channels, no MLP |
10.584 Mbps (exceeds maximum bit-rate) |
| PCM: 24 bit/96 kHz Six channels, no MLP |
13.824 Mbps (exceeds maximum bit-rate) |
Restoration, mixing and conforming
While support for surround sound enables DVD-Video as a home theatre format, it does not guarantee the ready availability of surround soundtracks. Dolby Stereo was introduced into theatres over two decades ago, but only in recent years have films been released theatrically in digital surround formats such as Dolby Digital, DTS and SDDS (Sony Dynamic Digital Sound).
Creating a 5.1 mix is particularly problematic for older films, where the original sound elements may be lost, or have deteriorated over time. In many cases the only soundtrack available is the mono optical track from a release print. Where a soundtrack or individual elements are in less than pristine condition, Sonic’s NoNoise® audio restoration technology may be used to minimize crackle, clicks, pops, hiss and other undesirable artifacts. If audio is available from more than one source, the best parts of each available soundtrack may have to be restored and then edited together to create a complete program.
Where only a mono or stereo soundtrack is available, it is up to the content owner or title producer to decide whether it makes sense to create a 5.1 mix through selective panning across a multichannel sound field. Even where the stems used to create the final mix of a film are available and in good shape, the producer must decide whether the cost of remixing the material is warranted by the aesthetic or marketing benefits of doing so. Thus, the choice between stereo, Dolby Surround or a 5.1 channel surround format will continue to be made on a case-by-case basis.
If a 5.1 channel mix has already been prepared for theatrical release (which may well be the case for recent films), that mix would normally be included on DVD. However, it may need further audio mastering to adjust for differences between theatrical and home theatre listening environments.
Professional audio preparation should also address the consistency of levels between all sections of the program. A complex DVD title may contain dozens of video segments and menus, each with audio that may have been created or edited at different post-production studios around the world. A large level discrepancy between, for instance, the trailer audio and the menu audio, or between the main and commentary tracks in a feature film, forces consumers to adjust the volume control every time they jump to a different part of the disc. Instead, these volume adjustments should be addressed before the audio is encoded.
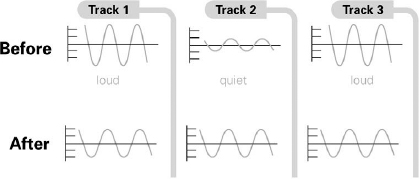
Figure 7.8 Section-to-section levelling of the title’s audio material ensures a consistent playback level throughout the program.
Another area of audio preparation that may be required for DVD is conforming, which means editing the audio tracks to be in sync with the video master. Especially when a movie has been out for several years or more, there may have been pull-ups or other changes made to picture elements without reference to sound elements. These changes may arise due to simply pulling out a damaged frame, or to making edits for specific venues such as airlines or broadcast. When an edited print is used as the master for encoding, the sound elements pulled for remixing may no longer be synchronized.
The potential for sync problems is compounded by DVD’s ability to deliver multiple audio tracks in different languages. In the past, there may not have been a reason to ensure that the soundtracks in all of a film’s release languages conform exactly to a given print of the picture. In DVD, the available French soundtrack might be taken from the film as it was released in France, while the English soundtrack is from the version released in Britain, where censorship might be more of an issue. The audio from each soundtrack used must be checked against and possibly conformed to the video version on the disc.
Audio encoding
Even if the audio is destined for delivery in Dolby Digital or MPEG, the editing and enhancement steps outlined above always take place before encoding, while the audio is still in PCM. Once mixed and edited, the audio is ready to be encoded into the format that will be used on the DVD. If the audio is in mono or stereo, and is associated with a video program, it will most likely be delivered to the DVD facility on the audio tracks of the video source tape, which is hopefully in a format such as D1 or Digital Betacam that has good audio fidelity.
Multichannel programs, on the other hand, will be delivered on a separate tape that is striped with SMPTE time code for synchronization with the video material. The most widely used format for this application is MDM (Modular Digital Multi-track), usually referred to as (Tascam) DA-88. The DA-88 format accommodates up to eight channels on a single tape.
Professional DVD production systems allow the audio to be transferred from the source into the system in real time, with the encoding from PCM to Dolby Digital or MPEG taking place ‘on-the-fly’ in a single pass. Batch processing should be supported as well, allowing automated retrieval and capture.
If the DVD production facility is set up as a networked workgroup that includes an audio workstation (e.g. SonicStudio HD™ networked to DVD Creator) then audio tracks that have been mixed, edited, restored or otherwise enhanced on the audio station will not need to be captured into the authoring system from tape. Instead, the authoring tool can access the audio files over the network, and perform file-based encoding on any audio that needs to be compressed.
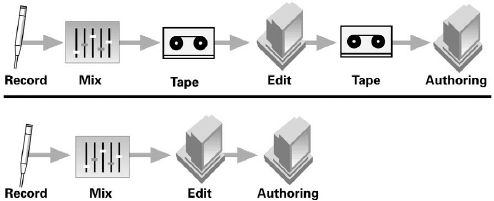
Figure 7.9 Two alternative production chains for the audio on a DVD title.
Once captured, the audio needs to be thoroughly checked. Proper synchronization with the video source must be confirmed, as well as the absence of any artifacts (glitches or dropouts) introduced during the transfer. If surround material has been encoded to Dolby Digital, the audio operator will also need to compare decoded surround playback with the decoded down-mix in order to be sure that there is no phase cancellation or other problem. In addition, the material will also be checked at the various dynamic compression settings (not to be confused with data compression) supported by Dolby Digital, which allow the listener to set a consistently comfortable dialog level. A full-featured audio encoding environment for DVD will include monitoring modes that support all these types of listening evaluations.
High-Density Audio™
As described earlier, both DVD-Audio and DVD-Video break new ground in audio fidelity by offering extremely high quality audio reproduction in formats designed for consumers. However, 16 bit stereo PCM at 44.1 or 48 kHz has been the norm for digital audio for many years, and the production infrastructure to support new audio capabilities is still developing. Therefore, while new formats will accelerate changes to conventional procedures, it is not yet clear what all of those changes will be. Even at this early stage, however, we can make some suggestions and observations about the practices and tools that will best support ultra-fidelity audio production in this new era.
In general, audio with 20- or 24-bit resolution and a sample rate of 88.2 or 96 kHz (or higher) is referred to as High-Density Audio™. In working with this high-resolution audio, it is always best to capture the audio source in the highest resolution format available, and to keep the audio at the highest resolution as long as possible. This approach preserves the material with the highest fidelity for future use, while also preserving creative flexibility in the present.
High-resolution audio also requires very careful attention – in both the design of the audio equipment and the production practices employed – to guard against signal degradation as the material moves through various steps in the production chain. For example, sample-rate conversion can degrade audio quality when moving from high resolution to conventional resolution, particularly when a complex conversion (e.g. 96 to 44.1 kHz) is involved rather than a decimation (96 to 48 kHz). This problem can be minimized, however, by the use of appropriate quad-precision sample-rate conversion algorithms, and also by avoiding any unnecessary conversions during production.
Thus, in ensuring that high-resolution audio delivers on its potential, it is important that the right steps are taken at each and every stage of the audio handling chain. (Preserving the integrity of high-quality digital audio signals has been a long-standing concern of Sonic Solutions’ co-founder, Dr Andy Moorer; the results of his work in this area have been incorporated into SonicStudio HD digital audio workstations.)
Surround in film and music
With high-quality multichannel audio enabled on DVD-Audio (as well as DVD-Video), the already strong consumer interest in surround sound is likely to increase significantly in coming years. For the music industry, this phenomenon is one of the most striking differences introduced by the new audio formats.
Of course, the long-standing tradition of surround audio preparation in the film industry gives the recording business a head start in understanding some of the issues involved. Surround mixing techniques were pioneered for a variety of theatrical release formats as far back as the 1950s, and this tradition has been extended with the advent of home theatre systems and the extensive surround capabilities incorporated into DVD-Video.
It is important to understand, however, the very real differences between music and film applications of surround sound. Virtually all surround sound preparation and mixing techniques to date have been developed in a cinematic context. This means that:
• There is always a moving picture on which the attention of the audience is primarily focused.
• The audio program is ‘synthetic,’ created on the mixing stage from music, sound effects and dialog elements that never actually happened together in the ‘real’ world.
• The audio is meant to support dramatic action – to aid in the telling of the story. In most movies this means that dialog is the focal point.
The influence of these factors on film sound has led to the development of a surround mixing style in which dialog is commonly centred, music is mixed to the front left and right, and the surround channels are used mostly for ambience and perhaps occasional dramatic sound effects.
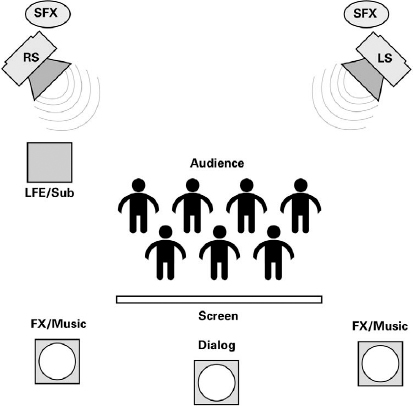
Figure 7.10 Typical usage of channels in a 5.1 theatrical mix.
In contrast, music applications do not involve the support of on-screen action, and if there is any picture at all (e.g. stills on a DVD-Audio), the audio program is still the primary focus. Additionally, popular music recordings (other than live albums) generally do not attempt to present a realistic sound field that corresponds to a performance that happened or could have happened in a real place and time. So music will offer more freedom than film for experimentation with instrument placement in surround mixes. For now, it is too early to say whether the way surround sound is used in popular music will remain diverse or eventually become standardized (and if the latter, what the standard practices will be).
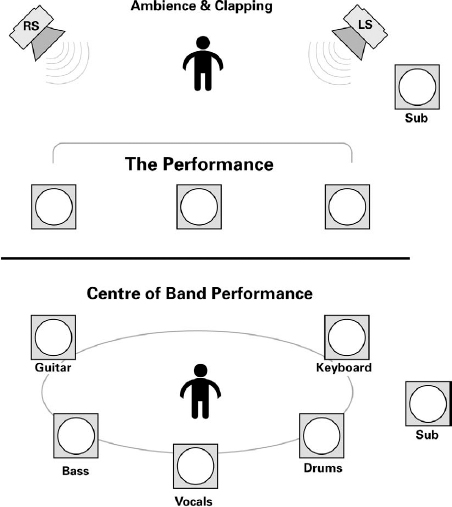
Figure 7.11 Two approaches to channel usage in 5.1 channel surround mixing for music projects. The top diagram illustrates a typical audience perspective; the bottom puts the listener in the centre of the band.
The situation for recordings in fields such as classical music which involve the presentation of ‘live’ events – whether actual concerts or just ‘real’ instruments playing together in a studio – is quite different than for the typical studio album in popular music. The goal here is often to recreate a sense of the original sound in the room during the performance.
Dr Moorer has conducted some very interesting research in this area. Moorer started with a set of psycho-acoustic theorems originally proposed by Michael Gerzon, then tested their implications in a practical setting with assistance from the San Francisco Symphony and its chief recording engineer, Jack Vad. The details of this work are beyond the scope of this book. Amongst the more significant findings, however, are the following conclusions.
• An arrangement of three directional microphones provides as much signal information as any other microphone setup, even those using many microphones.
• Knowledge of the position and orientation of microphones used during a given recording may be used mathematically to derive an optimal reproduction of that recording through any size speaker array.
• The optimal mixing technique for any microphone array and any speaker placement can be shown to involve a combination of all signals in all speakers. In other words, recording a live event using an array of microphones placed in the same positions as the playback speakers may seem correct intuitively, but will not produce an optimal result.
It is Sonic’s intent to incorporate the results of this work into future generations of SonicStudio HD systems designed for High-Density Audio™ (high-resolution) surround sound pre-mastering. The coming years will no doubt see the professional audio industry in general continuing to evolve new tools and techniques for the reproduction of music in surround settings.
Multi-format production
Traditionally, audio workstations assume that at any given moment, the user is working on a single program designed for a single venue; DVD challenges that assumption. In particular, when multiple versions – stereo and multichannel, for example – are intended to represent the same program, it may be important to ensure that editing and sonic enhancement is applied consistently to both programs.

Figure 7.12 Three directional microphones arranged to provide accurate spatial information for multichannel recording.
Professional editors and mixers will want to be able to quickly and seamlessly switch between a high-resolution multichannel version, a highresolution stereo version, and a standard-resolution stereo version, checking that imaging, balance and levels are consistent and that nothing of interest has inadvertently been left or processed out.
Of particular interest will be the compatibility in a given mix between multichannel and stereo modes. In a five-channel recording with the vocalist at centre, for instance, it will be crucial for the mixer to check whether the centre channel program is out of phase with the left and right front channels, and to see what happens when these channels are collapsed into a stereo mix.
Still images and subpictures
While presentation of time-based content (motion video and audio) is the main focus in both DVD-Video and DVD-Audio, still images are also an integral part of these formats. The use of stills encompasses several distinct roles: still pictures are used for slide shows and still shows, as menu backgrounds, and as subpictures.
In menus, subpictures are overlayed on the background images to give user feedback (highlights) for selected menu choices. During program playback, subpicture overlays are used to display subtitles (up to 32 subtitle streams are available for multiple languages) and other synchronized text, such as lyrics.
In DVD’s subpicture system, the player can display up to four different colours at a time overlayed on the main image (the menu background, or the video program that is being subtitled). The area(s) of the screen in which each of these colours is displayed is defined by a mask that is prepared as a separate single-colour bitmap graphic (no anti-aliasing or gradients allowed).
The colour used in each of the four masks is not the colour that the player will actually display in the defined areas. Instead, the mask colours are defined in the DVD specification: white for ‘Background’ areas, black for ‘Pattern’ areas (generally basic text or graphics), and red and blue for ‘Emphasis’ (additional text or graphic elements).
During playback, the player uses the four masks to determine where the background, pattern and emphasis areas are on the screen. Each area is mapped to a display colour drawn from a 16-colour palette defined in the current Program Chain. The transparency level of each colour is defined in authoring (the background colour usually has a transparency value of 0 per cent, allowing the underlying image to show through).
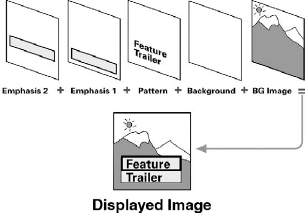
Figure 7.13 DVD’s subpicture overlay system composites four overlay layers and a background image to create the displayed picture.
On menus, subpicture colour mapping is defined for each of three states. The normal state maps the subpicture masks for areas of the screen that are outside of any button highlight areas (hot spots), or inside the highlight areas of buttons that are not currently selected. The selected state maps colours for areas inside the hot spot of the currently selected button. The activated state defines the colour mapping inside of the hot spot when a button is activated.
Both menu overlay graphics and still images are originally created as bitmaps in formats such as .TIFF or .PICT, normally using an image editing application such as Adobe Photoshop®. The still images are created in full 24-bit colour, and then individually compressed as MPEG-2 I-pictures.
In the case of subtitle overlays, the first step is to create a script showing the text to be displayed and the timecode information that will be used to synchronize the display with the source video. This script is then converted to a series of bitmap graphic images that are imported into the DVD production application along with the associated timecode information. The preparation of subtitling is often handled by specialized subtitling service bureaus.
Menu graphics for video
Because a viewer’s experience of a DVD title is largely defined by the menus used to access content, menu design is a crucial aspect of asset preparation. The navigational flow-chart for a title is defined in the project planning stage, and perhaps the general look and feel of the menus as well. But it is during the asset preparation stage that the menu designs are brought to life and finalized.
The appropriate approach to menu design for a given title will be determined by both the amount and the character of the title’s content. Some titles will use a minimal approach which makes access to the content as direct as possible. In other titles the menus are intended to be content in their own right, giving users an engaging interactive experience that sets the tone for the main content.
Because interactive design has been an important element of CD-ROM production for over a decade, DVD menu design is often handled by designers from the world of computer-based multimedia. It is important to realize, however, that DVD (meaning DVD-Video and DVD-Audio) is a video platform, not a computer platform. This means that graphics and menus need to be designed with the specific characteristics of television-based video in mind.
One important difference between the computer space and the TV space is in colour palettes. The range of colours supported in the NTSC and PAL colour space is different from those supported in the RGB (red, green, blue) world of computer displays. Designers need to take into account how their colour choices will translate when displayed on a TV screen.
Another consideration is correctly matching the size of the graphics with the aspect ratio and format of the video program. This is complicated by the fact that the graphics are normally prepared on computers, but they must look correct on televisions. Computer displays and graphic design tools use square pixels, while television displays use rectangular pixels that are about 10 per cent taller than they are wide. Thus, a 720 × 540 image yields a 4 : 3 aspect ratio on a computer, but a 720 × 480 image yields a 4 : 3 aspect ratio on a television.
If the aspect ratio of a DVD’s video material is 4 : 3, graphics for static and motion menus should be prepared at a resolution of 720 × 540 pixels, then scaled before being imported into the DVD authoring tool. The scaled resolution will be 720 × 480 for NTSC, and 720 × 576 for PAL. This will make the graphics look vertically stretched or compressed on the computer display (depending on whether they are scaled for NTSC or PAL), but when the graphic is ultimately displayed on a video monitor, the image will be correctly proportioned.
If, on the other hand, the aspect ratio for the DVD is 16 : 9, menus are prepared at 960 × 540, then scaled to 720 × 480 (NTSC) or 720 × 576 (PAL). The scaled graphics will look vertically compressed on a computer, but will appear at the proper aspect ratio when displayed on a widescreen (16 : 9) television.
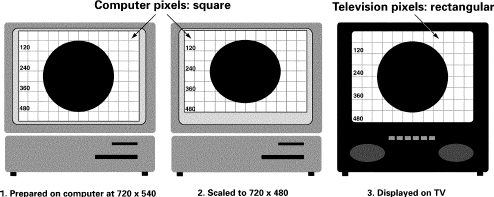
Figure 7.14 Menu backgrounds prepared in a computer graphics environment are scaled to compensate for the rectangular pixels used in television.
Within these resolutions for each type of menu, designers also need to be aware of the ‘safe area’. In computer graphics, an image in a given resolution is displayed in its entirety on screen. But when the same image is displayed on a television, the outer 5–10 per cent of the image may not be visible. These outer edges are referred to as being outside the safe area. Menu design for television will take this into account by not placing any crucial text, icons or selection areas outside of the safe area.
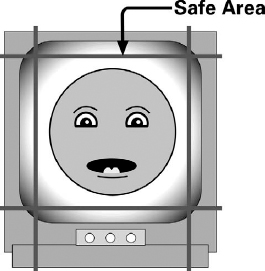
Figure 7.15 The ‘safe area’ on a television monitor.
Finally, the definition of images displayed on computer monitors is far greater than that of the same size image displayed on television. This means that text which appears crisp and clear on a computer display (progressive scan) may be barely legible (if at all) on television. Text for television needs to be bigger and bolder, which means that less of it will fit on any given screen. Fonts that are comprised of single pixel lines or serifs should be avoided because they tend to flicker in the NTSC playback environment due to interlaced scan.
The many potential complications involved in menu preparation underscore the necessity of budgeting production time for thorough checking of menu assets prior to importing them into the DVD production tool. Double-checking the basics such as spelling, safe areas, legibility, and button/highlight alignment will avoid problems later, helping to keep a project on track as it moves through the authoring phase of DVD production.