
Dunstanburgh Castle and Embleton Beach at dusk, Northumbria, England
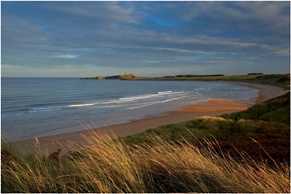
I try and get as perfect a shot in-camera as possible. I’m not one for complex manipulations anyway – the best shots are the simplest and you can’t improve on nature. Here I gave a slightly warmer tone to the reeds in the foreground in post-production. I’ll often tweak the contrast or brightness of selected parts of the image such as the sky. Upping the contrast can have the appearance of accentuating the colours, but it is so easy to go over the top. Subtlety is the key.
• Canon EOS-1Ds MKII, 17–40mm lens
Post-Production
Sometimes in our office I sit back and reflect. The three of us are here, tapping and clicking away in front of our monitors, dust busting, tweaking Curves, attaching metadata, converting RAW files, copying, scanning, updating the database, backing up etc. etc. etc. … it’s endless. Wendy and Sharyn, our office manager, are beavering away; I haven’t a clue what they’re doing, is it anything to do with me? The office is stuffed full of computers, monitors, printers and scanners: how did this happen? Just 12 years ago I had a typewriter, a light box, a filing cabinet and a fax machine, and that was about it. The trannies would come back from the lab, they’d be edited, mounted, captioned and submitted – a deliciously simple workflow. Granted, sending off precious originals was always a leap of faith; thankfully that’s not an issue any more. But what is an issue is the sheer amount of time that needs to be spent in post-production. Shooting digitally it’s easy to expose a lot of pixels, all of which need sorting. I still think the editing process was much better with just a sheet of trannies on a light box, but that’s tough, I’ve just got to deal with it.
From a shoot of say 200 images I’ll go through and weed out the obvious also-rans, bringing it down to maybe 40 images. Where a shot obviously has worked there will most likely be multiple variations of it, and picking the best isn’t always straightforward – often it’s necessary to process several of the options to choose the best. It’s easy here to get sidetracked into spending a lot of time on a shot that doesn’t warrant it; there comes a time when I have to say no, and hit the delete button. The flip side of the coin is that sometimes an image that looked lacklustre straight out of the camera can sparkle with just a few basic adjustments at the RAW conversion stage. In a nutshell a fine balancing act is needed to avoid wasting time on the dross without missing out on the jewels. I’m still learning with this, but hopefully getting better and quicker at homing in on the winners.
I groan in exasperation at one popular misconception – the notion that shooting digitally means less work. If only. In fact the digital workflow has meant the photographer’s workload in post-production has mushroomed. For me, this is the huge downside of the digital revolution. Clients, publishers, agencies and printers all now expect to be supplied with a digital image ready to go to print, website or repro. It would be nice if the image that came off the memory card was the finished article but it isn’t. Even if it were it would still need to be copied, backed up, stored in a database, submitted and tracked in its journeys. But before that it needs to pass through the digital darkroom.

Backing up images on a campsite in Languedoc, France
Exposing RAW files
When I expose a digital image the picture is just a bunch of information still in the camera as a RAW file. I think of it as a sort of digital negative, a means of recording an image that needs processing before it’s of use to anyone. If you’re serious about your photography then shooting RAW is the only way to go – forget about TIFFs and JPEGs. If you aren’t shooting RAW you’re letting your camera’s software make important decisions about your images that it has no business doing, and you’re throwing away information in the process. When I expose a digital image I am trying to maximize the amount of information recorded, in particular the range of tones and colours. I don’t want highlights burning out but I do want as much detail in the shadows as possible, and a RAW file has huge exposure latitude compared with transparency film. That has two big implications for the way I expose in the field. Firstly, bracketing exposures is a thing of the past, which saves much time and allows me to get on with making the most of the situation. Secondly, I’m trying to give the maximum exposure possible without losing highlight detail, known as exposing to the right, referring to the resultant histogram display. If you look at the monitor display and JPEG preview it may appear that I have an overexposed image, but by exposing to the right I’m maximizing shadow detail and minimizing noise. But beware of those highlights – perform a preliminary test exposure and check the highlights alert and histogram display in-camera. Basically, I’m exposing a RAW file not to give me the best display on the camera monitor but to produce the best ‘digital negative’, with the greatest scope in-computer later.

Heather lining the coastal path in late summer on the Great Hangman, North Devon, England (David Noton/National Trust)
The range of tones from the sky to the foreground detail is so high here that even a RAW file couldn’t cope, so I’ve made three different exposures and merged them. It’s a handy technique, but doesn’t work if there’s anything moving in the frame where the different layers merge, which is why I still need to carry neutral density graduated filters.
• Canon EOS-1Ds MKII, 17–40mm lens
RAW conversion
So, we’re back at base and have copied the RAW files to a computer ready for processing. The next step is the RAW conversion. To do this we need specialist software. Adobe RAW is the most common, but I use Phase One C1 Pro. At this stage, important decisions about colour balance, density, tonal range, saturation, sharpening and output are made – indeed the whole look of the image can be finalized here. If you understand nothing else about the digital darkroom the two key displays to understand are the Levels histogram, which represents the tonal range of an image, and the characteristic Curve, which controls the distribution of those tones. It’s beyond the remit of this book to go into too much detail, but working with Levels and Curves you can control the brightness, tonal range and contrast of an image. This is where we take that RAW file we ‘exposed to the right’ in-camera and pull back the Levels to give the density we desire. The net effect is an image with more shadow detail than if we’d ‘exposed to the left’. Then we output the image as a 16-bit TIFF, to hold on to as much information as possible through all the stages of post-production.

The Baptistry (1196), Piazza del Duomo, Parma, Emilia-Romagna, Italy
Often a picture needs minimal input. If it has a perfect range of tones and density it will go straight through the digital darkroom with no alterations. I always check the Levels and Curves, but try to avoid tweaking for the sake of it.
• Canon EOS-1Ds MKII, 70–200mm lens

Vineyards on the hillside above Saillon, le Valais, Switzerland
This one took hours. When you’re standing by the tripod making the exposure, it’s important to think through what is going to be necessary to optimize an image. Here in Switzerland, I shot three exposures of this composition with a 400mm lens, flattening the perspective of the vineyards and mountains. The trouble was the distant mountains looked washed-out in the haze. I knew I could reintroduce contrast into the distance using Levels and Curves, but getting a join that wasn’t obvious between the layers took hours with the Eraser tool. I’d much rather be out in the field, but that’s life. For every hour I spend behind the lens I spend the same in the digital darkroom. It feels all wrong but if I’ve gone to Switzerland, got up at dawn and spent hours waiting for the light to make this one shot I have to make the most of it, and that means time hunched in front of the computer.
• Canon EOS-1Ds MKII, 100–400mm lens
Photoshop adjustments and archiving
The last stage of post-production is to import the image into Photoshop for its final adjustments. There’s no way I can even start to talk about all the options for sorcery at this stage. Quite often, I do nothing. If it works, don’t fix it. Sometimes I do complex composites merging multiple exposures. Most often in Photoshop we dust-bust the image, checking for tiny imperfections resulting from grot on the camera sensor at 100 per cent magnification, and take out cables, masts, people and aerials where necessary. We routinely deprive whole
towns of their TV reception at this stage. I say ‘we’ because now the creative decisions about an image have been made, I’ve handed it over to the crew. Caption and keyword information is embedded in the image’s metadata, the finished image is converted to 8-bit, lowres JPEG copies are made for emails and quick searches etc., the image is entered into our database, copied to a dedicated hard drive and backed up twice to DVD libraries both on- and off-site. Finally, the image is done; ready for submission, or deletion if, as happens, I subsequently decide it’s no good.
I think we’ve gone full circle. In the old days we shot and processed our own black and white work in dark stuffy corners of lofts smelling of fixer. We made decisions about exposure in-camera based on the contrast in the scene and how we were going to develop the negative, and then we used all sorts of ruses with our hands and paper under the enlarger to maximize the tonal range and impact of the final print. The analogies with the digital darkroom are obvious. For decades I worked predominantly with colour transparency film where we had no such input, it all had to be done in-camera. Now, again, we’re controlling every aspect of an image’s processing and final impact. I rue the time it soaks up, but revel in having such control.
MILFORD SOUND, NEW ZEALAND
2am:
Eight meters of rain a year, and it’s all falling on our tent. I now know what it would be like to camp at the base of Victoria Falls. I’m not sure where the Official Wettest Place on Earth is, somewhere in India? But Milford Sound must be up there in the Top Three – it’s seriously soggy. I lie in the tent listening to the sheets of water deluging us, wondering how the young German backpacker in his NZ$30 supermarket special is faring; this really could be the winter of his discount tent. New Zealand’s fjordland is a spectacular corner of the world with famously atrocious weather. The combination of deep fjords, jagged mountains and lush temperate rainforest is inspirational, when you can see it. Only two rocky promontories interrupt the Roaring Forties tour of the southern latitudes, the tip of South America and here, with predictable results. From Britain, it’s a long way to come for a few sodden camp nights; I can do that in North Wales.

4am:
Incredibly, we’ve slept well. I awake to a strange sensation: silence. It has stopped raining, and I can see stars through gaps in the cloud – game on. I still get a real buzz in these situations, there’s a distinct possibility of a shot here, a chance I hadn’t dared entertain in the past few days. We scramble down to the flood plain at the head of the fjord, our chosen location. For the first time we see the full splendour of Milford Sound, uncloaked by rain clouds. The walls of the fjord are almost vertical, and the night’s precipitation is cascading down the cliffs in multitudinous waterfalls, as if the landscape is weeping – totally epic. The sky is still heavy with rain, but there are breaks and the first indirect dusk light is just starting to filter through. What’s more there’s not a soul around, we have one of the world’s most beautiful views all to ourselves.
4.40am:
I’m running now, trying to get to a piece of driftwood lying on the flats for foreground interest. Tripod up while we we’re on the move, bag on a rock, the driest option. Camera on the quick release head, compose,
level horizon, cock shutter, focus, set aperture, cable release in, position grad. Double check everything, then open the shutter. Then I take an exposure reading, while exposing. I know from experience at this time of day the exposure is going to be measured in minutes, so I might as well start on the first exposure immediately while I’m calculating how long it’s going to be. I don’t want to miss a thing, all sorts of wonderful things can happen to the light at this time of the day.
5am:
The first exposure is about 15 minutes. Wendy serves coffee from a flask as we contemplate the advancing tide. By the end of the first exposure the tripod legs are underwater and we’re perching on rocks, forcing a retreat to dry ground. This is going to be a problem. I want the shoreline in the shot, the semi-submerged rocks breaking the reflections of the fjord, but the tide is coming in at such a rate I can only make one frame before having to move and re-compose. Also, with long exposures like this the light levels are changing as I’m making the exposure. I open the shutter after taking a reading that gives four minutes: two minutes later that’s down to three minutes. I end up exposing for about three minutes 20 seconds. How do I come to that figure? A combination of mental arithmetic with wet feet and experience. It’s not rocket science but it works.
5.30am:
The twilight is spreading a palette of mauves and hues across the landscape, incredibly subtle and far more atmospheric than a clear sky and direct sunlight. The sun is coming up to our rear, giving diffuse front lighting to the scene. I hardly ever work with front lighting; generally I prefer side or backlighting. In this case though it’s indirect, the first tones of dawn striking the pregnant clouds and reflecting down into the image. Keeping ahead of the advancing tide we move up the fjord, exposing all the way like retreating skirmishers. The damp atmosphere keeps fogging the filter, just another of nature’s little reminders, and the sand flies are on their dawn missions. But this is very special. It has made waiting for the light worthwhile.