Optical printing is reprinting already filmed images onto film. It is a way to move one film size and/or type onto another. It is a way to change the speed of a series of images, including moving film that was shot at silent speed (18FPS) to sound speed (24FPS) so that it projects at the speed the original action took place. It is a way to preserve fragile images by transferring them onto new stock. It is a way to create superimpositions, dissolves, traveling mattes and other optical effects. Until the advent of digital effects and compositing it was used extensively in the mainstream film industry to create title sequences and a whole variety of optical and special effects. In the 1960s it was embraced by experimental filmmakers as a creative tool. In their 2010 book The VES Handbook of Visual Effects authors Zwerman and Okun differentiate between special or practical effects, those that can be done in camera/during production, with visual effects, image effects that require laboratory processing. This chapter is about experimental filmmakers and visual effects made through a very particular process called optical printing. However, these processes/technologies evolved out of the industrial practice and in order to fully understand the tool it is essential that you comprehend its history and the way it made its way into the avant-garde.
(A BRIEF) INDUSTRIAL HISTORY
This history of special effects in cinematography goes back to the very origins of cinema. The people who made and used the first cinematographs were part scientist, part inventor, part artist and they weren’t just interested in capturing something like “reality”. They quickly realized that the tools of cinema could convey images that humans could imagine, but never see. The earliest widely cited use of a special effect was in The Execution of Mary, Queen of Scots (1895) shot at Edison studios. During production, the camera was stopped as the execution was about to take place and the actress was replaced with a dummy who lost her head (Okun and Zwerman, p. 4).
One of the earliest experimenters in creating fantastical special effects was George Méliès. Before working with film, he was a theater owner. As a part of his performances he staged illusions and exhibited magic lantern shows. He purchased one of Edison’s kinetographs with the intent of photographing his performances but quickly realized that, due to the camera’s ability to move forward and in reverse, he could create multiple exposures and slow and fast motion. Combining these tricks with stop-motion animation as well as matte work (masking off part of the frame so that it does not get exposed—filming, rewinding and masking off the already exposed area and filming something in the unexposed area) he created the legendary short A Trip to the Moon in 1902.
An early pioneer in American cinema, Edwin S. Porter used double exposure to further realism in his The Great Train Robbery (1903). In the scene inside the railway station, a moving train is superimposed over a window, so that it looks as though it is leaving. Two shots later, film shot out of a moving train is superimposed over the set of the interior of a train car to simulate that the car is in motion.
Another landmark film that made use of in-camera special effects such as matting, superimposition and stop motion was Dziga Vertov’s Man with a Movie Camera. Completed in 1929 with support from a fully developed Soviet film industry, nevertheless it continues to be hugely influential in part because of its radical aesthetics used in service of a radical message. These tricks were all performed in camera and were the result of a filmmaker or director/cinematographer team experimenting as they made films.
In order for optical printing—the compositing or rephotography frame by frame of film—more stable cameras and projectors were required. In 1912 Bell & Howell began manufacturing cameras using registration pins, a pin that “holds” the film in the gate while the shutter is open so that each frame is exposed on precisely the same area between the sprocket holes as the last. Part of the flutter in early cinema, where the frame appears to move up and down, can be attributed to this, although it is also the result of the hand cranking of the camera. Having used one of these early hand-cranked 35mm cameras myself (for my 2006 film fall—thank you Joel Schlemowitz) I can tell you from first-hand experience that keeping a hand-cranked film camera steady, even when it is bolted to a tripod, is not easy.
The history of the development of visual effects in cinema is, like almost everything else, the product of directors and cinematographers pushing for more innovative shots. Until the early 1960s, most major motion picture films were shot exclusively on sound stages. In order to create authentic-feeling exteriors and motion shots, process photography was developed whereby backgrounds were projected onto large screens behind actors and sets (also called rear screen) or live action images were projected onto small sets (Okun and Zwerman, p. 6). As early as the 1930s studios were experimenting with blue screen (the predecessor to green screen) to separate the actors from a blank background and enable the effects coordinator to create traveling mattes so that a previously shot background could be composited through optical printing. Traveling mattes are positive and negative mattes that block out the image area during optical printing. There is more about this later on in this chapter.
Optical printers were developed commercially in the 1920s by the DuPue company in Chicago but until the 1940s most of those in use in the industry had been made in-house by their camera operators and visual-effects teams (Egbe and Woodward, p. 2). During World War II through the intermediary of Eastman Kodak, Linwood Dunn (in-house effects specialist at RKO) was assigned the task of designing a standardized, easily mass-produced optical printer (Dunn). Although studios had been using machines designed by their technicians up to this point, the Acme-Dunn optical printer, as it came to be known, soon dominated the industry. Besides helping to fund its invention, the US war propaganda machine was a large purchaser of these printers. After the war they, like cameras and other post-production equipment and even raw film stock, created a pool of surplus equipment that helped to jump-start the independent experimental and documentary practice in the United States.
AVANT-GARDE HISTORY
The optical printer became a part of the lexicon of experimental practice in the mid-1960s. Carolee Schneemann remembers using one at the London Filmmakers’ Cooperative on the production of her film Plumb Line (1968–1971). Other filmmakers such as Stan VanDerBeek, Jordan Belson, the Whitney Brothers, Hy Hirsh, Will Hindle and Peter Rose manufactured optical rigs to fit their own needs. (There is an interview with Rose and images of his printer in Chapter 9 of this book.) Working from within the special effects houses of the LA film industry Pat O’Neill began to make extraordinary avant-garde films. By the 1970s Jaakko Kurhi began to produce tabletop optical printers that worked with a Bolex 16mm camera (the workhorse of the avant-garde film world). Relatively inexpensive at around $5000, these soon became standard equipment at cooperatives and emerging film programs at universities throughout the United States and Canada.
The first time I used an optical printer was at the Evergreen State College in Olympia, Washington. It was love at first sight. After I graduated, by some strange twist of fate, a filmmaker stored her optical printer at my house in Seattle, Washington, for over a year. I was able to experiment with it at will and ended up printing my first film, Story of Sarah (1993), on it. Although I planned to make use of the optical printer at Millennium Film Workshop (they still have one, New York City denizens, and they give classes on it! http://millenniumfilm.org/), working in the film business took up all of my time and so it wasn’t until I began attending Temple University in Philadelphia, Pennsylvania, that I really began optical printing as a primary tool of film-making.
This was in 1996 and, although I was told that the school had an optical printer, it wasn’t until I arrived that I discovered it was taken apart and in storage. As it turns out, this was to my advantage as Frank Sauerwald, the school’s camera repair guru, handed me the pieces and said, “See what you can do.” I put the whole thing back together and was able to print my next film Razed by Wolves (1998) on that machine. The JK limped through that production but was deeply in need of a return to the mother ship and the ministrations of its maker, Jaakko Kurhi. So, in late 1998, I flew the device to his workshop in Oakland, California. Meeting him was like standing face to face with a real life Geppetto, complete with the very complicated spectacles of a watchmaker or diamond cutter. If I had only had a cellphone camera I would have snapped a picture but I didn’t even own a cellphone at that point. Jaakko fixed up the printer. Unfortunately, my work with the printer was gaining the attention of my peers as it was being shown in film festivals and their protests necessitated moving the JK back to the school.
Being without an optical printer in my own home felt wrong. That summer I attended the Flaherty Film Seminar as a fellow and met someone who was going to change my life, Bill Brand. Besides the major motion picture industry, another aspect of commercial cinema that began heavy use of the optical printer was archival restoration and reproduction. Bill Brand of BB Optics, an artist and experimental filmmaker, has made a business out of printing archival prints for artists and museums. He has taught classes in film archivism to graduate students at NYU and he has also brokered the sale of more than one optical printer. So it was in 2000; he facilitated my purchase of a K-103/104 hybrid optical printer with 16mm, Super-8 and Regular-8 gates from a poet somewhere in Virginia (Figure 3.1).
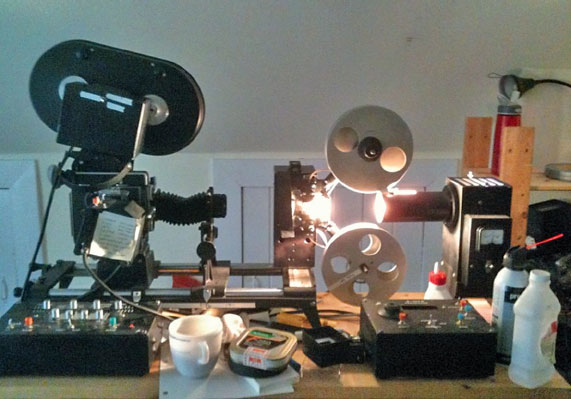
FIGURE 3.1
My very own model K-103 JK optical printer in my home studio. You may refer back to this picture as I describe the various parts of the unit.
I still have that printer and I have made a number of films with it. Over the years my facility with the device has grown, so much so that when Brand saw my 2009 film Yanqui WALKER and the OPTICAL REVOLUTION at Anthology Film Archives he asked, “Did I print that?”. While I contemplated interviewing myself for this chapter, you are getting enough of my perspective and philosophy in this book already. In 2012 I visited Bill at his studio and took pictures of his devices and talked and drank delicious coffee for hours. He has always been very generous with his time and his expertise, and so I am featuring an interview with him at the end of this chapter. What follows are some basic instructions in optical printing. The instructions assume the use of a JK optical printer. Other optical printers such as the Oxberry and home-made printers will be discussed when we will come back to optical printing in Chapter 9. What follows is a discussion of the JK optical printer with instructions on how to operate it.
JK COMPONENTS
There are a number of different versions of JK optical printers that you may encounter out there in the world. Some of them may have been converted to use DSLRs instead of a Bolex for capture (Figure 3.2). For the past ten or more years, it was possible to purchase a new JK with adapters for a DSLR as well as have your older JK adapted to shoot with a DSLR. As we move through these instructions, you will hear me referring to differences in the set-ups, motors and sequencers, and, when this difference is crucial to understanding how to use the machine, I will include images to illustrate. What follows is a list of the major components of the device.
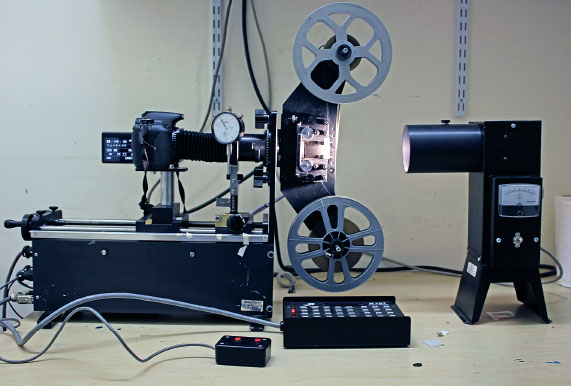
FIGURE 3.2
Courtesy of Lauren Cook, this is a picture of the JK at the University of Hartford that was modified to use a DSLR instead of a Bolex.
Camera
The JK uses a Bolex H-16 or Rex 4 or 5 to rephotograph film. The spring-wound motor has been disengaged (and should never be engaged) and the winding arm has been taken off. A motor has been attached to the 1:1 drive and this should be the ONLY way you advance the camera. You should NEVER take the motor off the Bolex. The camera motor will either have a single frame and continuous-run option as well as direction options directly on this motor (K-103) (Figure 3.3), on a wired remote (Figure 3.4) or on the back or side of the rails (K-107/108) (Figure 3.5). Besides the footage counter, all Bolexes have a frame counter (Figure 3.6). This is useful because it directly correlates to how many frames have gone through the camera. If the camera runs backwards (to reverse for a superimposition say) these numbers run backwards as well. To see this counter in the darkness of most optical printing rooms is why I recommend a head lamp or small flashlight.
Bellows/lens
There is not a standard lens on the JK. Instead there is a bellows with a lens element attached (usually a 50mm). This are the same type of lenses that is on enlargers and can be interchanged if necessary. If you want to do some close work you can swap out for a 75mm. If you need more room you can try to find a wider lens, although these are more difficult to come by.
If you’ve ever used extension tubes or a bellows on a still or motion picture camera then you understand the theory behind how this works. So bear with me while I explain it to everyone else. In most photography you are trying to fit a very big image onto a very small picture plane. Thus you need to refract the light so that it hits a small space clearly and the space between the place where the light beams cross is through the iris of the lens. In order to make big things small that light needs to cross very close to the picture plane. Thus the distance between the iris and the picture plane is small. If you are trying to make something small like a 16mm frame go onto something the same size, another 16mm frame, the distance between the object (the projected image) and the iris needs to be about the same as the distance (with a 50mm lens) between the picture plane and the iris. The bellows allows flexibility. See Figure 3.1 or 3.2 for a visualization of this.
Side effects of extending the distance between the iris and the picture plane are that exposure times must increase because the light has farther to go and that the depth of focus significantly decreases. That is why you have really just a hair’s breadth of focus on the JK. That’s OK. If your depth of focus was too great you might begin to see imperfections in the lens (scratches, distortions, dust) rendered on your print. At this point you’re probably wondering how in the world do I meter for this? The answer is you don’t. Towards the end of this chapter I will give you starting times with voltages, f-stops and filters for all kinds of film stocks. You will use these as a starting point for your experiments.

FIGURE 3.3
My K-103/104 optical printer (has parts from both).
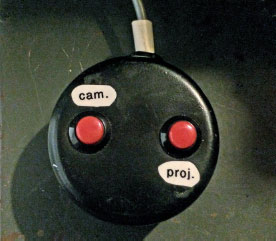
FIGURE 3.4
A wired remote from the K-105 at Emerson College.
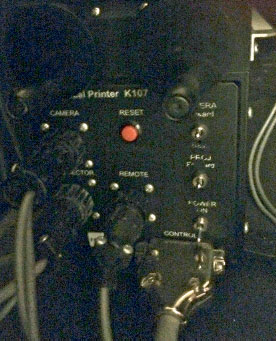
FIGURE 3.5
Back side of the rails on the K-107 at Emerson College.
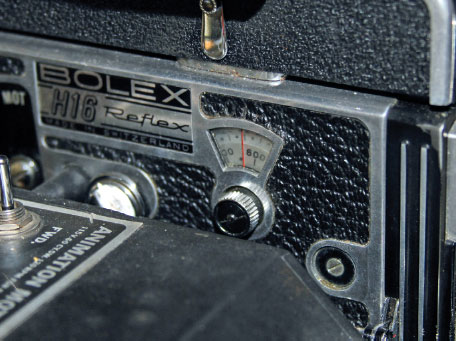
FIGURE 3.6
The frame counter on the side of the Bolex. Essential for making superimpositions, fades, dissolves, etc.
The projector is either controlled by a motor built into the unit with a sequencer that can control it during programed functions (K-103) or a wired remote that can single frame it (and the camera) and then all of the programming goes through the sequencer (K-105 and higher). The nice thing about the K-103 projector is that it also has a frame counter built into it that can be zeroed out (Figure 3.7). This enables the user to zero out the projector at the beginning of each shot and then track their progress in the shot. In the K-105 and above you can only track the projected frames through the sequencer. This becomes a problem if for some reason the sequencer needs to be reset in the middle of a shot as the specific point in the projector and camera will be lost.
All projection units have the capability to take interchangeable gates for the following film gauges: Regular-8mm, Super-8mm, 16mm and 35mm (Figure 3.8). JKs were not standard-issued with the full assortment of gates so before you go to use one or buy one make sure it has the gates you need. Although he is extremely aged, at the time of this writing Jaakko Kurhi, the owner and operator of Meritex Inc. and the inventor of the JK optical printer, is still making replacement parts and repairing existing units. The website for his company is www.jkcamera.com.
FIGURE 3.7
Projector total of my K-103.
FIGURE 3.8
Gates for a JK optical printer. Counter-clockwise from lower left: Regular-8mm, Super-8mm and 16mm. Jaakko also made a 35mm gate, not pictured.
(NB See Figures 3.1 or 3.2 to visualize.) Depending on how “new” or upgraded your system is, it may have an LED light source but most lamps are the old 300W versions with a dimmer. The lamps take basic projector bulbs that at the time of this writing could still be purchased fairly easily from good photo supply stores and online. The lamp is housed in a square metal casing with a vent on the top and has a fan inside that cools the bulb so it doesn’t explode. The light from the bulb shines through a metal tube with an element on the end that can focus the light more intensely on the film plane. On the side of the unit there is a dimmer knob and a voltmeter. YOU SHOULD ALWAYS TURN THE KNOB ALL THE WAY TO THE LEFT BEFORE YOU TURN ON THE LAMP. If the person before you left the lamp on a high voltage, THE LAMP WILL BLOW WHEN YOU TURN IT ON and your work time will end before it even began. So turn the dimmer all the way to the left, then flip the switch to turn on the lamp. You will hear the whir of the fan inside and may see a dim light coming out of the lamp. Turn it up to about 70V to focus the diopter and as far as 90V to focus the camera. You should not turn it up beyond that. It shortens the life of the bulb and can burn it out instantly. BE SURE TO TURN THE LAMP ALL THE WAY DOWN AND LET THE FAN COOL THE BULB FOR 5 MINUTES BEFORE YOU TURN THE LAMP OFF.
Sequencer
Although they all do basically the same thing, there are significant enough differences between sequencers that I will describe the different models separately.
K-103
The K-103 sequencer is solid state (Figure 3.1). If you open it (don’t) you will see a bunch of capacitors and resistors and wires, and it will look like what you imagine was under the dashboard of the USS Enterprise. Old School. The settings are adjusted with sliders. The decisions you have to make are as follows:
• Total frame count for the shot on either the camera or projector. You input this with sliders for ones, tens, hundreds and thousands.
• Function—alternate count, step print, skip print.
• Camera frames—pick a number between 1 and 9.
• Projector frames—pick a number between 1 and 9.
Both the camera and the projector have motors attached to them that are controlled by the sequencer during a function. But you can advance both the camera and the projector individually should you wish to do so. If you are working with a K-103, you will not have to follow the programming instructions under BASIC FUNCTIONS although you should review the basic information contained therein.
K-105
The K-105 is a touch pad sequencer (on left in Figure 3.9 below). It is a basic interface. Figure 3.9 is a picture of the K-105 unit at Emerson College. This sequencer is very delicate. It will break if you push too strenuously on the pads. So be gentle. The sequencer controls everything. There are toggle switches to control the direction of the camera and projection motors on the side or back.
K-107/108
There are major advantages to the K-107 and K-108 sequencers. The push pad (Figure 3.10) is significantly more sturdy than the touch pad on the K-105 and it allows you to vary your exposure time (the duration that the shutter is open on the Bolex). This is really only advantageous if you are trying to shoot on very slow intermediate stocks such as 7363 or internegative stock. Although extending the exposure time makes a slow process even slower, it has benefits. The more you open up the lens, the more shallow the depth of focus. If a lens is all the way open, you may not be focused throughout the depth of your original! Thus some or all of your frame will be out of focus. So extending the exposure time will allow you to stop down the lens and get back to the sweet spot, around f11.
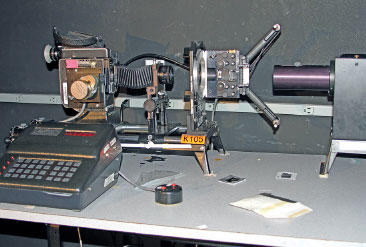
FIGURE 3.9
K-105 unit at Emerson College. Push pad sequencer on left.
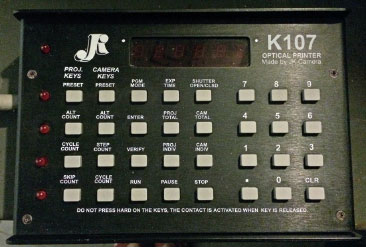
FIGURE 3.10
K-107 sequencer.
Rails
Rails are what the camera, lens mount and film gate are attached to. In the K-103–K-105s the rails sit on legs. For the K-107 and K-108 the rails are mounted on a platform that has the sequencer attached to it (refer to Figures 3.1 and 3.2 respectively). There are two knobs at the user end of the rails. One operates the camera, moving it closer to you or closer to the gate, whereas the other moves the lens mount closer to the camera or to the gate. These knobs enable you to focus and resize the image. Figure 3.5 shows the back of the K-107 with the knobs at the top of the frame as well as the location for the power and camera, and projector direction switches for the unit.
Magazine
Some units will have a magazine that you can attach so that you can print with larger quantities (up to 400ft) of 16mm film (see Figure 3.1 to visualize as a part of the whole set-up). This is very helpful if you are attempting to do long superimpositions or shots with multiple overlapping techniques. I have also used my magazine to bi-pack my system, loading the magazine with raw stock and putting the mattes on daylight spools within the camera. Obviously, if you are going to bi-pack the camera you will need to place the matte closer to the gate than the raw stock. Figure 3.11 is a picture of the magazine on my K-103. It has its own motor so as not to stress the Bolex and to keep tension on the take-up.
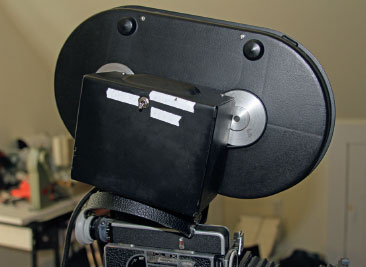
FIGURE 3.11
The magazine on my K-103 JK.
PREPARING FOR YOUR SHOOT
Most folks don’t have an optical printer in their own home. They have to go to their school or their friend’s house, or an art center like Millennium Film Workshop in New York City, to use one. So, just like when you go on a shoot, it is really important to be prepared with all the things you might need. Below is a checklist of items you should bring with you to your optical printing session. Following that is the items you should make sure that you can check out while you use the optical printer to facilitate your shoot.
To bring with you
• A small flashlight and/or headlamp (seriously).
• Canned air and/or one of those little brushes with a mini-whoopee cushion attached.
• At least three daylight spools and cans. You might not shoot all your film so you will need to break your roll and put the exposed in one can and the unexposed in another. Be sure to label!
• Unexposed film.
• The film that you are going to rephotograph.
• Black camera tape and a little black wrap if you have it.
• Scissors.
• An orange stick.
• Lens-cleaning fluid/papers.
• Isopropyl alcohol (99% pure) and cotton swabs.
• A magnifying glass.
• A fine-tipped Sharpie.
• A notebook to record your shots, exposures, settings, filters, etc.
• Something in the gauge you are shooting in that is easy to focus on. Titles or academy leader works great.
• White quarter-inch paper tape.
• Film renew or other film cleaner and cloth.
• A calculator.
Make sure the school/friend/art center has the following to use
• 400ft split or take-up reels in 16mm or 35mm (whatever format you are rephotographing) for take-up.
• 100ft or 400ft Super-8mm reels if you are shooting Regular or Super-8 for take-up—make sure they also have the adapters for the take-up spindles! Otherwise these just spin.
• A viewer and rewinds appropriate for the film you are rephotographing so you can find your frame and not waste your time going forwards and backwards on the projector end of the JK.
• The correct gate for the formats you are shooting. Meritex Inc., the manufacturer of the JK optical printer, machines several gates for the different film stocks commonly used in its projector. They are: Regular-8mm, Super-8mm, 16mm and 35mm. BUT not all people/institutions who have JK optical printers have all of these gates so make sure you will have the gate you need before you show up.
• A splicer and tape in the appropriate gauge for the film you are shooting.
• A prism for focusing.
IN FRONT OF THE MACHINE
Basic checks
So you’re standing in the JK room. Usually they are shoved in rooms barely bigger than a closet that are completely black inside and have little or no ambient or overhead lights. Try not to get claustrophobic. This is a safe and nurturing space. Breathe. If you need to, prop the door open when you aren’t shooting. This will let much needed air and light in. But when you are shooting, keep it closed.
You want to get started right away, but there are a few things you should check first to make your shoot go smoothly. First, is there film in the camera? To be kind you may want to turn off all the lights in case it is someone’s great work of art, so get it as dark as possible and then pop open the door of the Bolex. Put your (clean!) hands inside and feel around. Is there film in there? Are there reels on either the take-up or feed side? If yes, pop them off and feel inside. If there is film, you’ll feel it. Have a can nearby so you can put it in. Switch on the lights, prop open the door and go hand your discovery to the labbie or friend. They will be grateful.
Cleaning the camera and projector
Before you put your own film in, using your flashlight for added light, and your little brush and canned air, clean the inside of the camera. Make sure not to blow air into the gate, but be sure to take the pressure plate off and clean the gate thoroughly. The gate on the JK Bolex is exactly the same as the gate on any other Bolex. In order to really do this right you need to take the bellows off so you can get at the lens from outside. There is a small silver knob that tightens them to the adapter (the black ring connected where a lens normally goes). Turn that until it is loose, and you can pull off the bellows but not so far that it comes out. Gently push the bellows out of the way. Using the end of your orange stick, move the prism out (it swings out like a little door) and DO NOT TOUCH IT WITH YOUR FINGERS. Even clean hands have skin grease on them and that is not good for prisms. To move the shutter out of the way, however, you need to press the “open shutter” button on the sequencer. Then shine your light into the gate from that side. Contorting yourself like a true yogi, get your head around so you can see the gate from the interior of the camera side. Now using your magnifying glass look at the gate. Are there little hairs in it? If yes, gently rub your orange stick along the offending edge. You may put a very small amount of lens cleaner or isopropyl alcohol on your orange stick to make dust and dirt adhere to it better. Once the gate is clean, close up everything and pat yourself on the back.
If you are not familiar with how a Bolex works PLEASE DON’T DO THIS UNTIL SOMEONE TRAINS YOU. You will be glad you did.
Then check the front element of the lens and, if it is grubby (they usually are, or are at least dusty), use a small amount of lens cleaner and a clean lens tissue to gently wipe it clean. You may want to use your flashlight to check and make sure that it is really sparkling. Dust or fingerprints on the lens translate into out-of-focus images. Before you reattach the bellows to the Bolex it is an excellent time to focus the diopter to your eye.
Focusing the diopter on the Bolex
This is just like focusing the diopter on an ordinary Bolex and is necessary to do fine focuses and framings by eye as you shoot. Make sure the bellows are not attached to the Bolex. You can either hold your flashlight in front of the prism or if this contortion is annoying to you (it is to me) just flip on the lamp and turn it up to 70V or so. It doesn’t have to be very high, just bright enough to see the ground glass in the Bolex clearly. Put your eye to the eyecup and turn that diopter until the ground glass is in sharp focus. If you haven’t done this before it is sort of like looking for the texture in paper. It looks white, it looks white and then all of a sudden you can see the texture. You have just calibrated the Bolex on the JK to your vision. So what you see through the viewfinder as out of focus is out of focus in the film plane and vice versa. Nevertheless, framing through the viewfinder is not always 100 percent accurate so please be sure to follow framing and focus instructions below.
Changing the gate
Now move over to the projection side. Check what gate is in the projector. Is it the one you need? If you forgot to make sure that the rubber stoppers are present on the spindles, do so now. If they aren’t, check around nearby. Hopefully the last person just left them on the table. Note to self—if you have trouble finding the rubber stoppers because the last person using the JK didn’t put them back on the spindles, be courteous and do so for the next person. Always leave the JK better than you found it. It’s a camera karma thing. If the gate that you want isn’t on the JK, take whatever is on off, put it gently where it belongs (usually a box or a bag or on a shelf where the next person can find it) and get the gate you want. Before you put it on, take your alcohol and cotton swabs (you may want to open the door for this as it can get fumey) and clean the transport mechanisms on the gate thoroughly. That would be the silver metal spindles and the black plastic ones. Also clean around the gate. Once it is all sparkling clean, look on the back side and move the silver transport spindles so that they match the connections on the projection block. If you have never done this before, get someone to show you how the first time. It is tricky and the gate will not go on if the spindles are not oriented exactly like the inputs. There are two screws on the gate too. Make sure they are in place before you mount the gate on the projector and then screw them in until they are finger-tight. Do not muscle them as they are delicate. However, these screws can shimmy loose after hours of printing so it is a good idea to periodically check their tightness.
Setting the frame and focusing the JK
Now that you’ve got your gate on and clean, take out the piece of film you want to focus on. It’s not a terrible idea to have already cleaned the film (assuming it can be cleaned and isn’t hand-painted or fragile or something) before you print as dust WILL SHOW UP in the printing. Put the film you are going to focus and frame with into the projector. Please see Figure 3.14 for the correct way to load the projector. Make sure it is flat in the gate. You might want to move it one forward or one backward as sometimes the gate has come to rest slightly out.
If you had closed up the Bolex after you cleaned it (as you should have), open it up. Get out the prism for focusing and take the pressure plate off the Bolex. The prism goes on where the screw attaches the pressure plate (see Figure 3.12) and should rest in the gate. Open the shutter by pressing the open-shutter button on the sequencer. Turn on the lamp to 90V and open up the lens all the way. Make sure there are no filters or diffusion behind the gate in the filter holder area. Get out your magnifying glass and look at the prism. It is showing exactly what is in the gate. This is an excellent time to get out your black wrap if you brought it and make a flag on the front left-hand side of the projector to block the screaming bright light of the lamp. No joke—it could burn out your retina.
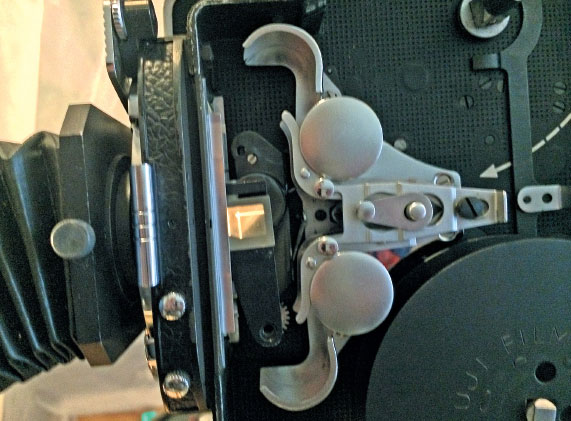
FIGURE 3.12
Remove the gate from the Bolex and put the prism on to focus the printer.
On the back of the JK (behind the Bolex and down near the table) there are two round dials with silver or black knobs on them. One is for framing (moves the front element of the lens in and out) and the other is for focus (moves the camera closer and farther from the lens element). If there are locking screws beneath the transom that the Bolex is mounted on, find these and make sure they are unlocked before you frame and focus.
Right now you are trying to determine what full frame is and then fine-focus for that full frame. Later you can experiment with zooming in or out from that frame but for now we are going to work with the full frame. So move the framing knob until it seems as though the film frame fills the camera frame. If the person before you was using a different gate or was shooting in anything other than full frame, this could be a laborious process where you move the lens element and then the Bolex until you get it somewhere near the right spot. If the frame seems really off left to right or up and down there are also adjustments that can be made on the front element of the lens to orient it properly toward the gate. There are locking screws on these as well so please check carefully before you start moving things. If anything is difficult to move, the locking screw is probably on. The dial for N/S movement (that is up and down) is underneath the lens element. The dial for E/W (side to side) is below and to the right as you face the lens. Move these until your frame is centered in the gate as you look at the prism. The prism is tiny so here again your magnifying glass will be useful. Once you have the frame correct you should see NO framelines on top or bottom or left or right, but if you nudge the frame a little in either direction they will come in. Now tighten all the locking knobs on the lens element. You may see your frame go a little out of focus. This is because when you had the N/S knob loose the lens element was tipped ever so slightly and this can impact focus. Now that your lens is battened down, nudge that focus dial back and forth until you get the best focus you can. Thankfully you probably won’t be shooting wide open so your depth of focus will be a micro-hair thicker than what you are seeing.
Once your focus is completely set, take a piece of quarter-inch paper tape and lay it down on the rail on the right-hand side of the Bolex track. There is sometimes a ruler-like thing there and there should be a little metal pointer coming off the transom that holds the Bolex and another that holds the lens. With vertical marks indicate where each marker is on your strip of tape. You should also label (write small but legibly) that the Bolex one is FFB (full-frame Bolex) and the lens one is FFL (full-frame lens). If you are going to be moving back and forth between different gauges (say superimposing Super-8 and 16mm) during the shoot you should do this for both BEFORE YOU LOAD THE CAMERA WITH FILM. Thus your markings would read FFB-16, FFB-8, FFL-16, FFL-8. If you have varying sizes of frames that you are shooting with you can make all these marks before you begin to shoot as well. It isn’t a terrible idea to have two Sharpies of differing colors (red and black is always nice) that you use for the different gauges.
LOADING THE CAMERA WITH FILM
Once you are completely done with all your fine focusing and mark making take the prism out and put it where it belongs, put the pressure plate back in and make sure it is flush against the gate, close the loop formers inside the Bolex, turn out all the lights (including the JK lamp) and put your unexposed film on the top spindle inside the Bolex the same way you would in an ordinary Bolex (film should come off the left side of the daylight spool). Feeling around, bring your film to the clipper on the bottom of the Bolex body. Clipping your film will really help it load more smoothly. Make sure the trimmed part is brushed out of the camera. Then gently insert the film against the upper sprocketed drive. There is no winding arm or spring on this Bolex so you have to use the motor. Do not, under any circumstances, try to remove the motor. If your Bolex has a single-frame advance, find it and use it to advance the camera as you load it. If it does not have a single-frame advance (this would be odd), you can input a sequence into the sequencer so that the Bolex runs constantly for a set number of frames. You may prefer to do this rather than single-frame advance. If you do, see below under “Sequence for Loading the Camera” in the “Basic Functions” section. It is best if you input this sequence before you are in the dark, but, if you forget, close the camera door (with your film inside so it is protected), turn on the lights or your flashlight and input the sequence. Then go back to the dark, open up the camera, make sure the loop formers are closed as closing the camera will have opened them, put the film against the sprocketed drive and press the last PROGRAM RUN when you are ready for your film to advance. As the film begins to move and you no longer need to hold it, bring your hand down to the bottom and wait to feel the film as it comes off the lower sprocketed drive.
When there is about 8″ of film you should stop the sequence, wind the film onto the daylight spool take-up reel you have standing by, put that on the lower spindle and gently close the Bolex door. Never force the door as there are tiny pieces of metal that serve to lock it that are easily bent. Once the door is closed you may turn on your flashlight or the room light. If there was any light on during the loading of your film you will want to advance the film for a few frames so that it will not be fogged. You can do this by using the same simple sequence I listed for loading. Remember, 40 frames is a foot and set the amount of camera frames accordingly.
Now you are ready to shoot. If you loaded the camera with a fresh 100ft roll of film you only have 4000 frames to go!
LOADING THE PROJECTOR
When the projector is moving forward the top spindle on the projection unit is take-up, whereas the bottom is feed. When the projector is moving backwards the top spindle is feed and the bottom spindle is take-up. If you look on the opposite side of the projection unit you will see springy bands that are coming out of the housing of the projector (Figure 3.13). These are what move the spindles and keep the film taking up. It is imperative that they are properly connected or your film will not take up correctly and will pool in front of the lens, ruin your shot and possibly melt. But there is a trick. In the “normal position” where the springy band is going directly around the spindle and back, your film will wind up over the top. This is the opposite of the wind with which film and workprint comes back from the lab and with which film is wound for projection. So you can either wind up your film the opposite way that it wants to go or you can put a single twist in the springy band and it will take up your film from the bottom of the reel (the way the film already wants to wind). This does not hurt the machine or the band. The same rule applies to taking up film on the bottom spindle. You should only apply the take-up springy band to the spindle that is taking up. If there is another springy band it is simply to hold tension on the feed side.
So moving back to the gate side of the projection unit (Figure 3.14), unscrew the knob facing the lens above the gate until you can swing the knob up and move the front element of the gate out slightly. Using your rewinds and viewer you should already have located the frame you want to begin shooting with. Place this frame in the gate. Gently slide the front element (essentially a pressure plate) back onto the gate. Swing the top knob back down and thumb-tighten. Wind the film snug on the take-up (you may have to back the film off the square part of the spindle to move it freely) until tight. Then put it securely on the square part of the spindle and put the rubber plug onto the spindle so that it holds the take-up securely in place. If you have 400ft split or take-up reels these work the best as they have a larger core. The spindle revolves to accommodate this core. If you use a daylight spool as your take-up you will need to wind the film up on it every so often so that it doesn’t hang down in front of the lamp, ruin your shot and melt. It is OK to have your feed on a daylight spool (as long as you are coming from the bottom) as it has nowhere to fall but the table.
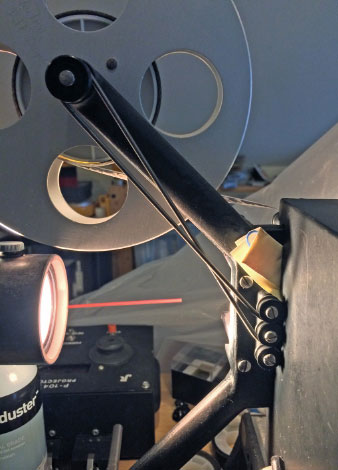
FIGURE 3.13
These are the spring belts that help to keep tension on your film. I twist them once so that they take up with the wind of the film.
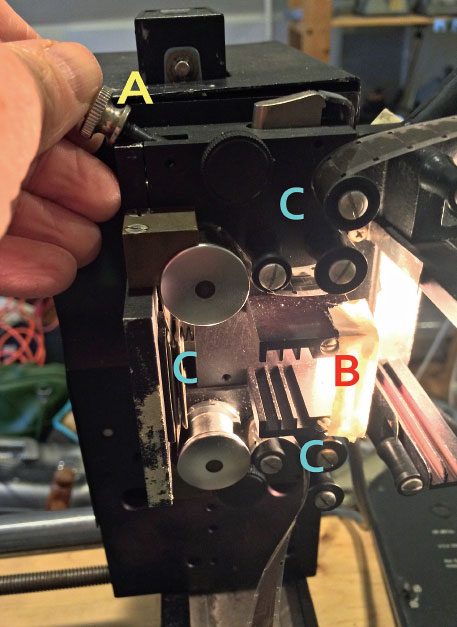
FIGURE 3.14
A 16mm gate. A is the knob that unlocks the pressure plate and locks it back in. If it isn’t engaged B is the ground glass. This must be in to diffuse the light so that you do not get hot spots on your film. Behind the small slots for the ground glass are larger slots to put filters in. C is the path of the film. When the film is loaded up going forward, the bottom reel is feed and the top reel is take-up. In this image the feed is coming from loose film at the bottom and is winding onto the top reel. This is because I often shoot off lengths that are in a trim bin by my work table.
If you are shooting very short lengths of film you may want to have some sort of trim bin in the JK room as well so you can hang them up before use. If space is tight you can bring in your clips in labeled sandwich bags and then just reel them up as you go. Below you will find descriptions of basic functions on the optical printer. Please review them and the checklist before you begin printing.
BASIC FUNCTIONS
Sequence for loading the camera
In order to thread the Bolex and have about 8″ of film coming out the take-up side to wind around the reel, you need to advance about 50–60 frames. Let’s assume that you spend the first bit of this fumbling trying to get the film to thread on the top sprocket of the Bolex and round up the number of frames needed for the sequence to load to 100. There are three different models of sequencers for the JK as listed in the component section above. Make sure you understand which one you are working with before you begin, although they basically all have the same functions. You will always need to know the total length in frames of either the projected image you are trying to reproduce or the number of frames in the camera you are trying to take. To load the film in the camera with a K105–K107 input the following sequence.
• PROGRAM
• STEP (OR Alternate)
• ENTER
• CAMERA PRESET COUNT
• 100
• ENTER
• PROJECTOR PRESET COUNT
• 1
• ENTER
• PROGRAM
• RUN
When you press run, the machine will begin to execute the sequence. You should see the frame counter moving on the Bolex and on the sequencer. Notice how you must press program to begin the sequence and enter after you input both the function and the number for that function. You press program to end the input.
Changing film format/film speed
So say you shot a scene at 48FPS and you now want it to run at normal speed. Or you shot it at normal speed but now you want to speed it up. This is a very simple process on the JK. First determine either how long the source footage is or how long you want the resulting shot to be in frames. Then determine the ratio—how many frames the camera will need to take of the projected image. In the first scenario you are trying to change a 48FPS shot into a 24FPS shot. If the original shot is 10 seconds in length (240 frames) the sped-up shot will be 5 seconds (120 frames). The sequence for that would be as follows:
• PROGRAM
• PRESENT COUNT CAMERA
• 120
• ENTER
• ALTERNATE COUNT CAMERA
• 1
• ENTER
• ALTERNATE COUNT PROJECTOR
• 2
• ENTER
• PROGRAM
• RUN
That was an easy one to figure out. Sometimes they are more difficult. Say the original shooting speed doesn’t easily divide or multiply to make the desired frame rate. A good example of this is when you are trying to change something from silent speed (18FPS) to sound speed (24FPS). First determine the total length of the projected image in frames. Then figure out the ratio. The projector is 18 and the camera wants 24. For second you need 6 more frames. How will you accomplish that? Six goes into eighteen three times so if you shoot every third frame twice you will end up with 24FPS. This is called step printing and you input the function like this.
• PROGRAM
• TOTAL PROJECTOR COUNT
• 120 (WHATEVER THE ACTUAL LENGTH THE SHOT YOU WANT IS)
• ENTER
• CAMERA STEP COUNT
• 2
• ENTER
• PROJECTOR STEP COUNT
• ENTER
• PROGRAM
• RUN
Different sequencers have slightly different ways to input information and sometimes you can get the same result using a different function. STEP PRINTING refers to slowing down footage, taking multiple exposures of a single frame of projected image. SKIP PRINTING speeds up the image by skipping some of the projected frames. ALTERNATE COUNT is another way of putting in these ratios.
THE CHECKLIST
When you are optical printing there are a lot of things that you need to remember all at once, for every shot. Although these translate across most optical printers, I will be giving the instructions based on the JK optical printer. If you are working with a home-made optical printer or another model such as an Oxberry, you will want to adapt this checklist to suit that machine. I strenuously recommend that you copy it down and bring it with you to review before every shot, every time you print.
• Focus and frame—have you adjusted your framing and focus? Did you loosen anything when doing so? If so, tighten it down. Jiggling can cause focus problems.
• Close the eyepiece—did you set your focus through the eyepiece? If so, close the eyepiece unless you plan to have your eye glued to it the entire time the printing is going on. Otherwise light will fog the film plane.
• Variable shutter—make sure the variable shutter is open if it is supposed to be open, or closed if it is supposed to be closed. Whenever you are doing superimpositions or lap dissolves or anything that causes you to move already exposed film backwards in the camera YOU NEED TO CLOSE THE VARIABLE SHUTTER. And then before you shoot again, whatever you want to superimpose, YOU NEED TO OPEN THE VARIABLE SHUTTER. So check it. All the way up is open. All the way down is closed. Also, if you see the little black triangle when you look through the eyepiece the variable shutter is closed or partially closed.
• Camera/magazine direction—is your camera motor and magazine motor set to go in the direction you want it to?
• Projector direction—is your projector set the direction you want it to go?
• F-stop—is the f-stop on the camera set correctly? If you focused or adjusted framing DOUBLE-CHECK because you often open all the way up to do these things.
• Filters—do you have filters in the filter holder? Are they what you want? Have you compensated for them when you set your exposure?
• Rubber stoppers—did you take them off of the projector to adjust the film? Put them back on. If you don’t the take-up reel will shimmy its way off of the take-up and stop taking up and film will fold down between the lamp and the gate, and perhaps catch on fire or melt. In any event your shot will be ruined.
Just to make sure I don’t forget—I have this Post-it on my unit (Figure 3.15).
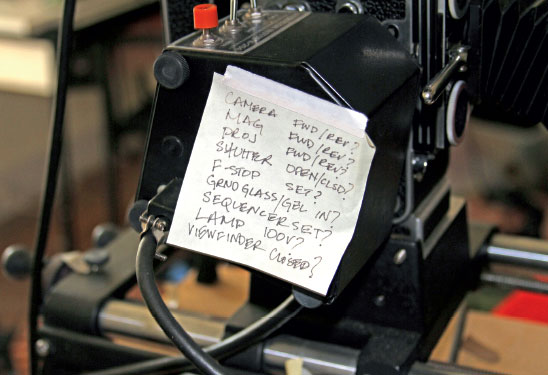
FIGURE 3.15
A post-it on my JK that reminds me to double-check everything.
MORE COMPLICATED OPTICAL EFFECTS
Superimposition
Superimpositions refer to printing a sequence of images over another sequence of images. In fact, you can superimpose several images over the same piece of film. The most layers I have ever superimposed is four. Beyond that you really lose the discreteness of the individual image. It is important to distinguish between matting and title work, described below, and superimpositions. With the latter, you need to make adjustments in exposures because you are laying light upon light upon light and there is only so much the film can take before being totally overexposed. So the basic equation is this: if your “correct” exposure is f11, and if you are superimposing two images, you need to shoot each at an f11/f16 split. If you are shooting three images shoot a third under f16 each, 4 images f16. Of course, if you are trying to superimpose very light images with darker ones you might need to compensate differently, using “less” light (a larger f-stop/smaller aperture for the lighter images) or “more” light (a smaller f-stop/larger aperture for the darker images). The best thing to do is to shoot tests when you are doing tricky camera work and keep very careful notes as to what you shot, so that you can see which combination of exposures worked best.
The process is fairly straightforward but warrants a checklist because it is so easy to mess up. Zero out the frame counter on the side of the Bolex (see Figure 3.6) by advancing to zero using your camera single-frame advance and then turning the knob on the frame counter until the tens are at zero too. This is an important step so don’t skip it. THEN:
1. Run through THE CHECKLIST above.
2. Shoot your sequence.
3. Close the variable shutter.
4. Backwind until the frame counter is at zero frames (where you started).
5. Frame up your next shot.
6. Open the variable shutter (run through THE CHECKLIST just to be safe).
7. Shoot the next sequence.
8. And so on.
Dissolves
It is possible to create dissolves between two shots, although they are not as smooth as lab dissolves. You print a sequence until you get to the point at which you want the dissolve to begin. You record the number on the frame counter. You input your sequence (usually the best you can hope for is a 24-frame lap dissolve) and once it starts you slowly close down the variable shutter until it is all the way closed at the end of the sequence. Keeping the variable shutter closed, backwind the camera 24 frames. Get your next shot loaded into the projector. You will use the same sequence you did last time and it is already loaded into the projector, so all you need to do is press run and slowly open up the variable shutter until it is totally open after 24 frames. Alternately, you can advance 2 frames, close down a hair, advance 2 more frames, close down a hair and so on.
Change frame size (zooms)
You can zoom into an image or reframe an image easily. However, when you zoom in you enlarge the apparent pixel size in the image you are rephotographing. If this doesn’t bother you (why should it?) then it is possible to get some really interesting effects by zooming in and moving around in images. If you want some kind of smooth zoom or pan you will need to determine the beginning frame and the ending frame, and how long the move is. You should mark these on your paper tape on the rail so they will be easy to find. Then separate the distance between the beginning frame and the ending frame by the number of frames of the move. That means you move a little each frame (refocusing each time) and then shoot a frame. This can also be done on twos (shoot 2 frames every move) but if you use any larger integer (3 or more frames shot per frame projected) the moves start to look jerky. Remember when you extend the bellows the image requires more light so, again, you will want to test your exposures. It should be sufficient to test an exposure at the beginning, middle and end of the move, and then estimate from there. In my work I have also done some zooming and reframing on the fly, which meant I was moving the camera and the front element as the camera was shooting! This resulted in some of the frames being a little blurry but this was an effect I liked.
Burning in titles
Burning in titles means putting white or optically clear titles over an image. This is a technique I have used extensively in my work for subtitles, intertextual comments, and title and credit sequences. First I shoot the titles I want on High-contrast stock (Kodak 7363). I shoot black titles on a white field and then develop the Hi-con as a negative so I end up with clear titles on a black field. Then I photograph the sequence I want to put them over, making a note of at what point (how many frames in) I want to begin the titles. I also make a note of where the whole sequence stops on the frame counter so that I can get back to that frame when I am done. Much like the superimposition, I close the variable shutter, backwind the camera until I get to the frame I want to start at and then put in the title I want to burn in. UNLIKE the superimposition I do not have to compensate for exposure because I want the titles to be clear. I want them to totally blast out from the image underneath where they are. The black of the Hi-con must be dense enough to allow me to do that and not bleed light through onto the image I want to keep. Like with the super-impositions, it is a good idea to test exposures on this because, in order to get optically clear titles, you may need to open up as much of a stop from the shooting stop you were using on the background footage. Once you shoot the titles for the desired length of time, close the variable shutter and advance to the end of the background shot. Then get yourself ready for your next shot.
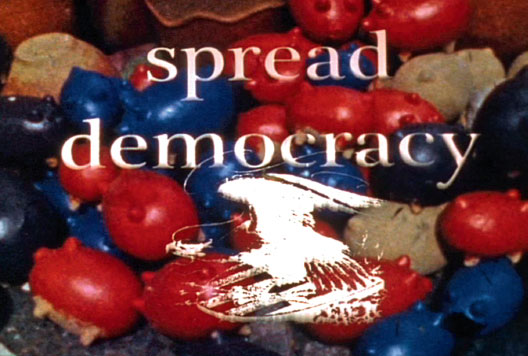
FIGURE 3.16
Burnt-in title and image (“spread democracy”) from Yanqui WALKER and the OPTICAL REVOLUTION (2009) by Kathryn Ramey. The image to be burned in was printed as black text on white paper, then filmed with Hi-con film and developed as negative. It was burned in over the moving image by first filming the image of the piggy banks, backwinding and then filming the text image over that so that, where the image in the title film was clear, light burned out the image in the background.
Traveling mattes
Traveling mattes are a way to get an image onto another image without it being a superimposition. In other words, without being able to see the background image through the foreground image. Say you want to take a picture of a pig, flying in a blue sky. Shoot a picture of a well-lit pig against a fairly dark background. Perhaps you want to put some wings on it, perhaps not. Then shoot a picture of the sky. Choose a day when the sky looks good with blue and clouds, and be sure to underexpose the picture slightly so you can get a really blue sky.
Rephotograph the pig film with High-contrast stock and have a print made, also on High-contrast stock. You will end up with a negative image where there is a black pig on a white background, and a positive image where there is a pig on a black background.
There are two ways to shoot this pig. If you have a film magazine, you can bi-pack the matte in the camera with your unexposed film. If you don’t have a magazine, you can bi-pack (sandwich together) the matte with the film. You will put the negative image (black pig, clear background) in front of the background image in the projection gate. You will shoot this sequence. Close the variable shutter. Backwind the camera. Put the pig and the positive matte (white pig, black background) sandwiched together in the gate. Be sure to line this up frame accurately so that the matte and the pig are perfectly matched. Open the variable shutter. Shoot this sequence. That’s it. Apart from testing it several times for correct exposure, you should end up with a picture of a pig in the sky. This is how all special effects (think Jason and the Argonauts by Ray Harryhausen) were done before fancy digital effects. Neat, huh? Figure 3.17 is a positive and negative traveling matte and Figure 3.18 is the composite, from my own experiments. Figure 3.19 is a still from Chuck’s Will’s Window (1982) by Bill Brand. Figure 3.20 is a frame from the title sequence of my film the passenger (2006).
FIGURE 3.17
Clips of positive and negative traveling matte.
FIGURE 3.18
Composite with those mattes.
FIGURE 3.19
Still from Bill Brand’s film Chuck’s Will’s Window (1982)—example of a traveling matte.

FIGURE 3.20
The title sequence of the passenger was a traveling matte of the text moving left to right across a scene of the prow of a boat with a different texture of water within the letters.
FILM STOCKS/EXPOSURE/FILTERS
Film stocks are changing all the time. The ideal film stock for use with the optical printer is a very slow, fine-grained, tungsten-balanced stock. Unfortunately, Kodak’s slowest tungsten-balanced stock is 200ASA. It is relatively fine grained, so it isn’t terrible to shoot with, but you will need to use a lot of filters to modify the light. If you just dim the light, its color temperature will change, becoming more orange, so you want to keep between 80–95V. I have also had good luck with shooting on 50ASA daylight-balanced stock and using an 80A filter or full blue CTB. I cut my gels and put them in slide holders so that I can easily load them behind the ground glass. I also label my filters so that it is easy for me to find the one I am looking for (Figure 3.21). I also have several neutral-density filters so that I can cut the light coming from the lamp without changing its color temperature. As I have said before, I prefer to shoot at an f11 or f16.
One of the ways that I determine exposure is by shooting test strips in Tri-X and then hand-developing them. This can get me within the range of proper exposures for each film/stock combination. But nothing can substitute entirely for tests with my shooting stock. Therefore, I always run bracket tests for each project. Figure 3.23 is a page from my book of film strip tests.
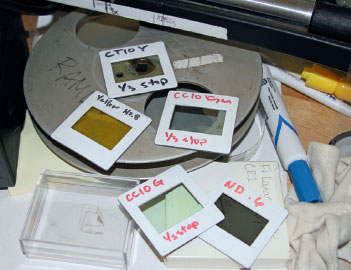
FIGURE 3.21
My labeled filters in slide holders ready to go.
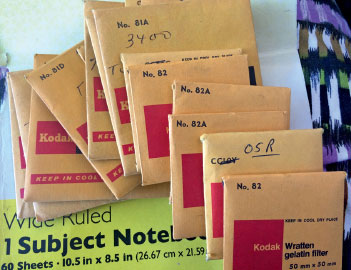
FIGURE 3.22
A gift of filters from Craig Baldwin!
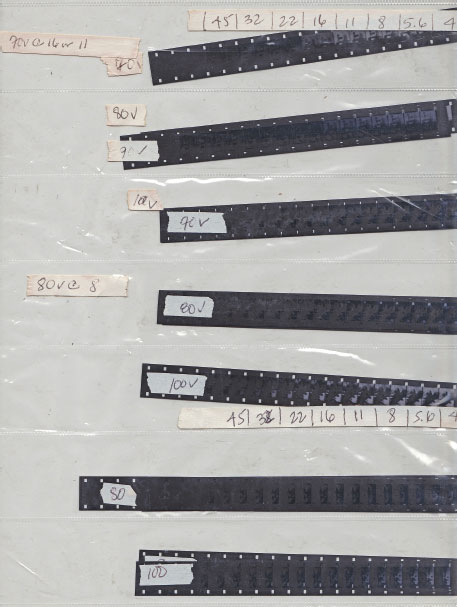
FIGURE 3.23
With every project I shoot exposure tests, particularly when I am executing complicated superimpositions. This shows one page from my exposure tests on Plus-X (no longer manufactured Kodak black and white reversal stock, testing for 50ASA color negative). Notice how I bracket from f45 to f2.8 and change the voltage on the lamp.
CONCLUSIONS—OPTICAL PRINTING (FOR NOW)
I own a K-103 optical printer that I purchased from a poet over eleven years ago with funds from Pennsylvania Council on the arts grant. This sale was brokered by Bill Brand who I met at the Flaherty Film Seminar in 1999, but my love affair with this quirky machine began when I was an undergraduate student at the Evergreen State College in Olympia, Washington, in the late 1980s. I loved the way the machine sounded, what it could do and how using it made me feel like I was playing a visual musical instrument. I have made almost all of my films since on an optical printer and it has become a critical part of my image-making practice, much like a typewriter or particular type of pen might be part of a writer’s working method. There are two people who greatly influenced my work with this machine: Peter Rose (interviewed in Chapter 9) and the man who found me my JK, Bill Brand. He and I sat and talked for hours in preparation for this chapter, but this interview was conducted via email. If you don’t know Bill, he is an artist, a film archivist, a parent and a professor at Hampshire College. He still lives in a loft in New York City even while the city is being gentrified around him. Visiting him in his studio in the city, drinking some delicious coffee and chatting, it is possible to imagine Manhattan before the Trumps and the Hiltons and all of the insane skyrocketing real estate. For that I am grateful too. Romantic notion though it may be, it is nice to remember that once upon a time there were more artists than bankers and real estate developers roaming the streets of TriBeCa and SoHo and the Lower East Side.
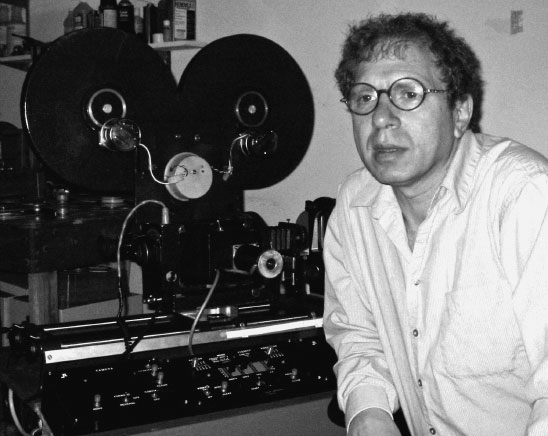
FIGURE 3.24
Bill Brand with his printer circa 2004-ish.
BIOGRAPHY OF BILL BRAND
Bill Brand’s films, videos and art installations have been exhibited extensively in the United States and abroad in museums, at film festivals and in microcinemas. His 1980 Masstransiscope, an animated mural installed in the New York City subway, is in the MTA Arts for Transit permanent collection. Bill Brand lives in New York City and is Professor of Film and Photography at Hampshire College in Amherst, Massachusetts, as well as Adjunct Professor of Film Preservation at New York University’s Moving Image Archiving and Preservation graduate program. His company BB Optics specializes in archival film preservation of small-gauge films and films by artists. In 2006 he was named an Anthology Film Archives Film Preservation Honoree and given a month-long retrospective to celebrate BB Optics’ 30th anniversary.
Brand’s films and videos have been featured at museums including the Museum of Modern Art, Whitney Museum, National Gallery of Art and Shanghai Duolun Museum of Modern Art, as well as at major film festivals including the Berlin Film Festival, New Directors/New Films Festival, Tribeca Film Festival and Rotterdam Film Festival. The work is discussed in histories of cinema including the books Documentary: A History of the Non-Fiction Film (1993) by Erik Barnouw; Allegories of Cinema (1989) by David James and in a chapter by Robin Blaetz titled “Avant-Garde Cinema of the Seventies” in Lost Illusions, American Cinema in the Shadow of Watergate and Vietnam 1970–1979 (2002) by David Cook. Brand’s work has also been written about in news and journal articles by Janet Maslin, Paul Arthur, J. Hoberman, B. Ruby Rich, Ian Christie, Noel Carroll, Brian Frye and Randy Kennedy among others.
Bill Brand founded the showcase and workshop Chicago Filmmakers in 1973, and served on the Board of Directors of the Collective for Living Cinema until 1991 in New York City. He co-founded Parabola Arts in 1981 and is currently an artistic director. He has served as a member of the board of trustees for the Flaherty and is an adviser to the Orphan Film Symposium. See www.bboptics.com/bboptics.html.
INTERVIEW WITH BILL BRAND
Kathryn Ramey: How did you come to your particular practice? Did you develop your own processes as a series of experiments? Where did the ideas come from? Does your form and method change as you go and, if so, where have you been and where are you going?
Bill Brand: I started making 8mm and 16mm films independently as an undergraduate at Antioch College in the late 1960s. In 1969 the school hired Paul Sharits to teach in the Art Department and I started studying Film as his student. By 1971 I was his assistant and collaborator inventing and developing his installation work Sound Strip/Film Strip, the first of a body of pioneering pieces he came to call “locational” works. Sound Strip/Film Strip involved, among other things, modifying a variable-speed 16mm projector in order to rephotograph film off a rear screen. Sharits includes in his “Green Box” materials at the Burchfield Penney Art Center in Buffalo, New York, some of my own notes and diagrams as well as his narrative course evaluation of my work for the independent study that was the official framework for my work with him on the project.
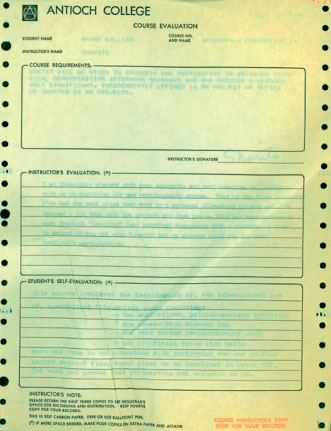
FIGURE 3.25
Bill Brand’s evaluation from his Film Production course with Paul Sharits.
The text reads:
FALL 1971
STUDENT NAME BRAND WILLIAM
COURSE NO. AND NAME ART288 FILM PRODUCTION IV
INSTRUCTOR’S NAME SHARITS
COURSE REQUIREMENTS:
CREDIT WILL BE GIVEN TO STUDENTS WHO PARTICIPATE IN ASSIGNED TECHNICAL DEMONSTRATION AFTERNOON SEMINARS AND WHO PRODUCE A REASONABLY SIGNIFICANT, INDEPENDENTLY DEFINED 16 MM PROJECT OR SERIES OF SHORT 16 MM PROJECTS.
INSTRUCTOR’S EVALUATION:
I am thoroughly pleased with your energetic and very creative collaboration with me in exploring our new rephotography system. This is the first opportunity I’ve had for much close team work in a personal filmmaking project and I’ve learned a lot from both the project and from you—this has been perhaps my most fruitful “teaching” (and learning) engagement with a student. I wish to extend to you not only “credit” but my sincere thank you for your invaluable participation.
STUDENT’S SELF-EVALUATION:
This course involved the development of, and experimental use of specialized filmmaking tools including:
– the shutterless, gripper-armless projector
– the cross-frame scratch box
– the rear screen re-photography unit
– the artificial frame line matte
Work was done in collaboration with instructor for use in four screen super-8 film, sound piece to be completed in March ’72. The work has proved most interesting and valuable to me.
For the school he later purchased a Kodak Analyst projector that was capable of very slow frame rates or even stopping on a frame without burning. I think this is how Ken Jacobs made Tom, Tom the Piper’s Son and Paul was probably looking to follow this example. I set up the Analyst projector with a rear screen and a Kodak Cine Special camera with an animation motor and wired them up so that the projector would trigger the camera and the camera would trigger the projector. I still have a copy of my drawing for the design. At this point I hadn’t yet even heard of an optical printer (see Figure 3.26).
I put together this camera/projector machine to carry out ideas I had that became my film Moment (1972) and Zip Tone Cat Tune (1972). For Zip Tone Cat Tune I replaced the rear screen with a system that used a front screen and a two-way mirror (www.bboptics.com/moment.html and www.bboptics.com/zip-tone-cat-tune.html).
When I was offered a teaching assistantship for graduate school at the School of the Art Institute, I took the opportunity in part because I was told that they had an optical printer. However, when I arrived in September 1972 I soon learned that they were still building one. I was immediately shown the machine shop, trained in basic milling techniques and given the job of building the printer myself. The first project I completed on it was to reprint Zip Tone Cat Tune because I was unsatisfied with the results that I had achieved at Antioch. My next project on the machine required very precise and complex multiple passes so I took an electronic arts course—which was really a course on basic electrical design. I designed and built a crazy electro-mechanical frame counter to control the optical printer. I used it to make Angular Momentum (1973) (www.bboptics.com/angular-momentum.html). The frame counter consisted of a series of ten-position rotary solenoid switches that I wired in series to allow for frame counts of up to 999. It worked pretty well but it sent out sparks for every frame and eventually caught fire just as I was completing the film!
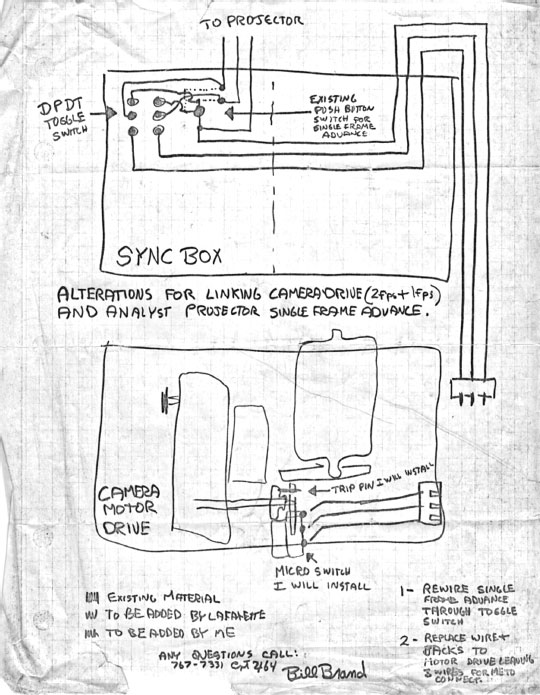
FIGURE 3.26
Drawing of the design for the Sharits/Brand printer.
FIGURE 3.27
Frames from Bill Brand’s Moment (1972). Courtesy of the filmmaker.
By 1975 I had moved to New York and learned about the JK optical printer designed by Jaakko Kurhi with Larry Jordan in San Francisco. When I was invited to show my films at the Carnegie Mellon in Pittsburgh, I found out that Pittsburgh Filmmakers had obtained a JK printer and I arranged to use it while I was there. I printed Still at Work, one of my films in the Cartoons series, during that visit. I managed to purchase my own JK printer in early 1976.
FIGURE 3.28
Photo of Bill Brand with his optical printer, 1975. Photo by Robert Haller.
KR: What role does media/technology/tools play in your work? What is the relationship between the media/tools and what your work is about? Is your work about something(s)?
BB: In some ways media/technology/tools are only the means I’ve used to explore or express ideas or to see images I have in mind. For example, I set about making films with the optical printer because I already had the urge to explore ideas that required frame-by-frame manipulation of film. My first 8mm and 16mm films were animations. On the other hand, by 1971 I was influenced by minimalism and conceptualism in art and music, ideas that in film became associated with works dubbed by P. Adams Sitney as structural film. In one thread, structural filmmakers sought to make films that were precisely and exclusively about the media, technology and tools. Our approach was not “What can we do with these tools?” but instead “What are the epistemological implications of them?” So I made films that were “about” time and space, and the limits of film as an information system and a system of representation and expression. I am very curious about the differences between current artists’ interest in analog film materials and techniques including the optical printer and what I was doing forty years ago.
KR: Can you be more specific about this? Are there filmmakers or particular works that come to mind?
BB: I am thinking of works, to name only a few, by Roger Beebe, Mónica Savirón, Steve Cossman and the others now with Mono No Aware, Tacita Dean, Jeanne Liota, Nicholas Rey and the work coming out of L’Abominable in France. There are artist-run film labs including L’Abominable and LaborBerlin in many countries in Europe, South America, Australia and North America that are committed to making art with analog film.
KR: One of the critiques that was leveled against Roger Beebe and myself recently—and by extension anyone who still uses celluloid—is that we are just nostalgic film festishists. Leaving aside the fact that a fetish is an inanimate object that is valued because it is inhabited by a spirit or believed to have magical powers—and thus is a rather good explanation for how much of art, let alone film art, works—what is wrong with coming back to film as a material? There are still good sculptures made with marble and paintings made with oils. It seems shortsighted to say that everything that could be understood with/through a medium has been accomplished. After all, the field of cultural possibilities has radically shifted from the 1970s. And though I wouldn’t dare speak for anyone else (Beebe has an interview later in the book in which he addresses this somewhat as does Cossman), for me film as film is necessary for the kinds of critiques I am making of 20th century (mostly US) empire building and I use film as a medium to get at the way film was used to articulate, visualize, spatialize certain arguments, truth claims, etc. So to me this is very different than what was happening in the 1970s.
Of course Tacita isn’t doing this. She is making BIG BEAUTY. Her work is MONUMENTAL. Cossman talks and writes about his work being an extension of a kind of environmental and social justice interest. Josh Lewis (also interviewed in this book and working with Mono No Aware) is going back to chemistry and abstraction. So, I guess what I’m saying is that, even with these few examples of people using film, they are SO different. You may agree or not agree with the politics behind the work, but you can’t lump all people who use film together just as it would be absurd to lump all people who make moving images shooting on DSLRs together. Perhaps it doesn’t make sense for artists who have moved beyond film (yourself, Peter Rose) to go back to it. But for kids raised on a steady diet of digital tech, going back to silver process and taking back the means of production seems really rebellious. Do you think that the work you see coming out of these independent labs is just retreading the same ground?
BB: Yes. This is exactly where I was hoping we’d go with the interview and I’m happy to follow up as best I can.
I think it’s too easy to think the younger artists are retreading the same ground as my generation even if we too believe there is political and ideological content to our work. My 1984 film Coalfields, for instance, which uses optical printing extensively, was for me an attempt to unite abstract structural film ideas with documentary subject matter and context. Peter Gidal certainly made political claims for his structural/materialist work and theoretical writing as did Sharits and Frampton, both of whom influence me as mentors and friends. When I say I’m curious about current artists’ work, some of whom I’ve named, I’m not indicating I think they are all doing the same thing. I don’t even think that those following very similar procedures and discovering very similar things to my generation are doing the same thing, because the ground is NOT the same. As you point out, digital culture has changed everything and working analog is an act of resistance to the 1984-for-real culture of surveillance and self-censorship we live in. Also, structural film including my work of the early 1970s is founded on constructivist ideas leading to high modernism—ideas too that had political implications in their time. Today’s artists including myself are responding to a postmodern culture, and while DIY work with analog film may be a reaction to postmodern cynicism it is no less a product of it. My optical printing work from the late 1970s to the mid-1980s was moving in this direction—looking for ways to carry forward the lessons of structural filmmaking and constructivism (especially factura) into other critiques of culture in line with what I later learned to call postmodern. I think I am unusual among my peers who mostly rejected structural film for underground or punk, but instead looked for the seeds of critique within the fissures of structural film work I’d already been doing for while. BIG BEAUTY was never excluded from structural film (think Anthony McCall’s Line Describing a Cone), nor was BIG IDEA, e.g. Hollis Frampton, Michael Snow or Carolee Schneemann for that matter, as much as she was ignored at the time.
We could certainly keep digging into this subject! It’s the most interesting for me as I straddle making my own new work, presenting my old work and preserving mine and everyone else’s from the last fifty years and more. I started working with computers in 1969 and incorporated digital technology into my optical printing work starting in 1974. I’m currently very involved in digital preservation of film and we now really may be finally be at the end of optical printing as a viable or desirable tool for preservation. Of course, I’ve been saying that for twenty years and I’m doing more optical printing than ever!
KR: Where do you show your work? How do you want people to experience it? Is there a relationship between the form that your work takes and your desired venue/audience?
BB: My work shows mostly in museums, in schools, at film festivals and in microcinemas. I have also made documentary works that have been broadcast on television. I have made films and videos available in a limited way on DVD and more broadly, for those who find it, on the internet. I have a very well known public artwork Masstransiscope in the New York City subway that has been seen by millions of commuters since it was first installed in 1980. One of the primary motives for creating Masstransiscope was exactly to explore the relationship between form and context/audience. While I am a teacher and believe films are best understood through exposure and knowledge, I also think they are best seen with limited mediation. This was another of my incentives for creating a public artwork.
KR: This brings me to another question I have asked a number of contributors: how do you describe to the layperson what it is that you do? What do you call yourself and your work?
BB: I call myself an artist or film and video artist. I call myself a filmmaker or experimental filmmaker, or experimental and documentary filmmaker. I call myself a film preservationist or sometimes an archivist. I usually explain that I make films that mostly don’t tell stories but are artworks that are more like music, painting, sculpture or poetry.
KR: And finally, your chapter is called “Optical Printing”. Please elaborate how you came to such an activity? Are you part of a community of makers (either locally or internationally) who communicate with each other about their work and get together either virtually or physically to discuss/show/celebrate? Where? When? How? What happens?
BB: I think I answered how I came to optical printing above. I am part of a community or communities of makers, scholars, activists, archivists and audiences locally and internationally. These overlapping communities consist of the loose network of experimental/avant-garde filmmakers and video artists, scholars and teachers in universities and colleges, curators, archivists, librarians and film preservationists at museums, galleries, microcinemas, libraries and archives, and artists. For me these networks are active globally, most recently in the United States, South America, Europe and China. I keep my networks active through my teaching at Hampshire College and New York University, through participation in the Flaherty Film Seminar, the Orphan Film Symposium, and the Association of Moving Image Archivists. Also important is ongoing creation and exhibition of my work as well as workshops I’ve offered on film preservation to artists, most recently in Uruguay and Spain. Finally, as a film preservationist and a laboratory (BB Optics) my network extends to various professional support industries for the medium including film labs, digital post-production facilities, film manufacturers and archival preservation companies.
KR: Could you please tell us about your optical work for BB Optics? How many years have you been doing this work? How has it changed as archiving film becomes more pressing? You have recently begun teaching graduate archival and restoration classes at NYU. How do these students approach optical printing differently than your arts students?
BB: BB Optics is what I called myself as a company in 1976 when I started charging for optical printing services. For many years it was only a word-of-mouth activity serving friends and acquaintances who were experimental and documentary filmmakers. Eventually, I started doing work for institutions, especially museums, libraries and archives, and I was introduced to the world of moving-image archiving and preservation where, without my knowing it, I had already developed a reputation. I have been teaching film preservation in the New York University graduate Moving Image Archiving and Preservation (MIAP) program since 2005, the year its first class graduated, and while I don’t train students in optical printing, they learn about its capabilities and usually get to work with me on some aspects of my work with the optical printer. At Hampshire College, where I teach undergraduates in film, photography and video, combining practice with history and theory, the optical printer is introduced as an option among many for creating art. A few students choose to pursue work with this tool and I have been available to mentor them. I occasionally teach a course that focuses more specifically on the optical printer. But this course covers a variety of artisanal practices such as analog animation, cameraless filmmaking, hand-processing and projector performance. Recently I have taught courses at Hampshire around audio/visual preservation but optical printing has not been a significant subject of the course.
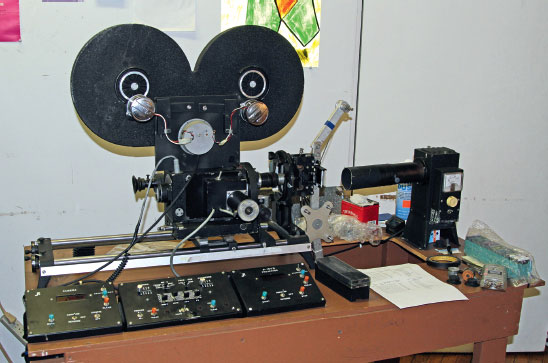
FIGURE 3.29
Bill Brand’s optical printer.
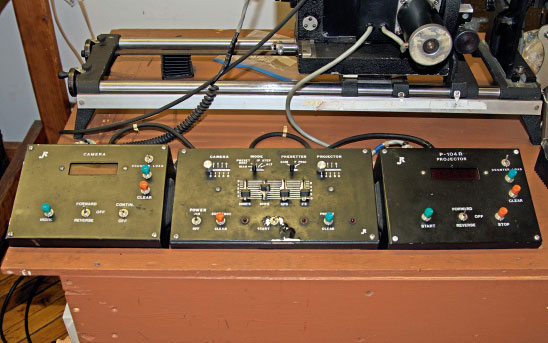
FIGURE 3.30
Close-up of the analog control panels.
KR: Can you give me the provenance of your optical printer? I remember it being something that came from various places and was put together by yourself and another…. As I consider the provenance of optical printers somewhat like the provenance of a violin, this is important!
BB: I bought my JK optical printer from Jaakko Kurhi in 1976. I had him adapt my Cine Special II camera for it but eventually replaced the camera with a 16mm Mitchell around 2000. In 2002 I purchased another JK printer from Michael Saunders in Canada. His father had adapted this printer working with the Canadian Film Board. It had a very good lens and the capacity to work with larger reels of film as well as 9.5mm originals. I combined the two printers to create the one I currently use that takes the features from each that I prefer. I sold the parts from each I didn’t use to Carolyn Faber, who put them together. I believe she keeps this optical printer with Chicago Filmmakers.
KR: Also, do you remember the name of the poet who sold me mine? You brokered the sale, but his name is lost to time for me and it is as though I have forgotten something really important!
BB: You bought your printer from the poet James Baker Hall. He died in 2009. In the early 1980s I offered optical printing workshops through the Collective for Living Cinema and James came from Kentucky to take one, a three-day weekend offering in my studio. Some time later he purchased his own JK optical printer and brought me to Sadieville, Kentucky, to help him set up his printer and instruct him further in its use. He also arranged for me to show my films in Lexington at the University of Kentucky where he taught. See http://en.wikipedia.org/wiki/James_Baker_Hall.
References
Barnouw, Erik. Documentary: A History of the Non-Fiction Film. Oxford: Oxford University Press, 1993.
Blaetz, Robin. “Avant-Garde Cinema of the Seventies.” In Cook, David, ed. Lost Illusions: American Cinema in the Shadow of Watergate and Vietnam 1970–1979. Berkeley and Los Angeles, CA: University of California Press, 2002, pp. 453–478.
Dunn, Linwood. “Historic Facts about the Acme-Dunn Optical Printer,” American Cinematographer, Vol. 62, No. 5 (1981).
Egbe, Amanda, and Martyn Woodward. “The (Im)material Aspects of Film Duplication: The Optical Printer as a Philosophical Apparatus,” Transtechnology Research Reader. Plymouth University, UK, 2012/2013.
Fielding, Raymond. The Technique of Special Effects Cinematography. Boston, MA: Focal Press, 1985.
James, David. Allegories of Cinema. Princeton, NJ: Princeton University Press, 1989.
Lambert, Andrew, ed. Results You Can’t Refuse: Celebrating 30 years of BB Optics. New York, NY: Anthology Film Archives, 2006.
Okun, Jeffrey A., and Susan Zwerman. The VES Handbook of Visual Effects: Industry Standard VFX Practices and Procedures. Burlington, MA: Focal Press, 2010.