If you’ve ever shot film, be it Super-8mm, 16mm or 35mm still film, you probably sent it off to a film lab to have it processed and didn’t think much about what went on there unless a mistake was made by the technicians. This chapter will not only explain the basics of processing negative and reversal black and white motion picture film. It will also tell you how to manipulate the film in the process of developing to achieve interesting results as well as unorthodox film stocks to use and unorthodox ways to use common film stocks. Before we do that, although I’m sure you know everything about film there is to know, let’s go through the details of the medium one more time.
ANATOMY OF FILM
What is film? At its most basic, film is silver halide crystals suspended in gelatin on a flexible base. These silver halide crystals are sensitive to visible light. Exposure to light “activates” them so that when they go through the chemical process called developing they become metallic silver. Variations in the size and amount of the crystals determine how sensitive the particular type of film is to light. In order to help the film move through the camera smoothly and minimize scratching there is usually a protective layer of gelatin over the layer of crystals. This layer is optically clear (i.e. doesn’t alter your exposure at all) but sometimes has a filter that cuts out ultraviolet light. In order to prevent light bouncing around in the gate and creating unintended artifacts, most films have some sort of anti-halation coating on the back. In order to prevent static electricity building up and creating a fog when it discharges, most films have an anti-static quality built into their anti-halation backing. What it is and how it looks can vary from stock to stock. It is most apparent in color film, but more about that in Chapter 6. For now let’s take a look at an extreme enlargement of a cross-section of Tri-X black and white film.
All black and white films can be processed as either negative or reversal. An image is negative when all the areas that were light in the subject are dark on the film and all that were dark in the subject are rendered light, or clear. A reversal or positive image renders the light and shadow of the subject as it appears relative to the capability of the film stock and the ability of the photographer to properly expose the film.

FIGURE 5.1
This picture is not to scale. For example, Kodak 16mm Tri-X film is .07mm thick and the base is by far the thickest part of the film.
You probably already knew this, but did you know that it isn’t a characteristic of the film that allows a black and white image to be negative or positive? It is dependent upon the process it goes through when it is developed. Wait a minute! Some of you might say, negative and reversal films are different in terms of how they respond to light. And this is true, to a point. Over time film manufacturers have modified black and white stocks in various ways to get what is considered to be the best-quality image if the film is used the way it is intended. Thus black and white reversal stocks have been developed to most accurately represent the light and shadow of the image they are rendering when they are developed in a reversal process as a positive image. When they are developed as a negative image, granularity decreases making the film appear grainy, and contrast increases, creating blacker blacks and brighter highlights.
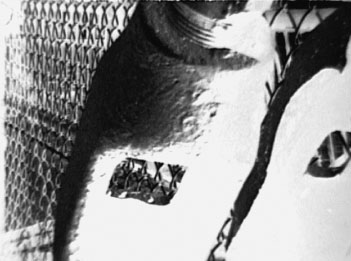
FIGURE 5.2
A negative image.
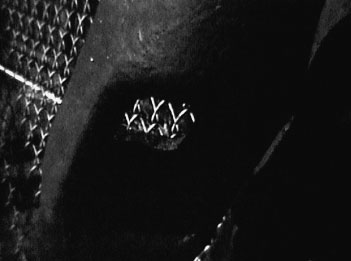
FIGURE 5.3
A reversal or positive image.
Conversely, black and white negative films have been developed to have a good distribution of density across the full range of tonalities they can capture. This is because they are meant to be printed onto a complementary workprint stock, a process that increases contrast. Therefore when you develop black and white negative in a reversal process, it tends to have very low contrast, without density in the shadows or clarity in the highlights. This is referred to as looking “muddy” and is not very desirable for most filmmakers. Shooting black and white film well requires, in addition to the ability to read a light meter and set the proper f-stop on your lens, at least a passing understanding of the zone system as well as the characteristic curves and the latitude of the film you are using.
HAND-PROCESSING
Although it is possible to have your film lab cross-process, or develop your negative film as positive or vice versa, developing black and white film at home or in your community or school darkroom is faster, cheaper and infinitely more fun. We’re going to start with some traditional recipes and then diverge to alternative processes. Along the way, we will learn some techniques and strategies to add additional “artifacts of the process” that you can use to enhance the graphic quality and visual interest of your film.
Before we can get to the chemistry involved we must first discuss the tools and space you will need. If you have access to a darkroom or a room you can darken completely, you can develop your film in a bucket. If you do not have access to a darkroom, it is pretty easy to turn a room in your home into a dark room. Find a room in your house that has few or no windows. Closets are especially good in this regard, but bathrooms tend to work well too. If there are windows, you might plan to work at night as it is easiest to make a room light tight when you don’t have to worry about that pesky sun. I make my bathroom light tight (even during the day!) by taking a piece of repurposed and reinforced (I doubled the layers) cardboard cut to the size of my single small bathroom window and taped around the edges with black gaffer’s tape. Then I created a “lip” of black tape around this that acts as a buffer to light bouncing in and also helps to hold the cardboard in place. Over this I hang a dark square of blanket and, if light is leaking in around that, I tape it down with the same black gaffer’s tape. Important note: tape can take paint off walls and trim so be careful about where/how you tape! I used scraps from the same blanket to make a tube-shaped light stopper to go under the door to block light there (I think I filled it with beans or popcorn). That pretty much blocks all the light. Then I set up my portable rewinds on the sink and I can down-spool film in there, develop film, or contact print or whatever.
If you do not want to make a room dark or cannot, you will need to get a developing tank of some kind and a changing bag or tent (a black bag or tent that is light-proof). There are a couple of tanks designed specifically for small-batch developing of motion picture film. Although these are no longer manufactured they are still available to purchase used. One is the Morse G3 developing tank, manufactured by Morse Instruments, Hudson, Ohio, in the 1950s and 1960s. This film can process up to 100ft of 35mm, 16mm or Super-8mm at a time. The film is cranked from one reel to another and is not in the bath continuously. In order to develop the film evenly, it is essential to extend the regular immersion tank developing time to compensate for the time the film is not in the bath. This can be a bit tricky at first and I will provide some times for you to start at. As with all hand-processing, you will experiment with times and temps until you find what gives you the best results.
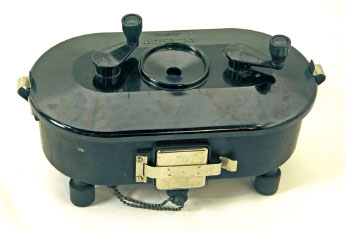
FIGURE 5.4
Exterior of a Morse tank.
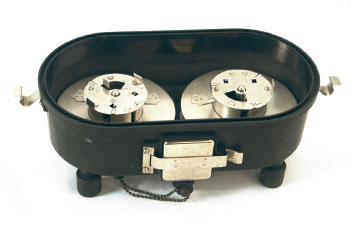
FIGURE 5.5
Interior of a Morse tank.
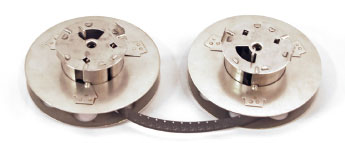
FIGURE 5.6
16mm film loaded in the spindles.
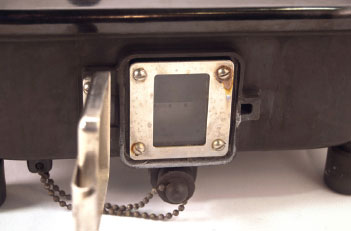
FIGURE 5.7
The door is for re-exposure during reversal processing.
Another commonly used motion picture developing tank for the DIY or at-home user is the Lomo tank. This tank was manufactured in Petrograd (now Saint Petersburg) in the old Soviet Union and is still readily available in like-new conditions via online sellers. What is great about these tanks is that because you wind the film onto a spiral reel (much like you would in still photography development) you can submerge all the film in the chemistry baths simultaneously. Thus is provides a very consistent and quick way to process your film. The only trick is that it must be loaded in the dark; loading it in a film changing bag is nearly impossible, and getting the hang of loading the film onto the spiral reels takes some practice. Also, the tanks range in size from ones that take 10m of film at a time (about 30ft) to dual 15m tanks with one reel on top of the other to process 100ft of film of 16mm (the amount on a standard daylight spool) or two 50ft rolls of Super-8 at a time. Obviously you can also process unsplit Regular-8mm film with the reels set for 16mm as it is the same width as 16mm film. It comes in 25ft lengths so conceivably you could process two rolls of Regular-8mm film on a single reel set for 16mm.
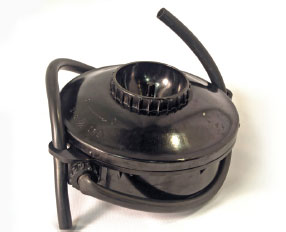
FIGURE 5.8
Exterior of a Lomo tank. This tank fits 50ft of film at a time.
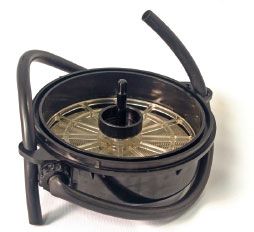
FIGURE 5.9
The interior with a single reel that can be adjusted for 35mm, 16mm (or unsplit Regular-8mm) and Super-8mm.
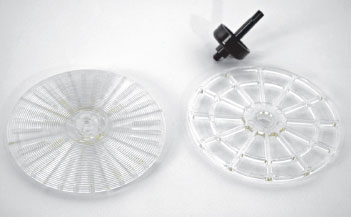
FIGURE 5.10
The disassembled reel.
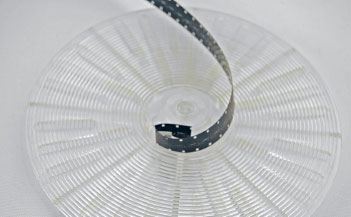
FIGURE 5.11
16mm being threaded on the reel.
During the home movie craze of the 1950s through the 1970s, there were a number of other retailers who produced tanks, reel and trough systems as well as small motorized processing units. During this time, DIY filmmakers developed other means made from equipment at hand including using a 25ft black rubber garden hose with a cork on the end to develop Regular-8mm film. Whatever the method, the initial impetus for home developing came mainly from hobbyists and was supported at least in the United States by a small industry devoted specifically to support home movie making.
Over the years intrepid small-gauge filmmakers have explored a variety of techniques to develop film with equipment readily at hand in a darkroom. Two methods that achieve relatively similar results in terms of “artifacts” left on the film are bucket processing and the jam it in the can method. Artifacts are scratches on the film, both base and emulsion, as well as unexposed areas caused by film sticking together, which are the result of the extreme handling in both of these methods. Filmmakers only develop their films this way if they want to explore the chance operations of the process. In other words, if they appreciate how this type of hand-processing leaves marks that are random and cannot be obtained through manipulating the film post-process as we explored in Chapter 1 of this book.
Jam it in the can refers to taking as much film, 16mm, Super-8, Regular-8 or 35mm, and finding the biggest tank for still processing you can and then filling it as full as you can with your film. I usually put about 100ft of 16mm in my 2L film can. The canister can be loaded either in a film changing bag or in a darkroom and the processing can be done in a sink or tub because, once you’ve put the lid on the can, it is light tight. So this is a very easy at-home process. Because the film is jammed tightly in a can it can touch and create areas that are not exposed to chemistry, it can get scratched or blotchy from emulsion scratched off of one area sticking to another, and sometimes the sprocket holes can be damaged so frames must be cut out for the film to run through a projector.
Bucket processing requires total darkness because the bucket itself is open so it isn’t light tight. Basically you line up buckets in a fully darkened room in order of process and filled with whatever chemistry is required for that step. Wearing rubber gloves, you immerse the film in the bath for each step. This process can be a little messy. It also requires an additional person to keep time or a clock that the person developing can see in the dark but that won’t flash the film. Also this process requires significantly more chemistry (at least one gallon, if not two), hyper-oxygenates the chemistry (because the film is being dunked in and out of the chemistry and the bath is open, exposing it to air) and so the chemistry is usually exhausted after one use and either needs to be tossed away or replenished. With any of the tank methods, including jam it in the can, chemistry can be reused multiple times. Both bucket processing and jam it in the can produce significant artifacts of the process such as scratches on the film, film stuck together, uneven processing, etc. but for many this is a desirable outcome. Bucket processing also requires significantly more chemistry, about 8L (approximately 2 gallons) at one time, but you can develop more than 100ft at a time, if you don’t mind serious detangling afterwards.
In my own film practice, I only use bucket processing when I have many rolls to develop at the same time that I wanted to be scratchy and blotchy. The most recent film that I used this process extensively on was Yanqui WALKER and the OPTICAL REVOLUTION. For this film I shot about 800ft of color negative 16mm, 400ft of 16mm and 200ft of Super-8mm black and white reversal, and a similar amount of both 16mm and Super-8mm Ektachrome. I wanted a very distressed look so bucket processing was perfect and I also had a large amount of film to process. Two of my then students, John McCarthy and Adaliz Guzman, spent two or three days with me bucket processing all of it. If I remember correctly we used two 5L Tetenal C-41 and E-6 kits and a couple of packets of D-19 for the black and white. It was an assembly line process and at the end of it all we were pretty exhausted, but the results were worth it. The point of this story is that, like everything else, you want to choose the process that makes the most sense for your project. If you are just experimenting, bucket processing is fine as long as you can share the chemistry between several folks or have a few hundred feet to develop.
DEVELOPING BLACK AND WHITE NEGATIVE
So, like I said before, any film can be developed as a negative image, but for clarity I will begin with discussing developing black and white negative film as negative. Although there has been a decrease in the variety of black and white negative motion picture films from manufacturers at the time of this writing, it is still produced by Kodak and ORWO (a German brand marketed by FilmTec and available in the United States via ORWO North America). The basic process for all black and white negative stocks involves two significant steps: 1. DEVELOPING in which the silver halide in the emulsion that has been “activated” through exposure to light is turned into metallic silver and 2. FIXING in which the silver halide crystals that were not exposed to light are washed away. There are other steps that help to create a more evenly developed image (pre-bath), prevent cross-contamination between chemistry (clearing bath), stop the developer from working (stop bath) and prevent chemical staining and aid in the drying process (a rinsing bath like Photo-Flo). Each film manufacturer has recommendations about specific developers, times and temperatures that will do the best job for their film.
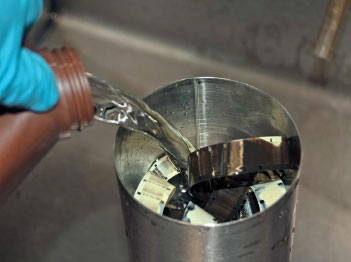
FIGURE 5.12
Pouring a second developer onto 16mm film “jammed in a (2L) can”.
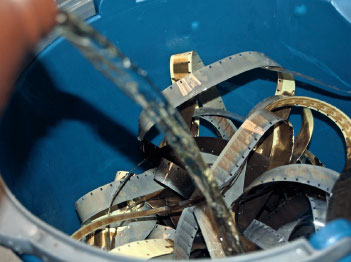
FIGURE 5.13
Pouring a fix during bucket processing of black and white negative film.
Currently there is only one black and white negative camera film stock used in the United States, Eastman Double X Negative 5222/7222 (35mm/16mm), although as of this writing ORWO is beginning to market their N74 film (ASA 400) and UN54 (ASA 100). Although the recommended chemistry for ORWO developing varies slightly, it can be safely developed with the KODAK-recommended process. We’ve discussed what you should wear (gloves), what you should put the film in (tanks, buckets, tubs) and where you should process (darkroom/light-tight space for open tank/tub process—bath tub or sink for tank process), but we have not yet discussed the other tools you will need. Before we get any further here is a recommended list of supplies you should get to process at home. If you have a darkroom that you can use, some of these things might already be available there so you should check before you buy.
What you will need—general processing equipment
• Gloves (nitrile/latex for most of the process, but chemical resistant for extensive time working with bleach or other nasty chemicals).
• Tank/bucket/hose—to put the film in for processing.
• Graduated cylinders in varying sizes for measuring and mixing chemistry.
• Something to mix chemistry with that is plastic or stainless steel. DO NOT USE ANYTHING THAT YOU WILL EVER USE TO PREPARE OR EAT FOOD WITH.
• A scale to measure dry chemistry (only necessary for chemistry you mix from scratch).
• pH strips (optional—most useful with alternative processes).
• Brown/light-tight jugs to store chemistry—be sure to label with what they contain to avoid contamination.
• A bucket or tub to rinse film in.
• Small glass or plastic containers to measure out ingredients before you mix them. DO NOT USE ANYTHING THAT YOU WILL EVER USE TO PREPARE OR EAT FOOD WITH.
• A changing bag big enough to load your tank in OR a totally light-tight space.
It is possible to buy prepackaged black and white developer and either use them as is or tweak them slightly to make them work better with motion picture stock. What follows is a recipe for Kodak D-96—the recommended developer for Kodak black and white negative film. Please note that it is not generally possible to purchase the ingredients for this “recipe” in a normal photo store. The best place to buy bulk chemicals in the United States is Photographer’s Formulary, headquartered in Montana but with a great online store at http://stores.photoformulary.com. Please note that a 50ft × 2 Lomo tank filled with 16mm (both reels) requires 1.6L of chemistry. So you will want to double the recipe. A Morse tank requires 1L of chemistry for 16mm, 750 ml for Super-8 and 2L for 35mm.
Table 5.1 D-96 Recipe to Make 1L
Ingredient—add in order |
Amount |
Instructions |
Water @ 125°F |
750ml |
Add just a pinch of sodium sulfite to inhibit Metol oxidation |
Metol |
1.5g |
Stir to thoroughly dissolve |
Sodium sulfite (anhydrous) |
75g |
Add ONLY AFTER Metol is completely dissolved—stir to dissolve |
Hydroquinone |
1.5g |
Stir to dissolve |
Borax (decahydrate) |
4.5g |
Stir to dissolve |
Potassium bromide |
0.4g |
Stir to dissolve |
Cool water to make 1L |
You will want to get the developer to 72°F for developing so use cold water. |
In order to develop your black and white motion picture film you really only need a developer and a fixer. I frequently use Kodak rapid fixer as it comes in easy-to-mix packages. However, you may want to save a few bucks and just mix your own. If that is your plan the following recipe for fixer is easy to make and lasts a few months when mixed if stored properly. If you ever have any doubt about whether your fixer is working, take a small piece of UNEXPOSED and UNDEVELOPED film and put it in a small film tank with some fixer for the recommended fix time. If the film comes out clear, your fixer is A-OK. If it doesn’t then your fixer is spent. In any event, fixer can be used multiple times so SAVE IT! If you are working in a community darkroom and use the chemicals there DO NOT put your fixer back into the jug with fixer for the still photographers but save it in its own jug and label it so your still photo friends don’t accidently use it. Hell hath no fury like a photographer whose negative is messed up because of contaminated chemistry!
Table 5.2 Kodak F-5 Hardening Fixer to Make 1L
Ingredient—mix in order and stir to dissolve before adding next |
Amount |
Water @ 125°F |
600ml |
Sodium thiosulfate (anhydrous) |
153g |
Sodium sulfite (anhydrous) |
15g |
28 percent acetic acid |
48mL |
Boric acid (anhydrous crystals) |
7.5g |
Potassium alum |
15g |
Cool water to make 1L @ 72–80°F |
The times and temps below are based on Kodak’s fact sheets for 5222/7222 and are a good starting point for ORWO N74 and UN54. These are recommended for immersion processes only (Lomo tanks, bucket processing and jam it in the can). If you use a Morse tank you will need to compensate for time when the film is not in the bath by extending all of the times of developing. The process listed is what Kodak recommends in terms of chemistry, times and temperatures but it is certainly possible to substitute a premixed developer such as D-19 or D-76. You can either use water as rinse between developer and fixer or you can use a generic black and white stop bath. I have also included a stop bath recipe for the diehard DIYers. Stop bath literally stops the work of the developer and it does so faster than a water bath. So you may want to use it. You may not. As you begin to experiment with developing your own film, you can begin to change developing times and temperatures to: 1. manipulate the contrast of your film and 2. push or pull film that was shot under- or overexposed respectively.
Table 5.3 Black and White Negative Developing Times and Temperatures
Processing step/chemistry temperature |
Time in minutes: seconds |
Developer D-96 @ 70°F |
7:00 |
Stop bath or water rinse 72–80°F |
0:50 |
Fixer F-5 (time for Kodak Rapid Fixer is about half) 72–80°F |
6:00 |
Water rinse 72–80°F continuous water exchange or several changes of water in a tank or bath—you can add Photo-Flo at the end to eliminate dust/debris |
10:00 |
Dry by hanging in a dust-free place |
TROUBLESHOOTING BLACK AND WHITE NEGATIVE DEVELOPING
If your results aren’t exactly what you imagined perhaps you need to go over your processes, both shooting and in developing, and see what might have caused the problem. Below are some potential problems and their possible causes.
Table 5.4 Troubleshooting Black and White Negative Development
Problem |
Possible causes |
NO IMAGE |
SHOOTING—extreme underexposure, variable shutter closed (in Bolex), lens cap on |
DEVELOPING—exhausted developer or insufficient developing time |
|
NEGATIVE IS THIN (you can hardly see anything) |
SHOOTING—underexposure, (in Bolex) variable shutter is partly closed, filter that is not accounted for |
DEVELOPING—exhausted developer or insufficient developing time |
|
NEGATIVE IS TOO DENSE |
SHOOTING—overexposure |
DEVELOPING—developed for too long or developer temperature is too hot |
|
FIXER—fixer is weak or not fixed sufficiently |
|
POTENTIAL SOLUTION: farmer’s reducer* |
|
NEGATIVE IS COMPLETELY DENSE |
The film has been exposed to light either in shooting or before or during developing |
NEGATIVE IS SOLARIZED—areas that should be clear are dense and surrounded by a halo |
The film has been exposed to light during the first developer. If you like this effect go to the end of this chapter and read about experimentation |
*Farmer’s reducer is a solution of potassium ferricyanide and sodium thiosulfate that helps to reduce the density of the silver in a print or negative. It is possible to purchase this as a mix or make it from scratch. At the time of this writing Photographer’s Formulary had several negative reducers available for purchase. The standard recipe for farmer’s reducer is as follows: solution A is 7.5g potassium ferricyanide, water to make 1L; solution B is 200g sodium thiosulfate, water to make 1L. Mix equal portions of solution A and solution B to create the necessary amount for your purposes. Wet the film with water or use a fix remover if you have used a fixer with hardener on the film. You may use the reducer in the light and watch it work until your negative or print is at the desired density. Wash your film in running water for 20 minutes after use or 10 minutes with the addition of Photo-Flo to the bath. Once the solutions A and B are mixed together they will exhaust themselves in 15–30 minutes so use immediately. The unmixed solutions can last well stoppered for 4–6 weeks.
One of the first things you should check if your processing results are not what you expected are the latent edge numbers. All film manufacturers place edge numbers along the edge of the film. They actually print them there with light. They contain a code that tells the lab what the film stock is, and in 16mm they are placed every 40 frames (every foot) and are also used in negative cutting to match back to the workprint. When developing negative film, if you cannot see the edge numbers at all the film has been underdeveloped. If the edge numbers are there but the film is clear or thin the film was developed correctly but underexposed. Conversely, if you can see the edge numbers and the frames are dense the film was overexposed. If the edge numbers are too dark the film was overdeveloped.
DEVELOPING BLACK AND WHITE REVERSAL FILM
Many of the principles used in developing negative film can be applied to developing film as positive. I already mentioned that there are black and white films specifically designed to be developed as a positive image called reversal films. For many years Kodak produced black and white reversal film with different sensitivity to light. As of this writing they only produce a single reversal film, 7266/5266, which is 200ASA daylight, a relatively high-speed stock. ORWO produces UN54, what they call a universal stock, which can be developed as either positive or negative and has an ASA of 100 daylight.
The process of developing black and white film as positive is similar to developing it as negative with additional steps. The important steps are:
1. First developer—this changes the silver halide particles that have been exposed to light into metallic silver.
2. Bleach—this removes the metallic silver to leave a “latent image”.
3. Re-exposure—the film is either chemically or physically “re-exposed” to light so that the silver halide particles in the “latent” image are “activated”. Re-exposure means opening up the can and letting in enough light to strike all the film—you cannot overexpose at this point. The rest of the processes can be done in the light.
4. Redeveloping—the “activated” silver halide particles are developed and turned into metallic silver.
5. Fixing—the silver halide particles that were not exposed to light are removed. There are additional steps such as a pre-bath that evenly softens the emulsion to allow it to accept the developer evenly, washes in between each step to avoid cross-contamination and when following the developer to stop the developing process, and a final wash with something like Photo-Flo to remove chemicals and aid in the drying process. What follows is Kodak’s recommended process for developing its reversal stock 7266. This can also be used successfully on ORWO’s UN54.
Both ORWO UN54 and Kodak’s 7266 (Tri-X) can be developed as negative. In the case of Tri-X, developing it as negative will produce a negative with increased contrast and less definition in the mid-tones when compared with 7222. What follows are directions to develop Tri-X and UN54 as either a positive or a negative image. As you will note, when developing these films as negative, the steps are precisely the same (although times differ) as for developing 7222.
First developer
Table 5.5 D-94, Kodak’s Official Recipe for First Developer in the Reversal Process
Ingredients to make D-94 |
Amount |
Water |
750ml |
Elon (same as Metol) |
.6g |
Sodium sulfite |
50g |
Potassium bromide |
8g |
Sodium thiocyanate |
9ml |
Sodium hydroxide |
20g |
Water |
To make 1L |
As you mix the chemistry above, be careful as it will heat up. It is best to mix it in Pyrex if available. Also the solution is caustic to the skin so wear gloves and an apron. Kodak D-94 is the recommended developer for reversal processing of Tri-X film. However, it is possible to substitute any strong developer such as D-19 (either purchased as a mix or made from scratch) with the addition of a silver solvent. My tried and true mix for first developer is 1L of fresh D-19 with 9ml of sodium thiocynate added.
Black and white reversal bleach
Table 5.6 R-9 Black and White Reversal Bleach
Water |
975mL |
Potassium dichromate |
9.5g (toxic, don’t breath in/use a mask) |
Sulfuric acid 48 percent* |
25ml |
* Sulfuric acid can be purchased from http://stores.photoformulary.com.
It is also possible to purchase a reversal bleach called Varicom II from a company called Clayton Chemical. It was necessary to purchase this in rather large amounts but it was easy for students to mix as it only required a dilution of five parts water to one part solution. Although it was possible to purchase it through B&H Photo at the time of writing they are no longer carrying it. An alternative black and white bleach as well as alternative developers and clearing baths can be found in Processing KODAK Motion Picture Films, Module 15.
Clearing bath (to get all that bleach off the film)
Table 5.7 Clearing Bath for Black and White Reversal Film Process
Water |
750mL |
Sodium sulfite |
10g |
Water to make |
1L |
For the second developer any strong, contrasty black and white developer will do. I use D-19 but be sure to have a different batch from the first developer as you do not want a silver solvent in your second developer. For fix the Kodak hardening fix listed in the negative process is fine. The times for full emersion processes (bucket, jam in can, Lomo) is as follows (Table 5.8).
TROUBLESHOOTING BLACK AND WHITE REVERSAL DEVELOPING
If your results aren’t exactly what you imagined perhaps you need to go over your processes, both shooting and in developing, and see what might have caused the problem. Below are some potential problems and their possible causes.
Process @ 68/72°F |
7266/ORWO 54 |
Pre-wash—water |
1 minute with agitation |
First developer |
6 minutes |
R-9 bleach |
3 minutes |
Clearing bath |
3 minutes |
Re-exposure to light |
At least 10 seconds with a 100W bulb 1ft away from the film. If you can just go outside, take the lid off the tank |
Second developer |
6 minutes |
Fixer |
5 minutes |
Wash |
10 minutes (several water changes) + Photo-Flo at the end |
Dry |
Until the film is clear and not tacky to the touch. |
Just like when processing negative, if you get results that you don’t expect, check the latent edge numbers. When developing reversal film if you cannot see the edge numbers at all and the film is clear the film did not get developed in the first stage. You will notice this during re-exposure. If this happens don’t even bother finishing the processing; just wash the film and use it for clear leader! If the edge numbers are there but the film is clear or thin the film was developed correctly but overexposed. Conversely, if you can see the edge numbers and the frames are dense the film was underexposed. If the edge numbers are too dark the film was overdeveloped in the first stage or did not bleach sufficiently. (See Table 5.9.)
A WORD ABOUT REVERSAL BLEACH
Bleach in the black and white film process is completely different from household bleach. It is called bleach because it removes (or bleaches) metallic silver from the film so that the latent image can be re-exposed to light and developed on its own. What would happen if the metallic silver was not removed after the first developer and the film was re-exposed to light and put through a second developer? Your film would be completely black. Both the positive image and the negative image would be on the film as metallic silver (optically dense).
Problem |
Possible causes |
NO IMAGE–film is clear |
SHOOTING—extreme overexposure, the film has been exposed to light either in shooting or before or during first developer. |
DEVELOPING—exhausted first developer or insufficient developing time, insufficient re-exposure to light, exhausted second developer. |
|
NOTE: IF YOU SEE AN IMAGE IN STEP AT RE-EXPOSURE AND THEN THERE IS NO IMAGE AFTER USING THE FIXER, YOUR SECOND DEVELOPER IS SPENT. This is why it is a good idea to observe steps 3–6. During the second developer you can actually see the image turn from gray to black as it is developed. If this doesn’t happen you need to replace your second developer |
|
IMAGE IS THIN—you can hardly see anything |
SHOOTING—overexposure. |
DEVELOPING—exhausted first developer or insufficient developing time, insufficient re-exposure to light, exhausted second developer—see note above |
|
IMAGE IS TOO DENSE—the frame is dark |
SHOOTING—underexposure. |
DEVELOPING—too long in or too hot first developer. |
|
BLEACH—bleach is weak or insufficient time in bleach. |
|
NOTE: You may notice during re-exposure that your film is too dense. You can decrease the time in second developer to try to compensate. |
|
THE FILM IS COMPLETELY BLACK |
The film was not exposed |
THE FILM IS SOLARIZED—areas that should be dark are light with dark halos around them |
The film was slightly exposed (flashed) after it was shot either before or during first developer |
ALTERNATIVE BLACK AND WHITE FILM STOCKS
As of this writing there are a couple of black and white intermediate and print stocks that have been in use by experimental filmmakers for their distinct characteristics. An intermediate film stock is one that is meant to be used by a film lab for intermediate steps in finishing a film. All Kodak camera stocks begin with either a 52 for 35mm or a 72 for 16mm (e.g. 5222/7222 is black and white negative). All “lab stocks” begin with a 53 or 73. Thus 5302/7302 is a fine-grain positive film to make release prints. The stock that is the most popular with experimental filmmakers is 7363. This is a High-contrast, pan-chromatic film. It is not considered a camera stock and can only be purchased in 400ft rolls. So if you want to shoot it in a camera that only takes a 100ft daylight spool, you will need to spool it down.
What makes Hi-con/7363 such a desirable stock for many experimental filmmakers is its extremely high contrast. It can be developed as either positive or negative and is about half as costly as other black and white film stocks. For a camera stock it is relatively low speed, rated at about 25ASA daylight and 3–12ASA tungsten. It is extremely sensitive to shifts in color temperature, being more sensitive to blue light (daylight) and less to orange light (tungsten). The film is made to produce titles as well as traveling mattes (for more information on traveling mattes see Chapter 9) and it is extremely fine grained.
Developing Hi-con/7363 is very similar to the processes for developing 7222 and 7266, although the developing and redeveloping steps are significantly shorter. Whereas Hi-con can be developed with any high-speed developer I have had consistent results with D-19 for both positive and negative developing. Fixer, bleach and clearing baths are all the same for both processes. Kodak’s recommended developer for 7363 is D-97 (see Processing KODAK Motion Picture Films, Module 15). This is the same recommended second developer for their black and white reversal process. In my experience there is no appreciable difference between using D-97 and D-19 (both high-contrast developers) for developing 7363 as negative and have had great success with developing 7363 in the reversal process above as well.
PUSHING AND PULLING MOTION PICTURE FILM
Just like with still photography, motion picture film can be pushed—developed longer to compensate for underexposure, or pulled—have a shortened developing time to compensate for overexposure. Pushing film increases the contrast; pulling film decreases the contrast. A general rule of thumb is that you can only go about 2 stops in either direction without significant loss of quality, but if you are a true experimenter you should feel free to try to see how far you can push or pull and how it changes your image. Pushing and pulling can be achieved two ways. You can change the temperature of the chemistry or you can change the amount of time film is left in the chemistry. The higher the temperature, the faster the film will develop. If you lower the temperature the film with develop more slowly. All of the black and white processes discussed in this chapter are to be conducted between 68 and 72°F and an increase or decrease of 20° will significantly speed or slow your developing. No matter how you decide to experiment with pushing or pulling it is wise to test any process that does not conform to standard procedure.
EXPERIMENTAL TECHNIQUES WITH HAND-PROCESSING—SOLARIZATION
While there are endless ways you can manipulate your film in the processing, what follows are a few experiments that you might try to start you on your way. Earlier in the chapter we mentioned solarization as a potential problem to be avoided. However, in both fine-arts photography and film solarization has been used as an artistic effect. Solarizing means exposing the film to light during the developing process. This causes a whole or partial reversal with areas that should be relatively thin in the negative becoming dense. A thin line or halo around these areas can also be a part of the effect. This can be achieved with either negative or reversal developing by flashing the film with a small amount of light during developing for negative and the first developer for reversal processes. This can be done with any of the stocks discussed in this chapter. Experimentation is the key, so if you are trying out solarization you might cut your film into smaller sections and develop 10–25ft at a time until you get the effect you want.

FIGURE 5.14
A film still from Endless Present: Biography Of An Unknown Filmmaker a film by Cornealius Thistle. Courtesy of the filmmaker. Note how the solarization of the film has created an image that is both positive and negative with dark outlines around some of the images, most notably the trees.
EXPERIMENTAL TECHNIQUES WITH HAND-PROCESSING—SEPIA REDEVELOPER
In the late 1800s it became popular to tone photographs with ink from a squid found in the English channel to tone them sepia. Toning has been done ever since with chemicals on prints and later with Photoshop. In motion picture film, from the very earliest days, cinematic artists such as Méliès were hand-painting their films. Tinting was also popular and was achieved on motion picture film prints by soaking the print in a bath that dyed the whole film a certain color. Toning film requires changing the metallic silver so that it isn’t black any more, but a different color! One of the easiest ways to do this is to develop motion picture film and use a redeveloper that changes the metallic silver in the redevelopment phase.
Table 5.10 T-19—Sepia Redeveloper for Black and White Reversal Process
Ingredient |
Amount |
Instructions |
Water @ room temperature |
750ml |
Put in a 1L or larger graduated cylinder |
Sodium sulfide |
20g |
Mix in—it really stinks so do this in a well-ventilated area or outside |
Water |
To make 1L |
Use right away or store in an airtight container |
FIGURE 5.15
A film still from Endless Present: Biography Of An Unknown Filmmaker a film by Cornealius Thistle. Courtesy of the filmmaker. Image with T-19, sepia redeveloper used as the second developer. Shot on 7363.
This process is most easily achieved with sepia/red tones. In order to make sepia film use the formula called T-19 as a substitute for the second developer in any reversal process, with 7266, ORWO UN54 or 7363 developed as positive. Please note, sodium sulfide stinks like rotten eggs and has been known to cause headaches if used without proper ventilation. As this is the second developer, you can watch the film as it is redeveloped. I highly recommend using this process outside or with the door open. This is a fogging redeveloper—which means that you don’t need to re-expose the film to light, but you can with no ill effects. If you do decide to pop the can, you can watch as the film turns from gray/white to brown/red. This process usually takes 5–6 minutes for 7266 and 2–3 for 7363. Follow the redeveloper with a water rinse and fix as usual.
LIQUID LIGHT—PAINTING ON EMULSION
There is a product out there called Liquid Light and it is meant for photographic purposes, to make almost any surface sensitive to light and thus able to have a negative printed onto it. If you want an interesting (and somewhat unstable) film emulsion, you can paint Liquid Light onto clear leader. Once dry, the resulting film will have the ISO of photo paper (between 4–10ASA) or around the same as High-contrast film. This film is best suited for ray-o-gram work (see Chapter 8) and exterior photography, and is very fragile at all stages of the process, including developing. Its best use is for special effects that will be rephotographed using an optical printer because the original will remain more fragile than conventional film. Reprinting will also allow you to loop various effects that you especially like. One final caveat: Liquid Light is not cheap. A single bottle will only cover about 200ft of film. What follows are the instructions for making and developing the film.
What you will need to make the film
• Rockland Liquid Light photographic emulsion (you can also buy liquid emulsion from Photographer’s Formulary online).
• Clear leader—acetate is preferable to Mylar.
• A couple of brushes.
• A large, clean, light-tight space to work (like a darkroom) with a big table.
• A way to heat up solutions.
• A photo thermometer.
• Stainless steel, glass, plastic or enamel containers.
• A medium amber or red safelight.
The process
Liquid Light comes with instructions, so you can read these to review the safety steps. Much of what I am about to write comes directly from them. First things first: DO NOT OPEN THE BOTTLE IN NORMAL LIGHT. This will fog the emulsion. You should treat Liquid Light much like you treat unexposed film. When not using it, keep it in a cool, dry place. DO NOT FREEZE IT. Unopened it can last up to a year. Although this will make shooting the film more difficult, you may want to cut up your film into lengths for application of the emulsion. I usually work on a big folding table that I have set up in my school darkroom. It is about 8ft long. I cover it with a plastic drop cloth and then a layer of butcher paper. However, you should adapt your process to whatever facility you have at hand.
In Room Light
1. Put the unopened bottle of liquid light in HOT (but not boiling) water. Liquid Light is solid at room temperature so you need to get it to about 110°F for it to become liquid. You can put it in a double boiler situation (bottle in water—resting in a metal bowl/pan also in water in a pan on the burner) on a hot plate or boil a pot of water and pour it into a bowl and set the bottle in that. Whatever means you are using to HEAT the solution you will also be using it to KEEP the solution above 110°F, so bear that in mind. This should be at one end of your table.
2. Then lay out whatever it is you are using to cover/protect your working surface. Newspaper is fine, as are cut-open paper bags, whatever. You will recycle these later.
3. Then lay out your film in strips (or you can unroll it, loop it, tape it at both ends, make a short loop and bring it back onto the table looped close to the first line, etc.) until you have laid out the entire 100ft from a daylight spool. Make sure that you do not flip the film in this process. You only want one side of it covered.
4. Turn Off The Room Lights And Turn On The Safelights.
5. Pour the Liquid Light into a stainless steel, glass or ceramic container. I find big-mouthed jelly jars are really good for this. Only Pour Out What You Need. If you are coating 100ft of film, this is about half of the bottle of Liquid Light.
6. At this point you will want to put the jelly jar (or whatever the Liquid Light is in) into the double boiler, hot water, etc. Be Careful To Keep The Liquid Light Warm—But Not Hot. It should be somewhere between 110°F and 135°F.
7. Using a paintbrush, paint the Liquid Light onto the film. You can also apply it with a sponge or a sponge paintbrush. You can experiment with putting on one, two or three layers. How thick the emulsion goes on depends on the heat it is at as you apply it, so one individual’s single layer might be thicker than someone else’s two layers.
8. Allow the film to dry. This can be facilitated by moving in a small electric fan, but as the emulsion cools it hardens and once room temperature should be firm. However, it remains significantly more fragile than commercial film so handle with care.
9. Once dry you can roll it up onto a daylight spool and put it into a camera. If you are not using it right away, keep it in a light-tight film can in the fridge. DO NOT FREEZE.
Filmmaker Robert Schaller, interviewed at the end of this chapter, has experimented more than anyone I have met with hand-made motion picture emulsion. He has his own recipe included at the end of his interview but I wanted to include a few images from his coating techniques. Figures 5.16 and 5.17 show an emulsion coating box that he made to coat 100ft of film at a time. This eliminates the need to lay out the film on a table or floor in a darkroom or coat it in very small sections. It was built rather simply with just a large pipe in the center to wind the film on and a vent and fan to speed up drying time. The other technique demonstrated was laying the film out on the side of Mt Zirkel on the night of a new moon (when there is no moon in the sky) (Figures 5.18 and 5.19). With only the stars to light their way, the workshop participants coated the film, allowed it to dry and then spooled it up before dawn. Figure 5.20 is an image shot with this film of a climber in the mountains.

FIGURE 5.16
Robert Schaller designed an emulsion coating box in which he can coat and dry 100ft of 16mm motion picture film at a time. Note: although the base could be wound up in room light, the coating and drying would be done under a safelight. Courtesy of the filmmaker, Robert Schaller.

FIGURE 5.17
Robert Schaller’s emulsion coating box.
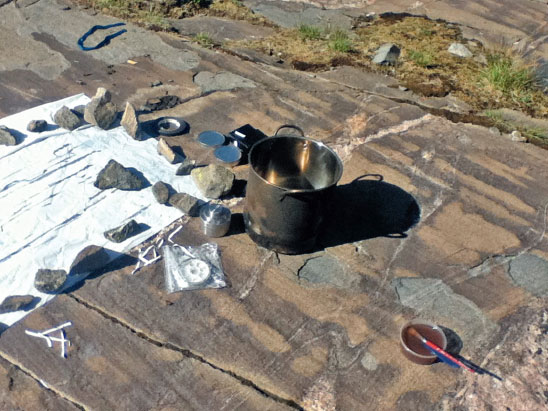
FIGURE 5.18
The coating location for In Lightning Agnes, Mt Zirkel Wilderness, 2014, Wilderness Film Expedition. Courtesy of the filmmaker, Robert Schaller.

FIGURE 5.19
The coating location for In Lightning Agnes (available on the companion website). Courtesy of the filmmaker, Robert Schaller.
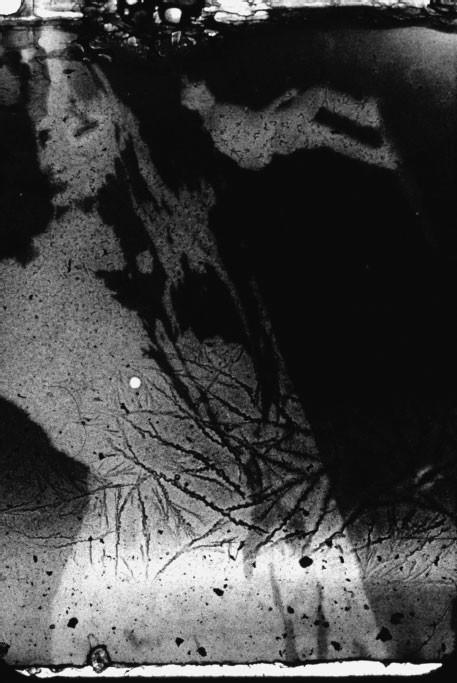
FIGURE 5.20
Black and white of a climber in the mountains; In Lightning Agnes, silver gelatin on 16mm (made and processed on location in the Mt Zirkel Wilderness, 2014, Wilderness Film Expedition). Courtesy of the filmmaker, Robert Schaller.
As I mentioned earlier, film made with Liquid Light is really SLOW—around 10ASA daylight. So use it outside on a sunny day and/or under-crank it (film at speeds slower than 24FPS). Remember, you will probably want to rephotograph this on an optical printer so you can manipulate speed changes then (photograph film shot at 12FPS on 2s—shooting 2 frames of every 1 frame—and make it look like it was shot at 24 FPS). Still, and this is important to remember, there is nothing normal about this film. You’re not trying to get a lab look. This is a unique, hand-made process. Also, if you kept the film in the fridge, take it out an hour or so before you intend to shoot it so that it can get to room temperature.
DEVELOPING THE FILM
This film process really only works well when used to create black and white negative images and can be processed with either D-19 or a Dektol solution. In terms of processing times and temperatures the most important thing to remember is to keep all chemicals AT OR BELOW 70°F. Anything higher and you run the risk of your emulsion sliding off your film. Hand-made film is a really good candidate for Lomo tank processing (as opposed to Morse tank, jam it in the can or bucket processing) because the emulsion is so soft and fragile. If you don’t have a Lomo, but have access to big paper trays, consider putting your developer in a tray and gently unspooling the film in that in large loops. This will shorten the life of your developer but save your film. The processing times/temperatures are shown on Table 5.11. Remember these are starting points, and you will need to experiment to find what works best for you.
Process |
Chemical |
Time |
Developer Or |
If using Dektol use in a 1:2 solution with water |
2 minutes |
Developer |
D-19 |
2 minutes |
FIX 1 |
Kodak rapid fixer or other developer with hardener (this will strengthen your film) |
Use fixer as a stop—instead of water or acid stop as both will soften the emulsion. This should be dumped after the process. 1 minute—dump this fixer |
FIX 2 |
Kodak rapid fixer or other fixer with hardener |
4 minutes—this fixer can be reused |
WASH |
Water—cool |
10 minutes |
DRY |
Cool—room temperature |
Hang until dry |
LAST NOTES ABOUT HAND-PROCESSING
Don’t be so eager to get out of the darkroom that you forget to wash your film. You may like the chemical stains on the film, but your skin won’t. So wash wash wash your film, 20 minutes or so with free-flowing water. Bath tubs are good for this. If you don’t have that, a big tub or bucket that you can change out the water a few times will work fine. Adding a few drops of Photo-Flo to the water never hurts. When your film is done, hang it up to dry in as dust free a space as you can. Once it is dry, it might be a bit brittle, so get a little film cleaner (available at most high-end photo stores or online) and a dust-free cloth, put on your latex or nitrile gloves, put a little film cleaner on the cloth and run the film between it to clean and lubricate it. It will make the film much easier to handle.
Hand-processing film has been an essential part of my filmmaking process for over 20 years. I just love the artifacts of the process, the scratches, the solarization, when film sticks together, all of the mistakes that would make a clean film fan stress are what I look for. In part this is because I think of film as a sculptural medium. One that both sculpts light when you project it, but also sculpts on the surface of the film. Rapid-fire etching? In any event, a fellow traveler and teacher in this hand-processing world is Robert Schaller. He runs workshops around the country and a camp every summer, and has lately been experimenting with making emulsion by hand. When the apocalypse comes and we can’t buy motion picture film from the commercial vendors any more, having the knowledge to make it ourselves will keep us all shooting. What follows is a brief interview with Mr Schaller followed by his very own recipe for hand-made emulsion.
BIOGRAPHY OF ROBERT SCHALLER
Robert Schaller is the Director and principal teacher of the Handmade Film Institute. He received his MFA at the University of Colorado with Stan Brakhage and Phil Solomon. As a faculty member at the University of Colorado in the late 1990s, he developed a course entitled “The Physical Properties of Film”, which was refined there and subsequently in teaching at the San Francisco Art Institute and at the San Francisco Film Arts Foundation. The Handmade Film Institute was founded in 2003 to expand these ideas, and currently offers workshops, retreats and residencies at numerous locations in the United States and elsewhere. His artistic work and involvement in the Institute unite his background in chemistry (he was a molecular biologist early on) with his interest in time-based art and his love of teaching. His films have won numerous awards and have been screened widely in the United States and around the world, as have those of his students (including the prize for Technical Innovation at the Ann Arbor Film Festival, won by former student Zachary Schueren in 2000). He has, additionally, made teaching appearances at the University of Florida, Gainesville, Florida Atlantic University in Boca Raton, Pitzer College in Claremont, California, and at the University of San Francisco. He has worked extensively with integrations of different media with film, including musical composition (he is a composer), modern dance, theater, installation, kite-making (the ongoing Aerial Cinema Project) and performance, in addition to the creation of emulsions and hand-made techniques.
BACKGROUND AND STATEMENT OF PURPOSE OF THE HANDMADE FILM INSTITUTE
The Handmade Film Institute was started in 2003 in recognition of the value of motion picture film as an artistic medium whose existence, given the changing landscape of moving-image technology, can no longer be taken for granted. The Institute’s mission is to preserve the knowledge and technical ability necessary for working with the medium of film, and to promote both the aesthetics of film and experimentation that further expands the techniques used with and within the medium. To this end, the Institute is pursuing several courses of action:
1. To collect any and all information about film chemistry and make this information available to artists who would work with film.
2. To offer regular workshops, retreats, residencies and classes that convey this information and how to use it safely, as well as to provide time and a place for groups of like-minded filmmakers to share and create.
3. To collect the physical resources necessary to the production of film, as these resources may soon be commercially unavailable.
4. To be a focal point in the community of artists who choose to work with film in times to come.
The Handmade Film Institute makes only the assertion that film is a beautiful medium in its own right, and as such warrants preserving as a viable artistic medium. Film represents an enormous technical and aesthetic achievement, and is in many ways a crowning glory of industrialism and science up to the late 20th century. Like oil painting in the age of photography, it offers the artist creative possibilities that cannot be fully duplicated by any other means, particularly in its unique combination of the tactile and the ephemeral. Claims as to the essential superiority of this or any other imaging technology are simplistic; all media have their place, and precisely that insight underlies our formation. See www.handmadefilm.org.
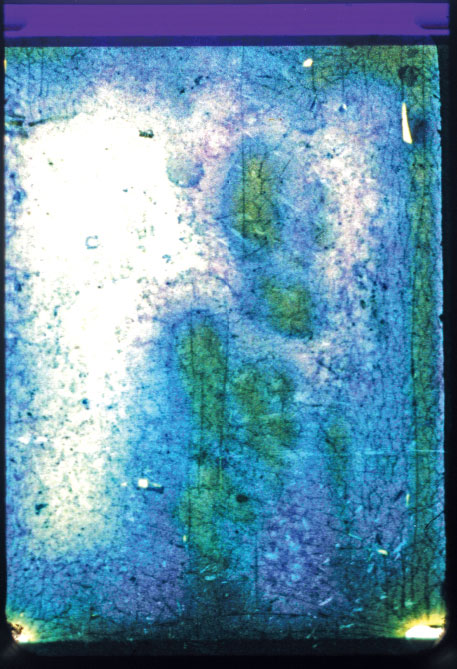
FIGURE 5.21
Image from To the Beach, gum print on 16mm, 1999. Courtesy of the filmmaker, Robert Schaller.
INTERVIEW WITH ROBERT SCHALLER
Kathryn Ramey: So—a general question to get the grease flowing—do you consider yourself an artist, a filmmaker, a new media practitioner, a shaman, a performer? How do you describe who you are/what you do to your aunt or the old guy next door? Or children? Yourself? Your friends? Or do you even try?
Robert Schaller: As you are no doubt aware, English doesn’t have a good word for this. An experimental filmmaker is a difficult thing to describe to anyone else, and perhaps even to oneself. I often say that I’m a filmmaker when asked what I do by “the guy next door”, but this leads inevitably to the question “What films have you made that I’ve heard of?” or the like, and I immediately have to explain that my films are like poems to the novels seen in a theater, that I make things that are typically non-narrative and short, in which representationality itself may or may not be present, and in which the degree of recognizability is itself one of the dimensions I use to create temporal form. I take it on myself to be something of an ambassador whose job is to explain a world, which most people have not only never seen but never imagined. I use analogies to music and poetry, both of which are often non-representational and concerned with the subtleties of surface, as I am. I try to explain in whatever terms make sense to the person I’m talking to, as long as they’re interested in talking about it.
This conversation applies to anyone, really; how interested the person I’m talking to, determines how far it goes. I suppose what I’m doing is really answering the question to myself, trying to define in words what I do that really doesn’t involve words. It’s like what Robert Frost reportedly said once when asked to explain a poem: “What, you want me to say it less well?” I am drawn to what for me is a fundamentally wordless medium, and so it is always a case that whatever I say about it is both a struggle and beside the point of the work itself. Nonetheless, I am convinced—increasingly, as I get older—that it is important to try to talk about it. Even if the description is less good than what I’m describing, even if it’s hard to talk about. I do not believe that meaning requires language—I would hold my work out as proof that this is not so—but it is also true that language is important to human beings, and is the primary way we have of understanding the world.
I am as much a mystery to myself as to anyone else, and I take seriously any opportunity to try to figure it out. If it helps bystanders understand me or anything else, so much the better, but it really doesn’t matter, except that I try.
Depending on how the conversation goes, I will often say that really, I’m an artist, but I usually don’t start that way. And really, in the end, I would have to say that I’m an artist who works with film. But this seems evasive to say, and not to say very much!
KR: How did you come to your particular practice? Did you develop your own processes as a series of experiments? Where did the ideas come from? Does your form and method change as you go and, if so, where have you been and where are you going?
RS: I came to my practice by wanting to be everything I am at once: it is, at root, a reflection of a drive to be a single, individuated, whole being, a union of what I am both intellectually and physically.
In more concrete terms, in my youth I was trained as a scientist, and employed as a molecular biologist; I then turned to composing music after deciding to do something that mattered (science was, in my estimation, ill equipped to answer questions like that), and then, on something of a dare from an old friend, took a filmmaking class (“It’s like writing music!”). I was hooked initially by the possibility of applying ideas about musical structure to image, and then by revelations about the photochemical process itself, that it was not just a given, but could be reinvented in as many ways as could be imagined.
I landed on filmmaking because it offered a platform on which I could combine a wide array of interests, and thus engage me on many levels: it involved chemistry, photography (I loved taking photos in the mountains on long wilderness trips with my father), involved being outside, in a lab, using machinery, using my body, creating physical objects, creating abstract forms that were completely immaterial, like thought; it allowed a way to explore issues of aesthetics, ethics, politics, history, culture, religion, mathematics, anything I thought of. It gave me a way to be in the world such that I could make sense of all the disparate threads that pulled me in so many directions and create singular works that I could share with others.
It also gave me a way to incorporate new ideas; in fact, it encouraged the incorporation of new ideas. A big influence was a teacher at the University of Colorado (Melanie Walker) who taught a class in alternative photographic processes, which is funny because I never took her class, but just heard one phrase: “non-silver photography”, and just hearing this term turned my world over, made me realize that nothing was fixed but everything could be reinvented.
So yes, it’s been a series of experiments, in that filmmaking for me is an engagement with the unknown, a way to enlarge the circle of awareness and competence. I don’t know how exactly I’ll be practicing in ten years, or twenty; right now, I’m spending some of my time focusing on learning to play the piano at least competently. It is an end in itself, of course, but how it fits into my life is perhaps telling, and indicative of how all roads lead to Rome: I will write music better, and be able to play it with my own films, in a form for now that I think of as “Chamber Cinema”, chamber music for classical instruments and film projector, in which I write all of it. That film allows such things is a good predictor that I will be doing this for a long, long time, expanding and stretching the notion of what filmmaking is to accommodate whatever interests come my way. It’s a big tent, as they say, and I have no reason to leave until it can no longer let my ideas live.
KR: What role does media/technology/tools play in your work? What is the relationship between the media/tools/and what your work is about? Is your work about something(s)?
RS: This is, I fear, a somewhat involved answer. Sorry! I have a complicated relationship with technology, or, rather, a simple relationship, but one that apparently differs from the attitudes that prevail in our society. From my point of view, technology is a tool that helps us do what we want. However, it would be naïve to think that it doesn’t play a role in defining the range of what we see as there to want; it helps not just to fulfill desires, but also to create the desires that we have. Film is a good example of this. It is inherently technological, both chemically and mechanically. It was created by technology, by industry, and can’t exist outside of it. Moreover, it was created to serve both capitalism (profit seeking) and conventional ideas of image and representation. Yet, it suits our condition in ways that transcend the impulses that gave it rise, our dual nature as embodied and ephemeral beings. Digital technologies do a better job of serving these official ends, and so film is being left behind in the marketplace and in society at large, yet, it continues to exist, the stubborn child of aims that have found other serviteurs [author’s note: Fr. servants], one that by accident creates what I consider a perfect nexus of the material and the ephemeral.
I am a materialist: I don’t see any reason to think that there is mind or soul without body. So too is film: the lovely immaterial image we see projected on the wall can’t exist without the strip of celluloid and the machinery that projects it. It grants the opportunity to create a strip of tangible “pictures”, an actual physical thing you can touch, a thing that you can make with your own hands, that responds to whatever scientific understanding you bring to it, that you can develop with your own hands, that responds to physical force in the same way your body does, that gets wet, dries, gets scratched, can be handled roughly or gently, subject to the accidents and whims of how conditions effect a nature too complex to fully understand, just like us—yet this strip, put into a projector, transcends itself. It becomes a luminous spirit, as immaterial and really inexplicable as the spirit within us, unreal, yet the only reality that matters. It’s a perfect medium! I feel like I’m in relationship with it, not using it nor being used by it. For me, it is very unusual in occupying that status. I would love to interact with everything so equally. With film and filmmaking, it’s a dance.
I do not eschew other technologies; I have a day job as a computer programmer, write computer programs to control machines to help with my filmmaking, create QuickTime movies to visualize rhythms and sounds. I build and maintain my own websites. I enjoy inventing and building all manner of apparatus for filmmaking, and living in general: collapsible blackout shutters for darkroom windows, rotating tubes for emulsion coating, an emulsion noodle washer that is light-proof and allows the water to be cooled, pin-registered printing frames for contact printing strips of film, a device that’s evolving into a home-made computer-controlled optical printer, a 16mm pinhole camera that has been my principle shooting tool for the last ten years. I enjoy creating the devices that I then use in my artistic work; these things are just tools, but because I make them, the whole process is part of the process of making, and my relationship and my work’s relationship with the material world is more explicit and more clear to me.
I am of the material world, and so is my work: at all stages, from conception to projection, I try to be involved with the underlying materiality on which I and the work depend, and try to know it and respond to it, so that both I and the work are in constant conversation with each other and with the world.
I use computers, but I am aware that they would use me if I’m not careful. I do not use social media, and I consider much of what happens on the internet to be fraudulent and exploitative, and the companies that have come to dominate it—Google and Facebook etc.—to be taking cynical advantage of human nature to gain wealth and power over others. I am not sanguine about where this will lead us as a society and a species; I find it hard to be optimistic when smart people sign up for email accounts that openly disclose that they will read every word you write, and dismiss any concern about it as if it doesn’t matter.
I prefer to make things myself, to control, as best I can, the means of my own production. I do not make everything I use, and don’t really aspire to do so. Making a significant part is enough, mostly just those things that nobody makes in the way I think they should be made. This slows me down, undoubtedly, but I don’t want to be beholden to what plugins are available or what device Sony just came out with. I’m not pure, but I try to be engaged.
KR: Where do you show your work? How do you want people to experience it? Is there a relationship between the form that your work takes and your desired venue/audience?
RS: My favorite way to show work is to be present at the screening. I enjoy talking about it, and although most of my films have moved the locus of performativity to the act of filming rather than to the screening, my recent interest in Chamber Cinema marks a turn toward the performative in screening, and my being present becomes a significant part of the experience. Many of my films work on their own, though, and increasingly my work is getting shown without me.
KR: And finally, finally—is there a process, project, recipe, assignment you’d like to share with the readers?
Robert Schaller’s silver gelatin emulsion—basic recipe: unwashed emulsion
This is an extremely simple but highly effective recipe. It produces a slow, blue-sensitive emulsion (≲ ISO 4–12). It works well for contact printing, or use in a camera in sunlight. It seems to have a sensitivity rather like Kodak 7363, or Hi-con, which I shoot outside all the time. The usual advice about using slow films applies, with a twist: if you want to use it in a camera, bear in mind that the fact that it’s only sensitive to blue light means that it won’t reproduce things the way your eye sees them, and requires a light source with lots of blue light like the sun. A light meter will be deceptive, because the equivalent amount of tungsten light probably won’t work. We haven’t tried it with HMI lights or fancy fluorescent lights; let us know if you try it! You might also need to under-crank. To make a faster emulsion takes more work. For that, have a look at: www.handmadefilm.org/research/tiki-index.php. Making a faster emulsion is one of the questions we’re trying to answer. For a slow film, however, it works well, so well, in fact, that it doesn’t seem necessary to make anything more complex.
For everything that follows, use distilled water, and rinse all implements with distilled water before use. Cleanliness is essential!
Solution A—mix separately (in normal room light):
Gelatin (Knox brand (or equivalent) plain, unflavored food gelatin, from the grocery store) |
10g |
Potassium bromide |
8g |
Distilled water |
62.5ml |
Add the gelatin to the water and allow to swell. Put the container (preferably stainless steel, like a two-reel still film developing tank) into a water bath and raise the temperature to 50°C. Add the potassium bromide and stir or swirl continuously until both ingredients are dissolved |
Table 5.13 Solution B—Hand-Made Emulsion
Silver nitrate |
10g |
Distilled water |
62.5ml |
Dissolve the silver nitrate in the water by stirring or swirling, again, in a stainless steel container (a processing can for 35mm still film is ideal), and raise its temperature to 40°C in a water bath |
The next steps must be conducted under a red or amber safelight, outdoors in the
Solution A—Hand-Made Emulsion Table 5.12
This is the recommended method. It takes about an hour and a half, and, if you’re careful with the temperature, yields a surprisingly fast emulsion with a high maximum density.
Stirring continuously, add half of solution B to solution A quickly. Continue stirring for one minute. Put on a water bath at 50°C, and let sit without stirring for 15 minutes. Keeping the temperature as close as you can to 50°C at all times is very important! If you get one piece of special equipment, get a temperature regulator for a water bath! Such a thing is made for “sous-vide” cooking (search for it on the internet) that turns any crock pot into just this; it’s not required, and don’t get it unless you want to do this again! Temperature has the single biggest effect on emulsion speed in a simple emulsion. Repeat the last two steps—stirring for a minute and letting it sit for 15—three more times, for a total time of about 60 minutes.
Add the other half of solution B in small amounts over 10 minutes, either by a steady drip, a slowly depressed syringe or about 1.5ml every 30 seconds stirring constantly. Keep the emulsion at 50°C as consistently as you can!
MIXING METHOD #2
This method is faster, but the emulsion produced is much slower. Add all of solution B to solution A in either a steady stream or in small, regular additions, stirring constantly. Keep the temperature at 50°C.
Either way, the emulsion is now finished and ready to use! Store it in a light-tight container—a daylight spool box works well. Make sure to label it so as not to open it accidentally in white light! To use, heat so that the gelatin melts—35°C might be a good starting point, but the consistency will depend on the temperature, and so this will be a matter of personal preference.
As to coating, it sticks well to cleared film that retains its commercially given gelatin coating (e.g. undeveloped fixed black and white print stock, or a finished black and white print that has been made clear by running through dichromate bleach or the equivalent), and seems to stick less well but maybe well enough to uncoated acetate, the clear leader you can buy in bulk. This will require some experimentation on your part. Coat on strips of a manageable length—say, about 4ft. A long continuous strip can be made by looping a strip of film back and forth on a flat surface, pinning or weighting down the corners where it changes direction, being careful to keep the gelatin side up. This will leave periodic spots where there is no emulsion. Or, if you have a way to wind up film with wet emulsion, you can coat a continuous strip of whatever length. Dry in total darkness, and be aware that it is light-sensitive film!
Expose generously—either outside in the sun if you’re using it in a camera, or a flashlight seems to work well for contact printing. It will require some testing in either case to figure out what the right exposure should be, but, if you keep the development time constant, this will be the only variable so this won’t be hard.
I like to use a very soft brush that picks up a lot of emulsion, and to re-dip it frequently. Multiple coats are fine, and help build up enough thickness so that the maximum density of the final image is high. You have to beware, though, too much thickness, which can make the film impossible to fix completely. Bear in mind that this is art, not science! If you want regular results, use commercial film and send it to a lab, but don’t send hand-coated film to a lab!
Develop in a standard developer and fixer. Use cold water for rinses, and make sure no solutions are over 20°C, otherwise the emulsion might come off. Colder is better! If you make the temperature colder, make the processing time longer (7 minutes @ 15°C). But be ready to remove the film from the developer if the emulsion starts to fall off!
Bear in mind that the wet emulsion is very fragile and scratches easily, and that it is susceptible to veiling, running and reticulation—all of which make working with hand-made emulsion exciting. You really should use a hypo-clearing agent at the end, as it is a silver image and will degrade if left contaminated with fixer, but the longer it’s in any solution, the greater the risk of falling off, so use your own judgment. If you’re just using it as an image source from which to print back onto regular film, this isn’t an issue.
One developing method might be:
Table 5.14 Developing Method
Developer D-19 |
20°C |
5 minutes |
Rinse |
<20°C |
15 seconds |
Any standard acid hardening or non-hardening fixer |
~20°C |
Until all milky areas are gone (or as gone as possible); ~2 minutes? |
Rinse |
<20°C |
1 minute |
Any hypo-clearing agent |
20°C |
2 minutes, if you dare! |
Final rinse |
<20°C |
5 minutes, or as long as you’re willing to risk it |
Hang to dry |
Please let us know how you do (or if you have any questions) if you try any of this, either by [email protected] on our research site! Happy emulsifying!