This chapter is about making photochemical films without cameras, or at least mostly without cameras. Back in the 1920s artist Man Ray first had the idea to put objects on top of photo paper and then expose that paper to light. He called these “ray-o-grams” and it wasn’t long before he experimented with doing this on motion picture film as well. You can see the results of such efforts in his films La Retour à la Raison (1923) and Emak Bakia (1926), both available online at www.ubu.com/film/ray.html.
Such efforts require access to film chemistry, a dark room and patience as the work is rather painstaking and involves a lot of trial and error. Needless to say, it didn’t catch on as a major strand of filmmaking either in the avant-garde or the mainstream. However, there are enough filmmakers who experimented with various darkroom printing techniques to warrant a chapter in this book. One of them, Austrian filmmaker Peter Tscherkassky, has become quite famous for his contact printing of found footage.
Contact printing in this context means laying already exposed and developed film onto unexposed (raw) stock and then shining light through it so that the image from the first is transferred or printed onto the latter. Tscherkassky has executed this in a very precise fashion with films such as Outer Space (1999), which is a reworking of The Entity (1981), a film starring Barbara Hershey. In Tscherkassky’s reimaging he prints both sound and image tracks onto the film, often layering them and creating overlapping fractured visions.
Whereas Tscherkassky works with a laser pointer and is very precise about his efforts, other filmmakers have employed randomness by simply laying film onto raw stock and running a small flashlight or cellphone over it. Steven Woloshen discusses in his book Recipes for Reconstruction (2010) how to create a contact printer with a sync block, rewinds, a cardboard box and a goosenecked desk lamp. Others, such as Steve Sanguedolce, have used a flatbed 16mm film editor as a contact printer (see www.stevesanguedolce.com/Interview.htm). Obviously any efforts in this regard require the ability to get a room completely dark and somehow controlling the spill of the light source so that the unexposed film and that which is already exposed are not fogged unintentionally. In my own experiments I have created a variety of somewhat workable solutions for this, including modified 100ft Kodak film cans (the black plastic boxes) by cutting a hole through the center for the spindle of the rewinds to go through, making a slit on the side for the film to come in and placing a small black flap over it to help with light spill. A set of these with two daylight spools inside to wind the film, as well as a fairly controlled light source, such as a small penlight with a snoot of black wrap or tape, is sufficient when working with slow-speed film such as Hi-con or 50D. I also use discs of neural-density (ND) filters and full blue to adjust the intensity and the color temperature.
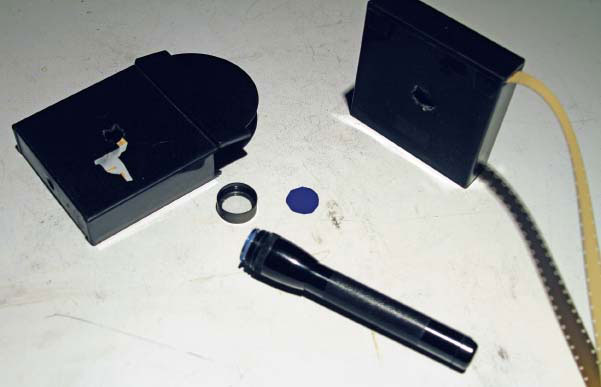
FIGURE 8.1
My homemade contact printing solutions: a small Maglite, discs of ND and full blue (the lens unscrews to allow me to place these). Also pictured is a set of 100ft modified film boxes that fit onto regular rewinds. They have a hole carved through them for the spindle to fit through and a small slit made in the side so that the stock can be pulled out and taken up. They work best if they are used with spring clamps.
What you will need
• A darkroom OR a dark room (see Chapter 5 if you don’t already know what I’m talking about).
• A small, controllable light source. I have a small Maglite into which I have cut so that ND and full blue filters fit inside the head (see Figure 8.1). This helps me control the amount of light. I also use my hand or some black wrap and tape as a snoot to control directionality and spill.
• Raw (unexposed) film stock. For your first experiments I recommend 7363—Hi-contrast black and white stock—as it is slow, fine grained and easy to develop.
• Something to create a shadow. This can be other film that you will lay on top of the raw stock, tacks, safety pins, whatever.
• A table to work on—you can work on the floor but, if you are like me, this hurts your back after a while.
• A processing can to put the film in as you expose it. I find a 1L can is big enough to put several strips in at once.
• Paper tape is useful but not necessary.
• Scissors.
The process
1. Get your workspace all set up, because once you turn out the lights you will be using your sense of touch to navigate it. Make sure you know where your shadow-making objects are, where your film can is, where your flashlight is and where your raw stock is.
2. Turn out the lights, wait for your eyes to adjust and make sure the room is light tight. If not, fix it.
3. Open up your film and lay it, emulsion side up, on the table. Film is wound so that the emulsion is on the inside, closer to the core. If you forget or you cut a strip and can’t figure it out, put the film between your lips; the side that sticks is the emulsion side.
4. Using the paper tape, tape the film in place, emulsion side up. Again, this isn’t necessary; maybe you could bring in a couple of paperweights to put on each end of the film? But if you don’t do something, the film will curl up and you want it to lie flat, emulsion side up.
5. Using your sense of touch, put the shadow-making objects on top of the film.
6. Using your hand as a snoot, turn on your flashlight and run it the length of the film then turn it off.
7. Take the shadow-making objects off the film.
9. Repeat with a new strip.
10. Once you have completed exposing your ray-o-grams and they are all safely in your film can with the lid ON you can turn on the room lights and go to wherever you develop your film.
11. Develop the film.
SUGGESTION: If you tried different exposure times or filters it works best to use different objects with these different filters (e.g. paper clips with a CTB filter, rubber bands with a CTB + .9ND etc.). Write down your variations as soon as you have turned on the lights so that, when you have developed the tests, you will be able to see which filter/lamp combo worked best.
CONTACT PRINTING WITH REWINDS AND SYNC BLOCK
What you will need
• A dark room.
• Rewinds with spindles.
• Sync block.
• Two spacers.
• Two spring clamps.
• Two daylights spools (one with unexposed film on it).
• Unexposed film—start with 7363 (Hi-con) for best results.
• Found footage that you want to print onto your film—on a reel.
• A take-up reel for your found footage.
• A controllable light source (see above/Figure 8.1) and a way to secure it over the sync block. Taping it to the arm of a desk lamp or goosenecked lamp is a good idea. I’m sure there are hundreds of DIY solutions!

FIGURE 8.2
An example of a ray-o-gram my students made of bolts on 7363—Hi-contrast stock.

FIGURE 8.3
An example of a ray-o-gram my students made of rubber bands on 7363—Hi-contrast stock.
1. Get your workspace all set up, because once you turn out the lights you will be using your sense of touch to navigate it. I put the daylight spool, a spacer, the take-up reel for found footage and a spring clamp on the right-hand spindle before I turn out the lights. I set up my raw stock and found footage, and make a couple of tape tabs to secure them on their take-up reels.
2. Turn out the lights, wait for your eyes to adjust and make sure the room is light tight. If not, fix it.
3. Put the raw film stock closest to you on the left-hand spindle, attach a spacer, put the found footage on the same spindle and put on a spring clamp. Then put both through the same reel in the sync block with the found footage on top and put two take-up reels on the right-hand spindle.
4. Use your tape tabs to secure the raw stock to the daylight spool and the found footage to the take-up reel.
5. Shine light onto the sync block spindle as you are winding the film from left to right. This method works best if you have an extra set of hands to hold the lamp OR you secure it so that it is in position. If not, you could fashion a snoot with black wrap and black tape, and hold the flashlight in your mouth. I have had reasonable results with this but it requires a bit of coordination and it’s a good idea to wrap some tape around the handle of the flashlight to provide a good place to bite. Another good solution is to tape the flashlight to the arm of a desk lamp or goosenecked lamp that you can position over the sync block.
6. Once you have exposed the film you can hand-process as you normally would.
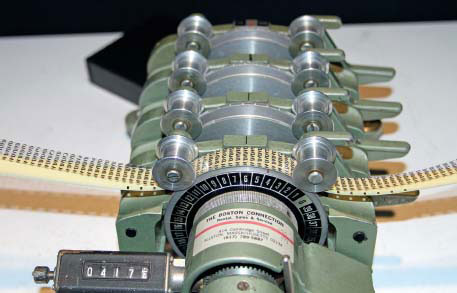
FIGURE 8.4
Titles have been printed onto clear leader with a laser printer. Then these titles are printed onto Hi-con stock by contact printing them on a sync block. Also see the film clip “Matt Shanafelt’s Jeanne” on the website.
I mentioned earlier that I used different filters in my flashlight. I cut them out of a swatch book for gels and experimented with different ones until I got something that worked. This involved a lot of testing on different strips of film and hand-processing them until I got the desired result. I highly recommend this for you as well. As you can see there are so many different ways that you can incorporate ray-o-grams into your cinematic toolkit. One of my students, Brendan Fields, took this idea of hand-printing and RAN with it. Instead of using a flashlight for a light source he used his iPhone. He created colored JPEGs in Photoshop and then used these to print on daylight-balanced color negative film. You can see the results on the website. The film is called Untitled #2 and what follows are his instructions for how he did it.
BRENDAN FIELDS—CONTACT PRINTING BY HAND: UNTITLED #2
Materials
• Hi-con 16mm.
• Ektachrome 16mm
• Color neg—7203—50D.
• iPhone.
• Bolex.
• JK optical printer.
• Filters for optical printer, 1 full blue.
• F-4 exposure .3 secs lamp at 90V.
• Black acrylic paint.
• Paint brush.
• Regular 8 × 11 copy paper.
What he did
1. Originally it began when he wanted to contact print on 35mm but this was short lived. He wanted 35mm to have more space on the frame to have image or mask. He was going to do ray-o-grams on 35mm but ended up painting cells (Figure 8.5) and shot them on 16mm with Hi-con for about 24 frames. He created 23 mattes (Figure 8.6). Then he hand-processed all the Hi-con.
2. Brendan selected colors in Photoshop, made them into JPEGs and loaded them onto his phone. His colors were red, blue, green, orange, purple and yellow. With each matte you could have thirty variations (Figure 8.7).
3. Then he contact printed onto Ektachrome using two colors as follows:
a. Cut a foot or so of Ektachrome (Figure 8.8).
b. Laid on splicer to line up with Ektachrome underneath, matte on top.
c. Exposed to a single color (Figure 8.9).
d. Removed matte.
e. Exposed to a different color (Figure 8.10).
f. Put them in a can.
4. Hand-developed Ektachrome strips.
5. He ended up with 102 short pieces of film.
6. With a digital camera he photographed one frame from each strip on digital and brought them into the final cut in a 24FPS timeline with music that had already been composed with a musician friend. He animated the frames to the music. This provided a “map” as to what frames to shoot for how long. So when he went to the optical printer he knew exactly how many frames to shoot of each image.
7. Brendan cut his own negative. He only had eleven splices including adding in credits and most of these cuts were in the credits. In the image there were only three edits to cut out a mistake and to splice a roll.
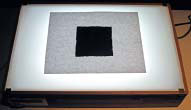
FIGURE 8.5
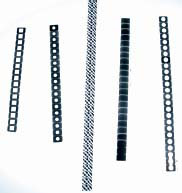
FIGURE 8.6
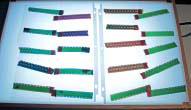
FIGURE 8.7
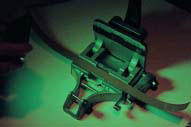
FIGURE 8.8
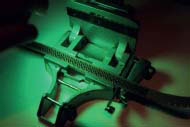
FIGURE 8.9
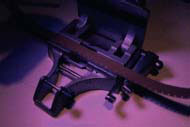
FIGURE 8.10
HALF-PROCESS
Half-process is a name I made up myself for a technique that results in the intentional and precise processing of reversal film as part reversal image (positive) and part negative image. It really should be called both process but calling it half-process helps me remember that I stop developing half of the film, partway through the process. I was first introduced to this process by filmmakers Anja Dornieden and Juan David González Monroy in their film Oro Parece (2012), although I have been told that Australian filmmaker Richard Tuohy originated the process. All of these filmmakers continue to work in and champion the use of celluloid, and are part of a worldwide network of independent, artist-run cooperative film laboratories. Richard Tuohy runs nano lab in Daylesford, Australia, and Dornieden and González work out of LaborBerlin in the German city of the same name. Please look at the artists’ websites at www.nanolab.com.au/richard_tuohy.htm and www.ojoboca.com for clips of their work and contact information.
The process involved hand-developing either black and white or reversal color film, and applying cellophane or paper tape after the first developer (and wash) and before the bleach. The film is then bleached and re-exposed to light (or chemically re-exposed), and then the tape is removed and the entire film is fixed. What results are areas of the film that are positive and others that are negative. If you look at the film Oro Parece (www.ojoboca.com/index.php?/film/oro-parece/) you can see that it is possible to be quite precise in the application of the tape. What follows are instructions for completing the half-process in black and white.
What you will need
• A roll of black and white 16mm or Super-8 reversal film that you have shot but not developed.
• All the chemistry, equipment and supplies to develop the film as reversal (see Chapter 4).
• A roll of cellophane tape—frosted is better as you can see it on the film and that makes it easier to remove. Paper tape also works and comes in more narrow gauges although it is more likely to fall off in the process.
• A light table is nice but not necessary.
• Some sort of cutting device, a blade, scissors, whatever you feel most comfortable with, to cut the tape to apply it to the film.
1. Put the film through the first developer and wash. It is a good idea (although not necessary) if you use a stop bath before the wash to stop the development of the silver halide grains in the film.
2. Hang the film to dry. At this point the film can be handled in white light as long as the developer is COMPLETELY RINSED OFF THE FILM. Otherwise you might get a little to a lot of solarization. Which could be cool, but might not be what you are going for.
3. Once the film is dry enough for tape to stick to it, apply tape to the areas that you would like to be negative images. You can work over a light box at this time. Basically there will be developed areas (black) and undeveloped areas (gray or white emulsion depending on what film stock you are using).
4. Once you have adhered tape to your liking, you can pick up the developing process where you left off—bleaching, washing and putting the film in the second developer.
5. After the second developer—STOP and carefully remove the tape BEFORE fixing the film.
6. Fix the film—converting all of the silver halide particles (the undeveloped film) to soluble silver thiosulfate that is washed off with the fix and the final washing.
7. Dry your film.
I began this chapter talking about Man Ray and I’d like to end it by talking about these artist-run film laboratories that have been popping up in the last fifteen to twenty years. The first time I was in contact with such a place was while doing my dissertation research for my doctorate in Anthropology. It was the late 1990s and I had an email discussion with someone working out of L’Abominable (www.l-abominable.org) in the suburbs of Paris. We had connected via the experimental film listserv frameworks, which remains one of the most vibrant and important online communities for experimental filmmakers, despite the frequent flare-ups and flamewars common to any such community (www.hi-beam.net/fw.html). Although I’m sad to say my notes are lost to time, when we exchanged emails the rationale for starting the (then relatively new) artist-run lab was that commercial laboratories were closing and that artists who wanted to work in film felt they had little choice but to create their own lab.
In 2012 I visited L’Abominable and a more recent self-described atelier of experimental cinema L’Etna, also in Paris, as part of a tour organized by the directors of the Collectif Jeune Cinéma. Both laboratories had a variety of equipment reappropriated from the commercial film industry in the region including bath processing tanks, contact printers, animation stands and telecines, as well as hand-made solutions to small-batch processing including a hand-machined 100ft reel for 16mm process and a film dryer made out of a salad spinner. At L’Abominable they process both color and black and white film on a regular basis. As of this writing there are over thirty small labs like this in the Americas, Europe, Australia and Korea (www.filmlabs.org/index.php/labs/). Most are unlike conventional labs in that, in order to get your film work done, you must become a member and actually do some or all the work yourself. All of them focus on small-gauge, Super-8, Regular-8 and 16mm film, and personal, artistic, artisanal production. Thus they are all comrades in arms with the author of this book. Through necessity and a desire for freedom to practice their work, the artists have taken control of the means of production and created a vibrant and nurturing alternative to working through/with the institutions of commercial cinema.
This is, of course, a large part of what this book is about. Many of the people whose work I discuss and all of the individuals I interview are associated with me in one way or another through mostly informal networks and friendships developed over many years and long distances. Some of them I know through my position teaching film at Emerson College. Some of them I met while in graduate school or at film festivals, or through friends of friends. I write about their work because I find it as well as them inspiring. The woman whose interview ends this chapter, Lauren Cook, was a student of a friend of mine, Sasha Waters Freyer, while she was teaching at the University of Iowa. Lauren went on to teach at the University of Hartford where she is currently the Program Director. Although I might have met her prior to this, in 2006 she organized an international conference Feminism(s): Film, Video, Politics at which I spoke and where she showed her own work. I became an instant fan of her hand-made cinematic style and when I saw her 2012 cameraless film Pxxxl I knew she had to be in this book (see the film on the website). What follows is an interview with Lauren in which she discusses her work.
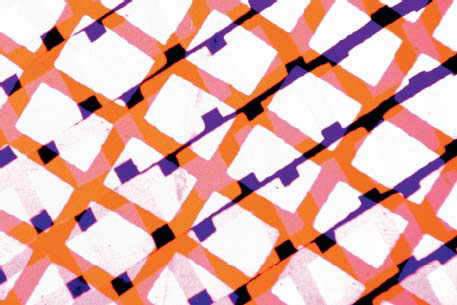
FIGURE 8.11
Film still from Pxxxl by Lauren Cook. Courtesy of the artist.
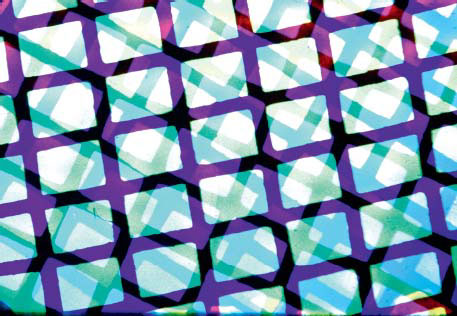
FIGURE 8.12
Film still from Pxxxl by Lauren Cook. Courtesy of the artist.
INTERVIEW WITH LAUREN COOK
Kathryn Ramey: So—a general question to get the grease flowing—do you consider yourself an artist, a filmmaker, a new media practitioner, a shaman, a performer? How do you describe who you are/what you do to your aunt or the old guy next door? Or children? Yourself? Your friends? Or do you even try?
Lauren Cook: I consider myself an artist. Although, when people ask, I usually just say I’m a professor because that’s an easier thing to explain. When people ask what kind of films I make, I usually say abstract films. Most people have no idea what an experimental film is and I also don’t really like to limit the idea of what type of film I’m making. I’m more and more frustrated with the label of experimental because I think it actually inhibits creativity and new approaches. Once you create a mold, people contextualize their work in that way and build upon previous forms. This can be a great thing when people push forms in new directions. It can also create barriers as well by making work inaccessible and field-referential. I see so much experimental work that only really has an impact for people who are in the know and understand its references and process. I like to create films that engage both in an experimental context, but also with any person who watches them. I have a personal test for work where I imagine how a particular friend would view a particular film. This person is an intelligent person who is interested and curious. She’s been to museums, but isn’t completely versed in theoretical underpinnings of each particular artistic movement. She’s probably seen some interesting YouTube videos, but hasn’t been to an experimental film festival. I feel like she’s the perfect litmus test for someone who I want to be able to engage with my work. I don’t think that you need to dumb work down or conform to make a film that has multiple entry points for different viewers.
KR: How did you come to your particular practice? Did you develop your own processes as a series of experiments? Where did the ideas come from? Does your form and method change as you go and, if so, where have you been and where are you going?
LC: For me, making experimental films is a political act. I worked on big-budget commercials in LA during 2002–2003. I quit a really great full-time job in LA the day I witnessed two little girls brushing each other’s hair discussing whether or not they were pretty enough to be in a commercial while waiting for a wardrobe fitting. Shortly after, I saw my first experimental film and it opened my eyes to the possibilities of the moving image as a form of protest and revolt. That’s when I started making my own films.
Generally, my films are responses to events or experiences that have struck me in a particular way. Like celluloid, we are all struck by the totality of our experiences with the world. With film, the result is 24 frames per second. With people, a lifetime of experience comes out in everything we do. I like to imagine my actions as one really long exposure sometimes. You see these long exposure shots of very busy places sometimes where the streets are just blurs and only the buildings remain visible. Moments come and go, but there are thoughts and concepts that remain constant enough to be like those buildings in the long exposure of our lives.
I mostly became interested in darkroom process because I don’t like waiting. The idea of sending work out to labs and the lack of immediacy felt like such an inconvenience. This didn’t make me want to stop using film though. It just made me want to process it myself! I got some photocopied papers that were passed around by filmmakers and then later was able to get my hands on Recipes for Disaster. I also did a ton of internet searches about different chemicals and ways to do certain processes. Over time I processed black and white negative and reversal as well as E-6 color. I’ve tried to cut down on this somewhat though recently because I partially lost my sense of smell and somewhat taste for a while once after processing color. Darkroom safety is really important and something I wish I learned more about when I first started making this kind of work.
KR: What role does media/technology/tools play in your work. What is the relationship between the media/tools and what your work is about? Is your work about something(s)?
LC: Altitude Zero was very much about that experience I had watching the two girls. I felt responsible for helping to create this idea for them that they had to be perfect. I thought a long time about what I could do as an individual to do anything different. In a capitalist society where the goals are always more, newer and quicker, how can you do anything to prevent those girls sitting there in that moment and questioning their own value, looks and identities? That’s what made me start actually destroying found images of women performing for the camera. I wanted to create some sort of filmic Frankenstein or palimpsest that showed what was behind the image. I wanted to make the viewer uncomfortable watching something that was created to give them pleasure. I also wanted the work and painstaking process of cutting and pasting each frame to be very evident in the product. I guess it’s like ritual of any other kind or perhaps some form of penance. I cut the frames and bleached them each night and thought about the many views: my own, those girls, the women in the images, and the eventual audience and eventually the film came together.
HandMade is about this idea of film being “dead”. I went to graduate school at a time when schools were throwing all their film equipment in dumpsters. There was this shift taking place to the digital formats because it was seen as cutting-edge, cheaper and faster. I thought it would be fun to try to create a film using 35mm (because it’s the format that was/is dying out in movie theaters) in the cheapest way possible, but make it something that couldn’t possibly be made with a digital format. The total cost ended up being under $300. I used three strips of found footage, a heart, focus leader and a hand, and spent days in a dark room contact printing them onto Hi-contrast film. I used several negative/reversal/solarization processes to create enough strips of film. I scratched a soundtrack onto the portion of the film that would normally have an optical track. Then I used a gang-sync and flashlight to make a print. I specifically didn’t fix the print because I knew it meant that the image would eventually disintegrate from the celluloid. I plan on rephotographing the process each ten years that I’m alive. Even if it is eventually only a clear strip, the power of the film is in what was only once there. It’s a film about technology not being rooted in the new, but being about innovation with all tools and forms.
Pxxxl is also about the turn to the digital. I noticed that many artists in film and other mediums, like painting and photo, began using digital glitches to disrupt their images. The whole fetishization of the digital was fascinating to me and seemed to be a really interesting representation of capitalism. Digital glitch is an interesting marker. It can’t actually exist without its host image, but is also something unique. It’s an artifact, time stamp and an error all in one. I wanted to create a film that looked digital using technology that has been available for over one hundred years. Even though a filmmaker could have created Pxxxl one hundred years ago, they never would have because pixels didn’t exist. For me Pxxxl is sort of like a time glitch. I also think it would be impossible to create this film by digital means. The photographic process couldn’t be replicated by digital means. Even simple digital layering never looks as good to me as multiple exposures on film.
I made Pxxxl entirely in a color darkroom—meaning no red light like the one that can be used with Hi-contrast black and white development. I used Super-16 color print stock that has the same speed as color photo paper. I made contact print tests on photo paper first to get my timing down. Then I printed small strips of the print stock about a foot at a time. I built a set-up that allowed the rest of the film on both ends not to be exposed. This allowed me to only expose about a foot at a time. I used several screens to create grid patterns and created many different colors through layering color on the film and thinking about how multiple color exposures would look as I removed and added the grids. I wanted to get contrasting colors and not end up with just black from exposing the film too much. I also used hand-made lenses that allowed light to filter through in certain patterns. I used some jelly bracelets that had a grid pattern. I’m attaching an image because it’s a little confusing (Figure 8.13). I don’t have the actual ones I used currently with me or I’d just take a photo of those. They are in my office at school. I painted them with several coats of black and then cut the tips off of some of them so that I could use them to project light through some parts and not other parts. I call these lenses because they guide the light to create various patterns of images and are actual 3D objects. I also thought about the grids I used and made sure that they were a certain size to where they would auto-animate from frame to frame. You see Man Ray’s contact-printed film La Retour á la Raison, where nails flash by and the tacks remain in the same position in the frame. When Man Ray arranged them in exactly the same position on each frame with only a tiny bit of motion, the tacks seem to move on their own whereas the nails appear to stay motionless as we see them flash on the screen. I’m doing the same thing in Pxxxl that Man Ray did with the tacks, but with screens that hit in nearly the same place each frame. The slight difference in location from one frame to the next creates motion of each individual square. I created different motion by changing the screens in different ways. It’s really just math. It sounds simple now when I explain it, but it took me a couple years of research, trial and error to make the film.
KR: Where do you show your work? How do you want people to experience it? Is there a relationship between the form that your work takes and your desired venue/audience?
LC: I show my work in film festivals, galleries, museums and on the internet. Every film I make is available for anyone to watch online. I also recently did an animation film tour called Women with Knives with two other filmmakers where we played venues like music halls, galleries and outdoor spaces. The goal was to broaden our audience and show our work in venues outside traditional experimental film contexts. Many of the people who saw our films on this tour had never seen an experimental film.
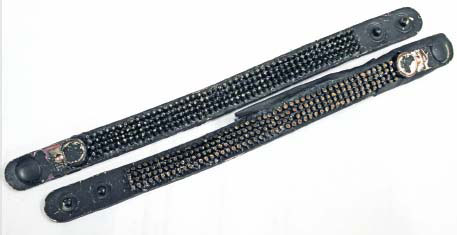
FIGURE 8.13
Lauren’s jelly bracelet lenses for Pxxxl. Courtesy of the artist.
KR: You’ve organized symposia, participated in screening tours, all kinds of things. Can you talk about the role these various communities and your participation in them plays in your work?
LC: I like to think about curating events as being very similar to making a found-footage film. The organization and way a program of work is put together is much like editing. More and more younger filmmakers are starting local screening series and festivals. Sight Unseen in Baltimore, Big Mama’s Cinematheque in Philly, Unexposed in Durham, and Contraband Cinema in Atlanta are all great examples of a few people organizing successful screening series and hand-made filmmaking workshops. It doesn’t take a venue or money. You can set up in a bar on an off-night or in your basement. Use whatever you’ve got in your town. You don’t have to go the movie theater route. Ask filmmakers if you can show their work or look for people traveling through on tours. Most people just want to get their work out there. Don’t be afraid to email and ask people if you can show work you like. Borrow a projector and bring it to the masses!
By creating events, you can build a community for your work and the work you like to watch. So few people have seen this kind of work. I know for me that it changed my life and I hope to give other people that opportunity to really see from a new perspective, outside the commercialized view of industry and narrative work.
Lauren’s assignment for you: curate a film screening
1. Decide on which films you want to show. Many filmmakers will let you show their work if you just send them an email and ask. Don’t be afraid to get in touch with people whose films you like. Think about specific films that might be of interest to the people you want to come.
2. Book a venue—it can be a backyard, garage, basement, bar, classroom or even a concert venue. If you’re using a residential space for your venue, just give your venue a name and put a sign up before the event so people know they are in the right place.
3. Write a press release. If you’ve never done it before, Google “how to write a press release”. Writing a press release is an art form and can make or break any event. Send it to your local media. See how many papers/radio stations/online sources you can get to cover your event. Sometimes they will publish your press release as an article, put your event in the calendar section, or they might write something on their own.
4. Promote your event in other ways with flyers, social media, telling everyone you know, etc. If you start with screening local filmmakers, their friends will come and you have an audience. You can build from there and send out notifications for each event to build your following. If this is going to be an ongoing series, give your microcinema a name so people recognize your events.
5. Get a projector. Some venues will have a video projector in their space. If not, see if you can borrow one. Sixteen millimeter and Super-8 projectors are cheap on eBay, and can sometimes still be found at thrift stores. [Author’s note: another great place to check are college, university or industry “surplus” stores. When I lived in Seattle, I got all kinds of weird stuff at the Boeing surplus store! My friend John Freyer used to pick up weird stuff at the University of Iowa surplus store. Once we found a film printer there!]
6. Get everything together ahead of time. Make sure you have all the files/films/prints well ahead of time. Don’t wait until the last minute to build a timeline of files for your screening.
7. Do a run-through rehearsal. Make sure you have all the technical kinks worked out so that you don’t get delayed with your start and annoy your audience.
8. Have fun, meet new people in your community, bring underground cinema to the masses!
[Author’s note: also, any time you get together it is a great idea to invite folks to bring refreshments (unless the venue forbids it).]
Reference
Woloshen, Steven. Recipes for Reconstruction: The Cookbook for the Frugal Filmmaker. Self-published, 2010