Even if they stop manufacturing film tomorrow, the world is full of already shot film in a multiplicity of gauges that has been abandoned, thrown on the trash heap and is ready for you to repurpose and make into a piece of art. You may use a piece of found footage because it has a kind of inherent beauty that you want to use as the building blocks for your movie. You may use a piece of film because it has content either visual or aural that you want to repurpose either to highlight what the film is doing overtly or to comment on what you see as its subliminal message or the hierarchies of power that you may feel the film supports. What I mean by subliminal message is the message(s) behind or underneath the overt “text” of the film—the message behind the message. What I mean by hierarchies of power is anything that you see in broader culture, sexism, racism, homophobia, transphobia, ageism, etc., that helps to keep some people in power, making decisions and hogging all the resources and keeps other people feeling like they have little impact on the way things go and without enough money, food or freedom. There are many great found-footage collage films from the history of cinema that set a precedent for the repurposing and redirecting of found footage. Some of these are politically charged and critical of the mass media from which they draw the material with which they are made. Some artists make use of found footage as a textural element. The title of this chapter is called “Film-destroy” because in order to make a new work all collage films have to cut up another film or films. In addition, this chapter will discuss other techniques of deconstruction that have been employed by filmmakers such as bleaching, scratching, baking, rotting, molding, boiling, cutting up and gluing.
Before we begin to look at destructive techniques used with found footage I want briefly to introduce you to the theories and histories associated with its most radical use. Most of the time film that was shot by someone else and repurposed is called “archival film”. Archival film usually comes from archives where it is catalogued according to location represented, content, who shot it, where it originally was used and so on. When a filmmaker uses found footage in this way they call it “archival” and it is used as proof of this or that historical occurrence, or to reference a place or time or person. In other words in general it is used entirely uncritically of its status as an image. When footage is used like this it is most often without any substantive critique of the content or the media being used, or the corporate machines and/or patriarchal nationalist regimes it is used to shore up. It is used as proof of something that the filmmaker believes really happened or to indicate a “there-ness” or a “then-ness” for a story that the filmmaker is telling. An entire industry in the form of archival houses has emerged to support the mainstream media’s need (feature film studios or television) for this kind of material. In addition, almost all studios and networks keep their own archives of their materials and charge a pretty penny for its use in other people’s projects.
The business of an archive is to collect and catalogue media according to type. Then when someone is looking for, say, images of Mt St Helens erupting in 1980 or the riots in LA in the 1990s or Barack Obama’s acceptance speech, someone has it somewhere exactly how they want it. The United States even has a national film archive where all kinds of footage are catalogued and preserved including home movies. The point of me talking about archives and the ways in which the majority of filmmakers use them is that most filmmakers who use archival footage use it as a document, proof of the thing they are trying to illustrate without any real analysis of its status as an image. In contrast, when most experimental filmmakers use found footage at the very least they are engaging in the artistic process called assemblage, which here means putting together media used in other contexts to create a new meaning. In addition, many assemblage filmmakers are working to subvert the dominant paradigm, the hegemonic discourses present in the unholy triad of media, state and civil society institutions. At least that’s what they hope for. For an excellent analysis of the difference between archival footage and the avant-garde use of found footage, particularly in the work of Craig Baldwin, please read Michael Zryd’s essay “Found Footage Film as Discursive Metahistory: Craig Baldwin’s Tribulation 99″.
So, what specifically am I talking about? Well the idea of the artistic use of the found object in modern art really goes back to those crazy Russian and European avant-gardists from the early 1900s. Assemblage is the artistic practice begun in various modernist art movements of the 20th century of taking a found object (objet trouvé) and using it as a part of your work of art. Dada artist Marcel Duchamp took this idea so far that he began exhibiting the objects themselves. Coined “ready-mades” his most notorious work was to exhibit a signed urinal titled Fountain and signed by one of his many aliases, “R. Mutt”. The custom of using material objects from the everyday world became a part of artistic practice throughout the 20th century and continues to this day.
Born in Queens, New York, and living his entire life with his mother and ailing brother, American surrealist artist Joseph Cornell was one of the film artists to use this idea of assemblage and cross over into film. Cornell is, of course, most famous for his “boxes”, beautiful sculptures created sometimes in homage to a screen siren he was enamored with such as Lauren Bacall (e.g. Untitled—Penny Arcade Portrait of Lauren Bacall, ca. 1945–1946) in which he used cuttings from movie magazines and other objects. Cornell was an obsessive junker. He trolled the pawn shops and junk stores of his day and picked up all kinds of materials, movie magazines, films, records and objects that he would use in his work. He made a number of short films from editing together this found footage but his most infamous contribution to the field was only briefly seen in the early days of cinema and then scuttled for decades. In 1936 Joseph Cornell premiered his found-footage collage film Rose Hobart in a New York art gallery (Figure 1.1). Cornell had taken the feature film East of Borneo starring Rose Hobart and taken selects, mostly the shots containing the actress, and re-edited them. When he screened it he would put a blue glass filter over the lens, show it at 18FPS (silent speed) and play it with two songs from Nestor Amaral’s album Holiday in Brazil. Both the album and the film had been purchased from a junk shop. At a screening the film so upset Salvador Dali (one imagines it was because he had not thought to make such a film first) that he knocked over the projector and accused Cornell of stealing the idea from his dreams. Cornell was so disturbed by this outburst that he refused to show the film again until he was coerced to do so in the 1960s by filmmaker and avant-garde champion Jonas Mekas.
American artist Bruce Conner is best known among cineastes as a filmmaker but he also produced assemblage sculptures, including Arachne (1959), which resides in the Smithsonian Museum of American Art in Washington, DC. The piece is a collage of thickly woven women’s stockings and other found material. It was Conner’s artistic practice of working with media objects as well as his interest in photography and critiquing media culture and the systems of oppression it supports that brought him to using cinema. Bruce Conner’s 1958 film A Movie has become the classic example of found-footage collage in which the media is reused to critique mass media’s impact on American culture and society. Conner’s film REPORT (1964) reworks the film of the John F. Kennedy assassination that he filmed off of the television. The film critiques the way in which the media, by repetitively screening the footage of the event, was benefiting by turning the tragedy into a spectacle. New York filmmaker Ken Jacobs’s epic Star Spangled to Death (1960, 2004) combines staged scenes with legendary performance artist Jack Smith among others with found footage that, as Jacobs himself attests, “pictures a stolen and dangerously sold-out America, allowing examples of popular culture to self-indict” (Jacobs 2014). This repurposing was never considered plagiarism by the artists, rather, a strategy for attacking dominant culture by repurposing its own weapons (media).

FIGURE 1.1
Film still of Joseph Cornell’s Rose Hobart (1936).
French filmmaker and philosopher Guy Debord founded a political and aesthetic movement called Situationalism in which detournement or “turning expressions of the capitalist system against itself” (Debord 1983: 207) was a central technique. Debord’s feature-length film Society of the Spectacle (1973) was composed entirely of found footage from fiction and non-fiction films. US filmmaker Craig Baldwin was inspired by Connor, Debord and Situationalism, and made several collage films including Wild Gunman (1978), RocketKitKongoKit (1986) and Tribulation 99: Alien Anomalies Under America (1991) that used extant fiction and non-fiction films to make hilarious paranoid rants that simultaneously mirrored the discourse of the cold war and American imperialism and criticized it. Baldwin calls this technique of using the tone of the conservative political regime in critiques against it as “point right and go left”. This is a technique also employed by various punk rock artists. One of the earliest of these, Jello Biafra of the band the Dead Kennedys, wrote a number of songs such as “Kill the Poor”, “Holiday in Cambodia” and “California Über Alles” that used the language and tenor of the far right to critique it. All of these artists not only critique the way in which media creates a passive consuming subject but also activate the viewer to recognize their own passivity in viewing.
Jane Fonda on the screen today
Convinced the liberals it’s okay
So let’s get dressed and dance away the night
While they: Kill kill kill kill kill the poor: tonight
“Kill the Poor” (1980) by Jello Biafra and East Bay Ray (writers) and the Dead Kennedys
Using found footage as a means to critique dominant culture and the media industry that supports it has become a strong facet of the film avant-garde. As we go through various destructive techniques that can be used of found footage you will also see how artists have used these techniques to subvert the intended message in the media they are manipulating.
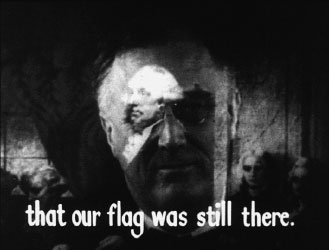
FIGURE 1.2
Still from Ken Jacobs’s Star Spangled to Death (1960, 2004).
The most basic intervention you can make into a film besides editing is scratching. Normally we try to avoid scratching the surface of the film. Scratches are seen as mistakes or worse. But early on in filmmaking artists started to acknowledge scratches as interesting marks on their own. In Fireworks (1947) Kenneth Anger used scratching on film as a means to draw a halo around a character. Stan Brakhage used scratching in his early live action work as well and would go on to experiment with all kinds of surface manipulation, scratching his signature “by brakhage” at the end of most of his films and creating entire series of films that were primarily abstract scratching. Len Lye’s film Free Radicals (1958) is a film created with abstract scratching that is made to sync with a song by the Bagirmi tribe. In Blinkity Blank (1955) Norman McLaren created a more representational film about a bird and its cage by scratching directly on 35mm celluloid.
In Cathy Joritz’s Negative Man (1985) a film of a man giving a sermon is disrupted by the artist scratching directly into the emulsion. These scratches take the form of symbolic interventions into his masculine authority as he is alternately given a pig’s snout and ears, a Mohawk, a fish on his head, beams streaming from his eyes and other mutations. These alterations serve to undermine the authority of the speaker and serve as a metacommentary on the authority certain kinds of men feel they have to tell the rest of the world what to do. Joritz calls the film “humorous vengeance” and says she is scratching her commentary directly into the celluloid (Joritz 2015). Another Joritz scratch film, Give AIDS the Freeze (1991), conveys messages about the importance of safe-sex practices scratched over a rather banal image of two men talking. In this film messages such as “Guys don’t forget the condom” are etched directly onto the 35mm film, which is then rephotographed on an optical printer.
In Two Sisters (1991) Caroline Leaf etched figures and scenes into 70mm black light-struck celluloid. She explains on her website that she digs into the soft emulsion side of the film with a variety of tools. Because the film is color, the dense black isn’t really black, but is actually the three layers of emulsion that comprise color film. So when you carve through it various colors are revealed, mostly yellow and green. It also appears as though Leaf painted directly on the film in a key sequence where a man who visits the sisters cuts his finger and blood fills the frame. Color was added during the printing process in the swimming sequence so that the black areas appear blue. Leaf uses a registration plate with a light box that appears to be specially made for her purposes so that her images gradually reveal themselves to her as she cuts into the film.
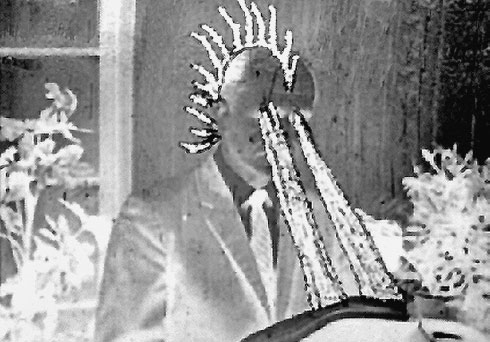
FIGURE 1.3
Cathy Joritz’s Negative Man (1985), Eye Light Beams.
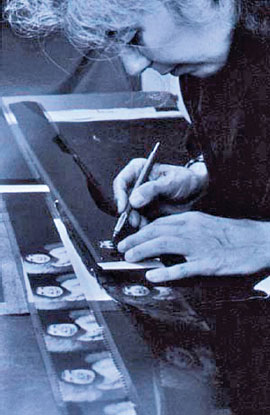
FIGURE 1.4
Caroline Leaf at work on Two Sisters (1991).
These are only just a few of the examples of how scratching or etching into the surface of film has been used by filmmakers. Other filmmakers have used blades and punches to cut out sections of the film frame. Sometimes these punches and cut-outs are inserted into other sections of film. In Girl from Moush (1993) Gariné Torossian cuts out Super-8mm frames, of what look like family images and home movies, and inserts them into a 16mm frame that has a cut-out of relatively the same size. She also cuts strips of 16mm vertically and then tapes that onto the film. She does this as a way to represent the fractured reality that is her family’s relationship to their lost homeland, Armenia.
Luther Price’s Sodom (1989) uses found Super-8mm hard-core male-on-male pornography as its source material to retell the biblical story of the doomed city. The film is altered using hole punches and awls to take out images that are taped back into other areas. Heads spin around and mouths are gouged out. For many viewers it is a very graphic and disturbing piece but the animation technique is quite stunning.
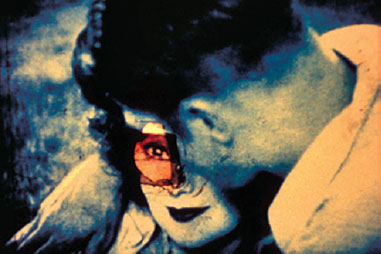
FIGURE 1.5
A frame from Lauren Cook’s film Altitude Zero in which part of the 16mm film frame has been cut out and another image inserted. Held in place by tape.
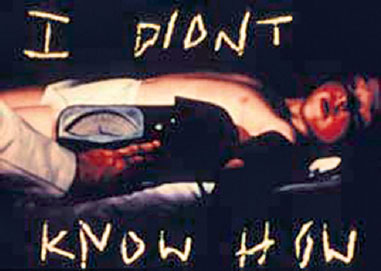
FIGURE 1.6
An image from Altitude Zero in which the text is scratched on the frame.
Lauren Cook’s film Altitude Zero (2004) is an exuberant exploration of found-footage collage, cut-out, painting and dyeing the film. The film is both a celebration of Amelia Earhart’s achievements and a criticism of the way that women are objectified and participate in that objectification in American history. Shots of beauty pageants and women’s bodies being judged while their faces are obscured and beautiful baby contests are interspersed with footage of Earhart. Cook scratches her lamentations directly onto the film, how she wants to be “more like her” (Earhart).
Another example of utilizing found-footage collage is Steve Cossman’s TUSSLEMUSCLE (2007–2009). Steve collected thousands of View-Master reels that featured flowers. View-Master images were shot on 16mm film and then cut and inserted into their cardboard cartridges. When Cossman discovered this he decided to collect View-Master reels via tag sales, junk stores and online sellers such as eBay and categorize them. TUSSLEMUSCLE is comprised of over 7000 individual frames held together with splicing tape and then rephotographed with an optical printer to create a projectable film. A sample of it is available to view on our website.
Steve Cossman describes TUSSLEMUSCLE as follows:
The work presented is a reflection on humanity’s ecological relationship and the ritual of restoration. Power is drawn from the colors and forms of the discarded flower image through the use of pattern and rhythm.

FIGURE 1.7
Steve Cossman’s TUSSLEMUSCLE (2007–2009)—a collection of View-Master flowers.
The violent pulse speaks with a sense of urgency and chaotic struggle while the hypnotic arrangement keeps us in blinding awe to its condition. TUSSLEMUSCLE is composed of 7000 single frames, which were appropriated from View-Master reel cells. Each frame was hand-spliced to create a linear film. Jacob Long created the score.
TUSSLEMUSCLE took over three years to make and was an extraordinary combination of abstraction and the rigorous application of organizing principles that began, like Cornell so many years prior, with collection. Cossman collected vintage flower-themed View-Master reels. These reels were originally shot on Kodachrome 16mm, but with a square aspect ratio using a third more film vertically than a traditional 16mm cine frame.
As he had found a significant number of duplicates these were organized into envelopes. He ended up with over 200 different images and with 14 to 240 frames of each image. These were sorted into various envelopes with the image on the front and organized. Inspired by musical and numerical patterns he generated a “script” for the process and determined what flower would stand in for what part of the script. Then he began an editing process that was both laborious and extremely structured. Every frame had to have that extra third trimmed and then be spliced to the next frame.
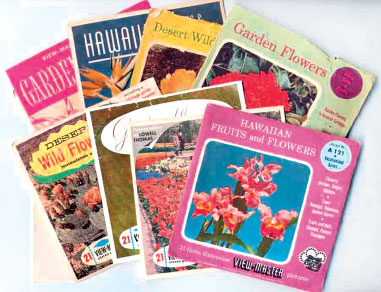
FIGURE 1.8
A sampling of packaging from the View-Master reels. Courtesy of Steve Cossman.
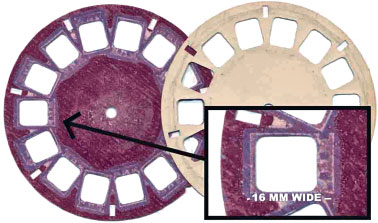
FIGURE 1.9
View-Master films are 16mm wide. Courtesy of Steve Cossman.
As you can see there is a myriad of really creative work out there that is made by distressing and cutting found footage. There are a number of tools that are ideally suited for this and various artists have their favorites, but at minimum you will need the following supplies.
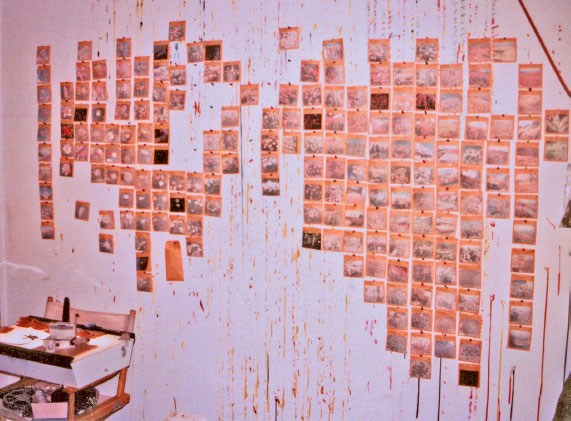
FIGURE 1.10
Steve’s wall of work. Courtesy of Steve Cossman.
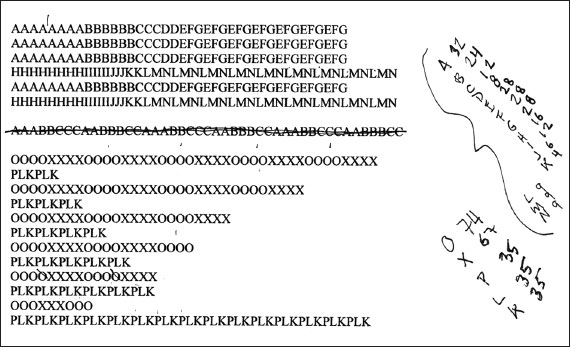
FIGURE 1.11
The score for TUSSLEMUSCLE (2007–2009). Courtesy of Steve Cossman.
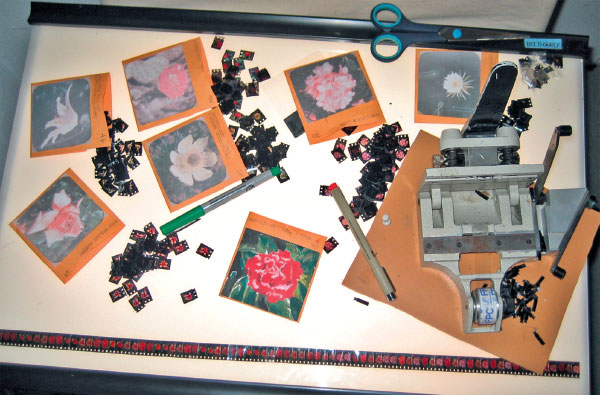
FIGURE 1.12
Steve’s light table with splicer. He trims each frame top and bottom. Courtesy of Steve Cossman.
WHAT YOU WILL NEED FOR FILM-DESTROY
• X-Acto or other blade. X-Actos are good because you can purchase a variety of nibs that can allow you to cut in different ways. Curved blades with practice can be wielded to cut through just part of black struck color film. Because color film is composed of three layers of color, this means you can carve different depths and show different colors. This takes practice! Also, for cutting you will need to change your blade fairly often as film dulls it.
• Small sharp needles or pins. If you go to a fabric store you can pick up a whole box of really sharp pins (used for holding fabric in place while sewing) and/or really thin, really sharp sewing needles. The latter can be a bit difficult to hang on to so it’s not a bad idea to embed them in some clay or an eraser to make them easier to hold.
• Hole punches. These come in a variety of sizes and shapes of hole punches including hearts and ones that look like dashes. It is best to get punches in which the dowel (the part that punches) is vertical on the sides and doesn’t bend in. The ones that bend in tend to leave rough edges on the punches.
• Tape and tape splicer. There are a whole bunch of different kinds of tape splicers out there and if you are a serious filmmaker you will want to get one. They are frequently available for sale on eBay.
• Fantastic™ or other very alkaline soap. While not as powerful as washing soda (pH 11) soaking your film a bit in Fantastic will soften the emulsion. Spray on a few feet at a time and keep wet with a sponge or mix up a small batch of water and soda ash, and sponge on a few feet at a time. The emulsion will be soft when wet and then harden again when dry.
• A light box or table or some under-lit surface that you can work on and see your film through. There are a number of DIY instructions for how to build your own on the web. When I started working I used a window that received lots of sun for most of the day with a piece of vellum on it! Later I trash-picked a window and a clamp light and, with some bricks, that same piece of vellum, wood and clamps, made my own inclined light table. Now I have a fancy, daylight temp, non-flickering animation table that is more portable and storage friendly.
• Found color or black and white of any gauge (bearing in mind that the larger the gauge the bigger the working surface).
• AND/OR black color or black and white “light struck” film (film that has been developed but is optically dense). It IS NOT painted leader. Emulsion is soft and easy to scrape off. In addition, color film has interesting layers to carve through. This is a great use for all those films that you may have already shot that were underexposed!
It is extremely helpful if you have a splicer for the gauge of film you are using. A film splicer is a device that sutures two pieces of film together. There are three general types of splicers: electromagnetic for polyester-based (Estar) film, glue splicers for permanent splices on acetate-based film, and tape splicers, also for non-permanent editing on either acetate- or polyester-based film. There have been splicers made for all gauges of film manufactured, because, almost from the beginning of motion picture production, films have been shot to be edited. Electromagnetic splicers are very expensive and predominantly used by labs because NO camera stock or workprint stock is Estar based. Glue splicers are predominantly used for negative cutting. If you’re going to be working with film it makes sense to get yourself some kind of tape splicer.
Since filmmaking used to be a relatively popular hobby there are plenty of splicers available on eBay or in thrift stores. The two most popular professional tape splicers for 16mm film (also available in 35mm gauge) are colloquially known as Guillotine and Rivas (type). Called a guillotine for the way it cuts the tape after an edit is made (I’ll leave it to your imagination) by far the most well-known and used 16mm and 35mm splicers were manufactured by Doctor Leo Catozzo of Rome, Italy (see Figure 1.13). Guillotine-type splicers were also made for Super-8mm and Regular-8mm editing. These can be purchased online from a variety of resellers including Boston Connection (www.cutfilm.com) and eBay. Guillotine splicers use unperforated, clear Mylar tape. As tempting as it is, do not use Scotch tape, because it is thicker and weaker than Mylar tape and won’t stand up to being put through a projector.
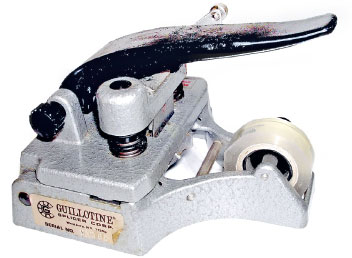
FIGURE 1.13
A guillotine splicer. To edit film, the tape is clear and unperforated.
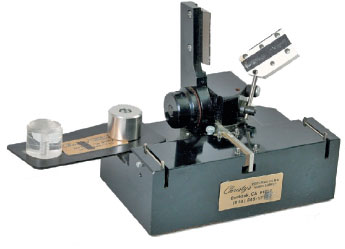
FIGURE 1.14
An Invisio 16mm film and audio butt splicer. It is nearly identical to the Rivas splicer, although a Rivas generally has framelines where you lay the film to aid in finding your splice. Rivas-type splicers use sprocketed tape and it must be cut and applied directly to the film.
The Rivas type splicer (Figure 1.14) uses perforated tape that is laid down over the splice area so as to line up with the sprocket holes on the film. Many people, the author included, find this kind of splicer extremely difficult to use. Other people swear by them. They are slightly more expensive than Guillotine splicers and the perforated tape is three to four times more expensive than Guillotine tape. Proponents of this type of splicer say you use less tape and that the splices are cleaner.
Other tape splicers use press tapes, pre-cut tape strips of sprocketed tape that are easy to apply but extremely expensive. You can also purchase block splicers that have sprockets to line up the film and a groove to cut film at the frameline. These would also require press tapes or sprocketed tape.
THE PROCESS
Once you have all your materials collected you can begin to experiment. In order to scratch the film it must be emulsion side up. You can only scratch into emulsion not base. The emulsion side is usually more matte than the base side of the film. If the film has images you may even be able to see that the images are slightly raised on the emulsion side. Film orientation is important here. Film that is single sprocket will be emulsion side up when the sprockets are on the left. You will want to work top to bottom and left to right for your film to project properly. You will only be able to work on short segments at a time. Sound film is 24FPS, whereas silent is 18FPS. And most projectors only run at sound speed. So to make one second of images you will need to alter 24 frames. A great way to see your progress as you go is to create a loop of 5–6ft of 16mm film and then load it into a slot-load projector. You make a loop by editing the head of the film to the tail.
HOW TO MAKE A FILM LOOP
First, in order to project a film loop you must have a slot-loading projector and a film splicer of some kind. All the major manufacturers (Eiki, Elmo, Bell & Howell) made slot-loading 16mm projectors. These are essential for testing out film loops because you can thread the loop into the projector without having to cut the splice. You can also test a film loop on rewinds with a moviescope viewer or on a flatbed. The length of the loop will be determined by how much film needs to be threaded through the machine in order for it to come back and rejoin itself at the splice.
The easiest way to determine the length that your particular viewing set up will work with is to take some leader, thread it through the system, splice it and then try to get the system to run. You want to try this with leader that you don’t care about in the event that it jams or breaks. In all systems, the use of daylight spools or cores will facilitate the loop threading through the path smoothly. Often it helps to put just a little tension on the loop by holding the loop between your fingers. If you have a piece of animation that you want to test out and it is not long enough for your projector, flatbed or rewind set-up, you can always splice in the appropriate amount of leader to create a length that works.
BLEACH
Ordinary household bleach, also known as sodium hydrochloride or by brand names such as Clorox™, is very good at removing emulsion of all kinds from the surface of film. Concentrated fumes can also irritate the mucous membranes (your nose and throat) and undiluted liquid can burn your skin. Bleach at any concentration will likely remove color from any clothing or even work surfaces and floors. In addition the combination of bleach and ammonia produces a number of by-products that, depending on the concentration of the substances and the mixing temperature, can be extremely hazardous. So if you are experimenting with a variety of chemicals please don’t mix them! Unless you have studied chemistry, you don’t know what the outcome will be.
In any event, a few simple guidelines during the use of bleach should enable you to keep your hands, mucous membranes, clothes and furniture unscathed. First, it is unnecessary to use bleach at full strength to get it to remove emulsion. It is sufficient to have a 1:2 or even 1:4 ratio with water. This will reduce the intensity of the fumes associated with its use and make it less hazardous if there is an accidental spill. In addition it is a good idea to wear protective gloves (nitrile or powder-free latex or vinyl are fine), work in an area that is easy to clean up in case of spills and has decent ventilation (the bathroom or outside on pavement), and either wear clothes that can get bleached or protect your clothing with a plastic apron. A large trash bag can be appropriated for these purposes in a number of ways. Cut up the sides it forms a large (3ft by 8ft) plastic drop cloth, and with a hole cut out of the top and one on each side it can be a great apron. If you want to be a little more fancy you can purchase drop cloths of various sizes and thicknesses at your local hardware store.
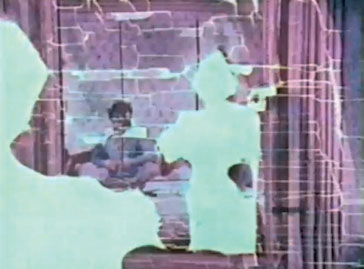
FIGURE 1.15
Still from Naomi Uman’s Removed (1999).
There are a number of ways to apply bleach. You can create a small dilution in a cup and apply it to film with a paintbrush or cotton swab. If you are interested in a random patterning of spots you can put your bleach solution in a spray bottle and (after laying the film emulsion up on a bleach-resistant surface like a bath tub, the sidewalk or your driveway) you can spray the film. If you are feeling flush, you can buy bleach pens that have a wide nib and can be applied easily without the fear of spilling. However, for the cost of a single bleach pen you can purchase an entire gallon of bleach, enough to use on your laundry, bathroom and film. One caveat: bleach does “go bad” in that it loses its strength over time. I recommend using up your bleach within the year that you purchase it. Again, if you are at loose ends as to how to do so I’m sure there is a toilet or shower in your house that could use a scrub.
If you want to work with more accuracy than the above methods provide you can use a “resist” technique to protect the areas of the emulsion that you do not want to remove. Derived from the ancient technique of batik this is really just applying tape, glue or nail polish to the surface of the film before you apply the bleach. Obviously, whatever you apply must either be see-through and relatively low profile (not bumpy) or be able to be removed after bleaching is completed. Nail polish comes with a ready applicator inside the bottle. It is not a bad idea to buy something with a little bit of color so that you can see where you have applied the nail polish. Bear in mind nail polish usually contains a whole host of nasty chemicals including formaldehyde (a carcinogen) so, despite the fact that billions of women use it, nail polish isn’t exactly risk free.
The applicator in the nail polish will probably need to be trimmed down a bit to facilitate more accurate application. If you’re looking to create a pattern you can use either Scotch tape or masking tape (the latter is much easier to remove when you’re ready to) to tape off areas or create stripes or patterns. You can also use a hole punch to create dots of tape or even use stickers as resist. You can cut tape or stickers into whatever pattern you wish and then apply them to the emulsion side of the film before you bleach. Please be aware that if you are using a film with an optical track (sound) that you want to maintain, you should absolutely tape over that before bleaching of any kind is done.
After your film has been sufficiently lightened it is important to wash off the bleach. Otherwise it will just keep lightening the film and even when dry it will come off on your hands, clothes and other films. It will also make your film more fragile and less pliable. Simply rinsing your film with warm, running water is sufficient to (mostly) get the excess bleach off of the film and to remove the tape or glue if water soluble. If you really want to get rid of the bleach, rinsing it in a mixture of sodium thiosulfate (the main ingredient in most photographic fixers) is the only way to stop bleach completely. This isn’t really necessary, as if you want to “preserve” your bleach experiment you will either make a film print of it (for instructions on this see Chapter 3 on optical printing) or transfer it to video. If you are trying to remove nail polish, wash the film and then apply nail polish remover to the areas of resist. Nail polish remover is commonly made of acetone, which is very hard on the skin and can cause the film to shrink and become brittle if put on in too high of a concentration or left on too long. It is possible to use non-acetone nail polish remover. This takes longer but is more kind to skin and film. After removing the nail polish, wash the film again and let it dry. If your film is particularly brittle you can use some film cleaner or lubricator such as FilmRenew. Do not roll up your film either after washing or after cleaning until it is completely dry. To aid in drying you can use a hairdryer or simply drape the film over a curtain rod or down a stairwell until it dries.
Probably the most well-known example of this kind of nail polish resist with bleach work is a film by Naomi Uman, Removed (1999). This film is made up of found footage from two different porno films. The artist applied the nail polish resist to the men in every frame and then bleached out the women. She was careful throughout to protect the optical track so that the sound (badly dubbed English, no less) remained as well. In the finished product men are seen talking to and caressing nothing, a big blank in the screen that nevertheless writhes and moans.
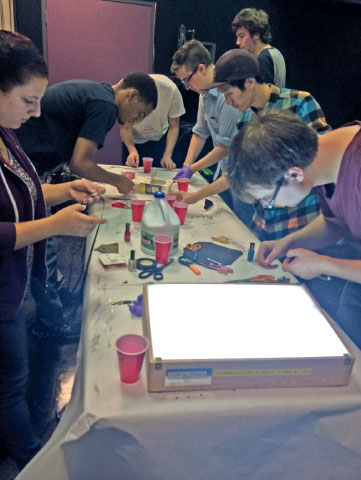
FIGURE 1.16
Students working on film.
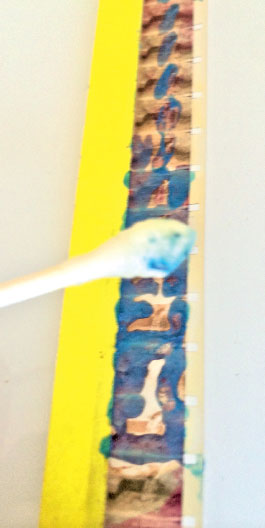
FIGURE 1.17
Close-up of resist technique.
Supplies/process for bleach/resist
• Ordinary household bleach and/or bleach pens.
• Film—found footage or black leader.
• Drop cloth or big trash bags to protect work area.
• Apron or big trash bag with holes cut out to protect people and clothes.
• Gloves to protect your hands.
• Nail polish.
• Nail polish remover.
• Cotton swabs.
• Brushes.
• A spray bottle.
• A bucket of plain water or a sink nearby to wash off film when it is sufficiently bleached.
• A hairdryer (to speed drying of film, nail polish, etc.).
• FilmRenew (optional) to soften and preserve film when it is all done.
SODIUM CARBONATE/A.K.A. WASHING SODA/A.K.A. SODA ASH
Sodium carbonate is more commonly used outside the United States as a laundering agent. It is very alkaline with a pH of 11. It is a close relative of baking soda, being just a few molecules removed. In fact, it is possible to turn baking soda into washing soda by heating baking soda in an oven at 400°F. The heat makes the baking soda molecule (NaHCO3) unstable, releasing water in the form of steam (H2O) and carbon dioxide (CO2) until you are left with sodium carbonate (Na2CO3). However, unless you have an unlimited supply of baking soda and no soda ash available, this isn’t really necessary. Where do you find soda ash? Besides laundering it is commercially used to raise the pH in swimming pools. So you can find soda ash either at a pool supply store, the cleaning supply section at a supermarket or hardware store, or at art stores that sell fabric dye as it is often used as a fixative. Like most things, it is also available to purchase online.
Soaking film in a hot water/soda ash solution softens and eventually breaks down film emulsion. Softened emulsion can provide a more suitable surface for scratching the film, but what is most distinct about this process is that within 10–15 minutes of soaking you can have film that appears as though it has been buried in the ground for a year. The emulsion will be eaten away in spots, bubbles will form, emulsion will raise up and re-attach to the film in a new place. This creates a very distinct distressed look. The film, even after drying, will require delicate handling so it is recommended that if you distress the film in this way you optically print it soon after. It is also possible to use Revis splicing tape or Scotch tape (being careful not to cover sprocket holds) to re-attach emulsion to the surface of the film.

FIGURE 1.18
Close-up of bleach.
Supplies for washing soda distressing of film
• Soda ash a.k.a. sodium carbonate a.k.a. washing soda. This usually comes in fairly large packages (8oz or a pound minimum) and is inexpensive. You only need a few tablespoons at a time.
• A portable burner or a stove that your roommates/parents/partners don’t mind if you “cook film” on. Really this isn’t a toxic solution so they needn’t be alarmed.
• A big metal or enamel pot and some wooden utensils and/or tongs to pull out film. Although washing soda isn’t toxic perhaps it’s best if you go ahead and get a pot you reserve for film now. It will make things easier with parents/roommates/partners when you’re finishing up film stuff while they are trying to make supper.
• Access to water in a bucket or sink.
• Film. Black and white or color found footage.
• Splicing table used along the length of the film is good to secure “flaky” emulsion
• A hairdryer or a place where your film can dry undisturbed.
Soda ash works most quickly when it is dissolved in warm water. I have a small burner and a pot purchased at a thrift store that I use to heat up a water/soda ash solution, but if you don’t have a burner, just get the warmest temperature out of the tap and stir that water until it dissolves. About a tablespoon per gallon of water should be enough to get you started. You can increase your soda ash amount if you want it to work more quickly. Film is soaked in this solution until the surface becomes soft and/or begins to flake off. You want to watch the film to make sure that it doesn’t lose the image altogether. If you have enough film floating around in the pot, some of the emulsion might flake off and re-attach itself to a different point on the film. In any case, once the film is soft and coming off the acetate, remove the strips from the pot and let dry. As the film dries the emulsion can shrink up and crack further. While the emulsion is still wet is a good time to etch into it because soda ash makes it very soft. You can also attempt to lift off sections with clear adhesive tape and then apply them to other areas or to clear leader. If you do this be sure not to cover up the sprocket holes!

FIGURE 1.19
Soda ash distress on color film.
LETTING NATURE TAKE ITS COURSE
There are a number of filmmakers who have distressed film simply by either burying the film in the ground (e.g. Louise Bourque), letting it blow around their backyard (e.g. Mark Street) or seeing what putting different organic or inorganic materials on film and then hanging it out in the yard accomplishes (e.g. Jürgen Reble, Schmelzdahin; Steven Woloshen) or plunging it into the sea (e.g. David Gatten). A few years ago a student at my school buried developed film in dog feces for most of a semester to see if that would cause an interesting pattern of destruction! These filmmakers were all inspired by what happens to film naturally if left in less than ideal conditions. To be more specific, they are interested in the ways in which the image breaks down as it is distressed and/or decayed. One filmmaker, Bill Morrison, made an entire film, Decasia (2002), out of films from the early part of the 20th century that had been made with silver nitrate (instead of the more stable silver halide) as the light-reactive particles in the emulsion. The films were very fragile and flaking off, and Morrison celebrated this as a beautiful aspect of their image.
So what is it that impacts the emulsion? Mold can grow on the surface of film. Some molds eat away at the gelatin in which the silver is suspended, erasing and altering the image while leaving their own biological footprint. You know how mold looks on cheese or on a wall? Well it also looks that way on film and it can be a whole variety of beautiful colors. Chemicals in the soil or air can also eat away at the surface of the film and sun can bleach its surface. Canadian filmmaker Steven Woloshen has devised all kinds of ways to accelerate and/or augment these processes. He advises mixing yeast and sugar, and applying it to color film and then putting the film in a trash bag outside. The sugar activates the yeast and makes it work at eating away at the emulsion (see Woloshen 2009). In the summer of 2012 I put a roll of Regular-8 home movies that I had purchased at a tag sale into this yeast/sugar mix. Here are some stills of the results. Clips of the footage can be seen on the website.
For his film Oona’s Veil (2000) Brian Frye took a screen-test of the then soon to be wife of Charlie Chaplin, Oona O’Neill, and rephotographed it at an altered speed with lap dissolves. Not happy with the result he made a duplicate of the negative and distressed it with chemicals before burying it in the industrially damaged soil of Flatbush, New York, and then leaving it to air on his fire escape in Long Island City (Queens). After some time in the elements he brought it in, spliced it together and had a print struck with a new soundtrack (a 78 played at 33 r.p.m. so significantly slowed). Because all these mutations were conducted on a black and white negative and then printed onto reversal the positive image (what you see when the film is projected) has significant dark areas where the emulsion was eaten away. What follows is a description of the film by Frye and some images from the film.

FIGURE 1.20
Found Regular-8 home movies, distressed with yeast.
From Brian via email, about Oona’s Veil:
WHISPERING HOPE, OR GRACE AND HOW TO GET IT
As I now beheld the robe, it seemed to me suddenly to become a mirrorimage of myself: myself entire I saw in it, and it entire I saw in myself, that we were two in seperateness, and yet one again in the sameness of our forms….
The Hymn of the Pearl
I know of only one film-record of Oona Chaplin (née O’Neill), this screen-test made for a film in which she was cast and never appeared, having met and married Charlie Chaplin before shooting commenced. Hers was quite possibly the briefest ever film career, but brevity is no obstacle to greatness. Some say that Chaplin himself directed her screentest; history says otherwise. To hell with history.
I re-photographed the original screentest, doing 20 frame (I think) lap dissolves from one to the next. The idea was lifted wholesale from David Rimmer, though I’ve never seen the film(s?) in which he did it. I was interested in the brief transition from still to motion in Chris Marker’s La Jetée, and wanted to extend it somehow. Anyway, I didn’t like the result, as the image shifted a lot. So I made a duplicate negative and did damage to it, to obscure the hiccups. It was exposed to chemicals, buried, and left on the fire escape for a year. What was left over I untangled, spliced together into something approaching a continuous strip of film, and had printed. The result became the master positive. The sound consists of a 78 of “Whispering Hope”, played at 33 r.p.m.
The process of destruction through nature takes time. The filmmakers mentioned above left their film to the elements for weeks, months, sometimes years. This requires three things: that you be patient enough to wait, have something you’re willing to destroy in this way, and that you have a place you’ll be where you can leave your film undisturbed for the time it takes. Because this is all pretty self-explanatory, I won’t write a list of what you will need, but I will recommend one thing: that you check up on your film periodically so that you can get a sense of the progress it is making. When you like what you see wash it (gently with water) and then let it dry. The emulsion may be very fragile at this point so I would not get really aggressive with the cleaning. Once it is dry transfer it or print it right away because the film will continue to decay, albeit at a slower rate.
If you are so inspired, you can do a little “tie-dying” with your film before you expose it to nature. This entails using paper clips at intervals (the more the better), clipping several rings of film together. The rings will create areas that are less easily penetrated by the decay and even stripes where the emulsion is undisturbed. Film that is tightly wound will protect itself where it touches and the decay will begin at the edges and work its way in. Film that is loose and contacted by the elements on all sides will decay more quickly.
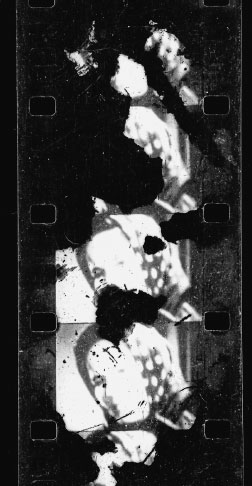
FIGURE 1.21
A scan from Brian Frye’s film Oona’s Veil (2000) showing the effects of being buried in the ground and left out in the elements. Because the film that was exposed this way was black and white negative, the black areas on the positive print are where the emulsion was removed on the negative. This film is also available to view on the website.

FIGURE 1.22
A scan from Oona’s Veil (2000).
TONERS, RETICULATION AND OTHER CHEMICAL EXPERIMENTS
For those of you familiar with still photochemistry and/or the history of cinema, the idea of toning a print or film with chemicals is not a new idea. Unless you have experimented with this process yourself, you probably aren’t exactly aware of how it works. Film and paper toners come in ready-made amounts or can be made from scratch with photo chemicals. Basic toners come in reds, blues, yellow/golden, purples, greens and sepia tones. Toners are best used on high-contrast black and white images. Toners replace the metallic silver with either a dye or another metallic compound. In some cases toner actually increases the stability of the image. In others (such as when the toner replaces the silver with a dye) it decreases the stability of an image. Toners can be used one after the other to achieve a third, different effect. Any toner that is on the market that can be used on transparencies can be used on motion picture film.
There is also a toning process called silver plating in which the silver halides are turned to metallic silver. While this image would simply be rendered as a dense image area if projected, if optically printed with a soft front lighting, you would be able to see a very beautiful silvery image. The toner for this process is called halo-chrome and requires that you submerge the black and white film image in an ammonia solution until it is “bleached” and then apply the toner. If your film was fixed with a hardening fixer it is imperative that you use fixer remover before you apply the ammonia. When the toner is applied you will watch as your image re-emerges as a silver image. You can stop the process whenever you have achieved the desired effect.
In addition to chemical toners the crafty film artist can use natural means to tint or dye film. In an early film of mine Story of Sarah (1993) I used beets and cabbage to dye the film. I did so on the premise that whatever could dye fabric should be able to, in sufficient solution, dye film. Other people have tried coffee, tea, mushrooms and other natural dyes. In order for these to work the film must be exposed to them for a much longer period than chemical dyes and the vegetable staining will fade rather rapidly so it is essential to transfer or optically print the film within a few weeks, even days, after it has been dyed. See Chapter 7 for more on natural film dyeing.

FIGURE 1.23
A color workprint that was spooled tightly and buried in the “hot corner” of a manure pile for one month. Clips available on the website.
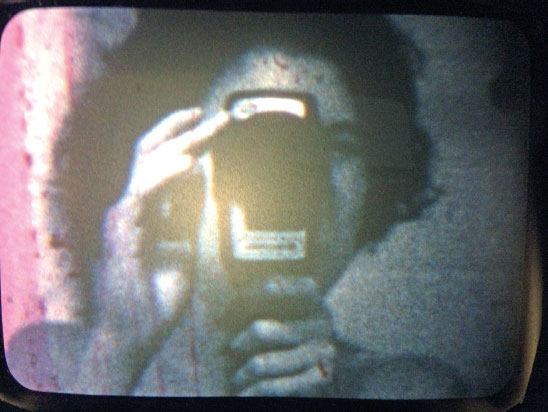
FIGURE 1.24
Film still from Story of Sarah (1993). Courtesy of the filmmaker.
• Toners. There are a whole host of toners available ready-made or in kits, and you can also construct your own from scratch by using the recipes below. However, buying raw chemicals and mixing things yourself can in the end be more costly if you’re only toning once or twice so I recommend you start with a kit and move on from there.
• A place to work with a sink, running water and ventilation. A film lab is nice but, if you don’t have one, a slop sink in a basement or your bath tub is good (as long as you clean it out really well afterward). I DO NOT recommend working in the kitchen unless you really, really clean up afterward.
• Buckets or trays to tone the film in and rinse it afterward.
• A place to hang up the film to dry.
Reticulation refers to the emulsion cracking and flaking off. While this can be achieved to a certain degree with the sodium carbonate process and some of the natural processes described above, it can also be achieved with chemical intervention. One filmmaker recommends dipping your film in sulfuric acid (a common chemical in the bleach for black and white reversal processes and very hazardous) and then washing the film with water. Others recommend dunking the film in boiling water and then in an ice bath. In one case it is recommended that you make a heated mixture of potassium permanganate (outside, because the fumes are dangerous) and dip your film in that, then in ice water. Film manufacturers have worked hard to make their film more hardy and less sensitive to sudden shifts in temperature and so reticulation through hot and cold manipulation of the film has become even more difficult (but not impossible) to achieve. One way to experiment with reticulation is to do it as a part of the developing process, using an extremely hot developer (over 120°F) and then subjecting the film to an ice bath wash. Obviously, it is advisable to experiment with developing times (see Chapters 5 and 6 for more information) because heating developer above the recommended temperature decreases developing time.
FILM-DESTROY—CONCLUSION
Throughout this chapter I have listed a variety of destructive techniques for the treatment of film. Obviously there is something very creative and inspiring in this destruction. From the very earliest days of cinema artists such as Man Ray began scratching on film. Film in a sense can be seen as a sculptural medium, with the surface of the emulsion having a thickness that can be manipulated. When light is shone through this surface it reveals the three-dimensional carvings in a two-dimensional plane of light. Throughout this book and in particular when I talk about expanded cinema and performance in Chapter 12 I will argue that film is, among other things, a sculptural medium that you physically carve and manipulate but that also creates physical three-dimensional manifestations in light projections.
This chapter will conclude with the work of film artist Steve Cossman who made the film TUSSLEMUSCLE discussed earlier in this chapter. I met Steve at the 2010 Ann Arbor Film Festival, where I saw his work for the first time. In the six degrees of separation world that is the avant-garde film community, Steve was a high school friend of a recent Emerson alum, Sean Hanley. Sean had a film at that year’s festival too and reconnected with Steve over their shared love of filmmaking. Later they would work together exhibiting films and teaching classes under the moniker Mono No Aware. Described by Steve as “an annually occurring exhibition of expanded cinema performances that takes place in Brooklyn, New York each November” (Ann Arbor) Cossman began it in 2007, with Hanley and others joining later. Steve describes Mono No Aware as both a haven for like-minded individuals, a place to preserve and practice (and remember) the rituals of hand-made cinema and a platform for building the careers of himself and other participants. Like microcinemas and artist-run labs throughout the world, these small groups of artists getting together are the future of experimental cinema.
Steve Cossman (b. 1987) is founder and director of Mono No Aware, a non-profit cinema arts organization whose annual event exhibits the work of contemporary artists who incorporate live film projections and altered light as part of a performance, sculpture or installation. In 2010 he established a series of analog filmmaking workshops for the organization and developed an in-person screening series entitled Connectivity Through Cinema. Steve’s first major work on film, TUSSLEMUSCLE (2007–2009), has screened at many institutions internationally. In 2013, he completed residencies at MoMA PS1 and the Liaison of Independent Filmmakers of Toronto. He has been a visiting artist at Yale, Dartmouth, the New York Academy of Art, SAIC, and the University of Pennsylvania. Steve’s most recent work on film, WHITE CABBAGE (2011–2014), a collaboration with Jahiliyya Fields of LIES, had its US premiere at Anthology Film Archives. He currently lives and works in Brooklyn as a director, curator, visual artist and member of the collective DecayNY, creating time-based works on film, video and paper. See www.stevecossman.com and www.mononoawarefilm.com.
INTERVIEW WITH STEVE COSSMAN BY STEVE COSSMAN
In the original email I sent out asking basic questions, I stated the following: “if you have better questions you would like to be asked, by all means ask yourself them (as me) and then answer them. You know your work/process/history so much better than I. You are the expert on your work!” and he took me at my word. So what follows is an interview with Steve Cossman by Steve Cossman. Thanks Steve!
How would you describe your own media practice?
My media practice is an extension of my work as an activist. My time-based work is created in observation of changes in our relation to environments both natural and man-made. I’m also interested the idea of the eternal, of memory, of how things are forgotten or commemorated, different forms of communication, concepts of time, experience, and the forces that shape and define these themes. Animation plays an integral role in my work, as it’s a way for me to take the fragments of a sequence and assemble them in such a way that the viewer can reconsider established perceptions associated with object, experience or surroundings. Materials for these works have been sourced from refuse, and repurposed, so that familiar imagery is re-contextualized to create new forms and new languages. In the ritual of restoration my process is methodical, requiring an ascetic dedication and often leaving visible evidence of the human handcraft.
You mention that your art practice came out of your work as an activist. Could you be more specific? What kind of activism?
Over the years I have been involved with a number of peaceful, primarily non-violent, efforts for positive change. At an early age I adopted a vegan diet, associated myself with the straight-edge movement, attended ALF/ELF meetings and was an active member of the student body, holding office all four years of high school. After school, I worked for a CSA farm that provided vegetables to an inner-city area that was without access to fresh produce. Earning little as a farm-hand, I would supplement my income by designing and silk-screening shirts for punk bands and non-profit organizations. While printing I chose to purchase union-made in the United States T-shirts from a small family-owned business in eastern Pennsylvania and even found a US-grown soybean-based screen-reclaiming solution with a neutral pH.
As a young adult I continue to associate myself with various conscious communities and make personal choices that demonstrate my social/political values. Most recently I have taken a strong stance against the unsafe working conditions of the garment industry through consumer activism. I have not purchased manufactured clothing since the factory fire that killed over 100 people outside of Dhaka, Bangladesh, in 2012. I now sew all my own clothing from discarded reams of fabric, remnants and fair-trade organic cottons.
Whenever possible I try to use materials/methods that convey the concept effectively and align with my ideologies. Making the decision to use film rather than DV and to create a camera-less animation for certain works can also be considered a form of consumer activism. Boycotting the use of digital cameras is a choice not to support planned obsolescence or contribute to the waste that it generates. In the case of my films TUSSLEMUSCLE and WHITE CABBAGE, these films were assembled rhythmically to invoke a heightened sense of anxiety brought on by looming eco-disaster. Mining for single 16mm cells from discarded toy viewers as a source material—in a similar fashion to how we mine the landfills for precious metals—was a way for me to speak to the desperation of our efforts to preserve the current ecological state while also acknowledging the economics of the changing/dying film industry.
Is there a relation between your work, both labors and artifacts, and the notion of community?
Creating the context and shaping the platform for the work are important elements in the overall experience. If the purpose of the work is to communicate an idea or to pose a question to the viewer, then connecting with the audience is critical. This desire to connect is what initially led me to establish the non-profit cinema-arts organization Mono No Aware in 2007.
You mention the idea of community being important to you and the founding of Mono No Aware as a move towards developing a community for yourself/your work locally. How does this group help you interact with other experimental/art groups as well as the larger experimental film/art world?
Mono No Aware allows me the opportunity to engage with the art world, the film industry and the experimental film communities through each facet of the organization: providing a platform for moving-image art forms at the annual exhibition of expanded cinema, engaging with artists in person at the Connectivity Through Cinema screening series, maintaining an equipment rentals program for local artists, and sharing knowledge with participants of our various workshops and educational initiatives. The moving image has been, and continues to be, such an influential part of global culture—Mono No Aware’s interest concerning cinema is rooted in its histories, its practices, its technologies and its possibilities. Our community is a community broadly appreciative of the cinematic art form and its variants spanning generations. It is my hope that Mono No Aware will continue to constitute a haven and a resource for the exploration and preservation of the cinematic arts for years to come.
What inspires you?
The potential of things, specifically human potential, and positive energy.
Would you position your film/media work within a particular genre? As traversing genres? On the margins?
I would say that my moving-image work is perceived as experimental, sometimes blurring traditional and contemporary practices. I employ media technologies as a tool to further the potential of the materials. In my series Forever Friends, I photograph friends with whom I share a positive experience or memory. I trace their image repeatedly onto paper and systematically hand-paint forty portraits. Each paper portrait is scanned and saved as a large-format image. All the images are placed onto the timeline, repeated and exported as a moving-image file. The paintings then can be played on screen, referencing internet presence, and loop indefinitely, creating an illusion of perpetuity. Held in a video container, the works are often described as videos, but to me these are achieved with the use of more paint than video material. Rather than staring at a painted image, the viewer exists in time with the painting.
Are the distinctions pertaining to analog vs digital, or cinema vs video, or current vs “dead” tech, relevant to your interests and practices?
Only in relation to the viewer experience, with specific regard to conveying/articulating the idea behind the work accurately.
Can you talk a bit about the economics of your art practice and community building? When your average person thinks of motion pictures they think of a big industry. What relationship does your practice have to that, if any? Is it oppositional, confrontational or ambivalent?
As humans, we are all subject to the same constraints of time and space.
As a member of society, I create work as I have the time and means with which to do so, using the tools and materials accessible to me. Although I operate outside of what most would call the “film industry” and make work that does not fall into a category that the average person would classify as a “movie”, it is not a choice made in opposition to big-budget feature films. The approach and intention are so different that the parallels are few or far between.
Community building is optimal when there is openness and inclusion. I’ve fought for years to maintain a strong sense of accessibility in our public programming. Through generous supporter donations and the efforts of our volunteer staff, the organization has been able to minimize workshop enrollment fees and make many of the screenings inexpensive or in some cases free to attend. Participants span a wide range of economic classes, belief systems, age groups and backgrounds. That diversity of ideas gives strength to the group and allows for a rich cultural experience. Within my own practice, inclusion comes in the form of universally recognizable imagery, common materials and contexts.
References
“Ann Arbor Film Festival: Filmmaker Focus: Steve Cossman.” www.aafilmfest.org/news/entry/filmmaker_focus_steve_cossman. Accessed August 26, 2014.
Debord, Guy. Society of the Spectacle. London: Rebel Press, 1983.
Jacobs, Ken. Star Spangled to Death. www.starspangledtodeath.com/mainfiles/sstd.html. Accessed August 1, 2014.
Joritz, Cathy. Cjanimation. https://cjanimation.files.wordpress.com/2010/04/joritz-publicity-book.pdf. Wordpress, n.d.
Woloshen, Steven. Recipes for Reconstruction: A Cookbook for the Frugal Filmmaker. Self-published, 2009. Please contact the author: [email protected].
Zryd, Michael. “Found Footage Film as Discursive Metahistory: Craig Baldwin’s Tribulation 99,” The Moving Image Vol. 3, No. 2 (2003): 40–61.