
Chapter 5. Web-Based Exploitation
Information in This Chapter:
■ Interrogating Web Servers: Nikto
■ Websecurify: Automated Web Vulnerability Scanning
■ Spidering: Crawling Your Target’s Website
■ Intercepting Requests with WebScarab
■ Code Injection Attacks
■ Cross-Site Scripting: Browsers That Trust Sites
This chapter examines web-based exploitation. The chapter begins by reviewing techniques and tools for interrogating web servers. Specific tools to scan for vulnerabilities in web servers are discussed through the use of Nikto and Websecurify. Exploring the target website by discovering directories and files is demonstrated through the use of a spider. A method for intercepting website requests by using WebScarab is also discussed. Code injection attacks, including the classic SQL injection, are explored. The chapter concludes with a brief discussion and example of cross-site scripting (XSS).
Keywords
Cross-site scripting (XSS), Nikto, SQL injection, WebScarab, web-based exploitation, Websecurify
Introduction
Now that you have a good understanding of common network-based attacks, it is important to take some time to discuss the basics of web-based exploitation. The web is certainly one of the most common attack vectors available today because everything is connected to the Internet. Nearly every company today has a web presence, and more often than not, that web presence is dynamic and user-driven. Previous-generation websites were simple static pages coded mostly in HTML. By contrast, many of today’s websites include complex coding with backend database-driven transactions and multiple layers of authentication. Home computers, phones, appliances, and of course systems that belong to our targets are all connected to the Internet.
As our dependence and reliance on the web continues to expand, so does the need to understand how this attack vector can be exploited.
A few years back, people started using words like “Web 2.0” and “cloud-based computing” to describe a shift in the way we interact with our systems and programs. Simply put, these terms are a change in the way computer programs are designed, run, accessed, and stored. Regardless of what words are used to describe it, the truth of the matter is that the Internet is becoming more and more “executable.” It used to be that programs like Microsoft Office had to be installed locally on your physical computer. Now this same functionality can be accessed online in the form of Google Docs and many other cloud computing services. In many instances, there is no local installation and your data, your programs, and your information reside on the server in some physically distant location.
As mentioned earlier, companies are also leveraging the power of an executable web. Online banking, shopping, and record-keeping are now common place. Everything is interconnected. In many ways, the Internet is like the new “wild west.” Just when it seemed like we were making true progress and fundamental changes to the way we program and architect system software, along comes the Internet and gives us a new way to relearn and repeat many of the security lessons from the past. As people rush to push everything to the web and systems are mashed up and deployed with worldwide accessibility, new attacks are developed and distributed at a furious pace.
It is important that every aspiring hacker and penetration tester understand at least the basics of the web-based exploitation.
Interrogating Web Servers: Nikto
After running a port scan and discovering a service running on port 80 or port 443, one of the first tools that should be used to evaluate the service is Nikto. Nikto is a web server vulnerability scanner. This tool was written by Chris Sullo and David Lodge. Nikto automates the process of scanning web servers for out-of-date and unpatched software as well as searching for dangerous files that may reside on web servers. Nikto is capable of identifying a wide range of specific issues and also checks the server for configuration issues. The current version of Nikto is built into Backtrack and available in the /pentest/scanners/nikto directory. If you are not using Backtrack, Nikto can be obtained by downloading it from the http://www.cirt.net/Nikto2 website. Please note you will need Perl installed to run Nikto.
To view the various options available, you can run the following command from inside the /pentest/scanners/nikto directory:
perl nikto.pl
Running this command will provide you with a brief description of the switches available to you. To run a basic vulnerability scan against a target, you need to specify a host IP address with the “-h” switch. You should also specify a port number with the “-p” switch. You can instruct Nikto to scan multiple ports by specifying a port range. For example to scan for web servers on all ports between 1 and 1000, you would issue the following command in a terminal window (again you must be in the /pentest/scanners/nikto directory):
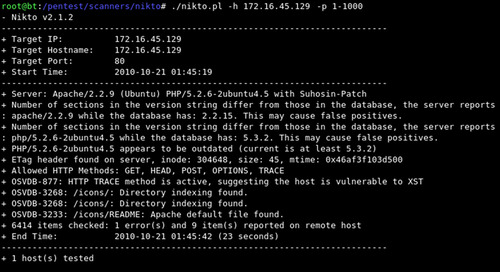
perl nikto.pl -h 172.16.45.129 –p 1-1000
If you fail to specify a port number, Nikto will only scan port 80 on your target. If you want to save the Nikto output for later review, you can do so by issuing the “–o” followed by the file path and name of the file you would like to use to save the output. Figure 5.1 includes a screenshot of the Nikto output from our example.
Websecurify: Automated Web Vulnerability Scanning
Another great tool to use when first interacting with a target web server is Websecurify. Websecurify provides an easy-to-use interface that allows penetration testers to quickly and easily identify web vulnerabilities including SQL injection, cross-site scripting, file includes, cross-site request forgery, and others.
Websecurify can be set up and used with little configuration making it very handy for people who are new to web penetration testing. You can access Websecurify by clicking: K-Start dragon → Backtrack → Web Application Analysis → Web (front end) → Web Securify.
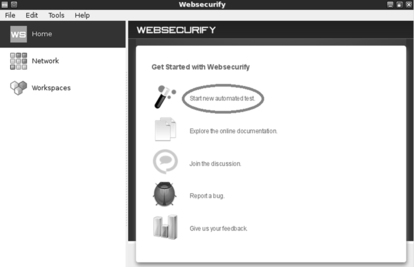
After starting the program you will be presented with a “Getting Started” page; you can begin your test by clicking on the “Start new automated test” link as shown in Figure 5.2.
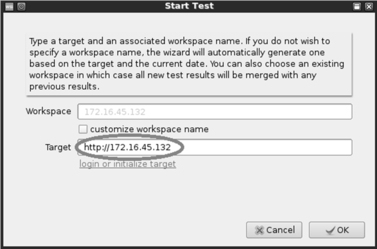
After clicking the “Start new automated test,” you will be presented with a Start Test window. You will need to enter a URL or IP address in the “Target” textbox. Entering information in the “Workspace” textbox is optional, as Websecurify will automatically generate this for you when you enter a target. Figure 5.3 shows the Start Test window; once you have entered a URL or IP address, you can click the “OK” button to begin your test.
Once the test is completed, you will be presented with a workspace report that will allow you to view specific details and issues that were discovered by Websecurify. You can view the specific information by clicking the triangle to expand the findings. Figure 5.4 shows the output from our scan.
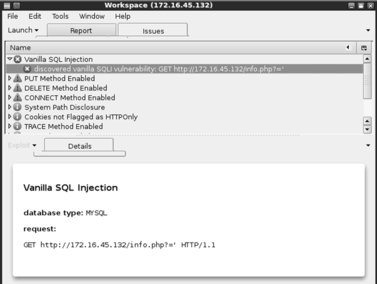
As you can see, Websecurify found several issues including an SQL injection vulnerability. SQL injection attacks will be discussed in a later section of this chapter.
Spidering: Crawling your Target’s Website
Another great tool to use when initially interacting with a web target is WebScarab. WebScarab was written by Rogan Dawes and is available through the OWASP website. If you are running Backtrack, a version of WebScarab is already installed. This powerful framework is modular in nature and allows you to load numerous plug-ins to customize it to your needs. Even in its default configuration, WebScarab provides an excellent resource for interacting with and interrogating web targets.
After having run the vulnerability scanners, Nikto and Websecurify, the next logical step is to run a spidering program on the target website. Spiders are extremely useful in reviewing and reading (or crawling) your target’s website looking for all links and associated files. Each of the links, web pages, and files discovered on your target are recorded and cataloged. This cataloged data can be useful for accessing restricted pages and locating unintentionally disclosed documents or information.
You can access the spider function in WebScarab by first starting the program through the K-Start dragon. This can be accomplished by clicking: K-Start dragon → Backtrack → Web Application Analysis → Web (front end) → Webscarab lite.
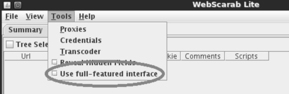
This will load the WebScarab program. However, before you can begin spidering your target, you will need to switch to the “full-featured interface.” You can do this by clicking on the “Tools” menu and putting a checkbox in the “Use full-featured interface” checkbox as shown in Figure 5.5.
After switching to the full-featured interface, you will be prompted to restart WebScarab. Once you restart the tool, you will be given access to a number of new panels along the top of the window including the “Spider” tab.
Now that you have set up WebScarab, you need to configure your browser to use a proxy. Setting up WebScarab as your proxy will cause all the web traffic going into and coming out of your browser to pass through the WebScarab program. In this respect, the proxy program acts as a middle man and has the ability to view, stop, and even manipulate network traffic.
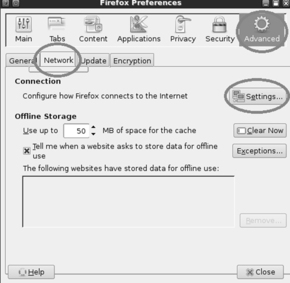
Setting up your browser to use a proxy is usually done through the preferences or network options. In Firefox, you can click on: Edit → Preference. In the Firefox Preferences window, click the “Advanced” menu followed by the “Network” tab. Finally, click on the “Settings” button as shown in Figure 5.6.
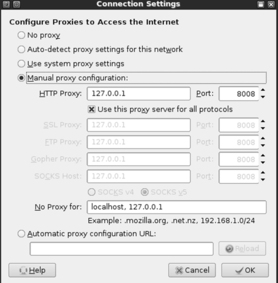
Clicking on the settings button will allow you to configure your browser to use WebScarab as a proxy. Select the radio button for “Manual proxy configuration:”. Next enter: 127.0.0.1 in the “HTTP Proxy:” input box. Finally enter: 8008 into the “Port” field. It is usually a good idea to check the box just below the “HTTP Proxy” box and select “Use this proxy server for all protocols.” Once you have all of this information entered, you can click “OK” to exit the Connection Settings window and “Close” to exit the Firefox Preferences window. Figure 5.7 shows an example of my Firefox Connection Settings window.
At this point, any web traffic coming into or passing out of your browser will route through the WebScarab proxy. Two words of warning: First you need to leave WebScarab running while it is serving as a proxy. If you close the program, you will not be able to browse the Internet. If this happens, Firefox is great at providing you with an error message that it cannot find a proxy and you will need to restart WebScarab or change your network configuration in Firefox. The second warning is that while surfing the Internet using a local proxy, all https traffic will show up as having an invalid certificate! This is expected behavior because your proxy is sitting in the middle of your connection.
As a side note, it is important that you always pay attention to invalid security certificates when browsing. At this point, certificates are your best defense and often your only warning against a man-in-the-middle attack.
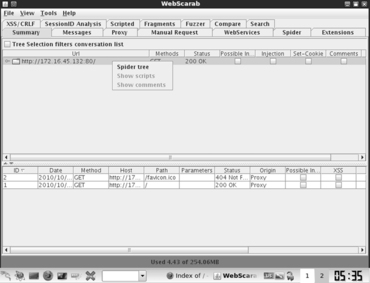
Now that you have set up a proxy and have configured your browser, you are ready to begin spidering your target. You begin by entering the target URL into the browser. In our earlier example, we discovered a website running on 172.16.45.132. Entering the following into your Firefox browser will load the website through WebScarab. Once the website has loaded in your browser, you can switch over the WebScarab program. You should see the URL you entered (along with any others that you have visited since starting your proxy). To spider the site, you right click the URL and choose “Spider tree” as shown in Figure 5.8.
You can now view each of the files and folders associated with your target website. Individual folders can be further spidered by right clicking and choosing “Spider tree” again. You should spend time carefully examining every nook and cranny within your authorized scope. Spidering a website is a great way to find inadvertently or leaked confidential data from a target website.
Intercepting Requests with Webscarab
As previously mentioned, WebScarab is a very powerful tool. One of its many roles is to function as a proxy server. Recall that a proxy sits between the client (browser) and the server. While the proxy is running, all the web traffic flowing into and out of your browser is passed through the program. Passing traffic through a local proxy provides us with an amazing ability; by running WebScarab in this mode, we are able to stop, intercept, and even change the data either before it arrives or after it leaves the browser. This is a subtle but important point; the use of a proxy allows us to make changes to data in transit. The ability to manipulate or view HTTP request or response information has serious security implications.
Consider the following: some poorly coded websites rely on the use of hidden fields to transmit information to and from the client. In these instances, the programmer makes use of a hidden field on the form, assuming that the user will not be able to access it. Although this assumption is true for a normal user, anyone leveraging the power of a proxy server will have the ability to access and modify the hidden field.
The classic example of this scenario is the user who was shopping at an online golf store. After browsing the selection, he decided to buy a driver for $299. Being a security analyst, the astute shopper was running a proxy and noticed that the website was using a hidden field to pass the value of the driver ($299) to the server when the “add to cart” button was clicked. The shopper set up his proxy to intercept the HTTP POST request. This means when the information was sent to the server, it was stopped at the proxy. The shopper now had the ability to change the value of the hidden field. After manually changing the value from $299 to $1, the request was sent onto the server. The driver was added to his shopping cart and the new total due was $1.
Although this scenario is not as common as it used to be, it certainly demonstrates the power of using a proxy to intercept and inspect HTTP requests and responses.
To use WebScarab as an interceptor, you need to configure your browser to use a proxy as discussed in the Spidering section of this chapter. Once your browser is configured to use the proxy, you can start WebScarab by clicking on the following: K-Start dragon → Backtrack → Web Application Analysis → Web (front end) → WebScarab lite.
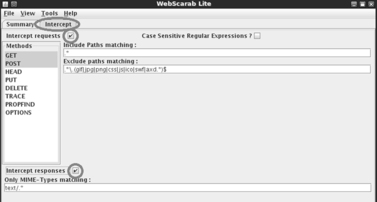
You will need to restart WebScarab to use the “lite” version. Once WebScarab has finished loading, you will need to click on the “Intercepts tab.” Next you should put a check box in both the “Intercept requests” and “Intercept responses” as shown in Figure 5.9.
At this point you can use Firefox to browse through your target website.
With WebScarab set up as described, the proxy will stop nearly every transaction and allow you to inspect or change the data. Luckily if you find yourself in this situation, WebScarab has included a “Cancel ALL Intercepts” button. This can be handy to keep moving forward.
To change the values of a given field, wait for WebScarab to intercept the request; then locate the variable you wish to change. At this point, you can simply enter a new value in the “value” field and click the “Insert” button to update the field with the new value.
Viewing HTTP response and requests can also be useful for discovering username and password information. Just remember, the value in many of these fields will be Base64 encoded. Although these values may look as though they are encrypted, you should understand that Base64 is a form of encoding not encryption. Although these processes may sound similar, they are vastly different. Decoding Base64 is a trivial task that can be accomplished with little effort using a program or online tool.
It should be pointed out that there are many good proxy servers available to assist you with the task of data interception. Do not be afraid to explore other proxy servers as well.
Code Injection Attacks
Like buffer overflows in system code, injection attacks have been a serious issue in the web world for many years, and like buffer overflows, there are many different kinds of code injection attacks. Broadly defined, this class of attacks could easily fill a chapter. However, because we are focusing on the basics, we will examine the most basic type of code injection: the classic SQL injection. We will explore the basic commands needed to run an SQL injection and how it can be used to bypass basic web application authentication. Injection attacks can be used for a variety of purposes including bypassing authentication, manipulating data, viewing sensitive data, and even executing commands on the remote host.
Most modern web applications rely on the use of interpreted programming languages and backend databases to store information and generate dynamically driven content to the user. There are many popular interpreted programming languages in use today including PHP, Javascript, ASP, Structured Query Language (SQL), Python, and countless others. An interpreted language differs from a compiled language because the interpreted language generates machine code just before it is executed. Compiled programming languages require the programmer to compile the source code and generate an executable (.exe) file. In this case, once the program is compiled, the source code cannot be changed unless it is recompiled and the new executable is redistributed.
In the case of modern web applications, like an e-commerce site, the interpreted language works by building a series of executable statements that utilize both the original programmer’s work and input from the user. Consider an online shopper who wants to purchase more RAM for his computer. The user navigates to his favorite online retailer and enters the term “16gb RAM” in the search box. After the user clicks the search button, the web app gathers the user’s input (“16gb RAM”) and constructs a query to search the backend database for any rows in the product table containing “16gb RAM.” Any products that contain the keywords “16gb RAM” are collected from the database and returned to the user’s browser.
Understanding what an interpreted language is and how it works is the key to understanding injection attacks. Knowing that user input will often be used to build code that is executed on the target system, injection attacks focus on submitting, sending, and manipulating user-driven input. The goal of sending manipulated input or queries to a target is to get the target to execute unintended commands or return unintended information back to the attacker.
The classic example of an injection attack is SQL injection. SQL is a programming language that is used to interact with and manipulate data in a database. Using SQL a user can read, write, modify, and delete data stored in the database tables. Recall from our example above that the user supplied a search string “16gb RAM” to the web application (an e-commerce website). In this case, the web application generated an SQL statement based off of the user input.
It is important that you understand there are many different flavors of SQL and different vendors may use different verbs to perform the same actions. Specific statements that work in Oracle may not work in MySQL or MSSQL. The information contained below will provide a basic and generic framework for interacting with most applications that use SQL, but you should strive to learn the specific elements for your target.
Consider another example. Assume that our network admin Ben Owned is searching for a Christmas present for his boss. Wanting to make up for many of his past mistakes, Ben decides to browse his favorite online retailer to search for a new laptop. To search the site for laptops, Ben enters the keywords “laptop” (minus the quotes) into a search box. This causes the web application to build an SQL query looking for any rows in the product table that include the word “laptop.” SQL queries are among the most common actions performed by web applications as they are used to search tables and return matching results. The following is an example of a simple SQL query:
SELECT * FROM product WHERE category = ‘laptop’;
In the statement above, the “SELECT” verb is used to tell SQL that you wish to search and return results from a table. The “*” is used as a wildcard and instructs SQL to return every column from the table when a match is found. The “FROM” keyword is used to tell SQL which table to search. The “FROM” verb is followed immediately by the actual name of the table (“product” in this example). Finally, the “WHERE” clause is used to set up a test condition. The test condition is used to restrict or specify which rows are to be returned back to the user. In this case, the SELECT statement will return all the rows from the product table that contain the word “laptop” in the “category” column.
It is important to remember that in real life, most SQL statements you will encounter are much more complex than this example. Oftentimes, an SQL query will interact with several columns from several different tables in the same query. However, armed with this basic SQL knowledge, let us examine this statement a little more closely. We should be able to clearly see that in our example the user created the value to the right of the “=” sign, whereas the original programmer created everything to the left of the “=” sign. We can combine this knowledge with a little bit of SQL syntax to produce some unexpected results. The programmer built an SQL statement that was already fully constructed except for the string value to be used in the WHERE clause. The application accepts whatever the user types into the “search” textbox and appends that string value to the end of the already created SQL statement. Lastly, a final single quote is appended onto the SQL statement to balance the quotes. It looks like this when it is all done:
SELECT * FROM product WHERE category = ‘laptop’
where SELECT * FROM product WHERE category =‘ is created ahead of time by the programmer, while the word laptop is user-supplied and the final ‘ is appended by the application to balance quotes.
Also notice that when the actual SQL statement was built, it included single quotes around the word “laptop.” SQL adds these because “category” is a string datatype in the database. They must always be balanced, that is there must be an even number of quotes in the statement, so an SQL syntax error does not occur. Failure to have both an opening and closing quote will cause the SQL statement to error and fail.
Suppose that rather than simply entering the keyword, laptop, Ben entered the following into the search box:
laptop’ or 1 = 1--
In this case the following SQL statement would be built and executed:
SELECT * FROM product WHERE category = ‘laptop’ or 1 = 1--'
By adding the extra quote, Ben would close off the string containing the user-supplied word of ‘laptop’ and add some additional code to be executed by the SQL server, namely:
or 1 = 1--
The “or” statement above is an SQL condition that is used to return records when either statement is true. The “—” is a programmatic comment. In most SQL versions, everything that follows the “—” is simply ignored by the interpreter. The final single quote is still appended by the application, but it is ignored. This is a very handy trick for bypassing additional code that could interfere with your injection. In this case the new SQL statement is saying “return all of the records from the product table where the category is ‘laptop’ or 1 = 1.” It should be obvious that 1 = 1 is always true. Because this is a true statement, SQL will actually return ALL of the records in the product table!
The key to understanding how to use SQL injections is to understand the subtleties in how the statements are constructed.
On the whole, the example above may not seem too exciting; instead of returning all the rows containing the keyword laptop, we were able to return the whole table. However, if we apply this type of attack to a slightly different example, you may find the results a bit more sensational.
Many web applications use SQL to perform authentication. You gain access to restricted or confidential locations and material by entering a username and password. As in the previous example, oftentimes this information is constructed from a combination of user-supplied input, the username and password, and programmer-constructed statements.
Consider the following example. The network admin Ben Owned has created a new website that is used to distribute confidential documents to the company’s key strategic partners. Partners are given a unique username and password to log into the website and download material. After setting up his secure website, Ben asks you to perform a penetration test against the site to see if you can bypass his authentication.
You should start this task by using the same technique we examined to return all the data in the “products” table. Remember the “—” is a common way of commenting out any code following the “—”. As a result, in some instances it is possible to simply enter a username followed by the “—” sequence. If interpreted correctly, this can cause the SQL statement to simply bypass or ignore the section of code that checks for a password and give you access to the specified user. However, this technique will only work if you already know a username.
If you do not know the username, you should begin by entering the following into the username textbox:
‘or 1 = 1--
Leaving the username parameter blank and using an expression that will always evaluate to true is a key way to attack a system when we are unsure of the usernames required to log into a database. Not entering a username will cause most databases to simply grab the first user in the database. In many instances, the first user account in a database is an administrative account. You can enter whatever you want for a password (for example, “syngress”), as it will not even get checked by the database because it is commented out. You do need to supply a password to bypass client-side authentication (or you can use your intercepting proxy to delete this parameter altogether).
SELECT * FROM users WHERE uname = ‘‘or 1 = 1-- and pwd = ‘syngress’
At this point you should either have a username or be prepared to access the database with the first user listed in the database. If you have a username, we need to attack the password field; here again we can enter the statement:
‘or 1 = 1--
Because we are using an “or” statement, regardless of what is entered before the first single quote, the statement will always evaluate to true. Upon examining this statement, the interpreter will see that the password is true and grant access to the specified user. If the username parameter is left blank, but the rest of the statement is executed, you will be given access to the first user listed in the database.
In this instance, assuming we have a username, the new SQL statement would look similar to the following:
SELECT * FROM users WHERE uname = ‘admin’ and pwd = ‘’or 1 = 1--
In many instances, the simple injection above will grant you full access to the database as the first user listed in the “users” table.
In all fairness, it should be pointed out that it is becoming more uncommon to find SQL injection errors and bypass authentication using the techniques listed above. Injection attacks are now much more difficult to locate. However, this classic example still rears its head on occasion, especially with custom-built apps, and it also serves as an excellent starting point for learning about and discovering the more advanced injection attacks.
Cross-site Scripting: Browsers that Trust Sites
Cross-site scripting, also referred to as XSS, is the process of injecting scripts into a web application. The injected script can be stored on the original web page and run or processed by each browser that visits the web page. This process happens as if the injected script was actually part of the original code.
Cross-site scripting is different from many other types of attacks as XSS focuses on attacking the client, not the server. Although the malicious script itself is stored on the web application (server), the actual goal is to get a client (browser) to execute the script and perform an action.
As a security measure, web applications only have access to the data that they write and store on a client. This means any information stored on your machine from one website cannot be accessed by another website. Cross-site scripting can be used to bypass this restriction. When an attacker is able to embed a script into a trusted website, the victim’s browser will assume all the content including the malicious script is genuine and therefore should be trusted. Because the script is acting on behalf of the trusted website, the malicious script will have the ability to access potentially sensitive information stored on the client including session tokens and cookies.
It is important to point out that the end result or damage caused by a successful XSS attack can vary widely. In some instances the effect is a mere annoyance like a persistent pop-up window, whereas other more serious consequences can result in the complete compromise of the target. Although many people initially reject the seriousness of XSS, a skilled attacker can use the attack to hijack sessions, gain access to restricted content stored by a website, execute commands on the target, and even record keystrokes!
You should understand that there are numerous cross-site scripting attack vectors. Aside from simply entering code snippets into an input box, malicious hyperlinks or scripts can also be embedded directly into websites, e-mails, and even instant messages. Many e-mail clients today automatically render HTML e-mail. Oftentimes, the malicious portion of a malicious URL will be obfuscated in an attempt to appear more legitimate.
In its simplest form, conducting a cross-site scripting attack on a web application that does not perform input sanitization is easy. When we are only interested in providing proof that the system is vulnerable, we can use some basic JavaScript to test for the presence of XSS. Website input boxes are an excellent place to start. Rather than entering expected information into a textbox, a penetration tester should attempt to enter the script tag followed by a JavaScript “alert” directly into the field. The classic example of this test is listed below:
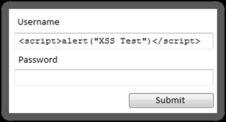
< script > alert(“XSS Test”) < /script >
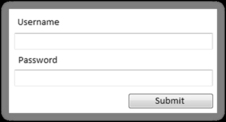
If the above code is entered and the server is vulnerable, a JavaScript “alert” pop-up window will be generated. Figure 5.10 shows an example of a typical web page where the user can log in by entering a username and password into the textboxes provided.
However, as previously described, rather than entering a normal username and password, enter the test script. Figure 5.11 shows an example of the test XSS before submitting.
After entering our test script, we are ready to click the “Submit” button. Remember if the test is successful and the web application is vulnerable to cross-site scripting, a JavaScript “alert” window with the message “XSS Test” should appear on the client machine. Figure 5.12 shows the result of our test, providing proof that the application is vulnerable to cross-site scripting.

Just as there are several attack vectors for launching cross-site scripting, the attack itself comes in several varieties. Because we are covering the basics, we will look at two examples: reflected cross-site scripting and stored cross-site scripting.
Reflected cross-site scripts occur when a malicious script is sent from the client machine to a vulnerable server. The vulnerable server then bounces or reflects the script back to the user. In these cases, the payload (or script) is executed immediately. This process happens in a single response/request. This type of cross-site scripting attack is also known as a “First Order XSS.” Reflected cross-site scripting attacks are nonpersistent. Thus, the malicious URL must be fed to the user via e-mail, instant message, and so on, so the attack executes in their browser. This has a phishing feel to it and rightfully so.
In some instances, the malicious script can actually be saved directly on the vulnerable server. When this happens, the attack is called a stored XSS. Because the script is saved, it gets executed by every user who accesses the web application. In the case of stored XSS attacks, the payload itself (the malicious script or malformed URL) is left behind and will be executed at a later time. These attacks are typically saved in a database or applet. Stored XSS does NOT need the phishing aspect of reflected XSS. This helps the legitimacy of the attack.
As mentioned earlier, cross-site scripting is a very practical attack. Even though we only examined the simplest of XSS attacks, do not let this deter you from learning about the true power of cross-site scripting. In order to truly master this content, you will need to learn how to harness the power of XSS attacks to steal sessions from your target and deliver the other payloads discussed earlier in this section. Once you have mastered both reflected and stored cross-site scripting attacks, you should begin examining and studying DOM-based XSS attacks.
How do I Practice this Step?
As mentioned at the beginning of this chapter, it is important that you learn to master the basics of web exploitation. However, finding vulnerable websites on which you are authorized to conduct these attacks can be difficult. Fortunately, the fine folks at the Open Web Application Security Project (OWASP) organization have developed a vulnerable platform for learning and practicing web-based attacks. This project, called WebGoat, is an intentionally misconfigured and vulnerable web server.
WebGoat was built using J2EE, which means it is capable of running on any system that has the Java Runtime Environment installed. WebGoat includes more than 30 individual lessons that provide a realistic, scenario-driven learning environment. Current lessons include all the attacks we described in this chapter and many more. Most lessons require you to perform a certain attack like using SQL injection to bypass authentication. Each lesson comes complete with hints that will help you solve the puzzle. As with other scenario-driven exercises, it is important to work hard and attempt to find the answer on your own before using the help files.
If you are making use of virtual machines in your hacking lab, you will need to download and install WebGoat inside a virtual machine. As discussed previously, WebGoat will run in either Linux or Windows, just be sure to install Java (JRE) on your system prior to starting WebGoat.
WebGoat can be downloaded from the official OWASP website at: http://www.owasp.org/. The file you download will require 7zip or a program capable of unzipping a .7z file. Unzip the file and remember the location of the uncompressed WebGoat folder. If you are running WebGoat on Windows, you can navigate to the unzipped WebGoat folder and locate the “webgoat_8080.bat” file. Execute this batch file by double clicking it. A terminal window will appear; you will need to leave this window open and running in order for WebGoat to function properly. At this point, assuming that you are accessing WebGoat from the same machine you are running the WebGoat server on, you can begin using WebGoat by opening a browser and entering the URL: http://127.0.0.1:8080/webgoat/attack.
If everything went properly, you will be presented with a log-in prompt. Both the username and password are set to: guest
As a final note, please pay attention to the warnings posted in the “readme” file. Specifically you should understand that running WebGoat outside of a lab environment is extremely dangerous, as your system will be vulnerable to attacks. Always use caution and only run WebGoat in a properly sandboxed environment.
Where do I go from here?
As has been pointed out several times, there is little doubt that this attack vector will continue to grow. Once you have mastered the basics we discussed in this section, you should expand your knowledge by digging in and learning some of the more advanced topics of web application hacking including client-side attacks, session management, source code auditing, and many more. If you are unsure of what else to study and want to keep up on the latest web-attack happenings, keep an eye on the OWASP “top ten.” The OWASP Top Ten Project is an official list of the top web threats as defined by leading security researchers and top experts.
Additional Resources
You can find the list at http://www.owasp.org website or by searching Google for “OWASP Top Ten.” You should keep a close eye on this list, as it will continue to be updated and changed as the trends, risks, and threats evolve.
It should be pointed out that the WebSecurify tool we discussed earlier in the chapter is capable of automatically testing for all threat categories listed in the OWASP Top Ten Projects!
Since we are talking about OWASP and they have graciously provided you a fantastic tool to learn about and test web application security, there are many benefits of joining the OWASP organization. Once you are a member, there are several different ways to get involved with the various projects and continue to expand your knowledge of web security.
Along with the great WebScarab project, you should explore other web proxies as well. Both the Burp Proxy and Paros Proxy are excellent (and free) tools for intercepting requests, modifying data, and spidering websites.
Finally, there are several great tools that every good web penetration tester should become familiar with. One of my colleagues and close friends is a very skilled web app penetration tester and he swears up and down that Burp Suite is the best application testing tool available today. After reviewing many web auditing tools, it is clear that Burp is indeed a great tool. A free version of the Burp Suite is built into Backtrack and can be found by clicking on the K-Start dragon → Backtrack → Web Application Analysis → Web (front end) → Burpsuite
If you are not using Backtrack, the free version of Burp can be downloaded from the company’s website at: http://portswigger.net/burp/download.html.
Summary
Because the web is becoming more and more “executable” and because nearly every target has a web presence, this chapter examined web-based exploitation. The chapter began by reviewing techniques and tools for interrogating web servers. The use of Nikto and Websecurify was covered for locating specific vulnerabilities in a web server. Exploring the target website by discovering directories and files was demonstrated through the use of a spider. A method for intercepting website requests by using WebScarab was also covered. Code injection attacks, which constitute a serious threat to web security, were explored. Specifically, we examined the basics of SQL injection attacks. The chapter concluded with a brief discussion and example of cross-site scripting (XSS).
..................Content has been hidden....................
You can't read the all page of ebook, please click here login for view all page.