
3
Behavioral Patterns
Behavioral patterns are patterns whose sole purpose is to facilitate the work of algorithmic calculations and communication between classes. They use inheritance heavily to control code flow. They define and produce process and run-time flow and identify hierarchies of classes and when and where they become instantiated in code. Some define class instance and state, some hand off work from one class to another, and some provide placeholders for other functionality.
Chain of Responsibility Pattern
What Is a Chain of Responsibility Pattern?
The Chain of Responsibility pattern performs a lot like it sounds. If you have a group of classes that are all interdependent on each other and each performs a particular piece of processing, this pattern is a very useful tool. It makes sure each member in a chain controls when and to what class it hands its processing to. The pattern controls the code flow by using inheritance and by allowing instances of its predecessors to be loaded one inside the other, forming in effect a chain of classes that hand off to the next class in the chain at the end of its turn.
The Chain of Responsibility pattern has a single main component: the Handler. The handler object encapsulates the entire chain of handler instances inside each other instance. In other words, the first link in the chain contains the next and that link contains each consecutive link. As you move through each link’s process and that process finishes, it automatically checks for the existence of the next consecutive link and calls the process of that next link. This can happen no matter which level of link in the chain you call and will continue down the chain until the chain ends.
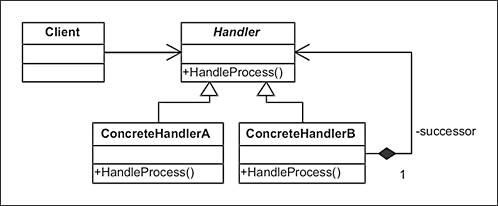
Figure 3-1. UML for Chain of Responsibility pattern
Problem: A group of classes each have processes to run in turn, but there is no way to directly determine in which class order each should run its process
For our example, we have a group of classes with a common parent. The parent class has a virtual method, Run(), which performs the actual process run on each class. Right now we have no cohesion between these classes and no way to guarantee how each class will access its Run() method or in which order. We need a way to define the order of operations between each of the classes, and define class responsibilities in the process flow.
Process firstProcess = new FirstProcess();
firstProcess.Run();
Process secondProcess = new SecondProcess();
secondProcess.Run();
Process thirdProcess = new ThirdProcess();
thirdProcess.Run();
Solution: Use a chained association of classes that have interdependence on each other to define the order of operations
In the problem above we stated we had no apparent order in which to run our class methods. We could call each in turn in code, but we need to encapsulate the execution of the method and call the next class’s method inside each class. After each class executes its Run() method, it should call the next class in a chained fashion.

Figure 3-2. UML for Chain of Responsibility pattern example
Using a Chain of Responsibility pattern, we pull the class execution responsibility into the class itself, allowing each class to contain an instance of the next class in its chain. To facilitate this process we add a new abstract method to the abstract base class Process. This method, RunNext(), contains the implementation code that we originally had in the Run() method. We make it protected to hide it from access outside the class and to allow the Run() method to act as the gate for each consecutive method.
abstract class Process
{
We have an instance variable in each of the chained classes that holds the instance for the next class:
private Process _nextProcess;
Our concrete implementations will handle how the current step in the chain gets called:
protected abstract void RunNext();
The Run() method is the way in which we start the chain at a certain point. We first call the RunNext() method to start the chain processing on the current class. Next, we check to see if there is another process in the chain. If so, we run that, passing control down into that class.
    public void Run()
    {
        RunNext();
        if(_nextProcess != null)
        {
           _nextProcess.Run();
        }
    }
This chain of actions continues as long as there is a class instance of the next chained class inside the executing class.
The class also has a public method to allow the setting up of the next process to be called. This should be done at class initialization time before the Run() method is called:
    public void SetNextProcess(Process process)
    {
        _nextProcess = process;
    }
}
Below we see the code for each concrete class implementation. Notice each class has a different process that it performs. For this example, we just pause the thread for a different time period:
class FirstProcess : Process
{
    protected override void RunNext()
    {
        System.Threading.Thread.Sleep(1000);
    }
}

class SecondProcess : Process
{
    protected override void RunNext()
    {
        System.Threading.Thread.Sleep(2000);
    }
}

class ThirdProcess : Process
{
    protected override void RunNext()
    {
        System.Threading.Thread.Sleep(3000);
    }
}
To set up the chain we use a method to include the class instances inside each other: SetNextProcess(). This method in effect registers one class inside another class, identifying the sequence of processes to execute.
Process firstProcess = new FirstProcess();
Process secondProcess = new SecondProcess();
Process thirdProcess = new ThirdProcess();
firstProcess.SetNextProcess(secondProcess);
secondProcess.SetNextProcess(thirdProcess);
thirdProcess.SetNextProcess(null);
Calling the Run() method on any of the process instances will in turn call its next instance in the chain on to the last registered instance:
firstProcess.Run ();
Any of the classes in the sequence can then be called, and all of the classes contained in it will execute in turn down through the chain. Here we see output if we start running our process on the first class:
Beginning first process....
Ending first process....
Beginning second process....
Ending second process....
Beginning third process....
Ending third process....
Comparison to Similar Patterns
Depending on whether you wish to provide a set operational cycle or you want to change that cycle on the fly might influence your decision to use the Chain of Responsibility pattern or a Command pattern. The Command pattern holds an order of operations in its command queue, but allows ad-hoc calls to any operation desired via the command object. In contrast, the Chain of Responsibility pattern more rigidly defines the order of operations. Your particular usage depends on which is more suitable to your needs. The Chain of Responsibility also is like the Composite pattern in that parsing through the class chain is like moving through each collection class in the composite. Both patterns move through class methods in a serial fashion.
What We Have Learned
The Chain of Responsibility pattern seems to be quite a good way to link classes that have interdependence on each other in an order of operations. You could implement the pattern in an approval cycle, where people needed to approve specific requests in turn. You could use it to determine an order of operations for executing nearly any kind of code. This order can easily be changed at run time or in different code instances, depending on the need.
Command Pattern
What Is a Command Pattern?
A Command pattern allows requests to an object to exist as objects. What does that mean? It means that if you send a request for some function to an object, the command object can house that request inside the object. This is useful in the case of undoing or redoing some action, or simply storing an action in a request queue on an object. When you send the request, it is stored in the object. Then later if you need to access that same request or apply the request or some method on the request to an object, you can use the request object instead of calling the object’s method directly.
The Command pattern has three main components: the Invoker, the Command, and the Receiver. The invoker component acts as a link between the commands and the receiver and houses the receiver and the individual commands as they are sent. The command is an object that encapsulates a request to the receiver. The receiver is the component that is acted upon by each request.
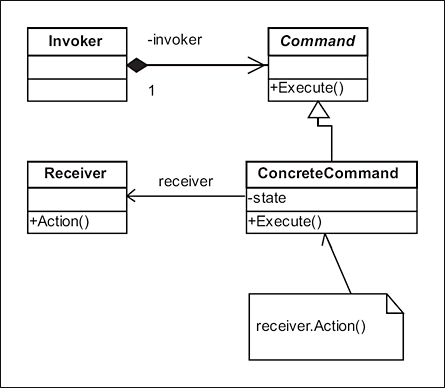
Figure 3-3. UML for Command pattern
Let’s take a look at an example of this interesting pattern. The example demonstrates a way to perform changes and undo those changes to text in a document. It shows how to use the command as a request to add some words to the document and store that text request.
Problem: A document object needs a way to add and store undo and redo actions
For our example, we will take a typical problem you may have encountered when using a simple text application like Notepad. You add some text, then find you need to undo what you have added. Sometime later you realize you actually wanted the text after all, and wish to add it back to the document. Most of the simple text applications available don’t have an undo queue or have one for only one action. In the example below, there is no such functionality. You realize that this would be a really useful feature to add, since your document has no concept of history of changes made to its text. Your current Document object stores text as lines of strings within an ArrayList. When you remove the text, it is gone, with no way to redo your previous text.
//receiver
class Document
{
A collection object stores each line of text:
private ArrayList _textArray = new ArrayList();
Methods exist for adding and removing lines of text. When text is added or removed, it is permanent; you cannot get it back if removed.
    public void Write(string text)
    {
        _textArray.Add(text);
    }
    public void Erase(string text)
    {
        _textArray.Remove(text);
    }
    public void Erase(int textLevel)
    {
        _textArray.RemoveAt(textLevel);
    }
There is a method to display all the lines of text in order. When called, this displays the current lines of text in the array list:
    public string ReadDocument()
    {
        System.Text.StringBuilder sb = new
            System.Text.StringBuilder();
        foreach(string text in _textArray)
            sb.Append(text);
        return sb.ToString();
    }
}
We need a way to introduce redo/undo functionality into our document object. In the solution we will see how the Command pattern accomplishes just that by storing commands as requests for a document.
Solution: Use a command as the request to store the text and allow the command to handle undo and redo requests of the document
To allow historical requests on our document and redo/undo functionality on those requests, we will use a Command class as a storage object for the request. Each command will house the text for the document and the methods to either undo or redo the text.

Figure 3-4. UML for Command pattern example
To give us the desired functionality we need to first create an abstract base class: Command. This class will serve as a contract for the inherited command classes. We have two abstract methods: Redo() and Undo(). These methods are to be implemented in the concrete classes and will contain references to methods on the Document object.
//base command
abstract class Command
{
    abstract public void Redo();
    abstract public void Undo();
}
Next we take a look at our concrete command class. Here we store the reference to the added text and a reference to our document. The text is part of the request and is how each request will modify the document:
//concrete implementation
class DocumentEditCommand : Command
{
    private Document _editableDoc;
    private string _text;

    public DocumentEditCommand(Document doc, string text)
    {
        _editableDoc = doc;
        _text = text;
        _editableDoc.Write(_text);
    }
Each of the parent class’s abstract methods is overridden and implemented here, giving us references to the document’s methods to add and subtract lines of text:
    override public void Redo()
    {
        _editableDoc.Write(_text);
    }
    override public void Undo()
    {
        _editableDoc.Erase(_text);
    }
}
Next we look at the Invoker object. This object serves as a repository for all request objects for this particular document.
//invoker
class DocumentInvoker
{
    private ArrayList _commands = new ArrayList();
We create and store a new document when the invoker instance is created. The invoker then can allow any command to access and modify the document’s text.
private Document _doc = new Document();
Which command is used on the document is based on the historical level, or the number of the request in the queue:
    public void Redo(int level)
    {
        Console.WriteLine("---- Redo {0} level ", level);
        ((Command)_commands[ level ]).Redo();
    }

    public void Undo(int level)
    {
        Console.WriteLine("---- Undo {0} level ", level);
        ((Command)_commands[ level ]).Undo();
    }
The document acts as the receiver of the action of the request and the invoker is the container for all the actions. Below, we see that the invoker class methods create and store commands, as well as apply them to the document:
    public void Write(string text)
    {
        DocumentEditCommand cmd = new
            DocumentEditCommand(_doc,text);
        _commands.Add(cmd);
    }

    public string Read()
    {
        return _doc.ReadDocument();
    }
}
Now we will look at how we can use the document’s invoker and command relationship to perform undo and redo actions on the document. First, we need to add some text to the document:
DocumentInvoker instance = new DocumentInvoker ();
instance.Write("This is the original text.");
Here is the text so far:
This is the original text.--first write
Now we write another line into the DocumentInvoker instance:
instance.Write(" Here is some other text.");
This is the original text. Here is some other text.--second write
Next, to illustrate the usefulness of the command we perform an undo using the DocumentInvoker’s Undo() method, which will remove the last text from the document by using the Command class’s Undo() method:
instance.Undo(1);
Here is the text now. Notice that the text has returned to its original state before the second write.
---- Undo 1 level
This is the original text.
After that we perform a redo with the same command. Notice this is possible because we store the text for the undo and redo within the command inside the invoker class.
instance.Redo(1);
Here is the text now. The text has been rewritten with the new text at the end.
---- Redo 1 level
This is the original text. Here is some other text.
We go on to perform undo and redo functions in a variety of operational orders to illustrate the flexible nature of the Command pattern strategy:
instance.Write(" And a little more text.");
instance.Undo(2);
instance.Redo(2);
instance.Undo(1);
And can see the results of our actions in the console window:
This is the original text. Here is some other text. And a little
more text.
---- Undo 2 level
This is the original text. Here is some other text.
---- Redo 2 level
This is the original text. Here is some other text. And a little
more text.
---- Undo 1 level
This is the original text. And a little more text.
Comparison to Similar Patterns
Commands and Mementos have some similarity due to the fact they both work with an object’s internal properties. The Command pattern keeps a record of changes to an object’s state and applies those changes in an ad-hoc fashion. A Memento pattern also records changes to an object’s state, and can restore that state at any time. The Chain of Responsibility pattern seems to handle processing in a similar manner to the Command, except it hands off processing to another process linearly. An Interpreter pattern works in the example above because we are using language elements to determine which changes to apply at a given time.
What We Have Learned
Commands are useful tools when dealing with behaviors in objects. By making the request to an object a command object and storing the command in an invoker object, we can modify and keep historical records of different actions performed on an object. Virtually any action could be stored as a command and used to process requests in a variety of operational orders on a receiving object.
Interpreter Pattern
What Is an Interpreter Pattern?
The Interpreter pattern interprets language elements into code solutions. Interpreters can be used for various purposes including handling regular expressions or reading flat files to interpret metadata into code. Generally, if you have some language or textual data that you need to deal with as a code process, you might use an interpreter to convert the data into a code-recognizable form.
The Interpreter pattern has two main components associated with it: the Context and the Expression. The context acts as a current data context, defining the language data as it is before the interpretation. The expression component contains the logic to convert a particular context into a code-readable form.
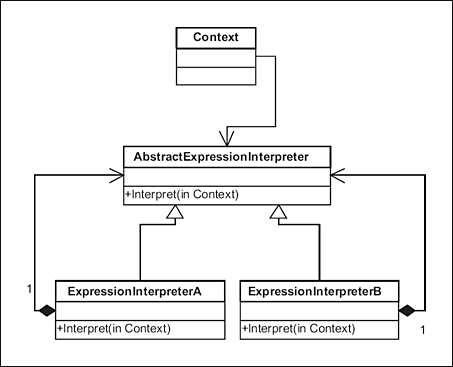
Figure 3-5. UML for Interpreter pattern
I use interpreters mostly for grabbing metadata from a configuration file or XML file and using that metadata to build code bases via reflection. I will show you in the examples two uses for interpreters that you may find interesting. One will deal with metadata conversion to code bases; the other follows the more traditional form of the pattern and converts dates based on the expression/context relationship.
Problem 1: The format of a date needs to be different depending on the particular type of date expression needed
Let’s say for this first example that we need to have a date formatted in a particular way and this format could change depending on the date expression used. Right now we have an if...then...else code block that performs this action, but we need this code to be encapsulated in a class or method so it can be used against any context of date that we wish to use it for. In other words, we need to build a language expression engine around this code so that we can use objects instead of Boolean logic to evaluate which expression we need for which context:
if(IsWordDate)
    formattedDate = date.DayOfYear + "th day, " +
            date.DayOfWeek + ", " +
            ConvertMonth(date.Month)+""+
            ConvertDay(date.Day)+", " +
            date.Year;
else if(IsCalendarDate)
    formattedDate = date.Month + "-" +
            date.Day+"-" +
            date.Year;
else if (IsGregorianDate)
    formattedDate = date.Month + "-" +
            date.Day+"-" + date.Year+""+
            date.Hour + ":" + date.Minute + ":" +
            date.Millisecond;
Solution 1: Use an interpreter and expression engine to manage the different date formats by expression type
A typical use of the Interpreter pattern is to allow different expressions to react to the context of language elements. Allowing expressions to be created as objects that can interpret the different context patterns of language elements allows the expression to be created in code from the language element.

Figure 3-6. UML for date Interpreter pattern example
To accomplish the task in our problem above, we first need to turn our language context into an object. The context includes the actual language value and the interpreted value. For the example purposes this allows a date context to be altered by an expression type. We make our context into an object holding the date value and a placeholder for the formatted value from the expression.
class Context
{
    private string _formattedDate;
    private DateTime _date;
We hold our date value in an instance variable that is input in our constructor. We can get it back via a getter property method.
    public Context(DateTime dateToFormat)
    {
        _date = dateToFormat;
    }
    public DateTime Date
    {
        get{return _date;}
    }
We also have a property for accessing our formatted value. This will get set in our interpreter.
    public string FormattedDate
    {
        get{return _formattedDate;}
        set{_formattedDate = value;}
    }
}
Next, we need to make our expression into an object. The expression is how the context is interpreted. We can have an expression for any type of interpretation we wish to have. For this example, we create a series of date expressions from an abstract parent class. Our abstract class holds a public abstract method that takes in our context class:
//interpreters
abstract class AbstractDateExpression
{
    public abstract void Interpret(Context context);
}
Each concrete expression has a different interpretation algorithm to alter the context:
class WordDateExpression : AbstractDateExpression
{
    public override void Interpret(Context context)
    {
        context.FormattedDate = date.DayOfYear + "th day, " +
            date.DayOfWeek + ", " +
            ConvertMonth(date.Month)+""+
            ConvertDay(date.Day)+", " +
            date.Year;
    }
}

class CalendarDateExpression : AbstractDateExpression
{
    public override void Interpret(Context context)
    {
        context.FormattedDate = date.Month + "-" +
                date.Day+"-" + date.Year;
    }
}

class GregorianDateExpression : AbstractDateExpression
{
    public override void Interpret(Context context)
    {
        context.FormattedDate = date.Month + "-" +
                date.Day+"-" + date.Year+""+
                date.Hour + ":" + date.Minute + ":" +
                date.Millisecond;
    }
}
As we pass the date context into each expression, that expression changes the value of the context to its particular interpretation of that context:
AbstractDateExpression exp = new WordDateExpression();
exp.Interpret(context);
Here we see the results for this interpretation:
Format for WordDateExpression:202th day, Friday, July
Our next interpretation of the context is for a calendar date:
exp = new CalendarDateExpression();
exp.Interpret(context);
And the results for our calendar conversion of the same date:
Format for CalendarDateExpression:7-21-2006
This is the interpretation of the Gregorian date format:
exp = new GregorianDateExpression();
exp.Interpret(context);
And the results for the Gregorian conversion of the date:
Format for GregorianDateExpression:7-21-2006 15:47:95
Problem 2: We need to create classes from metadata from remote packages or assemblies and load them using a common interpreter
For our next real-world problem we have a need to use metadata to determine class types at run time and load those class types instead of compiled references to the class types. Our metadata comes from an XML or config file and tells us the package and class name to load. We are doing this to allow an outside source to provide us the class types and use a common interpreter to load all these types. We need to do this to allow multiple assemblies or packages that have no compiled references to each other to interact in a common code base. Below we see the classes as they are constructed now. Currently these classes reside in the current code base, but for purposes of extensibility and a mandated change of scope we have to move them to a separate assembly or package.
class LoadOne{}
class LoadTwo{}

LoadOne one = new LoadOne();
LoadTwo two = new LoadTwo();
Here we have the metadata we are going to use to load the classes from the remote package or assembly from the XML file. Notice that we identify the name and the path inside the assembly to the class, along with the class name. (For this example we have not set the metadata to include the assembly or package path, but this is easy to implement.)
<?xml version="1.0" encoding="utf-8" ?>
<interpreter>
    <classes>
        <class name="LoadOne" path="Examples.Interpreter.LoadOne" />
        <class name="LoadTwo" path="Examples.Interpreter.LoadTwo" />
    </classes>
</interpreter>
Solution 2: Allow an interpreter to create the classes from metadata using reflection to recurse into the remote assemblies or packages
We will use our compiler and code language’s reflection API extensively to be able to recurse into the code identified in our metadata for this solution. We will use reflection in an interpreter to read and interpret the assembly or package in which the class to load exists.

Figure 3-7. UML for class instance Interpreter pattern example
This type of interpreter seems very different from the pattern implementation in the previous solution. It is, however, one use of an Interpreter pattern that I think is very relevant. We are interpreting the language elements in the XML file to render code. So we are not straying too far from the letter of what interpreters do.
Below we see our interpreter class:
class XMLInterpreter
{
Since we are reading from an XML file, we have an internal method that performs this read. Our XML reader could take any form, but for this example we simply import the XML file into a .NET DataSet, which does most of the work for us:
    private static void XMLReader()
    {
We need the path to the metadata file to interpret. For this example we are looking in the same directory as our executable:
      string path = Path.GetDirectoryName(
          GetValidAssembly().CodeBase.Replace(@"file:///","")) +
            Path.DirectorySeparatorChar + "Interpreter.xml";
We read our XML metadata into a dataset:
      DataSet _dsDataSet = new DataSet();
      DataView _dvDataView = null;
      try
      {

          _dsDataSet.ReadXml(path);
          _dvDataView = _dsDataSet.Tables[0].DefaultView;
          _dvDataView.AllowEdit = true;
          _dvDataView.AllowDelete = true;
          _dvDataView.AllowNew = true;

      }
      catch(Exception)
      {

      }
Next, we filter out the DataSet to a DataTable so we can see our XML file as data within the table:
        DataTable table = _dvDataView.DataViewManager
                          .DataSet.Tables["class"];
And last we filter and retrieve our XML metadata:
        table.DefaultView.RowFilter="name='LoadOne'";
        DataRowView row = table.DefaultView[0];
        _classDetails1 = Convert.ToString(row["path"]);

        table.DefaultView.RowFilter="name='LoadTwo'";
        row = table.DefaultView[0];
        _classDetails2 = Convert.ToString(row["path"]);
    }
}
As we said above, the way we get our metadata is not a factor; we could use a database or read XML from a file. The example above is just a sample of what we might do.
In our interpreter class we also have two methods to return the remote class types using the reflective method Activator.CreateInstance. Using this method we can load types we derive from the language elements we read from the config file. Our two methods return primitive object types.
    public static object GetClassOne()
    {
        if(_classDetails1 == null || _classDetails1 == string.Empty)
            XMLReader();
        return Activator.CreateInstance
               (Type.GetType(_classDetails1));
    }
    public static object GetClassTwo()
    {
        if(_classDetails1 == null || _classDetails1 == string.Empty)
            XMLReader();
        return Activator.CreateInstance
               (Type.GetType(_classDetails2));
    }
Note:
In the methods above we could define an expected return type, which would change this interpreter into a class factory.
If we wanted to we could provide more data, such as the path of the assembly or package for accessing remote code bases. For this example, we perform a simpler reflective recursion into the assembly structure by looking in the current directory for the assembly or for a registered assembly:
object class1 = XMLInterpreter.GetClassOne();
object class2 = XMLInterpreter.GetClassTwo();
We load our classes using our reflective class loader and we can then use them as needed:
ClassType for class 1:LoadOne
ClassType for class 2:LoadTwo
Comparison to Similar Patterns
The Factory pattern and the Interpreter pattern seem to have various similarities, especially when you factor in reflection. A Factory that creates classes based on reflection basically is an Interpreter if it uses metadata to define the class structure and path of the object it instantiates. Flyweights and other factory-driven patterns might also use this pattern to load data as needed for shared class types.
What We Have Learned
Interpreters allow us to take pieces of language from sources outside the code and implement them as code results. Basically, anytime you need any kind of conversion from textual contexts to code contexts, Interpreters are useful.
Iterator Pattern
What Is an Iterator Pattern?
Iterators allow sequential access of elements in a collection of objects without exposing its underlying code. What does this mean? If you have a list object and you wish to move through each element in the list sequentially and maintain your current place in the list, an iterator seems appropriate. Iterator patterns have been around a long time. In early Visual Basic, iterators came in the form of record sets with methods to move through the record set and keep the current row as the placeholder. Earlier than that, iterators in different forms existed in other languages. Almost anyone familiar with coding languages has used an iterator in some form.
The Iterator pattern has two classes that are associated with it: the Aggregate and the Iterator. The aggregate is a collection or aggregate object of some type whose elements we wish to iterate through. We use the iterator as a tool to move through the aggregate elements and keep track of the progress.

Figure 3-8. UML for Iterator pattern
Problem: A list object needs a way to move through each element in the list in consecutive order, retaining the position of the current record
For our example problem, we have a list adapter class that encapsulates and hides the functionality of an ArrayList. We need a way to determine which row we are on and keep a placeholder for that row, so that when we next access the list we can get the next object. In our current object we have standard methods for the list object represented in the adapter:
class List
{
A private array list object is adapted to hold our data:
private ArrayList _listItems = new ArrayList();
We have ways to check the number of records in our underlying collection:
    public int Count
    {
        get{ return _listItems.Count; }
    }
We can add and remove items with adapted methods for the underlying collection:
    public void Append(object item)
    {
        _listItems.Add(item);
    }

    public void Remove(object item)
    {
        _listItems.Remove(item);
    }

    public void RemoveAt(int index)
    {
        _listItems.RemoveAt(index);
    }
We can also get an item by supplying an index to a certain record:
    public object this[ int index ]
    {
        get{ return _listItems[ index ]; }
        set{ _listItems[index] = value; }
    }

}
Our problem is to build a device that moves through our list object and records the current place in that object each time we access a record. We will need methods to move forward and back inside the list, and all this functionality should be included inside the list object.
Solution: Create a list iterator that keeps the current record position and has methods to read and move to the next record or to any record in the list
The iterator will give us a method to move concurrently through the list object’s elements while keeping track between calls to the list of the location of the current record. We will need to derive the iterator from the List class to ensure that our iterator object contains a reference to the list.

Figure 3-9. UML for Iterator pattern example
Our List class is already a good placeholder for the method to derive the iterator. We need to add a method to create a new iterator that holds the current list as a reference:
class List
{
    ....

    public Iterator CreateIterator()
    {
        return new Iterator(this);
    }
}
Next we need to create the actual iterator class. We will need private variables for the list object, the current record index, and the number of records to skip between each read or step count:
//iterator
class Iterator
{
    private List _collection;
    private int _currentIndex = 0;
    private int _stepCount = 1;
We need to define the iterator object’s constructor as receiving the List class as its input parameter. This is done to hold the reference to the list object from the point of creation of the iterator.
    public Iterator(List collection)
    {
        this._collection = collection;
    }
Then we need an accessor for the step count. This will allow us to change the number of records between each read to the list.
    public int Step
    {
        get{ return _stepCount; }
        set{ _stepCount = value; }
    }
We need methods to iterate between records that will increment the current index or placeholder within the list by the step count and return the next object in the list. We have three methods defined for this example. There is a method to get the first record in the list, a method to get the last record, and a method to increment the list index by the step count and return the next record.
    public object First()
    {
        _currentIndex = 0;
        return _collection[ _currentIndex ];
    }

    public object Next()
    {
        _currentIndex += _stepCount;
        if(!IsDone())
            return _collection[ _currentIndex ];
        else
            return null;
    }

    public object Last()
    {
        _currentIndex = _collection.Count - 1;
        return _collection[ _currentIndex ];
    }
We also have a method to return the current object in the list to the index of the iterator:
    public object Current()
    {
        return _collection[ _currentIndex ];
    }
And last we need a method to indicate if we are at the end of the list:
    public bool IsDone()
    {
        return _currentIndex >= _collection.Count ? true : false ;
    }
To begin the test of our iterator, we call the CreateIterator() method to create our Iterator class and set the step to a value to skip to every third record:
Iterator skipIterator = list.CreateIterator();
skipIterator.Step = 3;
To test how our iterator gets each element in the list, we construct a for...loop. We use the First() method to return the first record in a for...loop. We use the IsDone() method to check for the last row and the Next() method to return the next record in the list.
for(object item = skipIterator.First();
    !skipIterator.IsDone(); item = skipIterator.Next())
Then we run the iterator and see we have returned every third record:
Skip to every third step
object 0
object 3
object 6
Next, we set the step to get every other record in the list from the iterator:
skipIterator.Step = 2;
Skip every other step
object 0
object 2
object 4
object 6
object 8
Last, we test the iterator to return every record. We set the step to 1 to indicate we get every record in the list from the first to the last:
skipIterator.Step = 1;
Skip no steps
object 0
object 1
object 2
object 3
object 4
object 5
object 6
object 7
object 8
Comparison to Similar Patterns
The Iterator pattern can be compared to the Memento pattern in the way it encapsulates the functionality of the aggregate and moves this logic to another class object, maintaining the state of the aggregate inside the iterator. This works much like the Memento pattern, which keeps state in the memento object until it is needed again. However, in the Memento the state is preserved as it was when removed from the originator. In the Iterator the state is changed directly inside the iterator. The iterator acts as an intermediary between the aggregate and itself, in effect acting as a mediator for itself, similar to the Mediator pattern.
What We Have Learned
The Iterator pattern can be a handy way to loop through a list and maintain the list’s state and position. If it is important to keep your position in the list or to get only a smaller search of a group of records, the Iterator might be a useful pattern to implement. If a list needs to have every record processed in turn and the next cannot be processed before the first, then the Iterator can handle the placement of each object in the list and help the code only return the record needed in a sequential fashion.
Mediator Pattern
What Is a Mediator Pattern?
The Mediator pattern allows groups of objects to communicate in a disassociated manner and encapsulates this communication while keeping the objects loosely coupled. If you have a group of objects that need to communicate in some way, but you don’t wish to allow them direct access to one another, then using this pattern would be a way to encapsulate this communication in a single object. The pattern allows objects to communicate on a one-to-one basis and acts as a proxy between objects to facilitate this communication.
The Mediator pattern has two main classes associated with it: the Mediator and the Colleague. The mediator acts as a go-between to the colleagues and controls which two colleagues communicate. The concrete mediator and concrete colleague act as implementation classes with their abstract bases defining the interaction.
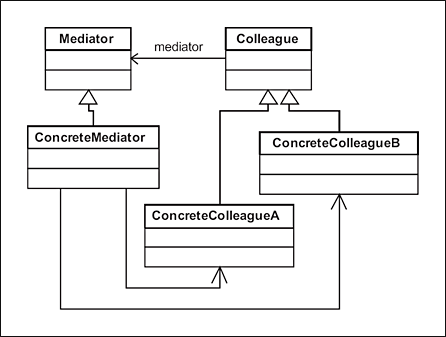
Figure 3-10. UML for Mediator pattern
Many times you find yourself needing to have several objects of similar types communicate in some way with each other. But often this communication can become too entangled and the methods of communication too deeply coupled or too rigid to make changes easily. Using a mediator you can register groups of objects, thus encapsulating the means of communication inside the mediator. After registering each class you then can specify a message in one object and have that message sent to another registered object without either object having a compiled reference to the other. This is especially useful since multiple class instances can be registered inside the mediator at run time and will be able to communicate between each other without having to know about each other directly.
Problem: Message windows reference each other directly, and if new windows are added the code cannot easily manage each window’s reference to the other
We start this problem with two message windows that both have some methods for sending and receiving messages. Right now these message windows can communicate directly. But if we needed to add several instances of these windows and control their communication, the code to do this would quickly become very complex.
MessageThread imWindow = new IMWindow("Jazzy Jeff");
MessageThread chatWindow = new ChatWindow("Sir Chats-A-Lot");

imWindow.Receive(chatWindow.Name, "Hey Jazzy!");
chatWindow.Receive(imWindow.Name, "Hey Sir Chats-A-Lot!");
We need a way to control how the messages get sent between the message windows. The method we use should allow us to add new window instances with a common base type. Each window should not have a direct reference to any other, and messages should be handed between windows by a third party. Also, since the message windows exist on client machines we need a way to allow remote communication between the different clients via a server object and allow that server object to manage each connection. Let’s take a look at how the Mediator pattern helps us do this.
Solution: Use a mediator to control messages between each window
The first step to using the Mediator pattern to solve our problem is to build our mediator to control the communication between the message window instances. The mediator we will use has two parts: an abstract mediator and a concrete mediator. Why do we need the two parts? Suppose you wanted to define multiple mediator class types. Making an abstract as a contract and allowing concrete instances is more flexible than defining one type. However, defining an abstract is not necessary, except for the fact that to communicate remotely across multiple threads as message windows do from client to client, they need to reference an interface to the server application.
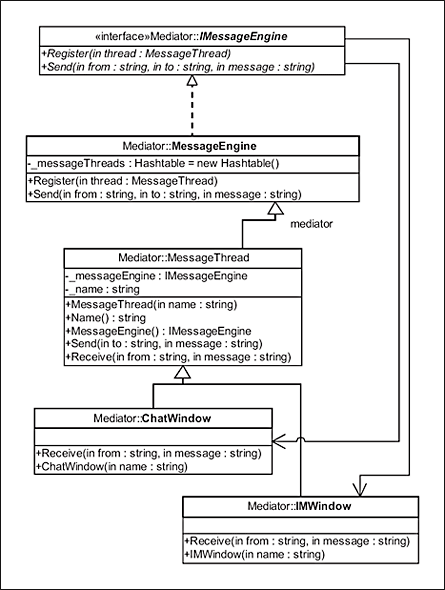
Figure 3-11. UML for Mediator pattern example
The abstract mediator in this example is an interface. The server application manages the multiple connections of the client message windows and allows one message window instance to send and receive messages to another instance registered with the server. The abstract mediator interface allows remote access from each client window into the server that controls which messages get sent between the registered clients. We use the IMessageEngine interface in this example to accommodate this:
interface IMessageEngine
{
    void Register(MessageThread thread);
    void Send(string from, string to, string message);
}
Note:
We are not taking into account TCP/IP handlers or client connection handling and managing connections remotely for this example. For a realistic client-server interface, obviously more work is involved, but this is beyond the scope of this example.
Next we create our concrete mediator class. This is the class that would reside on the server and allow different window client objects to register themselves and send communication messages to the server mediator, which in turn would redirect these messages to the proper client window.
class MessageEngine : IMessageEngine
{
Notice we have a collection of message window objects and a method to register new ones into the collection. Upon registration of the message window, the server mediator object adds a reference to itself to the MessageThread class instance to provide access back to the server.
    private Hashtable _messageThreads = new Hashtable();
    public void Register(MessageThread thread)
    {
        if(!_messageThreads.ContainsKey(thread.Name))
            _messageThreads.Add(thread.Name,thread);

        thread.MessageEngine = this;
    }
We also have a method to send messages to the server. The method finds the desired window to send the message to and sends it to the Receive() method of that window. This differs from the current solution in that each window is disconnected from references to other windows. The server interface manages each remote window from different clients.
    public void Send(string from, string to, string message)
    {
        MessageThread thread = (MessageThread)_messageThreads[ to ];
        if(thread != null)
            thread.Receive(from, message);
    }
}
Next, to finish the mediator implementation we modify our MessageThread class, adding an accessor to the IMessageEngine interface:
abstract class MessageThread
{
    private IMessageEngine _messageEngine;
    .....

    public IMessageEngine MessageEngine
    {
        set{ _messageEngine = value; }
        get{ return _messageEngine; }
    }
We also add a reference to the Send() method on the server mediator object. This allows our client message windows to send each message back to the server and have the mediator object decide and send the message to the proper receiver message window.
    public void Send(string to, string message)
    {
        _messageEngine.Send(_name, to, message);
    }
}
When we look at the example at run time, we can see how the code flows between the client windows. If we send a message to another client through our server mediator, it gets redirected to the proper receiver client via its Receive() method:
//Create the message engine which is the mediator
IMessageEngine engine = new MessageEngine();

//instantiate two chat instance message windows
MessageThread imWindow = new IMWindow("Jazzy Jeff");
MessageThread chatWindow = new ChatWindow("Sir Chats-A-Lot");

//Register each chat instance window with the mediator
engine.Register(imWindow);
engine.Register(chatWindow);

//Jazzy Jeff sends a message to Sir Chats-A-Lot
imWindow.Send("Sir Chats-A-Lot","Hey Sir Chats-A-Lot!");

Output: ------------
ChatWindow Received: Jazzy Jeff to Sir Chats-A-Lot:
'Hey Sir Chats-A-Lot!'

// Sir Chats-A-Lot sends a message back to Jazzy Jeff
chatWindow.Send("Jazzy Jeff","Hey Jazzy!");

Output: ------------
IMWindow Received: Sir Chats-A-Lot to Jazzy Jeff: 'Hey Jazzy!'
We could now add any number of client message windows without modifying our code. Since we allow the server to decide which windows communicate and handle the mapping to that communication, direct window references are no longer necessary.
Comparison to Similar Patterns
A Mediator pattern at first blush seems similar to an Observer pattern. The main difference is how it is implemented. The Mediator takes a group of classes and allows these classes to communicate between one another without having access to each other. This is done in a one-to-one fashion. An Observer pattern keeps a group of classes that is linked to it updated in a one-to-many fashion. So the Mediator allows decoupled communication between a pair of classes, and an Observer allows communication between one class and many other classes linked to it.
What We Have Learned
Mediators are useful when we need to control references between objects for purposes of sending or receiving data. If we wish to expand a relatively static code model into a more object-handled pattern, we can use mediators to control the program flow of how these independent objects communicate.
Memento Pattern
What Is a Memento Pattern?
The Memento pattern is a way to capture an object’s internal state without violating encapsulation of the object, and preserve that state for some purpose. That means if we have some values for an object we wish to preserve outside the object and these values do not necessarily have external access from that object and we do not wish to provide external access to these values because it would violate the encapsulation rules of the object, we can use a Memento pattern to hold these data points or states. State management in this fashion gives us a snapshot of data for an object. We could then use the preserved values to restore the object’s state at any time.

Figure 3-12. UML for Memento pattern
Memento patterns have three main objects associated to perform the work of the pattern: the Originator, the CareTaker, and the Memento. The originator is the class whose internal state we wish to capture. The memento class is the class in which we store the originator’s state. The caretaker class stores the memento until it is needed to restore that state to the originator.
Problem: A class needs to have its internal state captured and then restored without violating the class’s encapsulation
Our example illustrates a common problem with encapsulation in classes. We have a class that contains some data. This data is the state of the object for a particular instance in time. If we should wish to preserve that state for some reason (perhaps for a refresh back to the original), the only way to accurately capture the entire state would be to allow access to each data point on the object. This would violate the encapsulation of the object, exposing variables that are set internally to the class. But if we did not wish to provide direct access to values set internally, we could not capture the current state.
For our example, we have the object Product that has some externally accessible variables and one that is internally set: State. An enumeration is used to indicate the different types of state within the object:
enum State{NEW,LOADED,CHANGED};

//Originator
class Product
{
    private string _name;
    private string _description;
    private double _cost;
    private State _state = State.NEW;
The class’s constructor takes in the initial values and sets the internal state variable to LOADED. This marks the class as initialized and loaded with data.
    public Product(string name, string description, double cost)
    {
        _name = name;
        _description = description;
        _cost = cost;
        _state = State.LOADED;
    }
Our values have getter/setter properties, while our internal enum for indicating state has no outside access at this time:
    public string Name
    {
        get{return _name;}
        set{_name = value;_state = State.CHANGED;}
    }
    public string Description
    {
        get{return _description;}
        set{_description = value;_state = State.CHANGED;}
    }
    public double Cost
    {
        get{return _cost;}
        set{_cost = value;_state = State.CHANGED;}
    }
    public State State
    {
        get{return _state;}
    }

}
The obvious problem is that if we wanted to restore the original complete state of the object we could not do this without allowing external access to the state variable. We need a way to preserve the complete state without allowing access to the state variable in order to keep from violating the encapsulation rules of the class.
Solution: Use a memento and a caretaker to capture and store the object’s state
From the problem above we see that we have to maintain the encapsulation of the Product object and still capture and restore the full state of the object. To accomplish this we will use the Memento pattern to establish a class object that is internal to Product to capture and store its state.

Figure 3-13. UML for Memento pattern example
The first step is to create our memento class. The memento class contains all the variables of Product that will be needed to restore the object’s state at a later time. These variables are fed into the input parameters of the class’s constructor:
//Memento
class ProductMemento
{
    .....
    public ProductMemento(string name, string description,
                          double cost, State state)
    {
        this._name = name;
        this._description = description;
        this._cost = cost;
        this._state = state;
    }
Since we only wish to modify the memento at creation to maintain the proper state, each variable on the memento is read only:
    public string Name
    {
        get{return _name;}
    }
    public string Description
    {
        get{return _description;}
    }
    public double Cost
    {
        get{return _cost;}
    }
    public State State
    {
        get{return _state;}
    }
}
Next, we need a place to store the memento object until it is needed again by the Product class. The Memento pattern defines just such an object: the caretaker. The caretaker object houses our memento until such time as our instance of the Product needs to have its state restored:
//Caretaker
class ProductStateMemory
{
    // Fields
    private ProductMemento _memento;

    // Properties
    public ProductMemento Memento
    {
        set{ _memento = value; }
        get{ return _memento; }
    }
}
The last step to implement the Memento pattern is to place a method to create the memento inside the Product object. This gives the memento object internal access to all the variables of Product. This ProductMemento class will be created internally to the Product object. Because it is internal, it is allowed access to all the state variables encapsulated inside the object. Then, at a later time, we can return the object to the class and let the Product class use the ProductMemento to restore its complete internal state.
We need two methods to accomplish this. The first will create the ProductMemento object’s internal variables:
//Originator with memento methods
class Product
{
    ......
    public ProductMemento Memento
    {
        get{return new ProductMemento(_name, _description,
                                      _cost, _state);}
    }
The second will restore the Product object’s internal state by passing it back the ProductMemento class:
    public void RestoreMemento(ProductMemento memento)
    {
        this._name = memento.Name;
        this._description = memento.Description;
        this._cost = memento.Cost;
        this._state = memento.State;
    }
}
Now let’s take a look at how the Memento pattern performs during run time. First, we create our Product object, initializing the internal variables with input parameters in the constructor. This sets the internal State variable from NEW to LOADED:
Product product = new Product("Product A","The first Product
                               in inventory",50.00);
And we can see the variables indeed have the expected values:
Name:Product A
Description:The first Product in inventory
Cost:50
State:LOADED
Next, we call the method on Product to create our memento. We store this inside our caretaker object ProductStateMemory for later use:
ProductStateMemory memory = new ProductStateMemory();
memory.Memento = product.Memento;
Now we can change our Product object’s variables as we wish:
product.Name = "Product A(2)";
product.Description = "We have a change";
product.Cost = 60.00;
And see these changes are indeed reflected in the class:
Change the object:
Name:Product A(2)
Description:We have a change
Cost:60
State:CHANGED
To restore the state of the Product object, we simply pass the memento from our caretaker object back into the Product object via the RestoreMemento() method:
product.RestoreMemento(memory.Memento);
A look at the class values shows us that our original state for the Product object has been restored by the memento:
Restore state via the memento....
Name:Product A
Description:The first Product in inventory
Cost:50
State:LOADED
Comparison to Similar Patterns
The Memento pattern is similar to the Command pattern in that we are storing separately from the object a state or change to its internal values. It is similar to the Observer pattern in that both patterns use attributes of the target object passed to initialize or change values inside the pattern subject. It can be compared in somewhat the same manner to the Mediator, in that it holds and maintains control of data for another object.
What We Have Learned
Memento patterns allow us to beat the rules of encapsulation when dealing with classes with internal states that are inaccessible without violating the encapsulation of a class. We can use a memento to capture and store a class’s state, and then restore that state at any time.
Observer Pattern
What Is an Observer Pattern?
The Observer pattern facilitates communication between a parent class and any dependent child classes, allowing changes to the state of the parent class to be sent to the dependent child classes. We can use this pattern to allow the state changes in a class to be sent to all its dependent classes. The class relationship is one-to-many between the class and all its dependents.
The pattern generally consists of two base classes. The first is called the Subject class, and this class acts as the notification engine. The Observer classes act as receivers of the subject notifications. From these two base class types the concrete implementations for each type are derived: concrete subject and concrete observer.
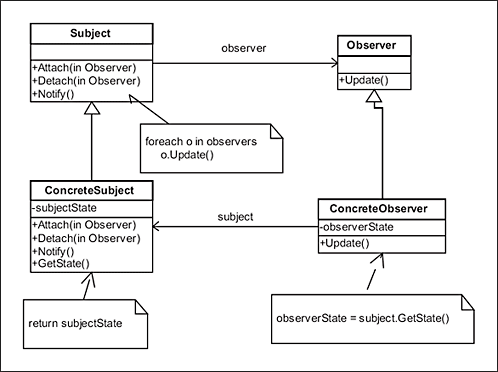
Figure 3-14. UML for Observer pattern
Observers generally monitor the state of a class they are linked to and get information from that class when changes occur that they are concerned about. If we had a class that linked into many classes, and those classes wished to know about changes within it, we might use this pattern. The pattern allows code to handle the notifications automatically through the structure of the objects, instead of letting Boolean logic decide. It also offers a cleaner and more intuitive way to allow communication between a single object supplying notifications and its dependent objects.
Problem: We have several child forms of an MDI form that we need to inform of changes that occur in the MDI form, and we have no way to do this automatically
For our example problem, we need to notify a series of child classes when an MDI (multiple document interface) form changes its title.
We start out with a Form class and MdiForm class but have no way to inform each individual Form class that has the MdiForm as its parent of changes within the parent.
class Form
{
    private string _name;
    private string _title;
    public Form(string name)
    {
        _name = name;
    }
    public string Name
    {
        get{return _name;}
    }
    public string Title
    {
        get{return _title;}
        set{_title = value;}
    }
}
The MdiForm inherits from the Form class. Its children are all simple Form classes:
class MdiForm : Form
{
    private ArrayList _forms = new ArrayList();
    .....
}
Our problem is that we don’t have a good way to inform the children of the MdiForm class of any changes in that class. We want our child forms to be notified each time the MdiForm’s title is changed, and reflect those changes in their titles.
Let’s see how the Observer pattern can help us with this problem.
Solution: Use the Observer pattern to provide notifications to the child forms when the MDI form state is changed
For our solution to the problem we will use the Observer pattern to provide notifications to the MDI form’s children without having to write code each time a change occurs. Instead, the MdiForm will notify all its children of its changes as they occur.
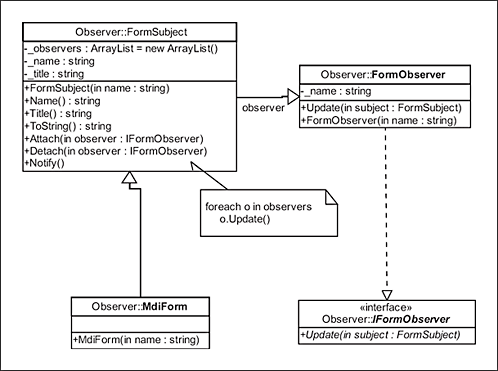
Figure 3-15. UML for Observer pattern example
We first need to change the classes to match the Observer pattern elements. Below we see we have refactored MdiForm into a class called FormSubject. This class is the subject class that controls the notifications of its observers. We will inherit the concrete MdiForm class from this class. Notice that we have an ArrayList to hold the observers, much as we had in the original MdiForm class:
abstract class FormSubject //refactored from Form
{
    private ArrayList _observers = new ArrayList();
    private string _name;
    private string _title;

    public FormSubject(string name)
    {
        _name = name;
    }
    public string Name
    {
        get{return _name;}
    }
Notice that the Notify() method is called when the Title accessor is changed. This allows all attached observer objects to be notified of the change:
    public string Title
    {
        get{return _title;}
        set
        {
            _title = value;
            Notify();
        }
    }
There are also methods to attach and remove the observer classes to and from the subject, allowing the subject to control the one-to-many relationship using the IFormObserver interface as a conduit to each observer:
    public void Attach(IFormObserver observer)
    {
        _observers.Add(observer);
    }

    public void Detach(IFormObserver observer)
    {
        _observers.Remove(observer);
    }
The Notify() method loops through each observer interface stored in the subject class and calls the Update() method on each. This will be how we notify each observer of changes to the subject class.
    public void Notify()
    {
        foreach(IFormObserver o in _observers)
            o.Update(this);
    }
}
Now the MdiForm will inherit from the FormSubject class. This gives the control of notification to the MdiForm class.
//Concrete Subject
class MdiForm : FormSubject
{
    public MdiForm(string name) : base(name){}
}
We use the interface IFormObserver as the reference to the concrete observer. This actually is an alternative to the pattern’s abstract observer class, and works the same way. Each observer interface accepts a reference to the subject in the Update() method to gain access to the subject’s properties:
//Observer
interface IFormObserver
{
    void Update(FormSubject subject);
}
We implement the interface on each FormObserver object that we refactored from our Form class:
// "ConcreteObserver"
class FormObserver : IFormObserver
{
    private string _name;

    public FormObserver(string name)
    {
        _name = name;
    }
The Update() method from the interface is implemented on the FormObserver class, which utilizes the passed FormSubject instance to retrieve the state that we wish to notify the observer of:
    public void Update(FormSubject subject)
    {
        Console.WriteLine("Form Observer {0}'s new Title is '{1}'",
            _name, subject.Title);
    }

}
When we examine the run-time behavior of the newly refactored classes we see that when our subject class MdiForm receives a change to its title, the Notify() method will send the change to each class that is attached to it. To demonstrate, we first create our FormObserver class instances, then our FormSubject instance as MdiForm:
IFormObserver formOb1 = new FormObserver("1");
IFormObserver formOb2 = new FormObserver("2");
IFormObserver formOb3 = new FormObserver("3");
IFormObserver formOb4 = new FormObserver("4");

FormSubject mdiForm = new MdiForm("MAIN MDI Form");
Next, we attach each observer class to the subject class. This allows the subject class to have a registry of attached objects to notify.
mdiForm.Attach(formOb1);
mdiForm.Attach(formOb2);
mdiForm.Attach(formOb3);
mdiForm.Attach(formOb4);
When we change the Title accessor for the MDI form, we can see that each observer child form receives that change when we make a change to the parent MdiForm’s Title property:
mdiForm.Title = "MDI Form Title Change #1";
Form Observer 1's new Title is ‘MDI Form Title Change #1’
Form Observer 2's new Title is ‘MDI Form Title Change #1’
Form Observer 3's new Title is ‘MDI Form Title Change #1’
Form Observer 4's new Title is ‘MDI Form Title Change #1’

mdiForm.Title = "MDI Form Title Change #2";
Form Observer 1's new Title is ‘MDI Form Title Change #2’
Form Observer 2's new Title is ‘MDI Form Title Change #2’
Form Observer 3's new Title is ‘MDI Form Title Change #2’
Form Observer 4's new Title is ‘MDI Form Title Change #2’
Comparison to Similar Patterns
I would say the main difference between Observer and Mediator patterns is how the objects communicate. In the Observer pattern, one object communicates with many linked objects. In the Mediator, objects in a group communicate on a one-to-one basis between each other without referencing each other. Observer subjects and singletons both pass values from a single object to many other objects. Observers use the state of the subject object and gain that state as a linked object. Observers use the state like a Memento pattern, storing parts of the state of the subject.
What We Have Learned
Observers are interesting ways to allow a one-to-many relationship for passing and sharing state between a subject and a number of observer objects. It allows an automatic relationship to be established between a subject and its observers that allows controlled information to be exchanged at key moments between these objects.
State Pattern
What Is a State Pattern?
The State pattern is a way to allow an object to change its behavior and functionality depending on its internal values. That is, when a value or attribute of an object changes, so too will its state. The state object controls the changes it makes or can be controlled by the context object in some cases and, depending on rules set up for the context, identifies these changes by changing itself into another object (or value in the case of an enum as an object state).
The State pattern has two main components: the State object and the Context object. The state object can change depending on factors associated with the context and identifies changes in the context based on which object representation the state is in at a given time. The state object uses values from the context to determine how the state of the context will change. The context object holds the state and is referenced by the state. It allows the state to change itself according to rules and data from the context.

Figure 3-16. UML for State pattern
State management is very important to systems that either are maintained against multiple threads or requests, or span multiple systems. State in a class or object allows different processes to change an object and have other processes see the results of those changes. This is particularly useful to database or entity relational systems. Also, any systems that manage unit of work or transactional data and/or information usually use state management in some way.
Problem 1: We have no way to determine the state of an object without performing calculations outside an object
We need to define a way to determine what kind of changes have occurred on the context object by checking a single attribute. In our current code we have a data object named Product on which we need to monitor state. This object is simple enough, but we can’t make any kind of determination about the object’s current state or if that state has changed in any way without making some calculations outside the object. We need a way to determine if we are low on product or have enough when changes are made to the object. Below is the stateless object before we begin to refactor:
class Product
{
First, we see private variables indicating the name of the product, the number of items in stock, and the number sold:
    private string _name;
    private int _numberInStock;
    private int _itemsSold;
The constructor takes in the basic information for our Product class such as the name and number of items in stock:
    public Product(string name, int numberInStock)
    {
        _name = name;
        _numberInStock = numberInStock;
    }
We have properties for the variables we input in the constructor:
    public string Name
    {
        get{return _name;}
        set{_name = value;}
    }

    public int NumberInStock
    {
        get{return _numberInStock;}
    }
The Sell() method takes in the number of items sold, decrements the number in stock, and increments the internal variable for items sold:
    public override void Sell(int itemsSold)
    {
        if(itemsSold > _numberInStock)
        {
            itemsSold = _numberInStock;
            _numberSold += itemsSold;
            _numberInStock -= itemsSold;
        }
        else
        {
            _itemsSold += itemsSold;
            _numberInStock -= itemsSold;
        }
    }
We also have a method to add new items for restock:
    public override void Restock(int itemsRestocked)
    {
        _numberInStock += itemsRestocked;
    }
}
Notice the methods Sell() and Restock().Weare going to need to modify these methods to allow a more stateful management of the variables they modify.
Solution 1: Use a state object that can change itself as the context object changes to determine the context state
Our solution for this example is to build objects with polymorphic properties to encapsulate rules around the Product class’s values and the state of those values. These objects will be our state objects and will also deal with how the values interact and are managed.

Figure 3-17. UML for State pattern example
Our first step is to create our base state class from which we will derive our concrete implementations for each state type. We do this by creating the abstract class State:
abstract class State
{
    protected Product _product;
    protected int _numberInStock;
    protected int _numberSold;
State holds a reference to the context object Product and holds current values for the number of products sold and in stock. We refactor State to hold these values so it can directly reference and manage each stateful value. This is not a mandatory way to manage these values since you always keep a reference to the context object, but it was the simpler implementation for this example.
    public Product Product
    {
        get{return _product;}
        set{_product = value;}
    }

    public int NumberInStock
    {
        get{return _numberInStock;}
    }

    public int NumberSold
    {
        get{return _numberSold;}
    }
We also define two abstract methods to be implemented on the concrete state classes. These methods provide the concrete state classes a way to define different implementations of functionality for each state. The methods for selling and restocking a product are going to be refactored from the product object to the state objects to have that functionality managed there. This allows the individual state to change this functionality as required for each state of the context object.
    abstract public void Sell(int itemsSold);
    abstract public void Restock(int itemsRestocked);
}
Next, we need to define our concrete state types. For this example we define two: LowStockState and NormalStockState. LowStockState is the state our Product object will reside in if the product stock reaches zero. Seeing this state on the object will tell us that we need to reorder and will not allow us to sell any more stock. NormalStockState is the state that is normal to the product. It tells us we have stock to sell.
The NormalStockState is our default state for the Product object. It contains two constructors: one to allow the product and number of stock to be passed in for initialization within the Product object, and one to allow control to be passed from the LowStockState state object.
class NormalStockState : State
{
    public NormalStockState(int numberInStock, Product product)
    {
        this._numberInStock = numberInStock;
        this._numberSold = 0;
        this._product = product;
    }
    public NormalStockState(State state)
    {
        this._numberInStock = state.NumberInStock;
        this._numberSold = state.NumberSold;
        this._product = state.Product;
    }
The Sell() method of NormalStockState checks to make sure we are not selling more than our current stock and manages each sale by adding to the items sold variable and subtracting from the items in stock. When the stock dwindles to zero, it changes the state and hands the processing to the LowStockState object via the Product:
    public override void Sell(int itemsSold)
    {
        if(itemsSold >= _numberInStock)
        {
            _product.State = new LowStockState(this);
            _product.State.Sell(itemsSold);
        }
        else
        {
            _numberSold += itemsSold;
            _numberInStock -= itemsSold;
        }
    }
Since restocking the product only changes the state if it is in the LowStockState state, the NormalStockState state object only adds to the product stock:
    public override void Restock(int itemsRestocked)
    {
        _numberInStock += itemsRestocked;
    }
}
In our LowStockState constructor we pass in the values from the preceding state to initialize the current state. Our constructor only needs to be passed the previous state, since it is never default:
class LowStockState : State
{

    public LowStockState(State state)
    {
        this._numberInStock = state.NumberInStock;
        this._numberSold = state.NumberSold;
        this._product = state.Product;
    }
If we look at the LowStockState representation of the Sell() method, we see we are checking to see if we have current quantities of stock, and if so we change our state to NormalStockState. We also pass back control to the Product object to allow it to determine the proper state to access to sell a product. If insufficient quantities of the stock are available, then this state manages how the stock is sold:
    public override void Sell(int itemsSold)
    {
        if(itemsSold >= _numberInStock)
        {
            itemsSold = _numberInStock;
            _numberSold += itemsSold;
            _numberInStock -= itemsSold;
        }
        else
        {
            _product.State = new NormalStockState(this);
            _product.State.Sell(itemsSold);
        }
    }
The Restock() method works in a similar fashion, changing the product’s state automatically to NormalStockState when the new stock is added:
    public override void Restock(int itemsRestocked)
    {
        _numberInStock += itemsRestocked;
        _product.State = new NormalStockState(this);
    }
}
Now let’s look at how the state changes both functionality and object type in the actual run-time workflow. We start off constructing a new Product object with 15 items:
Start with 'Product A' at quantity of 15—
Next we sell five items. This does not change our state, since we still have stock greater than zero:
Sell 5–
Name:Product A
State:NormalStockState, Number In Stock:10, Number Sold:5
Next we try to sell 11 items. Since we only have 10 items in stock, our state changes to LowStockState state and we only sell 10 items, which is the total of items in stock:
Sell 11–
Name:Product A
State:LowStockState, Number In Stock:0, Number Sold:15
Finally, we get in another 15 items and restock the product. The state is automatically changed back to NormalStockState state.
Restock 15–
Name:Product A
State:NormalStockState, Number In Stock:15, Number Sold:0
We can see each time we add or subtract items in the product that the state is changed and manages itself internally according to the rules set up for the Product.Wecan monitor the state simply by checking its implementation type on the Product object.
Problem 2: We need to prevent unsynchronized or dirty updates between factory class instantiation calls
For our second example I have chosen a scenario that I originally included in the factory section, but saw it seemed to pertain more directly to state management. It does not follow the letter of the pattern, but instead serves to illustrate another usage for state in regard to stateful object management within a synchronized repository.
We have discovered after using a factory that we need to have the states of our loaded factory objects maintained across multiple threads so that dirty updates can be handled and the states of loaded classes can be maintained. Dirty updates are when data from a data source has non-concurrent updates committed to its data. That is to say, if you pull some data from your data source, make a change to the data, and another process makes an update on the same data before you can make your update, then you make your update (in effect erasing the previous update), you have now committed a dirty update.
Solution 2: Make the factory a static interface, and maintain class states across multiple threads
To maintain state of our Suit classes between different process threads for purposes of determining whether a dirty update has occurred since data was last retrieved into the factory, we need to make the factory and its loaded class types accessible to multiple threads. To accomplish this, we make the factory a static one. We change the implementation of the dictionaries and the methods involved to make the factory accessible to any thread within the global process by marking them static:
    private static Hashtable _registered = new Hashtable();
    private static Hashtable _loaded = new Hashtable();
    private static LOADSTATUS _loadStatus = LOADSTATUS.Ghost;

    public static Suit CreateSuitWithState(SuitType suitType)
    {
        if(_loaded[suitType] == null)
            Load();
        return (Suit)_loaded[suitType];
    }
Note:
The static access modifier gives the method or attribute with this modifier global access; in other words, it gives access to any thread associated with the domain of the class. It also prevents instances of the class from having access to the method or attribute. This in effect provides any thread access to the method or attribute regardless of instance, and maintains the state of these across multiple threads involved in the global process.
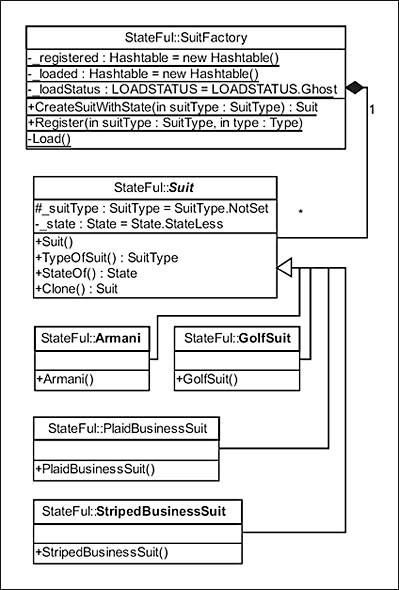
Figure 3-18. UML for State/Factory pattern example
We next need to modify our Suit class to include some parameters to indicate whether or not the particular instance has been modified. We use an enum class type State to indicate the class state inside the factory:
public abstract class Suit
{
    .......
    public enum State{StateLess, Loaded, Changed};
    public State StateOf
    {
        get{return _state;}
    }
Next, we need to modify the Suit class’s access modifiers to change its state if modified. Since each Suit implementation class is stored within the static factory, when a thread changes some value of an attribute that we want to maintain for object state, we want to change the State enum value on the object to Changed. This maintains across multiple threads, so that even if a dirty update occurs, only the last change to the specific attribute gets saved. Marking the class as dirty is only the first step, however. The way to make sure a dirty update does not occur is to throw an exception or refuse the change when we change a value on an attribute for a class whose state is changed. That way, any attempts to change the attribute thereafter until the current update was committed and a fresh data source retrieve was done would fail. This would effectively keep dirty updates from occurring within the scope of the domain of the code base.
Warning:
Dirty updates to SQL data sources or any data source not running exclusively inside the global process (including data sources that are external or modifiable outside the domain) will still be possible even if you mark your classes with a dirty update status. This is due to the lack of synchronization between your code base and the data source. If multiple global processes are running for the same code base (as in the case of multiple servers in a web farm) and there is no way to access the data repository code across servers, the solution in this example alone would not prevent a dirty update between multiple repositories. To keep a dirty update from occurring in such a situation, your transactional code would have to include the actual outside data source and give final control to that data source for managing dirty updates.
Here we see the Suit class with its TypeOfSuit attribute set up for changing its state. Notice that if the TypeOfSuit attribute is not set to the initialized form and the attribute value is changed, an exception is thrown. This is done to guarantee that a dirty update cannot be committed. Also, we change the state if the Suit class is not initialized.
public abstract class Suit
{
    public enum State{StateLess, Loaded, Changed};

    public SuitType TypeOfSuit
    {
        get{return _suitType;}
        set
        {
            if(_state == State.Changed)
                throw new Exception("Attribute 'TypeOfSuit' has
                   already been modified in another process and
                   cannot be modified again until the current
                   update has been committed.");
            if(value != _suitType)
               _state = State.Changed;

            _suitType = value;
        }
    }
    public State StateOf
    {
        get{return _state;}
    }
}
We determine our SuitType enum inside the constructor of the suit class implementation:
public class GolfSuit : Suit
{
    public GolfSuit(){_suitType = SuitType.GolfSuit;}
}
Our factory object will be the managing code repository for all Suit classes. We have two collections to manage the objects. One will house the allowed types as registered entities, and the other will house all the loaded instances and maintain their current states throughout the lifecycle of the factory.
public sealed class SuitFactory
{
    public enum LOADSTATUS {Ghost,Loading,Loaded};

    private static Hashtable _registered = new Hashtable();
    private static Hashtable _loaded = new Hashtable();
    private static LOADSTATUS _loadStatus = LOADSTATUS.Ghost;
We have two main methods in our factory. The first returns from the factory repository a stateful object instance of Suit. Since we are giving a reference to the object stored in the hash table collection, each reference in our static factory can be changed by multiple threads. We access all the stateful objects via the CreateSuitWithState method, passing in the SuitType enum value as a key to our Suit instance:
    public static Suit CreateSuitWithState(SuitType suitType)
    {
        Suit suit = null;
        if(_loaded[suitType] == null)
            Load();
        suit = (Suit)_loaded[suitType];
        if(suit != null)
            Console.WriteLine("StateFul type:" + suit.GetType().Name
               + " Enum:" + suit.TypeOfSuit + " State:"
               + suit.StateOf);
        return suit;
    }
Note:
Be mindful of synchronization issues when writing to hash tables. If you are planning to allow multiple writers in .NET, you need to lock the hash table using the SynchRoot method. In Java you need to use an iterator to change the elements.
We perform a lazy load upon the call to the static CreateSuitWithState() method to load all the registered class types. We load each registered object from the type information we stored from the Register() method and set each loaded object with the initialized state of LOADSTATUS.Loaded. Notice we have the lock keyword surrounding the code that actually loads each instance. This is done during the load to make sure only one thread at a time loads the objects and to prevent different threads from overwriting each other. We also are checking the factory status inside the lock. The first thread will see that the factory status is not loaded and will perform the load. No other thread can access this code until the current thread finishes executing it. Then when the next thread accesses the code, it will see the factory is already loaded and not perform the same load again.
    private static void Load()
    {
        lock (typeof(SuitFactory))
        {
            if(_loadStatus == LOADSTATUS.Loaded)
                return;
            _loadStatus = LOADSTATUS.Loading;
            foreach(DictionaryEntry obj in _registered)
            {
                Type type = (Type)obj.Value;
                ConstructorInfo info = type.GetConstructor(new
                                       Type[]{});
                Suit suit = (Suit)info.Invoke(new object[]{});
                //if(!_loaded.ContainsKey(obj.Key))
                    _loaded.Add(obj.Key,suit);

            }
            loadStatus = LOADSTATUS.Loaded;
        }
    }

}
The second method, Register(), is the method that controls workflow within our factory. We identify which class implementation types of Suit we wish to allow this factory instance to return. We bind the type reference with the SuitType enum to provide an indirect relationship between the SuitType enum as value type and the reflection type information. Notice we also check the factory load state and perform a load when registering new objects if the state indicates the factory is already loaded. This is done to take care of instances where the factory may be loaded already, but we wish to register a new object.
    public static void Register(SuitType suitType, Type type)
    {
        if(!_registered.ContainsKey(suitType))
        {
            _registered.Add(suitType,type);
            if(_loadStatus == LOADSTATUS.Loaded)
                Load();
        }
    }
When we look at the flow of the factory code, we can see how the state is changed between multiple threads accessing the same code base. We see each thread hitting the factory in turn (actually they can all hit at the same time, except for locked areas of code). As we change the state of the object, we can watch this change as it is reflected in the factory referenced object. The first call loads the object:
StateFul type:GolfSuit Enum:GolfSuit State:Loaded
We can change a value of the instance of the object and it will change the state of the object inside the factory:
suit.TypeOfSuit = SuitType.StripedBusinessSuit;
We can see the state changed:
StateFul type:GolfSuit Enum:StripedBusinessSuit State:Changed
When we next try to change the state for the same object, in this case in another thread, we get an exception:
StateFul type:GolfSuit Enum:StripedBusinessSuit State:Changed
--State Violation:Attribute 'TypeOfSuit' has already been modified
                  in another process and cannot be modified again
                  until the current update has been committed.
We can check how this works between multiple threads. Each thread that accesses an object can change the state. The changes will be reflected in every other thread. In this way we determine if an object has been changed. If it has, then we do not allow it to be changed again. Thus we maintain a factory level synchronized unit of work. We use state management to define whether or not we allow a transaction to occur.
Comparison to Similar Patterns
State patterns are related directly to any pattern that deals directly with an object’s intrinsic or extrinsic state. The Memento pattern is a good example of the usage of state in how it records and restores an object’s state in the memento object, stores that state in the caretaker, and restores it later to the originator. The Observer pattern also makes use of state by changing each observer’s state based on changes to the subject. The Factory pattern can use state to maintain changes to shared objects it stores. The Flyweight pattern uses both intrinsic and extrinsic state to keep shared objects flyweights in a context-changeable format, allowing common state elements to be shared. Singletons maintain state as a global static property.
What We Have Learned
State is used in many other patterns to augment their functionality. State is allowed by the property of encapsulation, which governs the private nature of stateful object values and allows those values to change. State is important for sharing persistent objects in a context, or across several contexts. State acts as a point or marker of progress within a class, or signifies persistent changes within that class.
Strategy Pattern
What Is a Strategy Pattern?
A Strategy pattern is a group of algorithms encapsulated inside classes that are made interchangeable so the algorithm can vary depending on the class used. Strategies are useful when you would like to decide at run time when to implement each algorithm. They can be used to vary each algorithm’s usage by its context.
The Strategy pattern has three main components: the Strategy, the Concrete Strategy, and the Context. The strategy is a common interface that ties together all supported algorithms. Usually this class is abstract. The concrete strategy is the implementation class where the logic for each different algorithm lives in the group. The context is the object that ties a concrete strategy to a particular code flow.
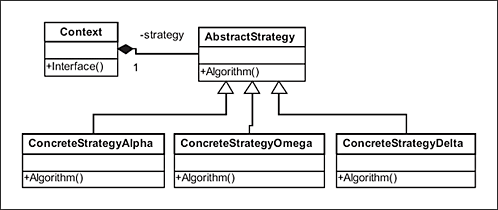
Figure 3-19. UML for Strategy pattern
Strategies are useful when you would like to use a family of algorithms across different contexts. Perhaps you have classes that each contain a different algorithm and you wish to allow them to use a common interface.
Problem: We have a series of algorithmic classes that have no correlation and are not easily exchanged but are needed to do so
For the function problem let’s use an example of a set of classes that all have arithmetic code that returns a value based on the type of arithmetic you wish to perform. Each class is slightly different, but all take a common input of a value and a variance. We have a class for addition:
class Addition
{
    public float Add(float arithmeticValue, float arithmeticVariance)
    {
            return arithmeticValue + arithmeticVariance;
    }
}
And we have a class that performs subtraction on the value and variance:
class Subtraction
{
    public float Subtract(float arithmeticValue,
                          float arithmeticVariance)
    {
        return arithmeticValue - arithmeticVariance;
    }
}
When we use each one we have to make the class part of the compile-time logic. We allow user input to decide which algorithm to use at any given time. Right now we have if...then...else code to do this, but it is not very efficient. If we wanted to add a class to perform multiplication and a class to perform division, we would have to add to or change the if...then...else code for each algorithm.
If(DoAdd)
    Addition calc = new Addition();
    calc.Add(12,7);
else
    Subtraction calc = new Subtraction();
    calc.Subtract(12,7);
We need a better and more flexible way to add classes and manage the algorithmic grouping. We need to use a common interface that ties all these classes together as well. Below, we see the two new classes we wish to add. There is one to perform multiplication on the value and variance and one to perform division:
class Multiplication
{
    public float Multiply(float arithmeticValue,
                          float arithmeticVariance)
    {
        return arithmeticValue * arithmeticVariance;
    }
}
class Division
{
    public float Divide(float arithmeticValue,
                        float arithmeticVariance)
    {
        return arithmeticValue / arithmeticVariance;
    }
}
Solution: Make each class inherit from a common base to provide ease of scalability and exchange between class types so one algorithm class can easily be exchanged for another
To solve this technical problem we will employ the Strategy pattern to help us write streamlined code. We use the Strategy pattern in this case because we are using a family of algorithms that all have similar input.

Figure 3-20. UML for Strategy pattern example
The first step in refactoring to the pattern is to create the common interface between all these classes, the strategy. This abstract class defines the basic interface that all the implementation classes use to define their particular equation. Notice the method Calculate(). This method is marked as abstract, and will be used by the implementation classes to contain each different strategy’s algorithm.
abstract class ArithmeticStrategy
{
    public abstract float Calculate(
        float arithmeticValue,
        float arithmeticVariance);
}
The next step in refactoring to the pattern is to build each implementation class. These classes will inherit from the base class ArithmeticStrategy. Each class will override the method Calculate() and provide its own calculation algorithm. Below, we see the first strategy. Notice that it returns the correct type for the method, but the calculation it uses to return the value is specialized to this strategy.
class AdditionStrategy : ArithmeticStrategy
{
    public override float Calculate(
        float arithmeticValue,
        float arithmeticVariance)
    {
        return arithmeticValue + arithmeticVariance;
    }
}
As we build our other strategies, we will use the particular logic that resides in the original classes to implement the correct algorithm:
class SubtractionStrategy : ArithmeticStrategy
{
    public override float Calculate(
        float arithmeticValue,
        float arithmeticVariance)
    {
        return arithmeticValue - arithmeticVariance;
    }
}

class MultiplicationStrategy : ArithmeticStrategy
{
    public override float Calculate(
        float arithmeticValue,
        float arithmeticVariance)
    {
        return arithmeticValue * arithmeticVariance;
    }
}

class DivisionStrategy : ArithmeticStrategy
{
    public override float Calculate(
        float arithmeticValue,
        float arithmeticVariance)
    {
        return arithmeticValue / arithmeticVariance;
    }
}
Now that we have created all our strategy classes, we need to create an object to deal with the strategy we want to use for each situation. We will call this object the Context object. It is thus named since it will be the point in code where an action occurs. This object will house the strategy object for its instance, all the values to which to apply the strategy, and a variance to apply to the values based on the strategy algorithm:
class MathEngine
{
    ......

    public void SetStrategy(ArithmeticStrategy strategy)
    {
        _strategy = strategy;
    }
    public void SetVariance(float variance)
    {
        _variance = variance;
    }

    public void AddValue(float arithmeticValue)
    {
        _values.Add(arithmeticValue);
    }

    public void RemoveValue(float arithmeticValue)
    {
        _values.Remove(arithmeticValue);
    }
We also have a method to process all the values using the variance and the strategy to be used for this context instance:
    public void ProcessCalculations()
    {
        foreach(float val in _values)
            Console.WriteLine("{0} uses {1} and variance {2}
                               for result:{3}",
            _strategy,val,_variance,_
                strategy.Calculate(val,_variance));
    }
}
Last, we will implement the context with a particular strategy. We will instantiate our context object and add some values that we want to process to the context:
MathEngine engine = new MathEngine();
engine.AddValue(15);
engine.AddValue(3);
engine.AddValue(8);
engine.AddValue(100);
engine.AddValue(55);
For each strategy algorithm we set our variance that the input values will calculate against:
engine.SetVariance(20);
Next, we need to add the strategy containing the algorithm we would like to use to process our values against our variance with the context object:
engine.SetStrategy(new AdditionStrategy());
Now we call the method used to process each value:
engine.ProcessCalculations();
And we can see our results for each application of the algorithm from the strategy we chose:
AdditionStrategy uses 15 and variance 20 for result:35
AdditionStrategy uses 3 and variance 20 for result:23
AdditionStrategy uses 8 and variance 20 for result:28
AdditionStrategy uses 100 and variance 20 for result:120
AdditionStrategy uses 55 and variance 20 for result:75
We can continue by setting the strategy to a new type and running the process method again as many times as needed. Notice the values will change depending on the strategy used each time we run the process method:
engine.SetStrategy(new SubtractionStrategy());
engine.ProcessCalculations();
......
SubtractionStrategy uses 15 and variance 20 for result:-5
SubtractionStrategy uses 3 and variance 20 for result:-17
SubtractionStrategy uses 8 and variance 20 for result:-12
SubtractionStrategy uses 100 and variance 20 for result:80
SubtractionStrategy uses 55 and variance 20 for result:35
......
engine.SetStrategy(new MultiplicationStrategy());
engine.ProcessCalculations();
......
MultiplicationStrategy uses 15 and variance 20 for result:300
MultiplicationStrategy uses 3 and variance 20 for result:60
MultiplicationStrategy uses 8 and variance 20 for result:160
MultiplicationStrategy uses 100 and variance 20 for result:2000
MultiplicationStrategy uses 55 and variance 20 for result:1100
......
engine.SetStrategy(new DivisionStrategy());
engine.ProcessCalculations();
......
DivisionStrategy uses 15 and variance 20 for result:0.75
DivisionStrategy uses 3 and variance 20 for result:0.15
DivisionStrategy uses 8 and variance 20 for result:0.4
DivisionStrategy uses 100 and variance 20 for result:5
DivisionStrategy uses 55 and variance 20 for result:2.75
Comparison to Similar Patterns
Strategies give us an interesting way to deal with grouping algorithmic equations. If we look at the Flyweight pattern, we see that this pattern uses a type of strategy method but also pools these strategies in a central repository or factory. Each flyweight has its own implementation of methods and intrinsic and extrinsic states, each of which could be thought of as algorithms. The Template pattern utilizes the abstraction of strategies to allow common interfaces among different algorithms. State is maintained on the context object in the form of the setting of values, variances, and strategies inside this object.
What We Have Learned
Strategies are useful ways to maintain a family of algorithms in such a way that they can easily be called dynamically and independent of immutable logical code. They allow similar inputs to interact in different ways just by switching the strategy type. Expressions can change by swapping only the strategy, not the inputs, giving flexibility to interfaces that may receive inputs from different sources that need processing in a unified manner.
Template Pattern
What Is a Template Pattern?
The Template pattern is the definition of the relationship abstract classes have to their inherited members. This pattern defines the skeleton or template for a group of classes as a parent class, and allows inherited members to modify this template without changing the underlying template class.
The Template pattern has two components: the Template class and the Concrete class. The template is the base or abstract class that acts as the skeleton for all the shared functionality that gets inherited to the class instances, or concrete classes. Each concrete class can override the methods and functions of the template class or use these inherited methods without overriding them.

Figure 3-21. UML for Template pattern
This pattern is the basic model for all inheritance of classes. Although the GoF doesn’t say this directly, there are a couple of good rules to follow with this pattern. One is to limit the layers of inheritance to no deeper than two layers. This is to prevent overcomplication of your code by using too many inherited classes. If you find you need a variety of functionality for inherited members, and some inherited classes share this functionality and some do not need to, you might try a plug-and-play pattern like the Visitor pattern. The Visitor pattern gives a little more flexibility to add new functionality without using multiple layers of direct inheritance and without rewriting this functionality in the new members. This allows the sharing of functionality across classes, without the need for deep and complicated inherited members.
Problem: Shared functionality between classes is desired without copying functionality
For our functional problem, we have two classes that we would like to use as template classes. We would like to share some functionality between these base classes and inherited members, but not share all the specialized logic inside these members. The classes are called Document and Application:
class Document
{
    public Document(string path){...}

    public string FilePath{...}

    public void Create(){...}
    public void Open(FileMode mode, FileAccess access) {...}
    public void Close(){...}
    public object Read(){...}
    public void Write(object writeable) {...}
}

class Application
{
    public Document OpenDocument(string path) {...}
    public bool CanOpenDocument(string path) {...}
    public Document CreateDocument(string path) {...}
}
The Document class is used inside the Application class. Both classes have specialized logic inside their methods. Some of these methods we would like to share as templates with inherited members, but we do not want the specialized logic from every method. We would like to share the method templates without inheriting the logic inside those methods. We would also like some functionality to be shared among all the inherited members.
Solution: Make both classes inherit from a single base that contains shared functionality
Our solution to our functional problem is to first make our two classes abstract. The methods that will contain only the core functional logic that needs to be shared will be marked virtual. The other methods we will use as templates are made abstract so we can have the inherited members define the logic in their override of these methods. As the following shows, we have made the Document and Application classes abstract so that they become the template for the pattern:
abstract class Application
{

    public abstract Document OpenDocument(string path);
    public virtual bool CanOpenDocument(string path) {...}
    public abstract Document CreateDocument(string path);
}

abstract class Document
{
    public Document(string path) {...}

    public string FilePath {...}

    public abstract void Create();
    protected abstract void Open(FileMode mode, FileAccess access);
    protected abstract void Close();
    public abstract object Read();
    public abstract void Write(object writeable);
}
We have the functional logic that is not specialized still located in the virtual methods and private variables. This will allow all inherited members to share this functionality. For the methods that are specialized to the inherited members, we will override them and prepare this logic in the methods of the inherited members.

Figure 3-22. UML for Template pattern example
For our purposes we have created two new inherited members that can be instantiated, one for each class. For the Document class, which is now abstract and cannot be instantiated, we have created the TextDocument class. This class overrides the Document class and allows specialization of the type of document we wish to use.
class TextDocument : Document
{
    public TextDocument(string path) : base(path){}
Notice in the overridden method Create() that we are adding specialized logic on how to create a text type of file. If we wanted to create a byte file, we could inherit another class and change the logic to meet those needs.
    public override void Create()
    {
        _stream = File.Open(FilePath, FileMode.Create,
                            FileAccess.ReadWrite);
        _stream.Close();
    }
With the other members of the Document class we include the specialized code for this instance type. This allows us to build similar class instances that can all be used interchangeably, but each performs its job differently.
    protected override void Open(FileMode mode, FileAccess access)
    {
        _stream = File.Open(FilePath, mode, access);
    }
    protected override void Close()
    {
        _stream.Close();
    }
    public override object Read()
    {
        object readable = null;
        Open(FileMode.Open, FileAccess.Read);
        using (StreamReader sr = new StreamReader(_stream))
        {
            String line;
            // Read and display lines from the file until the end
            // of the file is reached.
            while ((line = sr.ReadLine()) != null)
            {
                readable +="-"+line;
                Console.WriteLine(line);
            }
                sr.Close();
        }
        return readable;
    }

    public override void Write(object writeable)
    {
        Open(FileMode.Append, FileAccess.Write);
        using(StreamWriter sw = new StreamWriter(_stream))
        {
            sw.WriteLine(writeable);
            sw.Close();
        }
    }
}
The Application class works in a similar fashion. We override this class to keep it as a template, keeping the shared functionality in the base class. In the inherited class, we keep an array of documents that we can manipulate. We also define how we will deal with a particular document type.
class DocumentApplication : Application
{
    private ArrayList _documents = new ArrayList();

    public override Document OpenDocument(string path)
    {
        if(!CanOpenDocument(path)) return null;
        Document document = new TextDocument(path);
        _documents.Add(document);
        return document;
    }

    public override Document CreateDocument(string path)
    {
        if(CanOpenDocument(path)) return null;
        Document document = new TextDocument(path);
        document.Create();
        _documents.Add(document);
        return document;
    }
}
Now when we load the Application object, we specify the object type as the implementation class we want. From this class we have defined the Document object type as TextDocument. This allows the Application object to specify the type of Document object we wish to return by the Application object’s type:
DocumentApplication application = new DocumentApplication();
Document doc = application.CreateDocument(path);
Since this Application class type creates a text document, we can write text to it:
doc.Write("This is a Test!");
doc.Write("This is another Test!");
We can also call the created document from the Application class and do something to it directly:
Document docReopened = application.OpenDocument(path);

docReopened.Write("This is the 2nd Test!");
docReopened.Write("This is another 2nd Test!");

docReopened.Read();
We could define other implementation classes now, using the same Document and Application classes as templates. Each implementation can define the overridden methods for a different application or document type.
Comparison to Similar Patterns
The Template pattern is related to almost all the other patterns in some fashion. Since it defines the relationship between a parent class and its inherited members, the Template pattern can be seen in usage with most of the other patterns in some way.
What We Have Learned
The Template pattern gives us the very basic and useful relationship definition between a parent class and all its subclasses. It allows us to establish the inherited relationship for sharing and defining class structures, for use in polymorphic transitions in class types at run time or in code flow.
Visitor Pattern
What Is a Visitor Pattern?
The Visitor pattern allows changes or additions to a class’s structure without changing the actual class. The pattern allows this by passing into a class other classes with the same method structure but different functionality, and using that passed-in class’s method to change the class’s behavior. In other words, instead of coding methods or algorithms that perform functions inside a class, we pass in references to other classes that have the desired functionality. Then we allow the methods and algorithms on the passed-in classes to influence the behavior of the class we wish to modify.
This pattern has several components. The Visitor is the abstract base for the implementation classes that contain the functional methods. The Concrete Visitor contains the actual functional method and controls which Element type is allowed to use this method. The element is the abstract base for the class that actually contains the state we wish to modify. The implementation or instance of this class in the pattern is known as the concrete element. The Object Structure provides a container that allows an enumeration of the different element classes that we will allow the visitors to interact with.

Figure 3-23. UML for Visitor pattern
To understand the usefulness of the pattern let’s examine a functional example. Suppose you wanted to perform a certain function on a class’s attribute. However, the functional method you wish to use exists in another class. You don’t wish to provide an uncontrolled usage of that method, and you would not really want to rewrite the method in the class where you want to modify the attribute. And for clarity or for some other reason, you don’t wish to inherit from the class with that method. So to accomplish this using the method on the other class that modifies your class’s attributes, you would need to somehow share this method in an efficient manner.
This is where the Visitor pattern can come in handy. Allowing the functional method to be housed in the Visitor class allows a separation of duties between the class that needs this functionality and the actual function. When needed, the visitor can be passed to the element and the element can then submit itself to the visitor method, allowing the visitor implementation class passed to determine which functionality will be used to modify the attributes (or state) of the host element object. Thus, the element class does not need to be modified to change its attributes (or state), only a different visitor needs to be passed in. If you needed a series of elements to be changed by your visitor, you use the object structure object to house and provide a single interface for all your element objects. The object structure object contains a series of elements and, when a visitor is passed in, it iterates through each element, allowing the visitor to interact with each element object.
Let’s now look at some actual problems with code and how the visitor can assist us in better implementations refactored from Boolean logic.
Problem: We have a need for a class that encapsulates database transactions and performs specific functions based on the class instance type
Our functional problem is one that you may not encounter all that often, but when you do it can be quite frustrating to figure out without using a pattern. Although we could use other patterns to accomplish the same goal, the Visitor pattern seems to be a particularly good one for this example.
We start out with the class Customer. The Customer class accepts the name of the customer and the customer’s initial total. It also has two other methods that are notable, Credit() and Debit(), which do pretty much what they imply.
class Customer : Element
{
    public Customer(string name, double balance){...}

    public string Name{...}

    public double Balance{...}

    public void Credit(double amount)
    {
        _balance += amount;
    }

    public void Debit(double amount)
    {
        _balance -= amount;
    }
}
To credit or debit a customer we currently rely on a Boolean statement to identify what type of processing we wish to accomplish. This has worked for a while, but now we would like to encapsulate the database preprocessing and the change of the customer balance. Also, we would like to call several customers in a single transaction and have a single point to manage these customers. Below we see a snippet of the code we wish to refactor:
//transaction code
Customer customer = new Customer(customerName,balanceTotal);

//DB is our data layer
if(amount > 0)
    customer.Credit(DB.Credit(amount));
else
    customer.Debit(DB.Debit(amount));
//end transaction code
To perform the data processing (a database call to send the credit or debit), we accomplish this before the call to the methods Credit() and Debit(). Right now we cannot easily encapsulate this data-processing code or change it without rewriting the inline code. We would like a way to encapsulate both of the preprocessing methods and change the customer object’s state to reflect what we are sending to the database. We would also like to allow changing of multiple customers inside a transaction and have that handled from a single point. And lastly, we would like to be able to change which kind of data processing we perform without specifying the actual method needed or linking it to the customer object until it is needed at run time.
Solution: Place each database transaction type in a class that controls that functionality, and use this class to send the data into the database
The first part of our solution is to define the abstract base classes for Element and Visitor. The base classes give us a way to link all the other concrete classes together and limit usage to only these accepted types. So, for instance, an element for another type could not be passed into the visitor’s methods, because only types of Element can be used. This limits the scope and helps to define the logic in a more comprehensive manner. Defining this helps solve our problem of encapsulation for our credit and debit processing by setting the abstract methods as templates.
abstract class Visitor
{
    public abstract void Visit(Element element);
}

abstract class Element
{
    public abstract void Accept(Visitor visitor);
}

Figure 3-24. UML for Visitor pattern example
The second part of our solution is to place the actual data processing and modification of the customer balance inside the concrete visitor. We will need to refactor the data processing and customer object’s balance modification from the Boolean logic code into an acceptable method inside a different concrete visitor class for the credit and debit.
So we will move the logic we are seeing in the example in the problem section for credit and debit of the customer object to the Visit() method of two concrete visitor classes, CreditVisitor and DebitVisitor. This solves our encapsulation needs for the data processing and modification of the customer’s balance.
class CreditVisitor : Visitor
{
    public CreditVisitor(double amount){...}

    public override void Visit(Element element)
    {
        Customer customer = (Customer)element;
        customer.Credit(DB.Credit(amount));
    }
}
class DebitVisitor : Visitor
{
    public DebitVisitor(double amount) {...}

    public override void Visit(Element element)
    {
        Customer customer = (Customer)element;
        customer.Debit(DB.Debit(amount));
    }
}
Next we define the concrete element. We will allow the Customer object to inherit from the Element base class. This ensures that only accepted types can be passed into the visitor’s Visit() method.
class Customer : Element
{ ... }
Last, we want to define our object structure class object. This is the object that will allow us to apply the concrete visitor’s method to a series of customers without having to send them through one at time. We have three major methods on this class: AttachElement(), DetachElement(), and AcceptVisitor(). AttachElement() allows us to add a customer to the enumeration of Customers. DetachElement() removes Customers from the enumeration. The AcceptVisitor() method allows application of the visitor method to multiple customers inside a transaction.
class Customers
{
    public void AttachElement(Customer customer)
    {
        _customers.Add(customer);
    }

    public void DetachElement(Customer customer)
    {
        _customers.Remove(customer);
    }

    public void AcceptVisitor(Visitor visitor)
    {
        foreach(Customer customer in _customers)
                customer.Accept(visitor);
    }
}
Now we can look at how we call the pattern code and make use of it inside the transaction.
First, we need to instantiate our Customers collection that we will use to apply our visitor to:
//transaction code
Customers customers = new Customers();
Next, we need to attach our Customer classes to the collection. This will allow the collection to apply the visitor method to each customer registered with the collection. Notice each customer class has a name and balance as input parameters:
customers.AttachElement(new Customer("George",233.50));
customers.AttachElement(new Customer("Janice",102.25));
customers.AttachElement(new Customer("Richard",2005.48));
Now we can create our visitor classes. We instantiate them with the values they will use to modify each customer:
CreditVisitor creditVisitor = new CreditVisitor(50.15);
DebitVisitor debitVisitor = new DebitVisitor(22.20);
Then we call our AcceptVisitor method, which will loop through the Customers collection and apply the Accept() method to each customer. Remember, the algorithm in each visitor class’s Visit() method performs a specific function. The credit visitor performs a credit in the database and returns the balance:
customers.AcceptVisitor(creditVisitor);
and the resulting values:
------------------------------
Accepting CreditVisitor
CreditVisitor credited George $50.15. Balance:283.65
CreditVisitor credited Janice $50.15. Balance:152.4
CreditVisitor credited Richard $50.15. Balance:2055.63
While the debit visitor performs a debit in the database:
customers.AcceptVisitor(debitVisitor);
and returns the result:
------------------------------
Accepting DebitVisitor
DebitVisitor debited George $22.2. Balance:261.45
DebitVisitor debited Janice $22.2. Balance:130.2
DebitVisitor debited Richard $22.2. Balance:2033.43
Comparison to Similar Patterns
The Visitor pattern is similar to the Decorator pattern in that we use classes to pass and encapsulate functionality, and we share that functionality depending on the particular implementation. There is also a bit of similarity between this pattern and the Composite pattern, since composites add functions to a class instance at run time.
What We Have Learned
The Visitor pattern allows us some flexibility on how we wish to allow sharing of functionality. It gives us this flexibility through a looser association than direct class inheritance, and allows us to change the implementation of class methods at run time instead of at compile time as with class inheritance. By simply changing a type, we can change the function that is associated with either a single class or collections of classes.