
2
Creational Patterns
Creational patterns are patterns whose sole purpose is to facilitate the work of creating, initializing, and configuring objects and classes. They are grouped thus by the Gang of Four (Erich Gamma, Richard Helm, Ralph Johnson, and John Vlissides), who are the individuals originally responsible for formalizing the accepted design patterns we use today. Basically, creational patterns are grouped thus because they create things: other classes, interface implementations, attributes, or any other structural type. They basically act as factories, builders, configuration constructs, or class initializers. These types of patterns are useful when we need to render instances of objects, store these objects, perform complex initialization of objects, or create copies of objects.
Factory Pattern
What Is a Factory Pattern?
Factories are just what their name implies: they are classes that create or construct something. In the case of object-oriented code languages, this means they construct and return an instance of a class type. They provide an encapsulation of code required to render an instance of an abstract class type as an implementation class. The factory can initialize, pull in data, configure, set state, and perform nearly any other creational operation needed for a class.
As stated above, factories use a base class type to create a class instance. This type can be in the form of either an abstraction or an interface, and based on that type, via creational methods, the factory renders a functional class that inherits or implements this type.
Let’s talk about some ways to use a factory that you might find useful. You might use a Factory pattern if you had a lot of creational logic for instances of a class type strewn throughout your code base. You might wish to consolidate this logic into one place for uniformity and maintainability. Instead of having to change logic in many places when you want to modify how the class is created, you could move it into a factory. Then you could change it in one place inside the factory instead of hunting through your code.
A factory might also be useful when you want to limit and define the accepted member implementations of a certain abstract class type for a particular logical flow, but do not want to define at compile time the logic for which type might be used. For example, you might pass in a key to the factory method instead of using a Boolean if...then... else statement to determine the class you want to construct and return from your factory. Doing that would free you from having to use compiled Boolean statements and instead allow something outside your factory to determine the logical flow of which implementation of a class type is rendered.
Factories can be static or creation only, or repositories, which both create and store references to the created products. But in general, factories provide a way to house the creational aspects of class types.
The Factory pattern has two main components: the Factory and the Product. The factory class is the class that renders the product class. The product class is the class containing data or functionality and is part of a series of class types that can be rendered from a factory method as an instance of an abstract type.
Let’s take a look at some problems that you might encounter when working with your legacy code or creating new code, and how the Factory pattern can help.
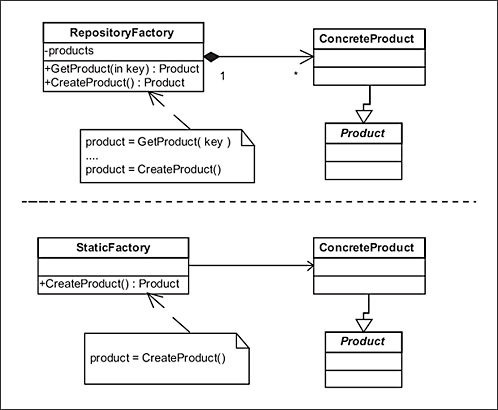
Figure 2-1. UML for Factory pattern
Problem 1: Implementation classes with a common base are created in multiple places and no uniformity exists between creational logic
To illustrate the usefulness of the Factory pattern in functional code, let’s define a common problem that you might find within your code. Let’s say we have several classes that need to be created that have a common base or abstract class. These classes are currently constructed throughout your legacy code in different places, which creates a maintenance problem:
.....lives in class FindSuit
Suit suit;
if(suitType == SuitType.Armani)
    suit = new Armani();
else if(suitType == SuitType.StripedBusinessSuit)
    suit = new StripedBusinessSuit();

.....lives in class GetSuit
if(suitType == SuitType.PlaidBusinessSuit)
    suit = new PlaidBusinessSuit();
else if(suitType == SuitType.GolfSuit)
    suit = new GolfSuit();
As you can see by the example above, we build a different implementation of Suit based on the value of a defined type as an enum, SuitType.WeuseSuit as a contract for the returned implementation type. The Suit class is an abstract class that defines all implementations for a suit, including common attributes and methods. The problem is that we do not have any central place to house all this creational logic and the code can be messy and lacks uniformity, which causes poor maintainability. (You can see in the example that the if...then...else code block exists in multiple places throughout the code.)
Solution 1: Use a factory to encapsulate the class creation code in one place
The first step in improving our existing code base and solving our maintenance and functional issues regarding our legacy code is to encapsulate the creation and decisional process of which type of the Suit class to create, giving us a central repository to house the conditional code. We use the Factory pattern to perform this encapsulation.
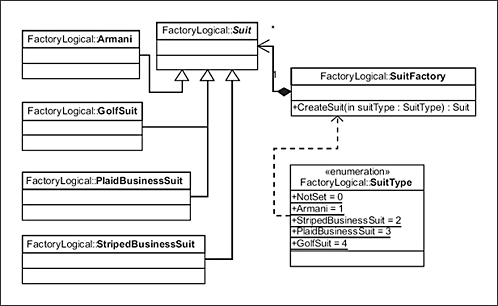
Figure 2-2. UML for logical Factory pattern example
The factory will allow us a singular place for the creational logic, solving the issue of maintaining the code in several places. It will also allow us to refine and expand the code in this one place, guaranteeing that calls from different access points within the code will render similar results. This decreases the number of bugs the code may contain and decreases the scope of making changes to the creational logic. In other words, if we need to change or add to the ways we can create a Suit, we need only do it inside the factory, instead of searching all over our code to make these changes, possibly missing some places or making these changes without uniformity.
Note
Notice in the code example below that we have identified our factory with the class accessor sealed. This is done to keep other classes from inheriting from the factory, which prevents any abstractions. It also ensures that we are dealing with a single known instance of SuitFactory that works the same across any implementation.
Here we see the Boolean logical code we have refactored inside our factory class:
public sealed class SuitFactory
{
    public Suit CreateSuit(SuitType suitType)
    {
        Suit suit;
        if(suitType == SuitType.Armani)
            suit = new Armani();
        else if(suitType == SuitType.StripedBusinessSuit)
            suit = new StripedBusinessSuit();
        else if(suitType == SuitType.PlaidBusinessSuit)
            suit = new PlaidBusinessSuit();
        else if(suitType == SuitType.GolfSuit)
            suit = new GolfSuit();
        return suit;
    }
}
Now we need to clean up all our different areas where the creational logic for Suit exists, and replace these references with the call to the factory:
.....refactored in class FindSuit & GetSuit
SuitFactory factory = new SuitFactory();
Suit suit = factory.CreateSuit(SuitType.Armani);
We have now successfully cleaned up the code base and improved maintainability and scalability of the creational logic for all Suit implementations. We can test the new code and see that we return only the expected type:
Suit:Armani
But we now have another problem. The factory has a scalability issue regarding the conditional logic stored within. To add new implementation classes that subclass Suit, we still have to change the conditional logic inside the factory. Also, we cannot define for the scope of the factory, only the required implementations of Suit that we wish to deal with. In the next section we will discuss how to make some improvements to resolve these issues, and how we might use reflection to improve our code.
Problem 2: Class types to be created are determined by immutable logical code and extending the returnable types requires scale modifications to the factory
Now that we have our factory class built and all our legacy code migrated to use the factory, the next problem is that we want to expand the logical if...then...else code. This presents a scalability issue, due to the fact that we are limited within the design to only the types included within the conditional logic, and cannot readily expand the accepted types without modifying this logic. Examine the example below. Notice we have added some new types to return from the factory. This code block could become unwieldy, especially if we want to expand into initialization or configuration of the class types before rendering them from the factory.
public sealed class SuitFactory
{
    public Suit CreateSuit(SuitType suitType)
    {
        Suit suit;
        if(suitType == SuitType.Armani)
            suit = new Armani();
        else if(suitType == SuitType.StripedBusinessSuit)
            suit = new StripedBusinessSuit();
        else if(suitType == SuitType.PlaidBusinessSuit)
            suit = new PlaidBusinessSuit();
        else if(suitType == SuitType.GolfSuit)
            suit = new GolfSuit();
        else if(suitType == SuitType.MotorcycleSuit)//added type
            suit = new MotorcycleSuit();
        else if(suitType == SuitType.JoggingSuit)//added type
            suit = new JoggingSuit();
        else if(suitType == SuitType.LadiesPantsSuit)//added type
            suit = new LadiesPantsSuit();
        else if(suitType == SuitType.SolidBusinessSuit)//added type
            suit = new SolidBusinessSuit();
        else if(suitType == SuitType.TennisSuit)//added type
            suit = new TennisSuit();

        return suit;
    }
}
We also need to somehow maintain the class types within the factory. We do not wish to load them each time they are called.
There are two solutions for this problem, and each is covered in its own solution section that follows. Read both sections before making your factory decision. The first uses reflected types to determine the accepted classes for the workflow. The second uses inheritance to accomplish the same goal. The first solution is something that is widely used in factories of all types in many different coding languages. Our second solution is closer to the original adaptation of the pattern by the Gang of Four.
Solution 2a: Replace conditional logic with a class activator, using reflection to determine the needed types for different workflows
Encapsulating the logic into a single location inside the SuitFactory class solves the issue of maintaining multiple code bases for the same logic, but we still have a lot of conditional Boolean logic code inside the factory that deals with the creational process. This means that our factory has a scalability issue, in that we have to now house logic for every possible solution rather than just those for the scope of the current workflow. This presents the same maintenance issue as before: with expansion or addition to the code we have to make compile changes to the factory conditional logic. This we will need to change as well since it is very hard to maintain and, with every new class type, we need to add a new code block to the if...then... else code. Also, the factory should be relatively dumb in regard to the actual implementation of the Suit class. That is, the factory should not have to make direct differentiations between different types; the abstract class itself should be the interface for doing that by using the polymorphic properties of the abstraction of the Suit class into its implementation classes. This is important because it allows the object-oriented language’s polymorphism property to interact with the logical flow, freeing immutable logical flow back into objects. Polymorphism of the classes removes the need to specify the class type, which allows new class types to be added to the factory in an ad-hoc fashion, provided they inherit from the Suit base class. This moves the scope back into implementing only the needed classes for each workflow. To accomplish this we can use an instance creation mechanism based on a reflected type and a type registry.
Note
Notice in the UML below that the actual implementation classes do not change from our previous solution. We simply change how the factory builds them. The factory methods do not need to change either. We will simply replace the Boolean logical code with the reflective algorithm.

Figure 2-3. UML for reflection Factory pattern example
We add into our factory two dictionary lists: one to house registered types keyed with the SuitType enum, and one for housing the loaded Suit implementation classes. We use a lazy load method to load the registered class types upon first call to the CreateSuit() method. Lazy loading is a technique by which data is only loaded when a method to access data is called, instead of doing it at process start.
private Hashtable _registered = new Hashtable();
private Hashtable _loaded = new Hashtable();

public Suit CreateSuit(SuitType suitType)
{
    //if the value is null we either have registered
    //a new type and not loaded it, or this is the first load
    if(_loaded[suitType] == null)
        Load();//lazy loaded on first call to method
    return (Suit)_loaded[];
}
To identify the proper class implementations of Suit for the workflow in which the factory is being called and only those implementations, we add a registry method to identify which implementation types of Suit are allowed. The registry method in the example ties together the enum with the class type, conforming to the legacy code’s already present data standards, but allowing typed reflection to be used in place of the Boolean logic to determine the class implementation of Suit to be returned from the factory. This is accomplished by entering the enum as a key and the reflected type data as a value into a dictionary object, which holds the key-value pairs.
public void Register(SuitType suitType, Type type)
{
    _registered.Add(suitType, type);
}
We will use reflection to interact with the keyed types we store in the registry to actually build our Suit classes. Reflection sometimes has been argued as being inefficient, but when used properly, it can be an invaluable tool in object-oriented languages that support it. Let’s talk about some types of reflective tools in languages, and how they can be used in the factory to both identify the class types and create them.
The Activator class in .NET is useful for creating instances of classes by using their type and any input parameters needed for the constructor. In our case we don’t have any constructor parameters, so we just pass in the type:
Type type = typeof(GolfSuit);
Suit suit = (Suit)Activator.CreateInstance(type));
Java uses reflection to do the same thing using the java.lang.reflect.Constructor package. Using a reflection method that takes the parameter types and builds the class implementation based on a constructor that matches both the class type and input parameter types, a class is built from a reflection constructor mechanism:
Constructor con = Class.forName("GolfSuit").getConstructor(null);
return con.newInstance(null);
.NET also has such a reflection constructor, Type.GetConstructor, which takes the parameter types and builds the class implementation based on a constructor that matches both the class type and input parameter types passed into the GetConstructor() method. It then uses the ConstructorInfo.Invoke() method, passing the parameter values to actually create the class instance:
Type type = typeof(GolfSuit);
ConstructorInfo info = type.GetConstructor(new Type[]{});
Suit suit = (Suit)info.Invoke(new object[]{}));
Any of these methods are acceptable. The main aspect to understand is that the actual expected type from reflection is needed to create a class, instead of hard compiling the class type declaration in the logical Boolean code.
Let’s take a look at the entire factory, with the registry and load methods. Notice how the CreateSuit() method has changed. Now no conditional logic is present, and there are no direct class declarations. We have extracted this using direct reflection upon the registered types, and allowed the workflow to determine which of those types it needs to deal with. We are lazy loading the classes all at once when either the first call to the method is made or we register a new class not yet loaded.
public sealed class SuitFactory
{
    private Hashtable _registered = new Hashtable();
    private Hashtable _loaded = new Hashtable();
Our actual factory create method receives as an input parameter the SuitType enum and returns the class instance from the loaded collection. If no value exists, we load the entire collection.
    public Suit CreateSuit(SuitType suitType)
    {
        if(_loaded[suitType] == null)
            Load();
        return (Suit)_loaded[suitType];
    }
Our registry method gives us a way to determine the allowed types for the particular process we are running. We call this method on initialization of our factory and before the first call to the CreateSuit() method.
    public void Register(SuitType suitType, Type type)
    {
        _registered.Add(suitType, type);
    }
Our Load() method constructs all the types registered with the Register() method we saw above and loads them into the collection. The factory performs the actual loading of the registered types using reflection on the class type from the values in the registry dictionary object. The loaded type is defined by stating an expected base type of Suit, and the implementation class is loaded by its type with the SuitType enum as the dictionary key.
    private void Load()
    {
        foreach(DictionaryEntry obj in _registered)
        {
            Type type = (Type)obj.Value;
            ConstructorInfo info = type.GetConstructor(new Type[]{});
            if(!_loaded.ContainsKey(obj.Key))
            //checks if the class is loaded
                _loaded.Add(obj.Key,(Suit)info.Invoke(new
                            object[]{}));
                //we can use direct reflection in .NET or an activator
         //_loaded.Add(obj.Key,(Suit)Activator.CreateInstance(type));
        }

    }
}
Another way to do this without sharing the instances is to create new classes with every call to the CreateSuit() method. We might do this if we did not desire any state for our instance variables. Be careful when dealing with dictionaries, especially hash tables, as they keep a reference to your class objects and store changes to those classes within themselves. If you want a class to have freshly initialized data every time you call an instance from the factory, create a new class with every call to the factory. If, on the other hand, you would like to maintain the state of your classes between calls to the factory, such a dictionary object might serve your purposes.
Finally, let’s look at where and how in your legacy code the factory can be implemented, replacing the existing conditional logic code used in different places. First, we must declare the particular instance of the factory we need. Next, we register only the needed class types we wish to return from the factory. After that, we can create our implementation of Suit, passing in the SuitType enum that our conditional logic used before.
SuitFactory factory = new SuitFactory();
factory.Register(SuitType.Armani, typeof(Armani));
factory.Register(SuitType.GolfSuit, typeof(GolfSuit));
factory.Register(SuitType.PlaidBusinessSuit, typeof
                (PlaidBusinessSuit));
factory.Register(SuitType.StripedBusinessSuit, typeof
                (StripedBusinessSuit));
We only define the classes for the current workflow of the factory. This prevents unwanted functionality from appearing during the current workflow. The way we define the classes allowed inside the factory gives us flexibility to change our workflow for each implementation of the factory without changing the internal factory code. Now when we call the factory’s creational method, we will only be returning expected results for the context of the factory instance:
Suit suit = factory.CreateSuit(SuitType.StripedBusinessSuit);
Our test shows us the results of our refactored code:
type:Examples.FactoryReflected.StripedBusinessSuit
Thus we have illustrated how we can use reflection to help us build our class implementations of Suit. We create our classes using reflection upon registered reflection info for a class, instead of immutable logical Boolean code. We also have stored each class instance in the factory, using the factory as a repository for the loaded class types. This meets our requirement for not having to reload a class each time it is called.
We might decide at this point that registering all the classes in one place and providing access to the factory from any thread might better suit our needs. We might make this decision because we see the impact of creating and storing classes across threads using the factory is moot, since we can get separate instances of the class for each thread, and we do not care to have a separate instance of factory for each thread. This might be the case because we would like to preserve the loading state on the factory objects, the use of reflection in the factory needs to be kept to a minimum for greater efficiency, or the classes we load should have their state maintained across multiple threads. In this case, changing the access modifier for the factory by adding the static access modifier would allow any thread to access the factory, and keep loading and using reflection inside the factory to a minimum. See the “State Pattern” section in Chapter 3 for details on this.
This solution is one way of using a factory, and generally the most common way when a simple class type needs to be implemented. In the next solution we will look at another way in which the Factory pattern is utilized, using inheritance instead of reflection to identify the accepted class types for a workflow.
Solution 2b: Use abstractions of the factory to determine allowable class types using inheritance (instead of reflection)
Another way we could determine which classes are available from each factory instance without using an outside registry method or reflection is to use abstractions of the factory, and inside those abstractions determine the allowable class type implementations for each factory type.

Figure 2-4. UML for inherited Factory pattern example
To do this we would need to make SuitFactory abstract, and inherit from it the factories for the individual workflows that will define the class implementations of Suit that can be allowed in each inherited implementation. That is, we will inherit from a base factory class, and each inherited member will be defined by loading the allowed class types of Suit. All factory methods to return the Suit implementation classes will be included in the abstract SuitFactory class with one exception: LoadSuits().
LoadSuits() is an abstract method that is to be implemented in the inherited members of SuitFactory, and is where we determine which classes will be allowed to be returned from the factory. Instead of using reflection to determine the class types, or a Boolean code block as in the previous examples, we use inheritance and polymorphism. We call the LoadSuits() method inside the abstract SuitFactory’s constructor to maintain a maximum of functionality in the abstract, and prevent duplicate code from making its way into the inherited members.
Below we see the class has a private collection of type ArrayList. This is to be used to hold the loaded class instances. It is marked private to control access in its inherited members. A little later we will create a protected method to allow loading of class instances to the collection.
public abstract class SuitFactory
{
    private ArrayList _loaded = new ArrayList();
In our constructor we call the LoadSuits() method. This ensures our classes that override the LoadSuits() method will have the desired implementations loaded.
    public SuitFactory()
    {
        LoadSuits();
    }
Here the GetSuit() method returns a concrete Suit class instance. The returned class instance has a property TypeOfSuit that matches the passed-in parameter of SuitType:
    public Suit GetSuit(SuitType suitType)
    {
        Suit suit = null;
        foreach(Suit obj in _loaded)
        {
            if(obj.TypeOfSuit == suitType)
            {
                suit = obj;
                break;
            }
        }
        return suit;
    }
Here we include a way to add the suits directly to the collection. The method is marked protected so that only inherited members can access the method:
    protected void AddSuit(Suit suit)
    {
        _loaded.Add(suit);
    }
Finally, we create our abstract method LoadSuits(). This method will be overridden in the inherited factory classes to tell us what type of classes we will be allowed to return from our factory.
    public abstract void LoadSuits();
}
Here we see one class that will inherit our abstract SuitFactory class. Because of the way we built that abstract base, we only need to override the LoadSuits() method and load the allowed classes into the underlying collection using our protected AddSuit() method.
//inherited factory from SuitFactory
public class LeisureSuitFactory : SuitFactory
{
    public override void LoadSuits()
    {
        this.AddSuit(new GolfSuit());
    }
}
We can now create a variety of inherited classes from our abstract SuitFactory class. Each one will contain the same override of the LoadSuits() method, where we can determine the correct types of classes we wish to return. In the class below, we see we are loading three new class instances. Each concrete factory class can define its own implementation by simply loading the class in the overridden method.
//inherited factory from SuitFactory
public class BusinessSuitFactory : SuitFactory
{
    public override void LoadSuits()
    {
        this.AddSuit(new PlaidBusinessSuit());
        this.AddSuit(new StripedBusinessSuit());
        this.AddSuit(new Armani());
    }
}
So we still have only the desired implementations for Suit for each workflow, and we use the appropriate inherited member of SuitFactory to determine which types are available for each workflow or code process flow:
LeisureSuitFactory lfactory = new LeisureSuitFactory();
BusinessSuitFactory bfactory = new BusinessSuitFactory();
Since we are allowing the concrete implementations of SuitFactory to determine which types are available for each workflow or code process flow, we are confident only the allowed instances of Suit will be returned from each factory instance:
Suit lsuit = lfactory.GetSuit(SuitType.GolfSuit);
Suit bsuit = bfactory.GetSuit(SuitType.PlaidBusinessSuit);
We can see by our test we indeed return the expected concrete implementations of Suit for each type:
Factory:Examples.FactoryInherited.LeisureSuitFactory
        Suit type:Examples.FactoryInherited.GolfSuit
Factory:Examples.FactoryInherited.BusinessSuitFactory
        Suit type:Examples.FactoryInherited.PlaidBusinessSuit
Comparison to Similar Patterns
Factories work well when returning a class type that is based on a base class. If, however, you need to perform several operations to create an object, a Builder pattern might be more appropriate. If you need uniformity over several factories to do the same work, consider an Abstract Factory pattern.
What We Have Learned
We saw in the solutions above that we could easily encapsulate the logical creation of classes of a determined type inside a factory class, giving us better uniformity and maintainability of the creational code. We also learned that we could change the scale and scope of the classes a factory could handle, depending on its implementation, using reflection and a registry method or by inheriting different factory implementations to define the required return types for each workflow. When working with inherited factory instances to control the workflow, we determined that each instance of the factory could react differently, depending on how it was set up for that code flow instance, and could render inherited classes from a common base class type.
Abstract Factory Pattern
What Is an Abstract Factory Pattern?
The Abstract Factory pattern is a creative way to expand on the basic Factory pattern. Since the Factory pattern is a class that creates other classes in a uniform way, the Abstract Factory pattern gives us a way to allow factories with similar methods and access points to be interchangeable. That is, using an abstract factory we can define implementation class types as factories with the abstract factory as the base, and thereby tie in all the different factory implementations to a base class.
So now that we have a basic explanation of what an abstract factory is, let’s talk about how this is useful in our code. Let’s start by discussing what factories actually do in code and why they are valuable.
A factory class is a way to compartmentalize code that creates other classes and types. It can initialize, pull in data, configure, set state, and perform nearly any other creational operation needed. An abstract factory then is generally used when you may have multiple factories that do different things for a class type, and you wish to provide uniformity between these factories. So let’s say you have two different factories. Each one has slightly different creational logic and renders a particular class type. If each of these factories rendered the same class type, but differed in how they create the class type as an instance, we could tie both those factories together using an abstract factory class as a base. Now if we wanted to use the two factory classes interchangeably for different situations but still return the same class type, we could do so without having to rewrite the code that calls the factory to explicitly call a particular factory class type.
The Abstract Factory pattern has two main components: the Abstract Factory and the Abstract Product. The abstract factory class holds the definition for creating the concrete implementations of the factory, including the abstract method references. The abstract product class is the definition for the concrete implementations of the class that the factory renders.
Let’s take a look at some problems that you might encounter when working with your legacy code or creating new code, and how the Abstract Factory pattern can help.

Figure 2-5. UML for Abstract Factory pattern
Problem 1: Different class types need a common interface to a factory method for creation of internal attributes
For our real-world code problem for this pattern we have a class that, depending on its type, needs a different factory to fill its attributes. Let’s say we also might want to be able to uniformly define which creation methods we can call on each factory in order to provide a common structure between factory implementations. So let’s look at the current problem in code:
if(obj is ImageClass)
    obj.Attributes = ImageFactory().GetImageAttributes();

else if(obj.GetType() == typeof(TextClass))
    obj.Attributes = TextFactory().GetTextAttributes();
Notice that we have an if...then...else statement that determines by the object’s class type which factory to use to fill in its attributes. We can assume for this example that the different object type classes of the Attributes accessor have a uniform or common base class, which gives us the accessible parameter Attributes. In this case the base type of Attributes is a hash table.
Our problem then is that we have no cohesion between factories and are forced to use different methods depending on the type of factory. We also have to change code in multiple places (assuming the if...then...else code block above exists in multiple places throughout your code), which presents a maintenance issue. We also might want to add some more types of objects and factories and do not want to have a long and cumbersome logical statement with repeating code.
Solution 1: Allow an abstract factory to act as a common base interface for the factories between classes
To provide uniformity between polymorphic class types we usually use some sort of contract, in this case we use an abstraction contract: the abstract factory. The abstract factory defines the common creation methods between the factories, allowing a polymorphic generation of objects depending on the factory implementation.
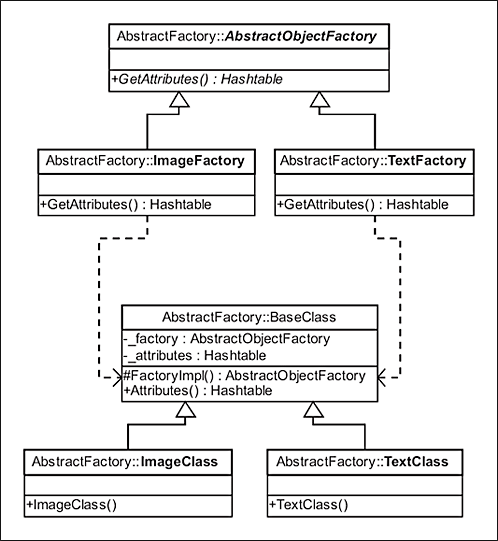
Figure 2-6. UML for Abstract Factory example
The particular problem in the previous section illustrates a lack of polymorphic cohesion between factories. We stated a need for a common interface between factories due to the need for additions to the existing code and a common way to introduce attribute values. To accomplish this we first need to establish the base factory as the contract:
abstract class AbstractObjectFactory
{
    abstract public Hashtable GetAttributes();
}
Notice the common abstract method on the AbstractObjectFactory for returning the attributes, GetAttributes(). This method defines how all implementations of the abstract factory will be formed, and how any access to the implementation factory will be handled. This gives us common uniformity between polymorphic instances of each factory.
Next, we need to make this abstract factory the base for the implementation factories, in effect inheriting each from AbstractObjectFactory and setting up the specialized factory code inside the overridden GetAttributes() method:
class ImageFactory : AbstractObjectFactory
{
    public override Hashtable GetAttributes()
        //changed from GetImageAttributes
    {
        Hashtable attributes = new Hashtable();
        attributes[“height”] = 52;
        attributes[“width”] = 100;
        attributes[“imageUrl”] = “http://imageserver/images/
                                  someimage.gif”;
        return attributes;

    }
}
Each concrete implementation of the AbstractObjectFactory class can have its own logic for how it returns its expected class type(s). In this case we differ the contents of our hash table based on which concrete implementation of our abstract factory we are using:
class TextFactory : AbstractObjectFactory
{
    public override Hashtable GetAttributes()
        //changed from GetTextAttributes
    {
        Hashtable attributes = new Hashtable();
        attributes["initialText"] = "N/A";
        attributes["maxTextLength"] = 100;
        attributes["textFormat"] = "_____@_____.__";
        return attributes;
    }
}
We need to modify the base class from which ImageClass and TextClass are inherited. The base class previously only defined the Attributes parameter, which was the common object parameter accessor for the two classes. Now we want to add a private instance for the desired concrete implementation of the AbstractObjectFactory class:
class BaseClass
{
    AbstractObjectFactory _factory;
    Hashtable _attributes;
Modifying the base by adding an accessor named FactoryImpl allows us to pass in any type of factory with a base of AbstractObjectFactory. This will allow the particular BaseClass implementation to store its implementation of the AbstractObjectFactory.
    protected AbstractObjectFactory FactoryImpl
    {
        get{return _factory;}
        set{_factory = value;}
    }
We also change the Attributes parameter, adding a call to the factory implementation if the attributes are not initialized. This gives us polymorphic cohesion between the classes for the implementations of AbstractObjectFactory. This also allows the BaseClass implementation to house the work of accessing the factory instead of doing it in external if...then...else statements.
    public Hashtable Attributes
    {
        get
        {
            if(_attributes == null) _attributes =
                FactoryImpl.GetAttributes();
            return _attributes;
        }
    }
}
In the constructor of the implementation classes we define the type of AbstractObjectFactory we need for each class type:
class ImageClass : BaseClass
{
    public ImageClass()
    {
        FactoryImpl = new ImageFactory();
    }
}
Each concrete implementation of BaseClass will define in its constructor the correct factory implementation that is desired for that class:
class TextClass : BaseClass
{
    public TextClass()
    {
        FactoryImpl = new TextFactory();
    }
}
When we make a call to the implementation of BaseClass’s property accessor Attributes, we now get the attributes without any need for the conditional logic we started with:
ImageClass Attributes:
imageUrl=http://imageserver/images/someimage.gif
width=100
height=52
-------------
TextClass Attributes:
initialText=N/A
maxTextLength=100
textFormat=_____@_____.__
The original code is no longer necessary, and can be removed from wherever it is located. All factory calls are handled by their particular class type in a lazy load fashion at run time.
Problem 2: We need to make a builder more extendible to allow different functional processes to occur without changing the builder
Another common use for the Abstract Factory pattern is when using a builder. A Builder pattern is another type of creational pattern that provides a way to organize a number of creational methods that initialize or configure a class type before rendering the implementation of that class.
Let’s say for this example we have a builder that uses a type of factory: DuplexFactory. The builder class uses the factory to create a class representation of a duplex house and initialize all the attributes of that kind of house. Using this particular type of builder, however, we can only build a duplex, since the only factory allowed is the DuplexFactory. But we have a contractor that now builds many other types of houses. For obvious reasons such as scalability of the build process and uniformity of the code that builds a house, we don’t want to change the builder class or create a new builder. So we need a way to use the current builder to build any type of house that is needed.
public class HouseBuilder
{
    public House Build()
    {
        DuplexFactory factory = new DuplexFactory();
        House house = factory.CreateHouse();
        house.Floor = factory.CreateFloor();
        house.WestWall = factory.CreateWall();
        house.EastWall = factory.CreateWall();
        house.SouthWall = factory.CreateWall();
        house.NorthWall = factory.CreateWall();
        house.Roof = factory.CreateRoof();
        return house;
    }

}
Solution 2: Use an abstract factory to define common creational methods for the builder
The first step in analyzing the problem above is to realize that we already have the code inside the builder ready for any implementation of factory that we wish. We only need to abstract the DuplexFactory, and make its creational methods abstract methods. This will allow us to create other factories based on these abstract methods.

Figure 2-7. UML for builder using Abstract Factory example
Here we see the factory code refactored into the abstract factory class HouseFactory:
public abstract class HouseFactory
{
    public abstract House CreateHouse();
    public abstract Floor CreateFloor();
    public abstract Wall CreateWall();
    public abstract Roof CreateRoof();

}
Notice that each of the methods we saw inside the builder in the problem section’s code example is represented here. These abstracted methods give us a contract, or common interface, for each implementation of HouseFactory,on which we can base inherited factory classes, giving each implementation its own functionality.
Next, we make the different factory classes inherit from HouseFactory and implement each of the abstract methods. Each overridden method holds its own representation of the factory code to build its particular type of house.
//original factory for duplex
public class DuplexFactory : HouseFactory
{
The CreateHouse() method creates a new class of type Duplex:
    public override House CreateHouse()
    {
        return new Duplex();
    }
The CreateFloor() method creates a new class of type CementFloor:
    public override Floor CreateFloor()
    {
        return new CementFloor();
    }
The CreateWall() method creates a new class of type CementBlockWall:
    public override Wall CreateWall()
    {
        return new CementBlockWall();
    }
The CreateRoof() method creates a new class of type ShingledRoof:
    public override Roof CreateRoof()
    {
        return new ShingledRoof();
    }
}
Using the abstract factory class HouseFactory we can now implement other factory types. The class below illustrates how by overriding the required abstract methods we can get a completely different set of classes from our factory, all based on their common type:
//new factory for different house type
public class HUDFactory : HouseFactory
{
The CreateHouse() method creates a new class of type HUDHouse:
    public override House CreateHouse()
    {
        return new HUDHouse();
    }
The CreateFloor() method creates a new class of type SlabFloor:
    public override Floor CreateFloor()
    {
        return new SlabFloor();
    }
The CreateWall() method creates a new class of type WoodenWall:
    public override Wall CreateWall()
    {
        return new WoodenWall();
    }
The CreateRoof() method creates a new class of type ShingledRoof:
    public override Roof CreateRoof()
    {
        return new ShingledRoof();
    }
}
The last step is to refactor the builder to accept the abstract factory class as an input parameter of the Build() method instead of declaring DuplexFactory inside the builder. Notice that the internal code of the builder did not need to change much. We simply changed the Build() method to have an input parameter HouseFactory. Now we can change the type of house we build by simply entering the correct implementation of HouseFactory. This allows a polymorphic integration between factory types without complicating the builder any more than is needed or changing the builder for each house type.
public class HouseBuilder
{
    public House Build(HouseFactory factory)
    {
        House house = factory.CreateHouse();
        house.Floor = factory.CreateFloor();
        house.WestWall = factory.CreateWall();
        house.EastWall = factory.CreateWall();
        house.SouthWall = factory.CreateWall();
        house.NorthWall = factory.CreateWall();
        house.Roof = factory.CreateRoof();
        return house;
    }

}
We now can change how the builder works by simply passing in a new factory instance of type HouseFactory. We get a new type of House depending on which factory the builder gets as its input parameter:
HouseBuilder builder = new HouseBuilder();
House duplex = builder.Build(new DuplexFactory());
House hud = builder.Build(new HUDFactory());
When we look at the results of our test for this code, we can see that each type has its expected implementations:
Duplex:
--Floor: CementFloor
--WestWall: CementBlockWall
--EastWall: CementBlockWall
--SouthWall: CementBlockWall
--NorthWall: CementBlockWall
--Roof: ShingledRoof
HUDHouse:
--Floor: SlabFloor
--WestWall: WoodenWall
--EastWall: WoodenWall
--SouthWall: WoodenWall
--NorthWall: WoodenWall
--Roof: ShingledRoof
Comparison to Similar Patterns
Abstract Factories are an abstraction of factory implementation, so whether to use a Factory or abstract the factory depends on your need. It may make more sense to use different factories inside a Builder or pass the factory into a Builder as an abstract one. Builders that accept Abstract Factories sometimes work better than Builders that accept one single factory type. Another option to the Abstract Factory is using a Builder with a director. The director accepts different builder types with operational methods and deals with each operational method in turn. This might be more useful if you have to implement several operations in the creational process instead of one. Factories usually are more useful with a specific class type or series of class types all subclassed from a single base. Abstract Factories are simply an expanded version of the Factory pattern, where the Factory needs to have a polymorphic implementation.
What We Have Learned
In the solutions we saw how to take different factories for classes with a common base, provide polymorphic cohesion between these class’s factories using the Abstract Factory pattern, and in effect simplify and/or enhance the overall code. We used this pattern to define a contract or common interface between factories used by similar objects, and using this contract allowed the base class to handle the actual factory call. We also learned a valuable lesson on polymorphism that incorporates similarities in interfaces between classes and, depending on the implementations of those classes, causes different actions to be performed. We found another positive aspect of polymorphism, in that it can enhance the maintainability of your code with respect to the way the factory implementation is used instead of having different multiple conditional logic areas either in classes or builders.
Builder Pattern
What Is a Builder Pattern?
Builders are a type of creational pattern that consolidates code for initialization and configuration of objects. Usually builders house several operations that may be involved in the creational processes involved in building classes, and often work hand in hand with factories. Builders usually deal with construction of complex objects or objects whose construction, initialization, and configuration spans more than one process and whose creational code is complex.
Builders are used to prevent duplication of creational code, and act as a central repository for the creational code involved. So a builder might be used when you have several processes that aid in the creation of an object, and the object’s creation or initialization is dependent on each of these processes. You might use different factories as input parameters for a builder, changing the way a builder constructs its object, or the type of object it constructs. Or you might use the builder inside or alongside a factory to aid the factory’s creation of its objects.
The Builder pattern has three main components: the Builder, the Director, and the Product. The builder is responsible for defining and producing individual parts of a whole class or product. It holds a number of processes needed to build, initialize, and configure the product class. The director class is the class that helps the builder to put all the methods together in a cohesive and consequential manner. When used with factories, directors can actually be the builder themselves. The product is the class that is produced from the builder-director relationship.
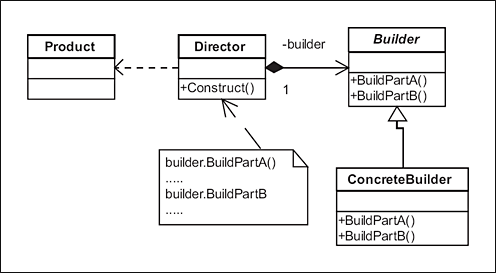
Figure 2-8. UML for Builder pattern
Problem 1: A class needs several operations to create and initialize each of its attributes in an expected order of operations, and each class type instance needs different attribute values
For our real-world example, let’s assume we have a class that uses several operations to get its fully configured and initialized created state. We will use the same House class we used in the “Abstract Factory Pattern” section in this chapter to illustrate our problem.
Below we have the creational code for House. Notice we are first creating the House class, then initializing each of its attributes with different classes. For this example, we can assume each attribute type has a base parent class from which the implementation class for the attribute is inherited. We can also assume that each attribute needs to be created and added to the House class in a set order of operations and each attribute must be set before the class can be considered as fully configured and initialized from the code.
House house = new Duplex();
house.Floor = new SlabFloor();
house.WestWall = new CementWall();
house.EastWall = new CementWall();
house.SouthWall = new CementWall();
house.NorthWall = new CementWall();
house.Roof = new ShingledRoof();
Our problem is that we are using specialized code to create and initialize the Duplex class. If we wanted to create and configure another House class type and have all its attributes set up in the same order as the Duplex class, we would have to create a different set of functional logic:
House house = new HUDHouse();
house.Floor = new CementFloor();
house.WestWall = new CementBlockWall();
house.EastWall = new CementBlockWall();
house.SouthWall = new CementBlockWall();
house.NorthWall = new CementBlockWall();
house.Roof = new ShingledRoof();
This duplicate logic might introduce uniformity and maintenance issues across the different creational logic areas. We would then have multiple areas to maintain and keep uniform, for exactly the same operational order and set of operations.
Solution 1: Use a combination of a director and a builder to encapsulate and uniformly define the processes in the expected order, and use inherited members of the builder to change each type’s reaction to the expected operations
The first step in figuring out the solution is to realize we have a set of operations that need to maintain a certain order for every class implementation of House. We also need to make sure that each operation gets performed before the House class can be returned from the code.
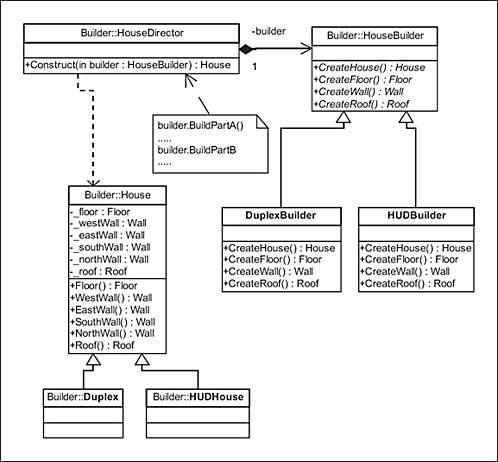
Figure 2-9. UML for director Builder pattern example
To accomplish this we will use the Builder pattern. We first need to create a common interface for the concrete builder classes. We use an abstract class with abstract methods that each concrete builder class will implement. The abstract HouseBuilder class is used for this. We inherit each class of type HouseBuilder from the abstraction and implement each method in a different way depending on the type of House we want the builder to build. Notice each abstract method in the class is a method we took from our original code. The only thing missing is the order in which each is called and the actual implementation of the methods.
public abstract class HouseBuilder
{
    public abstract House CreateHouse();
    public abstract Floor CreateFloor();
    public abstract Wall CreateWall();
    public abstract Roof CreateRoof();
}
For this example we created two builders, Duplex and HUDHouse, for House classes:
class DuplexBuilder : HouseBuilder
{
    public override House CreateHouse()
    {
        return new Duplex();
    }
    public override Floor CreateFloor()
    {
        return new CementFloor();
    }
    public override Wall CreateWall()
    {
        return new CementBlockWall();
    }
    public override Roof CreateRoof()
    {
        return new ShingledRoof();
    }
}
Each of these concrete classes implements the HouseBuilder’s abstract methods, and each method works in a different manner for its different concrete implementations:
class HUDBuilder : HouseBuilder
{
    public override House CreateHouse()
    {
        return new HUDHouse();
    }
    public override Floor CreateFloor()
    {
        return new SlabFloor();
    }
    public override Wall CreateWall()
    {
        return new WoodenWall();
    }
    public override Roof CreateRoof()
    {
        return new ShingledRoof();
    }
}
Now that we have builders that implement each of the creational methods for its house type, we need a way to make sure we perform the same order of operations for any builder. For this purpose we create a Director class that has a method that receives as an input parameter the abstract HouseBuilder class. Inside the director class’s Construct() method we identify each operation and its order of execution. This ensures that no matter which House class we want to create we always configure them in a uniform manner. Doing this provides us with an easily maintainable area for making additions and modifications to the order of operations, and ensures we always get expected results from our creational methods.
class HouseDirector
{
    public House Construct(HouseBuilder builder)
    {
        House house = builder.CreateHouse();
        house.Floor = builder.CreateFloor();
        house.EastWall = builder.CreateWall();
        house.WestWall = builder.CreateWall();
        house.SouthWall = builder.CreateWall();
        house.NorthWall = builder.CreateWall();
        house.Roof = builder.CreateRoof();
        return house;
    }
}
Now we have a way of using our builder classes to create and configure the type of House class we need while maintaining a uniform order of operations. The HouseDirector class maintains the order of the operations and the builder implementation classes return the correct classes and attributes appropriate for their type:
HouseDirector director = new HouseDirector();
House duplex = director.Construct(new DuplexBuilder());
House hud = director.Construct(new HUDBuilder());
We now have captured both the workflow and each separate implementation of that workflow in a central location. This adds to the maintainability of the code and establishes a pattern for future additions or revisions. When we run the test for this code we see each House type renders its expected attributes:
Create a Duplex:
--Floor: CementFloor
--WestWall: CementBlockWall
--EastWall: CementBlockWall
--SouthWall: CementBlockWall
--NorthWall: CementBlockWall
--Roof: ShingledRoof
And here we can see how a different implementation type will render a different instance of type House:
Create a HUDHouse:
--Floor: SlabFloor
--WestWall: WoodenWall
--EastWall: WoodenWall
--SouthWall: WoodenWall
--NorthWall: WoodenWall
--Roof: ShingledRoof
Problem 2: A factory produces classes that need initialization, configuration, data, or state set during creation and this can differ between class types and spans multiple operations
Let’s look at the suit example from the “Factory Pattern” section earlier in this chapter. Remember that we had an abstract parent class Suit that we inherited from to get different implementation subclasses of that class. Now assume that our Suit subclasses are part of an entire ensemble, and the Suit attributes need to be initialized and configured when the implementation class of Suit is created from the factory to include the ensemble variations. Some of these attributes are part of the Suit abstraction, some are only valid for individual inherited implementations of Suit, and each attribute object is subclassed from a common abstraction class. We need within our factory to completely initialize all the attributes for the particular implementation. For reasons of maintainability and scalability we do not wish to use the current Boolean logic code we have created for that purpose.
....resides inside the factory
if(suitType == SuitType.Armani)
{
    suit = new Armani();
    suit.Tie = new StripedTie();
    suit.Belt = new LeatherBelt();
    suit.CuffLinks = new GoldCuffLinks();
}
If we had to create different suits in different places at different times, and add different pieces of the ensemble to get the correct combination, the code would have to be duplicated, which would be a maintenance issue:
....resides inside the factory after Armani
    suit.CuffLinks = new GoldCuffLinks();
}
else if(suitType == SuitType.PlaidBusinessSuit)
{
    suit = new PlaidBusinessSuit();
    suit.Tie = null;
    suit.Belt = null;
}
Also, we have no way to determine in a standard way which pieces of the ensemble should be added to the suit. Each different type has different accessories that must be initialized in different ways, as we can see in the example above. We do not have a seamless way to add this functionality into the factory at this time.
Solution 2: Use registered builders for each class type inside your factory to aid in the initialization of class types
To allow us to configure each ensemble type by the suit type, we need to make use of a creational pattern type: the Builder. A builder basically is a class that encapsulates several initialization, configuration, or data access operations for building a class type. So, for a particular group of inherited members of Suit, we will need a different builder to configure each type’s attributes in different ways.
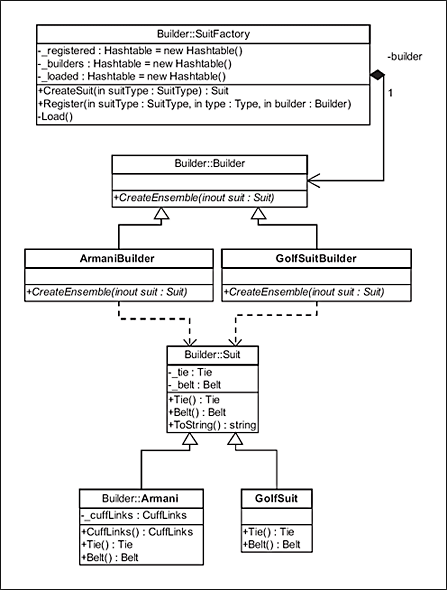
Figure 2-10. UML for factory Builder pattern example
Below we see the code for the Suit object:
public abstract class Suit
{
    Tie _tie;
    Belt _belt;
We have added two properties, which give us extended functionality. These properties will need to be configured on creation of the inherited members.
    public Tie Tie
    {
        get{return _tie;}
        set{_tie = value;}
    }
    public Belt Belt
    {
        get{return _belt;}
        set{_belt = value;}
    }

}
Here we have the concrete implementations of Suit. Notice that only the Armani suit has extended properties for this example.
public class Armani : Suit
{
    CuffLinks _cuffLinks;
    public CuffLinks CuffLinks
    {
        get{return _cuffLinks;}
        set{_cuffLinks = value;}
    }
}
public class StripedBusinessSuit : Suit
{

}
public class PlaidBusinessSuit : Suit
{

}
public class GolfSuit : Suit
{

}
Now we need to create an individual builder for each type of Suit we wish to configure. To accomplish this in a uniform fashion and to provide a uniform interface between builders for implementations inside the factory, we need to establish an abstract base class for the builder with a common abstract method. We will name this class simply Builder. The abstract method we will call CreateEnsemble(). This method is implemented in the inherited builder members, and will perform their specialized configuration of the Suit implementation class.
public abstract class Builder
{
    public abstract void CreateEnsemble(ref Suit suit);
}
Notice below in the GolfSuitBuilder class example that inside this specialized builder’s CreateEnsemble() method we define the expected type of Suit to be configured inside the builder. This is important because, based on the different inherited members, we have extended attributes to set as well as different values for attributes common to the parent class.
public class GolfSuitBuilder : Builder
{
    public override void CreateEnsemble(ref Suit suit)
    {
        GolfSuit aSuit = (GolfSuit)suit;
        aSuit.Tie = null;
        aSuit.Belt = new LeatherBelt();
    }

}
In the ArmaniBuilder concrete builder we define the extended attribute in the Armani suit class we defined previously as CuffLinks:
public class ArmaniBuilder : Builder
{
    public override void CreateEnsemble(ref Suit suit)
    {
        Armani aSuit = (Armani)suit;
        aSuit.Tie = new StripedTie();
        aSuit.Belt = new LeatherBelt();
        aSuit.CuffLinks = new GoldCuffLinks();
            //extended attribute for Armani
    }

}
Creating a builder in this fashion ties the builder indirectly to a particular type of suit.
Now we need to create our factory class. We define which type of suit we can render from the factory by adding the builder as a parameter in the factory’s Register() method. We use as a key for this method the enum SuitType. This defines within our factory at run time the particular builder class we wish to associate with an instance of Suit.
public sealed class SuitFactory
{
    ...
    public void Register(SuitType suitType, Type type,
                         Builder builder)
    {
        _registered.Add(suitType,type);
        _builders.Add(suitType,builder);
    }
Our CreateSuit() method on the factory works the same as it did in the Factory pattern example we read about earlier, with one difference:
    public Suit CreateSuit(SuitType suitType)
    {
        if(_loaded[suitType] == null)
            Load();
        Suit suit = (Suit)_loaded[suitType];
Instead of just returning a simple Suit class, we are now configuring within the factory the attributes of each concrete implementation using our registered builder. After we get our concrete instance of the Suit class, we pass it into the appropriate builder (if one is present) to be initialized:
        if(_builders[suitType] != null)
        {
            Builder builder = (Builder)_builders[suitType];
            builder.CreateEnsemble(ref suit);
        }
        return suit;
    }
}
Notice how the director role is spread in this example between the factory and builder. The builder defines some operations; the factory decides which builder to associate with which class in the factory. This is an example of how the director role can be very flexible in regard to its actual implementation.
Now when we define our expected types of Suit in our code, we also define the expected builder. This allows us to change the builder for each class type, or not have one at all if we choose, enabling a wide host of specialized configuration options.
SuitFactory factory = new SuitFactory();
factory.Register(SuitType.Armani, typeof(Armani),
                 new ArmaniBuilder());
factory.Register(SuitType.GolfSuit, typeof(GolfSuit),
                 new GolfSuitBuilder());
factory.Register(SuitType.PlaidBusinessSuit, typeof
                (PlaidBusinessSuit), null);
factory.Register(SuitType.StripedBusinessSuit, typeof
                (StripedBusinessSuit), null);
When we create our concrete implementation of Suit we get back an instance of a fully configured class. The manner in which each property is configured depends on its type of class and builder.
Suit suit = factory.CreateSuit(SuitType.Armani);
suit = factory.CreateSuit(SuitType.GolfSuit);
suit = factory.CreateSuit(SuitType.PlaidBusinessSuit);
suit = factory.CreateSuit(SuitType.StripedBusinessSuit);
When running our test we see that for each type we call from our factory we get back a specialized concrete instance. If there are extended attributes, those are set. Each attribute is set up according to its particular builder’s order of operations and initialized in the proper manner dependent on the builder.
Armani{StripedTie, LeatherBelt} extended:{GoldCuffLinks}
GolfSuit{No Tie, LeatherBelt}
PlaidBusinessSuit{No Tie, No Belt}
StripedBusinessSuit{No Tie, No Belt}
Comparison to Similar Patterns
Builders are useful when dealing with multiple operational methods. They do not necessarily create a series of classes. Factories are better suited to handle this particular problem. As you saw in the examples, Builders and Factories can usually work hand in hand either with a Factory inside a Builder, vice versa, or side by side. Abstract Factories are sometimes useful when you want different factories to act on the Builder in different ways.
What We Have Learned
Builders are useful for any creational methods spanning a number of operations. They are also useful for maintaining the order of the operations in creating classes. Using inheritance, we can make sure builders can provide us polymorphic processing of creational logic and can change this logic across inherited implementations. Using builders we can create a class, initialize its state, and maintain the order of operations for how the class gets created and configured. We can use builders in a variety of ways with factories and provide either added functionality or enhanced usability in their association.
Prototype Pattern
What Is a Prototype Pattern?
The Prototype pattern gives us a way to deal with creating new instances of objects from existing object instances. We basically produce a copy or clone of a class that we already have created and configured. This allows us to capture the present state of the original object in its clone so we can modify the cloned object without introducing those changes to the original. We might do this if we needed to duplicate a class for some reason but creating a new class was not appropriate.
Perhaps the class we wanted to clone had a particular internal state we wanted to duplicate. Creating a new class from scratch would not reproduce the appropriate internal variable values in the new class we desired without violating rules of encapsulation of the class. This might occur because we might not be able to directly access private variables inside the class. Simply constructing a new class would not get us the class in its current state. Making a clone of the existing class would allow the clone to be modified and used without changing the original and would allow us to capture the originating class’s state in the new class. This can be accomplished because the prototype method is internal to the originating class, and has access to its class’s internal variables. This gives the method direct access to both the originating and the new class’s internal state.
Another reason to use a prototype would be because we cannot create a new class in the current scope of the code or because allowing a constructor on the class in the current scope violates the rules of encapsulation of our application. A situation like this could occur if the class’s constructor was marked internal to a domain that is not the current domain. We could not call the constructor because of its encapsulation properties. This sometimes happens in cases where a facade is used. Since you cannot call the constructor outside of the facade’s domain, the only way to construct a new instance of a class would be to provide a prototype method on the class.
The Prototype pattern has one main component: the Prototype. The prototype is really an ordinary class that has a method implemented to create a copy (or clone) of itself.
This is an interesting and useful pattern. Let’s take a look at some examples of how it can be used.

Figure 2-11. UML for Prototype pattern
Problem: A class that cannot be constructed outside its assembly or package needs a copy made that keeps its current state intact
For our example, we start with a class that can only be constructed internally to an assembly or package. We need to create a new instance of the class in a scope that is outside of the assembly or package of the class. Since the constructor is marked internal to its domain, assembly, or package, we cannot call it in the current scope.
The Stone class needs to be added to another class outside its package or assembly without sharing the current reference. The only way to do that is to call the factory method again and get a new instance. This might be inappropriate since the Stone class may have changed attributes that we wish to maintain in the new class. We have tried to fix this problem by creating a new class and filling its attributes with the values of the original:
Stone stone = StoneFactory.GetGranite();
stone.Color = System.Drawing.Color.DimGray;
stone.Hardness = 5;
stone.Shape = System.Drawing.Drawing2D.WarpMode.Bilinear;
Calling the factory to get a new class will give us a new instance, but we have to be careful to write the code so we can get an exact replica of the original:
Stone nonClonedStone = StoneFactory.GetGranite();
nonClonedStone.Color = stone.Color;
nonClonedStone.Hardness = stone.Hardness;
nonClonedStone.Shape = stone.Shape;
This will only work as long as we can set the internal variables of the class through methods providing external access to these variables. If we had attributes that we could not set inside the new class, this method would not work. Our problem is that we do have such variables; we just cannot modify the internal state of the class easily from outside the class. We need a way to get a new instance of the class with its complete state maintained in the new class.
Solution: Create a prototype method on the class to return a cloned instance with its state copied to the needed depth
Our solution to this dilemma is to build a method on the class that will produce a prototype of the original. In other words, we clone or copy the class with a method that has internal access to the class without violating the class’s encapsulation rules.
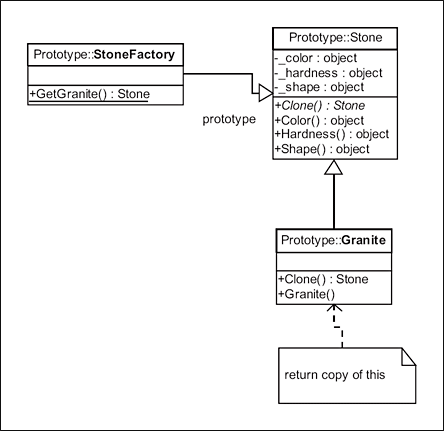
Figure 2-12. UML for Prototype pattern example
We start by looking at the abstract Stone class. We provide an abstract method on the class named Clone(). This method will be implemented on the concrete implementations of the class to provide a way to return the particular instance of the class with its current state at the time of the call to the method.
abstract class Stone
{
    public abstract Stone Clone();
}
Now let’s look at the implementation class Granite and its Clone() method. We use the .NET MemberwiseClone() method to render a shallow copy of the attributes of the class in its current state:
class Granite : Stone
{
    public override Stone Clone()
    {
        return (Granite)this.MemberwiseClone();
    }
}
In the case of having data that lived deeper in the object, we might have to capture the internal state directly. This could occur, for instance, in an object containing collections of object instances, and the collections would not necessarily get cloned because the objects in them were reference types instead of value types. In this case, you might have to add each object manually. This is referred to as a deep copy. A deep copy occurs when you have copied new reference types from existing ones, in addition to using MemberwiseClone() to copy the value types, making a completely disconnected new class instance. This results in an object whose internal reference types are not shared but are new instances of the original reference types. This ensures changes to the cloned object’s reference types do not affect the object from which it was cloned. In the following example, we are copying all the value types from the current object to a new object, then looping through the current object’s internal collection and calling a clone object on the value type in the collection:
public override Stone Clone()
{
    Stone ret = (Granite)this.MemberwiseClone();
    foreach(object obj in _collection)
        ret.Add(obj.Clone()); //Reference Type is also cloned
    return ret;
}
Now when we call the method it produces an exact copy with the same internal state as the original class:
Stone clonedStone = stone.Clone();
Our test of the new class confirms this:
Cloned
Color:Color [DimGray]
Hardness:5
Shape:Bilinear
Comparison to Similar Patterns
Depending on the scope and purpose of the creational methods, either a Factory or a Singleton pattern might be a better solution than the Prototype pattern. If you need a global instance of a class that cannot be instanced more than once, then a Singleton might be more appropriate. A Factory might also be another option for a more global management site for the object’s state. The Factory could retain created objects and their states, and render them as needed.
What We Have Learned
The Prototype pattern gives us another way to deal with creating a class when copying the original object’s state is important. It is also useful when the object cannot be created in its current context without violating the object’s encapsulation rules. The pattern basically provides a clone of the original object, maintaining all of the original object’s current state.
Singleton Pattern
What Is a Singleton Pattern?
The Singleton pattern is a way to provide global access to a class instance without making the constructor available outside the class. The singleton class instantiates itself and maintains that instance across multiple process threads.
The Singleton pattern has one main component: the Singleton. The singleton class acts as a global repository for an instance of itself, whose constructor is private. So no instance outside the class can be created, and only one instance resides inside the singleton.

Figure 2-13. UML for Singleton pattern
If, for example, we had a main MDI (multiple document interface) window for an application and wanted only one instance of this window, but wanted to allow many different process threads to access this one instance and maintain the state of the MDI window between the different calls, we might use a singleton.
Problem: A global class in the application needs to hide its constructor and maintain only one instance of itself while allowing all of its methods to be accessed as instance methods
For our example, we have a class that we wish to have globally accessible in our application. We want to allow only one instance of that class to exist. For purposes of state management, we need a class instance to be provided for each method on the class instead of making the methods static (shared between threads). We do not wish more than one instance of the class to be created.
In our present code, the state of our MDI class cannot be maintained across multiple threads. This class is called MDIWindow and has a public constructor. The class can be instanced any number of times.
class MDIWindow
{
    public State StateOf
    {
        get{return _state;}
        set{_state = value;}
    }

     public void Init()
    {
        ...Some code here
    }
}
Obviously, maintaining state across multiple process threads is not possible with this model, as we can see in the following code. The class is instanced only in the current process thread.
MDIWindow nonSingleton = new MDIWindow();
nonSingleton.StateOf = State.New;
nonSingleton.Init();
nonSingleton.StateOf = State.Initialized;
Another process thread has to create a new instance:
MDIWindow nonSingleton = new MDIWindow();
.......
Solution: Use the Singleton pattern to hide the constructor and maintain an instance of the class inside itself
We have to maintain the state of our class across multiple instances while keeping its scope global. To accomplish this, we will use the Singleton pattern to hide the constructor of the class and provide an instance. The actual constructor of the class needs to be hidden and the class instance needs to be internal to the class itself, limiting the number of instances to one static or global instance.
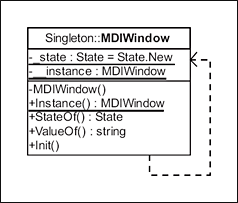
Figure 2-14. UML for Singleton pattern example
The first step to creating our singleton is to make the constructor private. This allows only the class itself to have access to its creation.
class MDIWindow
{
    private MDIWindow()
    {
        //... no-op for a singleton
    }
Next, we need to provide a method that will create the single internal instance of the class. We call this method for this example Instance. We use this method to initialize the class if not already done and to access the single instance.
//Lazy creation of singleton internal instance
    public static MDIWindow Instance
    {
        get
        {
            lock(typeof(MDIWindow))
            {
                if(__instance == null)
                   __instance = new MDIWindow();
            }
            return __instance;
        }
    }
Notice that the Instance method is marked static. This is done to allow all threads consistent access. To control multi-threaded access we use the lock statement outside the instance creation. This allows us to lock the instance creation to a single thread (the first one). This is important to keep multiple threads from creating their own instance before the first thread gets through the code. All the following process threads after the first one will see a non-null instance of our MDIWindow class and not try to create it again.
Note
The lock keyword from .NET used in the example above is needed to keep multiple threads from accessing the code within the statement at the same time. It keeps the access to the code block concurrent and synchronized. Java uses the synchronized keyword to perform the same functionality.
Another way to do this is to use a mutex or a semaphore. A mutex is a thread synchronization device that allows access to only one thread.
    private static Mutex mutex;
    ......
        if (mutex == null)
                mutex = new Mutex();
By using a mutex in your code you can restrict access to all other threads at a certain point and make them wait. In the case of the C# example below, the WaitOne() method sets the first accessing thread as the blocking thread:
mutex.WaitOne();
This allows a single thread to process the null check for the instance variable, much like it is done using the lock keyword:
        if(__instance == null)
           __instance = new MDIWindow();
Only after you release the mutex from the thread can these other threads have access to the mutex. This ensures that you do not have multiple threads trying to create a single instance over and over in a disorganized fashion.
        mutex.ReleaseMutex();
    }
The difference between a mutex and a semaphore is that a mutex enforces thread identity, and the semaphore does not.
All the other methods in the class are non-static public methods. These are the methods that will be accessible on the internal instance of the class.
    public State StateOf
    {
        get{return _state;}
    }
    public string ValueOf
    {
        set
        {
            if(_state == State.Initialized)
               _state = State.Runnable;
            else if(_state == State.Runnable)
               _state = State.Modified;
        }
    }
    public void Init()
        {
        if(_state == State.New)
           _state = State.Initialized;
    }
When we look at the code to access the MDIWindow class, we see that any access to the class instance is done through the Instance method. All the public methods are available in this manner. The constructor is not accessible, guaranteeing that all threads use the same instance of the object. And since we used a thread locking method, we are guaranteed of only one instance being created even if multiple threads are accessing the Instance method for the first time.
To test this we can call code on different threads to modify the state of the singleton class as shown below. First, we create an array of threads that we will use to access our singleton class:
Thread[] stateLessThreads = new Thread[_numberOfThreads];

TestRun entry1 = new TestRun();
TestRun entry2 = new TestRun();
TestRun entry3 = new TestRun();
Next, we start each thread:
Thread t = new Thread(new ThreadStart(entry1.StateThread));
stateLessThreads[0] = t;

t = new Thread(new ThreadStart(entry2.StateThread));
stateLessThreads[1] = t;

t = new Thread(new ThreadStart(entry3.StateThread));
stateLessThreads[2] = t;
The order in which each thread will execute our singleton code is arbitrary; there is no guarantee as to the order of entry of any thread:
for(inti=0;i<_3;i++) stateLessThreads[i].Start();
When the first thread calls the Instance property method, it locks the singleton creation code from being accessed by any other threads. It doesn’t matter which thread gets there first. None of the other threads can get past that code until it has finished and the locking mechanism has been released.
public void StateThread()
{
    MDIWindow.Instance.Init();
    MDIWindow.Instance.ValueOf = "changed";
    MDIWindow.Instance.StateOf);
}
The test above will show that state is maintained for the single instance across all threads. The first thread changes the status to New, then to Initialized, and last to Runnable by modifying a value that changes our state accessor. The next thread sees the new status of Runnable, and changes it to Modified. The last thread to access the singleton sees the new status of Modified and, since this status does not change, the thread leaves the status as is.
Thread{3} Singleton state before Init call:New
Thread{3} Singleton state after Init call:Initialized
Thread{3} Singleton state after Value change:Runnable
Thread{1} Singleton state after Init call:Runnable
Thread{1} Singleton state after Value change:Modified
Thread{2} Singleton state after Init call:Modified
Thread{2} Singleton state after Value change:Modified
Comparison to Similar Patterns
To control access to the constructor of a class, especially when you don’t wish to allow the constructor to be accessed outside a package or namespace, Singletons and Prototypes both work well. It all depends on how you wish to deal with the scope of the instance. Since the Prototype hides the creational method inside the Clone() method, obviously your constructor is safe from outside access. A Singleton pattern works the same way, but only allows one instance instead of many cloned instances.
What We Have Learned
Using the Singleton pattern allows us to control the construction access of a global class instance. We can use it to provide singular class instance access when we do not want to allow multiple instances and want the class itself to control its scope.
The Singleton pattern is the first pattern I ever learned to use. I used this pattern most extensively for creating classes for holding code to perform database select queries. It is a handy way for you to control and limit the scope of any class that you do not want to create over and over. Just be careful. This pattern can be addictive and you may end up using it when it is not appropriate when you first start using patterns.