As I mentioned in the acknowledgements, the first time I hand-processed motion picture film was with Robin Cline at her house in the late 1980s in Olympia, Washington, using an E-6 kit to develop Ektachrome. I think it is funny that I basically did the most difficult process first (it had something like eleven steps) with absolutely zero idea about how toxic the chemistry was. I don’t even remember what was on the film and the original is lost to time. Following that I began to experiment with black and white processing with kits designed for T-max still film. I hand-processed parts of Story of Sarah (1993), originally on Super-8mm, and was introduced to the joys of High-contrast black and white film by Michael Hoolboom. As I noted in the previous chapter, Hi-con was the cheapest, easiest-to-process stock and gave me the most interesting results. I was soon hooked on it and used it and various hand-processing techniques in my other 16mm films completed in graduate school, Razed by Wolves (1998) and Endless Present: Biography Of An Unknown Filmmaker, a film by Cornealius Thistle (1999). Endless Present even fore-grounded the act of hand-processing as part of the film.
Then I had a baby and got a doctorate in Anthropology. So my next films didn’t come out until 2006. Both fall and the passenger featured hand-processed color negative. Lest you think that anthropology took me away from filmmaking, as a graduate student I was in charge of the visual anthropology lab and facilities that included a darkroom. I spent a decent part of my time while working on my dissertation hand-processing motion picture film in that lab. By the time I came to Emerson College as an assistant professor, hand-processing was a staple of my artistic arsenal and my tenure film, Yanqui WALKER and the OPTICAL REVOLUTION (2009), featured black and white and color negative and reversal film, all hand-processed. Although there are plenty of filmmakers who do this sort of thing it really hasn’t been until recently that any of us spawned a second generation of hand-processers. In other words, most of the people I knew in the 1980s and 1990s who were hand-processing had sort of figured it out on their own. Then some of us became professors and began teaching others, and some of those others went on to make this a central aspect of their work.
Outside of college, I first taught a hand-processing workshop through Scribe (www.scribe.org) in Philadelphia, Pennsylvania. It was held in somebody’s basement and it was extremely fun. During the first few years I was teaching at Emerson, hand-processing was not a part of my pedagogy as I was trying to stay on the straight and narrow path towards tenure. But soon enough I was asked to teach something that required experimental processes and I jumped at the chance. It wasn’t long before we were annoying the photo faculty and staff with film students invading the darkroom to process their film. There were some turf wars that probably should have been expected, particularly because some students are not so good at cleaning up after themselves, but, now that the photo faculty are less interested in silver processes and have a digital lab, the darkroom seems to be less of a contested domain.
My experience mirrors a trend. Internationally, since the late 1990s there has been a strong resurgence in artists dedicated to celluloid and willing to experiment with it materially in a variety of ways. At the same time commercial cinema has moved more and more towards digital acquisition and distribution. This has resulted in a considerable reorganization of the manufacturing and processing motion picture film industries. In March 2013 Fuji stopped producing all their camera stocks. Around the same time Kodak ceased producing their color reversal film stocks and many film labs, large and small, have gone out of business or stopped processing celluloid, such as New York’s iconic DuArt laboratory did in 2010. The upshot is that smaller vendors are beginning to manufacture film stock for the boutique market of filmmakers, hobbyists and artists alike. The German company Agfa has begun to produce a color reversal film stock that can be purchased at Spectra Film and Video in North Hollywood and Dwayne’s Photo in Parsons, Kansas, and repackaged as Wittner-Chrome by the German company Wittner-Kinotechnik. All companies can be ordered from online.
Meanwhile Kodak has rededicated itself to Super-8mm, albeit with only color negative and black and white stocks available, and continues to give a considerable student discount. And if you are not interested in processing your own color film, there are small labs (and more opening every day it seems) that cater to this growing niche of small-gauge filmmakers. And I am proud to say that several new organizations founded or co-founded by Emerson College graduates have popped up that are promoting experimental film production and curating and running workshops, such as Mono No Aware in Brooklyn, New York, and Balagan (co-run by an Emerson grad) in Cambridge, Massachusetts. It is my hope that the instructions given in this book will facilitate you starting your own cooperative or experimental film workshop or class.
The instructions in this chapter are meant for individuals who want to venture into color processing. But there is one caveat: color chemicals are often significantly more toxic than black and white. If you are unfamiliar with a chemical or compound, look up its hazard warning on the web. In all cases I have tried to give you instructions that will help you either using kits OR mixing your own chemistry from scratch. Often the latter requires buying chemistry in powdered bulk and investing in a good scale and other photo-mixing supplies. In the long run you will save money by mixing your chemistry from scratch, but the cost outlay to begin can be prohibitive. This is why it’s not a bad idea to go in on these purchases with like-minded friends.
ANATOMY OF COLOR FILM
Although different film stocks developed over the years differed in a variety of ways, the basic structure of color film stock, whether reversal or negative, is as follows: there are three layers of emulsion, with specific dye couplers interspersed with the silver halide crystals in each. Often there will be different-size “grains” in each layer to create a range of tonalities across that color. There is a filter made to take out yellow light between the first and second layer of emulsion. There are filters to cut out different spectrums of light in both color reversal and color negative film (Figure 6.1). When the film is put in the silver developer, each layer develops only those activated silver halide crystals, turning them into metallic silver. If the film is reversal, the metallic silver is removed and the unexposed areas are re-exposed either chemically or with physical re-exposure to light. This is similar to the process for black and white reversal, only there are three layers of latent images. Whether reversal or negative, the process of turning silver halide into metallic silver oxidizes the developer, which then combines with the color coupler to form the dye specific to that layer. Metallic silver is then removed by being changed back into silver halide by the bleach with the fix removing all silver halide crystals. What is left on the film are “dye clouds” where the metallic silver was: three layers of images that collectively replicate the color spectrum of the captured image—or its negative. And, over time, these dyes fade. That is why color film, reversal and negative, fades. If you skip the bleach (a.k.a. “bleach bypass”) the metallic silver (blacks and grays) will remain, resulting in higher contrast, less saturation, blown-out highlights and loss of detail in the shadows in color negative. Skipping bleach will not make your film resist fading, although once it has faded you will be left with a more dense black and white image.
Color negative film also has a base that has an orange mask, whereas color reversal is on a clear acetate or polyester base. Both generally have an anti-halation backing that is black and can be removed by an alkaline pre-wash or in a final alkaline wash at the end of the process. This layer on the non-emulsion side of the film is called rem-jet backing. Composed of carbon black, this coating serves to improve the image by keeping light from bouncing around the film plane after it has already passed through the emulsion. However, if not removed before beginning color processing, it will tint your chemistry and, if not removed entirely during processing, it will create dark/opaque streaks on your color negative or reversal film. Although easy to remove, it is messy and often freaks out the novice processer.
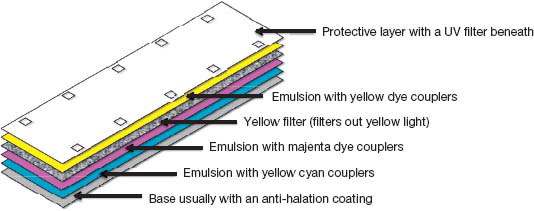
FIGURE 6.1
Anatomy of color film. Although the specifics of color and reversal film vary across manufacturer and type, the basic elements are the same. All color film has three different layers of emulsion: yellow, magenta and cyan.
Back in the day, there used to be a great variety of color reversal films that were marketed towards hobbyists for personal filmmaking. There were daylight-balanced stocks and tungsten-balanced stocks, 8mm, Super-8mm, 16mm film. Often film was sold with processing included. Back when I began making films you could still buy Kodachrome (a proprietary color reversal stock and processing) in a variety of ASAs and send them in a special Kodak mailer to Europe for processing. Although Kodachrome had three layers of film, sensitive to three different light spectrums, the dye couplers were not a part of the layers of emulsion—allowing it to render a finer image and also giving it a significant (12-stop) range. However, this design required a very complicated processing technique, one that wasn’t suited to home processing. The German film company Agfa began producing color film in the 1930s. Following World War II its United States-based subsidiary, Ansco, began producing a variety of color reversal film called Anscochrome. Fuji for a time also produced a color reversal film stock and Kodak began producing a faster (higher ASA) alternative to its Kodachrome stock called Ektachrome in 1977. Besides being able to shoot it with less light, because the dye couplers were suspended in the film itself (and not a part of the developing process), this film had the advantage of requiring a significantly simpler chemical processing.
Kodak made Ektachrome from 1977 until 2013. There was a flurry of panic amongst color reversal filmmakers in the Americas when Kodak announced it was discontinuing the stock. Almost immediately a German company called Wittner-Cinetec began taking Agfa color reversal film (Aviphot Chrome 200) and cutting and repackaging it as Super-8mm and 16mm film. At the time of this writing two retailers in North America are selling similar products. Spectra Film and Video has what it is calling Agfachrome in Super-8mm and 16mm and is selling it with processing and Dwayne’s photo in Parsons, Kansas, is selling WittnerChrome in Super-8mm and 16mm. Another German company, Kahl Film, is producing a 50ASA daylight color reversal stock available in 16mm, Super-8mm and 8mm. They also sell a Super-8mm kit with a developing tank, chemistry and reels. The films mentioned above are more expensive than the Ektachrome, Fujichrome, Kodachrome and Anscochrome of yore, but it would seem that small companies are reaching out to fill the void larger companies made when they stopped color reversal production.

FIGURE 6.2
Hand-processed color reversal image with burned-in optical title. Film still from Yanqui WALKER and the OPTICAL REVOLUTION. Courtesy of the artist.
BASIC COLOR REVERSAL PROCESS (E-6)
When I began writing this book, I used a kit manufactured by Tetenal for color reversal processing. Compared with my early experiments with color processing, it was fairly simple. There were three main steps, first developer, color developer and a combined bleach/fix with a pre-bath before (to swell the film and get it ready to accept the chemistry evenly) and a wash between each step. There was also a stabilizer included in the process that I would use if I wasn’t moving directly to printing the film on my optical printer or transfer after developing. For a while this chemistry was unavailable in the United States and so I used the Kodak five-step E-6 process. “Five steps” is misleading as this process has nine steps (not including drying), six of them requiring mixing chemistry that you need to keep at a particular temperature. A number of home processers have stated that they prefer the Kodak because steps that are combined in the Tetenal kit are separate in Kodak E-6, allowing the filmmaker to tweak the process with much greater accuracy. However, I was never hand-processing color reversal with the intention of replicating commercial lab results and so found the addition of steps annoying. There is also a three-step kit made by Arista that I have not used but which seems fairly similar to the Tetenal kit.
Each of these kits comes with mixing instructions and times (also available on the web). I won’t detail the process here, except to give a few recommendations. Some of them are designed to be used with 35mm still film and this can be confusing for the motion picture film developer as instructions on mixing and exhaustion/replenishment (how long you can use the developer before you need to toss it away or add more chemicals to it) are explained in terms of number of rolls of 35mm film. Although it is not entirely precise, because 35mm film and 16mm film have differently sized sprocket holes, and some 16mm film has sprockets on both sides of the film, not just one, basically, one 36 exposure roll of 35mm still film has the same surface area as just slightly more than 10ft of 16mm film. Thus a single 100ft roll of 16mm film requires the same amount of chemistry to develop it as 10–36 exposure rolls of 35mm. Using this calculation, if one liter of Tetenal E-6 chemistry is sufficient to develop 12, 36 exposure rolls of 35mm, then it will certainly be sufficient to develop 100ft of 16mm or four rolls of Super-8mm film! Beyond that, the time and temperatures for the kits should be the same for developing either motion picture or slide film. Also, because they are designed for use with still film, which generally does not have a rem-jet backing, they do not contain a pre-bath or process to remove it. Therefore, a good first step (or last if you plan on dumping your chemistry and not reusing) would be to use the pre-bath compound listed with the homemade E-6 substitute below.
HOMEMADE E-6 SUBSTITUTE PROCESS
Assuming you have tried a kit or two (really, it is highly recommended doing this before you mix your own chemistry!) what follows are instructions on how to mix your own chemistry to develop color reversal films that require an E-6 process. Using this process will require the purchase of dry chemistry (see a list of vendors at the end of this chapter) and the addition of a very accurate scale (a small cooking scale that works from micrograms to 2 kilos is what I have) and multiple light-tight bottles and graduated cylinders, as well as a respirator to wear during the mixing process and chemical-resistant gloves. The process below is a substitute for the E-6 process using a tweak of the Kodak ECN color developer and some of the same chemistry as the black and white processes described in previous chapters. I gratefully acknowledge Robert Schaller (www.handmadefilm.org and interviewed at the end of Chapter 5) for his sharing of this information. He states: “I know that this is not ‘correct’, and no doubt the official way is better, but in this case the best is the enemy of the good. I leave it for you to decide!”
• Accurate scale to measure chemistry. A kitchen scale is great, but don’t use it for cooking after!
• Five containers for your chemistry.
• Graduated cylinders for measuring and mixing wet chemistry.
• Measuring implements for spooning out dry chemistry.
• Stirring implement.
• Darkroom sink or other deep sink or tub that you can refill with warm water to keep chemistry at temperature.
• National Institute for Occupational Safety and Health (NIOSH)-approved toxic dust respirator for measuring and mixing dry chemistry.
Please see each recipe for the ingredients for each particular step. The times/temperatures follow the recipes. Some of these compounds can be mixed up in advance, such as the pre-bath, the first developer, the stop and the fix (shelf life listed with each) and then brought up to temp for processing. Others, such as the color developer and the bleach, although they may have a shelf life of a week or so after mixing, require such precise temperatures, well above room temperature in most climates, that it’s a good idea to mix them as needed.
Each dry chemistry should come with specifications for handling and disposal. If you have ANY QUESTIONS about this you should email or call the vendor and ask for Material Safety Data Sheets and follow the recommendations. You should mix the chemistry in a well-ventilated area, preferably with an exhaust fan and wear a toxic dust respirator, apron and chemical-resistant gloves when mixing. You should also wear the apron and gloves when processing. Make sure all your tanks, bottles, mixing containers and measuring implements are clean and the measuring implements dry. For each step of the process, measure out the ingredients and add them one at a time to the water, in the order listed, stirring to combine after each. DO NOT add dry ingredients together. Be sure to clean your implements between preparations so that you do not cross-contaminate. When you are ready to mix the temperature-sensitive compounds (color developer and bleach) fill a sink or tub large enough to fit all your jugs of chemistry with water slightly above the ideal temperature for those steps and place all your jugs into it once they are mixed. Before you begin processing, fill a second tub or sink that will fit your tank with water just above temperature to keep the chemistry at temperature while you are processing.
PRE-BATH
This is to remove the rem-jet backing—now this can be quite a trick to accomplish as it needs to be performed in total darkness. To be honest, I have frequently omitted this step and then put the film through a Borax bath at the very end of the process. There are a couple of downsides to doing this. One, the carbon black comes off throughout the process and pretty much ruins all your chemistry. This is fine if you are using a one-shot kit but not fine if (as with the recipe here) you are making chemistry, some of which (like the souped-up D-19, the stop bath, the fixer) you’d like to use again (as it lasts up to eight weeks or more). Also, the rem-jet can come off and stick to the emulsion side of your film making it streaky or opaque. The best way to use this pre-bath is to submerge the film in it and then squeegee it off by passing it through your fingers (Schaller recommends without gloves) or by using a sponge on the non-emulsion side. Following that you can load up your film onto the Lomo spool or into a tank. If you’re already working in buckets, there isn’t much to fear by adding this step, but loading a Lomo with wet film is tough. Alternately, you could agitate your loaded Lomo reel in the pre-bath and keep rinsing it with water until it runs clear. Each of you will have to find a balance between your aesthetic taste and your patience. What follows is Schaller’s recommended pre-bath taken from Kodak processes ECN-2 and ECP-2.
Table 6.1 Pre-bath to Remove Rem-jet Backing
Water 27–38°C (80–100°F) |
800mL |
Borax (decahydrate)—this is the Borax that can be found in the laundry detergent aisle at the grocery store! |
20g |
Sodium sulfate (anhydrous) |
100g |
Sodium hydroxide |
1g |
Water to make |
1L |
Note: pH at 77°F-9.25±0.10.
FIRST DEVELOPER
If pre-made, heat up to 37°C (98.6°F); 1L D-19 chemistry (either from pre-made mix or scratch—see recipe in Chapter 5). Mix in thiocyanate 2g/L.
STOP BATH
Any black and white stop bath (either from a pre-made mix or made from scratch).
COLOR DEVELOPER
SD-50 Processing KODAK Color Print Films, Module 9, Process ECP-2D. To make 1L—1L is sufficient to process 100ft of 16mm in a Lomo tank. It is possible to make replenisher (see Processing KODAK Color Print Films, Module 9, Process ECP-2D) if you will be processing additional rolls within a short period of time. The color developer and replenisher have a shelf life of one week so it is not advisable to make more than you will need to use within that time.
Table 6.2 Kodak SC-50 Color Developer
Water 24–38°C (75–100°F) |
900mL |
Kodak anti-calcium, No. 4 |
1.0mL |
Sodium sulfite (anhydrous) |
4.35g |
Kodak color developing agent CD-2 |
2.95g |
Sodium carbonate (anhydrous) |
17.1g |
Sodium bromide (anhydrous) |
17.2g |
Sodium hydroxide |
None |
Sulfuric acid (7.0N) |
.62ml |
Water to make |
1000mL |
Note: pH at 25°C (77°F) should be 10.59±0.05.
SR-27 Processing KODAK Color Print Films, Module 9, Process ECP-2D. This is to make 1L, which is sufficient to process 100ft of 16mm in a Lomo tank. It is possible to make replenisher (see Processing KODAK Color Print Films, Module 9, Process ECP-2D) if you will be processing additional rolls within a short period of time. The bleach and replenisher have a shelf life of one week so it is not advisable to make more than you will need to use within that time.
Table 6.3 Kodak SR-7 Ferricyanide Bleach
Water 32–43°C (90–100°F) |
900mL |
Potassium ferricyanide (anhydrous) |
30g |
Sodium bromide (anhydrous) |
17g |
Water to make |
1000mL |
Note: pH neutral—6.5±0.5 at 25°C (77°F).
FIX
Non-acid/non-hardening.
Table 6.4 Fix
Water at 27°FC (80°F) |
900ml |
Sodium thiosulfate anhydrous |
160g |
Sodium sulfite anhydrous |
30g |
Water to make |
1L |
Note: check your pH. You may need to add some Borax as a buffering agent to get it to a neutral (6.5).
Use the standard black and white reversal developer as the first developer, and ECP chemistry for the rest. This saves mixing extra chemicals, and makes it so that you can use the same set of chemicals for both reversal and positive prints, which is very handy if you do both. I know that this is not “correct”, and no doubt the official way is better, but in this case the best is the enemy of the good. I leave it for you to decide! Meanwhile, it boils down to this:
Table 6.5 Substitute E-6 Process by Robert Schaller
In total darkness!!! |
||
0. |
Pre-bath—room temperature (70–80°F)—see instructions with the recipe |
|
1. |
D-19 with thiocyanate (2g/L) |
6 min @ 37°C |
2. |
ECP-2 stop bath (Kodak SB-14), or any black and white stop bath—mix up a SEPARATE solution used only as a black and white stop bath |
1 min |
In normal room light |
||
3. |
Re-exposure—passing the film end-to-end 6 inches from a 500W bulb seems adequate. At this point you should check your film and see if the rem-jet is gone. If not you can, in room light, gently scrub the nonemulsion side with a soft toothbrush or cloth while running under running water. If you are using a Lomo tank, do not unspool it just to clean it! You can simply expose the film to light now and clean it with another alkaline wash at the end as you unspool it |
n/a |
4. |
ECP-2 developer (Kodak SD-50) |
3 min @ 36.7°C |
5. |
Water rinse |
1 min |
6. |
Ferricyanide bleach (Kodak SR-27)—the temperature is important, or it won’t work! |
5 min @37°C |
7. |
Water rinse—a thorough rinse is important here! |
1+ min |
8. |
Fixer (Kodak F-35c or equivalent: must be a non-acid, non-hardening fixer!) |
3–5 min |
9. |
Water rinse—several changes. Now is a good time to get the final bits of rem-jet backing off the film! You don’t want it to dry there. It’s not a bad idea to use perma wash at this point as it will help clean up the film and aid in drying |
5 min |
Note: the specified temperatures are essential! The first developer time can be adjusted with temperature, but the color has to be as specified! Temperatures not specified are not critical; ideally, use something around 20°C or warmer (but not hot).
BASIC COLOR NEGATIVE PROCESS (C-41)
The easiest way to develop color negative film is with a C-41 kit. At the time of this writing, Tetenal and Unicolor both make 1L home process kits that are very simple to mix and use. Tetenal also has a 5L kit. I recommend about 1L of chemistry per 100ft of 16mm although I have used the same kit over again, extending the time of each step and gotten pretty good results. What is great about the kits is that they are a three-step process, developer, blix (a bleach + fix compound) and stabilizer. The latter is very important to keep your film from fading. It contains formaldehyde (as does most nail polish, but for some reason THAT is not a controlled substance) so keep it off your skin. The kits come with times and temperature recommendations but are made for still film that does not have the rem-jet backing. Thus I recommend using the pre-bath listed above in the E-6 substitute process to remove the rem-jet before processing.
It is also possible to brew up your own C-41 chemistry or follow Kodak’s recipes for ECN-2 process as outlined in Kodak Publication No. H-24.07, Pro ces sing Kodak Color Negative Motion Picture Films, Module 7 (www.kodak.com/go/h24). If you are going to experiment with the substitute E-6 process above, you can easily mix up enough stop bath, bleach and fix to use for both processes. However, once you use if for one, do not cross-contaminate. Please see Robert Schaller’s instructions in this regard (https://filmprocessing.wordpress.com/final-recipes/) as he has really thought through tweaks to both processes for the home processer. The C-41 recipe is as follows:
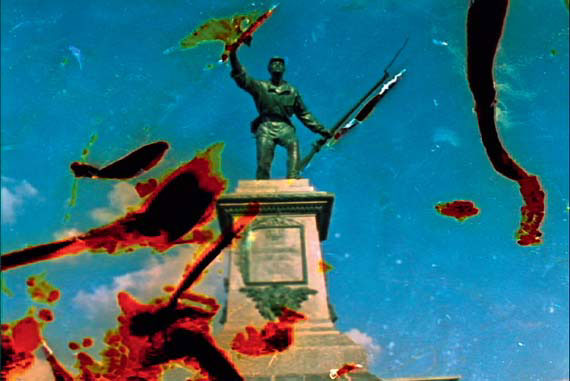
FIGURE 6.3
Film still from Yanqui WALKER and the OPTICAL REVOLUTON, color negative hand-processed film. Courtesy of the filmmaker.
C-41 from scratch
Use the pre-bath from the E-6 recipe above.
DEVELOPER
Table 6.6 C-41 Developer
Water 24–38°C (75–100°F) |
9GGmL |
Sodium hexametaphosphate |
2g |
Potassium carbonate |
34g |
Sodium bicarbonate (baking soda) |
1.9g |
Sodium sulfite |
3.5g |
Potassium bromide |
1.4g |
Potassium iodide |
1.4mg or 1.4mL of solution below* |
Hydroxylamine sulfate |
2g |
Color developer 4 (CD-4) |
5.3g |
Water to make |
1L |
Note: pH of 1G.16 at 25°C.
* Most home processors will not be able to measure 1.4mg. So the solution is to dissolve 1mg of potassium iodide in distilled water to create a solution. Then measure (a medicine syringe is good for this) 1.4ml of the solution. Voila!
C-41 STOP BATH
Table 6.7 C-41 Stop Bath
Glacial acetic acid |
1Gml |
Water to make |
1L |
Table 6.8 C-41Blix
Water (room temperature or 72°F) |
500mL |
Ammonium thiosulfate 60 percent |
200mL |
Ferric ammonium EDTA |
25g |
Sodium sulfite |
15g |
Potassium iodide |
1g |
Acetic acid 28 percent |
10mL |
Water to make |
1L |
C-41 STABILIZER
Table 6.9 C-41 Stabilizer
Water (room temperature or 72°F) |
800mL |
Formaldehyde 37 percent |
3mL |
Photo-Flo 200 |
0.8mL |
Water to make |
1L |
All chemistry (and film) MUST BE at 100ºF/38ºC. The best way to do this is fill a sink or tub (which can fit all the chemistry bottles) with warm water until the chemistry is up to temperature. Then fill another sink or tub that can fit the processing tank with warm 100ºF/38ºC water. Except when you are emptying chemistry out of the tank, the tank should stay in this warm bath to main tain temperature consistency. I know of many home developers who have not paid as much attention to temperature and this leads to color shifts and can (in the case of the color developer) lead to uneven development. So try to keep it at temperature.
Table 6.10 C-41 Temperatures and Times
Pre-bath 100°F/38°C-to remove rem-jet |
5 minutes in bath, then rinse until water runs clear OR use Schaller process |
Developer |
3:15 |
Stop bath |
0:45 |
Rinse (two changes of water) |
1:00 |
Blix |
6:30 |
Wash (several changes of water) |
4:00 |
Stabilizer |
1:00 |
The film will appear cloudy after the stabilizer, but will clear up as it dries.
LAST THOUGHTS FOR NOW
Developing color film is not for the faint of heart and requires a kind of precision and commitment that only a few home processers will really have. It is easy to experiment with premixed kits and I highly recommend this as a starting point as it will get you familiar with the steps and what works in your home lab. At the time of writing, they were still available for E-6 and C-41 processes. The recipes are included here in the event that kits become unavailable or you are ready to move beyond what a kit can provide. But please, don’t dump your chemistry; take it to the appropriate hazardous waste facility. And please be very careful to follow the material safety sheets for any kit or chemical you handle. You only have this one body, so be kind to it!
As I may have mentioned somewhere in this book, I’ve been teaching students how to process film for some time. In fact, the particular class that this text springs from, Alternative Production Techniques, has been responsible for leading more than one student away from the industrial/commercial path towards the life of an artist and/or experimental filmmaker. One such alum, Sean Hanley, became part of a collaborative in Brooklyn called Mono No Aware and it was through him that I met the artist I am interviewing for this chapter, Josh Lewis. Josh used to work in a film lab and this is how he came to his artistic practice. As such he brings the precision and insight of a scientist or engineer to his filmic experimentation.
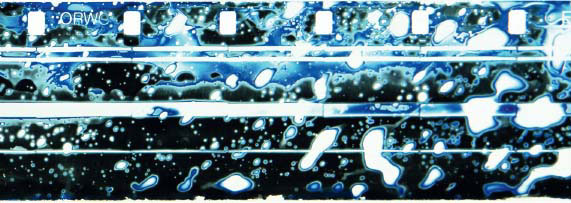
FIGURE 6.4
Doubt by Josh Lewis. Courtesy of the artist.
Kathryn Ramey: So—a general question to get the grease flowing—do you consider yourself an artist, a filmmaker, a new media practitioner, a shaman, a performer? How do you describe who you are/what you do to your aunt or the old guy next door? Or children? Yourself? Your friends? Or do you even try?
Josh Lewis: It depends on who I’m speaking with, but I usually go with either artist, filmmaker or experimental filmmaker depending on which term I feel like will register easiest with the other person. For myself personally, I don’t feel any particular allegiances to any term, they’re all fine.
KR: How did you come to your particular practice? Did you develop your own processes as a series of experiments? Where did the ideas come from? Does your form and method change as you go and, if so, where have you been and where are you going?
JL: After school, I took a job at a photochemical film-processing lab. We did 16mm and Super-8 reversal film. I studied art history in school and had made little movies with a video camera before, but I hadn’t had any real contact with proper filmmaking or film school, so my first real introduction to film was just as this kind of malleable, reactive material that we were subjecting to these various chemical baths. From working at the lab I got a basic understanding of what each chemical did (developer turned exposed parts of the film black, bleach removed the black, fixer turned things clear, etc.), eventually I started filling up a plastic cup with developer or bleach here and there from the machines and then applying them onto scraps of film to see what happened. From the beginning it was really just about trying to figure things out manually and through observation, and I think that’s where I’m still at. I’ve gotten more into the chemistry of it as I’ve progressed, but I think its important that things remain somewhat mysterious, otherwise I think there’s a risk of losing the art. Right now, the possibilities for working with chemicals, light and emulsion feels totally open and limitless.
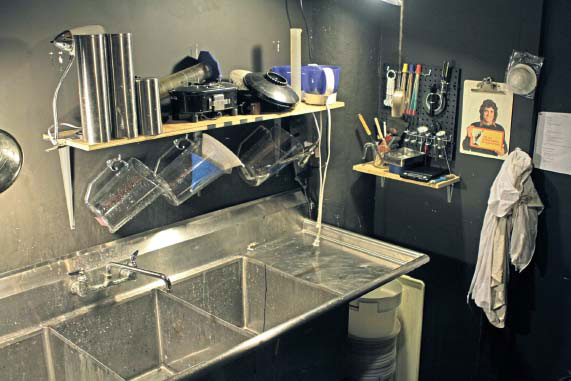
FIGURE 6.5
Josh Lewis’s home film lab.
KR: What role does media/technology/tools play in your work? What is the relationship between the media/tools/and what your work is about? Is your work about something(s)?
JL: I set up my own studio and darkroom about three years ago, and I had to spend some time figuring out my own set-up and had to learn how to work without industrial equipment. So most of my tools for working with film I built myself. The emphasis of these tools is about being able to access and apply chemistry to specific parts of a roll of film and to avoid just putting the film in a bath. Although I did acquire a contact printer recently, and that’s opened up some interesting possibilities in terms of using it for purposes it wasn’t necessarily intended for. Much of my work is completely abstract at this point—in terms of what it’s “about”, I’d say its pretty process oriented, the darkroom has become a kind of sanctified space in which I’m really forced to reckon with myself and this material I’ve chosen to work with that just seems relentlessly to have a mind of its own. It’s really about the struggle to control outcomes, having to accept that that kind of control is really impossible, and the beauty (or horror) that comes out of putting yourself into this situation.
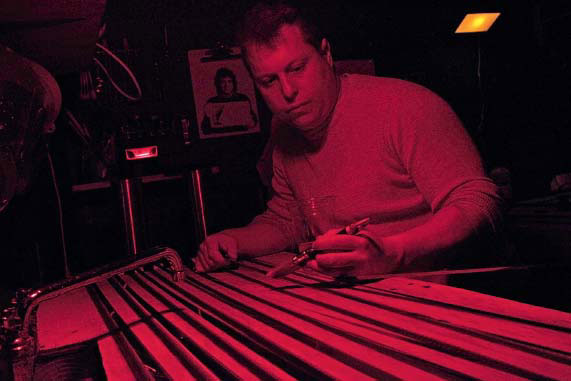
FIGURE 6.6
Josh Lewis hand-painting developer in red light.
KR: Where do you show your work? How do you want people to experience it? Is there a relationship between the form that your work takes and your desired venue/audience?
JL: Mostly I’ve shown at experimental film festivals and small venues/galleries that lean towards this kind of work. I generally think that the intimate “black box” style venues are adequate spaces to experience this kind of work, and I make the work knowing that this is where they’re probably headed. There’s certainly a value in having to sit through a film from beginning to end, to submit to the experience. As much as I think the communal aspect of cinema is important, I do have a fantasy about showing my films in a small room with just one person and a projector. My process is necessarily very isolated and done in confined spaces, and I think there might be a natural way of maintaining that if I could make a single viewer experience one film completely on their own. When you’re with others it’s easy to drift, and wonder what everyone else is thinking about the film; when you’re by yourself you might give in to the experience a little easier.

FIGURE 6.7
Josh Lewis applying the fix.

FIGURE 6.8
Josh Lewis still frame from Doubt. Courtesy of the artist.
KR: And finally, your chapter is called “In the Soup 2: Hand-Processing Color”. Please elaborate how you came to such an activity? Are you part of a community of makers (either locally or internationally) who communicate with each other about their work and get together either virtually or physically to discuss/show/celebrate? Where? When? How? What happens?
JL: See above re. how I came to the activity of hand-processing. I work and teach with Mono No Aware in Brooklyn and this is an extremely important network of makers for me personally and creatively. Mono offers workshops on many different aspects of analog filmmaking, but I’m mostly involved with the wet lab-related workshops (hand-processing, alternative processes, hand-made emulsion, etc.), which I teach out of my own lab. What’s nice about Mono is how many of the people stick around after workshops. A lot of people take what they’ve learned and get deeper and deeper pursuing their own channels and practices with the medium, and then just end up becoming friends and colleagues. I try to make my darkroom as open as possible to former workshop participants and others who want to use it, so the space has become a pretty active place for people looking to pursue experiments in photochemical work. It’s nice that you get immediate gratification from hand-processing; we can screen each other’s rolls right after they dry and talk about what happened. We push each other.
Another important network is www.filmlabs.org, which is a network of artist-run film labs, many of which are in Europe, but increasingly there are more and more initiatives happening in North America too. Having other lab people to talk to and consult with is extremely important in terms of exchanging information.
Josh’s developer
Here’s a recipe for a very alkaline paint-on developer:
• Start with 200g water.
• 8g metol.
• 10g sodium sulfite.
• 20g sodium carbonate.
• Add to 300mL water.
Use between 75–80°F. If you use this in the dark, this developer is aggressive enough so that you can apply small amounts of it directly to the film with a brush or whatever kind of tool you like and the image will develop up.
Fix, wash and dry as normal with black and white chemistry.
Filmlabs.org
In 2005 there was a meeting of independent/artist-run labs in Brussels. Following this meeting there was an initiative by the members of Cinema Nova and other film labs in the network that led to further meetings and the building of the website. Please go to the website for historical overviews, further technical information, recent works by members and more. They say:
Artist-run film labs implement an original way of using production tools, through their collective organizations, for filmmakers and artists currently working with celluloid film. They act as an experimental ground for cinema (beyond any genre) at a time when the industry is gradually getting rid of film and, with that, the means to process and print.
www.filmlabs.org/index.php/site/home
On the website there are thirty-two artist-run labs throughout the Americas, Africa, Asia and Europe. In December of 2012 I was privileged to visit two of these labs in the Paris region, L’Etna in the Marais neighborhood of Paris and L’Abominable in a suburb. L’Abominable runs both black and white and color negative and reversal on a weekly basis. They host classes to train new members on the equipment and then members either pay a fee to have the member/workers print their film or print it themselves. The member/workers do all of the processing at the lab. Below are a few images from our visit.
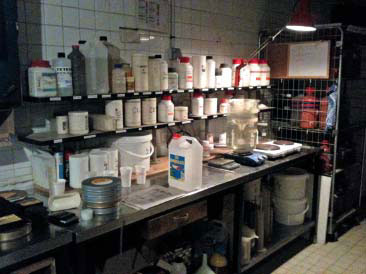
FIGURE 6.9
The chemical mixing bench at L’Abominable.
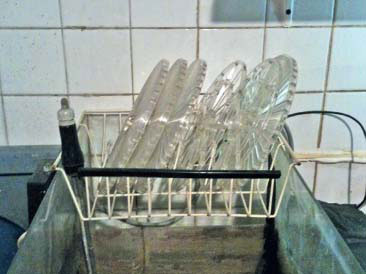
FIGURE 6.10
100ft Lomo reels dry in a dish rack.
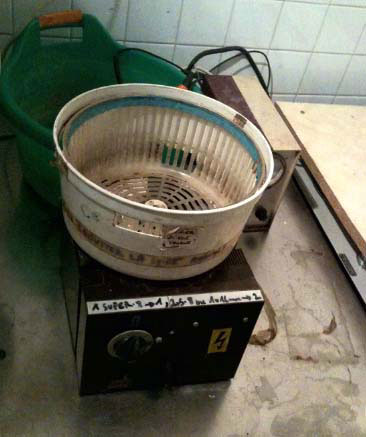
FIGURE 6.11
A film fryer made out of a salad spinner at L’Abominable.
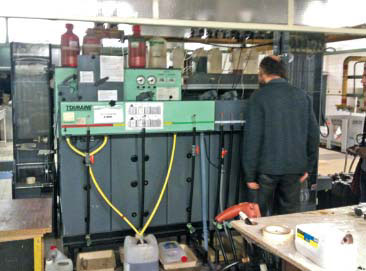
FIGURE 6.12
The processing machine.
References
Kodak Essential Reference Guide. Eastman Kodak, 2007. Available free online at http://motion.kodak.com/motion/uploadedFiles/Kodak/motion/Education/Publications/Essential_Reference_Guide/kodak_essential_reference_guide.pdf [accessed January 9, 2015].
Processing Kodak Color Print Films, Module 9, Process ECP-2D. Eastman Kodak, 2009. http://motion.kodak.com/motion/uploadedFiles/h2409a(1).pdf [accessed January 9, 2015].
ArtCraft Chemicals, Inc. PO Box 382, Altamont, NY 12009, (800)682–1730, www.artcraftchemicals.com/products/.
B & H Photo Video (superstore). 420 9th Ave at 34th Street, NY, NY 10001, (800)606.6969, www.bhphotovideo.com/.
Photographer’s Formulary Inc. PO Box 950/7079 Hwy 83 N Condon MT 59826, 800–922–5255, http://stores.photoformulary.com/index.php.