The title of this chapter may be a bit misleading. Film developing is never completely environmentally friendly, but you can minimize the risk to yourself and the environment significantly by processing your film with the recipes contained in this chapter. While all silver process films (color, black and white, reversal, negative) can be processed with the recipes in this chapter, the resulting image will be a black and white negative image, usually with a distinct brown cast to the film (although this can be removed). The processes this chapter discusses has been dubbed caffenol by the people who use it, most of whom are still photographers and comes (so far as I can assess) from a merging of the terms caffeic acid and phenol (more about these in a minute). There is a caffenol Facebook group, Flickr group, several websites and blogs, and even an online book, The Caffenol Bible, devoted to it. In the last decade or so a handful of intrepid filmmakers began to experiment with developing motion picture film with these homebrew processes. The results were amazing and seriously less toxic than using traditional developer.
So what is caffenol? It is a term coined by photographers over the past decade or so, who began using a developer made from coffee and a couple of other basic ingredients to process black and white film. As different folks experimented with different film stocks they began to tweak the recipe and variations were created such as caffenol C, which was the original recipe with vitamin C added, or caffenol LC, a variation meant to provide low-contrast images. A man named Donald Quall claims to have invented the term caffenol and the first usage of the term on the web that I was able to find was from 2006 and does point back to Donald Quall. Beyond that, attribution for the term is a little hazy, but there is ample evidence of experimentation with using coffee as a developer preceding the origination of the term.
Online investigation via the Facebook group (of which I am a member) has led to some claiming that coffee was used during World War II when traditional photochemistry was scarce as well as pre-World War II manuals listing “camp coffee” and urine as possible options for developing photographs. Most folks who use a coffee developer point to Dr Scott Williams and a publication of his and his students’ findings in their 1995 class Technical Photographic Chemistry at the Rochester Institute of Technology (RIT), in the September/October 1995 issue of Darkroom & Creative Camera Techniques. The class was tasked with finding common household substances that would work to develop film. The starting point was to ascertain the chemical composition of common photo developing agents and then find common ingredients with similar chemical make-ups. The class began with soaps, hydrogen peroxide and ascorbic acid, and then moved on to coffee and tea. Coffee yielded the best results and so the students worked to find a preparation of coffee with other common ingredients that would improve results.
As you will know from previous chapters, film is composed of silver halide and a developing agent needs to be reactive to silver. Silver is ionized when it is exposed to light. A developing agent needs to oxidize (turn black) the activated silver particles. Phenols, present in high concentrations in a variety of plants and also in wine, are also the primary component of film developers. Thus, when Dr Williams was looking for an everyday alternative to developing chemistry, his students began with items that were high in phenols.
Another aspect of successful developing chemistry is the pH of the mixture. The silver halide crystals are suspended in a gelatin or resin, which requires a base pH compound to swell in order for the developing agent to get at the silver. The higher (more base) this pH, the faster the gelatin will swell and the faster the film will develop. If the chemistry is too base, however, the process can happen too fast or be very uneven. Coffee is acidic, and every silver-ion to silver-atom conversion generates both acid and base, so Dr Williams’s students looked for something to “buffer” (raise the pH/make more alkaline and maintain that pH) the compound and hit upon sodium bicarbonate (baking soda) and potassium hydroxide (a drain cleaner). In their experiments, they found that a solution of pH 9 at 85°F for 25 minutes was most successful in developing Kodak Tri-X Pan (400ASA) still film and they used a similar agent for developing the print on resin-coated (RC) paper. The class used D-76 as a control, developing the same photo in both traditional and coffee processes. In a recent email to me, Dr Williams admitted that a developer made using mint worked even better than the coffee, but they decided to share the results of the coffee process as they had the most research on that.
Their coffee process, for use on Kodak Tri-X Pan (400ASA) film, was published as follows:
• Instant (caffeinated) coffee: two rounded teaspoons.
• Baking soda (sodium bicarbonate): two rounded teaspoons.
• Potassium hydroxide (added to achieve pH 9): one rounded teaspoon.
• Water: 12oz.
• Temperature: 85°F.
• Time: 25 minutes.
• Fix and wash as normal.
No matter what the origins of the “caffenol” process, it provides a really great option for filmmakers working in black and white to experiment with a non-toxic process. The developer can go down the drain as no silver has leached into it, but the fixer (more about this after the caffenol recipe) must still be disposed of properly as it contains silver, which is harmful to man and beast when it gets in the water supply. And like all photo processes, in order to make sure your negative remains in good condition, it is necessary to really rinse the film with several changes of water for at least 20 minutes. This wastes water, a resource that we increasingly need to think of as finite. So these are problems that environmentally minded artists need to think through. (Digital processes are just as environmentally hazardous, although we outsource much of that hazard to China and other countries for manufacture and disposal, and thus are somehow blind to the extraordinary environmental cost of obsolete digital technology.)
Hand-processing with caffenol requires much the same tools as any other hand-processing technique. If you haven’t read it already, please review the hand-processing section of Chapter 5 to determine your developing strategy (e.g. using a Lomo tank, jamming the film in a can, etc.). The chemistry works well at slightly above room temperature but isn’t terribly temperature sensitive, so a warm bath with tap water should be fine. The process does take a bit longer than other black and white chemistry, so using a Morse tank (reel to reel) does not make sense. Some people use volumetric measurement (e.g. teaspoons, tablespoons, etc.) to dish out the chemistry and others insist on weight. Strongly recommended are pH strips that can measure the full range (1–13) as is a straining device, especially when using grass, leaves and other plant material. However, you’ll find folks who embrace the chunks of organic material deposited during the process as desirable. Like most hand-processing techniques, if you want a lab look, this isn’t for you. What follows is a recommended list of materials in addition to those recommended in Chapter 5 for hand-processing.
What you will need
• A small scale that does precise measurements from grams to a kilo or so OR measuring spoons.
• pH strips.
• Something to strain your mix if using garden materials.
• Soda ash, a.k.a. washing soda, a.k.a. sodium carbonate. This can be found at pool supply stores—it is used to adjust pH in pools—AND at art supply stores that have a good fabric dyeing section. Outside of the United States this can be found in the laundry soap section.
• Vitamin C crystals (NOT pills but crystals without any additives—you may need to order this online).
• Potassium bromide OR iodized table salt.
• Instant coffee (not decaf).
So after photographers got the idea that film could be processed in coffee, recipes proliferated on the web. It was generally agreed (though I’m not exactly sure why) to substitute vitamin C crystals (ascorbic acid) for the acid buffer in the RIT recipe and washing soda or sodium carbonate for the alkaline. As I noted earlier, the etymology of the term caffenol is difficult to decipher, but around the early 2000s more web searches and posts for the term began to appear. If you Google it right now you can find dozens of sites with caffenol recipes tweaked for specific film stocks. Because I am mostly interested in motion picture film, I will give you the recipes that work best for black and white film stocks. The recipe below was arrived at with advice from the online Facebook group and is titled caffenol C (for vitamin C) M (for medium speed film) and is good for 50–200ASA. A word of caution: most caffenol developers don’t have a great shelf life when mixed so mix only as much as you need for the film you are developing at that time.
Caffenol-C-M
This is an alternative, non-toxic black and white developer that produces a black and white negative image and can be used on any type of medium-speed film, even color (the results will be black and white). To 1L of water at room temperature (72°F) mix in the following ingredients, stirring thoroughly after each until dissolved.
• 54g sodium carbonate (anhydrous).
• 16g powered vitamin C.
• 40g instant coffee.
Table 7.1 Estimates for Stocks in Caffenol-C-M
Orwo U54 |
Kodak Tri-X |
|
Pre-bath—water |
5 minutes/72°F |
5 minutes/72°F |
Developer |
15 minutes/72°F |
20 minutes/72°F |
Rinse/stop bath |
Two changes of water |
Two changes of water |
Fix (any rapid fixer will work—use a non-hardening variety if you hope to tone the negative after) |
4 minutes/72°F |
4 minutes/72°F |
Wash |
Several changes of water |
Several changes of water |
Dry |
20–40 minutes |
20–40 minutes |
Just like any developer, if you increase the temperature you can decrease the time of development. Below are some estimates for various stocks in this developer.
If you find that your results are too dense or fogged, you might try adding some restrainer to the mix. Potassium bromide (1.2g/L) gives the best results but ordinary iodized table salt (10g/L to start) can also be used.
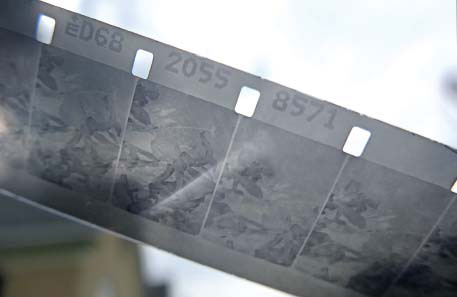
FIGURE 7.1
My first experiments with a non-coffee caffeic acid compound. I used lawn cuttings a.k.a. “grassenol”. These are frames of that film in their negative form.
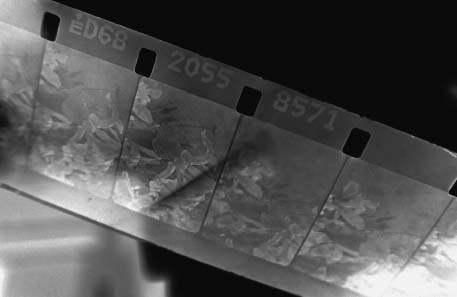
FIGURE 7.2
My first experiments with a non-coffee caffeic acid compound. I used lawn cuttings a.k.a. “grassenol”. This is what the frames look like digitally inverted to a positive image.
My first experiments with a non-coffee-based developer used grass from my freshly cut lawn. My initial experiments were completely overdeveloped so I posted my recipe and results on the Facebook caffenol page and got some extremely useful feedback. I thought I might need a restrainer, but it was recommended that I first try modifying the pH to be in the 9/9.5 range (see Figure 7.3). I am delighted to say that the following recipe was extremely successful.
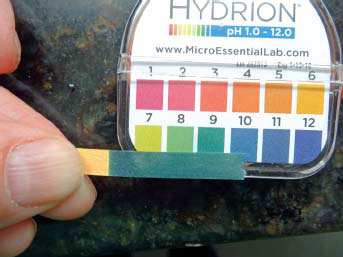
FIGURE 7.3
Using pH strips purchased online I was able to adjust the developer to a 9/9.5 level. This is essential for proper development.
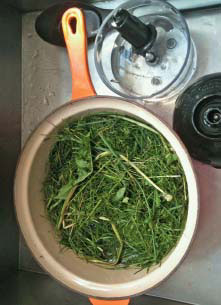
FIGURE 7.4
Stewing the grass.

FIGURE 7.5
Straining the grass juice.
1. Stewed a 2 quart pot of grass clippings and water for 2 hours (see Figure 7.4) (other users had simply set the clippings in the sun with water for a couple of days—grass sun tea—but reported serious stink from this process). Being pregnant at the time I wanted to reduce the possibility of nausea-inducing smells.
2. Strained the “grass tea” with a fine-mesh kitchen strainer and then a photo funnel with a fine-mesh strainer (see Figure 7.5).
3. Cooled the “tea” to 30°C.
4. Added 50g washing soda (sodium carbonate)—stir to mix!
5. Added 10g vitamin C crystals—stir to mix! (this was arrived at by testing the pH and adding Vitamin C until I got a pH of 9).
6. Used immediately for 10 minutes (at about 28°C/82°F) to develop Kodak Tri-X (200ASA daylight) as negative.
7. Fixed with Kodak rapid fixer for 4 minutes.
8. Washed with several water changes for 20 minutes.
9. Dried in the sun.
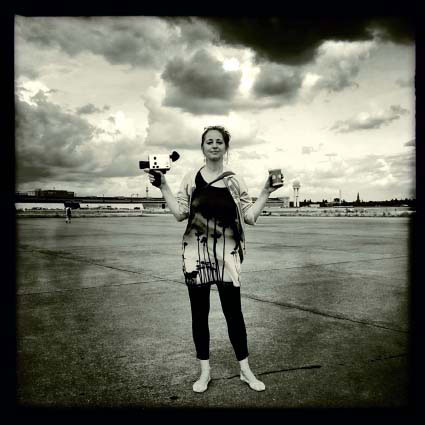
FIGURE 7.6
Dagie Brundert with her Nizo Super-8mm camera and a cup of coffee. Photo courtesy of the artist.
As you can tell from the process, I developed at a higher temperature than the previous caffenol recipe. This allowed me to shorten the developing time to 10 minutes. Just like with any developer, with caffenol processes, the hotter the chemistry the faster the developing time and vice versa. Faster times will also increase the contrast. My interest in using grass was that I happened to have a lot of cut grass lying around after mowing the lawn. Filmmaker Dagie Brundert has tried all kinds of organic materials that contain phenols, including beer, wine, potatoes and seaweed, among others. Wherever she travels she looks for local plants to work with. Below are her potato and wine recipes. An interview with her is at the end of this chapter.
KARTOFFEL—POTATO CAFFENOL
What you will need
• 1L pressed potato juice (you need a juicer for this).
• 20g vitamin C.
• 10g soda.
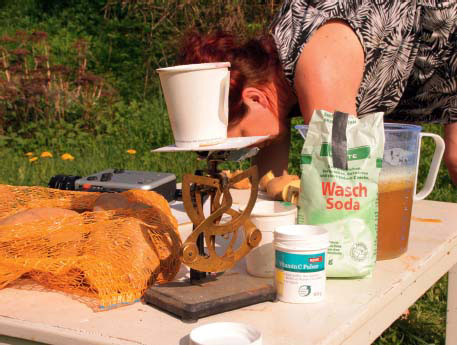
FIGURE 7.7
Dagie preparing kartoffel (potato developer). Photo courtesy of the artist.
• Develop at 28°C for 20 minutes.
• Fix 4–5 minutes in fixer of your choice.
• Wash 10–20 minutes, changing water every minute or so.
• Dry.
You can see a film made with this process at http://vimeo.com/65772992.
WINENOL—WINE CAFFENOL
There are many recipes for this on the web that I have tried. I have also tried a variety of wines, all of them leftovers or very bad (like two buck chuck in the United States that actually costs two USD for 750ml of red wine) and found no variation in the functionality of the developer. Wine (even from Trader Joe’s) is not as cheap as instant coffee, so I recommend setting out a pot at your next party where folks can drain their wine glasses if they don’t intend to finish them and saving up the dregs. Beer and other alcohols can also work as a developer and so I recommend experimentation (see Figure 7.8). As with all the recipes in this chapter, this one is based on making 1L of developer for processing 100ft in a Lomo tank. Halve it if you are developing Super-8 in a Lomo tank or double it for bucket processing.
WHAT YOU WILL NEED
• 1L of red wine.
• 100g of washing soda.
• 25g of vitamin C.
• Something to mix up your concoction in.
The process
1. Warm the wine a little if it has been kept cool—you want your wine at room temperature/72°F—so warm it in a water bath or just set it out until it has warmed to room temperature.
2. Stir in the washing soda/soda ash.
3. Stir in the vitamin C.
4. Develop your film for 25–30 minutes. If you want to shorten the process to 20 minutes you can raise the temperature of the developer to 80°F. I do recommend having a few snip tests that you take out during the process, quickly rinse and then dunk in fixer to see about adequate developing if you are experimenting with times and temperatures.
5. Wash with two changes of water.
6. Fix normally
7. Wash for 10–20 minutes.*
8. Hang to dry.
*You may get a nice rosy staining on your film that will invert to its opposite if you transfer the film and change it from negative to positive. If you don’t like this, simply wash with perma wash or hypo clear about half way through your final washes.
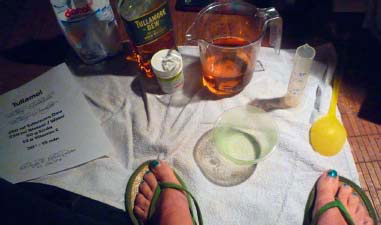
FIGURE 7.8
Dagie’s “Tullamol” recipe made with Tullamore Dew whiskey. The recipe is for 500ml—the amount to process 1 roll of Super-8mm in a Lomo. Photo courtesy of the artist.
SALT FIXER
Fixer, as you already know, removes the undeveloped silver halide from the negative. This is important because if the silver remains it will eventually darken and ruin the image. It is very simple to make fixer from either a powdered mix or liquid. It is also relatively inexpensive and, with black and white processing, lasts for a very long time. It is also possible to make fixer from scratch, but this seems like more trouble than it is worth and generally ends up costing more as you have to buy minimum amounts of the various chemicals that are used. The most important thing to remember is that, if you are going to tone your film after you develop it, you don’t use a hardening fixer. If you are not, use a hardening fixer as it will help preserve your film from scratches. Most black and white fixers out there aren’t terribly toxic, at least until you’ve used them. Then they have metallic silver in them, which, as I’ve said, must be disposed of properly. I also prefer to use an odorless fixer. But folks have really wanted to take their “household” processing all the way, so the following is a recipe for a fixer using ordinary table salt!
• A heat source and a pot you can make up your salt solution in.
• A liter + of water at room temperature.
• Something to stir your salt with as it is dissolving (takes some time).
• 300g of salt! (That is roughly 1 cup + a scant tablespoon of salt.)
• 1L or larger measuring cup/graduated cylinder/glass bottle you’ve recycled and marked where 1L is.
The process
1. Heat the water to boiling and then turn down to a simmer.
2. Add the salt a little at a time, stirring until dissolved.
3. Pour into your measuring implement and add cool water until your solution is at 1L.
4. You are looking for a working temperature of 30°C/86°F and it will take 2 hours or more to fix the film, so either keep the tank warm in a bath or if it is sunny put it outside.
5. If you want to experiment with times/temperatures, take an undeveloped piece of the kind of film you are using and put it in the fixer bath. Leave it in for at least an hour and then remove it every 15 minutes to see if it is clear. Once it is clear, double the amount of time it took and that is your fixing time.
6. Use perma wash or hypo clear or a little bit of dish soap to make sure you get all the salt off, unless you want salt formations on your film, which, come to think of it, look pretty cool.
DISPOSING OF SPENT FIXER—ECO STYLE
So the problem with dumping spent fixer down the drain is that it is loaded up with metallic silver and that is hazardous to put into the water supply. So, either bring your fixer to your nearest community photo lab with a silver recovery unit and dump it there, find out where to bring hazardous chemicals in your area (in the United States most areas have a disposal area for paint and other household wastes, and this is the same place you can bring your fixer) OR try this DIY method for leaching out the silver.
What you will need
• A big bucket.
• A packet of steel wool from the hardware store.
Put the steel wool in the bucket with the spent fixer. The steel wool will turn black—that is the silver—and the liquid will likely turn rusty red. Drain off the liquid and save the steel wool to dispose of at your local hazardous waste facility. It is perfectly fine to save up the steel wool for years until you have a big bag. It won’t hurt anyone.
Alternately you could purchase (or if you’re crafty DIY it) an electromagnetic silver recovery device. In the United States a photographer named John Nanian (www.nanianphoto.com) has designed a small silver recovery unit for home photographers. It uses electricity to capture the silver from the spent fixer and, once the reservoir is full, it can be sent back to Nanian who will harvest the silver and send you a new reservoir + some cash (minus about twenty bucks + shipping) for your silver! Pretty cool huh?!
TINTING WITH VEGETABLES AND FRUITS
So as it turns out just developing with some of these eco-processes can tint your film one color or another. This comes as no surprise to those of us coffee and tea drinkers who are occasionally tortured by the dental hygienist as she or he scrapes the evidence of our addiction off our pearly whites. The same can be said for wine: it certainly has irretrievably stained a thing or two in my life. But what else? What other compounds are good for coloring film? As I wrote in Chapter 1 under the toning section, the difference between tinting and toning is that tinting colors the clear areas and to a certain degree adds color to those that are opaque (it is an even wash over the entire surface) but toning changes the developed silver to a different color. What I’m about to share is a discussion of tinting film with household materials. Please be advised that what is basically happening is that you are softening up the gelatin by immersing developed film in a bath and that can lead to more scratches/artifacts on your film.
So what household items can you use? Basically anything that causes a serious stain. I first got this idea over twenty years ago when a friend and I were using foodstuffs and spices to dye eggs. We used purple cabbage for blue, beets for pink, turmeric for yellow, carrots for orange, spinach for green. For the eggs we used vinegar to increase the acidity of the compound and make it adhere to the shells. When talking with another friend of mine, she told me about her grandmother, Miriam Cohen Rice, who used mushrooms to dye fabric. Later, when I visited her home in Mendocino we talked a bit about using mushrooms to dye film. Although I have never tried it (I am not a mushroom gatherer so using mushrooms would be prohibitively expensive for me) I know from Miriam that mushroom dyes are quite strong and so it might be a good option for those of you who live in an area replete with the fungi. Although her books, Mushrooms for Color (1980) and Let’s Try Mushrooms (1974), are out of print, they can be found used or through libraries. I also recommend you check out various DIY sites on the web for fabric and egg dyeing as a way to get started. Once you find items that are easily accessible to you, try the process below.
• If you already have soda ash you can use that, or, if not, I recommend getting some Borax as I use it for all kinds of applications, laundry, cleaning and especially getting rem-jet backing off color negative!
• A bucket to soak your film in.
• A big pot with a lid (go to your local thrift store and pick up a large pasta pot—just make sure it isn’t aluminum!).
• A stove. You can also use a large mason jar (instead of a pot) and the sun (like you would make sun tea) to stew your dye. This takes longer but will ultimately be the most environmentally friendly.
• Some kind of organic material to produce your dye.
The process
1. First you need to decide if you are going to reel up your film onto a Lomo to do this or just dump it in a bucket. That will help determine your quantity needs. I am going to give you the recipe for 1L (the amount needed to dye 100ft of 16mm in a Lomo tank) but you can multiply or divide to fit the container you are working with.
2. Either in a pot on the stove or in a mason jar, combine your organic material and about 1.25L of water (this accommodates depletion of water due to absorption by the dye materials and steam).
3. Heat (on the stove or by putting the jar in the sun) until the organic material releases all of its color and/or the water is very highly colored. If you are using a stove but want to be eco-conscious, you can heat the water and pour it over the dye materials too and let it steep that way.
4. Set aside the dye and let cool to 30°C/86°F—to 40°C/104°F.
5. Strain your dye through cheese cloth or a fine-mesh kitchen strainer.
6. When your dye is almost at temperature, prepare a mild alkaline solution of warm (30°C/86°F) water and soak your film until it softens up a bit.
7. Put your film in your dye solution or your dye on your film.
8. Keep it there until the dye has reached the saturation you desire.
9. Hang to dry but DO NOT RINSE (unless it is super-sticky). Then gently rinse.
BE ADVISED—your film may be a little sticky. Also these organic dyes will likely fade over time so it is HIGHLY recommended that you transfer your film to digital or optical print ASAP if you want to preserve the look. Or you could just screen the film and re-dye and screen and re-dye until the emulsion falls off. Also an option.
FIGURE 7.9
Dagie Brundert’s logo.
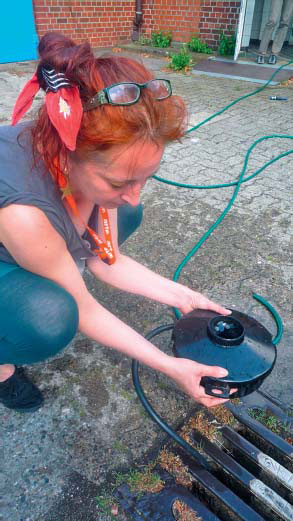
FIGURE 7.10
Dagie rinsing film. Courtesy of the artist.
The interview for this chapter is with a wonderfully funny and friendly German filmmaker, Dagie Brundert. I first encountered Dagie through the Facebook caffenol page when I was searching for non-toxic options for film developing during my most recent pregnancy. The information sharing on this site and other caffenol forums is really first rate. People are very interested in each other’s experiments and always ready to help problem-solve. With Dagie’s help I was able to develop film in both traditional caffenol (made with instant coffee) as well as a developer I made from grass clippings. I also made use of a fixer made from table salt that she shared with me. What follows is Dagie’s biography and an interview with her.
I was born in a small town in the middle of West Germany. Beautiful nature, but boring after a while … I moved to Berlin and studied visual arts/experimental film. Fell in love with my Super-8 camera (Nizo) in 1988. Since then I try to be a particle-finder, a wave-catcher and a good story-teller. I try to absorb weird beautiful things from this world. Chew them and spit them out again.
INTERVIEW WITH DAGIE BRUNDERT (POLLY PHENOLY)
Kathryn Ramey: So—a general question to get the grease flowing—do you consider yourself an artist, a filmmaker, a shaman, a performer?
Dagie Brundert: I’ve shot and developed Super-8 films for so long now, first I considered myself a “regular” short filmmaker, a story-teller … but it’s floating more and more into the direction of alchemist now! Filmic alchemist perhaps? Material player! Gelatin layer player! :-) I feel I get deeper into the matter, into the grains and molecules! Understanding light and time.
KR: How do you describe who you are/what you do to your aunt or the old guy next door? Or children? Yourself? Your friends? Or do you even try?
DG: I’m already beginning to love your questions. I guess I must make a quick hop to my fridge and pour myself a glass of cold wine … hang on … I’m back!
I usually start with “I’m a Super-8 short filmmaker!” and then I say “the old analog stuff!” and then “I tell short stories, they are not really narrative, they are experimental but mostly full of joy!”, then they produce question marks in their eyes so I add “I try to absorb weird beautiful things from this world. Chew them and spit them out again. With/on film!” Children understand that. Aunts as well!
KR: How did you come to your particular practice? Did you develop your own processes as a series of experiments? Where did the ideas come from? Does your form and method change as you go and, if so, where have you been and where are you going?
DB: I was looking for recipes. I had been developing films for half of my life, I love puddling around and now I felt like checking out if there’s something less harmful in this world. I stumbled across caffenol—photographers have used it for ages! For paper and negatives. So I thought: why not film? And the results were amazing. I wanted more. Tried to figure out what is inside coffee … reading a lot about chemistry, acid, tannins … in the end it’s all phenols! Phenol! The beloved little sister of hydroquinone that is a main ingredient in most black and white developers. Call me Polly Phenoly from now on! I want to walk around and buy, pick up, steal local “healthy stuff” like flowers, weed, leaves, local beer and wine, chuck them in a cauldron together with other magic powders and yeeeehaaaa!!!
KR: OK Polly Phenoly! Tell me more about your experiments with things besides coffee. Can you catalogue your first experiments? I have seen a film you developed with potato. What else have you tried and how do you determine the amount of phenol-producing ingredient to add?
DB: Coffee was my initial potion! Then I read articles about phenolic compounds in plants and herbs (they play an important role in cancer prevention and treatment by the way, which makes the whole stuff even more simpatico!) … and a chemical friend said: try potatoes! They contain a large amount! So I did: I squeezed juice out of raw potatoes—that recipe is one of my best!
As a chemical amateur I understand: phenols are tannins, acids, so I first tried the bitter, sour (parts of) plants like red berries, apples, red wine, Prosecco, sauerkraut … having no idea of how high the amount was, just trial and error. They worked more or less well. Prolonging developing time and raising temperature helps. I even made a kind of cross-check: what if I left the phenol part out and developed only in vitamin c and soda? Yes, you get an image, but a very, very pale one if at all. So the phenol compound is for blacks and contrasts I learned! The real silver attacker!
KR: What role does media/technology/tools play in your work. What is the relationship between the media/tools/and what your work is about? Is your work about something(s)?
DB: I’m not so sure if I understand what you mean. Media. Hmm. You mean about spreading my work? I love the internet and I love spreading my stuff and infecting people. But wait, reading it again, I think you might mean something else. Super-8—analog—technology. Instead of zeros and ones and pixels that I actually don’t understand at all.
My tool is simple. My films are about simple things. The tool isn’t much more than a camera obscura: a box, a hole where light gets in and a light-sensitive piece of plastic inside. (By the way, I experiment a lot with simple pinhole cameras right now and I’m so fascinated with how easy it is to capture light and time!) And then a more or less magic potion that transforms the captured, latent light molecules into something visible to the human eye.
KR: What I mean by this question is what is the relationship between your media (in this case Super-8 film) and your work? How does Super-8 and the camera help you make the work you make?
DB: Super-8 is the perfect media for me. Easy to understand and to handle, and so much more beautiful and magical compared with video! Real analog film colors, blacks, grays are by far deeper and profounder than their digital brothers and sisters. Or better: nieces and nephews. I don’t want to see the world one-to-one, I want to see the insides and the cracked imperfectness and second-view beauty of the world by an imperfect and sometimes out-of-focus (but in of heart!), partly unreliable but wabi-sabi-ish, always perfectly matching medium!
I play with coincidence. I am convinced that beauty is everywhere. I want to ban (Kr: Do You Mean Burn?—DB: YES!!! Maybe better: RECORD?) it on film so I step outside and capture it. No script. Just eyes and camera aware and awake. My work is mostly about small things. Little stories, one joke, one thought that evolves.
KR: How about your still photography? Did you shoot a lot of stills before you started shooting with pinhole devices? Do you now exhibit your pinhole photographs as well?
DB: Not really. Mostly only for documenting reasons. Pinhole photography has opened a new universe for me: capturing space AND time (because you have a long exposing time like many seconds or even minutes depending on the size of hole and box!). Through the pinhole you see your surroundings with other eyes. Moving people and cars vanish, plants move in the wind and leave weird blurred traces … it’s simply totally fascinating! No exhibition so far (only on my website) but I plan to make large copies from my negatives and hang them somewhere!
KR: Where do you show your work? How do you want people to experience it? Is there a relationship between the form that your work takes and your desired venue/audience?
DB: My favorite kind of show is a mixed one in a small cinema or club: some older films on a Super-8 projector (people love the rattling sound and for me it’s like gathering around a bonfire) and newer films on a good beamer, digital. A bar at hand, good wine. Talking between and after films.
All my films are digitalized by now and online.
KR: And finally, your chapter is called “In the Soup 3: Hand Processing”. Please elaborate how you came to such an activity? Are you part of a community of makers (either locally or internationally) who communicate with each other about their work and get together either virtually or physically to discuss/show/celebrate? Where? When? How? What happens?
DB: How I fell in the soup? ;-) As I said above: looking for new recipes, being tired of harmful chemicals and getting rid of them after use … and then: pure fascination. Simple things. Direct contact/influence on the material, love of smelling and touching and yes: analog (Super-8) film is sexy! I’m passing it on during workshops that I give every now and then, and people love it! Playing with food is finally allowed now!
I used to swim in my little bubble for many years, seeing other films on festivals, meeting filmmakers there … but always playing in my bubble alone. I feel it’s changing now. We are connected anyway, internet making it possible, forums and Facebook are our multiplying playgrounds. The community plays worldwide. I got to know so many people in different countries who are so dearly devoted to filmmaking, to exploring antique and haptic techniques (hand-developing, self-made emulsion, pinhole photography …) and renewing them with their own personal experiences (living at the seashore: using sea salt as fixer for example). Sharing the results with everybody. No competition.
KR: Can you talk a bit more about the communities you’ve worked with? You were in California recently giving a workshop at Echo Park. Where else have you given workshops? How do you make these connections? How does giving workshops influence your work?
DB: I started as a workshop teacher in 2008 when I was invited to be artist in residence at Echo Park Film Center in Los Angeles. Up till then I had no idea how it is to teach and to give away my experiences in film, and I must say that I like it; being an enthusiastic person, it’s quite easy to infect others!
In the following years I was invited to do it again in such great places like LIFT in Toronto, WORM in Rotterdam, Schmalfilmtage (Small Format Days) in Dresden, Cambridge UK Super-8 Festival, Hamburg Short Film Festival, and Zeche Zollverein in Essen, Germany, just recently. My aim is to go to these places, look at and check what is happening and growing there, what’s their local wine or beer for example, and mix it all to a unique regional soup to develop unique regional films shot by unique regional people in it!
Last quick, short questions!
KR: You also work in color Super-8. Do you develop that yourself? With a homebrew process or at the lab?
DB: I use the Tetenal kit, E-6 or C-41. But I heard from someone substituting E-6 regular process using less harmful stuff like coffee of course and hydrogen peroxide and lemon juice … haven’t checked it so far! The color and bleach stuff is really poisonous!
KR: How do you dispose of your spent developer and fixer? Do you use the salt fixer or some version with sodium thiosulfate?
DB: I give it to my local recycler! It’s for free here in Berlin. And I must admit: I always use “regular” fix … I’m not patient enough for the salty solution!
KR: Do you ever tone your Super-8 or prints with wine or coffee?
DB: I did it once with black tea, it’s beautiful! Henna as well!
KR: I’m asking each of my contributors if they would like to share a thought experiment or assignment with the readers. Some have been straightforward recipes of the artist’s invention, whereas some have been ways to help the reader free their artistic self. Anything you’d like to share?
DB: Hmmmmm … something like … activate and polish your inner antennas!!! Invite coincidence! Don’t be afraid of accidents! Let wabi-sabi enter! They might turn your piece of art into something unexpected, unplanned, unique! And I’d like to share my flower tea recipe for any black and white film:
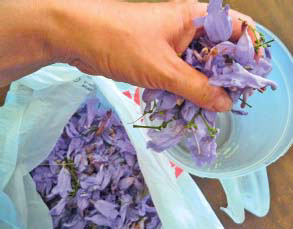
FIGURE 7.11
Dagie’s jacaranda blossoms getting ready to stew. Courtesy of the artist.
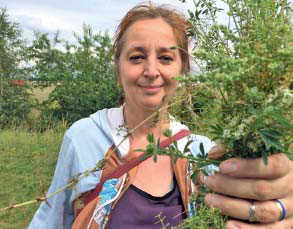
FIGURE 7.12
Dagie collecting weeds to use in developer. Courtesy of the artist.
1. Pick two large handfuls of any flower or weed that just happens to grow and bloom where you are.
2. Put it in a bucket.
3. Add a bit more than 1L boiling water.
4. Steep as you let it cool down to 30°C/86°F (maybe a little hotter).
5. Filter.
6. Pour off 1L into something where you can mix up your chemistry (a big mason jar works great!). Add 100g washing soda, stirring or shaking with lid on until dissolved.
7. Add 20g vitamin C until dissolved.
8. Use to develop your film, 30°C/86°F, 15 minutes (a bit longer if it’s cooler).
9. Rinse (two water changes) with water.
10. Fix as normal.
11. Wash, 10–20 minutes running water (less if you use perma wash or hypo clear, more if you use plain water).
12. Hang to dry.
Dagie links
Pinhole pics: www.dagiebrundert.de/Pinhole-photos.html [accessed January 11, 2015].
All my films: www.vimeo.com/dagie [accessed January 11, 2015].
Wabi-sabi + workshops: www.wabisabisuper8.com [accessed January 11, 2015].
References
Anchell, Steve. The Darkroom Cookbook. 3rd edition. Amsterdam, Boston: Focal Press, 2008.
“Caffenol.” Caffenol. www.caffenol.org/. Accessed August 14, 2014.
Caffenol.blogspot. http://caffenol.blogspot.com/. Accessed August 14, 2014.
Caffenol facebook group, https://www.facebook.com/groups/caffenol/. Accessed August 14, 2014.
“Caffenol, the Organic Developer!” Dagie Brundert. www.dagiebrundert.de/ECaffenol.html. Accessed August 14, 2014.
Rice, Miriam. Let’s Try Mushrooms for Color. Santa Rosa, CA: Thresh Publications, 1974.
Rice, Miriam C (author) and Dorothy Beebee (illustrator). Mushrooms for Color. Eureka, CA: Mad River Press, 1980 [re-released/self-published in 2007].