Whether you start with found footage, black leader or clear there is a corollary process to the film-destroy and that is creation on the very surface of the celluloid often without use of a film camera as a generative device. There are those who start with an entirely blank canvas of clear film and draw or paint directly on the surface. Sometimes the artist will also use lab processes and/or printing to produce mattes or rephotograph series of images. Sometimes the artist relies entirely on his or her handicraft and makes an entire film through the careful, frame-by-frame rendering of an image. Whereas the last chapter was mostly about taking away, this chapter is about adding. It is about making something completely new that usually has little or no camera involved but nevertheless is still cinema. Film doesn’t require a camera to be a movie.
In fact, before movies, there were painted magic lantern slides, kinetoscopes and other optical toys. Animation precedes photography in the history of cinema. Photography and realism became dominant because that was the spectacle that the public most desired. But before realism there was fantasy and it is from this fantasy, this abstraction, that direct animation or the application of paint, pens and a host of other devices to the surface of film, is drawn. Both subtractive (destroy) and additive techniques (create) are all considered direct animation because they occur at the surface of the celluloid, so to a certain degree my separating them into two chapters is a bit arbitrary. But as a teacher I have found that beginning with found “realist” footage and slowly abstracting it and taking away from it prepares my students best for working with the blank canvas.
To begin we will talk about painting. An additive technique usually at its most abstract in cinema because the frames, particularly of 16mm but also of 35mm, are so small. There are 24 frames in a second of sound cinema (25FPS outside the United States) and 1440 frames in a minute. Even if you draw a frame every minute it would take you twenty-four hours of uninterrupted labor to finish the same length that it takes a single minute to film on a motion picture camera. So, animators in general and direct animators in particular have to be patient and very, very persistent.
One of the most beautiful hand-painted films of all time is Harry Smith’s Interwoven No.3 (1947–1950). It was originally painted on 35mm clear leader using a variety of taped lines, cubes and dots, applied one can only guess with tooth picks, to act as resist, which were then painstakingly removed and reapplied in a different pattern for another coating of paint. The entire 3½ minute film was made to synchronize with the song “Guarachi Guaro” by Dizzy Gillespie. In order to do this Smith notated the song, beat by beat, analyzing how it progressed second by second. This allowed him to create images that would move in sequence with the song. The images in Interwoven No.3 are very bright and have a texture to them that indicates they were probably make with a variety of inks with various consistencies. There are no wiggly lines in the film, no hand drawing or scratching and no blank spaces, no white. All of the paint was applied by hand over patterns of resist, which were then removed and new ones laid down so that in some areas colors would blend and in others the first color would be protected. This technique is an application of strategies used in batiking fabrics and paper, something Smith, with his interest in non-Western culture and art, was no doubt familiar with and influenced by.
The original film was produced on 35mm and at times, it is rumored, was up to a half an hour in length! It is no wonder that Smith was working on it for almost ten years. The film was finished by being optically printed onto 16mm, the preferred distribution format for short films. This film was included in a collection of shorts on the compilation Avant Garde IV put out by the National Film Archives. The transfer on this DVD is very good and it is worth watching it in frame advance to see how the frames change one to the next throughout the film. Smith would make a variety of animation and live action films throughout his life, although Interwoven No.3 is singular in his oeuvre for its technique. He would also collect Ukrainian Easter eggs, witch’s cradles (a string game) and recordings of spoken word and folk music, the latter becoming the Folkways Compilation put out by the Smithsonian Museum.
Other filmmakers of the 1940s and 1950s who worked directly on the film surface were Len Lye and Norman McLaren. Although they knew each other during their formative years working in London with John Grierson and others at the Postal Film Unit, their style was very different. New Zealand-born artist Len Lye tended toward working with a variety of materials on the surface of the film, stamping, typing, painting and then using lab-based printing processes to layer and augment his direct animation. He was inspired by the body art of the Maori when he made work such as Trade Tattoo (1937), ostensibly an advertisement for the British postal service to run between features in movie houses of the 1940s.
Norman McLaren tried just about everything you could try working with celluloid including live action, stop motion animation, optical printing and direct animation of all kinds. He understood the capabilities of the film laboratory and, after relocating to Canada, had the generosity of the Canadian Film Board and their state-sponsored lab to help support his ideas. His drawn-on film animation tends to be with brush or pen and is usually abstract, although he can tend toward symbolic or biomorphic images as well, such as hearts and notes in Begone Dull Care (1949) or the representation of birds in Blinkity Blank (1955). In his seminal treatise Pen Point Percussion (1951) he explains how he makes hand-drawn animation and soundtracks. The film begins in live action as McLaren shows how to make these soundtracks and images by hand. The end of the film is the thing he has made.
In most 16mm and 35mm film the sound is created optically. Here’s how it works. A soundtrack is created by whatever method the filmmaker chooses and is mixed and synced to the image. Once the sound is complete it is sent to the lab and they make an optical track, a visual representation of that audio signal that runs down the side of the film and can be read by an optical head in a projector. Light shines through the track and the pattern (shadow) that the track creates on the optical head is transferred back into an electrical signal, which whizzes down the cable and into the speaker system, where the speaker turns it back into sound waves so our ears can hear it.
McLaren understood this and had studied the patterns of sound waves. He knew that fat brush strokes sounded like a tuba and short, thin lines sounded like a high-pitched beep. He knew that the more lines you put closer together the faster the beeps would sound. Experimenting with making sound visually, he created whole short films with drawn soundtracks that synchronized with hand-drawn images. McLaren, like Lye, made excellent use of the film labs by having lab technicians turn his black and white images into positive and negative mattes, and then print them in color. Much of McLaren’s direct animation involved significant lab processes. Nevertheless his direct animation was distributed widely in the United States and Great Britain, and many a filmmaker counted him as both an inspiration and mentor.
Several artists were mentioned in Chapter 1 who can also be discussed in terms of their work painting on celluloid. The seminal American experimental filmmaker Stan Brakhage is a less institutionally sanctioned version of Norman McLaren in that, although he was and continues to be thought of as one of the most influential US experimental filmmakers, he was not broadly recognized by either governmental or art world institutions. In general, in the United States, experimental cinema has not been incorporated into the art world or supported by national funding for the arts at the same level as other performative or plastic arts, or at the same level as experimental film in Canada or Europe. So Brakhage can be accurately described as the emperor of a world that very few of his fellow Americans knew or cared about.
Throughout his intensely productive career he produced over 300 films ranging in style from live action to direct animation with moth wings and other garden detritus to hand-painted films. His work was almost always very abstract and the number of his films with sound can be counted on a single hand. Unlike McLaren, who mostly worked in 35mm or 16mm, Brakhage celebrated the small gauge of Regular-8mm and privileged the hand and eye of the filmmaker in all stages of film production including post-processes such as developing and negative cutting. He is the grand-daddy of hand-made filmmaking in the United States. His early “textbook” of filmmaking, A Moving Picture Giving and Taking Book (1971), is more of an ideological treatise than a how-to guide, although there is plenty of instruction in there as well. The most important maxim is to forget what you think you know about film and start as though you have just encountered it. Brakhage explains it as its very material self, what it is physically and asks you to build your experience of it from there, from the very materiality of the object.
Brakhage began hand-painting films in the 1980s. Most of this work was done on clear 16mm leader. In most of these films there is a dense blackness out of which beautiful bursts of color emerge. As much as Harry Smith’s Interwoven No.3 looks like moving color field paintings, Brakhage’s hand-painted films are like moving abstract expressionist work. Like Jackson Pollock he gives them names to inspire a sense of their monumental intention or epic lineage, with titles like Glaze of Cathexis (1990) and Panels for the Walls of Heaven (2002). Brakhage taught film as art at the University of Colorado, Boulder, for over thirty years. He was one of the first faculty in the film program at the Art Institute of Chicago. More than any other filmmaker in the 20th century he was responsible for promoting experimental cinema as an important modern art form. He also was a great friend, mentor and inspiration to many filmmakers.
Jennifer Reeves is a contemporary film artist who credits Brakhage directly as her inspiration to paint on film in her works The Girl’s Nervy (1995) and Fear of Blushing (2001). These films are painted over live action but for the most part the images behind the painting are like distant shadows, only sometimes poking through with a symbolic significance. What these films feature in terms of technique is gorgeous reticulation (cracking) of the inks used and very deep and rich colors. Reeves always optically prints her own works so she can also compose the work by altering the speed in the printing, emphasizing parts of the image that she especially likes. (For more on optical printing read Chapter 3.)
So I hope I’ve convinced you of how gorgeous hand-painted film is. Now let’s take some time to talk about techniques and tools. Because there is a very large variety of options available and filmmakers frequently combine painting with other direct animation techniques, I will break this section up as follows: setting up, inks/paints/dyes, resists (things that stop or change the application process) and application tools/techniques.
Workspace, supplies and specifications
GAUGE
Film comes in various gauges but the bigger the canvas, the easier it is to work with. Thus 35mm is significantly easier to work with than 16mm, but you can still find 16mm slot-load projectors (the easiest ones to load and absolutely necessary for loop work) relatively cheaply. If you want to be able to look at your work projected as you proceed, 16mm is the way to go. If you want a bigger canvas and can wait and pay to transfer it or print it then 35mm may be the way to go. There are 35mm film viewers out there but they are large and heavy, and probably not what you want to invest in right off the bat. You can also scan short lengths of 35mm on a flatbed scanner and then composite them digitally. With every gauge there are drawbacks and advantages to consider in terms of your tools, workspace and processes.
SPEED
Sound speed film runs at 24 frames per second (25FPS in Europe). A second of 16mm is a little over 7″ of film (24 frames). Six feet of 16mm is 10 seconds projected and 240 frames. One second of 35mm is also 24 frames. There are 16 frames of 35mm per foot so a second of 35mm is one and a half feet. Silent speed is 18FPS but very few venues have projectors that run at silent speed. A foot of Super-8mm film is 72 frames or three seconds at sound speed and 4 seconds at silent speed. It is useful to remember these relationships as you work so that you can imagine timing on the screen as you work by hand.
EMULSION/FRAME ORIENTATION
You want to paint/ink on the emulsion side of the film and you want to remember the film orientation so you achieve the frame orientation (left/right, up/down) that you intend. This is easy if you are working on found footage where you can see which way is up, but what of film that is more abstract or if you are working on clear leader? If you have single-sprocketed film (film with sprockets on one side) the sprockets go on the left. You work from the top of the film down and left to right. Super-8mm is the same way. If you are working on 35mm (which always has sprocket holes on both sides) or 16mm with sprocket holes on both sides, first determine which is the emulsion side (the base is shinier and, if put between your lips, does not stick) and then work on that side following the rules above (from top to bottom and left to right). You can also work directly on color negative film that was unexposed (or barely exposed) and then developed. This film has an orange mask to it that when printed will be filtered out. All the colors you apply will be rendered as their opposites. In this case it is imperative that you use inks that really bond to the emulsion. In addition, unless you have the lab strike a “dupe neg” (duplicate negative) you will be printing off of your original hand-drawn animation every time you make a print. Still, doing this is really out there on the experimental edge.
WORKSPACE/TOOLS
Have a dedicated work area that no one will mess with. It is ideal if you have a light box or table. As noted in Chapter 1 these are possible to purchase relatively inexpensively or you can build your own to suit your finances and living space. There are a number of DIY instructions on building a light table online for all kinds of purposes. A sync block is also useful but not necessary. If you don’t have one it is a great idea to put down a strip of tape on the edge of your workspace facing you that has frames marked on it for the gauge you are working with, in whatever way is most useful to you, either time or length intervals. If time is your thing, mark off 24 or 48 frames, with markers every 6, 12 and 24 frames to indicate a quarter, a half and a full second of projected image. Steenbecks (flatbed film editors) usually have this kind of measuring strip at the very front edge of the machine. Whichever works for you, just put a piece of paper tape or masking tape down and, using a piece of film, mark it up.
Inks/paints/dyes/resists
INKS AND PAINTS
When you go to find your inks and paints you will want to go to a really good art store that sells drafting materials. While you can use a whole variety of inks on your film, only the drafting inks will really bond with the celluloid. India ink is gorgeous, but it flakes off. This is actually really good because you can get the effect of reticulation quite easily, but it also makes your film very fragile and flaky in the projector or optical printer. You can also use food coloring as a dye on film, but the color is not as intense and it fades quickly. A good rule of thumb is to look for ink that can be used on plastic. If it will draw on plastic it will draw on film.
Spray paint can produce amazing effects on film when applied very lightly. Remember, anything that is opaque (you can’t see through it) will be rendered as black when projected no matter what color it looks like on the surface. This applies to nail polish as well. Nail polish can be used as a paint on the surface of the film as long as it isn’t too gloppy. However, it does tend to flake off after a few projections and most polishes are not translucent.
RESISTS
These are things that will keep ink from the surface as you are working, a way to protect your image. The important thing about resists is that they are easy to remove afterward without damaging your ink job. Nail polish will not work because the acetone required to remove it will remove the ink as well. A good resist is masking tape, which can be cut into a variety of shapes and stickers. It is a good idea to experiment with stickers on film before you commit because you may need to get them wet to remove them and, again, that might ruin your ink job.
While not strictly a resist, Vaseline and vegetable oil can create floaty layers of ink. Put down one ink layer, let it dry, then apply a small amount of oil or Vaseline and then more ink. The greasiness separates the layers of ink. One caveat: it takes forever for this to dry so using a hairdryer on it is an excellent idea. Even then it has a bit of malleability for quite some time. If it helps there is an analogy here to oil painting. Oils take a long time to dry, but you can work on the layers over time. Latex dries quickly. Using Vaseline and vegetable oil is more like oil painting.
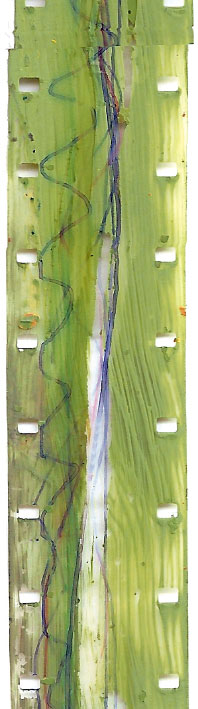
FIGURE 2.1
Pen, ink and paint. Although the paint looks light green, it is somewhat opaque and appears dark green when projected, whereas the pen appears blue and pink.
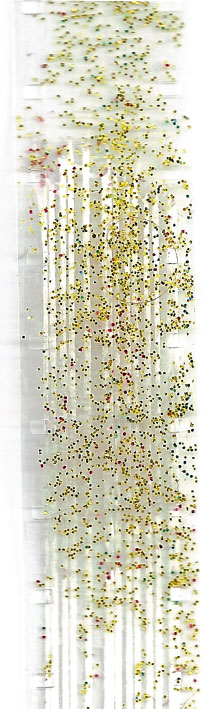
FIGURE 2.2
Glitter nail polish and packing tape. When applying glitter nail polish or glue you will notice that some glitter is metallic/opaque when projected and some is plastic and light will shine through the glitter.

FIGURE 2.3
A combination of yellow semi-opaque paint and with red ink underneath. Layering inks and paints creates a canvas that can be carved back into.
Application tools/techniques

FIGURE 2.4
A slot-loading projector with a film loop. First splice the loop together (A). Then, with the sprockets toward you, slide the film into the gate area first, then through the top part of the loop up toward the feed spindle (B), then through the channel at the bottom toward the take-up spindle (C). Make sure that the film is not twisted and that you can move the film freely through the channel by gently sliding it back and forth. You will likely need to provide a little tension for the loop to run properly through the projector. If so, you can hook the loop over a daylight spool on the front spindle, rear spindle or both (D).
The following tools are useful for getting ink onto your film and manipulating it once it is there:
• Paint brush.
• Eye dropper.
• Sponge.
• Toothbrush.
• Technical pens (these can be quite spendy but will draw really fine lines).
• Wire mesh, cheese cloth, small cheese graters—any of these can be used between the spray paint and the film to produce a pattern on the film. You must let the paint dry before you peel it off for it to work.
CAVEAT! Since working on direct animation takes SO long, when working in 16mm, I recommend you begin by working on 6ft strips (remember that’s 10 seconds projected). This is just long enough to run through the projector as a loop so that you can see the fruits of your efforts multiple times in one go! To make a loop, cleanly splice the ends of the film together (make sure not to twist!). Then use a slot-load projector and load your film as you would normally. You may need to hold your film taut at the top so that it doesn’t jam up and/or use a daylight spool on one of the spindles so that there is some tension.
DRAWING
In the pages above, I referred to drawing and painting on film to create abstract or geometric images. This section is about representational drawing on film. This is the rendering of (usually biomorphic or even realist) images directly on the teeny, tiny frame. This takes a lot of time, precision and the eyesight of a diamond cutter, or at least really, really good magnification. As you might guess, there is not a staggering amount of people who draw frame for frame on film, although it is a sizable enough amount given the effort it entails. The first person I would like to mention is someone I can guarantee (unless you are an anthropologist or one of my or his students) you have never heard of before, ever. He was a kind of idiot-savant of hand-drawn animation, only he is the total opposite of an idiot. He almost entirely made the whole process up for himself with no prior knowledge of filmmaking.
The man’s name is Robert (Bob) Ascher and for most of his life up to the point he became interested in film he had been a leading voice in post-processual archaeology (look it up) and a professor at Cornell University. And yet, for no explicable reason other than the words of Navajo Sam Yazzie and a fatigue with the anthropology of his time, in the early 1980s Bob Ascher decided to start making films about myths. Because he couldn’t afford a camera or lens, he decided to draw the myths directly onto film. A friend of his at Cornell Cinema showed him the work of Len Lye and Norman McLaren, and that was all it took. He reached out to McLaren for a little advice, who encouraged him and gave him a piece of 35mm film with frame lines, and away he went. In the course of a little over ten years he made four beautiful films, all hand-drawn. Because he really didn’t understand the back end of film or animation he drew every single frame from the titles to the credits. He did not know that you could draw 12 frames a second and then have your film printed 2 frames for every 1 frame (this is called drawing on twos), which would have saved him a significant amount of time and effort. He did not know how or have the resources to have his titles and credits optically done. He would work on a film for a year or two and then send it off to the lab as a single roll for them to optically print onto 16mm color negative and attach a soundtrack he had prepared (see Ramey 2014).
His films are drawn with a very fine technical pen, directly on clear leader. He inks his frames with paint brushes and small sponges. He works with a lamp that has a magnifying glass in it so that he can bend it over the work. In addition to the 35mm frame guide he got from McLaren, he had a friend machine brass pegs into the plexiglass top of his light table so that the film would be held in place as he worked. He would also use graph paper as a means to plot movement across a frame. Although his films were distributed for a time by Cecile Starr (author of Experimental Animation), Canyon Cinema Cooperative (an experimental film distribution cooperative out of San Francisco) and Cornell University, he was a virtual unknown in the experimental and art cinema world and his films did not find the kind of institutional rentals that other animators and experimental filmmakers have enjoyed. Despite his lack of high visibility, he is the perfect animator to demonstrate line-drawn direct animation. After the section on the necessary tools there is a two-page spread exhibiting stills from his work and working environment.
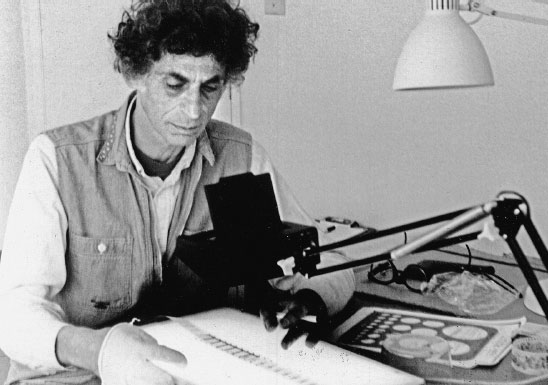
FIGURE 2.5
Bob at work. Photo courtesy of the artist, taken by Marcia Ascher. Notice the lamp with magnifying glass.
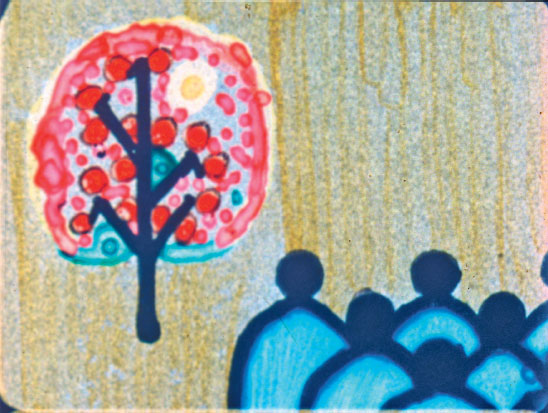
FIGURE 2.6
Hand-painted frame from Bar Yohai. Courtesy Bob Ascher.
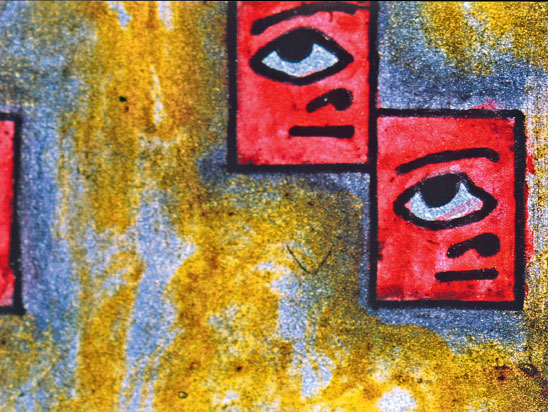
FIGURE 2.7
Hand-painted frame from Blue. Courtesy Bob Ascher.
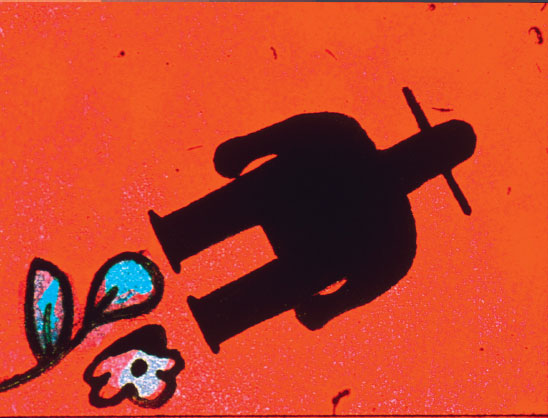
FIGURE 2.8
Hand-painted still from Golem. Courtesy Bob Ascher.
Of course there are other drawn-on film animators than Ascher and many of them use tools besides technical pens. Sharpies, particularly the ultra-fine variety, as well as Staedtler pen sets are great ways to get started with drawn animation too. In my classes I actually begin with a bunch of Sharpies and ink, and then help the more advanced students move on to buying their own technical pens.
Line-drawn direct animation
• Light table or box.
• Way to register film (hold it in place as you work).
• Graph paper or grid drawn on clear leader that you will put underneath your animation.
• A technical pen with an assortment of nibs.
• Drafting ink.
• Paint brushes.
• Small sponges.
• A magnifying glass light, jeweler’s glasses or other hand-free magnification device.
• A viewer so that you can see the film in motion as you work.
1. If you are trying to mimic a particular human or animal action, a blink, someone walking across the frame, a yawn, it is best to analyze live action first. How many seconds does it take for the action to happen? What are the movements? How are they broken down into individual still frames? If you can, find video of this online and advance it frame by frame to see the subtle shifts in motion.
2. Then decide if you are going to work on 1s, 2s, 3s or some larger interval. What this means is that, if you are working on 1s, every frame you draw will be shown in the final version just once at 1/24th of a second. If you plan on showing your original, you are obviously working on 1s. If you are going to transfer the original to digital or rephotograph it onto film, you can change the number of times a single frame is seen. Thus if you work on 2s you only need to draw 12 frames for 1 second of motion. Two frames (or 12 frames a second) is about the threshold of human vision to perceive a series of stills as fluid motion. After that (shooting on 3s or 4s) motion is no longer perceived and animation looks choppy. Think anime.
3. Once you have decided what your drawing ratio is, leave several frames at the top of the leader blank so that you have something to grab onto when you move the film around. If you are drawing with inks or pens, you may want to hang up the film to dry fully before you handle it too much. Handling film on which the ink is not set will result in smudgy film.
4. Once you have completed about 6ft of film make a loop and run it through a projector. If you have a flatbed or viewer nearby you can also run it through this to see how your motion works at different speeds.
5. If you’ve made 6ft, that is 240 frames or 10 seconds of film on 1s, 20 seconds if you plan on reshooting on 2s. Determine how long you want your film to be. That’s how many frames you need to draw!
MAKING SOUND
So back to Norman McLaren and his Pen Point Percussion. In that film he draws and paints on 35mm clear leader and then sends it off to the lab to have an optical struck from it. What he was essentially making was a negative—dense marks on a clear background—for his optical track, which when printed will become clear marks on a dark background that are legible to an optical head as a soundtrack. Without involving the lab, there are still a couple of ways you can make a soundtrack that you can pop into a projector and hear right away. Remember how we talked about film orientation? When we are working we need emulsion up towards us, the sprocket holes on the left and the soundtrack along the edge on the right. Remember 16mm film sound is 26 frames ahead of the picture that will be shown with it. This is because in the projector the optical track reader is 26 frames away from the picture plane. So, if you are drawing a soundtrack to match your pictures it needs to be 26 frames before its corresponding image. You can either make a soundtrack on clear leader or black. Instructions and information on supplies follow.
If you are drawing a soundtrack onto clear leader I recommend you do it first so that you don’t run the risk of ruining your image by putting masking tape over it. If you are scratching your sound into black leader, I recommend you do it after you have already scratched/bleached your image. Also, if you are planning to scratch in a soundtrack onto your black leader and you are bleaching in your image space, be sure to protect the optical area with masking tape while you bleach. Finally, you can make a soundtrack on found film that already has a soundtrack on it. You would essentially follow the instructions for working with clear leader and work over the existing soundtrack OR you could bleach your soundtrack area BEFORE you begin working on the found footage and then, when you have completed your work on the image, follow the instructions for working with clear leader below.
One last thing, when drawing a soundtrack, remember the following:
• Volume can be controlled two ways, by the clarity (lack of opacity) of the marks and by the number of them per frame.
• Pitch depends on the number (and thus the width) of individual marks in a single frame of sound. More marks, higher pitch; fewer marks, lower pitch.
• To make continuous sound there should be no break between marks. That doesn’t mean blend them all together; it means that in between sounds there should be a thin vertical line.
Supplies if drawing soundtrack on clear leader
• Clear leader either already drawn on or to be drawn on.
• India ink.
• Masking tape.
• Hairdryer (optional but really speeds things up).
• Fine pins and X-Acto blades for scratching sound.
Process for drawing on clear leader
1. With the sprockets on the left tape your film at the top and the bottom of your light table or workspace.
2. Apply a strip of paper tape or masking tape vertically so that only 2mm on the right-hand side of the film is visible.
3. With a brush densely apply black India ink and wait for it to dry completely OR blow it dry. It is not a terrible idea to do a whole 6ft strip (10 seconds) at a time to speed up the process.
4. Once it is dry you can scratch in your track. Remember, fat lines are lower-pitched sounds, whereas skinny lines are higher-pitched sounds. Wider lines are louder, narrower, softer. The closer together the lines, the more frequent they will be.
5. Listen to your new soundtrack on a projector.
Supplies for working with black leader
• Black leader.
• Something to soften the emulsion like Fantastic™ (optional and you will want to cover the image area if you do this).
• Masking tape.
• Fine pins and X-Acto blades for scratching sound.
Process for making a soundtrack on black leader
• With the sprockets on the left tape your film at the top and the bottom of your light table or workspace.
• Apply a strip of paper tape or masking tape vertically so that only 2mm on the right-hand side of the film is visible (optional—this is only necessary if your process in making your soundtrack will disturb your image area).
• Scratch your track. Remember, fat lines are lower-pitched sounds and skinny lines are higher-pitched sounds. Wider lines are louder, narrower, softer. The closer together the lines, the more frequent they will be.
• Listen to your new soundtrack on a projector.
STAMPING
Just like the ink you use to paint with, the ink you use to stamp with must NOT be water based. It must be able to print on plastic. There are so many cool stamps out there, including letter stamp sets, that you can use in addition to your painting and drawing. Look for stamps that are small, like the 16mm frame. This set of individual stamps has been much loved by my students over the years as a quick and easy way to create cool repeating patterns.
Supplies for stamping
• Clear leader.
• Stamp pads of various colors that will adhere to plastic.
• Stamp sets.
• Index cards or paper for blocking.
1. Put down white paper (there is no need for a light box, because stamps on clear leader are easy to see). If it makes it easier (and it probably does) use a fine-tipped black Sharpie to draw framelines on the paper so that you can align your film before you put it down.
2. Tape down your film at the top and bottom, sprocket holes to the left and emulsion up, so you can work on about 2 seconds (48 frames or 1 ft) at a time.
3. Working from top to bottom, stamp your films. Try to make objects move through the frame. Remember, if you want it to move vertically you will need to put an index card on the frameline so that your stamp doesn’t go into the frame above or below.
4. Since you are already there, you can work on your soundtrack simultaneously. Use your index card to protect the frames and experiment by stamping in the optical track area.
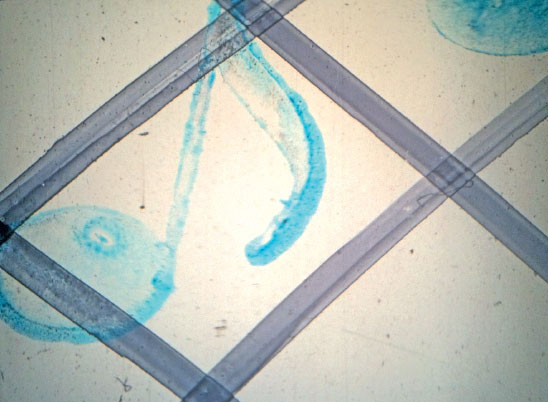
FIGURE 2.9
A film still from a student project called “DADA” that is included on the website. This film features all kinds of direct animation including stamping, drawing, scratching, laser printing, Letraset and stickers.
Rubbings are sort of like stamping, only in reverse. There are two ways to do rubbings. You can put black leader or found footage over a hard, bumpy surface (e.g. a large file, wire mesh, the size of a LaCie Quadra drive), emulsion side up, and taking a safety razor blade scrape away the film emulsion. Alternately, you can take sheets of semi-translucent contact paper or paper tape and lay them over a hard, bumpy surface. With an inked rubber roller (like you would apply ink to a woodblock) gently roll over the tape or paper. Then cut the contact paper or tape into strips that are the appropriate width for clear leader. Make sure NOT to cover up the sprocket holes! Although it really helps to have a light box or table around when you do this, it isn’t absolutely necessary.
So far as I know Devon Damonte is the guru of this practice and it must be acknowledged that what I know about rubbing has been learned from him through email exchanges and screening his loops. Therefore, the interview featured in this chapter will be with him. There are also some clips of his work on the website. Devon teaches animation at the Evergreen State College (my Alma Mater).
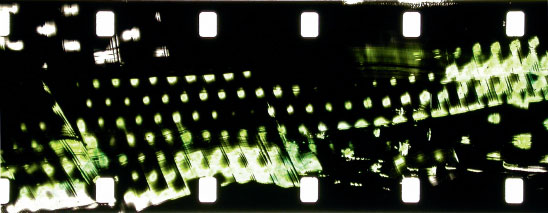
FIGURE 2.10
Rubbing of something bumpy. Black leader over a zester. Courtesy of Devon Damonte.
Supplies for rubbing
• Black leader, found footage or clear leader.
• A razor blade (if working on black leader or found footage).
• A brush (if working on black leader or found footage).
• Ink that will adhere to plastic and a roller (if working on clear leader).
• Translucent contact paper or paper tape (if working on clear leader).
• Scissors or X-Acto blade (if working on clear leader).
• Ruler or straight edge (if working on clear leader).
• Hard, bumpy things.
1. Put your black film, found footage or contact paper/translucent tape firmly over the bumpy things with the emulsion or non-sticky side up. This may require taping down.
3. On black leader, firmly and slowly drag the blade over the film. Use a brush or blower to remove the emulsion.
3. Unstick the film and move on to the next bit.
4. On contact paper/translucent tape, ink your roller and roll it over the contact paper/tape, being careful not to get ink all over the thing you are rubbing. If there is any question that you might and you or the owner of the bumpy object cares, use cellophane underneath to protect the object!
5. When you have a whole mess of contact paper/tape with images on it, carefully cut it into strips the width of the 16mm film frame. Remember, sprocket holes go on the left! If you tape over the sprocket holes use your X-Acto to cut them free without damaging them.
6. Tape the ends together to form a loop and project!
LETRASET/PAPER TRANSFER/PLASTIC BAGS
Much like rubbing this process is all about transferring images from one place onto your film. There are three processes that I will describe in this section and all of them are fairly easy to master.
Letraset is a product that was designed for illustrators to use before computers. It has evolved into a beloved tool for many comix (comics) artists and others. Letraset is available in sheets of various typefaces and in various sizes, and in shading and style sheets. Some sheets come in a variety of colors, but remember anything you can’t see through will be rendered black in projection. They are manufactured on clear plastic sheeting and it is very easy to place them over your frames and rub the letters and textures on. When projected, Letraset looks amazing. Letraset is available at art supply stores and online.
Supplies
• Letraset (remember the size of the 16mm frame and pick something small).
• Something dull but small tipped to rub onto your film. Really dull pencils work well as do wooden cuticle pushers.
• A work area either covered with white paper or a light box to work on.
• Index cards.
• Clear leader or found footage you would like to apply Letraset to.
1. If you are working with clear leader, it would help for you to work on white paper or next to a piece of tape, or over a transparency with framelines drawn in, so you know where the edge of your frames are.
2. It is not a terrible idea to take an index card and cut out a rectangle the size of a 16mm film frame. As you work you can move the frame along.
3. Work right to left and top to bottom so that your film is oriented correctly.
4. After you’ve made 6ft, make loop and project!
TRANSFERS FROM PLASTIC BAGS
This technique I learned directly from San Franciscan experimental filmmaker Thad Povey by watching his film at the Ann Arbor Film Festival in the late 1990s. In order to make this technique work you need to find plastic bags that have a colorful design painted on them. These are the only kinds of sacks that will work. Bags that do not have their designs painted on them often look shiny. If you look closely at the bags you will be able to see texture in the painted area.
Supplies
• Clear leader or found footage.
• Painted plastic bags.
• An iron.
• Something to iron on (a big piece of wood works or newspaper over a table).
• Newsprint or butcher paper to place between the plastic bag and the iron when ironing.
The process
1. Turn on iron to nearly its hottest—this is tricky so you will want to pay attention while you are doing it. Too hot and the plastic melts. Too cool and the transfer doesn’t work.
2. Cover your work surface with a few thicknesses of newspaper if the surface needs to be protected.
3. Put down butcher or newsprint paper.
4. Lay down your film, sprocket holes to the left, emulsion up.
5. Lay your plastic bags over the film, painted surface down. If you are trying to line up the plastic you can cut it into strips and tape it down with masking tape.
6. Lay a piece of newsprint or butcher paper on top of your film/plastic sandwich.
7. Press the plastic onto the film, checking to see if the paint transferred but avoiding melting the whole mess entirely.
8. Repeat until you have done the length that you want.
9. Make a loop and project!

FIGURE 2.11
Using an iron, paint from plastic bags has been ironed onto clear leader. The transfer was from a bag with lettering and for the most part only the paint was transferred.

FIGURE 2.12
Large blocks of color transferred from a bag.

FIGURE 2.13
A strip of plastic back that is semi-opaque that has been cut to size and then ironed onto a strip of 16mm film.

FIGURE 2.14
Packing tape applied to film. The tape has threads running through it that look somewhat like dental floss to the eye, but when projected create vertical stripes on the image.
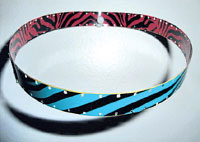
FIGURE 2.15
A film loop with tape on both sides by Devon Damonte. Courtesy of the artist.
STICKERS/TAPE/CONTACT PAPER
Stickers and tape are perhaps the easiest thing to apply to film. Pick out stickers that are at least semi-transparent or are very small on a trans parent background. Tape should be similar, transparent or semi transparent with small images. Contact paper should be semi-transparent. In all cases you can adhere these to clear leader or found footage. Cut the items small enough so that they will fit in the frame. With tape you can cut long and narrow lengths to apply to the film across several frames. As always work on film with the emulsion up and the sprockets to the left, working from top to bottom, left to right and don’t block the sprockets! One interesting thing about clear tape is that you can also use it to stick things to the surface of your film. Take a piece of tape and put it sticky side down on the floor. Then stick it on your film. When projected the dust and cat hair and bugs you may have found look amazing. You can also intentionally take small pieces of fuzz or leaves or dirt or string and tape them to the surface of your film.
Sounds crazy? Not so much. Legendary experimental filmmaker Stan Brakhage created an entire film by sticking bug wings and plant matter to the surface of clear leader in his film Mothlight (1963). The luminary Naomi Uman taped cut-out pieces of film and yarn to her film in Hand Eye Coordination (2002). Of course, whatever you do you must be careful not to make the film too bumpy or it will not run through the projector. Even if you plan on optically printing your work, if it is too bumpy it will stick in the gate and you will need to manually advance the film frame by frame (optical printing is discussed in Chapters 3 and 9). I was once told by painter, artist, performer and filmmaker Carolee Schneemann, in a con versation that also included M.M. Serra, that when Schneemann went to have her film Fuses (1967) printed the lab initially refused because it was too thick. She had layered multiple images on top of each other and painted and dyed the film so that it was much denser than an ordinary optical printer could handle. Only after much pleading was she able to convince the lab to print her original. The film would go on to be a phenomenon at Cannes and worldwide (Serra and Ramey 2007).
PRINTING ONTO FILM
Have you ever printed on a copy machine, ink-jet or laser printer directly onto a transparency? I have and it occurred to me that, if I could print onto that, I could print onto film. Of course, hand-made film guru Devon Damonte was way ahead of me and gave me some direction from his experience. What is so cool about this is that, if you are really precise with what you are printing and where you place your film, you can actually print things onto frames so that they move and change smoothly.
Supplies/tools
• A laser printer or copier that prints onto transparencies.
• Clear leader 16mm or 35mm.
• Scotch tape.
• Graph paper if precision is important.
• Glue (a glue stick is not messy or fumey and works great) (copy process only).
• Copier paper. The largest/longest the printer/copier will take is best.
• Text/images you want to put onto film.
• Scissors.
• A screwdriver in case you mess up and have to get your film/paper unjammed.
Process for laser printing on film
1. Analyze the machine to determine where the rollers are on the paper feed.
2. Develop the image you will print onto the film based on where the rollers AREN’T.
3. Tape your film securely onto the paper you will be printing on and make sure it goes through the printer. This can be accomplished without printing onto it by printing a blank page. Remember to orient your film so that it is emulsion up and sprockets on the left.
4. Print your practice image onto a blank piece of paper and compare it with your paper with film on it. This can be done by sandwiching them together, film on top and looking at them over a light table/box.
5. If everything is lined up, put your film/paper into the paper tray and print your image. If not, adjust your image until it lines up the way you want.
Process for printing on the copy machine
1. Bring the image/text you want to put onto your film with you to the copy machine.
2. Study the copy machine. Where are the rollers?
3. Tape your film to paper to avoid the rollers.
4. Run it through the machine. If it works, this is your template. If it doesn’t, adjust.
5. Take your image/text and cut it out gluing it onto the film template oriented in the way you want the film to come out.
6. Print this onto a piece of paper.
7. Using that piece of paper, line up new pieces of clear leader over the printed image of the film template and tape them onto the paper.
8. Print onto the clear leader. If you wish to make several copies of the same thing you can reuse the template if you are careful when you remove the film from it. If not, print up another template and begin again.
CONCLUSION—CREATE
By now you’re probably getting the sense that creation and destruction are intimately connected. The artist interview that follows is with a person named Devon Damonte who, as it happens, attended my Alma Mater, the Evergreen State College, studied with the same teachers and teaches animation classes there now. Although we missed each other (he graduated the year I began attending) we met in the greater Seattle film community in the early 1990s. Devon is inspired by texture, transparency and opacity. For him film really is a physical medium first and foremost—one that you handle with your hands as you make it. He is not interested in film for its representational qualities but for the way it can transform light as it is projected through it, with or without the aid of an actual projector.
Some of Devon Damonte’s work can be seen on his Vimeo account at https://vimeo.com/user4815979. He currently teaches animation and experimental filmmaking at the Evergreen State College in Olympia, Washington, and continues to make and screen his work locally and internationally. Despite his protests at not liking people, he is a very nice and extremely generous person.
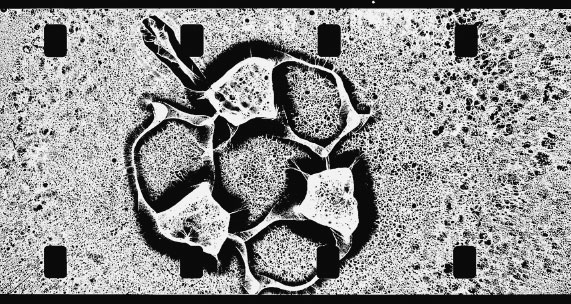
FIGURE 2.16
Contact printing with beach glass on 7363 by Devon Damonte. Courtesy of the artist.
Kathryn Ramey: So—a general question to get the grease flowing—do you consider yourself an artist, a filmmaker, a new media practitioner, a shaman, a performer? How do you describe who you are/what you do to your aunt or the old guy next door? Or children? Yourself? Your friends? Or do you even try?
Devon Damonte: I consider myself an artist, an experimental animator, a filmmaker, a supposedly extinct media fetishist, an obsessive-compulsive content provider, a crackpot crafter, a projection performer, an adhesive tape worshiper, also a teacher and curator/organizer (back in the old days we used to call it programmer, but now the kids giggle at that). To the guy next door, I’ll generally say I work at the library (my part-time day job) because that’s a lot simpler to explain. Years ago I realized that the specific acts that fill my practice mostly have nothing to do with what most people know as animation or even filmmaking. To get specific about it, most of the techniques have more resemblance to printmaking-in-motion or perhaps some odd high-speed bricolage. An example—recently I worked intently on a project for weeks in which I was carefully removing the paper adhesive layer of pink leopard-patterned washi tape (masking tape with printed graphics), then even more carefully washing the impossibly thin color washi layer, then drying, then re-adhering this layer onto clear 16mm leader with double-stick clear tape. So when you get right down to it, if you look too closely this is more like “art of the insane” than anything else! Yes I often don’t even try to explain, depending on context. But I’m virtually always prepared, carrying some sample bits of footage with me, because holding and examining primary-source visual aids are my only hope of ever describing what I make. Even then, it’s often too far outside the box for many folks to grok. [Author’s note: grok is a word coined by science fiction writer Robert Heinlein in his book Stranger in a Strange Land and it means to understand something so completely that you have a rapport with others about it and enjoy and appreciate it at a similar level.]
But perhaps that requires clarification—although I make this work with a vision as I see it, calling it names that fit my understanding and experience, I try to remain open to other perspectives and interpretations. This is an aspect I especially enjoy about making direct animation—I am a craftsperson making an object that can be experienced in a number of different ways. And though the primary intention of this object requires further contraptions and controlled environments to be experienced as time-based media, I often get the most satisfaction from “hand-to-hand” exchanges: pulling a strip of film from my wallet and handing it to somebody to hold it up to the light, to touch it and feel it and respond in some fashion.
KR: How did you come to your particular practice? Did you develop your own processes as a series of experiments? Where did the ideas come from? Does your form and method change as you go and, if so, where have you been and where are you going?
DD: I got my start in film in a course at the Evergreen State College called “Experiments with Light and Sound” in 1987, taught by Sally Cloninger, Peter Randlette and Marge Brown, who became my primary mentors and remain so to this day. My path to this class is somewhat significant too—I left SF State for Evergreen in Olympia, Washington, because I wanted to do more printmaking and I love the Northwest (I was born in Tacoma, but grew up in SF Bay Area). At SFSU I had an incredible freshman year (in retrospect it was a very Evergreen-esque experience, highlighted by an intensive literature and philosophy course called “The Two Crazies: The Mad Scientist and the Mad Artist” taught by an English professor and a Chemistry professor, plus an amazing intro to printmaking class). When I was told I couldn’t take more printmaking courses until I was an upperclassman, I set about finding a school where I could do more printmaking right away. That led me to Evergreen in 1984, where there was a hotshot young printmaking couple teaching, and an extremely liberal education philosophy. Unfortunately the printmaking studio closed due to budget cuts within a few months after my arrival, the hotshot couple moved to Idaho, and I was cast adrift. After a nearly disastrous detour through a Psych class, I landed in a summer TV Production class with my girl-friend, somewhat on a whim and probably mostly seeking easy credits rather than a real interest in the subject. I wasn’t prepared for professor Sally Cloninger, a profoundly brilliant and inspirational dynamo who looks like Harpo Marx and runs her classes like a Busby Berkeley production (FULL CONFESSIONAL NOTE—I LOVE THIS QUOTE IF I DO SAY SO MYSELF, BUT I MUST ADMIT IT’S ALREADY BEEN USED IN PRINT—in “INTERMITTENT” catalog from Museu do Chiado, essay by Coco Hardwater) and who probably exudes more inspirational integrity than anybody I have ever known. This experience completely changed my life forever. Sally was hatching the first “Experiments” class (which still continues largely the same, now known as “Mediaworks”) and many of us from the summer TV Production class followed her for the rest of our educational careers and beyond. As a component of Sally’s class, we each had to specialize in an area, and I stumbled into learning animation taught by another educational genius, Margery Brown. There I saw my first Len Lye, Brakhage, Breer, McLaren, Mary Ellen Bute and much, much more, and my awareness exploded. Our first animation assignment was cameraless animation, and I asked Marge if I could put rubbings on film, and she said “I don’t know, try it!” That encouragement was all I needed to set me on the path that is still going stronger and stranger than ever, now twenty-seven years later.
My practice has always since the very beginning been a dynamic marriage of three disciplines: making, showing/seeing and teaching/exchanging. For me, any of these taken alone renders them virtually inert and meaningless, but in concert altogether they create the universe, unlock the Oneness.
I work utilizing an almost scientific approach to the experimental process of trial and error and aesthetic refinement toward a specific conceptual framework: constant research via screenings, readings, travelings, experiencings; and teaching in as many varied contexts as possible, from college courses, to community workshops, to informal gatherings of friends.
While my processes are unusual by most standards, using tools in speakable ways not recommended by any manufacturer, most of my techniques are really quite simple, and not original to me—many of my “innovations” just stem from my being crazy enough to try seemingly impossible methods, and then to rigorously refine and develop these impossibilities into somewhat repeatable phenomena.
KR: What role does media/technology/tools play in your work? What is the relationship between the media/tools and what your work is about? Is your work about something(s)?
DD: I consider my work a collaboration between the materials and me. The material includes the medium—16mm film leaders for example; the tools to make work with the medium—such as tape, inks, scratchy devices and various crafty artifacts; and the technology required to share the work with others—a 16mm projector, electricity and a surface to project onto. Often my visual ideas will start with some sort of material artifact suitable for cavemanic movie craftifications—a snakeskin shedding, or animal-patterned washi adhesive tapes. There the dialogue begins: I wonder what that would look like? How will it interact in size, patterns, rhythms, frequencies, textures, opacities, etc. with the 16mm film and projection technologies specs? So the collaborative conversation that develops is very much like a scientific process, with hypotheses and experimentation, observation, adaptation, refinement. And then, while this material dialogue ensues, there’s almost always simultaneously a conceptual maceration occurring, ideas about meaning and relevance, connections to the Oneness and bigger ideas and bigger thinkers and warriors gone before.
My work is about experiencing aliveness via moving images. I’ve always felt that using cinema as an example of “the work of art in the age of mechanical reproduction” is a myth, and misses the point of this medium completely. Each piece of film is a unique artifact and an original “primary-source document”. Each strip, each reel possesses its own history and its own distinct and particular aura. Further, every projection is a unique experience that cannot ever be repeated. We’re casting light through spaces of air—it’s a different recipe of molecules every time, and, as David Suzuki brilliantly elucidates, a few of those molecules have been shared with every human who has ever lived. Even beyond that, since this is time-based media, as moving-image-maker I also get to have some sway on a chunk of time in my audiences’ lives, and I try to take that responsibility seriously for potentially changing realities in some positive way.
Jeanne Moreau once said something that has influenced all my work—she observed: “I never come out of a film the same as I went in. Each time I discover new capacities for feelings and emotions I never knew I had.” When I saw my first Len Lye movie in 1986, something connected to my entire being—Lye would call it the “old brain”. Beyond seeing in a completely new way, a way that makes infinitely more sense to my old brain than any photo-realistic vision, but I FELT his movies, body and soul. It definitely helped that alongside lots of Lye I was seeing Breer and Brakhage, Germaine Dulac and Dziga Vertov, and that this experience came in a carefully crafted academic environment, fueling assignments to make movies and learn the ropes. So in my seeing Len Lye and experiencing this awakening, yes it inspired me to attempt to create similar transcendencies in my own work.
KR: Where do you show your work? How do you want people to experience it? Is there a relationship between the form that your work takes and your desired venue/audience?
DD: I show my work wherever I can, whenever I can. After a coupla decades showing my films, I can now be a little more selective, and it’s really nice to be asked to show, instead of always having to submit and beg (I definitely served my time doing this), so now I try to say yes as often as possible. I also believe it’s especially important to be there in person at screenings of my work, and my presentation choices have evolved in concert with this belief. For example, my latest piece Auroroborous is a multi-projector 16mm performance, showing several loops of original hand-crafted material, and manipulated with “projection nozzles”. It’s not something that can happen without me there to do it—I can’t ship this around in a box. And I think this is a crucial element for experimental media in general—it’s old-fashioned interactive experience: cinema expanded beyond a passive trip to consume and escape at the multiplex. Many of my best peak experiences in cinema-going have involved connecting in-person with the makers—from grasping Stan Brakhage’s giant hand, to giggling uncontrollably like a schoolgirl Beatles fan when meeting Bärbel Neubauer, creator of direct animation’s all-time masterworks. The creators of many of my favorite contemporary films have become dear friends, and I’m honored to be among such a small community of mostly very kind, generous, freaky and fabulous folks.
I’m also lucky to have a small studio space in the back of a great all-ages venue called Northern in downtown Olympia, Washington State. Northern has an extremely open and liberal policy about people putting on shows, so I try to organize my own screenings frequently. It’s often tricky for me finding a balance between organizing shows of others’ work and showing my own—I’m kinda wary of doing too much “vanity programming”. But again, this is a pretty small, beautiful community, and mostly everybody knows everybody, and most of us are organizing shows too so we’re all showing our best friends’ best stuff, and it usually works out pretty well.
When I think about it, I guess I’m always aiming for re-creating for others my own cinematic “big bang” moment of seeing my first Len Lye film. It’s a moment as indelibly etched into my whole being as was the time for Lye as a boy when he stared at the sun until it became a “big black ball”. I want to blow people’s minds with synaesthetic dazzle to forever expand their awareness. I want people to experience my work in whatever way they want, and while I post work online and share in various formats (I love pulling my films out of my pocket to show friends in my hand, playing upon my device), my strong preference is always for people to see my work projected onto a big screen, watching together with other people, preferably including me at the party.
KR: And finally, your chapter is called “Film-create” (and is about additive direct animation). Please elaborate how you came to such an activity? Are you part of a community of makers (either locally or internationally) who communicate with each other about their work and get together either virtually or physically to discuss/show/celebrate? Where? When? How? What happens?
DD: So wait, “ADDITIVE” direct animation only? I don’t get to subtract too? I guess that makes sense, I am a collagist bricoleur maximalist hoarder, I shan’t deny it. Which I suppose leads nicely to how I came to this activity, which is that I believe, here in our modern times, obsessive-compulsive hoarding in one form or another is a normal, healthy state, and anything else is messed-up denial. How could any sane person respond in any other way than attempt to manipulate and conquer all our STUFF? For me, there’s something primal and cavemanic about collecting and feathering our nests, and I’m somehow fortunate to be in the position of artist where my job is to attempt to make new stuff from all the existing stuff, hopefully wresting new meanings for us all in the process. My Dad was a packrat, my Mom not so much though she’s got the kindergarten teacher’s appreciation for creative reuse. I am a natural-born rubber, like my father before me, and I’m only lately realizing how rubbings are kinda the epitome of indexicality, creating primary-source documents of experiential textures. So that leads very naturally into my penchant for film originals, unique loops, one-of-a-kind cinematic artifacts (and rubbings, especially large-scale ones, also end up in long rolls, much like long spools of film). Then somewhere along the line, the sticky-tape obsession kicked in (another material found in long rolls!), which continues rampantly, rabidly, unrepentantly to this day. Can’t get enough TAPE (which also represents a great symbolic icon for analog media in general, as well as fertile ground for AV geek puns)! Here, too, I think I can blame my AV geek Dad for fueling this fire—his bins labeled “things that go ‘stickum’” were always my favorite for rooting through.
Yes, I am very lucky to be part of several communities of makers, and to regularly exchange our work and communicate on various levels. This is very important—maybe the most critical thing of all. But perhaps I should preface this part by admitting that I don’t really like people. Generally other people bug me. And most of the bad stuff that happens is all their fault. In other words, I am somewhat anti-social, and often somewhat painfully introverted and overly sensitive. But I had to admit a while ago that we humans are social animals, and to be healthy we need each other, and making art really does achieve higher purpose and meanings when shared with others. So I have to work pretty hard to force myself to make any social encounters happen, and I made a conscious effort beginning around 1999 in Boston to start creating opportunities for critiquing work with peers. I might mention here too that for over a decade I was working at media arts non-profits for my day job, so these organizations often also fostered communities of creative exchange (such as the “Rough Cuts” work-in-progress series I helped create at Boston Film/Video Foundation, where people like Ross McElwee debuted and discussed new work).
My personal efforts toward critique groups evolved into informal workshop-like social get-togethers, which were soon dubbed “Crackpot Crafters”. The best description of this group is “it’s like a quilting bee for film freaks”. I’m pretty sure Jo Dery said that, and she may also have cooked up the Crackpot Crafter name. Jo is an artist/filmmaker/animator who then lived at the Dirt Palace in Olneyville, Providence, Rhode Island, which is an incredible hotbed of creative activism. In the midst of the Crafters’ early gatherings, Mme Dery cooked up a “24-Hour Moviemaking Experiment” in which about a dozen of us stayed up all night making hand-made movies, and then showed them all at a big party with bands at the end of the sleep-deprived night/day (we later took this concept on the road for a cross-Canada to Olympia mini-tour). Also there during that time Dirt Palace veteran Xander Marro’s “Movies With Live Soundtrax” summer extravaganzas were in the last days of a very long run, and I must say that participating in and attending these shows remain some of the greatest events ever in my life. It’s interesting to look back on the origins of Crafters, the many intersecting creative communities, the critical role played by power of place, and the relevance to current trends in “art as social interaction” and “relational aesthetics”. The two factors that were my immediate impetus for starting the Crafters were: firstly that I knew I’d be moving from an amazing penthouse warehouse loft in South Boston and I wanted to share it with more people before I left; and secondly I’d grown weary of teaching my direct animation classes for struggling non-profits who had to keep raising tuition for my classes, so that my students were increasingly the type who only wanted to know “How do I get my film into Sundance, dude?” So I decided to take all money out of the picture completely and give it all away, which worked out much better, and formed strong, deep and lasting communities of creatives.
Crackpot Crafters continues, still going strong thirteen years later, currently meeting somewhat irregularly while I’m teaching, but mostly monthly, at Northern in Oly. Besides starting at my studio at the Distillery in Southie and the Dirt Palace in Providence, Crafters has also met at Moody Station Studios in Waltham, Massachusetts (home to the good makers at Handcranked Films), dearly-recently-departed 911 Media Arts in Seattle, and Olympia Film Society’s Film Ranch here. The latest local incarnation of Crafters now includes faculty, students and alums from Evergreen as well as local video producers and graphic designers, and in 2011 we created our first major collaborative work, an 8-minute 16mm direct animation film entitled “The Artifacts of Life”, made entirely from elements of once-living things. More recently we’ve started doing big group shows called “LocaLoops” with a dozen or so artists and musicians, running 16mm loops on as many as eight projectors simultaneously, projecting on many custom screens all around the room at Northern, including our latest addition: a series of retractable small scrim screens designed and hung around the room by former Seattle artist Carl Smool, now hanging around Olympia.
I find that maintaining critical exchange and collaboration among my fellow artist filmmakers is almost never easy, often infuriatingly frustrating, and it always yields fruitful opportunities for growth, both personally and in developing my work and practice. And it doesn’t get any easier either the longer I do it—seems to always be difficult in new ways. But it is an essential element of becoming a whole artist maker film person.
Other topics to include but not quite covered by questions—$—Getting paid and paying artists (and giving it all away free)
What was the other one? … There was something else….
Thanks for the words of encouragement, and great follow-up questions. I’m wondering about maybe inserting a qualifier in the “I don’t like people” rant—there are, of course, a few notable exceptions. Anyhoo….
KR: About your a-ha experience seeing Len Lye. In other writing I have referred to this kind of moment as a conversion experience, a moment when the individual becomes indelibly marked by the work and decides to pursue making such work themselves. It is something like falling in love or like a religious awakening but the belief system involved revolves around aesthetic experience that is both personal and communal. Can you be more specific about this moment for you? When was it? Where was it? Who were you with? What did you do afterward? Had you made films or art up to that point? If so, how did your work change?
DD: Yes when I saw Len Lye films for the first time, must have been fall 1985 or 86 in Sally Cloninger’s “Experiments with Light and Sound” course at the Evergreen State College, it could be described as a conversion experience, though I’m not wild about the religious connotations of that word. And yes it was like falling in love, and yes it involves expanding my aesthetic belief system in both personal and communal realms. And it’s more than all that too because the experience—the opening of those “doors of perception” (to get all Huxley-delic about it)—it’s about more than me, beyond my individual self. Len Lye would call it tapping into the “old brain”, which is a big part of why he’s the perfect guide for this journey—his films stand alone, as among the greatest art in any media in his (or any other) century. And though he’s still generally under-appreciated, his work endures, stoking ever-brighter fires of young inspiration. Hence I believe that in the fullness of time his contributions will be better recognized. But also because in studying Lye, the deeper you dig, the more wonders are revealed, from his monumental kinetic sculpture Tangibles, to his giddy poetry, to his batik paintings, to his heady philosophical writings such as “The Absolute Truth of the Happiness Acid” (which incidentally had absolutely nothing to do with LSD)—it’s a brave new world apart, a calling to higher levels.
It’s strange to be asked to recall my “conversion experience” in specific detail, because remembering now I see how I was perfectly primed and privileged in so many ways for my first intensive exposure to experimental media. Group chemistry is a fascinating phenomenon, and the people with me in that supercharged class where I first saw Lye—alongside Breer and Brakhage and Dziga Vertov and William Wegman and Germaine Dulac and so many many other greats—it was an extraordinary gathering of minds and talents, a remarkable number of classmates with whom I am still friends today, lo these decades later. I had made quite a lot of visual art before that (drawing, printmaking, ceramics), and some video work (a student smattering of quasiexperimental home movies, plus some TV studio class stuff), and lots of music in various forms since a wee tyke, and I may have somewhere been briefly exposed to Super-8mm (I did some photo darkroom classes in middle school too), but I think that class was my first touch of 16mm. My dad had a higher than average AV geek knowledge and usage, so it wasn’t totally foreign to me. But I don’t recall any flash of moment where I decided “this is what I want to do for the rest of my life”. It almost seems like it was beyond any free will decision-making, like the question wasn’t even relevant after that, like obviously I wanted to make more film, how could I not? For me it’s been a steady flow since then, not always easy, but a naturally irrepressible impulse. And what was set in motion was not just the urge to create films, but the solid triumvirate of: making, studying and showing that continues in equal measure to this day. Which leads nicely to your next good question….
KR: The second question that you raised is about the economics of the film avant-garde (for use of a better catch-all term for what it is we all do). Getting paid, paying others or giving it away for free. Other writers (sociologist Todd Bayma for one) has likened the activity of the film avant-garde to economic irrationality because it doesn’t subscribe to either art or commercial market practices (although some artists have been able to monetize their work this way). I have argued a more complex understanding of the screening practices as a kind of gift economy that can lead to economic benefits (teaching, grants, etc.) but is not predicated on this eventuality. Please tell me about your own take on the “economics” of your practice.
DD: I like your notion of “gift economy” in regards to the film avant-garde (much of it would surely fit Lewis Hyde’s studies), and it’s certainly economically completely irrational, crazy and downright reckless. But it must be noted that all this economic gifting and beautiful irrationality is afforded by our social positions of financial and other privileges. Film avant-garde is an upper-class sport. We’re hopefully among the more enlightened and socially progressive (if not downright radically leftist) among the upper classes, but we’re still virtually all coming to this from positions of privilege across the spectrum, and anybody who denies this is either lying or deluded.
I showed a recent work Stalking the Wild Washi at the Portland, Oregon Experimental Film Festival last year, and I looked around the audience, delighted to see an eager packed house filled with avant-garde cinema luminaries. And I gradually realized that there were people from across the globe, many from Chicago and New York and other far-flung cities, some from South America and Europe, and, as far as I know, none of us had our travel paid, almost none of us were paid anything for showing our work there. So a room of 50–75 people, not only had many of them paid hundreds if not thousands of dollars to be there, but also, on top of it, many of us had invested hundreds or thousands of dollars into our work, and years of our lives, and when our masterpiece is done, we give it away. And we even say “Sure you can charge admission” for our gift and still you don’t need to pay us a penny. What fabulous, radical economic insanity is that?! But to complete this story, I must confess in full disclosure that a few weeks after the festival I did get an unexpected $100 check, thanks to the dogged lobbying efforts on my behalf from a fellow filmmaker, and I am very grateful for this money, and it probably didn’t even cover my modest expenses coming from only 100 miles away. To provide further details in hopes of demystifying how all this works in the real world (counter to the frequent norms of privilege where these “money matters” are dealt with in secret) … I submitted my work to the festival and waived the entry fee because I had showed with them before. My memory is sketchy but as I recall I wasn’t notified whether or not I was accepted with the main batch but I kept quiet and kept hoping, and I was delighted to soon learn I was selected to show on a special program with a premiere by one of my favorite filmmakers, Jodie Mack. Can’t remember if I offered or was asked to also teach a mini-workshop at a gallery opening event as part of the festival, which I was happy to do. Since I was doing extra duty, I asked for some money to help cover my expenses. The festival person said they’d ask the director and get back to me. I think I asked once more, and I think the answer was something like “We think we can give you something but we’re not sure yet and we’re not sure how much.” I never heard again after that, and I didn’t pursue it, so it was a nice surprise happy ending to get the check later. Oh and I should add that, as is so often the case, several of the festival organizers are good friends, so this makes the economics even more delicate.
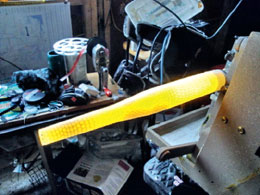
FIGURE 2.17
Devon Damonte’s “film nozzle”. Courtesy of the artist.
It is a unique community and a unique practice of the film avant-garde. Virtually every filmmaker I know also regularly organizes screenings, and regularly shows their own work near and far, usually all at their own expense. Imagine if every painter, watercolorist, silkscreener, etc. also regularly ran their own alternative gallery spaces. Sounds rather cool actually, but it would make a crowded exhibition scene.
KR: Is there a gift or recipe or assignment you would like to share with our readers?
DD: I like how your word choice is active and almost commanding for this project: “Break the machine!” Here’s your “assignment”! Get off your ass and do it already, you lazy slacker…. TURN. OFF. DEVICE. NOW! And look up! Tilt. Head. Upward. Good!
So … I suppose the “assignment” part is to expand the choice of photocopy/printed materials. Because the results are only as good as what a person picks to put on there. If you want it more spelled out as a “project” or “assignment”, let me know and I can write up a preamble—I generally leave these things slightly more open-ended. I’d probably do either: “make your own hand-made 16mm film credits” or “make your own hand-made, personalized SMPTE countdown leader”. Or if you don’t need that aspect, you can use this as is. Let me know.
Oh yeah, and I would want to note somewhere that I am not claiming to have “invented” this technique. I have worked hard to develop the best, most effective techniques for this application, and I’m always refining it with help from a multitude of crafters everywhere sharing information, but I wouldn’t claim any sole authorship. In fact, there’s another great filmmaker and direct animator, Donna Cameron in New York City, who actually has a patent on a particular application of this process! I discovered this by surprise at a screening in New Orleans a decade ago when by happenstance we were showing on the same night and I started teaching folks the tape-lift technique and asked if she knew it and she replied that she not only knew it, she also held the patent! Luckily she wasn’t feeling particularly litigious that night.
Thanks,
DD
Tape-lift image transfer
Summary: a way to grab imagery/text/patterns off photocopies or other printed matter onto clear tape, which is then stuck onto film leader for projecting.
Clear tape onto image side of photocopy (including color copies), turn over and wet the back with water, gradually rub paper fibers off leaving just image/toner/ink, dry, stick tape onto clear or color leader and reinforce with tape splicer (because often most of the stickum on the tape is covered over with photocopier ink).
TAPE-LIFT IMAGE TRANSFER RECIPE
Select imagery for transferring. Contrasty photocopies work best, especially black and white but color too (though be aware of copier halftoning patterns—check it with strong magnifier/loupe, at least 8× or better). Other printed matter sometimes works too; try it! NOTE: it must be non-water-based printed matter, so ink-jet prints don’t work (though photocopies of ink-jet prints will work).
Put clear tape on top of copied/printed stuff—sticky side on ink/toner side. Half an inch width works perfectly for 16mm film. Use clear tape, not “magic” or frosted. Not all clear tape works—try a sample first. I’ve had good luck with Scotch, Office Depot and Western Family brands (and sometimes the latter claims it’s non-petroleum-based!). Advanced practitioners can try tape variants—printed decorative tapes, washi, teflon tapes, etc., but stick with clear for starters, hey that’s funny!
Burnish it down really well. I like an agate burnisher, but you can use a plastic burnisher or fingernail or marker butt or giant squid beak or whatever hard, smooth thing you like. Life is all about burnishing. Now you know. Doesn’t matter so much what you do, what you wear, who you are, as long as you be sure to burnish it up real smooth and pretty.
Soak for 30+ minutes or so ideally (the tape-lift, not your life). Can get away with 10 minutes if you’re impatient; might need to briefly re-soak after peeling first layer.
Carefully peel and rub paper off back with fingers and/or toothbrush and/or sponge (rubber cement picker upper also works). Depending how much paper fiber is rubbed off, different effects are achieved. Leaving lots of fiber gives a compelling “fuzzy edges” result. When most of paper is gone, rub more carefully so as to not rub off ink. It’s usually possible, with care and practice, to rub off virtually all the paper fiber leaving only toner/ink. Continued rubbing will remove/lighten the toner image too, so quit when it looks good. Obsessive-compulsive rubbing beyond that will eventually remove the ink and adhesive too, and then probably your epidermis, and eventually you’ll dig to China, but I recommend moving on to next step before you get that deep.
Rinse and let dry, adhesive side up. Some tape will turn whitish/cloudy when wetted, but then it generally dries clear.
When there’s enough “blank space” on source imagery, such as with titles with black text on white/clear background, as the tape dries the adhesive in non-image areas becomes sticky again. So this type of material can then be stuck directly onto 16mm film. If there’s lots of toner/ink coverage on image source material, add a layer of double-stick tape on image side of transferred tape to adhere it to the film. Then burnish it all down onto the film so it’s well-stuck all around. Some trimming may be necessary, and splice-tape down any loose edges. If there’s any trouble, add more tape, burnish again, trim it cleanly. More tape generally fixes anything in life that burnishing can’t. Yep, just “stick with it” till you gets it right!
FURTHER NOTES
Can also put on backside of black leader and scratch through to reveal (especially nice for titles)—for this, be aware of lettering orientation, might need to print backwards or “mirror image” on copier to get it to read right. May want to print/photocopy white lettering on black background for this effect too—use “negative” special function button on the copier.
Beware: this tape-lift business is generally a decidedly non-archival technique—different adhesive tapes do weird things over time. Don’t even get me started about my transparent duct tape film Duct & Cover—oy what a nightmare! I went back to some other regular clear tape-lift transfer title credits footage about five years later and the toner ink was beginning to migrate around in the mucilaginous tape adhesive goo!
I usually use ½″ tape and carefully stick onto 16mm so it doesn’t cover the sprockets but comes right to the edge. You can also use wider tape to transfer more imagery at once, then trim to size.
References
Brakhage, Stan. The Moving Picture Giving and Taking Book. West Newbury, MA: Frontier Press, 1971.
Heinlein, Robert A. Stranger in a Strange Land. New York: Ace Trade, 1991.
Ramey, Kathryn. “Do No Harm—The Cameraless Animation of Anthropologist Robert Ascher” in Schneider, Arnd, and Caterina Pasqualino, eds. Experimental Film and Anthropology. London, New York: Bloomsbury Academic, 2014, pp. 97–112.
Serra, MM and Kathryn Ramey. “Eye/Body: The Cinematic Paintings of Carolee Schneemann.” In Blaetz, Robin, ed. Women’s Experimental Cinema: Critical Frameworks. Durham: Duke University Press, 2007, pp. 103–126.
Starr, Cecile and Robert Russett. Experimental Animation: An Illustrated Anthology. New York: Da Capo, 1976.