Chapter 7. ASP.NET
This chapter introduces the next technology for providing dynamic and interactive web pages. ASP.NET takes Active Server Pages (ASP) a step further to simplify the development process of web pages and enhance scalability of web applications. First, we review the conventional way of developing web applications using ASP to uncover some of the pitfalls that ASP.NET overcomes. We then discuss the benefits of ASP.NET and provide a high-level survey of the classes in the ASP.NET, such as control and page, as well as the complete syntax of ASP.NET Web Forms. To wrap up the chapter, we discuss the many aspects of ASP.NET development: how ASP.NET supports web services development, how to use custom server controls, and how session management has been improved to provide more scalable web solutions. This overview chapter is designed to provide experienced developers with a solid introduction to ASP.NET and Web Forms; for additional in-depth information, see Programming ASP.NET by Liberty and Hurwitz (O’Reilly) and ASP.NET in a Nutshell by Duthie and MacDonald (O’Reilly).
ASP
Microsoft ASP is a server-side scripting technology enabling dynamic web pages. An ASP page contains HTML markup and server-side scripts that generate HTML content dynamically. The server-side scripts run when a request for the ASP page arrives at the web server. Inputs to the ASP page come from the client browsers through HTTP POST and GET methods. ASP provides an object model to simplify developers’ tasks. Besides objects from the ASP object model like Application, Server, Request, Response, and Session, developers can use any COM components on the server.
If you’ve already been developing web applications using ASP, you probably agree that it is very easy to end up with intertwined, possibly conflicting HTML markups and server-side scripts. The poor encapsulation model of ASP pages makes them difficult to manage and reuse. Attempts have been made to improve upon this model, including server-side include files and parameterized functions in scripts; however, these attempts come with trade-offs such as time, the management of a network of include files, the performance impact of having nested includes, as well as object ID and variable-scope management.
Developers that deal with cross-browser web applications also run into problems generating HTML according the client’s browser capability. Most of the time, we end up generating only the simplest HTML tags and client-side scripts, which can be understood by many browsers, and foregoing the features of the more advanced browsers. The resulting web application can be only as good as the worst browser it supports. Sometimes, we also attempt to generate different HTML markups for different browsers to take advantage of browser-specific features, resulting in a much better client-side experience; however, this involves much more development time and effort.
Since scripting in ASP is available only to late-bound languages such as VBScript and JavaScript, type-safety is not an option. In addition, server-side scripts in ASP pages get reinterpreted each time the page is accessed, which is not ideal for performance.
Form-state maintenance in an ASP-based application is also labor-intensive—developers must do everything manually, including reposting data, using hidden fields, and session variables. At times, web applications are configured to run in web farm environments where there is more than one web server available to the client. Maintaining session states becomes much harder in these scenarios because it is not guaranteed that the client would return to the same server for the next request. Basically, the developers have to save states manually to SQL Server or other external storage.
Although ASP is a great technology to build dynamic web pages, it has room for improvement. ASP.NET evolved from ASP and overcomes most, if not all, of its shortfalls.
ASP.NET
Visual Basic developers have long enjoyed the ease of programming with forms and controls. Writing a VB form-based application is as simple as dragging some controls onto a form and writing some event-handling functions. This is one of the reasons VB has attracted lots of programmers interested in speed of development. Microsoft wisely built this feature into ASP.NET.
ASP.NET simplifies web page development with form-based programming. In ASP.NET, these forms are called Web Forms and are analogous to VB forms, replacing ASP pages. Similar to VB, Web Forms programming is also event based. We don’t have to write in-line ASP scripts and rely on the top-down parsing interpretation as in ASP programming. To match the rich set of ActiveX controls that VB programmers love in their toolset, ASP.NET equips ASP programmers with server controls. To further enhance the productivity of developers, ASP.NET’s Web Forms also allow for the separation of the application logic and the presentation layer.
ASP.NET evolves from the ASP programming model with the following additional benefits:
Clean separation between the application logic (server-side code) and the presentation layer (HTML markup)—no more spaghetti code
A rich set of server controls that automatically render HTML suitable for any clients and that additionally manage their states
Enhanced session-state management
An event-based programming model on the server side, which is simpler and more intuitive than an older script-based model like ASP
Application logic that can be written in any Microsoft .NET language (VB, C#, Managed C++, etc.); application server-side code is compiled for better performance
Visual Studio .NET as a RAD tool, which simplifies the development process of Web Forms
The System.Web.UI Namespace
Before getting into developing your favorite Hello, World! application in ASP.NET, it’s important that you become familiar with the underlying structure of ASP.NET. This section describes some of the most important classes packaged in the System.Web.UI namespace in the ASP.NET framework.
The System.Web.UI namespace defines classes and interfaces used in constructing and rendering elements on a Web Form. The most important class in the System.Web.UI is the Control class, which defines properties, methods, and events that are common in all server controls in the Web Forms framework. Another important class in this namespace is Page, which is a derivative of the Control class. All ASP.NET web pages are instances of derivatives of the Page class. To have an extensible framework, the System.Web.UI namespace also includes the UserControl class, which is similar to the Page class except that it is used as the base class for user controls. We will make use of the UserControl and Page classes in Section 7.5 and Section 7.5.4 sections later in this chapter.
Control Class
The Control class is the root of all controls. For example, a text box is a control; a button or a combo box is also a control. The Control class basically encapsulates common functionalities and properties of all user-interface widgets. As you get deeper into ASP.NET development, everything you see is a Control derivative of some sort.
Control’s properties
The Control class has the following important properties: Controls, ID, ClientID, Parent, EnableViewState, Visible, Context, and ViewState. We will go over each of these properties briefly to show you what the Control class is made up of and how deriving from Control class would create a model that is consistent and easy to work with.
The Controls property represents the children of the control instance; the Parent property defines the parent of the control. These properties enable a hierarchy of controls on a web page. The ID property allows the control to be accessed programmatically by just using the ID and the dot notation to get to the object’s properties and methods (i.e., MyObjectId.propertyname). While the ID property allows us to program the control on the server side, ClientID allows us to setup client-side script to access the control on the client side. More information on using ClientID will be shown later in this chapter.
The EnableViewState flag indicates whether the control will maintain its view state, as well as all view states of its child controls. If this flag is set to true, the control will remember its previous view state when the page posts back to itself.[1] For example, if EnableViewState is set to true, the user’s previous selection or form-field data are preserved automatically when the user performs some operation that requires a postback. When the page is sent back to the browser, the user can just continue filling in the form as if he never left it. This is how all derivatives of the Control class maintain their states between requests and free ASP developers from having to simulate view-state behavior with hidden form fields.
The Context property enables us to get to information about the current HTTP request, such as the Application, Server, Session, Request, and Response objects. ASP developers should be familiar with these intrinsic objects. You will likely use the Context property when you are processing the web page’s Load event to get to application- or session-level variables and request parameters to set up your page. Through the Context property, you can also get other information, such as cached resources, including database connection for performance improvement; the trace property for debugging purposes; and the user property for security validation.
The ViewState property is an instance of the StateBag class, which is used to store name/value pairs of information that can be made accessible across multiple requests for the same web page. These name/value pairs are instances of the StateItem class. ViewState allows ASP.NET controls to maintain their own state across multiple client roundtrips; it is implemented as a hidden form field on the page. If you’ve attempted to maintain state for your form in ASP development, you will appreciate this because it is now automatically done for you.
Control class methods
The list of methods for the Control class is much longer than what we’ve covered in this section; however, this short list is probably all you need to know to get started with the Control class:
- DataBind method
Binds the control to a data source. This method is used in conjunction with the data-binding expression syntax on the Web Form. When this method is called, all data-binding tags, <%# %>, are re-evaluated so that the new data is bound to the appropriate tag location. Also, any controls that have their DataSource property set, retrieve the data from the DataSource and fill themselves.
- CreateChildControls method
Called before any compositional custom control is rendered. A compositional custom control is similar to a user control. Both of them are composed of other controls to create more complex controls. You would not employ this method simply to use the control. When developing custom controls, this method can be overridden so that custom control developers can create and layout child controls prior to rendering the controls, whether for the first time or for postbacks.
- Render method
Similar to the CreateChildControls, primarily used to develop custom controls. Control developers override this method to render the control content through the provided HtmlTextWriter parameter.
We will revisit the Render and CreateChildControls methods when we show you how to create custom controls in “Customer Server Controls” later in this chapter.
- SaveViewState and LoadViewState methods
Save and reload the state for the control. Server controls maintain their state between requests via these methods.
Page Class
As mentioned earlier, the Page class is actually a derivative[2] of the Control class. This means it inherits all properties, methods, and events exposed by the Control class. In addition to the inherited things, the Page class defines more specific properties, methods, and events for a web page in the ASP.NET framework.
If you’ve done ASP development, you already know that Application, Request, Response, Server, and Session are intrinsic objects that you can access while scripting your ASP page. With ASP.NET, these objects are actually properties of the Page class. In addition to these familiar objects, the Page class also exposes other properties such as Cache, ErrorPage, IsPostBack, IsValid, Trace, and Validators.
Page class properties and methods
This list is not complete; however, it includes some of the more important features that we want to introduce:
- Cache property
Points to a Cache object of the Context for the current page. Here, resources such as DataSet with information retrieved from a database are stored for reuse while the cache item is not yet expired.
- ErrorPage property
Specifies the page to display when an error occurs. You can also specify the error page by using the @Page directive, as shown in Section 7.4.
- IsPostBack property
Indicates whether the page request is an original request or a postback, since the interaction between the user and the server controls requires a postback to the current page. If IsPostBack is
true, you should not redo all your page initialization to improve performance.- Validators property
Groups together server controls that can validate themselves inside the Validators property of the Page. (In ASP.NET, a web page usually consists of a number of server controls.) This is so that when the Page needs to validate itself, it can delegate the validation to all of these controls and then set the IsValid property to the appropriate value.
- Trace property
References a TraceContext object, through which you can issue warning or error messages. Tracing can be switched on or off at any time from the
web.configsetting.web.configis an XML-based text file that stores the runtime configuration for an ASP.NET application. Changes to this file take effect immediately. The main configuration file is at the root of your web application; however, you can have a configuration file for each subdirectory in your web application. The closest configuration file overrides the settings of distant configuration files. Being able to switch off tracing in a configuration file like this is much better than doing so manually in ASP development, where you must go through all ASP files to remove all instances of Response.Write debugging messages when you are ready to deploy your application.- LoadControl method
Loads server controls from a file into the page programmatically. This is especially for user controls in ascx files. For ordinary server controls, they can be instantiated directly and added to the page’s Controls collection. You can also have static server control declared on the page using the server-side object syntax as described in Section 7.4 later in this chapter.
- MapPath method
Maps a virtual path to a physical path for file I/O. This should be familiar to ASP developers.
- Validate method
Works with the Server Validation Controls on the page to validate data on the page. If any of the server controls fail to validate, this method returns
false, and the failed server-validation control renders the error message to the user.- CreateHtmlTextWriter method
Produces an HtmlTextWriter object to write HTML to the response stream. This is similar to ASP’s Response.Write method; however, the HtmlTextWriter object is much smarter than the raw Write method. It helps you write well-formed HTML.
- LoadPageStateFromPersistenceMedium, SavePageStateToPersistenceMedium methods
By default, save and load view state for all controls as hidden fields on the page. If you don’t want this setting, you can override the SavePageStateFromPersistenceMedium method to save the view state anywhere other than hidden fields. You will also have to override the LoadPageStateFromPersistenceMedium method to have the saved view states loaded back onto the page prior to rendering.
UserControl Class
The UserControl class is similar to the Page class (see the previous section) with the omission of page-specific properties or methods such as ErrorPage, IsValid, User, Validators, MapPath, Validate, and CreateHtmlTextWriter.
The UserControl class is typically used as the base class for custom controls. We can also build custom controls by inheriting directly from the Control class; however, it’s better to start from UserControl because it is not as raw as the Control class. If you find that UserControl supports a number of properties and methods that you don’t really want in your custom control, you might choose to inherit the raw Control class instead. We show you how to create custom controls in Section 7.5.4 later in this chapter.
System.Web.UI.HtmlControls Namespace
If you’ve done any client-side DHTML scripting, you know how all HTML tags are mapped to scriptable objects. ASP.NET brings this mapping to the server side. Before the web page is rendered and sent back the client, you can access and manipulate each of the objects on the page.
ASP.NET maps HTML tags with objects in the hierarchy of server-side classes defined in the System.Web.UI.HtmlControls namespace. These server objects are called HtmlControls because they closely map to standard HTML elements.
For example, here is a simple HTML page that relies on client-side scripting to change the output page dynamically. (This page won’t run on browsers that do not support VBScript client-side scripting or browsers that have client-side scripting turned off.)
<html>
<head>
  <script language=vbscript>
  sub cmd1_onclick(  )
    txtMessage.InnerHtml = _
        "(Client-side) Your name is: " & frm1.txtName.value
  end sub
  </script>
</head>
<body>
  <form id=frm1>
    Enter Name: <input id="txtName" type="text" size="40">
    <input type=button id="cmd1" value="Click Me">
    <span id="txtMessage"></span>
  </form>
</body>
</html>
We will convert this page so that it relies on server control instead of the IE Document Object Model. Since the output of the page is controlled from the server side, the page works regardless of what kind of browser you are using. One drawback to this is that all interaction with the page requires a postback to the server.
To take advantage of server controls mapping, all you have to do is
to add the id and runat
attributes, and your server-side script will be able to access and
manipulate the server controls:
<html>
<head>
<script id="scr1" language="c#" runat="server">
void svr_cmd1_onclick(Object o, EventArgs e)
{
txtMessage.InnerHtml =
"(Server-side) Your name is: " + txtName.Value;
}
</script>
</head>
<body>
<form id="frm1" runat="server">
Enter Name: <input id="txtName" type="text" size="40" runat="server">
<input type="button" id="cmd1" value="Click Me"
onserverclick="svr_cmd1_onclick" runat="server">
<span id="txtMessage" runat="server"></span>
</form>
</body>
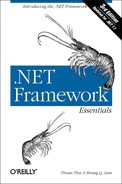
</html>By adding the
runat="server"
attribute to the HTML form and its controls, you have exposed an
HtmlForm object, an HtmlInputText object, an HtmlInputButton
object, and an HtmlGenericControl object (the span) to
your server-side script, as depicted in Figure 7-1.
As you can see in the previous script, you can manipulate the
HtmlGenericControl object’s txtMessage to set its
InnerHtml
property.
Even though the results of the two simple examples appear to be the same, they are drastically different from the technical point of view. Client-side scripting, as the name implies, runs in the client browser process. On the other hand, when we have controls tagged to run on the server, we can have accesses to other server resources.
Most classes in the System.Web.UI.HtmlControls namespace are derivatives of the HtmlControl class, which in turn derives from the Control class of the System.Web.UI namespace. See Figure 7-2 for a graphical presentation of the hierarchy. The HtmlControl class serves as the base class for these HtmlControls because most HTML elements share common characteristics that are defined in this HtmlControl base class. They share properties such as ID, Disabled, Value, Style, and TagName. Because these HtmlControls ultimately are derivatives of the Control class, they also have methods and events that the Control class exposes.

Table 7-1 maps the HtmlControls to standard HTML
tags. This means when you have an HTML tag that is flagged to
run on the server side with runat="server“,
ASP.NET creates an appropriate HtmlControl that you can program
against.
|
HTMLControl |
Description |
HTML tag |
|
| ||
|
| ||
|
Image input |
| |
|
| ||
|
| ||
|
| ||
|
| ||
|
Form tag |
| |
|
Miscellaneous generic HTML tags |
| |
|
A row in a table | ||
|
| ||
|
HTML button |
System.Web.UI.WebControls Namespace
While providing HtmlControls, which map to standard HTML elements, ASP.NET also provides another group of UI controls, the WebControl class (see Figure 7-3). In addition to providing all traditional controls similar to HtmlControls, WebControls also provide much richer controls such as calendars, grids, and validators.
WebControls are richer, more powerful, and more flexible than HtmlControls. It seems that it is the natural choice for new ASP.NET applications; however, HtmlControls are better if you are migrating ASP applications. Another thing that might make you consider using HtmlControls is that with it, your client-side scripts can still access and manipulate the objects.
Most classes in this namespace are based on WebControl, which is again a derivative of the Control class. The WebControl class provides the common properties and methods inherited by all of its descendants, including access key, tab index, tool tip, color, font, and border setting.

Web Form Syntax
Similar to Active Server Pages, Web Forms are text files consisting of HTML tags and other controlling tags such as directives and script blocks. The default extension for web forms is aspx; however, you can use the IIS administration tool to map other file extensions explicitly with aspnet_isapi.dll to have them parsed and compiled when accessed, as if they were ASP.NET resources.
There are 10 different syntax elements in ASP.NET; because most of them are carried over from ASP, we list here the familiar ones and discuss only those that are important in ASP.NET:
| Directives |
| Code declaration blocks |
| Code-rendering blocks |
| HTML control syntax |
| Custom control syntax |
| Data-binding expressions |
| Server-side object tags |
| Server-side include directives |
| Server-side comments |
| Literal text |
Directives
Previously, all
ASP directives were formatted as <%@
[
attribute=value
]+
%> because there was only one type of
directive.[3]
ASP.NET adds a number of directives to ASP.NET files. With the new
list of directives—Page, Control, Import, Implements, Register,
Assembly, OutputCache, and Reference—the syntax for directive
is now <%@ directive
[
attribute=value
]+
%>. All of the old ASP directives are
attributes under the Page directive. If you use the old syntax by
omitting the directive name, the attribute/value pairs will be
applied to the default directive, which is Page.
@ Page
In addition to containing all previous ASP directives (CodePage, EnableSessionState, Language, LCID, and Transaction), the ASP.NET Page directive also supports the important attributes ErrorPage, Inherits, Src, and EnableViewState, which we will make use of in this chapter. The complete list of all attributes for the Page directive can be found in the .NET Framework Developers’ Guide:
<@ Page Language="VB" ErrorPage="URL" EnableViewState="true">
@ Control
Similar to the way the Page directive is used for an ASP.NET page (an .aspx file), the Control directive is used for an ASP.NET control (an .ascx file). (We get into developing ASP.NET controls in Section 7.5.4 later in this chapter.)
@ Import
We can use the Import directive to add namespace references to the current page. Your code can access all classes and interfaces of imported namespaces. For example, if you want to use ADO.NET, you would include the following code:
<%@ Import Namespace="System.Data" %>
<%@ Import Namespace="System.Data.OleDb" %>
A number of namespaces are automatically imported into all ASP.NET pages to simplify the developers’ task:
| System |
| System.Collections |
| System.Collections.Specialized |
| System.Configuration |
| System.IO |
| System.Text |
| System.Text.RegularExpressions |
| System.Web |
| System.Web.Caching |
| System.Web.Security |
| System.Web.SessionState |
| System.Web.UI |
| System.Web.UI.HtmlControls |
| System.Web.UI.WebControls |
@ Implements
Because an aspx file is basically a Page class derivative, it too can also implement an interface. The @ Implements directive is used to declare that the aspx implements the specified interface. For example, the following line declares that the page implements the IPostBackEventHandler interface:
<%@ Implements Interface="System.Web.UI.IPostBackEventHandler" %>
@ Register
This directive registers custom server controls for use in the current page by specifying the aliases to be used as prefixes for class names. It is used in conjunction with the custom server-control elements to provide a concise way of specifying server-control names. The following line of code registers a custom control to be used in this page:
<%@ Register Tagprefix="Ch07"
             TagName="MyCustomControl
             Src="MyCustomControl.ascx" %>
The name of the control is MyCustomControl; the
prefix used when declaring the control is Ch07;
the source for the control is in
MyCustomControl.ascx. (We demonstrate this when we
develop our ASP.NET controls later in this chapter.)
If the server custom control was not done through .ascx but instead, through inheriting UserControl, the syntax for the Register directive is the following:
<%@ Register Tagprefix="MyCustomCtrl"
             Namespace="MyNamespace"
             Assembly="MyDll.dll" %>
@ Assembly
The Assembly directive specifies the assembly to which the current page belongs. This effectively makes all the classes and interfaces belonging to the assembly accessible to the current page. For example, the following line of code specifies that the current page belong to the Ch07 assembly:
<%@ Assembly Name="Ch07" %>
This means that code in this page can access anything in the Ch07
assembly as long as the Ch07 assembly is compiled and placed in the
bin subdirectory of this web
application.
@ OutputCache
You can use the OutputCache directive to control the output-caching duration for the current page. This is similar to setting up the expiration for the response object in ASP programming. The Duration attribute of the OutputCache directive defines the time in seconds until the page expires.
@ Reference
The @ Reference directive is used to add a reference to a page or a control to this aspx page.
Code Declaration Blocks
As in ASP,
code declaration
blocks define the code to be parsed and run for the page.
In these blocks, the runat attribute specifies
whether the code block is client-side or server-side code. For
server-side programming, set this attribute to
server. If you ignore the runat
attribute, IIS will interpret the code block as client-side code,
which is used for
Dynamic HTML (DHTML).
<script runat="server" [language="codelanguage"]>
  Code
</script>
For both client- and server-side code declaration blocks, you can also use the src attribute to point to an external source file containing the code. This helps separate the code from the HTML content of the page. The value for src can be a relative path or a URL to a source file. The URL can be on the same or a different web server:
<script runat="server"
  [language="codelanguage"]
  [src="externalfilename"] />
Code-Rendering Blocks
There are no changes to this syntax versus that
in ASP. Inline code or inline expressions specified in these
code-rendering blocks are executed when the page is rendered. All
these blocks are enclosed between the tags
<% and
%>. The language used in these tags is
specified in the language attribute of the Page directive.
HTML-Control Syntax
HTML controls are very similar to standard HTML elements, with the
exception of the id and the
runat attributes. If you’ve
developed web applications with DHTML, you should be familiar with
the id attribute of an HTML element and how to
programmatically reference the client-side control representing the
HTML element. The difference in this case is that the control is not
on the client side but on the server side. For example, the following
code represents an HTML server button control:
<input id="cmd1" runat="server"
  type="button" value="Click Me" />
All HTML server controls must be inside a <form
runat="server"> control because Web Forms use
the POST method
to maintain the controls’ states.
When encountering an HTML element tagged with id
and the
runat attribute set
to server, ASP.NET creates the appropriate
scriptable server HtmlControl object. For example, the previous HTML
snippet generates a server HtmlControl of type HtmlInputButton that
has an id of cmd1.
You can bind an event handler to this control’s event to handle notification from this control, such as the onclick event. There are two ways to bind an event handler to a control’s event, the declarative way and the programmatic way. The declarative is done inside the HTML element tag as an attribute/value pair. The attribute is the name of the event, and the value is the name of the event-handling function. For example, to handle the onclick event, add this to the previous HTML tag:
onserverclick="handleServerClick"
The programmatic way to bind an event to the handler involves a line of code that assigns a delegate to the event property of the control. In C#, the code to bind the ServerClick event of the button to the event handler handleServerClick is:
cmd1.ServerClick += new System.EventHandler(handleServerClick);
If you’ve used client-side DHTML in your web
applications, event binding should be nothing new to you, except for
some subtle differences. The first difference is obvious: the event
handler runs on the server before the page is sent back to the
browser, instead of running on the client side. The other difference
is that all event-handler functions for server-side must have two
parameters: Sender and Event. The Sender parameter is of type
object, indicating the source element that caused
the event to happen; the Event parameter is of type
EventArgs, which is the actual event fired. In
DHTML scripting, we would inspect the window.event object to find out
which element was the source of the event and other event
information.
Custom-Control Syntax
Similar to HTML Server Controls,
custom
controls also have id and
runat attributes; however, custom controls are not
standard HTML elements. To insert a custom control into a page, use
the following syntax:
<tagprefix:tagname id="controlID" runat="server" eventname=
  "eventHandler" />
Notice that all custom controls’ tags have a tag prefix, which is an alias to the namespace in which the control is defined. See the Register directive earlier in this chapter for information on registering namespaces’ aliases. Binding events to their handlers for custom controls is the same as for HTML controls. Even though we show the two ways of binding events, it is preferable to bind events using the second method because it cleanly separates the HTML tags from the code behind the screen.
All web controls mentioned in the WebControls namespace can be
inserted in the same manner (these controls have the prefix
asp). For example, you can have the following tags
in your aspx page:
<asp:TextBox id=txt1 runat=server></asp:TextBox>
<asp:Button id=cmd1 runat=server Text="Web Button"></asp:Button>
<asp:Label id=label1 runat=server></asp:Label>
These tags result in three objects generated from the three classes: TextBox, Button, and Label, from the System.Web.UI.WebControls namespace. In your server script, you can access and manipulate these objects to render your page appropriately.
Data-Binding Expressions
Data-binding expressions bind the server controls with some data sources. The syntax to bind data is:
<%# data-binding-expression %>
Examine the following block of code to see the simplest data binding:
<asp:Label text='<%# TestData %>' runat=server/>
The data-binding expression here indicates that the
label’s text content is bound to a publicly defined
property, TestData, of the Web Form. This means that when data
binding occurs for the form, <%#
TestData
%> will be replaced
by the content of the TestData property. Let’s
define this property for the Web Form:
public string TestData = "Hello World";
The Web Forms page framework does not perform data binding automatically. The developers must explicitly call the DataBind( ) method to activate the evaluation of the data-binding expression and perform the substitution. We can call the page’s DataBind method upon the page-load event or whenever we change the TestData property and want it reflected on the page. This example calls DataBind( ) upon page load to bind the Label’s text to the TestData variable:
<html>
  <head><title>Data Binding Sample</title></head>
  <body>

    <script language="C#" runat=server>
      /* Declare the variable we want to bind to. */
      public string TestData;
      void Page_Load(Object oSender, EventArgs oEvent) {
        TestData = "Hello World!
";
        Page.DataBind(  );
      }
    </script>

    <asp:Label text='<%# TestData %>' runat=server/>

  </body>
</html>
Let’s try something a little more complicated. In
the next block of tags, we have three labels bound to three different
properties of an object called currStudent:
Name: <asp:Label text='<%# currStudent.FirstName %>' runat=server/>
<asp:Label text='<%# currStudent.LastName %>' runat=server/> <br/>
SSN: <asp:Label text='<%# currStudent.SSN %>' runat=server/>
The currStudent object is a publicly accessible
property of the current page:
<script language="C#" runat=server>
  public class CStudent {
    /* Declare the variable we want to bind to. */
    public string FirstName;
    public string LastName;
    public string SSN;
  }
  public CStudent currStudent;

  void Page_Load(Object oSender, EventArgs oEvent) {
    currStudent = new CStudent(  );
    currStudent.FirstName = "Jack";
    currStudent.LastName = "Daniel";
    currStudent.SSN = "123-45-6789";
    Page.DataBind(  );
  }

</script>
You can have this currStudent object filled with
data coming from any source then perform a DataBind call to update
the page with the current student’s information. The
assumption here, of course, is that the Student class provides the
previously mentioned properties.
Server-Side Object Tags
Server-side object tags statically declare and instantiate COM and .NET objects. The syntax to declare server-side objects in global.asax is:
<object id="id" runat="server" scope="scope" class=".NET class name">
<object id="id" runat="server" scope="scope" progid="COM ProgID">
<object id="id" runat="server" scope="scope" classid="COM classID">
Scope can be pipeline, application, or session, which means the object is available on the page, as an application variable, or as a session variable, respectively. To dynamically add a server-side object to the page, you would use the Page.LoadControl( ) method or just instantiate the control directly.
Other Elements
Server-side includes server-side comments and literal text which are exactly the same as in ASP. Therefore, we will not go over them here.
ASP.NET Application Development
In conventional ASP programming, developers typically access the Request object to get the parameters needed to render the page and render the content of the page through either the Response object or code-rendering blocks. We also use other ASP objects such as the Application, Session, and Server objects to manage application variables, session variables, server settings, and so on.
As mentioned earlier, ASP.NET is intended to change all this spaghetti madness by introducing a much cleaner approach to server-side scripting framework: Web Forms, or programmable pages, and server controls.
In the following sections, we cover the components of a Web Form, its life cycles, the server controls that the Web Form contains, event-handling for these server controls, as well as how to create your own server controls.
Web Form Components
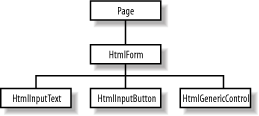
Similar to VB Forms, a Web Form consists of two components: the form with its controls, and the code behind it that handles events associated with the form’s controls. A Web Form has the file extension .aspx and contains HTML elements, as well as server controls. The code behind the form is usually located in a separate class file. Note that while it is possible to have both the form and the code in one file, it is better to have separate files. This separation of user interface and application code helps improve the spaghetti-code symptom that most ASP-based applications are plagued with.
ASP.NET provides the Page class in the System.Web.UI namespace. This class encapsulates all common properties and methods associated with web pages. The code behind the class derives from this Page class to provide extensions specific to the page we’re implementing. The aspx file provides the form layout and control declarations. Figure 7-4 illustrates the relationship between the Page base class, the Web Form code behind the class, and the Web Form user interface (UI).
As a Web Form developer, you will have to provide the latter two. The Web Form UI is where you declare server controls with appropriate IDs. The code behind the class is where you programmatically access server controls declared in the Web Form UI, as well as handle events from these controls. The following simple example shows the aspx page, the code behind source file, and how they work together. The aspx file (TestEvent.aspx) contains only HTML tags and a directive that links to the code behind:
               <%@ Page language="c#" codebehind="TestEvents.cs" inherits="CTestEvents"%>
<html>
  <head><title>Testing Page Events with codebehind</title></head>
  <body>
    <form runat=server>
      Init Time: <asp:Label id=labelInit runat=server/><br/>
      Load Time: <asp:Label id=labelLoad runat=server/><br/>
      <input type=submit />
    </form>
  </body>
</html>
The code-behind, TestEvents.cs, contains the class CTestEvents to which the aspx page is referring:
using System;

public class CTestEvents : System.Web.UI.Page {
  protected System.Web.UI.WebControls.Label labelInit;
  protected System.Web.UI.WebControls.Label labelLoad;

  public CTestEvents(  ) {
    labelInit = new System.Web.UI.WebControls.Label(  );
    labelLoad = new System.Web.UI.WebControls.Label(  );
  }

  public void Page_Init(Object oSender, EventArgs oEvent) {
    labelInit.Text = DateTime.Now.ToString(  );
  }

  public void Page_Load(Object oSender, EventArgs oEvent) {
    labelLoad.Text = DateTime.Now.ToString(  );
    if(IsPostBack) {
      labelLoad.Text += "(PostBack)";
    }
  }
}
You must compile TestEvents.cs and place the DLL in the /bin directory under your web application’s virtual directory before trying to access the aspx page.[4]
The command to compile this C# file is:
csc /t:library TestEvents.cs
ASP.NET parses the Web Form files to generate a tree of programmable objects, where the root is the Page-derived object representing the current Web Form. This is similar to how the IE browser parses the HTML file and generates a tree of scriptable objects to be used in DHTML; however, the tree of objects for the Web Form files resides on the server side.
As you are already aware from our survey of the System.Web.UI namespace, the Page class actually derives from the Control class. In a sense, a Web Form is a hierarchy of Control-derived objects. These objects establish the parent-child relationship through the Parent and Controls properties.
Besides the Controls and Parent properties, the Page class also provides other useful properties, which are familiar to ASP developers—such as the Request, Response, Application, Session, and Server properties.
Because the Web Form is nothing but a programmable page object, using this object-oriented model is much more intuitive and cleaner than the conventional ASP development. As opposed to the linear execution of server-side scripts on an ASP page, ASP.NET enables an event-based object-oriented programming model.
Let’s take an example of a web page that contains a form with numerous fields. One or more of these fields display list information from a database. Naturally, we have code in the ASP page to populate these fields so that when a user requests this ASP page, the generated page would have the content ready. As soon as the last line of data is written to the browser, the ASP page is done. This means that if there were errors when the user submits the form, we will have to repopulate all the database-driven form fields, as well as programmatically reselect values that the user chose prior to submitting the form. In ASP.NET, we don’t have to repopulate the database-driven fields if we know that the page has already been populated. Furthermore, selected values stay selected with no manual handling. The next couple of sections describe the concept in more detail.
Web Form events
The Page class exposes events such as Init, Load, PreRender, and Unload. Your job as a developer is to handle these events and perform the appropriate task for each of these stages. This is much better than the linear execution model in ASP programming because you don’t have to worry about the location of your initialization scripts.
The first event that happens in the life of a Web Form is the Init event. This is raised so that we can have initialization code for the page. Please note that because the controls on the page are not yet created at this point, this initialization should only contain code that does not rely on any controls. This event is raised once for each user of the page.
Most developers are more familiar with the Load event that follows the Init event. Subsequently, it is raised each time the page is requested. When this event is raised, all child controls of the Web Form are loaded and accessible. You should be able to retrieve data and populate the controls so that they can render themselves on the page when sent back to the client.
The following example shows the how the Init and Load events can be handled in ASP.NET. In this example, we show both the HTML and its code together in one file to make it simpler:
<html>
  <head><title>Testing Page Events</title></head>
  <body>

    <script language="C#" runat="server">
      void Page_Init(Object oSender, EventArgs oEvent) {
        labelInit.Text = DateTime.Now.ToString(  );
      }

      void Page_Load(Object oSender, EventArgs oEvent) {
        labelLoad.Text = DateTime.Now.ToString(  );
        if(IsPostBack) {
          labelLoad.Text += "(PostBack)";
        }
      }
    </script>

    <form runat="server">
      Init Time: <asp:Label id="labelInit" runat="server"/><br />
      Load Time: <asp:Label id="labelLoad" runat="server"/><br />
      <input type="submit" />
    </form>
  </body>
</html>
The first time you access this page, the Init event happens, followed by the Load event. Because these events happen quickly, both the Init Time and Load Time will probably show the same time. When you click on the submit button to cause the page to reload, you can see that the Init Time stays what it was, but the Load Time changes each time the page is reloaded.
The PreRender event happens just before the page is rendered and sent back to the client. We don’t often handle this event; however, it depends on the situation. You might want to alter the state of some of the “server-side” objects before rendering the page content.
The last event in the life of a Web Form is the Unload event. This happens when the page is unloaded from memory. Final cleanup should be done here. For example, while unloading you should free the unmanaged resources that you’ve allocated at the Init event.
Beside these page-level events, controls on the page can raise events such as ServerClick and ServerChange for HtmlControls, as well as Click, Command, CheckedChanged, SelectedIndexChanged, and TextChanged events for WebControls. It is the handling of these events that makes ASP.NET truly dynamic and interactive.
The Life Cycle of a Web Form
In ASP, the web page starts its life when a client requests a particular page. IIS parses and runs the scripts on the ASP page to render HTML content. As soon as the page rendering is complete, the page’s life ceases. If you have forms that pass data back to the ASP page to be processed, the ASP page runs as a new request, not knowing anything about its previous states. Passing data back to the original page for processing is also referred to as postback.
In ASP.NET, things are a little different. The page still starts at the client’s request; however, it appears to stay around for as long as the client is still interacting with the page. For simplicity’s sake, we say that the page stays around, but in fact, only the view states of the page persist between requests to the page. These view states allow the controls on the server to appear as if they are still present to handle server events. We can detect this postback state of the page via the IsPostBack property of the Page object and forego certain costly reinitialization. The handling of events during these postbacks is what makes ASP.NET so much different than conventional ASP development.
In the following example, we extend the previous example to handle
the postback. When the Load event is handled for the first time, we
populate the drop-down list box with data. Subsequently, we indicate
only the time the event is raised without reloading the data. This
example also demonstrates the server event handler
handleButtonClick
that was bound to the ServerClick event of the
button:
<html>
  <head><title>Testing Page Events</title></head>
  <body>

    <script language="C#" runat="server">
      void Page_Init(Object oSender, EventArgs oEvent) {
        labelInit.Text = DateTime.Now.ToString(  );
      }

      void Page_Load(Object oSender, EventArgs oEvent) {
        labelLoad.Text = DateTime.Now.ToString(  );
        if(!IsPostBack) {
          selectCtrl.Items.Add("Acura");
          selectCtrl.Items.Add("BMW");
          selectCtrl.Items.Add("Cadillac");
          selectCtrl.Items.Add("Mercedes");
          selectCtrl.Items.Add("Porche");
        } else {
          labelLoad.Text += " (Postback)";
        }
      }

      void handleButtonClick(Object oSender, EventArgs oEvent) {
        labelOutput.Text = "You've selected: " + selectCtrl.Value;
        labelEvent.Text = DateTime.Now.ToString(  );
      }
    </script>

    <form runat="server">
      Init Time: <asp:Label id="labelInit" runat="server"/><br/>
      Load Time: <asp:Label id="labelLoad" runat="server"/><br/>
      Event Time: <asp:Label id="labelEvent" runat="server"/><br/>
      Choice: <select id="selectCtrl" runat="server"></select><br/>
      <asp:Label id="labelOutput" runat="server"/><br/>
      <input type=button value="update"
             OnServerClick="handleButtonClick" runat="server" />
    </form>

  </body>
</html>
The life cycle of a Web Form consists of three main stages: Configuration, Event Handling, and Termination. As mentioned earlier, these stages span across many requests to the same page, as opposed to the serving-one-page-at-a-time policy found in ASP.
Init and Load events map to the configuration stage (i.e., when the page is first requested and each time the page is reloaded via postbacks). Events such as Button.Click and ListControl.SelectedIndexChanged map to the Event Handling stage, where user interactions with the page are handled via postbacks. The Termination stage involves the Dispose method and the Unload event. The postbacks allow the ASP.NET web page to appear like a continuous thread of execution while spanning multiple, full round-trips. In the old ASP world, each round-trip is a brand new request to the page unless the developer has built in a custom and elaborated framework similar to that of ASP.NET.
Configuration
In the Configuration stage, the page’s Load event is raised. It is your job to handle this event to set up your page. Because the Load event is raised when all the controls are already up and ready, your job is now to read and update control properties as part of setting up the page. In the previous code example, we handled the Load event to populate the drop-down list with some data. We also updated the labelLoad control’s Text to display the time the Load event happens. In your application, you will probably load the data from a database and initialize form fields with default values.
The page’s IsPostBack property indicates whether
this is the first time the page is loaded or if it is a postback. For
example, if you have a control that contains a list of information,
you will only want to load this control the first time the page is
loaded by checking the IsPostBack property of the page. When
IsPostBack is true, you know that the list control
object is already loaded with information. There is no need to
repopulate the list. In the previous code example, we skipped over
the population of the drop-down and just displayed a string
"(Postback)“.
You might need to perform data binding and re-evaluate data-binding expressions on the first and subsequent round trips to this page.
Event handling
In this middle stage, the page’s server event-handling functions are being called as the result of some events being triggered from the client side. These events are from the controls you’ve placed on the Web Form. Figure 7-5 depicts the life cycle of an event.

Termination
At this stage, the page has finished rendering and is ready to be discarded. You are responsible for cleaning up file handles, releasing database connections, and freeing objects. Although you can rely on the CLR to perform garbage collection of managed resources for you, we strongly advise you to clean up after yourself because garbage collection only happens periodically. On heavily loaded systems, if the garbage-collection cycle is not optimal, the unfreed resources can still exhaust memory and bring your system to a halt.[5]
We can perform the cleanup for the previous example with the Unload event handler shown as follows. Because there is nothing to clean up in this simple example, we just show you the function as a template:
 void Page_Unload(Object oSender, EventArgs oEvent) {
   // Cleaning up code here
 }
Server Controls
As we saw from the System.Web.UI.HtmlControls and System.Web.UI. WebControls namespaces, server controls are programmable controls that run on the server before the page is rendered by ASP.NET. They manage their own states between requests to the same page on the server by inserting a hidden field that stores the view state of the form. This eliminates the need to repopulate the value of form fields with the posted value before sending the page back the client.
Server controls are also browser-independent. Because they are run on the server side, they can rely on the Request.Browser property to get the client’s capability and render appropriate HTML.
Since the server controls are just instantiations of .NET classes, programming the server controls yields easy-to-maintain code. Especially when you have custom server controls that encapsulate other controls, web application programming becomes nothing more than gluing these blocks together.
All HTML controls and web controls mentioned in System.Web.UI.HtmlControls and System.Web.UI.WebControls are server controls shipped with ASP.NET.
Custom Server Controls
As you become more familiar with the ASP.NET framework and the use of server controls on your Web Form, you will eventually need to know how to develop these server controls yourself. In ASP.NET, there are two ways of creating custom server controls: the pagelet approach, which is easy to do but rather limited in functionality, and the Control base class (or UserControl) derivative approach, which is more complicated but also more powerful and flexible.
Pagelets
Until
recently, code reuse in ASP development has
been in the form of server-side includes. If you have common UI
blocks or scripts, you can factor them into an include file. Use the
syntax <!--
#include
file="url"
--> to include the common file into the main
page to return to the browser. This approach is fine, but it has
serious limitations. The main thing is to make sure the HTML tag IDs
and script variable names are unique. This is because
IIS does nothing more than merge the
include file when it parses server-side includes. The include file
ends up being in the same scope with the container file. You cannot
include the same file twice because there will be tag ID and script
conflicts.
With ASP.NET, you can factor out common HTML and scripts into what is currently called a pagelet and reuse it without worrying about the ID conflicts. A pagelet is a Web Form without a body or a form tag, accompanied by scripts. The HTML portion of the pagelet is responsible for the layout and the user interface, while the scripts provide the pagelet with programmability by exposing properties and methods. Because the pagelet is considered a user control, it provides an independent scope. You can insert more than one instance of the user control without any problem.
The container Web Form must register the pagelet as a user control
with the
@Register directive and
include it on the page with the
<
prefix:tagname
>
syntax. If more than one copy of the pagelet is used in a container
page, each of them should be given different IDs for the container
page’s script to work correctly. The script on the
container Web Form can access and manipulate the pagelet the same way
it does any other server controls. The next example shows how an
address form is reused as a pagelet. You might display this address
form to allow the web user to register with your application or to
display the shipping and billing addresses when the web user checks
out:
<table>
  <tr>
    <td><asp:Label id="labelName" runat="server">Name</asp:Label></td>
    <td><asp:TextBox id="txtUserName" runat="server"
         Width="332" Height="24"></asp:TextBox></td>
    </tr>
  <tr>
    <td><asp:Label id="labelAddr1" runat="server">Address</asp:Label></td>
    <td><asp:TextBox id="txtAddr1" runat="server"
         Width="332" Height="24"></asp:TextBox></td>
    </tr>
  <tr>
    <td><asp:Label id="labelAddr2" runat="server"></asp:Label></td>
    <td><asp:TextBox id="txtAddr2" runat="server"
         Width="332" Height="24"></asp:TextBox></td>
    </tr>
  <tr>
    <td><asp:Label id="labelCity" runat="server">City</asp:Label></td>
    <td>
    <asp:TextBox id="txtCity" runat="server"></asp:TextBox>
    <asp:Label id="labelState" runat="server">State</asp:Label>
    <asp:TextBox id="txtState" runat="server" Width="34" Height="24">
      </asp:TextBox>
    <asp:Label id="labelZIP" runat="server">ZIP</asp:Label>
    <asp:TextBox id="txtZIP" runat="server" Width="60" Height="24">
      </asp:TextBox>
    </td>
    </tr>
  <tr>
    <td><asp:Label id="labelEmail" runat="server">Email</asp:Label></td>
    <td><asp:TextBox id="txtEmail" runat="server"
         Width="332" Height="24"></asp:TextBox></td>
    </tr>
</table>

<script language="C#" runat="server" ID="Script1">
  public String UserName {
    get { return txtUserName.Text; }
    set { txtUserName.Text = value; }
  }
  public String Address1 {
    get { return txtAddr1.Text; }
    set { txtAddr1.Text = value; }
  }
  public String Address2 {
    get { return txtAddr2.Text; }
    set { txtAddr2.Text = value; }
  }
  public String City {
    get { return txtCity.Text; }
    set { txtCity.Text = value; }
  }
  public String State {
    get { return txtState.Text; }
    set { txtState.Text = value; }
  }
  public String ZIP {
    get { return txtZIP.Text; }
    set { txtZIP.Text = value; }
  }
</script>
To use your pagelet, register it as a server control via the
@Register directive, as shown in the next block of
code. After registering, include the tag for the pagelet as if it was
a normal server control. Specify the prefix, the tag name, the server
control’s ID, and set the runat
property to server:
<%@ Register TagPrefix="Acme" TagName="Address" Src="Address.ascx" %>
<%@ Page language="c#"%>
<html>
<head>
  <script language="C#" runat="server">
    void Page_Load(Object oSender, EventArgs evt) {
      addr.UserName = "Jack Daniel";
    }
  </script>
</head>
<body>
    Welcome to the E-Shop.
    Registering with E-Shop will allow for monthly updates of bargains . . .
  <form method="post" runat="server">
    <p><Acme:Address id="addr" runat="server"></Acme:Address></p>
    <p><asp:Button id="cmdClear" runat="server" Text="Clear"></asp:Button>
       <asp:Button id="cmdSubmit" runat="server" Text="Submit">
       </asp:Button></p>
  </form>
</body>
</html>
You should be able to programmatically access the properties of the
pagelet through the server control’s ID
(addr in this case). In the previous example, we
accessed the UserName property of the Address pagelet via its ID:
addr.UserName = "Jack Daniel";
For an e-commerce checkout page, you could have two instances of
<Acme:Address> on the same page: one for the
billing and the other for the shipping address. Your script should
access these instances of the pagelet via the ID you assign to each
address control.
You can also programmatically instantiate instances of the pagelet
through the use of the Page’s
LoadControl method. The first thing is to
declare a variable of type Control in your script to host your
pagelet. This is because the Control is the root of all objects,
including your pagelet. Then instantiate the variable with a call to
the LoadControl, passing in the filename of the control page. To make
the control visible on the page, add the control to the
Page’s collection of controls. Because you currently
have an instance of the Control object, you won’t be
able to call the pagelet’s properties and methods
until you cast the variable from Control type to
your pagelet type. This is similar to having an Object variable in
Visual Basic to hold a COM component. To access the COM-component
methods and properties, you would cast the Object variable to the
component type. Pagelets when loaded are automatically typed as
pagename_extension. For example, if your pagelet
were named myControl.ascx, the type generated
for it would be myControl_ascx. The boldface line
in the following example shows you how to cast
addr1 from Control to type
Address_ascx in order to access the UserName
property of the pagelet:
<%@ Register TagPrefix="Acme" TagName="Address" Src="Address.ascx" %>
<%@ Page language="C#" %>
<html>
<head>
  <script language="C#" runat="server">
    void Page_Load(Object oSender, EventArgs evt) {
      addr.UserName = "Jack Daniel";
      Control addr1;
      addr1 = LoadControl("Address.ascx");
      ((Address_ascx)addr1).UserName = addr.UserName;
      this.frm.Controls.AddAt(3, addr1);
    }
  </script>
</head>
<body>
  <form id="frm" method="post" runat="server">
    Billing Address:<br/>
    <Acme:Address id="addr" runat="server"></Acme:Address>
    Shipping Address:<br/>
    <p><asp:Button id="cmdClear" runat="server" Text="Clear">
       </asp:Button>
       <asp:Button id="cmdSubmit" runat="server" Text="Submit">
       </asp:Button>
    </p>
  </form>
</body>
</html>
This example, the checkout page, shows you how to declare a pagelet
statically in your page with the
<Acme:Address> tag, as well as how to
dynamically create an instance of the custom control
Address with the Page’s
LoadControl( ) method. Once you’ve created the
control dynamically, you must cast the object to the control type
before manipulating it.
The AddAt( )
method is used to insert the Address pagelet at a particular location
in the checkout page. Instead of declaring the dynamic pagelet as a
Control, you can also declare it as its type, which is
Address_ascx. This way, you have to cast it only
once when loading the dynamic control:
Address_ascx addr2 = (Address_ascx)LoadControl("Address.ascx");
addr2.UserName = "ABC";
Control derivatives
Although it is easy to create custom controls using the pagelet approach, this technique is not flexible enough to create more powerful custom controls, such as ones that expose events or hierarchy of controls. With ASP.NET, you can also create custom controls by inheriting from the Control base class and overriding a couple of methods.
The following example shows you how to create the simplest custom control as a Control derivative:
namespace MyWebControls
{
  using System;
  using System.Web.UI;
  using System.Web.UI.WebControls;
  using System.ComponentModel;

  public class MyWebControl : System.Web.UI.WebControls.WebControl
  {
    //protected override void Render(HtmlTextWriter output)
    //{
    //    output.Write("custom control testing via Render(  )");
    //}

    protected override void CreateChildControls(  )
    {
      Table tbl = new Table(  );
      TableRow row = new TableRow(  );
      TableCell cell = new TableCell(  );
      HyperLink a = new HyperLink(  );
      a.NavigateUrl = "http://msdn.microsoft.com";
      a.ImageUrl = "image url";
      cell.Controls.Add (a);
      row.Cells.Add(cell);
      tbl.Rows.Add(row);

      row = new TableRow(  );
      cell = new TableCell(  );
      cell.Controls.Add (new LiteralControl("custom control testing"));
      row.Cells.Add(cell);
      tbl.Rows.Add(row);

      tbl.BorderWidth = 1;
      tbl.BorderStyle = BorderStyle.Ridge;

      Controls.Add(tbl);
    }
  }
}
As you can see, the MyWebControl object derives from the WebControl
class. We have seen that WebControl ultimately derives from the base
Control class. All we really do here is override either the Render or
the CreateChildControls methods to construct the custom web control.
If you choose to override the Render method, you will have to
generate the HTML for your custom control through the HtmlTextWriter
object,
output. You can use
methods such as Write, WriteBeginTag, WriteAttribute, and
WriteEndTag.
In our example, we override the CreateChildControls method. Instead of worrying about the actual HTML tag and attribute names, we then create ASP.NET objects directly by their class names, such as Table, TableRow, TableCell, HyperLink, and LiteralControl, to construct a hierarchy of objects under a table. We can also manipulate attributes for the objects via their properties. At the end of the method, we add the table to the custom control’s collection of controls.
You will have to compile the previous control code to generate a DLL
assembly (i.e., csc
/t:library
MyWebControls.cs). To use the control, deploy the
assembly by copying it to the /bin directory of
your web application. Then you should be able to register the control
with the
@Register directive and
use it as if it was a server control provided by ASP.NET. If you are
using Visual Studio .NET, you can add a reference to the control
assembly file or the control project for the test web project that
uses the control.
Your custom-control test page should now look like the following:
<%@ Page language="c#"%>
<%@ Register TagPrefix="WC" Namespace="MyWebControls"
Assembly="MyWebControls"%>
<html>
<head>
<script language="C#" runat=server>
void Page_Load(object sender, EventArgs e) {
MyWebControls.MyWebControl myCtrl;
myCtrl = new MyWebControls.MyWebControl( );
this.Controls.Add(myCtrl);
}
</script>
</head>
<body>
<form method="post" runat="server">
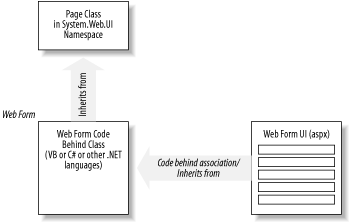
This is the main page
<WC:MyWebControl id="myControl1" runat="server" />
</form>
</body>
</html>As you can see, we register the custom control with the
@Register directive and alias the namespace
MyWebControls with the WC prefix. In the body of
the Web Form, we can add the custom-control tag as
<WC:MyWebControl>.
In addition to inserting the custom control onto the page declaratively, as shown earlier, we can also programmatically create the custom control at runtime. The Page_Load code demonstrates this point:
 MyWebControls.MyWebControl myCtrl;
 myCtrl = new MyWebControls.MyWebControl(  );
 this.Controls.Add(myCtrl);
The output page is shown in Figure 7-6.
Event-Driven Programming
There are two ways to associate event handlers—functions that handle the event—to the UI controls.
Refer to Section 7.4 earlier in this chapter, particularly where we
describe the syntax for server controls. All we do to bind an event
from a control to an event handler is use the
eventname
=
eventhandlername
attribute/value pair for the control. For example, if we want to
handle the onclick event for the HTML control
input, all we do is the following. Note that for the HTML controls,
the server-side click event is named
onserverclick, as opposed to the client-side click
event, onclick, which can still be used in DHTML
scripting:
<input id="cmd1" runat="server"
  onserverclick="OnClickHandler"
  type="button" value="click me">
For an ASP.NET web control, the syntax is the same:
<asp:Button id="cmd2" runat="server"
  onclick="OnclickHandler2"
  Text="click me too"></asp:Button>
After binding the event to the event-handling function name, we have to provide the actual event handler:
void OnClickHandler(object sender, EventArgs e)
{
  // Code to retrieve and process the posted data
}
The second way of binding events is delegation. You
don’t have to have any notion of code in the
aspx file, not even the event-handling function
name. All you have to do is register the event handler with the
control’s event-handler property. For web controls,
the event-handler property for button click is
Click. For HTML controls, it’s
ServerClick:
ControlID.Click += new System.EventHandler (this.EventHandlerName);ControlID.ServerClick += new System.EventHandler (this.EventHandlerName);
Custom Server Controls and Client Script
Although ASP allows for the generating of dynamic pages from the server, the HTML generated usually needs the help of client-side scripting to provide a richer user experience. Again, in ASP.NET, the Server Controls are not meant to just generate static HTML. Client-side scripts can still be incorporated to further enhance the user interaction. There are two general way of doing this. The first is to include the client-side scripts within the body of the ASPX page, or somewhere the custom control can get to. The second way is to make the custom control emit its related client-side script while rendering. Either way, the client-side events will need to be tied to the script either through declarative means (i.e., attributeEvent=eventHandler) or programmatically through adding attributes to the rendering control dynamically. This is also where we can use the ClientId property of the Control object to allow client-side script to refer to the control on the client side.
We show two examples in this section to describe how you can do both. The pros and cons for each of these should be weighed technically as by other factors, such as time and usage of the control. For example, if you write the custom control for internal use in your company and the time-to-market is extremely short, you might opt to just include the client-side script manually because it might be easier to debug and change client or server-side code independently. On the other hand, if the custom control you are writing will be distributed widely, you might want to package it so that the control users do not have to worry about having to set up any external scripts. Enough said, let’s see some examples. In this first example, we change the simple custom control shown earlier to include some invocation of client-side script and add the client script to the test page that uses the control:
namespace MyWebControls
{
   . . .

  public class MyWebControlWithClientScriptV1 :
  System.Web.UI.WebControls.WebControl
  {
    protected override void CreateChildControls(  )
    {
       . . .
      cell.Controls.Add (new LiteralControl("custom control testing"));
      cell.Attributes.Add("onmouseover", "MouseOverHandler(this);");
                     cell.Attributes.Add("onmouseout", "MouseOutHandler(this);");
      row.Cells.Add(cell);
       . . .
    }
  }
}
The changes from the custom control are highlighted. Basically, we just add two attributes “onmouseover” and “onmouseout” to the cell that contains the text “custom control testing” to call two client-side functions: MouseOverHandler and MouseOutHandler, respectively. What we need to do now is add these two client-side script functions to the custom control test page:
<%@ Page language="c#" Trace="true"%>
<%@ Register TagPrefix="WC" Namespace="MyWebControls"
Assembly="MyWebControlWithClientScriptV1"%>
<html>
<head>
<script language="javascript">
function MouseOverHandler(ctl) {
ctl.style.color="red";
}
function MouseOutHandler(ctl) {
ctl.style.color="black";
}
</script>
</head>
<body>
<form id="myForm1" method="post" runat="server">
<WC:MyWebControlWithClientScriptV1 id="myControl1" runat="server" />
</form>
</body>
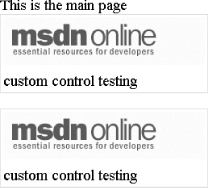
</html>The two client-side script functions change the color of the text within the custom control when the mouse moves over and out of it.
As you can see, in order to use this version of the custom control, you have to know to include the client-side script functions to avoid errors. This is not ideal if you are writing custom control for a living. We move on to the second example where you don’t have to do anything special to use the custom control.
Let’s start with the test ASPX page:
<%@ Page language="c#" Trace="true"%>
<%@ Register TagPrefix="WC" Namespace="MyWebControls"
             Assembly="MyWebControlWithClientScriptV2"%>
<html>
<head>
</head>
<body>
  <form id="myForm1" method="post" runat="server">
    <WC:MyWebControlWithClientScriptV2 id="myControl1" runat="server" />
  </form>
</body>
</html>
Notice that there is no client-side script block and the class name for the control is V2.
Now on the control side, we add the following block of code in the overridden CreateChildControls method:
      if(!Page.IsClientScriptBlockRegistered("myScript")) {
        string sScript =
@"
<!-- ctrl generated -->
<script language=""javascript"">
    function MouseOverHandler(ctl) {
      ctl.style.color=""red"";
    }
    function MouseOutHandler(ctl) {
      ctl.style.color=""black"";
    }
</script>
<!-- ctrl generated -->
";
        Page.RegisterClientScriptBlock("myScript", sScript);
Here, we basically ask the Page (that hosts the control) to see if “myScript” has been registered. If not, we register the included script with the name “myScript”. When the control is rendered to the browser, the script will be rendered only once for this version of the control.
This example is just to demonstrate how client-side scripts can be inserted into the stream rendering to the browser. In practice, you might only render the script header block that points to an external script file that you’ve installed on a specific location on the web server. This improves performance in the long run by having the client-side script file cached by the browser. In case you really don’t want anybody to change the client-side script that you have installed on the web server, you can include the client-side script file in your assembly as a resource. You can then load and register the script block from the DLL file.
ASP.NET and Caching
When talking about caching in ASP.NET, there are two kind of caching you should know. “Output caching” involves caching the generated html for part or the whole ASPX page so that it can be resent to the client without regenerating the cache content. The second type of caching in ASP.NET is application specific “Application data caching”. Here you write code to cache data generated via expensive operations so that you don’t have to regenerate the data for every request. Output caching is done through a declarative mean and it’s automatic while Application data caching is programmable and flexible but not automatic.
Let’s look at the following simple ASPX file:
<%@ Page language="c#" %>
<html>
<body>
  <form id="frm1" runat="server">
    Page generated: <% DateTime t = DateTime.Now; Response.Write(t); %><br/>
  </form>
</body>
</html>
If you browse to this ASPX file, you will see the time the page was generated on the server. Every time you refresh your browser, the page is regenerated.
You can cache the content of this page by just adding the output cache directive:
<%@ OutputCache duration="30" varybyparam="none" %>
With this change, every time you refresh the browser within 30 seconds from the first request, the page does not get regenerated.
There are attributes associating with the OutputCache directive dealing with:
- Duration
How long the item stays in the cache (in seconds).
- Location
Where the cache is stored (for an ASPX file).
- Shared
Whether the cached item can be shared with multiple pages (for an ASCX file).
The rest of the attributes specify how to uniquely cache the item
based on differences by control IDs, by HTTP header variables, by
QueryString variables or Form variables, and by custom management
(VaryByControl, VaryByCustom,
VaryByHeader, VaryByParam).
The example shows that we cache the page with no distinction on param. Of course, you can set it up so that the system will cache multiple versions of the page based on params.
Now that we know how to cache pages or controls on a page, let’s take a look at how application content caching has changed from ASP. In ASP, developers have used Application variables or even Session variables as the cache mechanism. This works fine, but there are a number of considerations the developers have to worry about around issues such as memory resource and freshness of data. ASP.NET introduces the Cache object that is associated with each instance of ASP.NET application. You can add items into this Cache collection with priority, duration (absolute duration or relative to latest access), file or key dependencies (so that when the file, directory, or dependent cache item changes, the cache item is cleared. In addition, you can also have call-back function so you will know when the cache item is removed from the cache.
<%@ Page language="c#" %>
<script runat="server" language="c#">
  void Page_Load(  ) {
    if(Cache["myItem"] == null) {
      Cache.Insert("myItem", // Cache name
               DateTime.Now, // Cache data
               null, // Cache dependency
               DateTime.Now.AddSeconds(30), // Absolute
               TimeSpan.Zero // Relative
                   );
    }
    myLabel.Text = Cache["myItem"].ToString(  );
  }
</script>
<html>
<body>
  <form id="frm1" runat="server">
    <asp:Label id="myLabel" runat="server"></asp:Label>
  </form>
</body>
</html>
The above code behaves similar to the output cache example we had earlier. The cache item, which is the current date time value is stored for 30 seconds. In the real world, you would probably cache something that would cost a little more than DateTime.Now, such as a DataSet that contains a number of rows or tables from a database.
For the second example, let’s see how we can cause the cache to refresh the data using the dependency. We continue with the previous example and add the following code to Page_Load to load myDoc.xml into the cache and display this xml content in myLabel2. The cache dependency specifies that when myDoc.xml is changed, this cache item should be invalidated:
    if(Cache["myItem2"] == null) {
      System.Xml.XmlDocument oDoc = new System.Xml.XmlDocument(  );
      oDoc.Load(Server.MapPath("myDoc.xml"));
      Cache.Insert("myItem2",
               oDoc,
               new CacheDependency(Server.MapPath("myDoc.xml")));
      myLabel2.Text = "<br/>Refresh time: " + DateTime.Now.ToString(  );
    }
    myLabel2.Text += "<xmp>"
               + ((System.Xml.XmlDocument)Cache["myItem2"]).InnerXml
               + "</xmp>";
We also have to add another label object inside the form tag:
<br/>
<asp:Label id="myLabel2" runat="server"></asp:Label>
Now if you navigate to this test page for the first time, the first label will be the date time on the server and the second label will contain “Refresh time” and the xml in myDoc.xml. Refreshing the page won’t reload the xml file until this file is modified.[6]
ASP.NET and Web Services
The ASP.NET framework simplifies development of web services.[7] All the low-level work, such as packaging and unpackaging data in XML format and utilizing HTTP protocol to transport the web messages between distributed components, are done by the framework. This allows the developers to focus on the application logic.
The .NET Framework uses asmx as the default file extension for web services, as opposed to aspx for Web Forms and ascx for web controls.
The WebService Directive
All
asmx files start with
the
@WebService directive that instructs ASP.NET on
how to compile the code, as well as the main class name. The
WebService directive has the following attributes:
- Language
Specifies the language in which the code was written. This instructs the ASP.NET framework to use the appropriate compiler to build your web service. Use
VBfor Visual Basic,C#for C#, andJSfor JScript .NET. As other languages emerge, obviously you can specify other languages.- Class
Specifies the main class, which exposes web methods. The ASP.NET framework instantiates this class in order to serve the web methods to the clients.
- Codebehind
Specifies the source file for your code, which allows for complete code/ASP separation.
You can easily create a simple Web Service similar to the following asmx file:
<%@ WebService
               Language="VB" class="MathClass" %>
imports System.Web.Services
Public Class MathClass
  <WebMethod> _
  public function Add(a as integer, b as integer) as integer
    return(a + b)
  end function
end class
Note the line continuation symbol right after
<WebMethod>. If you prefer to separate your
code completely from any ASP.NET elements, you could have the code
for your Web Service saved in a separate file and specify the
Codebehind attribute of the
@WebService directive to point to the code file:
<%@ WebService Language="VB" Codebehind="MathClass.vb" Class="MathClass" %>
The source for MathClass.vb looks exactly like the asmx shown earlier minus the first line. You can use the following command line to compile MathClass.dll:
vbc /t:library /r:System.Web.Services.dll MathClass.vb
As with all code-behind, the binary has to be deployed in the /bin directory under the application.
The WebMethod Attribute
Public methods of any classes can be tagged with the WebMethod attribute to be made accessible from the Web. The syntax for tagging attributes to methods is different for each .NET language. For example, in C# the tag takes the following form:
[WebMethod(attribute="value" attribute="value"  . . . )]
    public returnType FunctionName(paramsList)
In VB, angle brackets are used instead of square brackets and the assignment symbol is “:=” instead of just “=”. Also note that the whole web method declaration is on a single line. If you want to separate them for readability, use the line continuation symbol “_”:
<WebMethod(attribute:="value"attribute="value" . . . )> Public Function FunctionName(paramsList) as returnType <WebMethod(attribute:="value"attribute="value" . . . )> Public Sub SubName(paramsList)
Using Web Services
If you are
using Visual Studio .NET, you can choose
Project/Add Web Reference and then type in the URL where the Web
Service resides.[8] For our purpose,
we’ll point to the Web Service we created in the
last chapter, PubsWS. The URL to this Web Service on our server is
http://localhost/PubsWS/PubsWS.asmx. The default
web reference name is the server name where the Web Service was
found. After adding the web reference, you can access the proxy
object to the Web Service you are calling via the type
servername.proxyObjectName. For your case, it is
localhost.PubsWS.[9]
The following code excerpt demonstrates how to use the Web Service
through the proxy. We create an instance of the proxy object and then
ask it to relay the message to the real Web Service to get the list
of authors. The result will be streamed back in XML format, which is
reconstructed into a DataSet object. We then bind
DataGrid1, which is just a DataGrid object that we
have on the Web Form, to the default view of the first table of the
DataSet. Finally, we ask for the actual binding to take place. The
resulting page is the grid populated with rows from the Authors table
of the Pubs sample database:
localhost.PubsWS ws = new localhost.PubsWS(  );
DataSet ds = ws.GetAuthors(  );
DataGrid1.DataSource = ds.Tables[0].DefaultView;
DataGrid1.DataBind(  );
Instead of using Visual Studio .NET to locate and automatically generate the proxy class, you can also use the information from the previous chapter to generate the source for the proxy class yourself. You can then include or compile the source into a DLL and add the DLL to the project as a reference. In any case, the end result is the same. Here is an example that links against the proxy we created in the previous chapter and fills a grid with data:
<%@ Page Language="C#" %>
<%@ Import Namespace="System.Data" %>

<!-- Link to the proxy generated by wsdl.exe -->
<%@ Assembly Src="PubsWS.cs" %>

<html>
  <head>
    <title>SOAP Client</title>
  </head>
  <body>

  <!-- Make the SOAP call and fill the data grid. -->
  <%
    PubsWS ws = new PubsWS(  );
    DataSet ds = ws.GetAuthors(  );
    dg.DataSource = ds.Tables[0].DefaultView;
    dg.DataBind(  );
  %>

  <!-- Create a data grid. -->
  <asp:DataGrid id="dg" runat="server"/>

  </body>
</html>
Data Binding and the Use of Templates
Although all web controls can be data bound, only DataGrid, DataList, and Repeater use a template to control the display of data items. In this section, we show you how to perform simple data binding with some common web controls and how to use an HTML template to provide fully customized data-bound controls.
In ASP.NET, data binding between a control and its data source simply means that the data is copied from the source and placed onto the control upon the call to the DataBind( ) method. This is different than data binding in Windows Forms, where a link is maintained between the control and the data source. We cover Windows Forms and data binding in the next chapter.
In its simplest form, data binding is the act of binding a control to a data source. Previously, data binding required that an ADO recordset be a data source, which is not too flexible. There was no way to bind, for example, an array or a collection of objects to a control. With ASP.NET, the whole data-binding business is revamped. The only requirement to make your data source bindable to web controls is that your data source implements the System.Collections.ICollection interface. In other words, a bindable data source is a collection of homogeneous objects that the web controls can obtain data items from.
Although it is possible to write your own data classes that implement the ICollection interface and bind them to web controls, numerous classes exist that do this for you, such as Array, ArrayList, DataView, HashTable, Queue, SortedList, and Stack. All you have to do is put your data in these forms, and you can bind your data to web controls.
Here is the simplest form of data binding. In the form file, all we
have are two list boxes with ids
list0 and list1:
<asp:listbox id="list0" runat="server"></asp:listbox>
<asp:listbox id="list1" runat="server"></asp:listbox>
In the Page_Load event handler in the code-behind source file, we construct the data sources of type Array, which implement the ICollection interface we mentioned earlier, and then bind the list controls with the data sources:
int[] myArray0 = new int[7] { 1, 2, 3, 5, 7, 11, 13 };
string[] myArray1 = new string[7] {
                               "Monday",
                               "Tuesday",
                               "Wednesday",
                               "Thursday",
                               "Friday",
                               "Saturday",
                               "Sunday"
                                  };
list0.DataSource = myArray0;
list0.DataBind(  );
list1.DataSource = myArray1;
list1.DataBind(  );
Figure 7-7 shows the output of this page.

Most of the time, we tend to bind data from data sources that come
from a database. The next example pulls data from the Categories
table of the familiar NorthWind database. We can still use the
asp:listbox control, but this time, we specify the
item’s property we want for the text, as well as the
value property of the list box. We did not have to do this for the
previous example because the items that the list box binds to are of
simple types (int and string). If we were to have an array of
objects, we would have to specify the property we want to bind to
datavaluefield and
datatextfield the way we do in the following
example:
<asp:listbox id=ListBox1 runat="server"
    datavaluefield="CategoryID"
    datatextfield="CategoryName">
</asp:listbox>
Again, in the code-behind source file, we have the code to construct the data source and to bind the data source to the list control. Note that because we are using ADO.NET to get the data from the database, we must have references to System.Data and System.Data.OleDb namespaces. The DefaultView property of class Table is of type DataView, which implements the ICollection interface:
System.Data.DataSet m_ds = new System.Data.DataSet(  );
String sConn =
    "provider=SQLOLEDB;server=(local);database=NorthWind;Integrated Security=SSPI";
String sSQL =
    "select * from Categories";

System.Data.OleDb.OleDbDataAdapter da =
    new System.Data.OleDb.OleDbDataAdapter(sSQL, sConn);
da.Fill(m_ds, "Categories");

ListBox1.DataSource = m_ds.Tables["Categories"].DefaultView;
ListBox1.DataBind(  );
Figure 7-8 shows the output for this example.

DataGrid
The DataGrid control takes data binding a step further by allowing more than one property of the bound item to be displayed. This section’s example shows you how to control the binding of data columns to the grid, as well as how to customize the look and feel of the DataGrid using style.
By default, the DataGrid automatically binds all columns of the data
source in the order that they come from the database. Sometimes this
is not the behavior you would want. To fully control what columns
bind and in which order you want the binding to happen, switch off
the autogeneratecolumns attribute of the DataGrid,
and provide the columns property, as shown in the following sample:
<asp:DataGrid id=DataGrid1 runat="server"
      ForeColor="Black"
      autogeneratecolumns=false>

  <columns>
    <asp:boundcolumn datafield=CategoryID
                     headertext="ID" readonly=True/>
    <asp:boundcolumn datafield=CategoryName
                     headertext="Category" />
    <asp:boundcolumn datafield=Description
                     headertext="Description" />
  </columns>

  <SelectedItemStyle backcolor="#ffcc99" font-bold=True/>

  <AlternatingItemStyle BackColor="Gainsboro"/>

  <FooterStyle BackColor="Silver" ForeColor="White"/>

  <ItemStyle BackColor="White"/>

  <HeaderStyle BackColor="Navy" Font-Bold="True" ForeColor="White"/>

</asp:DataGrid>
Figure 7-9 shows the result of this example.

In addition to using asp:boundcolumn to bind a
column of the DataGrid to a column of the data source, you can also
use asp:buttoncolumn to insert a column with
buttons that generate notifications. You can handle these
notifications to perform predefined tasks such as selecting the item,
removing it, and adding it to the shopping basket. You can also have
asp:hyperlinkcolumn insert links to other pages in
a column, asp:editcommandcolumn control editing of
the selected row of data, or asp:templatecolumn
customize the display of your column of data.
There are a number of styles that you use to control the visual formatting of your DataGrid control. The HeaderStyle and FooterStyle, as the names imply, control the style for the header and the footer of the DataGrid. The ItemStyle, AlternatingItemStyle, SelectedItemStyle, and EditItemStyle are used for each type of items in the list. The PagerStyle controls the visual appearance and layout of the paging interface.
The code-behind source file for binding data to the DataGrid is similar to that of the previous example. Basically, we bind the set of the DataSource property of the DataGrid to the DefaultView of the Categories table and perform the binding with the DataBind method:
DataGrid1.DataSource = m_ds.Tables["Categories"].DefaultView;
DataGrid1.DataBind(  );
DataList
Unlike the DataGrid control, where the data binding is still in a tabular form, the DataList control allows to you lay out the list in any way[10] through the use of HTML templates.
Within a DataList tag, you can customize a number of templates. The templates that can be customized include:
| AlternatingItemTemplate |
| EditItemTemplate |
| FooterTemplate |
| HeaderTemplate |
| ItemTemplate |
| SelectedItemTemplate |
| SeparatorTemplate |
Specific tags are used to set up the style for each type of items you want to display. Similar to the previous list, you also have ItemStyle, SelectedItemStyle, and so on.
In the following example, we only show you one template, the ItemTemplate, which is applied to all items in the list. In this template, we use Web Form data-binding syntax to bind two properties of the data item, the CategoryID and CategoryName fields. In this simple template, the CategoryID will always be shown with Verdana font in size 10.
You can also control the flow of the DataList by setting attributes
such as repeatcolumns,
repeatdirection (vertical, horizontal), or
repeatlayout (flow, table):
<asp:DataList id=DataList1 runat="server"
    repeatcolumns=3
    repeatdirection=Horizontal>

  <AlternatingItemStyle BackColor="Gainsboro"/>
  <ItemTemplate>
    <font face=Verdana size=10>
      <%# DataBinder.Eval(Container.DataItem, "CategoryID") %>
    </font>
    <%# DataBinder.Eval(Container.DataItem, "CategoryName") %>
  </ItemTemplate>

</asp:DataList>
The code behind the data binding is shown here:
DataList1.DataSource = m_ds.Tables["Categories"].DefaultView;
DataList1.DataBind(  );
Figure 7-10 shows the output of this DataList data-binding example.
Repeater
The ASP.NET Repeater control is completely driven by an HTML template to repeatedly display each of the data items bound to it. When the page renders, the Repeater control loops through all the records in the data source and generates HTML to display the record according to the HTML template. This is as free-form as you can get for data binding. You can have templates to generate bulleted lists, numbered lists, comma-separated lists, and tabs. Unlike the DataGrid or DataList that use an HTML table to control the layout of the data, the Repeater control does not add any HTML of its own. You can specify the layout however you want using the templates described below.
There are only five templates in the Repeater control:
| AlternatingItemTemplate |
| FooterTemplate |
| HeaderTemplate |
| ItemTemplate |
| SeparatorTemplate |
We will use two of these templates to control the display of the item and its separator.
Again, we bind two fields of each item to the template. The end
result is a comma-separated list of URLs that link another Web Form
to display more detailed information about the clicked category. As
you can see, we also use Web Form data-binding tags,
<%# and %>, to perform
the binding. The CategoryID fills the cat
parameter of the query string to the fictitious
DisplayCategory.aspx Web Form, and the
CategoryName is the display text for the anchor tag.
You could also replace the anchor tag and comma with graphical images to make your page more visually appealing:
<asp:Repeater id=Repeater1 runat="server">

  <ItemTemplate>
    <A HREF="http://YourURL/DisplayCategory.aspx?cat=
   <%# DataBinder.Eval(Container.DataItem, "CategoryID") %>"
  ><%# DataBinder.Eval(Container.DataItem, "CategoryName") %>
    </A>
  </ItemTemplate>
  <SeparatorTemplate>, </SeparatorTemplate>

</asp:Repeater>
Figure 7-11 shows the result of using the data repeater to bind data.
As with the other controls, the Repeater needs to be bound to a data source:
Repeater1.DataSource = m_ds.Tables["Categories"].DefaultView;
Repeater1.DataBind(  );
As you can see, using a template to bind data to these list-bound controls can be very simple, yet powerful. However, you should be aware of how the generated HTML will look. You should not have complicated, bloated templates that will result in unappealing, large files. In web application development, the page size is directly proportional to the response time the customer experiences.
State Management and Scalability
ASP.NET overcomes all major limitations of ASP when it comes to managing session states. As you are aware from ASP development, a session state is nothing but a named variable that is cached at the server for the duration of the web user’s session. As the user navigates through the web application, the session state retains its value as long as the session is not expired.
ASP session-state management can be summarized as follows:
The session starts, and the web application assigns a unique key to the user.
This key is stored in an HTTP cookie. Along each subsequent request, the client browser sends the unique key back to the server.
The server looks up the states stored for this particular key and processes the request accordingly.
Although this has worked fine for all these years, we’ve found out that there were a number of limitations to live with or work around. The biggest limitation is that the session state is process-dependent, which is impossible to implement in a web farm environment without custom session management.
ASP.NET Session-State Management
ASP.NET improves on ASP session-state management by giving you the option to move to an out-of-process model. By having all web servers in the farm pointing to a common server that hosts the out-of-process state manager, the web client can be redirected around the farm without losing the session states.
By using an out-of-process model, we no longer have the problem of losing session states when the IIS process is cycled. This means that if the web server application crashed for whatever reason and restarted within the session timeout duration, the web clients could still have all their session states intact. Of course, if the out-of-process state manager crashed, that is a whole different issue. This leads to the next improvement of ASP.NET—the ability to persist session state to a database.
The idea of persisting session state to a database is not new. Many of us have implemented this as the workaround for dealing with web farm configuration. However, ASP.NET makes it easier.
Similar to all other configurations in ASP.NET, session management is done through the use of the web.config files. There are two levels of configuration: machine and application. Machine-level configuration associates with the machine.config file stored in WinNTMicrosoft.NET Framework<version>CONFIGmachine.config, while the application-level configuration uses the web.config file in the application root directory. The application-level configuration overrides the machine-level configuration.
The following code is a portion of the web.config file dealing with session-state management:[11]
<configuration>
  <system.web>
    <sessionState
      mode="InProc"
      cookieless="false"
      timeout="20" />
  </system.web>
</configuration>
Table 7-2 lists the properties of the SessionState class.
|
Property |
Description |
|
| |
|
Specifies whether to rely on the client acceptance of cookie. If this
property is set to | |
|
Specifies session timeout in minutes. This is a sliding window of time: it starts counting down for each request. The default is 20 minutes. | |
|
Specifies the server and port of the remote session-state server (not
a SQL Server). The format is
| |
|
Represents a SQL Server connection string, such as
|
Out-of-process session-state management
When you set the session-state mode to run
on a remote server (mode=StateServer), you must
prepare the remote server to run the state management service
automatically.
ASP.NET SDK includes an NT service call
ASP.NET State
Service to be used for out-of-process session-state
management. Before setting your web.config files
to use the out-of-process mode, you will have to start the ASP State
service by going to the NT Services Management Console and start the
service. You might want to change the startup
type to automatic so that this service
will start automatically at subsequent reboots.
SQL Server session-state management
To use this mode, the SQL Server machine has to be prepared.
ASP.NET SDK includes a SQL script to create the ASP State database,
which is where all session states are stored. Find this SQL script
(InstallSqlState.sql) at
%SystemRoot%Microsoft.NETFrameworkBUILDNUMBER.
To apply the script to your SQL Server, use the SQL Server
command-line tool osql.exe or SQL Query
Analyzer. We use the latter because it allows us to inspect the
script to get a better understanding of how this mode of session
management is implemented. You will have to stop and restart SQL
Server because the script alters the master to run
the ASPState_Startup helper procedure at SQL
startup time.
Cookieless session-state management
In ASP development, it is a usual practice to impose the requirement that the clients’ web browsers be set up to accept cookies so that we can use session state the way it is meant to be used. However, when this requirement is not in place, especially for business-to-consumer (B2C) kinds of applications, the developers have to package the session ID along with the URL as a variable in the query string or as a form field and manage the session states manually.
With ASP.NET, as you can see from the sessionstate
section of the configuration file, all you do is flip the setting of
cookieless to true, and
everything is automatically done for you. Session state can be used
as if nothing has changed.
To setup and experiment with these session-state configuration,
we’ve created two fictitious
asp.net pages: login.aspx and
main.aspx. The main page redirects the user to the
login page if the user has not logged in. The login page redirects
the user to the main page when the user is authenticated. When the
user logs in, session variable UserName will be
populated.
The following is the source for the simplified login page:
<HTML>

<script language="VB" runat="server">
Sub cmdLogin_Click(ByVal sender As System.Object, _
                   ByVal e As System.EventArgs)
  ' more processing here
  Session("UserName") = txtUID.Text
  Response.Redirect("Main.aspx")
End Sub
</script>

<body>
<form id="Form1" method="post" runat="server">
<table>
  <tr>
    <td>User ID</td>
    <td><asp:TextBox id="txtUID"
                     runat="server"></asp:TextBox></td>
    </tr>
  <tr>
    <td>Password</td>
    <td><asp:TextBox id="txtPWD"
                     textmode="password"
                     runat="server">
                     </asp:TextBox></td>
    </tr>
  <tr>
    <td></td>
    <td><asp:Button id="cmdLogin"
                    runat="server"
                    Text="Login"
                    onclick="cmdLogin_Click">
                    </asp:Button></td>
    </tr>
</table>
</form>
</body>
</HTML>
The skeleton for the main page is as follows:
<HTML>

<script language="VB" runat="server">
Sub Page_Load(ByVal sender As System.Object, ByVal e As System.EventArgs)
  If (Session("UserName") <> "") Then
    labelData.Text = "Welcome back, " + Session("UserName")
  Else
    Response.Redirect("Login.aspx")
  End If
End Sub
</script>

<body>
<form id="Form1" method="post" runat="server">
  <asp:Label id="labelData" runat="server"></asp:Label>
</form>
</body>
</HTML>
In the first scenario, we will use session-state mode
InProc. Because the IIS process handles the
session state, if we simulate a web server restart by issuing the
command iisreset and trying to refresh the main
page, it will redirect us to the login page.
In the second scenario, we change the session-state mode to
StateServer and start the ASP.NET Session State
Service (i.e., the command line net
start
aspnet_state). Note that
here we are running the Session State Service on the same machine as
the web server even though we can have this service running on a
separate server for more reliability. This time around, the session
state persists through the resetting of the web server. Of course, if
we restart the ASP.NET Session State Service itself, the main page
will still redirect us to the login page.
Now that we’ve seen in-process and out-of-process
session-state management, the last scenario we try will be to have
session state persisted to a database. This is as simple as setting
the mode and the
sqlConnectionString attributes of the
sessionState node in the
web.config file. Of course, we ran
InstallSqlState.sql on the SQL server to generate
theschema and supporting stored procedures needed by ASP.NET to
persist state into the database. The result is similar to the
previous trials, however. Because the session data are stored in
tempdb, they are cleared when the SQL server is
restarted. As a side note, remember to have SQL Server Agent start
automatically so that the cleanup session-state job can be run
correctly.
Performance Versus Scalability and Reliability
As we’ve said, ASP.NET introduces an out-of-process model of session-state management, which enables more scalable solutions, but not without a cost. Out-of-process communication performs much worse than in-process communication, not to mention persisting the session states to a database. You should weigh the benefits of each of the different modes of state managements to find the one that is most suitable for your application. Table 7-3 summarizes the different modes and their trade-offs.
|
Mode |
Description |
|
This mode gives you the best performance. It is not reliable, because it is memory-based. It is not scalable, because it is process-based. If you are setting up a web farm, you will have to make sure that subsequent requests are going to the same server. | |
|
The reliability factor is still in question because this mode is still memory based. However, because a separate process manages the session state, it is more reliable than the in-process mode. Because of the out-of-process communication overhead, it is much slower than in-process mode. It is scalable for use in web farms. | |
|
This mode gives you the highest level of reliability at the cost of performance. It is scalable for use in web farms. |
Forms Authentication in ASP.NET
The previous example in the session management section only demonstrates how session state can be managed in ASP.NET. If you want to expand the example to handle your application authentication, every single aspx file in addition to main.aspx should check for the session variable “UserName” and redirect to the Login.aspx file if this session variable is not found. This is too much work, at least in the .NET world. We take this opportunity to show you how to do forms authentication in ASP.NET. By definition, forms authentication is basically a setup where unauthenticated requests are automatically redirected to a designated login form. Once the user provides the login information and the login form processes it successfully, the user is then redirected back to the original page along with an “authenticated cookie.” Subsequent requests do not get redirected to the login form until the cookie expires.
The first thing you will have to do is edit the
web.config file to set the authentication mode to
“Forms” and setup the URL for the
login page and the name of the authentication cookie:
<configuration>
  <system.web>
    <authentication mode="Forms">
      <forms loginUrl="login.aspx" name=".authToken"/>
    </authentication>
    <authorization>
      <deny users="?" />
    </authorization>
  </system.web>
</configuration>
In this web.config file, we’ve
specified that the authentication mode is
“Forms” for form-based
authentication. Other settings are
“Windows,”
“Passport,” and
“None” (case-sensitive), which we
will not cover in this book because of its size. The
loginUrl is where the system should redirect the
request if the user is not yet authenticated and the
name attribute is the name of the cookie to store
the authentication info. We also have to set up the authorization so
that this web application will deny all unauthenticated users.
Since we specify that the login URL is login.aspx, let’s see the content of this file:
<HTML>
<script language="VB" runat="server">
Sub cmdLogin_Click(ByVal sender As System.Object, _
                   ByVal e As System.EventArgs)
  ' more processing here
  FormsAuthentication.RedirectFromLoginPage(txtUID.Text, false)
End Sub
</script>
<body>
 . . .
</body>
</HTML>
Once we have authenticated the credentials, we call a helper method of FormsAuthentication object to redirect to whatever page the client was from. The first parameter is the user name and the second Boolean variable tells the function not to persist the cookie across browser sessions. Note the difference between this and the home-grown authentication via the session example we had earlier. Here, we don’t have to remember what URL to return to.
The main.aspx page now looks like this:
<HTML>
<body>
<script language="VB" runat="server">
Sub Page_Load(ByVal sender As System.Object, ByVal e As System.EventArgs)
    labelData.Text = "Welcome back, " + Context.User.Identity.Name
End Sub
Sub Logout(ByVal sender As System.Object, ByVal e As System.EventArgs)
    FormsAuthentication.Signout(  )
    Response.Redirect("Login.aspx")
End Sub
</script>
<form id="Form1" method="post" runat="server">
  <asp:Label id="labelData" runat="server">Label</asp:Label>
  <asp:Button id="cmdLogout" runat="server" onclick="Logout" Text="Logout"></asp:Button>
</form>
</body>
</HTML>
Summary
Throughout this chapter, we’ve introduced you to ASP.NET and the benefits that it brings to web application development. These benefits include a new and extended web page life cycle that involves events driven from the client browsers, server controls that manage their own states, the separation of user interface and the code behind, the replacement of late-bound scripting languages with strong-typed compiled languages, and the new and improved session-state management that improves scalability.
If you are trying to embrace the web paradigm by using ASP.NET for your web application, along with web services for integration between sites, you are right on target. However, not all applications are suitable for the Web. There is a huge market of standard applications where the development is done in traditional VB, C, C++, Java, and so on, and there is no need for it to be web-based. In the next chapter, we cover Windows Forms, which map to traditional Windows applications.
[1] Postback is the condition when an ASP page posts the data back to itself for processing. In conventional ASP programming, the states of the fields in the form have to be managed manually. In ASP.NET, we can have these field states managed automatically with a simple EnableViewState flag.
[2] The Page class derives from TemplateControl, which derives from the Control class.
[3] As noted in the Preface, the plus sign indicates one or more instances of the preceding term in brackets.
[4] The Web Application directory is the root virtual directory where your web application resides. To set up the virtual directory, use the IIS Administration Tool.
[5] These so-called logical memory leaks equate to areas where large blocks of memory (managed or unmanaged) were allocated and used for a brief amount of time but won’t be free automatically until it is out of scope. Because in ASP.NET the scope from the configuration phase to the termination phase is rather small, this problem does not appear to be that bad. For Windows Form applications or Windows Services, this problem, if undetected, could be catastrophic. The way to expedite the deallocation of objects is to set long-lived objects to null (or nothing in VB). If the object implements the IDisposable interface, call its Dispose method as soon as you can. The garbage collector won’t pick up this kind of unintentional memory usage if you have references to objects that are unused, yet remain in scope throughout the life of the application.
[6] This is merely an example to demonstrate the CacheDependency. Reading a file in a web application is dangerous, especially when there is no error handling code.
[7] We’ve seen web services in detail in Chapter 6. This section reviews web services briefly to remind you that the underlying support for web services is ASP.NET.
[8] In VS.NET 1.1, you can also browse the web services on your local machine in addition to browsing web services on UDDI servers.
[9] You can rename
the web reference when adding it to your project. This way the Web
Service will be
<yourwebservicename>.proxyObjectName
instead of
servername.proxyObjectName.
[10] For both the DataList and DataGrid controls, the table html tag is used to lay out the output. The difference is that the DataGrid actually uses the table to display tabular data while the DataList uses the table for the lay out only and flows the data into the rows in the table.
[11] The content of this file is case-sensitive.