Games are full of visual effects—probably even more than you realize. These effects are important not just as eye candy, but also for giving the player clues and information about what is happening in the game world. These effects also add a great deal to the level of immersion that a player will experience in a game. For example, in some games you can shoot at a wall and nothing will happen—did a bullet come out of your gun? In another you can shoot a wall and a few pixels may fly from the point of impact; how satisfying is that? Shoot a gun at a wall in a recent game of any quality and you will see a hole or abrasion on the wall, a small shower of debris fly from the point of impact, and a puff of dust dissipate into the air. Typically, if you shoot at any surface in a game—wood, metal, concrete, and their variations—you will see and hear a different effect for each surface. Effects also include the glow around a candle, light shafts from a window, even rain drops—and a whole lot more. The assets for these effects are fairly easy to create. Actually, asset creation is the easy part of creating effects in a relative sense. It does take work to create the art and it must look good, but the systems that run the effects can still be complex and challenging to work with. There are generally three types of effects for which you will create assets:
• Static
• Animated
• Particle
Most effects are based on a fairly simple texture and mesh set, and the texture and mesh of the static effect don’t move. Effects like the light beams streaming from the windows in the warehouse and fantasy settings and the glow around the candles in the fantasy setting are static effects. Some of the most common static effects are the marks left on a wall after the impact of a bullet, like those in the opening image of this chapter. The various impact marks on each of the different surfaces are all created in this chapter. See Figure 9.1 for an illustration of the bullet-hole image (with alpha) mapped to a two-triangle polygon to create the decal, and how it looks when placed in the world. Effects like the bullet holes are called decals, because they are displayed like a decal on a surface in the game world.
A bullet hole is easy to make; it’s the programmers who have the difficult job of getting the decal to appear at the right time, display correctly on the surface, fade away after a certain amount of time, and control of numerous other variables. Some game engines rotate the image, cycle through different images for each bullet hole, and even animate the images on the decal. Though usually simple, these effects add a lot to the game world they appear in.

FIG 9.1 An illustration of a bullet-hole decal—a simple texture with an alpha channel applied to a two-triangle polygon. Below: a row of bullet decals placed on a wall.
Animated effects are based on the texture/mesh arrangement, except that the texture is animated and plays like a mini-movie on the face of the mesh. There can be anywhere from a few to many frames in an animated progression, and the frames can exist as one large image or as separate images. As one large image, the separate frame images are displayed one after the other, and as separate images, the frames are all on one image and the game engine displays the various areas of the image in order. The program flips through these frames and plays the images like a movie.
Animated sequences were usually used as fire in previous games, blinking lights on a console, oozing blood, and many other effects. Fire was created by using a flat plane that always faced the camera and the animated sequence was mapped to it. Animated effects can also be applied to nonmoving models, like the lights of a computer console (Figure 9.2). I put the entire console image in the figure so that you can see the animation in context, but for a game the lights would be a separate image with an alpha channel to save memory. Some current games, and probably all future games, are increasingly using nonanimated particles, because the particle systems and the hardware have evolved enough that a much higher degree of control can be achieved, more particles and emitters can be used, and effects exist that process in real time that make the particle systems look much better than a static, or prerendered, asset.
Animated effects are still used to animate some decals, such as a weapons blast. Imagine the burst of energy from a blaster hitting a metal wall beside you in a space station. The blast mark is bright from the heat of the blast and the glow fades and shrinks as it quickly cools; see Figure 9.3. This animated sequence was made quickly in Photoshop. Animated images are a little more challenging to work with, and the job of creating a 2D animation for an effect often falls to the artist who may not be used to traditional animation, or have access and the knowledge to use a 3D package. Animated effects are commonly used in the muzzle blast from a gun and are often used for explosions and smoke, so you will most likely see them around a little while longer. You can use ImageReady to create and test animated effects.

FIG 9.2 Animated effects are based on the texture/mesh arrangement, except that the texture plays like a mini-movie. There are several frames in the animated progression, and the frames can exist as one large image or as separate images. The computer console is an example of an animated sequence in context.

FIG 9.3 The creation of an animated particle or decal doesn’t always have to be difficult. This laser blast was made quickly in Photoshop.
A particle system is a system that can display an assigned asset in great numbers (the asset is usually a small polygon—two triangles—with an applied texture that has alpha transparency on it). The system tracks the particles in 3D space using a set of parameters that the artist can change. These parameters typically alter the rate, size, speed, position, and life span of the particle, as well as telling the particle to shrink, fade, or always face the camera (which it usually does). Particles can even physically interact with the game world, colliding and bouncing off surfaces. Figure 9.4 shows the same scene with the same particle system in use with a different texture used in each scene. Actually, the particle used for all of the effects (except the sparks in the upper-left-hand corner) is mapped with the same texture; however, in each case the texture has been colorized with a different hue and saturation. The texture itself is simple to create:
1. Create a 512×512 image, black background.
2. Create a new empty layer.
3. Drag out a circular selection with a 22-pixel feather centered in the image.
4. Render clouds.
5. Select > Load Selection > Load the transparency of the layer.
6. Dodge, Burn, Airbrush, and/or Colorize this image to get the effect you want.
A particle system can be used to simulate a wide variety of effects from smoke to a flock of birds. Traditionally, the use of particle systems with a large number of particles coming from it was too big a drain on a computer, so the effects that game developers were able to achieve were limited. But as software gets more complex and game hardware more powerful, smoke and fire and other impressive effects are being very effectively generated using a much larger number of particles.

FIG 9.4 Particles are used in these scenes to create various effects such as sparks (upper left), gaseous flames (upper right), volcanic smoke or ash (middle), poisonous gas (lower left), and steam (lower right). These scenes use the same particle system, with a different texture used in each scene. Actually, the particle used for all of the effects (except the sparks) is mapped with the same texture. In each case, the texture has been colorized with a different hue and saturation.
Dealing with particle systems can be the most difficult part of effects work. Understanding and effectively using the systems that drive the particles, especially a good system with lots of options, can take a lot of time and patience. But even a complex particle system usually uses the same simple texture and geometry setup for the visual particles. See Figure 9.5 for the progression of a static magical sparkle. Figure 9.6 shows a simple particle system. In the upper set of images, the particles are represented by crosses (so that you can see what the particle system is actually doing), and the lower images are the same as the upper, but with the sparkle asset attached to each particle.

FIG 9.5 A magical spell starts with a small static sparkle.
The point at which the particles are spawned, or appear, is called an emitter. An emitter can be of any size. A small emitter with lot of particles coming out in a spray may be what you would use for a garden hose, whereas a very large emitter high in the sky of your game world with a few particles falling from it might be used for rain or snow. See Figure 9.7 for the effect of using different emitter sizes. Often, special particle systems are written for specific uses. Specific particle systems that handle weather effects, for example, are commonly created, because weather systems have a more limited function but cover a larger area than a typical full-featured particle system usually does. These special versions of a particle system allow the developers to make them run more efficiently, which is achieved in part by dropping many of the features a typical particle system has that are not needed for a more specific-use particle system. Emitters are typically represented by some sort of icon in the game editor, but are invisible in the game—you see only the assets spawning at the emitter point being controlled by the particle entity that they are attached to. Usually the game artist, when placing an emitter, makes sure that it looks as if the particles are coming out of something—not just from thin air.
Although a simple particle system may contain only an emitter, a polygon, and a texture, more complex particle systems can contain multiple emitters and multiple textures, and use 3D meshes as particles. An explosion is usually composed of a quick ball of fire and a spray of debris, then smoke that drifts from the blasted area and dissipates into the air. This effect is typically created using a blast decal and several systems, one for each effect: flash, debris, and smoke. Additionally, particle systems are usually associated with sound events. Sound adds a lot to the effect that a particle system has. What would rain be without the rumble of thunder? How effective would a silent explosion be? When a fire crackles as you get near it, it adds another level of realism and immersion to a game.

FIG 9.6 This is an illustration of a simple particle system, a magical spell. The upper set of images shows the particles represented by crosses, so that you can see what the particle system is actually doing, and the lower images are the same as the upper, but with the sparkle image attached to each particle.

FIG 9.7 Emitters are where the particles come from and can be of various sizes. The same number of particles is coming out of both emitters in the figure, but the wider emitter has spread the particles out over a larger area.
We will start with some simple weather effects and then tackle some of the more common effects for a game, such as lighting and weapons effects.
Weather
As complex as nature can be, the particles for the most common weather effects are easy to create. Rain and snow are both tiny simple images. You can see the effect that a few hundred of these tiny particles can have on a scene; see Figure 9.8. Notice that the images are blurred a little. The rain is blurred toward the back of the drop to simulate the blurring of a real rain drop as it falls to the ground.
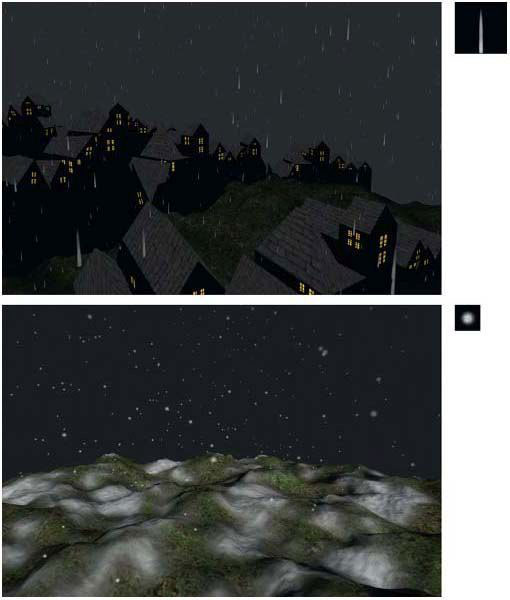
FIG 9.8 The particles for the most common weather effects are easy to create. Rain and snow are both tiny simple images. You can see the effect that a few hundred of these tiny particles can have on a scene.
Lighting
If you understand the math and science of light, then more power to you. But most of us mortals can understand this stuff only on a basic level—it can get really complex. Of course, it helps to understand how light works, but it is absolutely no guarantee that you can create the art that makes a light look good in a game. In fact, an artist is probably better served by observing a variety of light sources in various situations and studying them at a purely visual level than trying to wrap his or her mind around a subject that may have inspired an interest in art in the first place. Fortunately, we are artists and we have to make things look good, not write the code that controls the particle. Several of the more common lighting effects are easy to understand and recreate in a game setting. These effects are accomplished with a simple mesh and texture set. You have already seen a few of these effects in the previous chapters.
Light Shafts
Do you remember the shafts of light that streamed in from the windows in the warehouse and the windows in the fantasy setting? In the real world, light shafts are created when light passes through the atmosphere and reflects off tiny floating particles. Light shafts are prevalent in games because they look cool, but they can also be important visual clues. Presently light shafts are created using the simple mesh/texture set. In the future they will probably be rendered in real time, but for now, see Figure 9.9 for the components of the light shafts as I created them for the scenes in this book.
To produce that texture, I created an image that was 256 pixels wide and 1024 high. I turned on the Fade option in the Shape Dynamics for the brush and drew a few white lines with a soft brush from top to bottom. Then I Motion Blurred it down a few times and Gaussian Blurred it a little, too.
If you are able to use these textures in a 3D application, keep the following points in mind:
• Exclude the geometry from being affected by the light sources in the world so that it doesn’t cast a shadow.
• Turn the full-bright (or illumination) on the texture all the way up. When you do this, the texture displays at full brightness and seems to glow. Because light shafts are located near a source of light that is brighter than the surrounding (relative) darkness, they look great and will never be in a situation where they are bright for no reason (well, I guess you can make a door close and the light shafts will remain, but you shouldn’t do that).
• Turn collision off so that your light shafts don’t block anything (like real light); the collision process is a processor hit, so it’s always a good idea to turn collision off anything that doesn’t need it.

FIG 9.9 The components of the light shaft are a simple mesh and texture.
I have seen this effect augmented in some creative ways: with animated textures that make the shafts seem to waver or shift, with particle systems that simulate dust drifting through the light shaft, with a projected shadow like the one I used on the floor of the warehouse so it appears that the light is actually casting a shadow.
Candle Glow/Corona
At night, light sources often seem to have a glow or halo around them. This effect, in the real world, is caused by the light, the atmosphere between the light source and the viewer, and the viewer. As the light hits water droplets in the air, it is broken up into various colors based on the many variables that can exist in the light source (distance, color, brightness), the atmosphere (amount of moisture in the air, pollutants), and even the viewers’ eyes. Although a game might have one corona for many light sources, occasionally creating a few special-case coronas for drastically different-colored light sources, in reality each corona you see is unique because of the many variables involved. Fortunately, a game is usually designed around a theme or setting, which allows for the use of a smaller, more focused set of assets—coronas being one of them.
In the fantasy setting, we created a glow around the candle flame, which is also a corona but has a different texture made to look like a candle glow rather than an electric light source (see Figure 9.10). The light shafts are static, but a corona needs to move. To simulate a glow around a light source effectively, many games rely on a technique that uses a moving polygon with a simple corona or glow image mapped to it. The corona entity allows the artist to control several parameters that make the corona image shrink, grow, and fade in and out as the player moves toward and away from it.

FIG 9.10 The fantasy setting uses a glow around the candle flame, which is also a corona entity with a texture made to look like a candle glow rather than an electric light.
I actually created two glows for the candles in the fantasy scene: one that was more diffuse and faint for the background candle, and a brighter, more fanciful glow for the candle on the table in the foreground to give the impression that it is magical. See Figure 9.11 for the progression of both glows. The steps are as described here.

FIG 9.11 The progression of the candle glows.
Candle Glow, Faint and Diffuse
1. Create a new image, 1024×1024. I work this large so that I can get finer gradation in the glows. You do lose some of that when you resize, but I find that it makes the corona smoother.
2. Make a layer named center filled with black and snap two guides to the horizontal and vertical center of the image.
3. Create a new layer named lines.
4. Use a small, soft brush with the Fade option set to about 75 pixels.
5. Draw yellow-orange lines from the center to all four points of the compass. Copy, paste, and rotate this four times.
6. Filter > Blur > Gaussian Blur: 20 pixels.
7. Filter > Blur > Radial Blur: Amount 100, Quality Best.
8. Create the alpha channel in the same manner as you did for the candle flame in the fantasy chapter.
Candle Glow, Brighter and More Fanciful
1. Create a new image, 1024×1024.
2. Make a layer named center filled with black and snap two guides to the horizontal and vertical center of the image.
3. Create a new layer named lines.
4. Use a smaller, soft brush and set the foreground color to a very desaturated yellow: RGB 255,248,218.
5. Set the foreground color to white, reduce the brush size a few steps, and put a white center in the yellow circle.
6. Create a new layer named lines.
7. Invert your colors and use the desaturated yellow and a small, hard brush, 5 pixels. Draw lines across the canvas until you have a complete circle of tight thin lines. You can draw two lines using the guides and then copy, paste, and rotate them. Merge all the line layers together when you are done.
8. Use an inverted circular selection with a 42 feather to remove the ends of the lines.
9. Gaussian Blur this: 4 pixels.
10. Radial Blur this, too: Amount 100, Blur Method Zoom.
Traditional Corona
The traditional corona is a little more involved than a candle glow. You can use the Render > Lens Flare filter to get a variety of effects that are great references when creating a corona, but you can’t use the resulting lens flare as a corona texture, because you can’t render the effect on an empty layer, which makes the creation of a decent alpha channel a challenge. Also, the lens flare is meant to simulate the flare from a camera lens, not the glow from a light source, so there is a good deal of extra visual information in the effect that would be next to impossible to remove. The steps to create a corona start as the candle glow:
1. Create a new image, 1024×1024.
2. Make a layer filled with black, and snap two guides to the horizontal and vertical center of the image.

FIG 9.12 The progression of the traditional corona.
3. Create a new layer named center.
4. Use a large, soft brush and set the foreground color to white. Put the center white glow in.
5. Coronas can have many colors in them, but they should be subtle. We will start by creating a faint circle in the background. Create a layer named brownish circle behind the glow on the center layer. Use a circular marquee with a 22-pixel feather and fill it with a brown: RGB 80,71,59.
6. Create a new layer named ring1 under the center layer.
7. Set your foreground color to RGB 40,47,40.
8. Use the circular marquee with the 22-pixel feather still on it and stroke an 8-pixel line outside of the brownish circle.
9. You have the option of adding a circle or two more if you like. Ultimately, the corona’s color and intensity will be based on the setting it is in.
10. Either paint or smudge the white lines out from the center. Note that the lines are fewer than the fanciful candle glow and are of varying lengths.
11. Finally, Gaussian Blur this about 4 pixels. See Figure 9.12.
Weapons
Now we are going to tackle weapons effects. These can be the most involved and complex effects to set up, given the number of weapons in a typical game, the number of effects each weapon has associated with it, and the effect that the weapon’s projectile might produce when impacting any given surface of the game world. Though these effects are usually complex and involved to set up, the assets they use are fairly easy to create.
Muzzle Blasts
The plume of fire that discharges from the barrel of a weapon is called a muzzle blast. In reality, every type of weapon has a distinct muzzle blast, but most people can’t distinguish between the muzzle blasts from similar firearms to any great degree. A muzzle blast from a rifle will do the job for most rifles in a game, but a muzzle blast from a rifle on a handgun might be noticeable. Although the muzzle blast from various weapons will have various patterns and sizes, currently they are all made in the same basic fashion. They are a combination of geometry and texture. First, let’s look at the elements of the typical muzzle blast in Figure 9.13 and the complete muzzle blast in front of a backdrop (Figure 9.14).

FIG 9.13 The plume of fire that discharges from the barrel of a weapon—a muzzle blast—is created with a combination of geometry and texture. Upper right, the muzzle blast texture. Middle, the model of a gun with the geometry for the muzzle blast in place. Bottom, the muzzle blast with the texture and geometry together.

FIG 9.14 Here is the completed muzzle blast in front of a colored backdrop.

FIG 9.15 The progression of the steps to create the muzzle blast.
Here are the steps to create the muzzle blast. See Figure 9.15 for a visual progression of the steps below. To create the circular part of the muzzle blast, do the following:
1. Open a new 512×512 document in Photoshop with a black background.
2. Create a new layer named orange.
3. Set your foreground color to orange: RGB 255, 150, 0.
4. Use a very large soft brush (300 pixels) and put a large orange circle in the middle of the image using a horizontal and vertical guide.
5. Use a smaller, soft brush (200 pixels) and put a white circle in the middle of the orange circle.
6. Use the Smudge tool (27 pixels, 74%) and smudge out the color from the center of the image.
7. Filter > Distort > Ripple: Amount 75%, Size Large.
8. Filter > Blur > Radial Blur: Amount 10, Blur Method Spin, Quality Good.
9. Filter > Blur > Radial Blur: Amount 25, Blur Method Zoom, Quality Good.
To create the elongated part of the muzzle blast:
1. Open a new 512×512 document in Photoshop with a black background.
2. Create a new layer named orange.
3. Set your foreground color to orange: RGB 255, 150, 0.
4. Use a large, soft brush (100 pixels) and set the Shape Dynamics to Fade (25 pixels). Drag a long orange line from the bottom to the top.
5. Use a smaller brush (50 pixels) and set the Shape Dynamics to Fade (55 pixels). Drag a white line from the bottom to the top of the image.
6. Use the Smudge tool (27 pixels, 74%) and smudge out from the center of the image and upwards.
7. Filter > Distort > Ripple: Amount 75%, Size Large.
8. Filter > Blur > Motion Blur: Angle 90, Distance 25 pixels.
9. Filter > Blur > Radial Blur: Amount 25, Blur Method Zoom, Quality Good.
10. . I did a little more smudging to strengthen the flames.
Impact Effects: Bullet Holes and Debris
When you fire a gun in a game, the muzzle blast may be notable, but it’s the effect the bullet or projectile has on the surface it strikes that is really satisfying. If little to nothing happened when you fired a weapon, you wouldn’t feel as immersed or excited by the game. The effect is not only cool, but it also is an important interaction with the game world. In fact, a player is usually made aware of the effect his interaction has on the game world (other players being part of the game world) through visual effects. Impact effects give you important visual clues as to how close you are to hitting the target you are aiming at. It is a particularly tense event in a game to hear the sound of a bullet impact near you and see the hole and debris and realize that you are the target. In a stealth shooter, where you are both hunter and prey, this is an important part of game play. Of course, auditory and even tactile effects (vibrating controller) play an important role, too, but you can more easily play a game without speakers than without a monitor.
This section is entitled “Impact Effects,” with the additional phrase “Bullet Holes and Debris,” because almost any interaction with a game world is an impact that spawns an effect: weapons effects are just a subset of impact effects. But weapons effects are usually the most commonly needed and complex effects created for a game. I am limiting the examples of impact effects in this chapter to basic weapons effects, because the same principles apply to the creation of virtually all other effects. The bloody hole and red spray from a gunshot wound, the tracks left behind and dust kicked up by a vehicle’s tires in the desert, a swarm of insects, and most other effects are all created in the same manner as those effects created in this chapter.
Some effects are relatively simple—you fire a gun and blow dirt from the ground or leave a hole in a metal panel—but some can be pretty dramatic. In some games, you can shoot a window and blow the glass pane into a thousand shards. If you are in the position of creating effects such as these for a game, you will quickly realize that you need a spreadsheet to track the weapon types, ammunition or projectile, world surfaces, and the description and needed assets for each impact effect. This spreadsheet can also include the associated sound files and even special case events like malfunctions and misfires. Here I will walk you through the basics of creating impact effects for an average bullet on the most common surfaces.
First, we list the most common surfaces in an average game world:
• Cloth
• Concrete (plaster)/brick
• Dirt
• Glass
• Grass
• Metal
• Water
• Wood
For each of these surfaces, we must create a texture that the game engine can display over the surface (like a decal) and look as if a bullet left a mark at the point of impact. We also need to create a particle/debris image for each surface and variations for some of the surfaces. For example, a bullet hitting the thin metal of a tin garden shed might simply put a neat hole right through the metal with little to no debris coming from the point of impact, but the same bullet slamming into the heavy metal of a blast door might dent the metal only slightly but send a shower of debris, or even red-hot sparks, flying from the point of impact.
Although you can come up with a neat list of the materials in your world, these might all look vastly different in variations of each material. For example, heavy metal can be rusted or freshly painted, wood can be old (desaturated and brownish) or new (brightly painted furniture or highly polished panels). The challenge here is to create a bullet-hole decal for a certain material (wood, for example) that will work equally well in many situations (old wood, painted wood, and so on). I find that a grayscale image with good light, shadow, and alpha treatment works best, as it tends to blend with the material that it is displayed on top of. This method also allows you to focus your efforts on how a given material will react to a bullet impact regardless of the color or condition of the material. For example, wood generally splinters, glass shatters, metal is dented or punctured, and so on. By leaving the color information out, you can create an effect that will adopt the color of the surface it is displayed on and spew the appropriate particles for the material type. The key to creating a good impact and debris set is to consider the physical properties of the material first; how hard, brittle, or squishy is the material, and how will it react to the impact of the specific projectile that will be hitting it? Then focus on the highlight and shadow of the hole and debris. Experiment with the effects in Photoshop and in the game and adjust the alpha channeling to obtain the best results. A deeper hole may be small with an almost solid black center while a shallow dent may be wider and almost transparent with only a hint of light and shadow.
Here are the basic surfaces I usually work with within a game. They are listed alphabetically, not by importance.
Cloth
If you kick in the door of the average crack house and start blazing away with your nine, chances are you will hit a sofa, a stained mattress, or some dope shag carpeting. When you are taking down that stained mattress, you want to know it’s really dead, so the game artist better give you some good visual feedback.
Cloth tends to rip and tear and leave strings or fibers when it is destroyed. To create the impact and particles for cloth, I started with a simple stringy pattern and applied the Bevel and Emboss layer style and finally added some additional strings and darkened the hole to give it depth. See Figure 9.16 for the progression of the cloth bullet hole and Figure 9.17 for the bullet hole, debris, and the effects in context.

FIG 9.16 The progression of the steps to create the bullet hole for cloth.
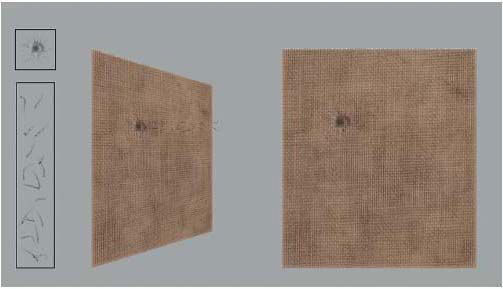
FIG 9.17 The cloth bullet hole, debris, and the effects in context.
Concrete (Plaster)/Brick
These three materials are very common in game worlds and similar in their effects. The holes and debris are almost interchangeable, but you may want to differentiate between light concrete, heavy reinforced concrete, and/or bricks and heavy ceramics because of the frequency and wide variety of these types of materials.
Light concrete or plaster will leave a cleaner hole and produce a wispier puff of debris. See Figure 9.18 for the light concrete/plaster effects set. This effects set was created as most of the other effects were using various brushes and the Bevel and Emboss Layer Style as a beginning.
For the heavier, reinforced concrete, I made the holes shallower and rougher and the debris essentially the same as the lighter concrete. I also added a puff of dust to the context image—we created the puff earlier in the chapter in the section on particle effects—so you could see a more complete example of an effect (Figure 9.19).

FIG 9.18 The light concrete/plaster effects set and the effects in context.

FIG 9.19 The heavier concrete effects set and the effects in context, with a puff of dust that drifts away after the initial impact. We created the puff earlier in this chapter in the section on particle effects.
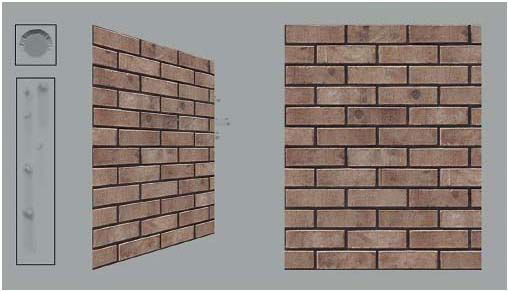
FIG 9.20 The brick effects set and the effects in context.
For the bricks, I went with a simple circular hole as if the brittle brick were blown out in a large shallow circle. I think the shallow, carved-out look works for most brittle brick and tile surfaces. I made the debris contain some small chunks, as it seemed like the brick would be blasted outward, whereas the concrete would powder under the impact (Figure 9.20).
Dirt
Dirt tends to crater when impacted, so I created a wider, shallower, crater-like hole and a longer, wider, spray of dirt grains (see Figure 9.21).
Glass
In general, one of three things can happen when glass is impacted in a game world. In one case the glass remains intact and a decal of a bullet hole is laid on the surface followed by a small amount of debris shooting out from the hole. In the second the glass shatters into pieces and falls out of the frame. The third option is a hybrid of the two; you shoot the glass several times, putting holes in it as you weaken it, then it shatters out of the frame after several shots.

FIG 9.21 The dirt effects set and the effects in context.
When glass breaks out of a frame and falls to the floor in pieces, this usually involves the model of the glass pane being removed from the scene upon the impact of the projectile and the particle system of falling glass shards spawned at the place the glass pane used to be. This involves less asset creation, as you are making a few tiny shards, and more technical setup as you are coordinating events in a chain reaction:
projectile impact >
remove pane mesh >
play breaking glass sound effect >
spawn falling glass shard particle system >
play tinkling glass sound effect…
For the first option, the hole-decal and debris, the effect is technically simpler to set up but involves more asset creation; this is the effect we will create since this is an asset creation book. As stated above, this effect mimics the effect of thick, reinforced, or bulletproof glass being impacted by a projectile but not breaking. When impacted, the glass pane remains and a hole appears with spidery cracks emanating from it. A small shower of glass shards is thrown back from the hole. For this effect, the hole is simply a black circle with a faint inner glow for some depth and thin white lines emanating out from the center (use the Fade option for this). The glass debris are some simple shapes that I dodged and burned. See Figure 9.22.
Grass
I created the grass effects set based on the techniques used for the cloth and dirt set. The hole created when grass is shot wouldn’t be a clear hole, but a dark patch where the grass was displaced, with a few blades overhanging. The debris would be dirt and grass blades. I colored the debris greenish so that it would look like grass blades, but I could have left it desaturated if I needed it to be more versatile. See Figure 9.23.

FIG 9.22 The glass hole and debris effects set and the effects in context.

FIG 9.23 The grass effects set and the effects in context.
Metal
Metal is another potentially big category. I created three basic scenarios: the light metal with a clean hole, the heavier metal that will get dented inward and punctured when shot, and a dense metal that will only dent when impacted. Each hole is a variation on a bevel and emboss with some dodging and burning. See Figure 9.24 for the light metal, Figure 9.25 for the heavier metal, and Figure 9.26 for the dense metal.
Water
When water is shot, it sprays upward and outward. Here I show you the simple decal/debris version that we have been working with. Some games make the water splash more complex, resembling the muzzle blast of the gun that we looked at earlier. See Figure 9.27 for the water impact and splash.

FIG 9.24 The light metal effects set and the effects in context.

FIG 9.25 The heavier metal effects set and the effects in context.

FIG 9.26 The dense metal effects set and the effects in context.

FIG 9.27 The water effects set and the effects in context.

FIG 9.28 The wood effects set and the effects in context.
Wood
Wood will splinter when shot, so I created a simple hole similar to the grass impact. There is a depression with splinters that overhang the hole. The debris is obviously splinters or chips of wood. See Figure 9.28.
That’s a basic rundown of in-game effects. The asset creation is the easy part; it’s working with the various systems to get the desired effect that is the real challenge. This chapter has provided you with a basis for creating the assets for any effect that you may be required to create for a game.