
CHAPTER 24
Rendering Non-Photorealistic Effects
For many years, the goal of 3D graphics has been to make scenes as realistic as possible, but other types of art emphasize style over realism. These stylistic approaches give us the cubes of Picasso, the points of Seurat, and the surreal landscapes of Dali. Although no software title has a button to magically turn your scene into a classic piece of art, the new Nitrous display drivers found in Max allow you to display your scene as if it were drawn using acrylic, ink, or pastels.
Viewing Stylized Scenes
Stylized non-photorealistic effects often are not as computationally complex as realistic renderings, and as such, they can be enabled and displayed within the viewports as well as rendered images. Although you probably would want to work in one of these stylized display modes, you can use the Viewport title Rendering label to access a menu of available stylized display options.
New Feature
The Stylized display options available in the viewports are new to 3ds Max 2012.
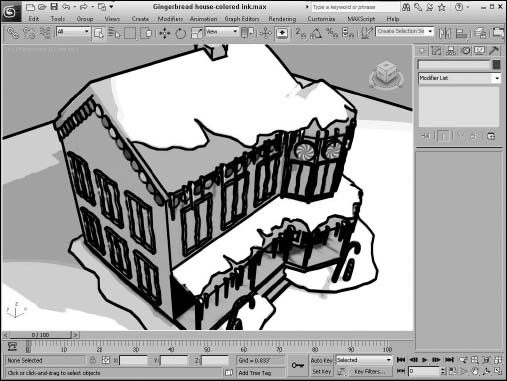
The available stylized display options are all located in the Stylized submenu under the Viewport Rendering Label menu in the upper-left corner of each viewport. The options include Graphite, Colored Pencil, Ink, Colored Ink, Acrylic, Pastel, and Tech. Figure 24.1 shows the gingerbread house model with the Colored Ink option.
FIGURE 24.1 The Gingerbread house scene is displayed using the Colored Ink display style.
The various stylized display options also can be set in the Visual Style & Appearance panel in the Viewport Configuration dialog box.
Rendering Stylized Scenes
The same stylized display options that are available in the viewports also are available as render options using the Quicksilver rendering engine. To switch to the Quicksilver renderer, click the three dots to the right of the Production renderer in the Assign Renderer rollout of the Common panel in the Render Setup dialog box and choose the Quicksilver option.
Cross Reference
You can learn more about the Quicksilver renderer in Chapter 23, “Rendering a Scene and Enabling Quicksilver.”
After Quicksilver is enabled, you can select one of the stylized render options from the Rendering Level drop-down list in the Visual Style & Appearance panel, shown in Figure 24.2.
When a stylized non-photorealistic rendering option is selected, clicking the Render button renders the scene in the Rendered Frame Window, as shown in Figure 24.3.
FIGURE 24.2 The Visual Style & Appearance panel includes all the stylized non-photorealistic rendering options.
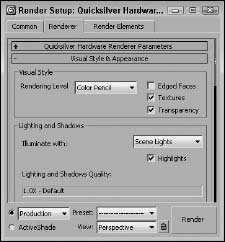
FIGURE 24.3 Non-photorealistic rendering methods can be specified in the Render Scene dialog box using the Quicksilver renderer.

Summary
This chapter covered the stylized non-photorealistic display options made available by the Nitrous display driver and showed how they could be rendered.
In this chapter, you accomplished the following:
- Viewing stylized scenes using ink, pastels, graphite, acrylic, and colored pencil
- Rendering non-photorealistic scenes using the Quicksilver renderer
The next chapter covers the ability to combine external objects and scenes into the current scene using Containers and XRefs.