
In this chapter you will learn how to:
<objective>Import XML into specific elements
</objective> <objective>Import XML to update data in place
</objective> <objective>Import XML to delete empty elements
</objective> <objective>Edit XML to create proper element structure
</objective> <objective>Combine XML files for complex workflows
</objective> </feature>It occurred to us that the number of readers producing world atlases (Chapter 6) any time soon is small, so we looked around for other more common projects to demonstrate. The candidate that came to mind immediately, ideal for an XML workflow, is the traditional product catalog or pricelist.
In this Chapter you will learn everything you need to know to set up and complete a typical product catalog using an XML workflow.
Note
Download all applicable files for Chapter 7 from www.peachpit.com/indesignxmlguide and copy them to a folder on your hard drive (approximately 8 MB).
Thousands of catalogs are printed each year for every conceivable market and category, including consumer electronics, industrial equipment, parts, and accessories, professional services, and many, many more. Although most of these items are available online today, one office supply distributor revealed to us that sales still increase dramatically when their printed catalog arrives in customer mailboxes and, in turn, subsequently dip when the interval between catalogs becomes too long.
Common sense would seem to dictate that publishing catalogs more frequently would drive sales and increase profits. Unfortunately, traditional production methods are way too expensive. In most markets the cost of producing catalogs more frequently far outstrips any gains in sales.
You probably already know that, next to the printing itself, the biggest cost in creating a catalog is the time and labor involved in design and production. Literally hours and days are devoted simply to transcribing and formatting product descriptions, prices, and SKU numbers. To address the need for increasing the frequency of catalog releases, some companies have resorted to expensive third-party solutions to help automate the process. These plug-ins and programs can cost thousands of dollars and often require lengthy periods of instructor-led training before a design department can get up and running. We’ve got a better way: the XML way!
Scenario: Your company specializes in selling classic books, as well as adaptations on audio tape, VHS, and DVD. You are developing a print catalog to augment your company’s online store. The goal is to create a multi-section catalog design that lists the products both by format and by author. You have access to a catalog template started by a coworker, the XML files used by the Web-based store, and the product images, which are saved in JPEG format.
Open BookCatalog.indt from the Chapter 7 folder.
Show the Structure pane, tag markers, and tagged frames.
Select View > Show Frame Edges, if they are hidden.
Examine the structured layout in front of you. (It may help to switch to Story Editor (Figure 7.1) to get the full flavor of the design’s complexity.) You should be able to identify one tagged anchored frame and nine tagged text placeholders. The layout also takes full advantage of Paragraph, Character, and Object styles throughout. Let’s check out what kind of magic we have in store for you.
Select the Inventory element in the Structure pane.
Import Books.xml.
The Import XML dialog appears.
The Show XML Import Options checkbox is selected.
The Import into Selected Element checkbox is selected.
Targeted Import Hits the Mark
InDesign inserts, updates, or replaces the tagged content depending on whether the structure of the imported XML matches that of the existing data, element for element. By default, this process starts at the root element in the Structure pane. When checked, the Import into Selected Element option can be used to target the imported XML to an element other than the root. By selecting an element in the Structure pane before importing—as you did in step 4—you cause InDesign to turn on this option by default (Figure 7.2).
Note: When the imported XML doesn’t match the existing structure, it is always inserted into the structure.
Click Open.
The XML Import Options dialog appears.
Select only the following checkboxes in the XML Import Options dialog:
Clone repeating text elements
Only import elements that match existing structure
Do not import contents of whitespace-only elements
Deselect all other checkboxes. Click OK.
A second BK element appears in the Structure pane, but otherwise nothing else happens.

What’s up? No magic? No miracles? No nothin’? What went wrong? Let’s see if you can figure out the “problem” in the project.
Press Cmd-Z/Ctrl-Z.
The layout should return to its original configuration.
Launch TextEdit or Notepad, whichever is appropriate for your operating system.
Open Books.xml from the Chapter 7 folder.
A quick scan of the XML shows that the structure matches the names and order of the elements in the file perfectly. But a more careful examination reveals one small, seemingly insignificant, difference: In InDesign, the root element in the Structure pane is named Inventory but there is no such element in the XML file! Although the structure of the placeholders matches in all other aspects, trying to import the XML into an element that didn’t match its own structure caused the import process to fail just as surely as it would have had the elements been misspelled or out of order.
We purposely threw this curve ball at you for two reasons. First, just to see if you were paying attention. And second, to demonstrate a cool trick we call Targeted XML Import.
Select the BK element in the Structure pane.
BKis a child element ofInventory.Import Books.xml.
The Import XML dialog appears.
The Show XML Import Options checkbox is selected.
The Import into Selected Element checkbox is selected.
Select only the following checkboxes in the XML Import Options dialog:
Clone repeating text elements
Only import elements that match existing structure
Do not import contents of whitespace-only elements
Deselect all other checkboxes. Click OK.
In a few seconds the placeholder text in the layout is replaced by the data entry for the book A Connecticut Yankee in King Arthur’s Court.
A total of 35 book entries appear in the Structure pane.
Drag the BK element from the Structure pane to the main text frame on page 1.
The color of the frame changes to match the
BKelement.Page 1 fills with the content stored in the Structure pane.
Each entry displays an anchored frame.
Most of the anchored frames contain images depicting the book covers.
The text frame displays a red plus (+) sign indicating overset text.
By selecting, or targeting, the BK child element in the Structure pane, you correctly matched up the structure in the layout to the structure of the XML file. In the next lesson you’ll see why this is so important.
Up until now we have used single XML files for each project. These files run the gamut from simple to complex. In this lesson, we explore how one structure can be used to import content from multiple XML files.
Open BookCatalogSection.indt.
Show the Structure pane, tag markers, and tagged frames.
Select View > Show Frame Edges, if they are hidden.
The document features the identical structure based on the BK child element as in the previous lesson with a special bonus: two additional structured layouts based on child elements named AB and MV (Figure 7.3).

Select the BK element in the Structure pane.
Import Books.xml. Click Open.
The Import XML dialog appears.
The Show XML Import Options checkbox is selected.
The Import into Selected Element checkbox is selected.
Select only the following checkboxes in the XML Import Options dialog:
Clone repeating text elements
Only import elements that match existing structure
Do not import contents of whitespace-only elements
Deselect all other checkboxes. Click OK.
The data entry for the book A Connecticut Yankee in King Arthur’s Court appears in the layout.
The
BKelement in the Structure pane fills with 35 book entries.
Drag the BK element from the Structure pane to the main text frame on page 1.
The page fills with products, as in Lesson 7-1.
Select the AB element in the Structure pane.
Import Audiobooks.xml. Click Open.
The Import XML dialog appears.
The Show XML Import Options checkbox is selected.
The Import into Selected Element checkbox is selected.
Repeat steps 6 and 7.
The data entry for the audio book Anna Karenina appears in the layout.
The
ABelement in the Structure pane fills with 11 audiobook entries.
Drag the AB element from the Structure pane to the main text frame on the page that begins the audiobook section.
The page fills with audiobook entries and cover images.
Select the MV element in the Structure pane.
Import Movies.xml. Click Open.
The Import XML dialog appears.
The Show XML Import Options checkbox is selected.
The Import into Selected Element checkbox is selected.
Repeat steps 6 and 7.
The data entry for the DVD A Farewell to Arms appears in the layout.
The
MVelement in the Structure pane fills with 24 DVD and VHS entries.
Drag the MV element from the Structure pane to the main text frame on the page that begins the movies section.
The page fills with movie entries and cover images.
All three child elements—BK, AB, and MV—are filled with content.
In previous sample projects you used autoflow to automatically create pages from the overset text. Unfortunately, this feature doesn’t work properly with multisection documents. Let’s explore two alternative procedures for inserting additional pages to accommodate the overset text:
Show the Pages panel, if it’s not visible.
Using the Selection tool, click on the red plus (+) at the bottom of page 1 to load the overset text.
The arrow cursor changes to indicate that the overset text is loaded.
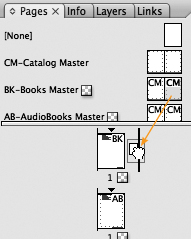
Select and drag one of the BK-Books Master icons from the masters section of the Pages panel and drop it to the right of the icon for page 1 (Figure 7.4).
A new blank BK-formatted page appears in the panel between the first and second pages.
Click the loaded text icon over the main text frame on the new page 2.
The page fills with book entries.
The lower right corner of the text frame displays a red plus (+) indicating additional overset text.
Dragging master pages to the panel is okay for onesies and twosies, but if you need to add two or more pages at a time, here’s a better way:
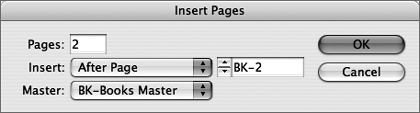
Select Insert Pages from the Pages Panel or select Layout > Pages > Insert Pages.
The Insert Pages dialog appears.
Enter the specifications shown in Figure 7.5. Click OK.
Load the overset text from page 2 and flow it manually onto the new pages.
Insert additional pages as necessary to flow the remaining entries in each of the three sections.
All the catalog data should now be displayed within the document.
That was fun. Targeted XML Import offers important advantages to complex workflows. It allows you to import XML of widely differing structures into one document, or the same XML file for a variety of purposes. Let’s explore one example where you can—with small modifications—use the same XML file in multiple ways:
Open BookCatalogPricelist.indt.
Show the Structure pane, tag markers, and tagged frames.
Select View > Show Frame Edges, if they are hidden.
Observe the Structure pane. Note the MV and MV2 elements contained in the root element Inventory. The MV element is structured to populate the Movie data entries on pages 1–3.
The MV2 element has been delegated to create a six-column pricelist on page 3.
Select the MV element in the Structure pane.
Import Movies.xml.
Select only the following checkboxes in the XML Import Options dialog:
Clone repeating text elements
Only import elements that match existing structure
Do not import contents of whitespace-only elements
Deselect all other checkboxes. Click OK.
Pages 1–3 fill automatically with the text and images for the movie product entries.
Select the MV2 element in the Structure panel.
Import Moviesprice.xml as in steps 6 and 7. Click OK.
The placeholder text is replaced by the first data entry from the imported XML.
Drag the MV2 element to the text frame containing the pricelist.
The text frame fills with the movie data formatted line-by-line into the pricelist.
Note
You may notice a blank line at the top of the pricelist. The extra line is not in the placeholder, it’s not in the XML, it simply appears when you drag the
MV2element to the text frame. These phantom spaces will plague your workflow from time to time, and although they’re annoying, they’re also perfectly harmless. Just go ahead and delete any lines that are not supposed to be there. Once deleted, they will not appear again, even if you re-import or update the XML.
If you were thinking that Targeted XML Import was going to involve a bunch of tedious drudge work in the Structure panel, pay attention to this lesson. Here we combine all the XML data we’ve used up until now in the catalog (and a bit more) to give you a glimpse at what’s possible. The only limitation to this technique is your imagination and skill in assembling the XML file.
Open BookCatalogInventory.indt.
Show the Structure pane, tag markers, and tagged frames.
Select View > Show Frame Edges, if they are hidden.
Examine the entire document carefully. You’ll notice six distinct structured layouts, two for each of the sections: Books, Audiobooks, and Movies.
Select the Inventory element in the Structure pane.
Import Inventory.xml.
Select only the following checkboxes in the XML Import Options dialog:
Clone repeating text elements
Only import elements that match existing structure
Do not import contents of whitespace-only elements
Deselect all other checkboxes. Click OK.
Depending on the speed of your computer, the process can take up to a minute or more. Upon completion, each of the structured layouts has been populated by the content in the XML file. One file, six distinct sections—can it get any better?
Insert pages as necessary in each of the sections and flow the remaining data entries, as shown in Lesson 7-3.
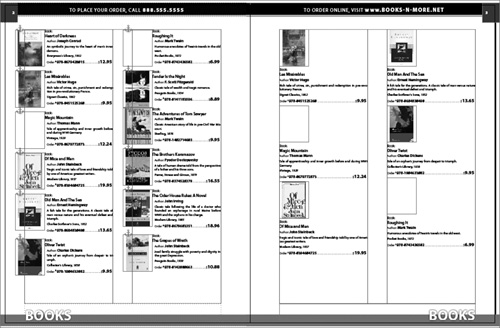
Click the Preview button at the bottom of the Toolbox to see the completed catalog as it would print.
The frames and XML structure are hidden. You should see only text and pictures.
The entire catalog is complete with entries and pricelists in place for the Books, Audiobooks and Movies sections.
Click the Normal button at the bottom of the Toolbox. Do not close the file, but proceed to the next lesson.
All the frames and the XML structure should be visible again.
You can probably see how an XML workflow can help you create data-driven documents more quickly and easily with fewer errors overall, but perhaps you’re not convinced yet on the need to switch. Maybe it’s time to bring out the big guns. One of the banes of the catalog designer’s existence has to do with the constant need to update prices and product photos, sometimes right up to press time. We’ve heard numerous horror stories of how prices and photos had to be changed even as plates were being hung. XML can’t change the industry but, fortunately, it can help save your sanity.
Launch TextEdit, Notepad, or your favorite XML editor.
Open Inventory.xml.
Scroll down to the first product in the file: A Connecticut Yankee in King Arthur's Court.
Locate the <price> element and change the price from 4.95 to 6.50. Be sure not to delete any of the tags or other code elements.
Scroll down to the next product: A Farewell To Arms.
Change the price from 18.15 to 20.50.
Continue down through the products and alter several more prices. Note the changes that you make.
Save the file as updatedInventory.xml and close it.
Switch to InDesign; select the Inventory element in the Structure pane.
Import updatedInventory.xml.
Select only the following checkboxes in the XML Import Options dialog:
Clone repeating text elements
Only import elements that match existing structure
Do not import contents of whitespace-only elements
Deselect all other checkboxes. Click OK.
The modified XML data replaces the existing content, completely updating all the prices automatically.
Most importantly: Nothing else has changed! The positions and formatting of all the unaffected text and graphics are in position and ready for press.
Updating data on the fly is probably one of the most impressive aspects of an XML workflow. It allows designers to work on a design, without regard to the status of the product data, and update information right up to the last minute. In the past, we waited as long as possible before importing data, because we knew it would change. We wanted to minimize the number of manual corrections we’d have to make. Now there’s no reason to delay. Set up the catalog, import the data, get everything formatted and positioned perfectly. As long as you’re using an XML workflow you can simply smile when the inevitable calls comes: “The prices have changed!”
“No sweat,” you say. “I have XML on my side.”
However, there’s one big caveat: The changes you made to the XML file just now were minor—modifications that probably wouldn’t affect layout or text flow. If you make larger, or more aggressive, changes to the XML, the effects on the layout can be unpredictable. Just because updates can be fast in XML doesn’t mean they’ll be without hassle altogether. Don’t make it your standard procedure to wait to the last minute to perform updates.
Remember what your mother told you: “Just because you can doesn’t mean you should.”
You probably noticed in the previous lessons the numerous empty anchored frames in each of the catalog sections. This is not an unusual situation for catalog designers as new items are added frequently, often even before product photos can be taken. In fact, any time you assemble hundreds or thousands of products into a single catalog, you’re guaranteed to end up with some empty data elements. In our sample catalog we anticipated the situation and designed it in such a way that empty elements (and therefore empty picture frames) didn’t affect the look or flow of the data. Not every design can be so accommodating, and empty frames can leave unacceptable holes in your layout. Fortunately, InDesign provides a feature to automatically delete these potential troublemakers before they can cause you any grief.
Select the Inventory element in the Structure pane.
Import Inventory.xml.
The XML Import Options dialog appears.
Select only the following checkboxes in the XML Import Options dialog:
Clone repeating text elements
Only import elements that match existing structure
Do not import contents of whitespace-only elements
Delete elements, frames, and content that does not match imported XML
Deselect all other checkboxes. Click OK.
After a few moments, depending on the speed of your computer, the text and graphics reflow through the entire catalog, and all the empty graphic frames are deleted automatically.
That last checkbox selected is the key. By selecting “Delete elements, frames, and content that does not match imported XML” in the XML Import Options dialog, you ordered InDesign to strip out any anchored frame that did not contain a picture. This option will remove empty text elements, too.
Delete Option a Must for Data Updates
The option “Delete elements, frames, and content that does not match imported XML” has an important secondary purpose that is vital for updating data in any XML workflow. When updating prices, photos, and other data, it’s a certainty that, just as products will be added to the catalog, from time to time products will have to be completely removed, too. When checked, the “Delete elements...” option also deletes complete products that are no longer contained in the XML (Figure 7.6).

Unchecked, InDesign imports new items and even swaps out old products that are still represented in the XML, but if the product has been removed from the XML the program ignores it and leaves it in the layout. Scary!
The structure of the catalog is only slightly different from that of the atlas you created in Chapter 6. You could probably create this type of layout with your eyes closed by now. As usual, the XML workflow takes advantage of InDesign’s full set of features.
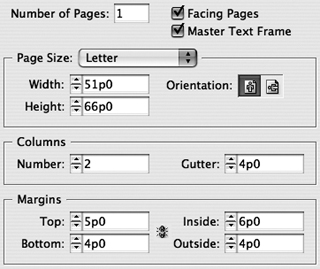
Create a new document using the specifications shown in Figure 7.7.
Show the XML structure, tag markers, and tagged frames.
Import rawBooks.xml.
Deselect all checkboxes in the XML Import Options dialog. Click OK.
Option-click/Alt-click on the triangle in front of the dataroot element.
The entire XML content is revealed.
Drag the first Book icon from the Structure pane to the main text frame on page 1.
The text entry for A Connecticut Yankee in King Arthur’s Court appears in the frame.
Note that this entry does not contain an image element. A master placeholder must contain all the elements desired in the final product. A quick scan of the Structure pane shows that the first Book element doesn’t contain a cover image, but the second one does.
Drag the second Book icon from the Structure pane to the main text frame on page 1.
The entry for A Farewell to Arms completely replaces the first entry.
Right about now you’re probably wondering what you did wrong. The first line of the layout displays the text 978-0684837888.jpg but where’s the picture? The simple answer: It’s still somewhere on your hard drive, and 978-0684837888.jpg is the name of the file.
The file you imported in step 3 is the raw (unmodified) XML generated by the database for this project. Because XML supports only text, we can store only the name of the graphic in the database. But there’s a small problem: The database program exports the XML reference for a graphic like this:
<image>978-0684837888.jpg</image>We could include the entire path—relative or absolute—but it wouldn’t improve the reference at all:
<image>/Mac HD/chapter 6 files/images/978-0684837888.jpg</image>Neither statement enables InDesign to import the graphic, as you see in previous lessons both in this chapter and in Chapter 6. Instead, for the reference to work (see Chapter 6, Lesson 6-2), it would have to look like this:
<image href="file://images/978-0684837888.jpg" />In the first and second examples, the filename is being stored as data within the element, but the correct structure, shown above this paragraph, is constructed as an empty element (see “Data Content Types Key” in Chapter 1) where the image filename is referenced merely as an attribute.
Getting the database to export the image name and path as an empty element to an XML file is beyond our meager programming and scripting capabilities. Instead, we resort to a simple but tried-and-true method available to every designer using a Mac or PC: Find and Replace.
Before you work on the XML files, save the InDesign document to be safe.
By now your XML skills and savvy should be sufficient to pull back the curtain a bit and let you have a little peek at the wizard and machinery at work behind the scenes. In our previous sample projects we provided perfectly formatted XML files and structured documents, and everything worked right out of the box. Unfortunately, the real world is rarely that neat and orderly. You’ll find that, more often than not, you have to dig into the XML file itself to edit the code, or even completely reformat it.
In this lesson we show you one of the most common fixes we make in an XML workflow.
Launch TextEdit or Notepad or your favorite XML editor.
Open rawBooks.xml.
Note the first <image> element.
As we describe in Lesson 7-8, the element is not structured correctly to import the graphic in InDesign. For it to work, the entry <image>978-0684837888.jpg</image> must be reconstructed to look like this: <image href="file://images/978-0684837888.jpg" /> as well as all the other 28 image elements. Before you totally freak out, we assure you that the change is a lot easier than it sounds. It’s a simple two-step process using the Find/Replace command.
Note
CS3 and other programs can create complex search and replace routines using wildcards and Boolean expressions that can complete this operation in one step. Look up GREP expression in the CS3 help file for more information.
Select the opening tag <image> and press Cmd-C/Ctrl-C to copy it.
Activate the Find command.
The Find/Replace dialog appears. (In some programs the copied element may appear automatically in the Find field.)
Insert the cursor in the Find field. Press Cmd-V/Ctrl-V to paste the element in the Find field if the element doesn’t appear automatically.
Type <image href="file://images/ in the “Replace with” field (Figure 7.8). Click the Next/Find Next button.
The next
<image>element in the code is highlighted.Click the Replace button.
The opening
<image>tag is replaced by the code<image href="file://images/.The next
<image>tag is selected.
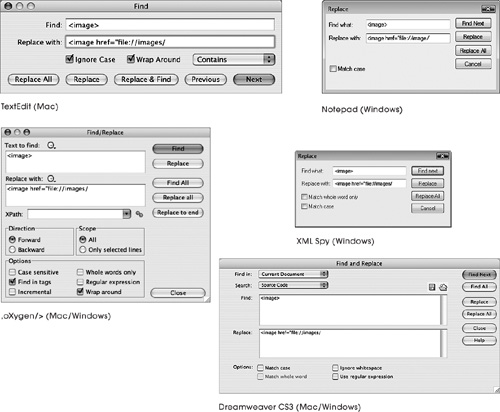
Before you proceed to replace the rest of the <image> tags, carefully check the change; some programs will not allow you to Undo this process if find you make a mistake. The text should now look like this: <image href="file://images/978-0684837888.jpg</image>.
If the text has changed properly, click the Replace All button. The program will replace all the text that matches the search field to the end of the file. You may need to repeat the command once to catch any elements you may have missed at the beginning of the file.
All opening
<image>tags are replaced.
Now you need to perform the second half of the element reconstruction.
Select a closing </image> tag. Press Cmd-C/Ctrl-C to copy it.
Activate the Find command if the Find dialog is not visible.
Select any text displayed in the Find field. Press Cmd-V/Ctrl-V to paste the closing </image> tag.
Any previous text displayed in the Find field is replaced by the closing
</image>tag.Select any text displayed in the “Replace with” field and type ” /> (double-quote, space, slash, right-angle bracket).
Click the Next button.
The next closing
</image>element in the code is highlighted.Click the Replace button.
The closing
<image>tag is replaced by the code" />.The next
</image>tag is selected.
Before you proceed to replace the rest of the </image> tags, carefully check the change. The entry should now look like this: <image href="file://images/978-0684837888.jpg" />. By reconstructing the element thusly you have created an element that will import the cover image properly.
If the text has changed correctly, click the Replace All button.
All closing
</image>tags are replaced.Select File > Save As.
Save the file as myBooks.xml.
Repeat steps 2–17 with the file rawAudiobooks.xml. Save the file as myAudiobooks.xml.
Repeat steps 2–17 with the file rawMovies.xml. Save the file as myMovies.xml.
All the <image> elements are now reconstructed in the proper way, and the file is ready to use.
The myBooks.xml file, created in lesson 7-9, can now be used to create the books section of the product catalog template. First, let’s start with a clean layout in myBookCatalogInventory.indt:
In InDesign, select the text frame on page 1 and delete it.
Select the BK element in the Structure pane. Press the Delete key.
The content of the Structure pane is deleted.
Drag the A-Master icon and drop it on page 1.
The master is reapplied to the page.
Import myBooks.xml. Click Open.
The Import XML dialog appears.
The Show XML Import Options checkbox is selected.
The Import into Selected Element checkbox is grayed out.
Deselect all checkboxes in the XML Import Options dialog. Click OK.
The XML content fills the Structure pane.
Option-click/Alt-click on the triangle in front of the BK element.
The entire XML content is revealed.
Drag the first Book icon from the Structure pane to the main text frame on page 1.
The text entry for A Connecticut Yankee in King Arthur’s Court appears in the frame.
As we note in Lesson 7-8 the first entry doesn’t contain an image element. For the master placeholder to work properly it must contain all the elements desired in the final layout. As before, you’ll see that the second Book element contains everything you need.
Drag the second Book icon from the Structure pane to the main text frame on page 1.
The entry for A Farewell to Arms completely replaces the first entry, displaying a cover image at the top of the text.
Before proceeding, select and delete all the unused Book elements from the Structure pane.
The
BKand theBookentry for A Farewell to Arms are the only elements remaining in the Structure pane.Select the text frame containing the book entry. Press Cmd-Y/Ctrl Y to switch to Story Editor.
Story Editor appears.
Note the blank line above the anchor icon.
Note
For the purposes of the following lessons, whenever the Delete key is mentioned the instructions refer to the small Delete key on the right side of most keyboards (Mac and Windows). The large Delete key on Mac keyboards will be referred to as the Backspace key, as it’s called on Windows-based keyboards. On Mac laptops that have only one Delete key, you can achieve the described action by holding the Fn (Function) key before pressing the Delete key.
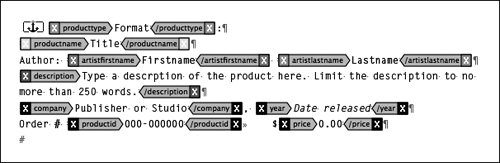
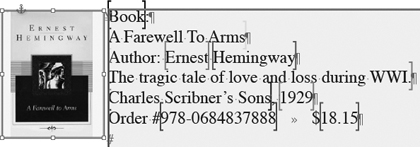
To achieve the desired layout you will delete the unneeded paragraph returns and arrange the placeholders so the data appears thusly:
Book:
A Farewell To Arms
Author: Ernest Hemingway
The tragic tale of love and loss during WWI.
Charles Scribner's Sons, 1929
Order # 978-0684837888         $18.15
Delete the paragraph return in the empty line so the anchor icon moves up to the first line.
The blank line is deleted, and the anchor icon moves up to the first line.
Delete the paragraph return after the anchor icon so that producttype moves up to the same line.
The
producttypeelement moves up behind the anchor icon.Insert the cursor after the closing producttype tag. Type : (colon).
Insert the cursor in front of the artistfirstname. Type Author: (including the colon).
Insert a space after the closing artistfirstname. Delete the paragraph return so artistlastname moves up to the same line.
The
artistlastnameelement moves up to the same line and directly afterartistfirstname.Insert a comma and one space after the company closing tag. Delete the paragraph return so year moves up to the same line.
The
yearelement moves up to the same line separated from thecompanyelement by a comma and one space.Type Order # (don’t forget the number sign) in front of the opening productid tag.
Insert a tab after the closing productid tag. Type $ (dollar sign). Delete the paragraph return so price moves up to the same line.
The
priceelement moves up to the same line asproductid.There should be one extra paragraph return at the end of the entry.
Before the physical structure of your template is finished, you have to adjust the position of the anchored image. In its current inline position, if the graphic frame ends up empty (as several have in the previous lessons) it would leave an unacceptable hole in the layout. But by floating the placeholder outside the text flow, empty frames won’t even be noticeable (Figure 7.9).
Press Cmd-Y/Ctrl-Y to switch to Layout view.
Select the anchored graphic. Select Object > Anchored Object > Options.
The Anchored Object Options dialog appears.
Enter the specifications as shown in Figure 7.10. Click OK.
The anchored object repositions to the left and is aligned to the top of the data entry.
Select New Object style from the Object Styles panel menu. Name the style Cover-image. In CS3, click the Apply to Selection checkbox. Click OK. In CS2, apply the Cover-image Object style to the anchored frame.
The new style named Cover-image appears in the panel.
The master placeholder is structured and should appear as in Figure 7.11.
Press Cmd-S/Ctrl-S to save the changes to the file myBookCatalogInventory.indt.

Before you import the catalog data, let’s create the XML and structure needed for a pricelist to create a true multisection catalog, similar to the one in Lesson 7-4.
You could use the existing myBooks.xml file as is for both the book listings and the pricelist. But as we explain in the sidebar “A Rose Is Still a Rose,” the elements in the file are already mapped to Paragraph and Character styles used for the catalog. To use the same content for a different purpose and in a different format requires that we first make a small modification to the XML structure and save it as a separate file.
Open myBooks.xml in TextEdit, Notepad, or your favorite XML editor.
Activate the Find/Replace command.
Type > in the Find What field.
This entry will find the closing bracket for all XML elements.
Type 2> in the Replace With field.
This text will insert the number 2 before the closing bracket in all XML elements.
Press the Find Next button.
The next closing bracket in the file is selected.
Press the Replace button.
The number 2 is inserted before the selected bracket.
The next closing bracket in the file is selected automatically.
If the replacement was made correctly, press Replace All.
The number 2 is inserted before every closing bracket in the file.
Save the file as myBooksprice.xml.
If you are working in an XML editor, when you try to save the file the program will warn you that the structure is not well-formed (see “Well-formed XML” in Chapter 1). Unfortunately, TextEdit and Notepad won’t make a peep, so it’s important to understand proper XML construction before you play around with the structure in a non-XML-aware application. In the process of inserting the number 2 into all the elements, two of the elements in the file have essentially been broken. Luckily, it’s just as easy to fix the problem as it was to create it in the first place.
One of the errors in the very first line of the code. The processing instruction in line 1 now looks like <?xml version="1.0" encoding="UTF-8"?2>. Note the 2 between the ? and the >. No text or numbers may appear in this position.
Delete the 2 in the processing instruction so it looks like this:
<?xml version="1.0" encoding="UTF-8"?>.
In line 15 of the XML file, the image element looks like this: <image href="file://images/978-0684837888.jpg" /2>. Note the 2 was added between the / (slash) and the >. As with the processing instruction earlier, this is an invalid construct in XML. If you scroll down through the file you will notice that all the <image> elements are structured incorrectly as well. Let’s go back and fix the elements that are broken
Select the text /2> in the image element on line 15. Press Cmd-C/Ctrl-C to copy the text.
Activate the Find/Replace command. Insert the cursor in the Find What field. Press Cmd-V/Ctrl-V to paste.
Select any existing text in the Replace With field and type />. Click the Next button.
The text
/2>is selected.Click the Replace button.
The text
/2>is replaced by the text/>.The next
/2>is selected automatically.
If the change was made correctly, click the Replace All button. Otherwise correct any errors and then click the Replace All button.
The elements are all correctly structured.
Save the file.
Open myAudiobooks.xml. Repeat steps 2–15. Save as myAudobooksprice.xml.
Open myMovies.xml. Repeat steps 2–15. Save the file as my myMoviesprice.xml.
You have created XML for each section of the catalog.
You have all the components needed for a multisection catalog at hand. In this lesson you will insert three sections and add pricelists based on the XML saved in Lesson 7-11.
In InDesign, access the Structure pane in myBookCatalogInventory.indt and reveal the entire XML contents. Observe the structure.
The solitary
Book(child) entry is contained within theBK(parent) element.
Before we can create a multisection catalog, we have to create a multisection XML structure in the current document. As is, the existing structure can only support one section.
Select New Tag from the Tags panel menu.
The New Tag dialog appears.
Name the tag Inventory. Click OK.
Inventoryappears in the Tag panel.Select the BK element in the Structure pane.
Click Inventory in the Tags panel to rename the BK element.
The
BKelement is renamedInventoryin the Structure pane.
This structure is no better than the previous one, but you’re not finished, yet.
Select New Element from the Structure pane menu. Select BK from the drop-down menu. Click OK.
A
BKelement appears in the Structure pane as a child element ofInventory.Drag the Book element into the BK icon (see Chapter 4, Lesson 4-15).
The
Bookelement becomes a child element of the newBK.The structure is now ready for a multisection workflow.
Select Inventory in the Structure pane. Import myBooksprice.xml. Click Open.
Note that the Import into Selected Element checkbox is selected by default.
Deselect all checkboxes in the XML Import Options dialog. Click OK.
A
BK2element appears belowBKin the Structure pane.Drag the A-Master icon to the Pages panel beside the page 1 icon.
A new page appears in the panel.
Navigate to page 2.
Using the Text tool, create a new text frame from the left to the right margins, approximately 3 picas tall, at the top of the page.
In this frame you will create a descriptive header for the pricelist to identify the columns of data. The header must be inserted in a separate non-structured frame or it would be cloned along with the rest of the placeholders.
Type 2008 Book Pricelist. Press Enter/Return to create a new paragraph.
Type Format. Press the Tab key. Type Title. Inserting a tab character between each, type the words Author, Year, Order #, and Price.
Create a second text frame directly below the first that extends to the bottom of the page.
Drag the first Book2 element from the Structure pane to the new text frame.
The entry for the book A Connecticut Yankee in King Arthur’s Court appears.
Note that this entry does not contain an
imageelement.
Before proceeding, delete all unplaced Book2 elements in the Structure pane.
Only the entry for the book A Connecticut Yankee in King Arthur’s Court remains in the Structure pane in the
dataroot2element.Insert the cursor in the data entry and press Cmd-Y/Ctrl-Y to switch to Story Editor.
The data entry appears in Story Editor displaying its tag structure.
Note the blank first line.
Note the absence of an
imageelement.
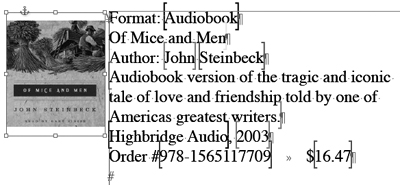
As in previous examples, each XML data element occupies its own line in the text frame, separated by paragraph returns. For the purpose of creating the pricelist, you will delete certain elements altogether and all paragraph returns except the last one. Then you will insert tabs between all the placeholders, except the gap between artistfirstname2 and artistlastname2, which gets a single space.
Delete the blank first line. Select and delete the entire description2 placeholder, including the opening and closing tags.
The
producttype2placeholder moves up to the first line.Insert a tab after the closing producttype2 tag. Delete the paragraph return.
A tab character is inserted between the
producttype2andtitle2elements on the same line.Insert a tab after the closing title2 tag. Delete the paragraph return.
A tab character is inserted between the
title2andartistfirstname2elements on the same line.Insert a space after the closing artistfirstname2. Delete the paragraph return.
The
artistfirstname2andartistlastname2elements appear the same line separated by a single space.Repeat step 21 with each of the remaining elements until they all are on the same line with a single tab character or space inserted between them, as shown in Figure 7.12.
All element placeholders are on a single line separated by tabs.
There is a single paragraph return at the end of the line.

The first section of the catalog is complete. It contains structured placeholders for the product entries and pricelist.
Depending on your preferences, a catalog can be created in one file or in multiple files using InDesign’s book feature. For this example, we keep it simple by using InDesign’s section feature.
Show the Pages panel.
The current document contains two pages in one section.
Select the A-Master in the Pages panel. Select Master Options for “A-Master” from the Page panel menu.
Rename the page prefix BK and the page Name as Books. Click OK.
The BK-Books master appears in the Pages panel.
Icons for pages 1 and 2 display the BK prefix.
With the BK-Books master selected, choose Duplicate Master Spread “BK-Books” from the Pages panel menu.
A new master spread called BK-Books copy appears in the Pages panel.
Select Master Options for “BK-Books copy” from the Pages panel menu. Change the master page prefix and name to AB-Audiobooks. Click OK.
The new master page is renamed AB-Audiobooks.
Repeat steps 4–5 to create a third set of master pages. Name them MV-Movies.
Drag the AB-Audiobooks master down beside page 2 to create two new pages.
Two AB pages appear in the Pages panel as pages 3 and 4.
Click on the first AB page. Select Numbering & Section Options from the Pages panel menu.
Enter the specifications shown in Figure 7.13. Click OK.
The page is number 1 in the new AB section.
Repeat steps 7–9 to create a new section with two pages using the MV-Movies master.

The document contains six total pages in three sections.
Before the catalog template can be complete, you first have to create product and pricelist structures for the Audiobook and Movie sections.
Select the Inventory element and import the XML content, as in Lesson 7-8, steps 2–4, for each section in the following order:
myAudiobooks.xml
myAudiobooksprice.xml
myMovies.xml
myMoviesprice.xml
In the XML Import Options dialog deselect all checkboxes before clicking OK.
Each new element is added consecutively.
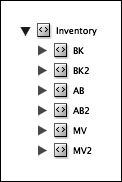
The Structure pane displays six child elements—
BK,BK2,AB,AB2,MV,MV2—within theInventoryroot.
Navigate to page 1 of the AB section.
Option-click/Alt-click on the triangle in front of the AB element in the Structure pane.
The data from myAudiobooks.xml is revealed.
Drag the first Audiobook element to the main text frame on AB-1.
The master text frame is filled by the audiobook data entry.
Structure the entry as in Lesson 7-10, steps 8–18. Apply the Object style named Cover-image to the anchored graphic frame. The completed structure is shown in Figure 7.14.
Navigate to page 2 of the AB section.
Using a child from the AB2 element in the Structure pane, create the pricelist structure for the audiobooks section as shown in Lesson 7-12, steps 12–22. The completed audiobooks pricelist structure should appear as shown in Figure 7.15.
Create product (Figure 7.16) and pricelist (Figure 7.17) structured placeholders for the MV-Movies section using the appropriate elements from the Structure pane.
The placeholders in all three sections are complete and ready for formatting.
To complete the template the final task is to assign Paragraph styles to the data entries.
Load all styles from BookCatalogPricelist.indt.
Select Map Tags to Styles from the Tags panel menu.
Click the Map By Name button.
All tags are mapped automatically to correspondingly named Paragraph and Character styles, the tags that do not have matching styles are left unmapped.
Map the producttype2 tag to the Pricelist Paragraph style. Click OK.
The placeholders throughout the layout adopt the formats specified by the Paragraph styles.
Apply Pricelist Main Head to the first line of the pricelist header.
Apply Pricelist Header to the second line of the pricelist header.
Because the design combines elements together in several places, we make liberal use of nested styles to format the text. Take a few minutes to check out the specifications before proceeding.
The master placeholders for the catalog section are in place and formatted, and you’re ready to import data.
The placeholder structures in the template you just saved should be similar if not exactly like the template BookCatalogInventory.indt used in Lesson 7-5. If you study the Structure pane of the new template shown in Figure 7.18, in the Inventory root element you’ll see the six child elements, BK, BK2, AB, AB2, MV, and MV2, which correspond to the XML files you created in Lessons 7-9 and 7-11. You could import these files one at a time, targeting the specific element as in Lesson 7-2, but we have a better idea. By combining all six into one XML file you can import all the data in one operation, savings tons of time and effort.
Open myBooks.xml in TextEdit, Notepad, or your favorite XML editor.
Select File > Save As. Name the file myInventory.xml. Click Save.
Note that the root element is named <dataroot>.
Select the <dataroot> tag. Type <Inventory>. Remember to match the spelling and case of the element used in your template structure.
Scroll to the bottom of the XML code, locate and select the closing </dataroot> tag.
Type </Inventory>. Remember to match the spelling and case of the element used in your template structure.
Save the file.
By adding the <Inventory></Inventory> tags at the beginning and end, you have matched the root structure of your template. Now all you have to do is insert the code from other XML files to complete the structure
Open myBooksprice.xml.
Select and delete the processing instruction: <?xml version="1.0" encoding="UTF-8"?>.
Press Cmd-A/Ctrl-A to select all the code in the file. Press Cmd-C/Ctrl-C to copy the code. Close the file. Don’t save the changes.
In myInventory.xml, insert the cursor in front of the closing </Inventory> tag. Press Cmd-V/Ctrl-V to paste the code from myBooksprice.xml.
The code for the books section pricelist is inserted between the closing
</BK>and closing</Inventory>tags.If the file is properly structured, press Cmd-S/Ctrl-S to save it.
Repeat steps 7–11 to insert the code from the files: myAudiobooks.xml, myAudiobooksprice.xml, myMovies.xml, and myMoviesprice.xml in the same sequence.
If the file is properly structured, press Cmd-S/Ctrl-S to save it. Close the file.
Well, this is the moment of truth. Everything you did up until now has led to this point. Let’s see whether all your hard work has paid off. Cross your fingers.
Open myBookCatalogInventory.indt.
Select the Inventory element in the Structure pane.
Import myInventory.xml.
Select only the following checkboxes in the XML Import Options dialog:
Clone repeating text elements
Only import elements that match existing structure
Do not import contents of whitespace-only elements
Deselect all other checkboxes. Click OK.
After a moment the XML content populates the Structure pane and replaces the placeholder in each individual section.
Show page 1 in the BK-Books section. Drag the first BK element to the main text frame.
The frame color changes to match the
BKelement tag color.The frame fills with identically formatted book entries.
A graphic frame is anchored to the left of each data entry.
The overset (+) symbol appears at the bottom of the frame.
Click the overset symbol to load the remaining text. Insert two pages after BK-1, based on the BK-Books master. Flow the content manually into each of the pages. Insert additional pages as necessary until all the overset content is exhausted.
Navigate to the pricelist in the BK-Books section. Drag the first BK2 element from the Structure pane to the pricelist frame.
The frame color changes to match the
BK2element tag color.The pricelist fills with identically formatted product data.
Repeat steps 6–8 for the Audiobook and Movie sections until all the product and pricelist data has been inserted.
All the product data and images are now displayed.
There’s one last chore. You’re ready to send the catalog to the press and you want to remove all the empty frames before sending out the file. Can you remember how to do it?
Select the Inventory element in the Structure pane. Re-import myInventory.xml.
Select the following checkboxes in the XML Import Options dialog:
Clone repeating text elements
Only import elements that match existing structure
Do not import contents of whitespace-only elements
Delete elements, frames, and content that does not match imported XML
Deselect all other checkboxes. Click OK.
The XML content is imported once more, but this time the anchored frames for products that don’t have cover photos are removed.
It’s a thing of beauty. With a little advance prep work you have created a complete product catalog with a few clicks of the mouse. We don’t know how we’re ever going to get that silly grin off your face.