
After discussing API design and implementations, it is time to check out a few existing APIs that are publicly available. Publicly, in most cases, means that a developer account must be created. This is usually free.
The referenced APIs require a different mix of credentials and have very different reasons for their existence. They provide the opportunity to look back at some important aspects that were discussed in this book to close the loop between theory and practice.
Note
All information in this chapter is based on official documentation and personal experience and conclusions.
Google Maps
https is the URL scheme.
www.google.com is the server hosting the API.
/maps is the maps service.
/place is the current feature.
/Vancouver,+BC is the location to find.
The API is built in such a way that it starts off globally ( www.google.com ) and each part of the URL path narrows the scope of the location. The API can be compared with to funnel, from wide to narrow.
Embedded Maps
Google provides dedicated APIs that support embedded maps for use within a web site. The documentation is freely accessible; to try them out, a Google account is required. Once the account is created, a so-called API_KEY gets issued. The API_KEY is a unique identifier just for your app!
The documentation provides examples that leverage iFrames. These examples can be copied and pasted into your HTML code and are ready to use. However, we are interested in the API that is used:
https://www.google.com/maps/embed/v1/place?key=API_KEY&q=Space+Needle,Seattle+WA
If you look closely, you can find the placeholder API_KEY. Once configured, it will be included in each request. You can also see that the feature has changed from place to embed. There are even two more selectors: v1 and place. v1 indicates the version of this API and place is referred to as the mode (other values are search, view, directions, and streetview).

Looking at Figure 9-1, at least for me, makes it pretty obvious that it is a challenge to manage a large number of APIs. Imagine v1, v2, v3. In addition, all of these APIs take query parameters that are not the same for all of the mode values. You can see why it is so important to invest design time when starting an API-based environment.
HTTP header “referrer”: Provide a list of valid values that Google’s server should accept. A request from another location will fail. The value includes your own web server’s host name.
IP address: Provide a list of IP addresses that Google’s server should accept. A request from any other IP address will fail.
These supported features are not a guarantee that your API_KEY cannot be misused. In fact, the HTTP header can be added to any request. Nevertheless, it’s better than nothing. In addition, the API_KEY can be limited to a set of APIs or just a single one. Trying to access an API that was not listed for this API_KEY will fail.
JavaScript API
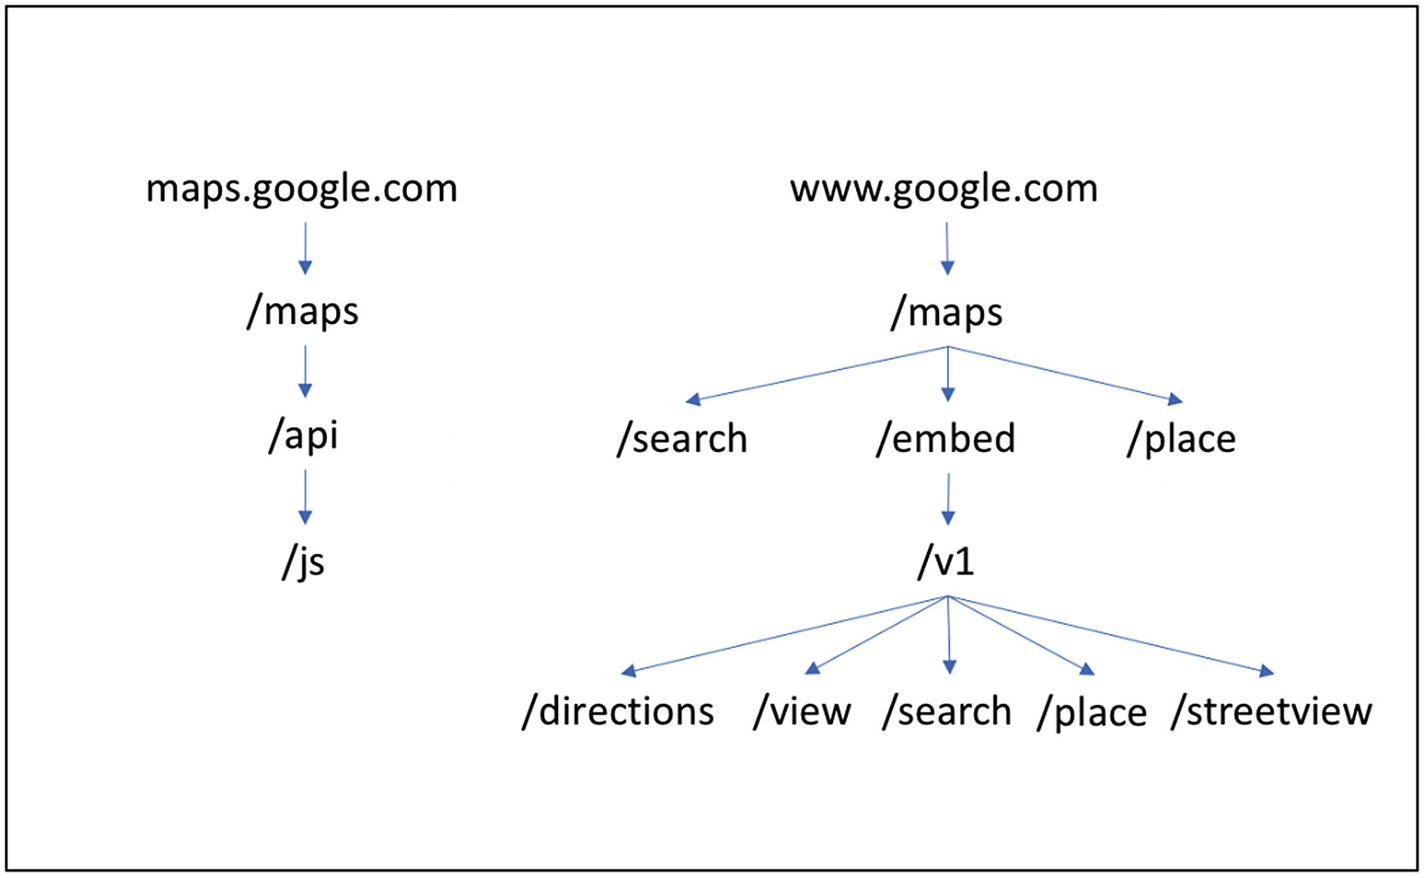
Extended graph on Google Maps APIs
The main difference when using those APIs is the level of support developers receive. In one case (embed), the developer needs to construct the correct APIs himself. In the other case (JS), the JS libraries provide helper methods for retrieving data, so only the initial URL has to be configured. If you look into Googles SDKs for supporting iOS and Android, you will find that no URL needs to be configured at all!
- Different levels of access:
Anonymously
Google account
- Different levels of authentication:
None
API_KEY
OAuth (This was not shown above, but Google also supports OAuth as an authorization scheme for mobile applications.)
- Different levels of support for developers:
None (documentation only) for embed scenarios.
JavaScript: Only one URL needs to be configured.
SDKs: URLs are completely hidden.
Hierarchical URL path
Whenever your organization wants to start an API-based system, check that the relevant properties from above have been addressed. They are not only relevant for Google Maps but for any API. If there are any plans of monetizing APIs, some kind of authentication is required.
In addition, the process of onboarding developers has to be designed. Developers do not simply appear out of nowhere; they need an easy way to join the system. In Google’s case, one account works for all of its services, which makes it very easy to get started! And getting started is done by one sign-up process only!
Microsoft, OpenID Connect
Microsoft is one of the main drivers for OpenID Connect and one of the early supporters. Since OpenID Connect is an identity layer, it is certainly only useful in a context that requires knowledge about users (or resource_owners in OAuth terms). For that, any interaction with Microsoft’s OpenID Connect implementation requires a Microsoft account such as [email protected]. Microsoft’s services are also used with Microsoft Office 365. As for Google, the documentation is publicly available, but an account is required to use the APIs.
OpenID Connect Discovery
As specified in OpenID Connect, Microsoft supports the Discovery endpoint, which can simply be called from a browser:
https://login.microsoftonline.com/common/.well-known/openid-configuration
It returns a JSON document describing the APIs, OAuth SCOPEs, and other values that help developers build an application.
The URL contains the default URL path, which is the same for all OpenID Connect-supporting providers: /.well-known/openid-configuration. It is a reminder that it’s nice to adhere to standards!
https is the URL scheme.
login. microsoftonline.com is the server hosting the API.
/common is the tenant.
/.well-known/openid-configuration is the discovery document location.
The interesting component here is common, representing a tenant. Microsoft’s online services are available as SaaS4 and therefore they are multi-tenant–enabled. This means that anyone, after creating an account, can start leveraging OpenID Connect features for his own purposes. The value common represents the general tenant. For example, if you sign up with an email address, that will be handled as tenant common. However, if you sign up with an email address and create your own user directory, you also get your own tenantId tied to your own user directory. To reference a tenant, the value common is replaced with {tenant}.
Microsoft has chosen to require the tenant in more or less all APIs. For example, the OAuth endpoints, such as /authorize and /token, include the tenantId as well:
https://login.microsoftonline.com /{tenant} /oauth2/authorize
With that, the OpenID Connect Discovery document is tailored to each tenant.
id_token Validation

Virtual spaces
Whatever is configured in the virtual space of the tenant (Figure 9-3) can be extended (with limitations) to partners using simple federation mechanisms. The public space can also be served by restricting users of that space even more.
For example, software developers usually maintain internal documents that include functional specifications and test results for features they are implementing. Since these documents are meant for internal users only, they never get published. Nevertheless, sometimes partners could be more effective if they had at least read-access to those documents. Using OpenID Connect, OAuth-protected APIs, and the concept of tenants could support the use case where partners log in to the internal system but only get read-access to these technical documents.
- Different levels of access:
Anonymously
Microsoft account
- Different levels of authentication:
OAuth for applications (secrets and pki)
User authentications via username, password
Support for MFA (multi-factor authentication)
Multi-tenancy
Whenever your organization wants to provide a SaaS for authentication and authorizations, make sure the relevant properties from above have been addressed. Multi-tenancy especially has to be part of early designs. Trying to add that kind of requirement into a ready-to-use single-tenant system is a very intense process.
IFTTT
Google Maps and Microsoft OpenID Connect are services that can be leveraged by developers. Anyone can start developing against their APIs immediately. IFTTT is slightly different. If you haven’t worked with IFTTT, this is what is does.
IFTTT is a SaaS that hosts applications. Users may combine these applications to implement message flows that follow the pattern “IF <something happens> THEN do <this or that>.” For example, having API- and cloud-enabled lights (e.g. Philips Hue) and cameras (e.g. Netgear Arlo) enable flows such as “IF my camera detects motion THEN turn on my front door light.” For end users specifically, this is done by simply configuring a few dialogs on a web site or mobile app.
If your company wants to become “the lights” or “the camera” provider, you need to provide APIs! IFTTT needs APIs to connect to! Your company needs to become an API provider!
Authentication and Authorization

Overview of connections between components in IFTTT
In IFTTT a user can pick and choose features he wants to use. One feature could be “turn lights on” and the other could be “notify me when my camera detects motion.” To support this, IFTTT needs to be able to communicate with each of those systems. In Figure 9-4, OAuth is emphasized. This is because OAuth can authenticate users and collect users’ authorization decisions. If you are the vendor of the camera system, your system needs to support OAuth as a server! In addition, your server also needs to support an IFTTT API Key.
Let’s have a look how IFTTT APIs are structured. IFTTT provides test endpoints that are, more or less, always the same. And there are application-specific endpoints.
https is the URL scheme.
your-server is your server, hosting the test API.
/ifttt is the indicator of the platform.
/v1 is the API version.
/test is the feature.
/setup is the test step.
You may notice that your-server is shown, instead of having some kind of itfttt-server location! This indicates that IFTTT is communicating as a client only. And, in fact, that is the case! What is not shown here is that IFTTT test requests always include an API_KEY called IFTTT-Service-Key. This has to be supported and validated in your implementation, too!
Here are more APIs for triggers and actions (two different entities in IFTTT of which you may implement both or just one):
Trigger: https://{your-server}/ifttt/v1/triggers/{your-trigger}
Action: https://{your-server}/ifttt/v1/actions/{your-action}
The APIs’ URL paths end on your-trigger and your-action. Regardless of it saying your-*, it is still dictated by the platform. That path element is derived from a trigger or action that you may have implemented. What I like is that there are no questions like How shall I name it? It follows a pattern that makes everyone’s life easy. And, in the end, it does not really matter how it’s called as long as it makes sense in association with a supported feature.
- Easy-to-use web interface:
Easy on-boarding for new developers
- Easy-to-use test framework
Developers are well supported during their implementation phase
- Comprehensive documentation
Practically all needed topics are documented online
- Easy user experience
End users are able to configure an app within minutes with just a few clicks
If your company is in the process of providing a platform for similar features, check out IFTT, which I think is a very good example of a well-designed system.
What to Remember Based on These Examples
Support flexible authentication and authorization schemes.
Plan for free and billable APIs or features of APIs.
Provide comprehensive but well-structured public documentation.
Plan for multitenancy as of the first design sessions (if needed).
Provide easy onboarding methods for developers and users.
Enable partners with privileged access.
Anyone following these guide lines should have a good starting point!
Summary
The discussed APIs serve different purposes, they use different authentication and authorization schemes, and they also monetize their APIs differently. However, they are examples of well-designed systems with an ecosystem that makes it easy for any developer to get involved.
If your company is in the process of starting an API-driven business, it is highly important to look at the whole system: APIs, documentation, accessibility to the system, presentation, features, and usability from different audiences. APIs do not get popular by just existing!