Chapter 2: Principles of API Design
You might be surprised that there is a chapter on API design in a book about API testing and development. Don't designers work on making things look good? An API doesn't really have much to look at, so why would I spend a whole chapter talking to you about API design?
I believe that design, testing, and documentation are just as much a part of creating a quality product as development is. Perhaps they are even more important. Good design can make the life of a developer or tester much easier. Designing something isn't so much about making it look good as it is about ensuring that it brings satisfaction. We humans enjoy things that look nice and so designs can sometimes be focused on the look and feel of something, but even in the realm of APIs where there isn't much to "see," good design can make it much more enjoyable to use and thus improve the quality.
This chapter will go over the principles of API design and cover the following main topics:
- Figuring out the purpose of an API
- Design principles for structuring an API so that it is easy to use
- Creating documentation in Postman
- Using specification languages to design an API before writing any code
The material in this chapter can feel a bit abstract and theoretical, but I have included a few exercises to help you figure out how to use these concepts. I would encourage you to spend the time to work through those exercises and by the end of this chapter, you will be able to use these design principles to come up with great insights for APIs that you are currently working on, as well as having a strong foundation that you can use if you need to create a new API. This chapter will also help you get started with API documentation in Postman. You will also be able to use the RAML specification language to design and model an API and to automatically add requests into Postman.
Technical requirements
The code used in this chapter can be found at https://github.com/PacktPublishing/API-Testing-and-Development-with-Postman/tree/master/Chapter02.
Start with the purpose
We don't just build an API because it is a fun thing to do. We build APIs to achieve a purpose. They help us or our users do something that we want to do more efficiently. This might seem obvious, but let's be honest: we forget to do this far too often.
Design is a difficult domain. Perhaps your company has designers (as mine does). Technical people such as testers and developers can sometimes dismiss what designers do as "just making things look pretty," but the reality is that good design is very hard. Good design makes something that is suited for its purpose. This book is not a book on designs (if you want to read more about the theory of design, check out books such as The Design of Everyday Things by Don Norman). However, if you are interested in good-quality APIs, you need to think for a few minutes about the purpose of your API and how you will design it to meet that purpose.
Knowing that you need to do something is an important first step. Unfortunately, many talks, articles and books stop there. But what good does that do you? You are convinced that it makes sense to design an API with the purpose in mind, but what is the purpose? What do you do if you don't know? How do you figure out the purpose of your API?
Figuring out the purpose
You want to figure out the purpose of your API, but how do you do that? There are a few simple strategies that you can use for this. The first thing is to ask questions. If you or your team is writing an API, you were probably asked to do it by someone. Perhaps your manager or the product manager or one of the clients. Someone asked you to create the API. Talk to that person! Why do they want the API? What do they want to do with it? What problems do they think it will solve? Ask them these questions and see if you can figure out some of what the purpose of the API is.
Personas
Another simple strategy that you can use to think of personas. A persona is simply a made-up person that you use to help you think through who might be using your API. For example, you might have a persona representing a user in your company who will be using the API to develop user interfaces, or you might have a persona of a software engineer who works for one of your clients and is using the API to develop a custom application. Thinking through different kinds of users and considering how they might interact with your API will help you with understanding the purpose that it serves.
When creating a persona, think about things that go beyond just the technology that the person might use or understand. Think about things like the goals and motivations they might have and the things that might frustrate them. It's also helpful to think of some personal details that might make them a bit more relatable to you. For example, you could think about whether they are a dog person, or whether they have kids. Is there some other thing that makes them unique? In other words, what kind of person are they? Writing down details like this can seem a bit silly at times, but it helps you to better empathize with this persona and as you are able to do that you will be more able to put yourself in their shoes and understand the kinds of things that are important to them. The more you understand this, the better you will be able to understand the purpose of your API.
The why
At the heart of figuring out the purpose is the question why. Why are we making this API? The why is almost always about solving a problem. A great way to figure out the purpose of an API is to figure out what problem it solves. Does it make it easier to write UI elements? Does it enable clients to customize the application? Does it enable third-party developers to use your platform? Does it simplify integrations with other applications? What problem is your API solving? Answer these questions and you will be well on your way to knowing the purpose of your API.
Important note
This exercise of figuring out the purpose of an API doesn't just apply to new APIs. If you are working with an existing API, there is a lot of value in understanding the purpose. It may be too late to radically alter the design of the API, but there is no more important threat to quality than not actually helping people solve the problems they need to solve. If nothing else, understanding the purpose of an existing API that you are testing will help you figure out which bugs are important and which ones might not matter as much. It takes some skill to figure out which bugs are urgent, and which are not, and understanding the purpose of the API helps with that.
Try it out
I have just given some practical advice, but it won't do you much good if you don't use it. This book isn't just about filling your head with some theory. It is about helping you immediately get better at testing APIs. A little later in this book, I will show you some of the tools that Postman has for helping with API design, but right now I want you to pause and try out what we have just been talking about.
Take an existing API that you have been working on and see if you can write down the purpose in two or three sentences. Use the following steps to work through the process:
- Identify at least two key stakeholders for the API. Do this by asking the question "who wants (or wanted) this API built?" Write down these stakeholder names.
- If possible, talk to those stakeholders and ask them what they think the purpose of this API should be and why they want to build it. Write down their answers.
- Create preferably two (but at least one) personas that list out the kinds of people that you think will be using the API. What skill level do they have? What work are they trying to accomplish? How will your API help them?
- Write down what problem(s) you think the API will solve.
- Now, take all the information that you have gathered and look through it. Distill it down into two or three sentences that explain the purpose of the API.
Creating usable APIs
Usability is about the balance between exposing too many controls and too few. This is a very tricky thing to get right. On the extremes, it is obvious when things are out of balance. For example, the Metropolitan Museum of Art has an API that gives you information about various art objects in their possession. If all the API did was provide one call that gave you back all that data, it would be providing too few controls. You would need to do so much work after getting the information that you might as well not use the API at all. However, if on the other hand, the API gave you a separate endpoint for every piece of meta data in the system, you would have trouble finding the endpoint that gave you the particular information you wanted. You would need to comprehend too much in order to use the system.
You need to think carefully about this if you want to get the balance right. Make sure your API is providing users with specific enough data for the things they need (this is where knowing the purpose comes in handy) without overwhelming them. In other words, keep it as simple as possible.
Usable API structure
One thing that can help create a usable API is to use only nouns as endpoints. If you want users to be able to understand your API, structure it according to the objects in your system. For example, if you want to let API users get information about the students in a learning system, don't create an endpoint called /getAllStudents. Create one called /students and call it with the GET method.
Creating endpoints based on nouns will help you better structure your data. For example, if you have /students as an endpoint, you can easily add an endpoint for each student at /students/studentId. This kind of categorization structure is another helpful API design principle to keep in mind. Creating a structure like this maps the layout of the API onto the kinds of things that the API user needs information about. This makes it much easier to know where to find the relevant information.
A structure like this works nicely, but does it really match up with how users will interact with the API? If I am looking for information about a student, am I going to know what their ID is in the API? Perhaps, but more likely I will know something like their name. So, should we modify the structure to have an additional endpoint like /students/name? But what if we are looking at all the students of a certain age? Should we add another endpoint /students/age? You can see where I am going with this. It can get messy pretty quickly.
This is where query parameters are helpful. A query parameter is a way of getting some subset of the category based on a property that it has. So, in the examples that I gave earlier, instead of making "name" and "age" be endpoints under the "students" category, we could just create query parameters. We would call /students?name='JimJones' or /students?age=25. Query parameters help keep the endpoints simple and logical but still give the users the flexibility to get the information they are interested in in an effective way.
Good error messages
A usable API helps the users when they make mistakes. This means that you give them the correct HTTP codes when responding to a call. If the request is badly formatted the API should return a 400 error code. I won't list all the HTTP codes here as they are easily searchable online but ensuring that your API is returning codes that make sense for the kind of response you are getting is an important quality consideration.
In addition to the HTTP codes, some APIs may return messages that let you know what possible steps you can take to correct this issue. This can be very helpful, although you will want to be careful that you don't reveal too much information to those who might be bad actors.
Document your API
One often-overlooked yet vitally important aspect of a good-quality API is proper documentation. Sometimes testers and developers can overlook documentation as something that is outside of their area of expertise. If you have a team that writes documentation for your API, it is certainly fine to have them write it, but don't treat documentation as a second-class citizen! Documentation is often the first exposure people have to your API and if it does not point people in the direction they need to go, they will get confused and frustrated. No matter how well you have designed your API, users will need some documentation to help them know what it can do and how to use it.
Documenting with Postman
Postman allows you to create documentation directly in the application. In Chapter 1, API Terminology and Types, I showed you how to create a request to the GitHub API. Of course, GitHub has its own API documentation, but let's look at how you can create documentation in Postman using that API request. If you did not create the GitHub collection, you can import the collection from the GitHub repo for this course:
- Download the GitHub API Requests.postman_collection.json collection file from https://github.com/PacktPublishing/API-Testing-and-Development-with-Postman/tree/master/Chapter02.
- In Postman, click on the Import button.
- On the resulting dialog, click on the Upload Files button and browse to where you downloaded the collection file and select it.
- Click on the Import button and Postman will import the collection for you.
Once you have the collection set up, you can create some documentation with the following steps:
- The first thing to do is to navigate to the GitHub API Requests collection and click on it.
- To the right of the application, you will see a few icons. Click on the Documentation icon as shown in the following figure:
Figure 2.1 – Open the Documentation panel
This brings up the Documentation panel.
At this point, you can edit the documentation for the collection itself, if you want. There might be times when you want to do this, but in this case, you only have one request so there probably isn't too much documentation to put in here. Instead, go to the Get User Repos request as shown in the following figure:

Figure 2.2 – Go to the request documentation
If you click on it, you will be taken to that request and you can once again use the documentation icon on the right of the page to open the documentation panel for the request. Click on the edit icon and you can start typing your documentation for this request directly into the provided text box.
Important note
Postman API descriptions support Markdown. If you are not familiar with Markdown, it is a simple set of rules that can be used to format text. A great resource showing the kinds of commands available is the Markdown cheat sheet, which you can find at https://github.com/adam-p/markdown-here/wiki/Markdown-Cheatsheet.
Let's write down some documentation for this endpoint:
- At this point, just type something simple in here so that you can try it out. Type in something like this: This Endpoint will get information about the given user.
- Click Save and now you are ready to publish this.
- In order to publish, click on the View complete collection documentation link at the bottom of the panel, as shown in the following figure:
Figure 2.3 – The view collection documentation link
- Click on the Publish icon, as shown in the following figure:

Figure 2.4 – Publish documentation
- This opens a web page where you can choose various formatting options for your documentation. Once you have set up the options that you want on this page, you can scroll down and click on the Publish Collection button to make this documentation available to others.
- The published page tells you the URL from which you can see the documentation that you made. Click on that and you can see a nice documentation page.
When looking at this documentation, I think it could be improved if the example request showed a response. You can easily add examples in Postman with the following steps:
- Return to Postman and once again go to the Get User Repos request.
- Click on the Send button for the request to send it off. Now go down to the response and Click on Save Response, and choose the Save as example option.

Figure 2.5 – Adding examples
- Postman will automatically add an example to this request. Give it a meaningful name and click on the Save button. Return to your API documentation page and refresh it. You will now see an example request and response:
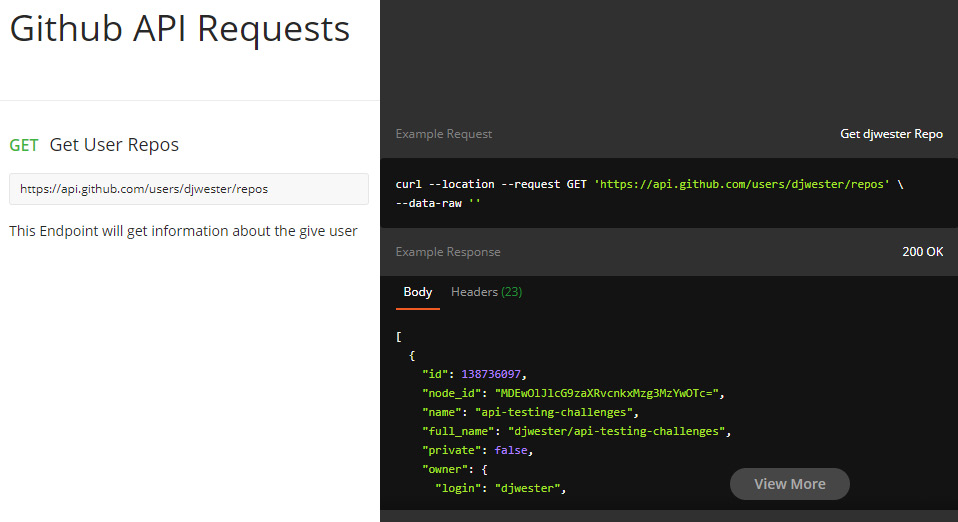
Figure 2.6 – Example API request and response in documentation
It is worth spending more time exploring how to document your API well, but these features make it straightforward to do in Postman. Whether you are a tester or developer and whether you are working on a new API or one that has been around for some time, I would encourage you to take the time to properly document your API. Good documentation will make a world of difference to your users and will also lead to you and your team having a better understanding of how it works. It is well worth the time that it takes, especially when working with a tool like Postman that makes it so easy to do. In fact, although this is not a book on API documentation, I think it is worth spending a few minutes on some of the theory of how to write good API documentation.
Good practices for API documentation
One key practice to keep in mind when writing API documentation is consistency. In this chapter and the previous one, I have been giving you a lot of API-related terminology. There is always going to be some variation in how terms are used, but as much as possible try to use terms in a way that is consistent with how other APIs use them. You should also try to have as much internal consistency as possible in your documentation. This means things like using the same terms to mean the same thing throughout the documentation. It also means that as much as possible you want your API structure to be consistent so that you don't have to explain similar things in different ways throughout your documentation.
Sometimes, in reading or creating documentation, things will jump out to you. You might see how two things that are quite similar are laid out in very different ways. I think this is another benefit of good API documentation. It lets you see where there might be flaws in the API layout.
Another very important thing to keep in mind when it comes to API documentation is the importance of examples. We already saw how easy it is to make examples in Postman documentation. Take advantage of that! It has been said that a picture is worth a thousand words. I think that an example in an API doc is worth nearly as many. Some things are difficult to explain well in words and it takes seeing it done in an example for people to grasp how it works. Do not underestimate the power of a well-crafted example.
One final thing to keep in mind with API documentation is a problem that happens with all documentation. It gets out of date. Code changes, and that applies to API code as well. Over time, what your API does and the exact ways that it does it will change. If you don't keep your documentation up to date to match those changes, the documentation will soon cease to be useful.
You have already seen how you can keep your documentation right with your tests and how you can generate examples directly from your requests in Postman. Take advantage of that and make sure your documentation stays up to date. Postman will take care of a lot of the work of it for you by updating all the documentation automatically every time you publish.
There are some specification tools that can help automatically generate documentation. These kinds of tools can help keep documentation and tests up to date with the latest code changes. I will take you through some of those in more detail in Chapter 4, Considerations for Good API Test Automation. In that chapter, I will particularly focus on the Open API specification, as it is a powerful and popular API specification tool, but there are other API specification tools that we can use.
There is an ongoing debate in the API development community that mirrors broader debates in the software development community as whole. The debate boils down to how much time you should spend upfront on design. Some will argue that since the only good software is software that helps someone solve a problem, we need a "ship first" mentality that gets our ideas out there. We then fill out the design based on the kinds of things clients actually need and care about. Others will argue for a "design first" approach where you rigorously define the API behavior before you write any code. As with most things, you are probably best off avoiding either ditch and finding the middle ground between them. Modern tooling can help us do this. For example, there are tools that will allow you to create simple designs and then use those designs to get feedback from clients. Since this is a chapter about API design, I do want to spend a bit of time talking about a specification language that is meant to help shift the focus from merely documenting your API to helping with API design.
RESTful API Modeling Language
RAML, which stands for RESTful API Modeling Language, is an API specification language that, as the name implies, helps with modeling APIs. You can read more about it on the RAML website, https://raml.org/. RAML has some tools that can help with API design but getting into those is beyond the scope of what I want to cover in this book. For now, I just want to introduce you to this specification and let you see how you can use it to design an API that meets the design criterion I've talked about in this chapter.
Getting started with RAML is as easy as opening a text editor and typing in some text. RAML is meant to be human-readable and so the specification is written in a simple text-based format. RAML is also structured hierarchically, which makes it easy to create the kind of usable API structures that I've talked about. In the next section, I will walk you through an example of using this modeling language to design an API and leverage the power of that design in Postman. You will then get to try it out on your own as well!
Designing an API
I have talked about a lot of the theory of API design, so now I want to look at how you can use Postman to help you out with designing an API. API design does not only apply to new APIs that you create. In fact, using the principles of API design when testing an existing API is a great way to find potential threats to the value of that API, but for the sake of understanding this better, let's look at how you can design an API from scratch. If you understand the principles through this kind of example, you should be able to use them on existing APIs as well.
Case study – Designing an e-commerce API
Let's imagine that we want to design an API for a very simple e-commerce application. This application has a few products that you can look at. It also allows users to create a profile that they can use when adding item to their cart and purchasing them. The purpose of this API is to expose the data in a way that can be used by both the web and mobile application user interfaces. Your team has just been given this information and you need to come up with an API that will do this.
So, let's walk through this and see how to apply the design principles we've covered. I will start with a simple RAML definition of the API. The first thing we need is to create a file and tell it what version of RAML we are using. I did this by creating a text file in Visual Studio Code (you can use whatever text editor you prefer) called E-Commerce_API-Design.raml. I then added a reference to the top of the file to let it know that I want to use the 1.0 version of the RAML specification:
#%RAML 1.0
---
I also need to give the API a title and to set up the base URI for this API, so next I defined those in the file:
title: E-Commerce API
baseUri: http://api.ecommerce.com/{version}
version: v1
Defining the endpoints
This is a made-up API so that baseURI reference does not point to a real website. Notice also how the version has been specified. Now that I have defined the root or base of the API, I can start to design the actual structure and commands that this API will have. I need to start with the purpose of this API, which is to enable both a website and a mobile app. For this case study, I am not going to dive too deep into things like creating personas. However, we do know that this API will be used by the frontend developers to enable what they can show to the users. With a bit of thought, we can assume that they will need to be able to get some kind of product information that they can show the users. They will also need to be able to access a user's account data and allow users to create or modify that data. Finally, they will need to be able to add and remove items from the cart.
With that information in hand about the purpose of the API, I can start to think about the usability and structure of this API. The frontend developers will probably need a /products endpoint to enable the display of product information. They will also need a /users endpoint for reading and maintaining the user data and a /carts endpoint that will allow the developers to add and remove items from a cart.
These endpoints are not the only way that you could lay out this API. For example, you could fold the carts endpoint into the users one. Each cart needs to belong to a user, so you could choose to have the cart be a property of the user if you wanted. It is exactly because there are different ways to lay out an API, that we need to consider things like the purpose of the API. In this case, we know that the workflow will require adding and removing items from a cart regularly. Developers will be thinking about what they need to do in those terms and so to make them call a "users" endpoint to modify a cart would cause extra data to be returned that they do not need in that context, and could also cause some confusion.
Now that I have picked the endpoints I want to use in this API, I will put them into the RAML specification file. That is simply a matter of typing them into the file with a colon at the end of each one:
/products:
/users:
/carts:
Defining the actions
Of course, we need to be able to do something with these endpoints. What actions do you think each of these endpoints should each have? Take a second to think about what actions you would use for each of these endpoints.
My initial thought was that we should have the following actions for each endpoint:
/products:
get:
/users:
get:
post:
put:
/carts:
get:
post:
put:
Think about this for a minute, though. If I only have one endpoint, /carts, for getting information about the carts, I need to get and update information about every cart in the system every time I want to do something with any cart in the system. I need to take a step back here and define this a little better. The endpoints are plural here and should be representing collections or lists of objects. I need some way to interact with individual objects in each of these categories:
/products:
get:
/{productId}:
get:
/users:
post:
get:
/{username}:
get:
put:
/carts:
post:
get:
/{cartId}:
get:
put:
Here, I have defined URI parameters that enable users to get information about a particular product, user, or cart. You will notice that the POST commands stay with the collection endpoint as sending a POST action to a collection will add a new object to that collection. I am also allowing API users to get a full list of each the collections as well if they want.
Adding query parameters
In Chapter 1, API Terminology and Types, you learned about query parameters. Looking at this from the perspective of the users of the API, I think it would be helpful to use a query parameter in the carts endpoint. When a user clicks on a product and wants to add that product to their cart, the developer will already know the product ID based on the item the user clicked on. However, the developer might not have information about the cart ID. In this case, they would have to do some sort of search through the carts collection to find the cart that belonged to the current user. I can make that easier for them by creating a query parameter. Once again, I am using the design principles of usability and purpose to help create a good model of how this API should work.
In RAML, I just need to create a query parameter entry under the action that I want to have a query parameter:
/carts:
post:
get:
queryParameter:
username:
/{cartId}:
get:
put:
I have designed the structure of the API using the principles I laid out, and hopefully you can see how powerful these principles are in helping you narrow down a broad space into something manageable and useful. When it comes to creating a RAML specification for an API, you would still need to specify the individual attributes or properties of each of the endpoints and query parameters that you want to create. I won't go into all those details here. You can look at the RAML tutorials (https://raml.org/developers/raml-100-tutorial) to learn more about how to do this. I didn't give enough information about this imaginary API that we are designing to fill out all the properties. We don't know what information each product or user has for example. In real life, you would probably get this information based on what is in the database and then build out the examples and attributes based on that.
Using the RAML specification in Postman
This might not be a fully fledged API specification, but it is enough for us to use in Postman! Click on the Import button in Postman and then click on Upload Files and select the .raml file from this case study. Ensure that both the request and response parameter generation options are set to use schema and click on Import. Postman will parse the specification for you and automatically create a collection with calls defined for each of the endpoint and action combination that you created in the specification file. Pretty cool, isn't it?
Once you have learned some more Postman features, I will show you how to use these concepts to dive a lot deeper into the design process for APIs. For now, though, I want you to be able to think about how API design intersects with the quality of the API. In fact, I want to give you a little challenge to try out.
Modeling an existing API design
You have been learning how to think through API design. I gave you some principles for this and then walked you through putting the principles into practice in a case study. Now I want you to see if you can use these principles on an API that you are currently working on. If the company you are working at does not have an API that you can use, you can of course just find a public API to try out this exercise with.
Using the API you have selected, work through the following steps to apply the principles of API design:
- Add each of the endpoints to a RAML file. Make sure to follow the hierarchy of the API in that file.
- Spend a bit of time thinking about what the purpose of the API is and reflecting on if the structure that you see here fits with that purpose. What other ways might you design the API? Could you improve the layout to better fit the purpose?
- If you were designing this API, what actions and query parameters would you give to each endpoint? Create a copy of the file and fill it in with what you think you would do with this API.
- In the original file, add in the actual actions and query parameters that the API has. How do they compare to the ones that you made in the copy of the file?
If you want, you can import the file into Postman and as you learn more about testing and other features that you can use in Postman, you will already have a collection of requests ready to use.
Summary
Designing an API takes careful thought. An API is software and the whole reason we write software is to help people solve problems. APIs need to solve a problem, and the better they solve that problem, the better quality they are. One thing that can help with API quality is to have a well-designed API. A well-designed API is one that is designed to fulfill the purpose for which it is used. In this chapter, you learned how to think through the purpose of an API by coming up with personas. You also learned some questions that you can ask to get to heart of why an API needs to exist in the first place.
This chapter also showed you some way to structure and document APIs. You learned about API specification and how you can use RAML to create design driven specification for an API. And, of course, you also got to try these things out and put them into practice! With a firm grasp of principles of API design, you are ready to move on to the next chapter and learn about what it takes to create good API test automation.