Chapter 1. High-speed beginner ramp-up
This chapter covers
- Introducing the MVC pattern
- Dissecting the default application template
- Creating your first ASP.NET MVC 2 project
- Handling user input
- Working with the view
This chapter is intended to provide you with a quick, high-level overview of the ASP.NET MVC Framework. We’ll create a basic sample application, collect user input, and display some web pages.
But first, let me introduce you to your new friend...
1.1. Welcome to ASP.NET MVC
ASP.NET MVC is a new web application framework from Microsoft. It was first unveiled in November 2007 and has since seen more than 10 releases and 2 major versions. With the high number of releases, this framework has received quite a bit of feedback and is much more stable than some other new frameworks from Microsoft, such as Windows Workflow Foundation. MVC stands for Model-View-Controller, a pattern that’s becoming increasingly popular with web development frameworks.
ASP.NET MVC is both an alternative and a complement to Web Forms, which means you won’t be dealing with pages and controls, postbacks or view state, or complicated event lifecycles. Instead, you’ll be defining controllers, actions, and views. The underlying ASP.NET platform is the same, however, so things like HTTP handlers and HTTP modules still apply, and you can mix MVC and Web Forms pages in the same application.
We’ll cover all the major features of the framework throughout this book. Here are some of the benefits you’ll learn about:
- Full control over HTML
- Full control over URLs
- Better separation of concerns
- Extensibility
- Testability
As you read the chapters in this book, these benefits will become increasingly apparent. For now, we’ll briefly look at the underlying pattern the framework is based on. Why MVC? Where did it come from?
1.2. The MVC pattern
The Model-View-Controller (MVC) pattern is an adaptation of a pattern generated from the Smalltalk community in the 1970s by Trygve Reenskaug. It was popularized for use on the web with the advent of Ruby on Rails in 2003.
The components of MVC are straightforward:
- The model— The “thing” that your software is built around. If you were building a blog, your models might be post and comment. In some contexts, this might refer to a view-specific model, which you’ll learn about in the next chapter.
- The view— A visual representation of a model, given some context. It’s usually the resulting HTML that the framework renders to the browser, such as the HTML representing the blog post.
- The controller— A mediator. The controller processes input, acts upon the model, and decides what to do—render a view, redirect somewhere else, and so on. The controller might pull the most recent comments for a blog post and send them to a view.
To see how these components interact with each other, take a look at figure 1.1.
Figure 1.1. The relationship between the model, view, and controller. The solid lines indicate a direct association, and the dashed lines indicate an indirect association. (Graphic and description used with permission from Wikipedia.)

Now that you have a rudimentary overview of the ASP.NET MVC Framework and the MVC pattern in general, you’re armed to create your first project.
1.3. Creating your first ASP.NET MVC 2 project
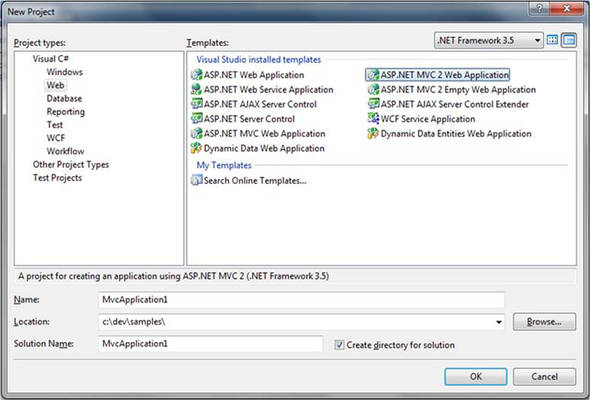
We’ll create a web application with some guestbook features. Fire up Visual Studio, and go to File > New Project. You’re presented with the dialog box pictured in figure 1.2.
Figure 1.2. The New Project dialog box. Notice the ASP.NET MVC 2 project templates.
Note
The rest of this book assumes that you have ASP.NET MVC 2 installed, either on Visual Studio 2008 or on Visual Studio 2010.
In the left pane, under Project Types, select Web. In the Templates pane, select ASP.NET MVC 2 Web Application. Give the application a name and location, and click OK.
You’re greeted with a dialog box (figure 1.3) that asks you if you want to create a unit test project. Normally we’d recommend creating a unit test project because most nontrivial projects need automated tests, but to keep this chapter focused, we’ll select No for now.
Figure 1.3. Visual Studio prompts you to create a unit test project. For now, select No.

Your project is ready to go. Visual Studio created a number of folders for you. Let’s examine them and see what their purposes are:
- Content— Static files such as CSS and images
- Controllers— Your application’s controller classes
- Models— Your application’s models
- Scripts— JavaScript files
- Views— Your application’s views
Take a look at the folder structure for a minute. You’ll work with this structure for all your ASP.NET MVC projects, so everything will eventually look familiar.
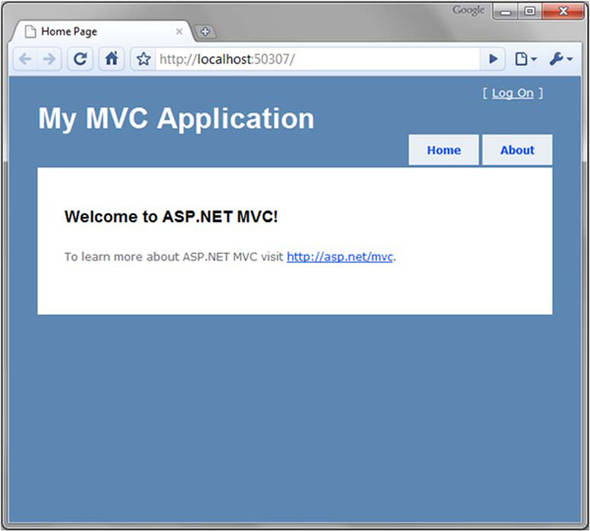
The application that Visual Studio has given you is a working sample of the ASP.NET MVC Framework. That means you can just run it (Ctrl-F5) to see how it works. Go ahead and do that now.
Your browser should be opened, and you should be looking at a page that looks like figure 1.4. Notice that the URL is simply http://localhost:port/. No path is specified. Let’s examine how this view was rendered.
Figure 1.4. The default ASP.NET MVC project template is fully functional.
The initial request to the application was made to / (the root of the site). We can check the routes to see how the application responds to URLs. Routes are a way for you to customize the URLs that users use when interacting with your site. You’ll learn about routing in depth in chapter 16, but we’ll cover what you need to know to get started.
Routes are (by default) defined in the Global.asax. Open this file and you should see the code shown in listing 1.1.
Listing 1.1. Route definitions

Notice that two entries are defined. The first is an IgnoreRoute, and that basically tells the framework not to worry about anything matching the specified path. In this case, it says not to process any paths containing the .axd file extension, such as Trace.axd. The second entry, MapRoute, is what defines how URLs are processed. This built-in route will suffice for a while, but later on you’ll want to add more routes in order to provide URLs that are specific to your application. Just like how previous versions of ASP.NET decided the URL for you based on the directory structure and the Web Form filename (such as Default.aspx), ASP.NET MVC projects come with a default URL structure. Applications that don’t require custom URL schemes will do just fine with the defaults.
Each route has a name ![]() , a URL definition
, a URL definition ![]() , and optional default values
, and optional default values ![]() . Our first request for / doesn’t have any of these URL pieces, so we look to the defaults. The default values are:
. Our first request for / doesn’t have any of these URL pieces, so we look to the defaults. The default values are:
- controller—"Home"
- action—"Index"
- id—Optional; defaults to null
The route with the template {controller}/{action}/{id} is a generic one and can be used for many different web requests. Tokens are denoted by the inclusion of curly braces, {}, and the word enclosed in braces matches a value the MVC Framework understands.
The most common values that we’ll be interested in are controller and action. The controller route value is a special value that the System.Web.Mvc.MvcHandler class passes to the controller factory in order to instantiate a controller. This is also the route we’ll be using for the rest of the chapter, so we’ll be content with a URL in the form of http://site.org/controllername/actionname.
The basic route handler is an instance of IRouteHandler named MvcRouteHandler. We have complete control and could provide our own implementation of IRouteHandler if we wished, but we’ll save that for a later chapter.
We know now that the controller is Home and the action is Index. Take a look in the Controllers folder and you’ll see a class called HomeController. By convention, all controller classes end with the word Controller. Open this class and you’ll see your first controller class (listing 1.2).
Listing 1.2. The HomeController class
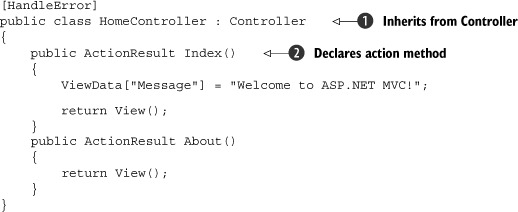
So what defines a controller in ASP.NET MVC anyway? For a class to be considered a controller, it must:
- End with the word Controller
- Inherit from System.Web.Mvc.Controller (or implement IController)

- Contain public methods that return ActionResult (these are called actions)

We know that the Index action is going to be called. In this action method, we have these two statements:
ViewData["Message"] = "Welcome to ASP.NET MVC!";
return View();
The first statement adds a string into a dictionary called ViewData. This is one way of passing data over to the view.
The second line returns the result of a method called View(). This is a helper method, defined in the Controller base class. It returns a new ViewResult object. View-Result is one of the many ActionResult derivatives that you can return from actions.
This ViewResult tells the framework to render a view. You have the option of providing a name for the view, but if you don’t—as in our case—it will just use the name of the action.
So where is this view located? We learned a few minutes ago that the default project structure contains a Views folder. By convention, views are located in a subfolder corresponding to the controller name. The name of the action (again by convention) is the same as the name of the view.
Inside the Views folder you’ll find a folder for each controller in the application, along with a special one named Shared. Open the Home folder (because we’re dealing with HomeController), and open the Index.aspx file. It should look like listing 1.3.
Listing 1.3. The Index.aspx view
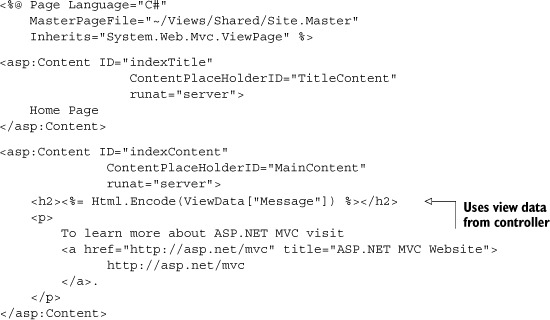
This view uses a master page, which is similar to what you’d see in an ASP.NET Web Forms project. If you’re curious, you can find this in /Views/Shared/Site.Master, but for now we can just focus on the view.
This view will render the data provided by the controller. It shouldn’t contain any complex logic. Keeping the view simple makes it easy to read and maintain, especially because we’ll be mixing code with HTML. In listing 1.3, you can see that it outputs a message inside a code block denoted by <%= %> tags.
To illustrate working with the ASP.NET MVC Framework, we’ll add some guestbook features to this application. The first step is adding a new controller.
1.4. Creating controllers and actions
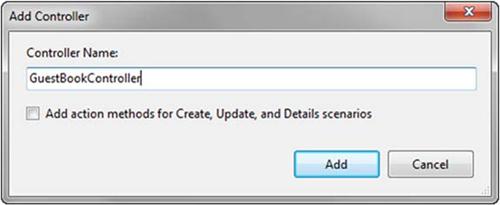
To add a new controller to our site, right-click on the Controllers folder and select Add Controller. In the Add Controller dialog box, shown in figure 1.5, type Guest-BookController in the Controller Name text box. For now, don’t select the check box because we want to write our own actions. Click Add.
Figure 1.5. The Add Controller dialog box in Visual Studio
A class will be created for you that looks like listing 1.4.
Listing 1.4. Creating your first controller
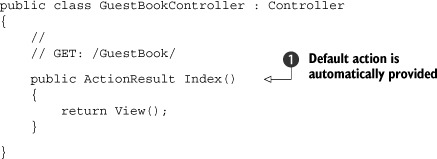
Notice that an initial action method, Index, is created for you ![]() . For this action, we don’t need to do anything except render a view. Let’s do that now.
. For this action, we don’t need to do anything except render a view. Let’s do that now.
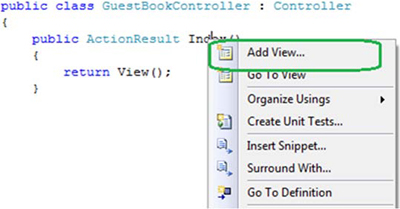
1.5. Creating views
To create a view, right-click on the action method name and select Add View, as shown in figure 1.6.
Figure 1.6. Right-click on an action to create a view.
You’ll see a dialog box asking you for some information about the view (shown in figure 1.7). The view name (by default) is the same name as the action, so verify that Index appears in the View name field. You can ignore the other options for now, and click Add.
Figure 1.7. The Add View dialog box
Visual Studio will automatically create the appropriate folder and place the Index.aspx file in it. Open this file and modify it so that it looks like listing 1.5.
Listing 1.5. The GuestBook Index view
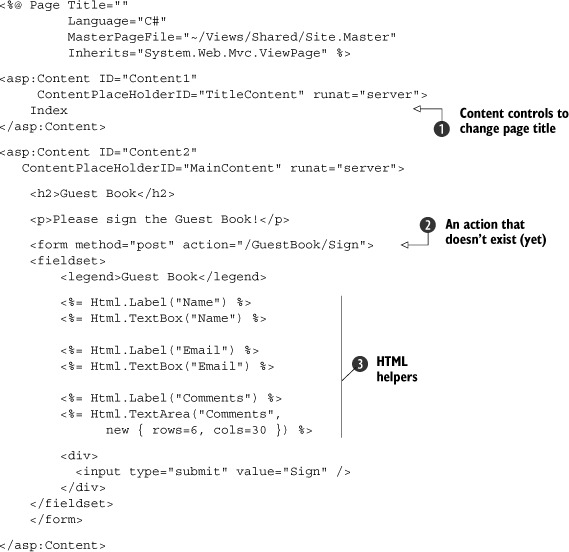
By using Content controls, you can specify sections of content to be placed in different areas on your page. The master page defines the various
ContentPlaceHolders you can use. As you can see, you can change the title of the page without having to hard-code it in the master page ![]() .
.
The view has some form fields, so we need a <form> tag. Unlike Web Forms, ASP.NET MVC doesn’t create any implicit forms for you. We create a simple form that posts to the URL
/GuestBook/Sign ![]() . This action doesn’t exist yet, but we’ll create it in just a minute.
. This action doesn’t exist yet, but we’ll create it in just a minute.
In the form, we have some HTML helpers that generate form controls for us ![]() . For now, just know that these output the HTML required for each element, but they have some friendly functionality to deal
with validation errors and automatic binding of data.
. For now, just know that these output the HTML required for each element, but they have some friendly functionality to deal
with validation errors and automatic binding of data.
Before you run the application, you can add a couple of CSS entries to make the form look decent. Open the /Content/Site.css file and add the following code somewhere in the file:
fieldset label
{
    display: block;
}

fieldset input
{
    display: block;
    margin-bottom: 5px;
}
You’re now ready to run the application. Go ahead and press Ctrl-F5 and see the site open. Navigate to http://localhost:port/GuestBook. You should see the page shown in figure 1.8.
Figure 1.8. The GuestBook view

Notice that we only supplied “GuestBook” in the URL. The “Index” part was implied. How did this happen? Remember the routing rule from before? The default action is defined as Index, which is what’s happening here.
If you try to fill out the form, you’ll quickly find that a 404 error occurs. This is because we haven’t written the action that the form posts to yet! We’ll do that next.
Open the GuestBookController file and write the action in listing 1.6.
Listing 1.6. An action to respond to the form post
public ActionResult Sign(
       string name, string email, string comments)
{
    //do something with the values, such as send an email

    ViewData["name"] = name;
    ViewData["email"] = email;
    ViewData["comments"] = comments;
    return View("ThankYou");
}
In this action, you can see that the arguments match the names of our form values. This is intentional because the ASP.NET MVC Framework will automatically convert values from posted form values, query string values, and other places.
We want to access this data on the view (so that we can present the entry to the user). To do this, we utilize a feature called ViewData. This is a dictionary object (which means you put objects in a data structure that are referenced by a key).
Finally, we return a specific view, called ThankYou. You don’t necessarily have to choose a view name that matches the action name, but in many cases that’s the most desirable course. We’ll create this view now (listing 1.7).
Listing 1.7. The ThankYou.aspx view
<%@ Page Title="" Language="C#" MasterPageFile="~/Views/Shared/Site.Master"
    Inherits="System.Web.Mvc.ViewPage" %>

<asp:Content ID="Content1" ContentPlaceHolderID="TitleContent"
    runat="server">
    ThankYou
</asp:Content>

<asp:Content ID="Content2"
     ContentPlaceHolderID="MainContent" runat="server">

    <h2>Thank You!</h2>

    <p>Thank you for signing the guest book!  You entered:</p>
    Name: <%= ViewData["name"] %><br />
    Email: <%= ViewData["email"] %><br />
    Comments: <i><%= ViewData["comments"] %></i>

</asp:Content>
In the view, we access the data that was provided by the controller. Notice how we use code blocks, <%= %>, to output the values.
Now we’re done with our feature. If you run the application one more time and fill out some values (figure 1.9), you should be taken to a new page that shows what you submitted (figure 1.10).
Figure 1.9. Submitting the Guest Book form
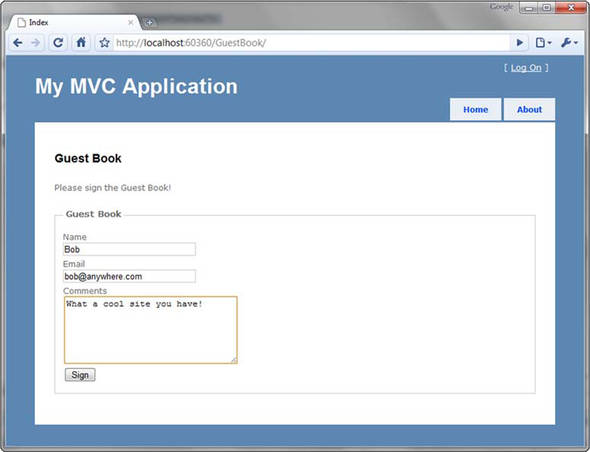
Figure 1.10. Your data is displayed back to you.

Your first application is complete. Although it’s functional, it contains a number of problems that your authors consider bad practices:
- The URL in the form tag is hard-coded. If we change the URL structure, this will break.
- There’s no model. We dealt purely with primitive values.
- Using ViewData["foo"] utilizes magic strings and relies on casting to do anything meaningful with the data.
- The URL still says “Sign” even though we rendered the ThankYou view. This is because we didn’t redirect to a success page; we simply rendered one. This causes the next unfortunate aspect of the site...
- If you refresh this page, it will prompt you to submit the data again. If the user obliges, two records will be posted with the same data.
This example is complete (and probably representative of many examples you’d find online), but it demonstrates some real problems that shouldn’t be present in a real application. This book is about practical ASP.NET MVC development practices that we would recommend. Let’s take the remainder of this chapter to clean up some of these shortcomings.
1.6. Improving your application
On the Index view, we have a hand-written form tag. This in itself isn’t bad, but we hard-coded the URL. Using different routing rules, our URLs could easily change, and that would cause this form to break. Instead, let’s leverage the framework to build our form tag for us. We can use Html.BeginForm to generate a form tag like this:
<% using(Html.BeginForm("Sign")) { %>
   <!-- form fields here -->
<% } %>
Html.BeginForm is a special HTML helper. It doesn’t directly return a string (where we’d have to use <%=). Instead, it uses the Disposable pattern to gracefully wrap the form’s contents in a <form> </form> set of tags. The first argument is the name of the action.
You’re free to use the alternative <% Html.BeginForm(); %> without the curly braces, but you’ll have to write </form> yourself.
We can simplify this further by making the action name the same as the action that was rendered (Index). In this case, we can omit the argument to BeginForm. Listing 1.8 contains this change.
Listing 1.8. Using the Html.BeginForm helper to generate a form tag

The next step is to create a model. The model doesn’t have to be any particular type of object or inherit from any special class. It can be any class at all. Let’s create a model class that represents the data that the user will be posting back to the server (listing 1.9).
Listing 1.9. Creating a view model for the GuestBook application
public class GuestBookEntry
{
    public string Name { get; set; }
    public string Email { get; set; }
    public string Comments { get; set; }
}
Notice that the class doesn’t contain any logic, nor does it have any dependencies on other systems. It’s simply a data container.
Next, let’s move our attention to the Sign action in our GuestBookController class. Earlier we decided to change the action name to Index to simplify the rendering of the form. It makes sense to have one action method respond to the HTTP GET request and another respond to the HTTP POST. In general, a GET request shouldn’t be allowed to alter the system. To enforce the POST-only nature of this action, we can apply the [HttpPost] attribute to the action.
Now that we have a model object representing the form fields on the view, instead of taking separate parameters in the action, we can use our newly created model, GuestBookEntry. Listing 1.10 shows these changes.
Listing 1.10. Accepting a complex object as an action parameter
public ActionResult Index()
{
   return View();
}

[HttpPost]
public ActionResult Index(GuestBookEntry entry)
{
    /* snip */
}
You’re probably wondering how it’s possible to accept a complex object like that. The answer lies in the magic of model binding. You’ll learn all about model binding in chapter 14, but for now, just understand that the ASP.NET MVC Framework is smart enough to bind these objects where the property names match keys contained in the Request.Form collection as well as Request.QueryString.
One more advantage of having a strongly typed model for use on the view is that we can utilize the strongly typed view helpers and get rid of the magic strings we saw back in listing 1.6. We’ll use what are called strongly typed views to define a specific type for view data for a given view. This is accomplished by changing the Inherits directive of the view to include ViewPage<T> (rather than just ViewPage). Listing 1.11 shows this change.
Listing 1.11. Changing the Index view to ViewPage<T>
![]()
Now our Index view requires an instance of GuestBookEntry ![]() to be assigned to the view before rendering. We need to revisit the action to make sure this is provided. Listing 1.12 shows our original Index action modified to send a new instance of Guest-BookEntry to the view.
to be assigned to the view before rendering. We need to revisit the action to make sure this is provided. Listing 1.12 shows our original Index action modified to send a new instance of Guest-BookEntry to the view.
Listing 1.12. Providing the expected model instance to the view
public ActionResult Index()
{
    var model = new GuestBookEntry();
    return View(model);
}
Instead of just rendering a view, we must provide an instance of GuestBookEntry. This makes perfect sense, as we are indeed creating a new GuestBookEntry on the form.
Now we can use the strongly typed view helpers, shown in listing 1.13. Notice the lack of magic strings!
Listing 1.13. Using strongly typed view helpers instead of strings
<h2>Sign the Guest Book!</h2>

<% using (Html.BeginForm()) {%>
    <fieldset>
        <legend>Fields</legend>
        <p>
            <%= Html.LabelFor(model => model.Name) %>
            <%= Html.TextBoxFor(model => model.Name) %>
        </p>
        <p>
            <%= Html.LabelFor(model => model.Email) %>
            <%= Html.TextBoxFor(model => model.Email) %>
        </p>
        <p>
            <%= Html.LabelFor(model => model.Comments) %>
            <%= Html.TextAreaFor(model => model.Comments) %>
        </p>
        <p>
            <input type="submit" value="Create" />
        </p>
    </fieldset>
<% } %>
We have a couple more changes before we’re done. Remember that we noticed that a refresh would cause the form data to be reposted, so we’d have duplicate entries in the guest book? To fix this we’ll leverage the Post-Redirect-Get (PRG) pattern. It’s quite simple:
1.
2.
Redirect the user to a different action.
3.
The user’s browser issues a GET for the new action.
Because the browser is issuing a GET as the last request, a refresh does no harm at all. It simply retrieves the page again.
Our controller can be augmented to implement this pattern, as shown in listing 1.14. To render the data back to the user (because we’re not redirecting them), we need to store the data somewhere temporarily. TempData is perfect for this. TempData is a collection that you can use to store data. It will be persisted in server Session memory for one round-trip.
Listing 1.14. Implementing Post-Redirect-Get

In listing 1.14, the Index action stores the GuestBookEntry object in TempData ![]() and then redirects the browser to the ThankYou action
and then redirects the browser to the ThankYou action ![]() . When the ThankYou action is invoked, it first checks to see whether TempData has been correctly populated
. When the ThankYou action is invoked, it first checks to see whether TempData has been correctly populated ![]() . If so, the GuestBookEntry is retrieved from TempData
. If so, the GuestBookEntry is retrieved from TempData ![]() and passed to the view for rendering.
and passed to the view for rendering.
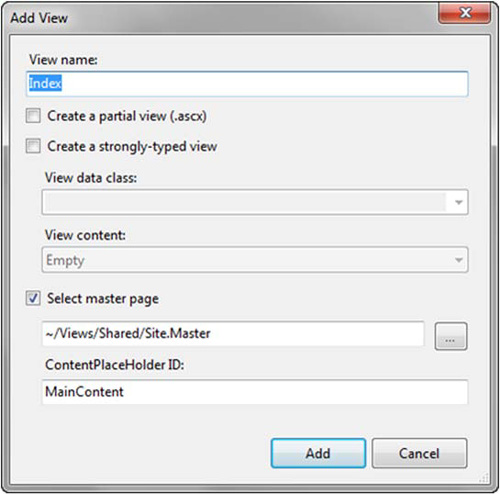
The only thing remaining is to modify the ThankYou view to be strongly typed as well. This time, we’ll do it with the Add View dialog box, so first delete the ThankYou.aspx file. Next right-click on the action method and choose Add View just like you did earlier. This time, check the box to create a strongly typed view. Look at figure 1.11 to see what the options should look like; then click Add.
Figure 1.11. Creating a strongly typed view using the Add View dialog box
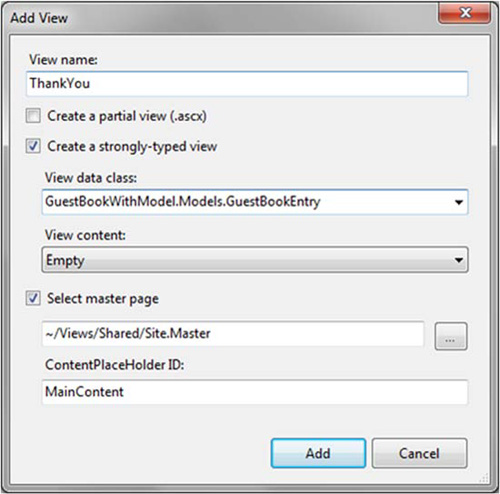
Your model object might not show up at first, so make sure you’ve built the solution before opening this dialog box. Also, your namespace might differ from the one shown in figure 1.11.
Inside the view, we’ll utilize a quick helper called Html.DisplayForModel(). This relies on a neat feature called Templated Helpers that you’ll learn about in chapter 3. For now, just enjoy the free functionality! Listing 1.15 shows the ThankYou view.
Listing 1.15. The ThankYou view, which uses a helper to display the model object
<%@ Import Namespace="GuestBookWithModel.Models" %>
<%@ Page Title=""
    Language="C#" MasterPageFile="~/Views/Shared/Site.Master"
    Inherits="System.Web.Mvc.ViewPage<GuestBookEntry>"
%>

<asp:Content ID="Content1"
     ContentPlaceHolderID="TitleContent" runat="server">
    ThankYou
</asp:Content>

<asp:Content ID="Content2"
     ContentPlaceHolderID="MainContent" runat="server">

    <h2>Thank You!</h2>

    Thank you for signing our Guest Book.  You entered: <br />

    <%= Html.DisplayForModel() %>

</asp:Content>
Isn’t that much easier? No need to enumerate all of the properties if you want to simply output the whole thing.
We’ve made a number of changes to make this application a little bit nicer. We addressed each one of the problems listed in section 1.5 and we now have a fully functional guestbook application.
Go ahead and run it. Notice how the URL says ThankYou when you’ve signed the guest book. Also notice that when you refresh, the system handles it gracefully and brings you back to the Index view.
1.7. Summary
We covered a lot of material in this chapter. Congratulations on making it through. You’re now well positioned to dive into each subtopic in more depth.
Now that you have the big picture, you can see that programming pages with the MVC pattern is quite a bit different from programming with Web Forms. You’ve seen that the first difference is the added simplicity.
In this chapter, you learned how to create a project, add controllers and views, work with models and strongly typed view data, and use the PRG pattern. You learned how to deal with user input, how to leverage model binding, and how to use TempData to stash data for a single round-trip to access it later. Phew!
The rest of the book will contain much more focused chapters in order to give you a deep understanding of each concept in the book. Let’s begin this journey with an in-depth look at the presentation model. Both controllers and views depend on the shape of the presentation model used; therefore, a firm understanding in this area will serve you well. Read on.