
Chapter 5. Consuming third-party components
- Learning the basic MvcContrib Grid
- Advanced MvcContrib Grid techniques
- Uploading files with SlickUpload
The ASP.NET MVC Framework provides a lot of control over rendering HTML out of the box, but that comes at a cost. The HTML helpers are basic and provide simple user interface elements, leaving it up to you to handcraft nice UIs using HTML and CSS. Although that’s a great option for an experienced web designer, most developers find relying on a third-party component to be much more productive. Doing so allows you to develop your application rather than spend lots of time on UI infrastructure.
This chapter will demonstrate two third-party components that offer different styles of integrating with the MVC Framework. The first is the Grid component, available from the open source MvcContrib project, which can be used to render an HTML table. The second is the SlickUpload component for uploading large or multiple files.
First let’s look at the MvcContrib Grid.
5.1. The MvcContrib Grid component
The MvcContrib Grid is a UI component that creates a well-formed HTML table. It uses a fluent interface, which allows you to define the configuration of the Grid with a strongly typed and refactoring-friendly syntax. The refactoring support makes this style of component work nicely with refactoring tools like JetBrains ReSharper and DevExpress Refactor! Pro. This type of component generally requires a strongly typed view, which is used to drive the API of the Grid.
5.1.1. Using the MvcContrib Grid
One scenario where you might want to use a Grid like this would be to display a list of model objects. Listing 5.1 shows an action that will send an IEnumerable model to the view for rendering.
Listing 5.1. An action that renders a list of Person objects
public ActionResult AutoColumns()
{
    return View(_peopleFactory.CreatePeople());
}
The example in listing 5.1 ignores more advanced features like paging. It will simply send every Person object in the application to the view for rendering.
The next step is to use the MvcContrib Grid to get a table-formatted view of our Person objects:
<%= Html.Grid(Model).AutoGenerateColumns() %>
The AutoGenerateColumns method will automatically generate columns in the table based on the public properties of the Person object, as shown in figure 5.1.
Figure 5.1. The view produced by Grid.AutoGenerateColumns
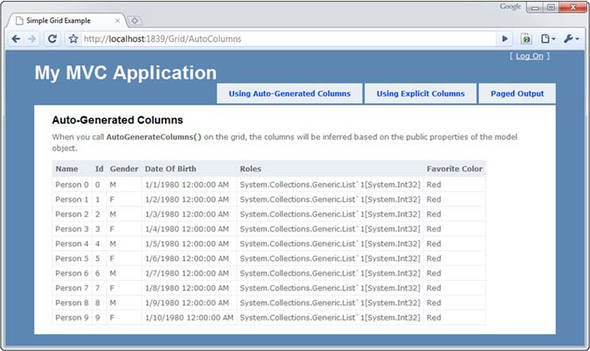
This is only useful in certain situations. You’ll see in figure 5.1 that there are some columns, such as Roles, for which the Grid doesn’t know how to render a value. The default behavior is to call ToString on each property value, but this isn’t particularly useful for complex types because it just displays the type name. AutoGenerateColumns is most useful if you’re using a dedicated presentation model rather than a nested object hierarchy.
5.1.2. MvcContrib Grid advanced usage
Although the previous example of the MvcContrib Grid seemed to just work magically with a single line of view code, it has some pretty strong opinions about how it will render a model. For example, it assumes that all public properties should be rendered as columns (unless they’re decorated with the ScaffoldColumn attribute). If you don’t like this behavior, you do have more options—and this is where the power of the Grid comes into play.
Listing 5.2 shows how you can use the Grid to customize the output for individual columns.
Listing 5.2. Using the MvcContrib Grid with more control
<%= Html.Grid(Model).Columns(column => {
    column.For(x => x.Id).Named("Person ID");
    column.For(x => x.Name);
    column.For(x => x.Gender);
    column.For(x => x.DateOfBirth).Format("{0:d}");
    column.For(x => Html.ActionLink("View Person", "Show",
             new { id =   x.Id})).DoNotEncode();
}) %>
In listing 5.2 the columns are explicitly specified by calling the Columns method, which makes use of a nested closure to configure which properties on the underlying model should be displayed as columns in the table. This is done by passing a lambda expression to the column.For method. By default, the name of the property will be used as the column heading, but this can be overridden by chaining a call to the Named method and providing a custom column name.
Columns can be more complex than just including a simple property. For example, the final column in listing 5.2 defines a column that contains a hyperlink.
The MvcContrib Grid created using the view code in listing 5.2 will render nicely in a table, as shown in figure 5.2.
Figure 5.2. The MvcContrib Grid rendered using column configuration
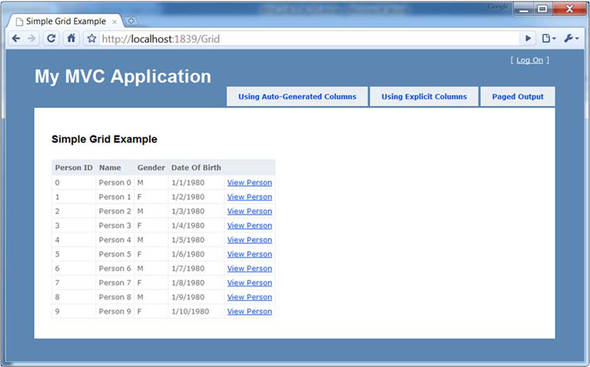
The main reason to explicitly specify the columns for the Grid is to be able to customize the output of various columns (for example, by using a custom string format or to add additional columns to the table).
The syntax for defining the Grid may look odd at first—it uses some of the newer features of the C# language. For example, lambda expressions are used to specify which properties should be rendered as columns in the table. By using this syntax, if you change the name of a property using a refactoring tool, the property gets changed in your view code too. This eliminates the runtime errors that you’d see when using magic strings and late binding to configure how to pull property values out of your model and render them into a table. Although the MvcContrib Grid was one of the first components to use this method of configuration, this style has caught on.
The Grid was created and is currently maintained by Jeremy Skinner, a committer on the MvcContrib project. For more information about the Grid, go to the MvcContrib project at http://www.MvcContrib.org. You can find more information and blog posts from the creator of the Grid at http://www.jeremyskinner.co.uk. A large number of additional features are built into the Grid that we can’t cover in this chapter, but the MvcContrib project has a number of samples that walk through the extensive options for using the Grid.
5.2. The SlickUpload component
For small files, the default HTML file input element works quite well. However, its usefulness tends to wane as the desire for better feedback about file uploads grows.
For example, the HTML file input element doesn’t show file progress or upload speed, and failures tend to be difficult to detect. On the server side, large files pose a particularly difficult problem. If we want to display an upload progress bar to the user or to stream the file directly to disk instead of loading it to memory first, we start developing more complex extensions.
Fortunately, many third-party libraries exist solely to tackle the difficult issue of allowing users to upload files to the server. One such library is SlickUpload from Krystalware (http://krystalware.com/Products/SlickUpload/). Although many free alternatives exist, SlickUpload offers many benefits over its competitors:
- Multiple file uploads
- Detailed progress information, including percent complete, upload speed, and more
- Handling large files (up to 4 GB) without crashing the server
- Streaming directly to file or to a database
- Extensive documentation
- Support
So how does SlickUpload work? Like many high-performance uploading components, SlickUpload processes uploads through an IHttpModule, bypassing much of the ASP.NET pipeline. By using an IHttpModule, files can be streamed directly to disk instead of loaded into memory. If large files are loaded into memory, as is the case with the default file-uploading processing in ASP.NET, a large file can take down the entire server by consuming all available memory.
To use the SlickUpload component, we’ll first need to add a reference to the Krystalware.SlickUpload assembly. There’s no need to install anything, because the SlickUpload component is only a single deployed .NET assembly. Next, we need to modify our Web.config file to configure and enable SlickUpload in our application.
In listing 5.3, we add the configuration sections to the configSections group.
Listing 5.3. Adding the SlickUpload configuration sections
<configSections>
    <sectionGroup name="slickUpload"
                  type="Krystalware.SlickUpload.Configuration
.NameValueConfigurationSectionHandler, Krystalware.SlickUpload">
        <section name="uploadParser"
                 type="Krystalware.SlickUpload.Configuration
.NameValueConfigurationSectionHandler, Krystalware.SlickUpload"/>
        <section name="uploadStreamProvider"
                 type="Krystalware.SlickUpload
.Configuration.NameValueConfigurationSectionHandler,
 Krystalware.SlickUpload"/>
        <section name="statusManager"
                 type="Krystalware.SlickUpload.Configuration
.StatusManagerConfigurationSectionHandler,
Krystalware.SlickUpload"/>
    </sectionGroup>
The sections in listing 5.3 enable the component-specific SlickUpload configuration sections.
Next, in the slickUpload section in listing 5.4, we turn off the handleRequests feature, because we’ll later configure a specific path for handling requests.
Listing 5.4. Turning off global SlickUpload request handling
<slickUpload>
    <uploadParser handleRequests="false" />
</slickUpload>
With the global handling turned off, we now need to configure a specific path for handling uploads. The SlickUpload Ajax client component will send requests to this path, instead of to the normal form target for processing the file. Listing 5.5 includes the complete path-specific SlickUpload configuration.
Listing 5.5. Configuring location-specific SlickUpload information

Listing 5.5 shows how we configure the SlickUpload handler for the specific path SlickUpload.axd ![]() . First, we turn upload parsing back on. Then we configure the upload stream provider to use files. We’ll upload files to
a Files folder and existing files will be overwritten. Next, we need to configure ASP.NET to handle larger files. We’ll set
the maximum request length to a much larger value
. First, we turn upload parsing back on. Then we configure the upload stream provider to use files. We’ll upload files to
a Files folder and existing files will be overwritten. Next, we need to configure ASP.NET to handle larger files. We’ll set
the maximum request length to a much larger value ![]() and configure the maximum allowed content length to something on the order of 2 GB
and configure the maximum allowed content length to something on the order of 2 GB ![]() .
.
Each of these configuration settings is in place to ensure that ASP.NET doesn’t detect large files and abort the file upload. These settings depend on the available disk space, so we may need to adjust these values to reflect the production environment. In our example, we save files to the local disk, but we could also save to a database or network share.
The final pieces of Web.config modifications we need to include are the custom IHttpModule and IHttpHandler declarations inside the system.web element, shown in listing 5.6.
Listing 5.6. Adding the SlickUpload HTTP handler and HTTP module
<httpHandlers>
       <add path="SlickUpload.axd" verb="GET,HEAD,POST,DEBUG"
         type="Krystalware.SlickUpload.SlickUploadHandler,
Krystalware.SlickUpload" />
</httpHandlers>

<httpModules>
    <add name="HttpUploadModule"
         type="Krystalware.SlickUpload.HttpUploadModule,
Krystalware.SlickUpload"/>
</httpModules>
We may have more or fewer handlers and modules, but we need to add the custom IHttpHandler, which configures the HTTP handler, and IHttpModule, which configures the HTTP module, to the end of the list. Note that if you’re running under IIS 7, these declarations will need to be moved under the system.webServer/handlers and system.webServer/modules sections of Web.config, respectively.
With SlickUpload referenced and configured in our Web.config file, we can now create a controller and view to allow the user to upload files. We’ll create a screen to upload files, with the Index action displaying a simple form. The controller in listing 5.7 merely returns a ViewResult.
Listing 5.7. The UploadController’s Index action
public class UploadController : Controller
{
    public ActionResult Index()
    {
        return View();
    }
...
SlickUpload uses a traditional web control to process file uploads. But because we can still use web controls in an MVC application, the SlickUpload control won’t pose a problem for us. SlickUpload also supports additional configuration options that enable MVC scenarios, such as hosting in a nonserver control form tag.
In listing 5.8, we see the Index that’s used to build the upload form. The view includes a form tag and the SlickUpload control.
Listing 5.8. The Index view using the SlickUpload web control

To build our file upload form in listing 5.8, we first need to build the outermost form HTML tags with the Html.BeginForm method ![]() . The target will be the UploadResult action of the Upload controller, which will be the action redirected to after the upload is complete. To ensure our form works correctly with
the browser and the SlickUpload control, we give the form a unique ID and set the encoding to "multipart/form-data". Next, we add the SlickUpload control
. The target will be the UploadResult action of the Upload controller, which will be the action redirected to after the upload is complete. To ensure our form works correctly with
the browser and the SlickUpload control, we give the form a unique ID and set the encoding to "multipart/form-data". Next, we add the SlickUpload control ![]() , matching the upload form ID to the form tag’s ID and setting the maximum number of uploaded files to 1. The control allows adding multiple files, but we’ll restrict the number of files for this example.
, matching the upload form ID to the form tag’s ID and setting the maximum number of uploaded files to 1. The control allows adding multiple files, but we’ll restrict the number of files for this example.
The next two configuration properties match up to a cancel button (which we leave off) and the upload button. The values match
up to HTML element identifiers because our input button for initiating the upload has an ID of "uploadButton" too ![]() .
.
With the control configured, we supply a set of templates for the file selector, file template, and progress template. To
support older browsers, we configure both the down-level and up-level ![]() file templates. Older browsers are presented with the normal file input, whereas newer browsers are presented with a simple button. Figure 5.3 shows the site displaying the file selector template.
file templates. Older browsers are presented with the normal file input, whereas newer browsers are presented with a simple button. Figure 5.3 shows the site displaying the file selector template.
Figure 5.3. The Upload Files screen showing the file selector template

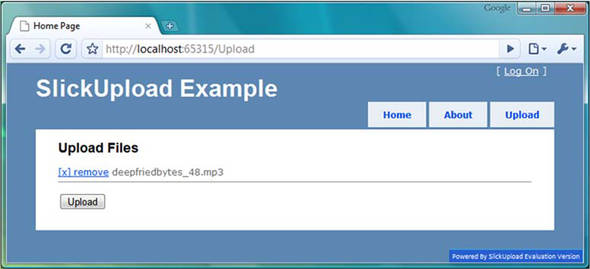
Once the user chooses a file, the file template is shown for each file. In this example, we include the name of the file and a remove link. If we allowed multiple file uploads, the user could remove a file from the list before uploading the entire group of files. Because we only allow one file, the Add File button is hidden once a file is chosen, as shown in figure 5.4.
Figure 5.4. The Upload Files screen showing the file listing template
Finally, we configure the upload progress template, which is shown to users after they click the Upload button. We display a progress bar using the supplied SlickUpload controls. If we wanted, though, we could show much more information, including the file count, current file being uploaded, upload speed, and time remaining. Our site, in figure 5.5, shows the progress bar and percentage complete.
Figure 5.5. The Upload Files screen with the progress bar

The file we chose was quite large, around 64 MB. A progress indicator is a great mechanism for providing users with feedback that their file is being uploaded. Without a progress bar, users receive no information on the progress of their upload, which leads many users to believe that the upload isn’t being processed. They’re liable to refresh the form or stop the upload.
The final piece we need to implement is the action that we redirect to after the file upload is successful. We’ll likely need to retrieve some sort of information about the file uploaded, especially if we want to store file metadata somewhere else for processing and viewing.
In listing 5.9, our UploadResult action uses the SlickUpload UploadConnector class to retrieve the UploadStatus for the uploaded files. The UploadStatus class contains file metadata that we can then process as needed.
Listing 5.9. The UploadResult action
public ActionResult UploadResult()
{
    UploadStatus status = UploadConnector.GetUploadStatus();

    return View(status);
}
Typically, we’ll store file metadata in a database because we’ll likely want to be able to show the user a list of uploaded files to download. With the file metadata in a database, we can show this information much more easily than trying to read the file information from the disk. In our example, we’ll only display the metadata information in the view, as shown in listing 5.10.
Listing 5.10. Displaying the file metadata
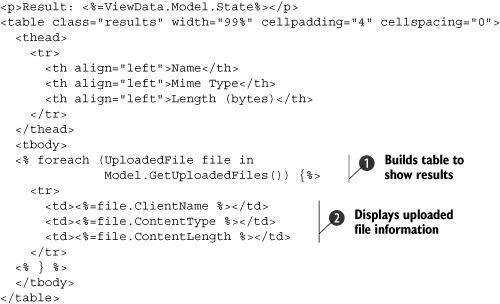
Our view is passed an UploadStatus object, which contains upload status as well as file information. We first show the result of the upload, which indicates
success or failure. Then we display a table of the uploaded files ![]() . We show the name, content type, and content length
. We show the name, content type, and content length ![]() .
.
Figure 5.6 shows the final Upload Results screen.
Figure 5.6. The Upload Results screen

Because we have the file size, MIME type, and filename, we can provide a good file downloading solution. The browser’s download file dialog box uses this information to provide a download progress bar.
SlickUpload isn’t the only file upload component, but it works well with ASP.NET MVC. We used a web control, but it’s fully supported in an ASP.NET MVC environment. By using a file-streaming component, we can prevent end users from crashing our web server by uploading large files. With SlickUpload’s configuration options, we have a lot of flexibility in processing uploads without resorting to a lot of custom code.
5.3. Summary
This chapter covered using third-party components in an MVC application. We covered using a page-level component, the MvcContrib Grid, and we walked through using the Grid’s AutoGenerateColumns feature for simple cases. We also demonstrated a more advanced use of the Grid, using its powerful strongly typed API. In addition, we looked at integrating a third-party upload component product, SlickUpload. With its configuration options, performance benefits, and progress bar, we were able to provide a good user experience for uploading files.
These two different types of components show that differences exist in how much functionality a component can provide. The Grid provides a single control-like experience, whereas the SlickUpload component shows how we can integrate existing web control products. By using these components, we can provide more functionality quickly.
The next chapter will cover hosting an MVC application in IIS.