
Chapter 7. Leveraging existing ASP.NET features
- Exploring the ASP.NET server controls
- Using caches, cookies, and sessions
- Applying the tracing feature
- Setting up health monitoring
- Leveraging site maps
- Configuring personalization and localization
Many of us have invested heavily in ASP.NET. With ASP.NET MVC now available as an alternative to Web Forms, is all that knowledge useless? Do we have to relearn this platform entirely from scratch?
You’ll be relieved to know that many of ASP.NET’s platform features work the same way they always have. Even some Web Forms server controls work. In this chapter, we’ll cover what works in ASP.NET MVC and what doesn’t. By the end of the chapter, you should feel comfortable using your existing knowledge of ASP.NET to build robust websites with ASP.NET MVC.
7.1. ASP.NET server controls
As you just learned, some ASP.NET server controls work with ASP.NET MVC, but which ones? How can we determine if a control will work?
To put it simply, any control that depends on ViewState or generates postbacks won’t be helpful. Some controls will render, but they require a <form runat="server">, which you might not want to add. Adding a server-side form tag will put hidden fields on the page for ViewState and event validation. The form will also POST to the same action you’re on, which is sometimes unacceptable.
In this section, we’ll visit the TextBox, Menu, TreeView, and GridView and see how they function. Finally, we’ll see some alternative options to the traditional server-side controls that you can use in your ASP.NET MVC applications.
Note
The code in this section of the chapter is purely exploratory. Most of it contains hacks and other workarounds that go against the intended design of an MVC web application. The intent of this section is to see how far we can bend the framework without breaking it. We wouldn’t recommend using these methods in a production application unless absolutely necessary. Furthermore, server-side controls are changing considerably from .NET 3.5 SP1 to .NET 4.0. These changes are outside the scope of the book, but expect changes in the rendered HTML as well as the generated client ID. Going forward, all ASP.NET MVC view helpers will work with Web Forms, and many more Web Forms controls will render fine with MVC views.
7.1.1. The TextBox
The first control we’ll examine is the <asp:TextBox />, which renders as an <input /> HTML element. It requires a <form runat="server"> tag to function, and will be given a generated ID (if it’s placed in a container control such as a MasterPage). This is what we’re trying to avoid! Because it’s a form field, and the form is required to be runat="server", its function is crippled.
Figure 7.1 shows it in action, while figure 7.2 shows the resulting HTML.
Figure 7.1. The TextBox renders correctly.
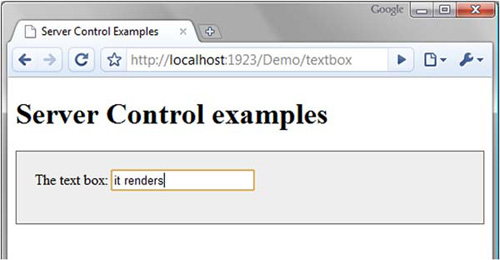
Figure 7.2. The resulting HTML for the TextBox is less than desirable.

We can see that the rendered HTML contains much we didn’t ask for. In addition, notice that the form tag has an action attribute that we didn’t specify. This will prevent the form from submitting to an action that we request.
We can apply a quick trick to avoid the server-side form requirement. In the Page class, there’s a method you can override called VerifyRenderingInServerForm(Control control). If we override this method, we can prevent the error that results when using a control outside of the server form. Because there’s no code-behind, the only way to accomplish this is to add a server-side script block in your view directly, like this:
<script language="C#" runat="server">
    public override void VerifyRenderingInServerForm(Control control)
    {
    }
</script>
Now you can use the TextBox (or any other control) in your own form tag to avoid having the ViewState and EventValidation hidden fields generated for you.
Because a text box in ASP.NET MVC is as simple as <%= Html.TextBox("name") %>, the TextBox server control offers no compelling functionality—only baggage—for your ASP.NET MVC views. ASP.NET controls are also only usable with the WebFormViewEngine. Other view engines can’t utilize them.
Now that we’ve seen the TextBox, what about other controls?
7.1.2. Other common controls
We can see from our simple text box example that most ASP.NET Web Forms input controls have little to offer. But some controls have semifunctional rendered output.
One example is the <asp:Menu /> control. It doesn’t require postbacks if you specify a NavigateUrl for each of the MenuItems, and it doesn’t require view state (though it does use it to store the last selected item). It simply renders HTML and JavaScript to allow elements to expand and hide on mouse events. Again, a server-side form tag is required and, unlike with the TextBox, you shouldn’t remove it. Doing so will prevent the JavaScript that controls the hiding and showing of the items from being rendered. Also, Menu renders a nasty pile of HTML tables to display properly—we’ve come to expect this from Web Forms controls. We could choose to fix the poor markup with ASP.NET control adapters, but the benefits would probably not be worth the trouble. Figure 7.3 demonstrates the menu control working on an MVC view. The rendered markup is shown in figure 7.4.
Figure 7.3. The menu control renders okay in Firefox and IE. Unfortunately it depends on a server-side form tag, and JavaScript surgery would be needed to make it function properly. WebKitbased browsers (Chrome and Safari) have problems with the JavaScript used to pop open the menus.

Figure 7.4. The horrific markup that’s rendered by the Menu control. Stay tuned for a better way.

The <asp:Menu /> control renders, and the JavaScript open and close behavior functions properly (as long as you have a server-side form tag.) But the links without a NavigateUrl property depend on the postback model of Web Forms. We could conjure up some JavaScript to alter this behavior, but doing so would just add to the mess. Additionally, take a look at the rendered markup in figure 7.4. Hard-coded styles, deeply nested tables, and highly obtrusive JavaScript make this tiny menu render nothing short of a headache.
Note
Even though .NET 4 overhauls the markup rendered by the menu control, developers still using .NET 3.5 SP1 won’t be able to benefit from all the great work the ASP.NET team has done in fixing the generated markup across all the server-side controls. This type of markup is a constant reminder of why we want more control over our HTML! One of the original strengths of server controls is that they can modify the markup rendered based on a browser. This was of critical importance in 2002, when the popular browsers treated markup in a very different way. This varied rendering was more important than control over the markup—it was worth having to deal with generated markup and ClientIDs for the sake of cross-browser compatibility. Fast-forward to today. The major browsers now are on board with XHTML, and the same markup works well in various browsers. The architectural trade-offs are different, and the need to compromise on messy markup no longer exists.
Two commonly used controls are <asp:TreeView /> and <asp:Calendar />. The TreeView nodes are postback links, but the visual aspect works just fine. The calendar relies heavily on the postback model for navigation, so it doesn’t function in ASP.NET MVC except when viewing a single month.
We still need tree views, and we still need calendars. With ASP.NET MVC, we’ll tend to use more client-side UI functionality, such as that found in jQuery UI, which has a rich JavaScript calendar and more.
We’ve so far neglected the big daddy of ASP.NET server controls. Yes, we’re talking about the GridView. The GridView is an interesting case, because it has so many different forms. At its simplest, the GridView is just an HTML table—it’s great for displaying tabular data. If we don’t require any postback, then it should work, right? It does, but there are a few gotchas along the way.
7.1.3. The GridView
The first issue is that there’s no declarative way to bind the GridView to data coming from ViewData. It’s possible to employ data-binding code directly in the view markup, inside <% %> code blocks as listing 7.1 demonstrates. This type of code should send bad vibes up your spine, but it’s possible.
Listing 7.1. Binding a GridView from the view itself
<%
    grid1.DataSource = Model;
    grid1.DataBind();
%>
You also have the option of using the DataSource controls, such as ObjectDataSource, SqlDataSource, and XmlDataSource. Of course, in doing this you’ve completely circumvented the MVC pattern and placed all your data access directly in the view! Figure 7.5 illustrates the grid rendering properly.
Figure 7.5. The GridView renders properly.
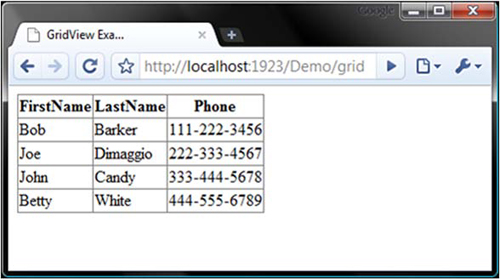
Figure 7.5 shows our newly bound GridView in action. Unfortunately, that’s all you get, because none of the advanced features of the GridView will work. No sorting, paging, editing, or selecting. Because of this, it’s of limited utility and will probably only aid you during prototyping and demos.
All is not lost, however. In ASP.NET MVC you can achieve the Holy Grail of an editable data grid, complete with sorting, paging, and editing, when you structure it in a different way. In fact, UI component vendors like Telerik are already offering UI components for use with ASP.NET MVC. You can find a free grid component here: http://www.telerik.com/products/aspnet-mvc/grid.aspx.
7.1.4. Where do I get the good stuff?
The examples we’ve shown here might be turning you off of ASP.NET MVC. But before you decide that you don’t want to live without your TreeView and Menu controls, consider this: many thousands of samples online show how you can achieve the same functionality with a little bit of JavaScript and CSS. These are freely available solutions that many other platforms leverage. With ASP.NET MVC, we can do the same, and with minimal friction in applying them. Often, these solutions are so simple they make the declarative ASP.NET controls look like sledgehammers.
Here are a few references for platform-agnostic solutions to tree views, menus, and tabs using jQuery:
- jQuery Treeview example—http://jquery.bassistance.de/treeview/demo/
- jQuery Menu example—http://jdsharp.us/jQuery/plugins/jdMenu/
- jQuery Tabs example—http://stilbuero.de/jquery/tabs_3/
Although ASP.NET MVC doesn’t gain much from server controls—as you’ve clearly seen in these examples—other aspects of ASP.NET function exactly as they did in Web Forms. We can use the ASP.NET platform in the same way as before. The first topic we’ll investigate is state management.
7.2. State management
One of ASP.NET’s strong points is state management. ASP.NET has excellent support for caching, cookies, and user sessions. In ASP.NET MVC we can leverage these as we have in the past.
State management refers to the storage and retrieval of state. As we all know, the web is a stateless environment, so special techniques have to be used to retain data about the user’s current state and recent activity. Session state and cookie storage address these concerns. Sometimes it’s helpful to store per-user data that lives only for a single web request, and request storage is useful in these scenarios.
Frequent trips to a backend data store can yield horrible performance under heavy loads. ASP.NET’s built-in support for caching can help keep a popular application running efficiently. We’ll examine the ASP.NET cache first.
7.2.1. Caching
Caching is immensely important in today’s web applications. A website of significant size or traffic can drastically reduce the amount of database access by effective use of caching. With ASP.NET we can also cache rendered HTML, which saves CPU resources on the server. Done properly, it’s one of the best tools for coping with severe loads. Done poorly, your efforts will be detrimental to your website’s performance.
Note
Caching tips and strategies are out of the scope of this book. Correctly applying caching strategies can be critical to website performance. We’ll cover how caching is applied in ASP.NET MVC, but if you want to read more about advanced caching, see Professional ASP.NET 4 in C# and VB by Bill Evjen, Scott Hanselman, and Devin Rader.
In an ASP.NET application, caching frequently accessed sets of data is accomplished by using the Cache object. This object has a hard dependency on HttpRuntime, which impedes testing. For ASP.NET MVC, if we want to ensure testability, we can’t use this static reference. We can access the cache via ControllerContext.HttpContext.Cache, but this class is sealed, so we can’t create a mock object for use in tests.
This inherent lack of testability is one of the challenges that ASP.NET overcame with version 3.5 SP1. ASP.NET versions 1.0 through 3.5 weren’t built with testability in mind. Even though System.Web.Abstractions.dll contains abstract wrappers around so much of the core of ASP.NET, some parts, like caching, are still very concrete. To cope with this, we can wrap the cache in our own interface. Listing 7.2 shows wrapping the cache with an abstraction, and listing 7.3 demonstrates using the ICache interface. Listing 7.4 shows the test.
Listing 7.2. Wrapping the cache in our own testable interface
public interface ICache
{
    T Get<T>(string key);
    void Add(string key, object value);
    bool Exists(string key);
}

public class AspNetCache : ICache
{
    public T Get<T>(string key)
    {
        return (T)HttpContext.Current.Cache[key];
    }

    public void Add(string key, object value)
    {
        HttpContext.Current.Cache.Insert(key, value);
    }

    public bool Exists(string key)
    {
        return HttpContext.Current.Cache.Get(key) != null;
    }
}
Because we’ve wrapped the cache in listing 7.2, we’re able to use a simplified API and couple our code in listing 7.3 to an abstract cache instead of the ASP.NET cache.
Listing 7.3. Using the cache wrapper in our controllers

The HomeController in listing 7.3 depends on ICache, but it has no idea about the ASP.NET cache. The controller accepts the cache instance in the constructor ![]() . The unit test for HomeController becomes simple because we can simulate the ICache interface, as shown in listing 7.4.
. The unit test for HomeController becomes simple because we can simulate the ICache interface, as shown in listing 7.4.
Listing 7.4. Testing an action that accesses the cache

Wrapping the cache in our interface allowed us to write code decoupled from a specific implementation. It also aided us during testing. If we hadn’t abstracted this concept, our controller would remain untestable.
Note
It’s generally not a recommended practice to specify your data-caching strategy directly in your controllers. Application services can easily use this ICache interface in combination with a repository or service to hide this from you. Then your controller has a dependency only on the service, and its actions become much more concise. Always keep your controllers tight and focused.
As you might expect, cache dependencies (such as a file dependency or SQL 2005 table dependency) and all other features work just as they did in ASP.NET.
Output caching is another powerful feature of ASP.NET. It allows you to take the rendered HTML of a page or user control, cache it on the server, and return it directly for future requests. This not only eliminates the overhead in getting data, but also in rendering the page. Subsequent requests are immediately returned canned HTML.
In ASP.NET MVC, we have a slightly different construct for output caching. Listing 7.5 demonstrates how to enable output caching for a controller action.
Listing 7.5. Caching the result of an action for 100 seconds

Executing the action in listing 7.5 gives us the page shown in figure 7.6.
Figure 7.6. Refreshing the page gives us the same result for up to 100 seconds.

The HTML that makes up the page in figure 7.6 is cached on the server and returned for subsequent requests for up to 100 seconds (the duration we specified in the OutputCache attribute in listing 7.5). Of course, we can vary the cache based on a number of criteria, such as a specific HTTP header value, or a query string value. All the features that worked with output caching in Web Forms also work in ASP.NET MVC.
A limitation of the OutputCache attribute is that it only works at the action level. If you render other actions on your main view with Html.RenderAction("someAction"), the cached version of that action will be used for the partial HTML snippet. This is an excellent way of achieving page-fragment caching. If instead you use Html.RenderPartial(), the entire HTML document would have to be cached at the root action level.
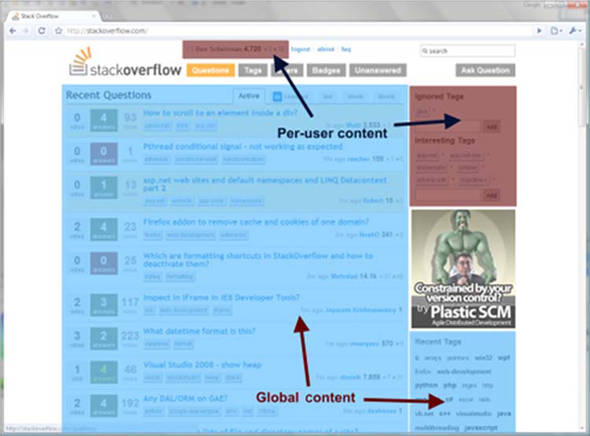
StackOverflow.com is a great example of this. The home page has many pieces of data on it, some of which are unique to the user logged in (see figure 7.7 for an example). Under heavy load, it may make sense to output cache the action for the home page, but the per-user content shouldn’t be included in this cache. Here, Html.RenderAction can be used for the per-user sections, and the rest of the page can safely be cached.
Figure 7.7. StackOverflow.com is a good example of how you can use output caching in combination with Html.RenderAction() to cache different regions of the page. On the home page, some sections can be cached globally, and other sections are rendered per user.
Now that we’ve examined how to leverage the ASP.NET cache in our apps, we can move on to session state.
7.2.2. Session state
In a web application, session state refers to temporary data (stored on the web server) that exists per user. An excellent example of this is a user’s shopping cart. Each user gets his or her own shopping cart, which lives as long as the user is online. The data in the session typically expires after 30 minutes of inactivity.
Like Cache, Session depends deeply on HttpContext. Luckily, ASP.NET 3.5 SP1 has wrapped this object for us in HttpSessionStateBase. This is an abstract base class that mirrors the public API of the real HttpSessionState class. We can now easily replace this with a mock object in our unit tests.
Listing 7.6 contains an action that uses session state, and the respective test is shown in listing 7.7 with the use of the Rhino Mocks dynamic mocking library (note the calls to Expect).
Listing 7.6. An action that uses Session

Just like in previous versions of Active Server Pages (ASP), you can access the session directly via a property reference
![]() . This programming experience goes all the way back to ASP 1.0 and has been carried through ASP.NET and ASP.NET MVC.
. This programming experience goes all the way back to ASP 1.0 and has been carried through ASP.NET and ASP.NET MVC.
Listing 7.7. Testing controllers that use Session
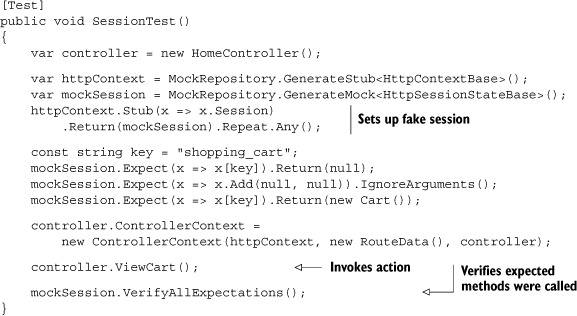
In listing 7.7, session is retrieved through the controller’s HttpContext property (which in turn comes from ControllerContext.HttpContext), so we must create a stub for it to return our mocked session object. Sadly, the only way you’d know this is by viewing the source or by using Reflector. Once we have the test double in place, we can set it up with canned data that the action method will use.
The setting-up-the-fake-session code could be placed inside a test helper class so that you have a cleaner test. Something like this would be much nicer:
var controllerContext = new FakeControllerContext();
var mockSession = controllercontext.HttpContext.Session;

mockSession.Stub(...);
The other form of user-specific data storage lies in HTTP cookies, which we’ll examine next.
7.2.3. Cookies
Cookies store tiny bits of information in the client’s browser. They can be useful to track information, such as where a user has been. By default, the user’s session ID is stored in a cookie. It’s important to not entirely rely on the contents of a cookie. Cookies can be disabled by the user, and malicious users may even attempt to tamper with the data.
In ASP.NET, you’re used to adding cookies like this:
Response.Cookies.Add( new HttpCookie("locale", "en-US") );
That API works going forward in ASP.NET MVC. The only difference is that the Response property of the controller is HttpResponseBase, rather than the sealed HttpResponse class in Web Forms.
You can test actions that use cookies much as we tested against the Cache or Session in previous sections.
7.2.4. Request storage
Sometimes you need data to be stored for a single web request only. Because individual requests are served by threads, it might be tempting to put a [ThreadStatic] attribute on a piece of data and expect it to work. But ASP.NET occasionally reuses threads for other requests, so this is a poor choice for ASP.NET if you want to avoid mixing data in requests from two separate users.
If you’re familiar with NHibernate (http://nhibernate.org), you may be familiar with the Session-per-Request pattern. It refers to the lifecycle of the NHibernate Session object—in web environments it’s common to open the session at the beginning of the request and close it at the end. Throughout the request, the current session is available in HttpContext.Items. There’s an example of this in chapter 23.
As has been the case since the advent of ASP.NET 1.0, you access request storage through HttpContext.Items, and it’s guaranteed to be isolated from other concurrent requests. This works in ASP.NET MVC, but the actual HttpContext property of the Controller class is of type HttpContextBase. This ensures that your controllers remain testable because you can mock HttpContextBase easily.
We’ve examined the ways of storing and retrieving data in ASP.NET and how they work with MVC. Next, we’ll investigate the tracing and debugging experience.
7.3. Tracing and debugging
Tracing and debugging work much as they have since ASP.NET 2.0. The same techniques for placing breakpoints and stepping through code with Visual Studio apply. With tracing, though, there’s a slightly different story.
Tracing is configured with the Web.config file. The configuration shown in listing 7.8 will enable tracing for an ASP.NET application.
Listing 7.8. Enabling tracing with Web.config
<system.web>
       <trace enabled="true" pageOutput="true" localOnly="true" />
</system.web>
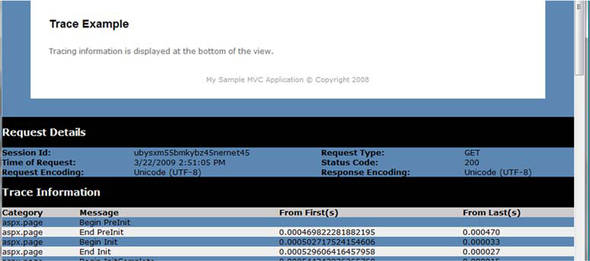
With these modifications to Web.config in place, we can browse our site and see the tracing information appended to the bottom, as in figure 7.8.
Figure 7.8. Tracing information appended to the bottom of our page
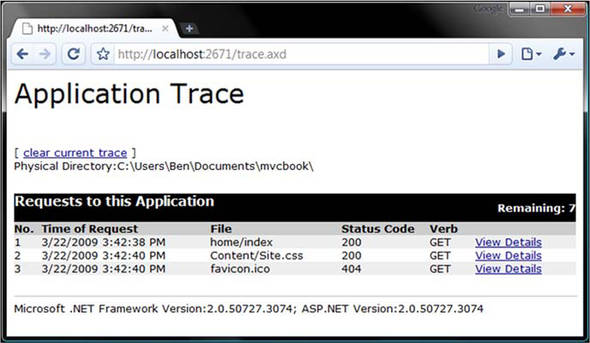
You don’t have to show the information at the bottom of every page. You can also see the trace information for each request by using the Trace.axd handler, as shown in figure 7.9.
Figure 7.9. Viewing the tracing info for each request using the Trace.axd HttpHandler
The only part of this story that doesn’t function similarly to Web Forms is writing to the trace. There’s no Trace.Write() in your controllers. We’ll see why next.
7.3.1. TraceContext
When you called Trace.Write() in Web Forms, you were interacting with the Trace-Context class. This exists on your ViewPage in ASP.NET MVC, but this isn’t where you would want to write tracing statements. By the time you’ve passed the baton over to the view, there’s no logic there that you’d need to trace. Instead, you’d like to trace the logic embedded in your controllers.
You might try to leverage the TraceContext class in your controller, but these statements won’t ever make their way to the list of messages in the trace log (on your page or on Trace.axd). Instead, you can use System.Diagnostics.Trace and set up your own TraceListeners to inspect the activity in your controllers. Alternatively, you can leverage a more mature logging framework such as log4net or NLog:
You debug ASP.NET MVC applications just as you would any .NET application. Tracing, however, doesn’t offer as much for MVC. Instead, you can lean on the built-in TraceListeners in .NET, or utilize a good logging library like those mentioned earlier. Another aspect of error logging is health monitoring.
7.3.2. Health monitoring
Health monitoring is related to tracing and debugging. ASP.NET 2.0 introduced a set of providers for reporting on events occurring in an ASP.NET application, and the machine.config file on your server (or local machine) defines some policies for reporting the health of your applications. You’ve probably noticed before that you receive an error in the computer’s event log when an unhandled exception occurs in your ASP.NET applications. This is an example of one of those providers.
Health monitoring continues to function in the same way in ASP.NET MVC.
7.4. Implementing personalization and localization
Often our applications need to display different information depending on the user. Sometimes this data is personal, such as the user’s name or the customized look and feel of the site. Other times this might be displaying messages in a user’s native language, depending on the locale on their browser.
ASP.NET personalization and localization work the same way in ASP.NET MVC. The only difference is that with ASP.NET MVC, you don’t use the Web Forms controls that come with these features.
7.4.1. Leveraging ASP.NET personalization
ASP.NET personalization requires database objects to be created. You can create these on your database by running a Visual Studio 2008 command prompt and typing this command:
C:> aspnet_regsql -S <server> -E -A all
This will install database support for profiles, roles, membership, and personalization on the server specified. To define the type of data you want to store for your users, you have to define it in Web.config. Listing 7.9 shows a sample configuration.
Listing 7.9. Setting up the personalization properties
<system.web>
   ...
   <anonymousIdentification enabled="true"/>
   <profile>
      <properties>
         <add name="NickName" type="System.String" allowAnonymous="true" />
         <add name="Age" type="System.Int32" allowAnonymous="true"/>
      </properties>
      ...
   </profile>
   ...
</system.web>
We’ve identified two properties that we want to track for our users. In a Web Forms application, you’d set these values to controls on your page, from directly accessing the Profile API from your code-behind. The only difference in ASP.NET MVC is that we need to do this in our controller. When adding items to ViewData, we can choose between explicitly adding each property into ViewData directly or passing the entire profile object. Your preference depends on how complex your profile properties are.
Listing 7.10 shows a controller action that passes profile data to the view. The view is shown in listing 7.11, and the edit form is displayed in listing 7.12.
Listing 7.10. Passing the profile dictionary to the view
public class ProfileController : Controller
{
    public ActionResult My()
    {
        var profile = ControllerContext
                            .HttpContext.Profile;
        return View(profile);
    }
}
Listing 7.11. Displaying profile data on the view
<h3>Your Profile:</h3>
Nick Name: <%= Model["NickName"] %><br />
Age: <%= Model["Age"] %><br />

<%= Html.ActionLink("Edit my Profile", "edit") %>
Listing 7.12. Editing the profile data
<h3>Edit my profile</h3>
<% using(Html.BeginForm("save", "profile")) {%>
    <label for="nickName">Nick Name:</label> <%= Html.TextBox("nickName")%>
    <br />
    <label for="age">Age:</label> <%= Html.TextBox("age") %><br />
    <input type="submit" value="save" />
<% } %>
Luckily, the Profile property is of type ProfileBase and is an abstract base class. This means we can easily test actions that utilize profile data. Setting the profile data is basically the opposite operation: take form control values and put them on the profile dictionary.
7.4.2. Leveraging ASP.NET localization
With the power of the internet, people all over the world can instantly become users of our sites. It would be naive to believe that English would be sufficient for the entire world. In some cases, providing multilanguage and culture support can increase sales or reach and make your site much more popular (and profitable!).
.NET gave us resource files (.resx) that can house the translations for text or images that you’d display on the screen. You can create a localized version of this resource file for each culture you want to support. In addition, localization controls how numbers are formatted on the screen and whether the text reads left-to-right or right-to-left.
In .NET, there’s also the concept of global and local resources. Global resources are pieces of data that your entire site might need, such as the title of the site, whereas local resources are the content specific to one page of your site. In ASP.NET MVC, this means that your views will be able to reference local resources, but your controllers will have access only to global resources.
Let’s start with an example. We’ve taken the ASP.NET MVC starter template and added a global resources directory (right-click on the project in the Solution Explorer and select Add ASP.NET Folder > Global_Resources). We’ve also added a resource file called Site.resx. Figure 7.10 shows the solution and figure 7.11 shows the resources we’ve created.
Figure 7.10. Adding an App_GlobalResource directory and a default resource file to the project

Figure 7.11. Our site’s resources

As you can see in figure 7.11, we’ve pulled out some of the text you’ll find on the sample project. We’ve also changed the default Home-Controller to pull these resource strings out, depending on the current culture. Listing 7.13 demonstrates this.
We’ve used a simple helper method to make it easier to pull out strings from the resource file. We’ve only defined one, so that’s all the users will see.
Listing 7.13. Pulling strings out of the resource file based on the current culture
public class HomeController : Controller
{
    public ActionResult Index()
    {
        ViewData["Title"] = GetResource("PageTitle");
        ViewData["Message"] = GetResource("WelcomeMessage");

        return View();
    }

    private string GetResource(string key)
    {
        var httpContext = ControllerContext.HttpContext;
        var culture = Thread.CurrentThread.CurrentUICulture;
        return (string)httpContext.GetGlobalResourceObject("Site", key,
            culture);
    }
}
Let’s add another. We’ll add one for the esES culture—Spanish (Spain). To do this, add another resource file in App_Global-Resources, but this time we’ll append the culture string to the filename—in this case, Site.es-ES.resx. Figure 7.12 shows the contents of this file, and figure 7.13 shows the Solution Explorer view.
Figure 7.12. A localized resource file for Spanish (es-ES)

Figure 7.13. Our new resource file is added to the App_GlobalResources folder.

We’ve now added a second resource file that contains the same keys but the values are localized to the culture in question (in this case Spanish). Figure 7.14 shows what the site looks like when we run it.
Figure 7.14. Seeing the strings from the resource file live on the site. This browser is Mozilla Firefox with a custom skin.

How did it know which culture we wanted to display? How do Spanish-speaking users see the localized version? In .NET, the current executing thread has a property called CurrentUICulture. We can set this program-matically, but most web browsers will do the work for us, provided we allow them.
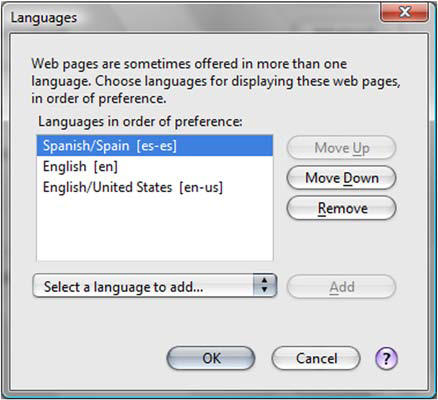
Here we’re using Mozilla Firefox, though all major browsers will allow you to do this. In Firefox, select Tools > Options > Content (tab) > Languages and you can choose your language preference. Figure 7.15 shows that we’ve added Spanish (es-ES) to the list and moved it to the top. You’ll also need the Web.config setting shown in listing 7.14.
Figure 7.15. Setting our preferred language to Spanish in Firefox
Listing 7.14. Enabling autoculture selection from the browser
<system.web>
    ...
    <globalization enableClientBasedCulture="true" uiCulture="auto"
        culture="auto" />
</system.web>
When you enable the culture setting, ASP.NET can apply globalization when the application runs.
After doing this, our browser will submit the culture we prefer to the server. The server reads this and returns the localized resources (if they’re available, of course). Figure 7.16 shows that after refreshing the browser, we’re greeted with Spanish messages. The content region of the page has also been localized. To add local resources for a single page, which are accessible on the view, add an App_LocalResources folder next to the .aspx files. Figure 7.17 shows this for our index view.
Figure 7.16. Viewing the site with a different preferred language setting in the browser

Figure 7.17. Adding local resources for the Index view

It isn’t as simple as this. Remember that .aspx views residing in the Views folder is all just convention. Due to the highly customizable nature of ASP.NET MVC, there’s nothing to stop you from having your views be served from the database, or from another location on disk. This complicates the notion of a “local” resource because “local” is now dynamic.
Luckily Matt Hawley has discovered this (the hard way) and posted his findings on his blog. You can find the post, “ASP.NET MVC: Simplified Localization via ViewEngines,” at http://mng.bz/6LcX. His solution involves deriving from the standard WebFormView-Engine to create a LocalizableWebFormsViewEngine. This derived class stores the view path in view data for each view, so when the helper methods invoked from the view require a path, it can be taken directly from ViewData. We’ll leave the rest of the details to Matt’s excellent post.
In these examples, we saw the basic resource API for .NET. In Web Forms, there are additional features in which server controls can declaratively display resources from the current culture. In ASP.NET MVC, none of these exist yet, but it’d be trivial to create additional view helpers to accomplish this.
Localization is an enormous topic, and unfortunately few developers pay attention to it. We’ve just scratched the surface in this section. If you’re building a site that will have users from different countries, be sure to look into localization.
7.5. Implementing ASP.NET site maps
The last feature we’ll visit in this section is the ASP.NET site map. A site map allows you to define the hierarchy of your site in an XML file (called Web.sitemap) or another data source of your choosing. On your pages, you can include a SitemapPath control that displays breadcrumb navigation to the users, allowing them to navigate back to higher-level pages.
In ASP.NET MVC, site maps work surprisingly well. You define a sample Web.sitemap file, such as that in listing 7.15, to define the URL hierarchy of the site. You can create a site map file by choosing Sitemap in the project’s Add New Item dialog box.
Listing 7.15. Defining our site structure in Web.sitemap
<?xml version="1.0" encoding="utf-8" ?>
<siteMap xmlns="http://schemas.microsoft.com/AspNet/SiteMap-File-1.0" >
<siteMapNode url="/home" title="Home" description="">
<siteMapNode url="/home/index" title="Index" description="" />
<siteMapNode url="/home/about" title="About Us" description="" />
<siteMapNode url="/home/contact" title="Contact Us"
description="" />
<siteMapNode url="/home/legal" title="Legal" >
<siteMapNode url="/home/legal?section=privacy"
title="Privacy Policy" />
<siteMapNode url="/home/legal?section=terms"
title="Terms & Conditions" />
</siteMapNode>
</siteMapNode>
</siteMap>
Now that ASP.NET knows about our site’s structure, we can display the current breadcrumb path to the user, using the standard SiteMapPath server control from Web Forms (listing 7.16). Luckily, this control doesn’t require any server-side form tag (nor ViewState or postbacks). It renders just as you’d expect it to.
Listing 7.16. Using the server control to display our current path in the site map
<div id="main">
    <asp:SiteMapPath ID="smp" runat="server"  />
    <asp:ContentPlaceHolder ID="MainContent" runat="server" />
</div>
We’ve placed this control in the master page, so every page of our site will get the current site map path displayed at the top, above the content. You can see the result in figure 7.18.
Figure 7.18. Displaying the site map breadcrumbs on the master page

As you can see, our breadcrumb links look good and they help the user navigate back through the higher layers of the site hierarchy. There’s only one facet of the site map story that doesn’t work well. Can you guess what it is? That’s right: it’s those pesky hard-coded URLs! If we change our routing structure, this SiteMapPath control will display the wrong links, and our site will be broken. Take care when restructuring URLs in your site.
We can choose to live with this and update it when our routes change (which is actually reasonable, because routes aren’t expected to change often), or we can implement our own custom SitemapProvider that knows about the controllers, actions, and routes in our web application. This is beyond the scope of this book, but it’s an exercise you might want to try.
7.6. Summary
As you’ve seen in this chapter, some features we’ve used in the past take tweaking to function. Others have limitations or don’t work at all. But you can harness the core features of the ASP.NET runtime to your advantage. We hope this chapter has helped you better distinguish between the pre-MVC ASP.NET world and the ASP.NET MVC world. Many of the examples in this chapter were purely exploratory, such as the ASP.NET server controls. The section on ASP.NET caching demonstrated how you can cope with some of the APIs that aren’t testable out of the box.
We’ve intentionally skipped over the ASP.NET AJAX feature—you can read about it in chapter 12. Now, it’s time to move on to part 2 of this book, leaving behind the fundamentals and going on to more advanced topics.