
Chapter 15. Validation
- Implementing Data Annotations
- Extending the ModelMetadataProvider
- Enabling ASP.NET Ajax client-side validation
The ASP.NET MVC 1.0 release provided a lot of out-of-the-box functionality, but one common piece was missing: user input validation. Integrating validation frameworks with the 1.0 release was quite difficult, because the hooks to put in validation weren’t fully formed. With ASP.NET MVC 2 comes full support for validation frameworks, as well as built-in support for Microsoft’s Data Annotations library.
Many web applications require some level of easy validation from the initial login screen. In this chapter, we’ll examine the built-in validators provided in the Data Annotations library. Then we’ll look at extending the model metadata providers with richer, more convention-driven behavior. Finally, we’ll describe how to enable client-side validation support.
15.1. Validation with Data Annotations
Data Annotations, introduced with the .NET 3.5 SP1 release, are a set of attributes and classes defined in the System.ComponentModel.DataAnnotations assembly that allow you to decorate your classes with metadata. This metadata describes a set of rules that can be used to determine how a particular object should be validated.
The Data Annotation attributes control more than validation. Some are used for the new templating features, as we saw in chapter 3 with the DisplayName and DataType attributes. The attributes that specifically control validation are listed in table 15.1.
Table 15.1. The Data Annotations attributes used for validation
|
Attribute |
Description |
|---|---|
|
RequiredAttribute |
Specifies that a data field value is required |
|
RangeAttribute |
Specifies the numeric range constraints for the value of a data field |
|
RegularExpressionAttribute |
Specifies that a data field value must match the specified regular expression |
|
StringLengthAttribute |
Specifies the maximum number of characters that are allowed in a data field |
ASP.NET MVC 2 includes a set of backing validation classes associated with each attribute that are responsible for performing the actual validation. To demonstrate the validation attributes, let’s first look at a screen that might need some validation. Figure 15.1 shows an Edit screen that includes Company Name and Email Address fields.
Figure 15.1. An Edit screen with a required field

In our application, Company Name is a required field and Email Address is optional. To indicate that the Company Name field is required, we use RequiredAt-tribute, as shown in listing 15.1.
Listing 15.1. Decorating our model with Data Annotations attributes
public class CompanyInput
{
    [Required]
    public string CompanyName { get; set; }

    [DataType(DataType.EmailAddress)]
    public string EmailAddress { get; set; }
}
We’ve decorated the CompanyName property with the RequiredAttribute. We’ve also decorated the EmailAddress attribute with the DataTypeAttribute to take advantage of custom email address templates.
In our view, we need to display potential validation error messages, and we can accomplish this in several ways. If we’re using the model templates, validation messages are already included in the template, as shown in listing 15.2.
Listing 15.2. The Edit view using editor templates for displaying validation messages

The default editor model templates ![]() generate a user interface that includes side-by-side input elements and validation messages.
generate a user interface that includes side-by-side input elements and validation messages.
For finer-grained control of the output, we can use the HtmlHelper extension methods for validation. The ValidationSummary extension provides a summary list of validation errors, usually displayed at the top of the form. For validation errors for specific model properties, we can use the ValidationMessage and expression-based Val-idationMessageFor methods.
With our validation messages in place, we need to check that our model is valid in the resultant POST action in our controller. We can decorate our model with validation attributes all we like, but it’s still up to us to handle validation errors in our controller action, as shown in listing 15.3.
Listing 15.3. Handling validation errors in our controller action
[HttpPost]
public ActionResult Edit(CompanyInput input)
{
    if (ModelState.IsValid)
    {
        return View("Success");
    }
    return View(new CompanyInput());
}
In our Edit POST action, we first check to see if there are any ModelState errors. The MVC validation engine places validation errors in ModelState, aggregating the existence of any errors into the IsValid property. If there are no errors, we show the Success view. Otherwise, we display the original Edit view, now with validation errors inline.
To display our validation errors for this example, we simply need to post our form without the company name filled out. On this page, company name is required. The resulting page is shown in figure 15.2.
Figure 15.2. Validation error resulting from a missing company name

When we submit a form with the company name field empty, our validation message shows up correctly.
In figure 15.2, there’s still a problem with our screen and the validation error message. Both the validation error message and input label are displayed as “CompanyName” with no space. We’d like to always include spaces between words in our labels. One way of fixing the label would be to include a DisplayNameAttribute (part of the System.ComponentModel namespace). But because it’s common to display the property name with spaces between words, we’ll extend the built-in ModelMetadata-Provider class to automatically include spaces.
15.2. Extending the ModelMetadataProvider
As we saw in the previous section, many new features in ASP.NET MVC 2 use model metadata. Templates use model metadata to display input elements and display text, and validation providers use model metadata to execute validation.
If we want our model metadata to be populated from sources other than Data Annotations, we need to create a ModelMetadataProvider implementation, as shown in listing 15.4.
Listing 15.4. The abstract ModelMetadataProvider class
public abstract class ModelMetadataProvider {
    public abstract IEnumerable<ModelMetadata>
        GetMetadataForProperties(object container,
                    Type containerType);

    public abstract ModelMetadata
        GetMetadataForProperty(Func<object> modelAccessor,
           Type containerType, string propertyName);

    public abstract ModelMetadata
        GetMetadataForType(Func<object> modelAccessor,
            Type modelType);
}
The ModelMetadataProvider class includes methods to get ModelMetadata for each member in the type ModelMetadata for a specific property, and ModelMetadata for a particular type, all of which can be seen in listing 15.4.
To customize the display text for a particular property, we only need to override specific behavior of the existing DataAnnotationsModelMetadataProvider class. To assist in model metadata scenarios where the metadata is pulled from traditional classes, properties, and attributes, the AssociatedMetadataProvider class provides some common functionality. Derived classes, such as the DataAnnotationsModelMetadataProvider class, only need to build ModelMetadata from already-discovered attributes.
In our case, we want to modify the behavior of the DisplayName model metadata. By default, the ModelMetadata’s DisplayName property comes from the DisplayName-Attribute if supplied. We may still want to supply the DisplayName value through an attribute.
In listing 15.5, we extend the built-in DataAnnotationsModelMetadataProvider to construct the DisplayName from the name of the property, split into separate words.
Listing 15.5. Our custom, conventions-based model metadata provider
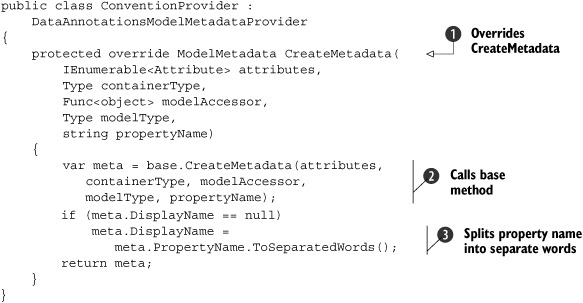
To build our convention-based display name scheme, we first create a class that inherits from the DataAnnotationsModelMetadataProvider class. This class provides quite a lot of functionality out of the box, so we only have to override the CreateMetadata method ![]() . The base class provides a lot of behavior we want to keep, so we first call the base class method
. The base class provides a lot of behavior we want to keep, so we first call the base class method ![]() and store its results in a local variable. Because we might override the display name with an attribute, we only want to
modify its behavior if the display name hasn’t already been set. If that value wasn’t set, we want to separate the property
name into individual words with the ToSeparatedWords extension method
and store its results in a local variable. Because we might override the display name with an attribute, we only want to
modify its behavior if the display name hasn’t already been set. If that value wasn’t set, we want to separate the property
name into individual words with the ToSeparatedWords extension method ![]() . Finally, we return the ModelMetadata object containing the modified display name.
. Finally, we return the ModelMetadata object containing the modified display name.
The ToSeparatedWords extension method, shown in listing 15.6, is a rather naive regular expression separating out Pascal-cased identifiers into individual words.
Listing 15.6. The ToSeparatedWords extension method
public static class StringExtensions
{
    public static string ToSeparatedWords(this string value)
    {
        if (value != null)
            return Regex.Replace(value, "([A-Z][a-z]?)", " $1").Trim();
        return value;
    }
}
With our custom ModelMetadataProvider built, we need to configure ASP.NET MVC to use our new provider. The typical location for this customization is in the Global.asax file, as shown in listing 15.7.
Listing 15.7. Configuring the new ModelMetadataProvider
protected void Application_Start()
{
    RegisterRoutes(RouteTable.Routes);

    ModelMetadataProviders.Current =
            new ConventionProvider();
}
To override the model metadata provider, we set the ModelMetadataProviders.Current property and supplied our custom provider. With our custom provider in place, the labels displayed on both the input and validation messages have a much friendlier look, as shown in figure 15.3.
Figure 15.3. The Edit screen with friendlier input labels and error messages

With our convention-based modification to the built-in DataAnnotationsModel-MetadataProvider, we can rely on our property names for displaying better labels and error messages. Otherwise, we’d need to avoid using the editor and display templates, or supply the display name in attribute form in many, many more places.
In the examples so far, we’ve used strictly server-side validation, but ASP.NET MVC 2 includes support for dual client- and server-side validation too. We’ll see that in the next section.
15.3. Client-side validation with ASP.NET Ajax
With the advent of modern browsers and rich client behavior, client-side validation in the form of JavaScript has become more popular. The feedback from client-side validation is much quicker than server-side validation because the round-trip from client to server is avoided. Many client-side validation frameworks also include advanced functionality such as executing validation when input element focus is lost, so that a user tabbing through form elements gets dynamic validation messages.
Building this behavior from scratch is most often cost-prohibitive and wasteful because many client validation frameworks have been under development and in production for years. The real trick with integrating client-side validation has been linking client-side and server-side validation without repeating a lot of code. With ASP.NET MVC 2, the potential duplication is greatly reduced. ASP.NET MVC 2 ships with support for using the Microsoft ASP.NET Ajax library for performing client-side validation. Integration with jQuery is also available as part of the Mvc-Futures project, which can be found at http://aspnet.codeplex.com.
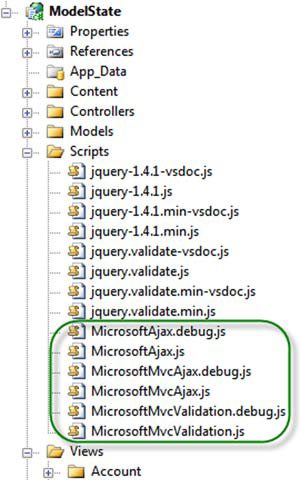
To enable client-side validation in our sample application, we first need to make sure that our application includes both the ASP.NET Ajax script library as well as the MVC validation support library, as shown in figure 15.4.
Figure 15.4. The ASP.NET Ajax client libraries and supporting debug files
With our JavaScript libraries included in the project, we now need to include them in our pages. This can be done in the master page, as shown in listing 15.8.
Listing 15.8. The master page with script files included
<head runat="server">
   <title><asp:ContentPlaceHolder ID="TitleContent" runat="server" /></title>
    <link href="../../Content/Site.css" rel="stylesheet" type="text/css" />

    <script src="../../Scripts/MicrosoftAjax.js" type="text/javascript"></
     script>
    <script src="../../Scripts/MicrosoftMvcAjax.js" type="text/javascript"></
     script>
    <script src="../../Scripts/MicrosoftMvcValidation.js" type="text/
     javascript"></script>
</head>
Because each JavaScript library builds on others, it’s important that the files be included in the correct order. We first register the ASP.NET Ajax library and later register the MVC validation support library. If we’re using jQuery as our validation framework, we’ll include the MicrosoftMvcJQueryValidation file instead (included with MvcFutures).
With our client libraries included in the master page, we can selectively opt in to validation on individual pages. This is as simple as using the EnableClientValidation HtmlHelper extension method, as shown in listing 15.9.
Listing 15.9. Enabling client validation in our view
<h2>Client Validation</h2>
<% Html.EnableClientValidation(); %>
<% using (Html.BeginForm("Edit", "Home")) { %>
    <%= Html.EditorForModel() %>
    <button type="submit">Submit</button>
<% } %>
The EnableClientValidation method merely turns on a flag in ViewContext. It’s the BeginForm form helper method that emits the pertinent client-side scripts to enable validation. The EnableClientValidation needs to be placed before the BeginForm method in your view to correctly enable scripts.
In our original screen with company name and email address, the model metadata is emitted as a set of JSON objects. This JSON, shown in figure 15.5, includes the model metadata information, validation information, and model information in the form of a well-structured JSON object.
Figure 15.5. The generated metadata and validation information

The generated validation information combines with the MVC validation library to act as a bridge between the client-side validation framework and the server-side model metadata emitted as JSON. For example, we can see in figure 15.5 that there seems to be some information about the CompanyName field, as well as a validation message for the required field validation.
With our custom validators in place, we can now exercise client-side validation by submitting our form with missing company name information. The result doesn’t post back, as shown in figure 15.6.
Figure 15.6. The client-side validation in action

Because our server-side validation is still in place, we can be confident that even browsers without JavaScript available or enabled will still have validation executed. ASP.NET MVC 2 also supports custom validators, with plug-ins for both server and client-side behavior. It’s up to the developers to decide how much richness is needed in the client-side behavior.
15.4. Summary
With the release of ASP.NET MVC 2, a large gap was closed in validation functionality. Rich, extensible, server-side validation, in the form of Data Annotations, and support for popular client-side validation help remove much of the custom-built validation solutions prevalent in MVC 1.0 applications. The integration of a metadata model allows validation and HTML generation tools to share metadata information for displaying labels, generating input elements, and executing and displaying validation errors. Because many applications demand a rich client-side experience, MVC 2 also includes support for two popular client-side validation libraries: jQuery and ASP.NET Ajax. Validation is now as simple as decorating our models with attributes.
In the next chapter, we’ll move into the advanced ASP.NET MVC topics, starting with routing.