Chapter 20. Full system testing
- Testing a web app with browser automation
- Examining simple, but brittle, tests
- Building maintainable, testable navigation
- Leveraging expression-based helpers in tests
- Interacting with form submissions
ASP.NET MVC ushered in a new level of testability for .NET web applications. Although testing a controller action is valuable, the controller action itself is only one piece of ASP.NET MVC’s request pipeline. Various extension points can be used, such as action filters, model binders, custom routes, action invokers, controller factories, and so on. Views can also contain complex rendering logic, unavailable in a normal controller action unit test. With all of these moving pieces, we need some sort of user interface testing to ensure that an application works in production as expected.
The normal course of action is to design a set of manual tests in the form of test scripts and hope that the QA team executes them correctly. Often, the execution of these tests is outsourced, increasing the cost of testing because of the increased burden on communication. Testing is manual because of the perceived cost of automation as well as experience with brittle user interface tests. But this doesn’t need to be the case. With the features in ASP.NET MVC 2, we can design maintainable, automated user interface tests.
20.1. Testing the user interface layer
In this book so far, we’ve examined many of the individual components and extension points of ASP.NET MVC, including routes, controllers, filters, and model binders. Although unit-testing each component in isolation is important, the final test of a working application is the interaction of a browser with a live instance. With all of the components that make up a single request, whose interaction and dependencies can become complex, it’s only through browser testing that we can ensure our application works as desired from end to end. While developing an application, we often launch a browser to manually check that our changes are correct and produce the intended behavior.
In many organizations, manual testing is formalized into a regression testing script to be executed by development or QA personnel before a launch. Manual testing is slow and quite limited, because it can take several minutes to execute a single test. In a large application, regression testing is minimal at best and woefully inadequate in most situations. Fortunately, many free automated UI testing tools exist. These are some of the more popular tools that work well with ASP.NET MVC:
- WatiN—http://watin.sourceforge.net/
- Watir—http://watir.com/
- Selenium—http://seleniumhq.org/
- QUnit—http://docs.jquery.com/QUnit
- Lightweight Test Automation Framework—http://aspnet.codeplex.com/wikipage?title=ASP.NET%20QA
In addition to these open source projects, many commercial products provide additional functionality or integration with bug reporting systems or work-item tracking systems, such as Microsoft’s Team Foundation Server. The tools aren’t tied to any testing framework, so integration with an existing project is rather trivial.
20.1.1. Installing the testing software
In this section, we’ll examine UI testing with WatiN, which provides easy integration with unit-testing frameworks. WatiN (an acronym for Web Application Testing in .NET) is a .NET library that provides an interactive browser API to both interact with the browser (by clicking links and buttons) and find elements in the DOM.
Testing with WatiN usually involves interacting with the application to submit a form, then checking the results in a view screen. Because WatiN isn’t tied to any specific unit-testing framework, we can use any unit-testing framework we like. The testing automation platform Gallio (http://www.gallio.org/) provides important additions that make automating UI tests easier:
- Logs individual interactions within the test
- Runs tests in parallel
- Embeds screenshots in the test report (for failures)
To get started, we need to download and install Gallio. Gallio includes an external test runner (Icarus), as well as integration with many unit-testing runners, including Test-Driven.NET, ReSharper, and others. Also included in Gallio is MbUnit, a unit-testing framework that we’ll use to author our tests.
With Gallio downloaded and installed, we need to create a Class Library project and add references to both Gallio.dll and MbUnit.dll. Next, we need to download WatiN and add a reference in our test project to the WatiN.Core.dll assembly.
With our project references done, we’re ready to create a simple test.
20.1.2. Walking through the test manually
A basic, but useful, scenario in our application is to test to see if we can edit product information. Our sample application allows the user to view and edit product details, a critical business feature. Testing manually, this would mean following these steps:
1.
Navigating to the home page
2.
Clicking the Products tab, shown in figure 20.1
Figure 20.1. Clicking the Products tab

3.
Clicking the Edit link for one of the products listed, as shown in figure 20.2
Figure 20.2. Clicking the Edit link for a product

4.
Modifying the product information and clicking Save, as shown in figure 20.3
Figure 20.3. Modifying product information and saving

5.
Checking that we were redirected back to the product listing page
6.
Checking that the product information updated correctly, as shown in figure 20.4
Figure 20.4. Verifying the correct landing page and changed information

20.1.3. Automating the test
Once we have described our test scenario behavior, we can author a test to execute this scenario. Our first pass at this UI test is in listing 20.1.
Listing 20.1. A first pass at our UI test

We first create a class and decorate it with the TestFixtureAttribute. Like most automated testing frameworks in .NET, MbUnit requires you to decorate test classes with an attribute because it
looks for these attributes to determine which classes to execute in its testing harness. Next, we decorate the test class
with the ApartmentState ![]() attribute. This attribute is necessary because WatiN uses COM to automate the Internet Explorer (IE) browser window. Each
test we author is a public void method decorated with the Test attribute. MbUnit will execute every method with the Test attribute and record the result.
attribute. This attribute is necessary because WatiN uses COM to automate the Internet Explorer (IE) browser window. Each
test we author is a public void method decorated with the Test attribute. MbUnit will execute every method with the Test attribute and record the result.
With our test class and method in place, we need to use WatiN to execute our test scenario. First, we instantiate a new IE object in a using block ![]() . When the IE object is instantiated, a browser window immediately launches and navigates to the URL specified in the constructor. We need
to enclose the IE lifecycle in a using block to ensure that the COM resources WatiN uses are properly disposed. The IE object is our main gateway to browser automation with WatiN.
. When the IE object is instantiated, a browser window immediately launches and navigates to the URL specified in the constructor. We need
to enclose the IE lifecycle in a using block to ensure that the COM resources WatiN uses are properly disposed. The IE object is our main gateway to browser automation with WatiN.
To interact with the browser, the IE object exposes methods for finding, examining, and manipulating DOM elements. We use the Link method ![]() to find the Products link by its text, and then click it with the Click method. The Link method includes many overloads, and we use the one that selects based on a WatiN BaseConstraint object. The Find static class includes helper methods to build constraints that are used to filter the elements in the DOM.
to find the Products link by its text, and then click it with the Click method. The Link method includes many overloads, and we use the one that selects based on a WatiN BaseConstraint object. The Find static class includes helper methods to build constraints that are used to filter the elements in the DOM.
Once we click the Products link, we navigate to the first Edit link on the page and click it. After clicking this link, we’re then on the edit screen for a single product.
We now need to find and fill in the input element for the price. Looking at the source, we can see that the input element
has a name attribute with a value of "Price", so we search by name attribute to locate the correct Price input element. To modify the value of the element, as if we were typing in the value
in a browser manually, we set the Value property to a new value ![]() . With the value changed, we can now find the Save button by name and click it
. With the value changed, we can now find the Save button by name and click it ![]() .
.
If our save completes successfully, we should be redirected back to the products list page. If we encounter a validation error,
we’ll stay on the product edit screen. In our scenario, we entered all valid data, so we check to make sure we’re redirected
back to the products list page ![]() . Finally, we can check that our product value is updated by searching for the price value on the page
. Finally, we can check that our product value is updated by searching for the price value on the page ![]() . ShouldBeTrue() is an extension method of the NBehave testing library.
. ShouldBeTrue() is an extension method of the NBehave testing library.
20.1.4. Running the test
When we execute this test, we’ll see our browser pop up and perform all of the interactive tasks that we’d normally accomplish manually, but in an automated fashion instead. It can be quite impressive to see our test running and passing successfully. A suite of manual tests is slow and error-prone, and automation eliminates the human error of manual site manipulation.
Unfortunately, our confidence will wane as our page starts to change. The test created in this section functions well, but it’s quite brittle in the face of change. The test will break if any of the following occur:
- The Products link text changes
- The Edit link text changes
- The first item in the list changes
- The name of the input element changes
- The Save button text changes
- The URL changes (either the controller name, action name, hostname, or port)
- Another product has the same price
These are all legitimate changes that normally occur over the lifetime of a project, so none of these changes should result in the test breaking. Ideally, our test should fail because of an assertion failure, not in the setup or execution phases.
The solution for brittle tests at any layer is to design for testability. So far we’ve treated our application as a black box. The test only used the final rendered HTML to build an interaction with the application. Instead of treating our application as a black box, we can design our user interface for stable, valuable user interface tests.
In the next section, we’ll look at creating maintainable navigation elements for our site.
20.2. Building maintainable navigation
Our original test navigated to a specific URL inside the test. Although this might not change, we don’t want each test to duplicate the starting URL. Things like port numbers and home page URLs can change over time.
Instead, we can create a base test class that extracts the common setup and cleanup of our IE browser object, as shown in listing 20.2.
Listing 20.2. Creating our base test class

Our new base test class creates the IE browser object with the correct starting URL ![]() . If we need different starting URLs, we’d still want to eliminate any duplication of the host name and port number.
. If we need different starting URLs, we’d still want to eliminate any duplication of the host name and port number.
We create a SetUp method that executes before every test, storing the created IE object in a local field. At the conclusion of every test, our TearDown method executes ![]() . The original test wrapped the IE object’s lifetime in a using block. Because the removal of the using block doesn’t eliminate the need for our test to dispose of the IE object, we need to manually dispose of our browser object in the Tear-Down method.
. The original test wrapped the IE object’s lifetime in a using block. Because the removal of the using block doesn’t eliminate the need for our test to dispose of the IE object, we need to manually dispose of our browser object in the Tear-Down method.
Finally, to allow derived test classes to have access to our created IE object, we expose this field with a protected property ![]() .
.
With this change, our UI test already becomes easier to read, as shown in listing 20.3.
Listing 20.3. The ProductEditTester class, modified to use the base test class

First, we change our test to inherit from the base test class, WebTestBase ![]() . We were also able to remove the original using block, which added quite a bit of noise to every test. Finally, we replaced all usages of the original using block variable with the base class Browser property
. We were also able to remove the original using block, which added quite a bit of noise to every test. Finally, we replaced all usages of the original using block variable with the base class Browser property ![]() .
.
With few exceptions, each of our UI tests will need to navigate our site by clicking various links and buttons. We could manually navigate through URLs directly, but that would bypass the normal navigation the end user would use. In our original test, we navigated links strictly by the raw text shown to the end user, but this text can change fairly easily. Our customers might want to change the "Products" link text to "Catalog", or the "Edit" link to "Modify". In fact, they might want to translate the labels on the page to a different language. Each of these changes would break our test, but they don’t have to. We can embed extra information in our HTML to help our test navigate the correct link by its semantic meaning, instead of the text shown to the user. In many sites, text shown to end users is data driven through a database or content-management system (CMS). This makes navigation by raw link text even more difficult and brittle.
The anchor tag already includes a mechanism to describe the relationship of the linked document to the current document—the rel attribute. We can take advantage of this informative, but nonvisual, attribute to precisely describe our link. If there are two links with the text "Products", we can distinguish them with the rel attribute. But we don’t want to fall into the same trap of searching for the final, rendered HTML. We can instead provide a shared constant for this link, as shown in listing 20.4.
Listing 20.4. Adding the rel attribute to the Products link
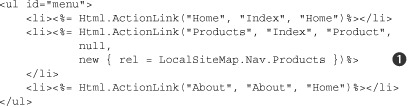
The Products link now supplies an additional parameter to the ActionLink method to render the rel attribute, in the form of an anonymous type ![]() . The LocalSiteMap class is a static class exposing a simple navigational structure through constants, as shown in listing 20.5.
. The LocalSiteMap class is a static class exposing a simple navigational structure through constants, as shown in listing 20.5.
Listing 20.5. The LocalSiteMap class

We can mimic the hierarchical structure of our site through nested static classes. Individual areas of concern, such as navigation,
are placed inside inner static classes ![]() . Finally, we can define constants to represent navigational elements
. Finally, we can define constants to represent navigational elements ![]() .
.
We don’t want to fall into the same trap of hard-coding rel values in our test and view, so we create a simple constant that can be shared between our test code and view code. This allows the rel value to change without breaking our test, as shown in listing 20.6.
Listing 20.6. The UI test using a helper method to navigate links
[TestFixture]
public class ProductEditTester : WebTestBase
{
    [Test]
    public void Should_update_product_price_successfully()
    {
        NavigateLink(LocalSiteMap.Nav.Products);

        ...
    }
}
The NavigateLink method is a helper method wrapping the work of finding a link with the rel attribute and clicking it. The definition of this method is shown in listing 20.7.
Listing 20.7. The NavigateLink method in our WebTestBase class
protected virtual void NavigateLink(string rel)
{
    var link = Browser.Link(Find.By("rel", rel));

    link.Click();
}
By encapsulating the different calls to the IE browser object in more meaningful method names, we make our UI test easier to read, author, and understand. Because both our view and our test share the same abstraction of representing navigational structure, we strengthen the bond between code and test. This strengthening lessens the chance of our UI tests breaking because of orthogonal changes that shouldn’t affect the semantic behavior of our tests. Our test is merely attempting to follow the Products link, so it shouldn’t fail if the semantics of the Products link don’t change.
In the next few sections, we’ll continue this theme of enforcing a connection between test and UI code, moving away from black-box testing.
20.3. Interacting with forms
In this book, we eschewed the value of embracing strongly typed views and expression-based HTML helpers. This allowed us to take advantage of modern refactoring tools that can update our view code automatically in the case of member name changes. Why then revert to hard-coded magic strings in our UI tests?
For example, our edit view already takes advantage of strongly typed views in displaying the edit page, as shown in listing 20.8.
Listing 20.8. The strongly typed view using editor templates

Our edit view is a strongly typed view for a ProductForm view model type ![]() . We use the editor templates feature from ASP.NET MVC 2
. We use the editor templates feature from ASP.NET MVC 2 ![]() to remove the need to hand-code the individual input and label elements. The EditorForModel method also lets us change the name of any of our ProductForm members without breaking our view or controller action.
to remove the need to hand-code the individual input and label elements. The EditorForModel method also lets us change the name of any of our ProductForm members without breaking our view or controller action.
In our UI test, we can take advantage of strongly typed views by using a similar approach with expression-based helpers, as shown in listing 20.9.
Listing 20.9. Using a fluent API and expression-based syntax to fill out forms

This simple fluent interface starts by specifying the view model type by calling the ForForm method ![]() . The ForForm method builds a FluentForm object, which we’ll examine shortly. Next, a call to the WithTextBox method is chained to the result of the ForForm method and accepts an expression used to specify a property on the View-Model, as well as a value to fill in the input element.
Finally, the Save method clicks the Save button on the form.
. The ForForm method builds a FluentForm object, which we’ll examine shortly. Next, a call to the WithTextBox method is chained to the result of the ForForm method and accepts an expression used to specify a property on the View-Model, as well as a value to fill in the input element.
Finally, the Save method clicks the Save button on the form.
Let’s examine what happens behind the scenes, first with the ForForm method call, shown in listing 20.10.
Listing 20.10. The ForForm method on the WebTestBase class

The ForForm method accepts a single generic parameter, the form type ![]() . It returns a FluentForm object, which wraps a set of helper methods designed for interacting with a strongly typed view. The ForForm method instantiates a new FluentForm object
. It returns a FluentForm object, which wraps a set of helper methods designed for interacting with a strongly typed view. The ForForm method instantiates a new FluentForm object ![]() , passing the IE object to the FluentForm’s constructor, as shown in listing 20.11.
, passing the IE object to the FluentForm’s constructor, as shown in listing 20.11.
Listing 20.11. The FluentForm class and constructor

The FluentForm’s constructor, shown in listing 20.11, accepts an IE object ![]() and stores it in a private field
and stores it in a private field ![]() for subsequent interactions.
for subsequent interactions.
The next method called in listing 20.9 is the WithTextBox method, shown in listing 20.12.
Listing 20.12. The expression-based WithTextBox method
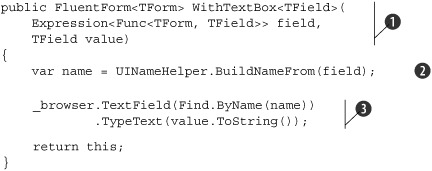
Our FluentForm method ![]() contains another generic type parameter, TField, which helps with compile-time checking of form values. The first parameter is an expression that accepts an object of type
TForm and returns an instance of type TField. Using an expression to navigate a type’s members is a common pattern for accomplishing strongly typed reflection. The second
parameter, of type TField, will be the value set on the input element.
contains another generic type parameter, TField, which helps with compile-time checking of form values. The first parameter is an expression that accepts an object of type
TForm and returns an instance of type TField. Using an expression to navigate a type’s members is a common pattern for accomplishing strongly typed reflection. The second
parameter, of type TField, will be the value set on the input element.
To correctly locate the input element based on the expression given, we use a helper class ![]() to build the UI element name from an expression. For our original example, the code snippet form => form.Price will result in an input element with a name of "Price".
to build the UI element name from an expression. For our original example, the code snippet form => form.Price will result in an input element with a name of "Price".
With the correct, compile-safe input element name, we use the IE object to locate the input element by name and type the value supplied ![]() . Finally, to enable chaining of multiple input element fields, we return the FluentForm object itself.
. Finally, to enable chaining of multiple input element fields, we return the FluentForm object itself.
The benefits of this approach are the same as for strongly typed views and expression-based HTML generators. We can refactor our model objects with the assurance that our views will stay up-to-date with any changes. By sharing this technique in our UI tests, our tests will no longer break if our model changes. If we remove a member from our view model—if it’s no longer displayed, for example—our UI test will no longer compile. This early feedback that something has changed is much easier to detect and fix than waiting for a failing test.
Note
The code that turns an expression into an HTML element name is quite complex, and can be found in the full sample code for this book.
After we have the input element populated, we need to click the Save button with our Save method, as shown in listing 20.13.
Listing 20.13. The FluentForm Save method
public void Save()
{
    _browser.Forms[0].Submit();
}
Although the Save method in listing 20.13 only submits the first form found, we can use a variety of other methods if there’s more than one form on the page. As we did for locating links, we can add contextual information to the form’s class attribute if need be. In our scenario, we only encounter one form per page, so submitting the first form found will suffice.
Now that we have our form submitting correctly, and in a maintainable fashion, we need to assert the results of the form post.
20.4. Asserting results
When it comes to making sure our application works as expected, we have several general categories of assertions. We typically ensure that our application redirected to the right page and shows the right information. In more advanced scenarios, we might assert on specific styling information that would further relate information to the end user.
In our original test, we asserted a correct redirect by checking a hard-coded URL, but this URL can also change over time. We might change the port number, hostname, or even controller name. Instead, we want to build some other representation of a specific page. Much like when representing links in our site, we can build an object matching the structure of our site. The final trick will be to include something in our HTML indicating which page is shown.
Although we could do this by attaching IDs to the body element, that approach becomes quite ugly in practice because this tag is typically in a master page. Another tactic is to create a well-known input element, excluded from any form, as shown in listing 20.14.
Listing 20.14. Providing a page indicator in our markup
<asp:Content ID="Content2"
             ContentPlaceHolderID="MainContent"
             runat="server">

    <input type="hidden" name="pageId"
      value="<%= LocalSiteMap.Screen.Product.Index %>" />

    <h2>Products</h2>
In listing 20.14, we include a well-known hidden input element with a name of "pageId" and a value referencing our site structure as a constant. The navigational object structure is designed to be easily recognizable—this example indicates the product index page.
The actual value is a simple string, as shown in listing 20.15.
Listing 20.15. Site structure in a well-formed object model
public static class LocalSiteMap
{
    ...

    public static class Screen
    {
        public static class Product
        {
            public static readonly string Index = "productIndex";
        }
    }
}
Our site structure is exposed as a hierarchical model in listing 20.15, finally exposing a constant value. It’s this constant value that’s used in the hidden input element.
With this input element in place, we can now assert our page simply by looking for this element and its value, as shown in listing 20.16.
Listing 20.16. Asserting for a specific page

The CurrentPageShouldBe method in listing 20.16 encapsulates the work of locating the well-known input element and asserting its value. We pass in the same constant value
![]() to assert against as was used to generate the original HTML. Again, we share information between our view and test to ensure
that our tests don’t become brittle.
to assert against as was used to generate the original HTML. Again, we share information between our view and test to ensure
that our tests don’t become brittle.
The CurrentPageShouldBe method, shown in listing 20.17, is defined on the base WebTestBase class so that all UI tests can use this method.
Listing 20.17. The CurrentPageShouldBe method
protected void CurrentPageShouldBe(string pageId)
{
    Browser.TextField(Find.ByName("pageId")).Value.ShouldEqual(pageId);
}
Finally, we need to assert that our application changed the price value correctly. This will require some additional work in our view, because it’s currently quite difficult to locate a specific data-bound HTML element. The original test merely searched for the price text anywhere in the page. But this means that our test could pass even if the price wasn’t updated, because the text for the price might show up for something unrelated, such as another product, the version text at the bottom of the screen, the shopping cart total, and so on.
Instead, we need to use a similar tactic of displaying our information as we did for rendering our edit templates. We’ll use the expression-based display templates, as shown in listing 20.18.
Listing 20.18. Using expression-based display templates
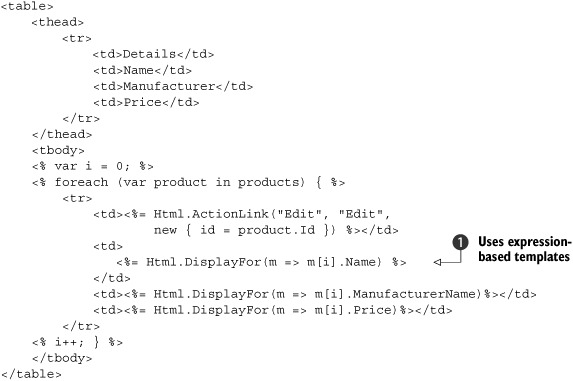
We need to utilize the full expression, including the array index, with the expression-based display templates ![]() . Out of the box, the display templates for strings are just the string values themselves. We want to decorate this string
with identifying information, in the form of a span tag. This is accomplished quite easily by overriding the string display template.
. Out of the box, the display templates for strings are just the string values themselves. We want to decorate this string
with identifying information, in the form of a span tag. This is accomplished quite easily by overriding the string display template.
First, we need to add a new string template file in our Shared Display Templates folder, as shown in figure 20.5.
Figure 20.5. Adding the new string template

The string.ascx template is modified in listing 20.19 to include a span tag with an ID derived using the TemplateInfo.GetFullHtmlFieldId method.
Listing 20.19. The updated string display template
<%@ Control Language="C#" Inherits="System.Web.Mvc.ViewUserControl" %>
<span id="<%= ViewData.TemplateInfo.GetFullHtmlFieldId(null) %>">
    <%= Html.Encode(ViewData.TemplateInfo.FormattedModelValue) %>
</span>
The span tag wraps the entire value displayed with a well-formed ID derived from the expression originally used to display this template. In listing 20.19, the original expression m => m[i].Name would result in a runtime span ID of "[0]_Name". Because the array index is included in the span ID, we can distinguish this specific model value apart from any other product shown on the screen. We don’t need to search for items matching generic values; we can navigate directly to the correct rendered model value.
In our test, we build a FluentPage object. This is a similar abstraction to the FluentForm that we saw earlier, but FluentPage provides a way to assert information displayed correctly on our screen. In listing 20.20, our test uses the ForPage and Find-Text methods to assert a specific product’s price value.
Listing 20.20. The final test code using expression-based display value assertions

The ForPage method takes a single generic argument, specifying the view model type for the particular page being viewed at the moment
![]() . Next, we find a specific text value with the FindText method
. Next, we find a specific text value with the FindText method ![]() , which accepts an expression for a specific model value and the value to assert. We look for the first product’s price and
assert that its value is the same value supplied in our earlier form submission.
, which accepts an expression for a specific model value and the value to assert. We look for the first product’s price and
assert that its value is the same value supplied in our earlier form submission.
The ForPage method builds a FluentPage object, which is shown in listing 20.21.
Listing 20.21. The FluentPage class

The FluentPage class has a single generic parameter, TModel, for the page’s view model type. The FluentPage constructor accepts an IE object ![]() and stores it in a private field.
and stores it in a private field.
Next, we define the FindText method ![]() as we did our WithTextBox method earlier. FindText contains a generic parameter against the field type and accepts a single expression to represent accepting a form object
and returning a form member. Find-Text also accepts the expected value.
as we did our WithTextBox method earlier. FindText contains a generic parameter against the field type and accepts a single expression to represent accepting a form object
and returning a form member. Find-Text also accepts the expected value.
In the body of the method, we first need to build the ID from the expression given ![]() . Next, we find the span element using the ID built from the expression
. Next, we find the span element using the ID built from the expression ![]() . The span object contains a Text property, representing the contents of the span tag, and we assert that the span contents match the value supplied in the Fluent-Page method.
. The span object contains a Text property, representing the contents of the span tag, and we assert that the span contents match the value supplied in the Fluent-Page method.
Finally, to allow for multiple assertions using method chaining, we return the FluentPage object itself.
With our test now strongly typed, expression based, and sharing knowledge with our views, our tests are much less likely to break. In practice, we’ve found that tests built using this approach now break because of our application’s behavior changing, rather than just the rendered HTML.
20.5. Summary
ASP.NET MVC introduced a level of unit testing that wasn’t possible in Web Forms. But unit tests alone can’t ensure that our application functions correctly in the browser. Instead, we need to employ full system testing that exercises the system with all moving pieces in place.
Full system testing can be brittle, so we must take steps to ensure that our tests stay as stable as possible. To create stable, reliable UI tests, we use techniques such as expression-based HTML generators and embedded semantic information to navigate and interact with the application. In all our techniques, the common theme is designing our UI for testability, by sharing design information that can be used in our tests. As we encounter new scenarios, we need to be wary of testing strictly based on the rendered HTML and instead investigate how we can share knowledge between our views and our tests.
In the next chapter, we’ll look at organizing large applications with the new Areas feature in MVC 2.0.