
So you’ve finished your Web application and are ready to release the application onto the world. This chapter is about how you do this.
In this chapter, you will learn
Three methods of deploying an ASP.NET Web application
About important, last-minute checks you should perform before deployment
How to use Web Setup Projects to distribute your Web application project
There are three main methods of copying an ASP.NET Web application from a development server onto a production Web site:
Use XCopy deployment
Use the Visual Studio .NET
Copy ProjectcommandUse a Web Setup Project
XCopy deployment
refers to the process of simply copying files from one server to another using the DOS XCopy command or using the Windows Explorer to copy one folder from one location to another. In other words, you can deploy an ASP.NET application simply by copying all the files from your project directory to a production Web site.
For example, if your Visual Studio .NET project is named myApp in the Solution Explorer window, you can drag the InetPubwwwrootmyApp folder from your development computer to the InetPubwwwroot folder on the “live” Web site (or FTP the folder in the case of a remote server being hosted by an ISP).
The fact that you can deploy an application in such a simple manner is amazing, especially if you have come from a background of developed Web applications in ASP Classic. Unlike ASP Classic, ASP.NET does not depend on the computer registry, so you can deploy an ASP.NET application without worrying about registering components on the production Web server.
However, there are drawbacks to XCopy deployment. The most important drawback is that simply copying your project from one server to another will also copy your source code from the development server to the production Web site. You should avoid placing your source code (the .cs or .vb files in your project) onto a “live” Web server.
Note
In theory, you should be safe placing the
source code for your project on a production Web server because access to source code files is blocked in the Machine.Config file. Source code files are mapped in the <httpHandlers> section to the ForbiddenHandler, which displays an access denied message. However, it is best in this kind of situation to err on the side of caution and not place your source code files on a production machine.
A better alternative to using XCopy deployment is to use the Visual Studio .NET
Copy Project command. This command enables you to copy only those files needed to run your application without including the source code files.
There is a button for the Copy Project command at the top of the Solution Explorer window. You can also access the Copy Project command from beneath the Project menu.
The Copy Project command provides you with three options for copying a project. You can choose to copy only the files needed to run the application, all project files, or all files in the source project directory (see Figure 19.1). You should select the first choice when deploying an application onto a production Web server because the first choice does not copy the source
code files.
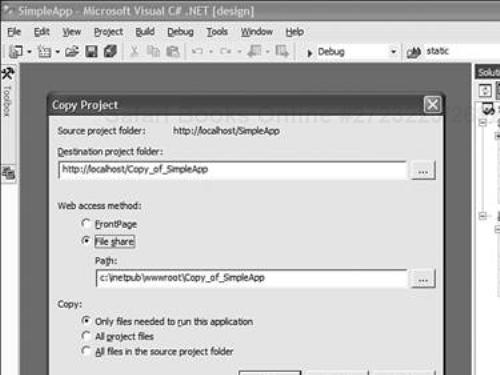
Notice that the Copy Project command supports copying a project using either FrontPage extensions or a File Share. Most companies disable FrontPage extensions on a production Web server for security reasons (FrontPage extensions are just one more point of entry for a potential hacker). Consequently, you’ll want to use File Share access unless you are copying the project to a remote host over the Internet.
There is one last method that you can use for deploying your application. You can create something called a Web Setup Project. A Web Setup Project enables you to create a Microsoft Installer package for a project. This is useful when you need to distribute your project and want the installer to perform all the necessary setup tasks. For example, the installer automatically creates a new virtual directory for the project on the target computer and sets whatever permissions for the virtual directory that you specify. We’ll look at Web Setup Projects in detail later in this chapter in the “Creating Web Setup Projects” section.
Before you deploy an application, you should complete the following checklist:
Did you remember to build your application in Release mode?—. Executing a Web application in debug mode carries a severe performance penalty. Before deploying your application, make sure that your project has been built within Visual Studio .NET in Release mode. Also, check that the
debugattribute in the<compilation>section of the Web.Config file is set tofalse. See Chapter 6, “Debugging Your Web Form Pages,” for more information.Did you disable page and application tracing?—. You should make sure that tracing is disabled for your application for security reasons. Make sure that you have disabled both page and application tracing. Disable remote page tracing on a server by setting the
localOnlyattribute totruein the<trace>section of the Web.Config or Machine.Config file. You should also disable application tracing by setting theenabledattribute tofalse. See Chapter 6 for more information.Did you enable custom errors?—. Displaying error messages can be a serious security risk because sensitive information, such as database passwords, can be exposed. Therefore, if you have disabled custom errors, you should re-enable custom errors in the Web.Config or Machine.Config file. Assign the value
OnorRemoteOnlyto themodeattribute of the<customErrors>tag. See Chapter 6 for more information.Did you disable the .vsdisco handler?—. Make sure that dynamic discovery is disabled for your application. Remove the reference to the .vsdisco handler in the
<httpHandlers>section in the Web.Config or Machine.Config file. See the final section of Chapter 21, “Building XML Web Services,” for more information.Are you using sa to login to SQL Server?—. Don’t use an account that has SQL administrator privileges for database-driven Web Form Pages on a production server. In particular, don’t use the sa account. Either use SQL Server Integrated Security (the ASPNET account) or use SQL Server Mixed Security with an account that has restricted permissions.
Have you applied all the latest security patches?—. Make sure that you have applied all the latest security patches to both Windows and Internet Information Server (IIS). There have been several serious security holes in IIS. Check http://www.microsoft.com/technet/security for the latest security updates. You can use the IIS 5.0 Hotfix Checking Tool to automatically check for any necessary security updates for IIS.
Tip
You can lock down settings in the Machine.Config file in your production Web server to prevent applications from being deployed with settings that present a security risk. To learn more, see Chapter 15, “Configuring Your Application.”
If you need to distribute a finished ASP.NET Web application to a client and you want the application to configure itself automatically on the client’s Web server, you should consider creating a Web Setup Project. You can use a Web Setup Project to create an installer for your ASP.NET Web application that automatically creates a virtual directory and installs all the necessary files for your application.
Suppose that you have an existing ASP.NET Web application named MyWebApp open in Visual Studio .NET. Perform the following steps to create a Web Setup Project:
Right-click the name of the Solution in the Solution Explorer window and select New Project from the Add menu. Select the Setup and Deployment folder under Project Types and select Setup Wizard under Templates. Name your Web Setup Project
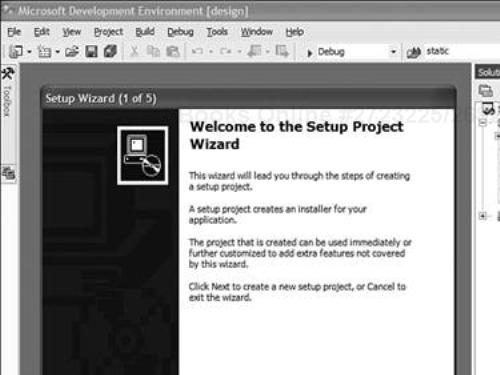
MySetupand click OK.The first page of the Web Setup Wizard will appear (see Figure 19.2). Click Next to start the wizard.
In the Choose a project type page, select Create a Setup for a Web Application and click Next.
In the Choose project outputs to include page, check Primary Output from MyWebApp and Content Files from myWebApp and click Next.
The Choose Files to Include page enables you to add additional files. Don’t add any additional files to your Web Setup Project and click Next.
After you complete these steps, a new project named MySetup will appear in the Solution Explorer window. The final step is to build the Web Setup Project. Right-click MySetup and select Build.
Warning
There is a bug in the current version of Visual Studio .NET that causes error messages to be displayed when you build a Web Setup Project that contains multiple folders with the same name. You can ignore these error messages; the Web Setup Project will build successfully.
The finished installer is named MySetup.msi. You can find this file in the following folder:
My DocumentsVisual Studio ProjectsMyWebAppMySetupDebugMySetup.msi
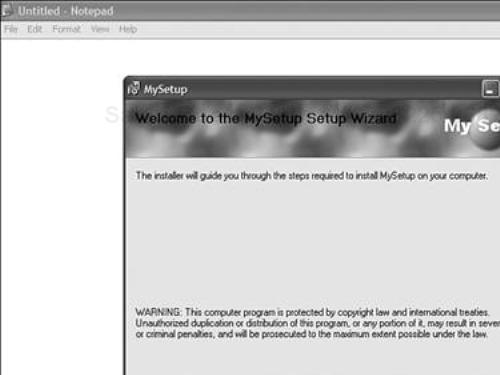
You can distribute the MySetup.msi file to your clients. When the MySetup.msi file is executed, you get the standard Windows installer (see Figure 19.3). The installer creates a virtual directory and installs the content files and assemblies from the MyWebApp project.
If you want to remove an ASP.NET Web application that was added to a server with the installer, you can remove the application from the Add/Remove Programs applet in the Windows Control Panel.
Note
You might have noticed that building the MySetup project not only creates a MySetup.msi file, it also creates a Setup.exe file. You only need to distribute the MySetup.msi file. The Setup.exe file simply calls the MySetup.msi. Microsoft included the Setup.exe file because so many people are used to executing a program named Setup.exe when installing an application.
If you want to quickly test the installer on the same computer as Visual Studio .NET, you can right-click MySetup in the Solution Explorer window and select Install. You can uninstall the application by right-clicking and choosing UnInstall.
If you select the MySetup project in the Solution Explorer window and open the Properties window, you’ll see several useful properties that you can set. For example, you can supply a product name, the URL for a support Web site, and an icon for the Web application that appears in the Add/Remove Programs applet.
The value of the Product Name property is used both in the title bar and the description text during the installation process. The support URL appears in the Add/Remove Programs applet.
You can also modify the properties of the virtual directory that the installer creates when installing a Web application. To view the virtual directory properties, right-click the MySetup project in Solution Explorer and select View, File System. After you select this option, you should see the screen in Figure 19.4.
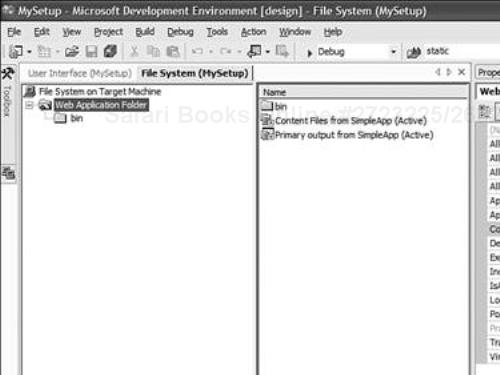
The File System Editor provides you with a representation of the file system where your application will be installed. If you select the Web Application Folder and open the Properties window, you’ll see a list of virtual directory properties that you can modify. For example, you can change the name of the virtual directory by modifying the VirtualDirectory
property.
You can modify the appearance of the dialog boxes that a user views when executing the installer by right-clicking MySetup in Solution Explorer and selecting View, User Interface. You will see the User Interface Editor in Figure 19.5.
If you select any of the dialog boxes, you can modify the dialog’s properties in the Properties window. For example, you can modify the banner image that appears at the top of each dialog box by performing the following steps:
Right-click MySetup in Solution Explorer and select File System from the View menu.
In the File System Editor, right-click Web Application Folder and select File from the Add menu.
Browse to a .bmp or .jpg image on your hard drive and click Open.
Right-click MySetup in Solution Explorer and select User Interface from the View menu.
In the User Interface Editor, select the Welcome dialog box.
Assign the .bmp or .jpg image that you added previously to the
BannerBitMapproperty.
After you complete these steps, the image you selected will appear in the Welcome dialog box when a user executes the installer (see Figure 19.6).
You can also use the User Interface Editor to create additional dialog boxes, such as splash screens or license agreement dialog boxes. For example, perform the following steps to add a license agreement:
Right-click MySetup in Solution Explorer and select File System from the View menu.
In the File System Editor, right-click Web Application Folder and select File from the Add menu.
Browse to an .rtf file on your hard drive that contains the text of the license agreement and click Open (you can create the .rtf file with WordPad).
Right-click MySetup in Solution Explorer and select User Interface from the View menu.
In the User Interface Editor, right-click the Start node and select Add Dialog. Select the License Agreement dialog and click OK.
You can rearrange the order of the dialog boxes in the User Interface Editor by dragging one dialog box above or beneath another. Move the License Agreement dialog box above the Installation Address dialog box.
Select the License Agreement dialog box and open the Properties window.
Assign the license agreement file that you added previously to the
LicenseFileproperty.Right-click MySetup in the Solution Explorer window and select Build.
After you complete these steps, the license agreement will appear when the installer executes (see Figure 19.7). If the user does not agree to the terms of the license, the only choice left to the user is canceling installation.
In this chapter, you learned how to deploy an ASP.NET Web application. In the first section, you were provided with an overview of the different methods for deploying a project. You were also provided with a deployment checklist that you should consult before deploying a Web application onto a production server.
Next, we looked at Web Setup Projects in detail. You learned how to create an installer for a Web application. You also learned how to customize the appearance of the installer dialog boxes.