
Chapter 2. Presentation model
- Representing UI concepts in code
- Defining the presentation model
- Representing user input
- Scaling to complex scenarios
A model is a representation of something meaningful. It’s not necessarily something physical but something real: a business concept or an API that’s difficult to work with.
When we write object-oriented software, we create classes that make up this representation. We can create our representation so that when we use it we’re working in a natural human language, like English or Spanish or business jargon, instead of in programming language constructs like Booleans, meaningless strings, and integers.
When working with a user interface (UI) framework like ASP.NET MVC, the UI is the complex problem that we manage. It’s the data in a window, a form submission from a user, the options in a select list. Whereas model is an overloaded term in software, this chapter focuses on the presentation model—the model that represents the screen and user input of an application.
2.1. The M in MVC
Consider a screen that shows a table to the user, as shown in figure 2.1.
Figure 2.1. A table in our user interface

This table is the product of our software development. It deserves to exist as a first-class object in our system. This will allow us to intentionally create it and to maintain it after its initial development.
A first-class object representing this table, or rather representing each row, will also allow our view code to easily display the table itself. In listing 2.1 we have a simple model class for the table in figure 2.1.
Listing 2.1. The CustomerSummary class
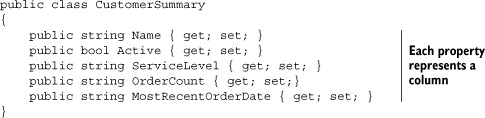
This model is intentionally simple; it consists mostly of strings. That’s what we’re representing, after all: text on a page. The logic that displays the data in this object will be straightforward; the view will only output it. The presentation model is designed to minimize decision making in the view.
The model for the entire table is of type IEnumerable<CustomerSummary>. With a simple model like that, the view only has to iterate through it, writing a row for each CustomerSummary.
In the next section, we’ll discuss the programmatic creation of the model.
2.2. Delivering the presentation model
Somewhere in our application, we’ll build this presentation model. It may be hydrated with the results of a simple database query, like a flat report. Or it may be calculated and projected from another set of interesting data.
It’s common to have a class whose sole responsibility is to formulate the presentation model. Doing the work of building a presentation model in application code is better than doing that work in the view. The view is convoluted enough as it is, and it’s focused on HTML and style. A separate class that creates the presentation model can be easily tested, programmed, and maintained.
It’s also best not to create the presentation model in the controller. The controller is busy deciding which view to render and coordinating these other efforts. Listing 2.2 offers a simplistic look at how a controller might send the presentation model to the view.
Listing 2.2. A controller action preparing the presentation model

Once the CustomerSummary objects have been created, the controller passes them into the View() method, which transferring the objects to the view ![]() . There’s a special mechanism for sharing the model in ASP.NET MVC 2, and we’ll cover it next.
. There’s a special mechanism for sharing the model in ASP.NET MVC 2, and we’ll cover it next.
2.3. ViewData.Model
The controller and view share an object of type ViewDataDictionary named View-Data. ViewData is a regular dictionary, with string keys and object values, but it also features a Model property. Conveniently, ViewData.Model is where we put our model. The Model property is also strongly typed, so our view knows exactly what to expect, and developers can take advantage of IDE features like IntelliSense and support for renaming variables.
Listing 2.3 shows how a view can describe its model type in the Page directive.
Listing 2.3. Defining the model in the Page directive
<%@ Page Language="C#" MasterPageFile="~/Views/Shared/Site.Master"
Inherits="System.Web.Mvc.ViewPage<IEnumerable<CustomerSummary>>" %>
The Inherits attribute in listing 2.3 specifies that the view’s model (the View-Data.Model property) is of type IEnumerable<CustomerSummary>. Because we designed our model to work with our screen, it’s easy to mark up with HTML, as shown in listing 2.4.
Listing 2.4. Using the model in the view

The markup in listing 2.4 renders our table. Instead of relying on “magic string” keys and complex logic, we’re free to work directly with a strong, clear model. By constructing the model elsewhere and designing it to represent the screen, we’ve made the developer’s job easy.
Some screens are more complex than a single table. They may feature multiple tables and additional fields of other data: images, headings, subtotals, graphs, charts, and a million other things that complicate a view. The presentation model solution scales to handle them all. Developers can confidently maintain even the gnarliest screens as long as the presentation model is designed well. If a screen does contain multiple complex elements, a presentation model can be a wrapper, composing them all and relieving the markup file of much complexity. A good presentation model doesn’t hide this complexity—it represents it accurately and as simply as possible, and it separates the data on a screen from the display.
Another complex, real thing that a web application must process is user input. We’ll look at modeling user input next.
2.4. Representing user input
Just like we crafted a presentation model to represent a display, we can craft a model to represent the data coming into our application. And just as a strong presentation model made it easy to work with our data in the view, a strong input model makes it easy to work with user input in our application. Instead of working with error-prone string keys and inspecting request values that hopefully match input element names, we can leverage ASP.NET MVC 2 features to work with a strong input model.
2.4.1. Designing the model
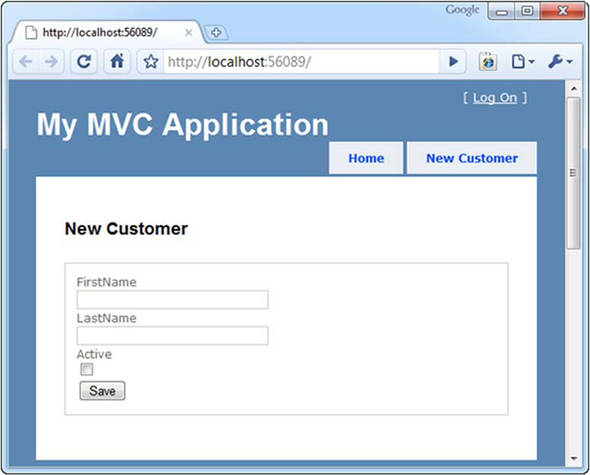
The simple form in figure 2.2 has two text boxes and a check box. As a feature of our application, this form is also worthy of a formal, codified representation: a class.
Figure 2.2. A form for user input
Designing the class to represent this form is easy: it’s two strings and a Boolean value, as you can see in listing 2.5.
Listing 2.5. The input model

The input model in listing 2.5 is a simple class with a focused job. It’s the surface area of user input—nothing more, nothing less.
2.4.2. Presenting the input model in a view
Views can be strongly typed by declaring the base type for the view as ViewPage<T>. In this case, T will be NewCustomerInput, which means that the ViewData.Model property will also be of type NewCustomerInput. We can craft the HTML form using the input model.
ASP.NET MVC 2 ships with several helpers that make this easier and allow for strong associations between form element names and model property names. These helpers will be covered in depth in chapter 3, but it’s important to see the basics of how they’re used. Listing 2.6 shows a view using the NewCustomerInput view model.
Listing 2.6. A view using the input model
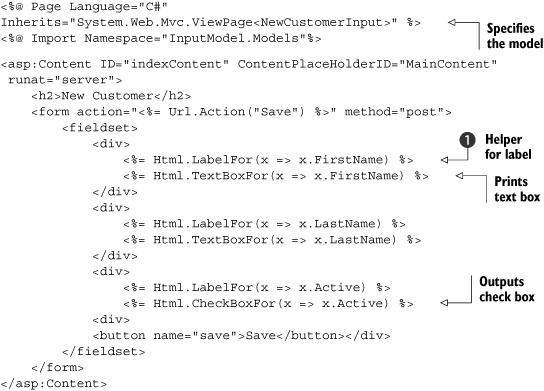
The form in listing 2.6 is built with our input model, NewCustomerInput, from listing 2.5. Note the special HTML helpers that take a lambda expression ![]() . These helpers will parse the lambda expressions and extract the property name, which will then be used as the value for
the form element’s name attribute. For example, a call to Html.TextBoxFor(x => x.LastName) would generate <input type="text" name="LastName" />.
. These helpers will parse the lambda expressions and extract the property name, which will then be used as the value for
the form element’s name attribute. For example, a call to Html.TextBoxFor(x => x.LastName) would generate <input type="text" name="LastName" />.
Before strongly typed helpers, we relied on magic strings, and programmers manually ensured consistency between the input form and the processing logic. With strongly typed helpers, like we use in listing 2.6, ASP.NET MVC 2 handles this coordination for the developer, so renaming a property won’t cause our screen to malfunction. We cover these helpers in depth in chapter 3.
Don’t underestimate the value of lambda expressions in your views. They are compiled along with the rest of your code, so if you rename an action, this code will break at compile time. Contrast this with code in your ASPX that references classes and methods with strings—you won’t find those errors until runtime.
Having strongly typed view data references also aids in refactoring. Using a tool like JetBrains ReSharper (www.jetbrains.com/resharper) will allow you to refactor code and have it reach out to all the views that use it as well. Very powerful indeed.
2.4.3. Working with the submitted input
The form in listing 2.6 posts to the Save action, and ASP.NET MVC 2 offers a convenient way to translate the values in the HTTP request to our model. This process is called model binding, and it’s explored in depth in chapter 14, but we’ll take a quick look at it now in listing 2.7.
Listing 2.7. Model binding form values to the input model
public ViewResult Save(NewCustomerInput input)
{
    return View(input);
}
By declaring the action’s parameter as a NewCustomerInput object, the value is wired up by ASP.NET MVC 2’s DefaultModelBinder and delivered properly. This is the default behavior in ASP.NET MVC 2.
Our action works with our strong input model object, not a dictionary of key-value pairs. In this case, it’s not doing much (just sending it as the model of a different view, so in the example we can inspect the “saved” values), but in a real action we’d have the opportunity to work with it like any other class: persist it or pass it along to collaborating classes for further processing.
Many views aren’t just displays or input forms but combine elements of both to achieve a rich user experience. In the next section, we’ll apply the concepts we’ve already learned in this chapter to a more complex view.
2.5. More complex models for both display and input
Figure 2.3 shows a table that has a list of customer summaries as well as an input element for each row. End users can see a list of customer summaries, but they can also modify the status of the customer, checking the box if the user should be activated.
Figure 2.3. A combined display and input form

2.5.1. Designing the model
This is familiar now, but it’s important enough to reiterate: the presentation model we design represents the screen, and the input model represents user input. Both are as simple as possible, with C# properties reflecting the reality of the UI. Listing 2.8 shows the code for a model that represents the table in figure 2.3.
Listing 2.8. A combined display and input model
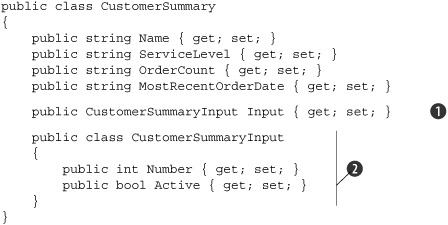
It makes sense to model the input model as a nested class ![]() . After all, in the user interface, the input elements are nested inside the display. The Input property is the input model for each item
. After all, in the user interface, the input elements are nested inside the display. The Input property is the input model for each item ![]() . Keeping it as part of the presentation model ensures that it will be easy to maintain: there’s only one class that represents
this screen. Note the Number property in CustomerSummaryInput—it’s the ID of each customer, and exists to distinguish the inputs. We don’t want our users to intend to activate Jim Doe
only to have our application actually activate Susan Power. On this screen it’s important that our application have a logical
connection to a specific customer.
. Keeping it as part of the presentation model ensures that it will be easy to maintain: there’s only one class that represents
this screen. Note the Number property in CustomerSummaryInput—it’s the ID of each customer, and exists to distinguish the inputs. We don’t want our users to intend to activate Jim Doe
only to have our application actually activate Susan Power. On this screen it’s important that our application have a logical
connection to a specific customer.
2.5.2. Working with the input model
Model binding works the same way. We still must be specific in our action signature about which type we intend to model bind. It’s just slightly different because we’re editing multiple customers.
In listing 2.9 we model bind to a list.
Listing 2.9. Working with the input model

We direct the model binder to collect all the inputs by accepting a List<CustomerSummary.CustomerSummaryInput> ![]() . This works out of the box.
. This works out of the box.
2.6. Summary
The main concept in this chapter is designing a presentation model by crafting it to represent the user interface. We saw how a presentation model designed to support a screen makes the corresponding view easy to work with. By representing user input with an explicit model object, we can use ASP.NET MVC 2 model binding to work with objects. We saw how representing a complex screen with a focused model can make it easier to manage.
With strong presentation models comes an avalanche of simplicity that enables maintainability and rapid construction. Refactoring, renaming, adding fields, and changing behaviors is returned to the world of programming. Freed from the shackles of the designer and a constant effort to maintain consistency across a myriad of magic strings that may or may not make sense, developers can focus on one thing at a time. The model is at the core of Model-View-Controller.
There are other types of models. Just as presentation models represent the user interface, domain models typically represent a part of a business or conceptual problem, and we’ll cover the domain model in chapter 8. Armed with knowledge of the M in MVC, you are now ready to move on to chapter 3, where we’ll more closely examine MVC views.