Chapter 10. Advanced view techniques
- Using master pages to craft site-wide templates
- Applying partials for shared snippets of content
- Leveraging child actions for common widgets
- Building parameter lists for generating URLs
- Examining the Spark view engine
The MVC pattern gives us separation of concerns between the model, controller, and view, but this pattern didn’t eliminate the need for developers to carefully design their views. With the elimination of code-behind and the addition of a view model object, we can focus strictly on rendering content inside our view. But without careful attention, our views can still slide into a morass of duplication and spaghetti code. We can no longer lean on custom controls to encapsulate view behavior as we did in Web Forms. Instead, ASP.NET MVC provides similar and expanded mechanisms for tackling all levels of duplication in our views.
First, we’ll look at the various forms of duplication we encounter in our views and explore various means of tackling duplication as it arises.
10.1. Eliminating duplication in the view
In ASP.NET MVC, the ability to use web controls to encapsulate complex UI elements is all but gone. We can use web controls that don’t take advantage of ViewState, but that renders web controls built for Web Forms mostly useless. Instead, we have to turn to other means to eliminate duplication in our views.
With the release of ASP.NET MVC 2, our choices for tackling view duplication are expanded:
- Master pages
- Partials
- Child actions
- Templates
- HtmlHelper extensions
Each of these means of addressing duplication in our views has its sweet spot, and there’s some overlap between some of them. In chapter 3, we examined using the new templates feature to standardize the display and editing of data across our entire application. Templates work well for rendering one editor or display template for a single model member or type, but they tend to break down in other scenarios. Partials work well with common snippets, but they don’t scale out to entire sites.
In our first example, we’ll look at establishing site-wide templates with master pages.
10.1.1. Master pages
When using the WebFormViewEngine, we retain the ability to use master pages as part of our views. Originally added as part of ASP.NET 2.0, master pages allowed developers to create master layouts for common pages. A master page defines a layout, leaving placeholders for derived pages or other master pages to fill in the blanks.
In listing 10.1, the master page defines placeholders for both a page title and main content.
Listing 10.1. A master page defined for an MVC view

Master pages in ASP.NET MVC are similar to master pages in Web Forms. We can define content placeholders, place common markup in the view, and enforce a site-wide layout. In ASP.NET MVC, the master page now inherits from System.Web.Mvc.ViewMasterPage. This new base class gives us access to the same helper classes and model as our view, including the following:
- AjaxHelper (through the Ajax property)
- HtmlHelper (through the Html property)
- ViewData and model
- UrlHelper (through the Url property)
- TempData and ViewContext
In listing 10.1, we used the HtmlHelper object to generate the common menu links ![]() . An alternative strongly typed master page base class is available, but because a master page is used with many views, it’s
an unreasonable constraint to have a single-view model type specified for the entire application.
. An alternative strongly typed master page base class is available, but because a master page is used with many views, it’s
an unreasonable constraint to have a single-view model type specified for the entire application.
Master pages can also nest within each other, so that a generic site-wide master page can be defined for the general layout of the entire site. More specific master pages can then define a more specific layout and define new content placeholders.
Master pages are best applied when multiple views share common content. This content can then be pulled up to a master page, and each view only needs to supply the pieces that differ from view to view.
Although master pages work well for common layouts, we need to use different approaches when we encounter common snippets of markup across disparate views. In the next section, we’ll examine a common means of rendering content snippets in partials.
10.1.2. Partials
When it comes to rendering common snippets of content, we have many choices for consolidating those snippets into common rendering logic. With the addition of templates in ASP.NET MVC 2, many of the situations when we might use partials are now supplanted by templates. But we still might run into situations where we’d rather not work with the templating infrastructure and instead would prefer to specify exactly which partial to render from the view.
Templates work well with a strongly typed view, but they still need to work with a specific model to execute. Partials, on the other hand, don’t require a model to render. With templates, you’ll usually render a template for a specific member, whereas partials have much looser restrictions.
Partials are analogous to user controls in Web Forms. They’re intended to render snippets of content, when it’s most advantageous to develop these snippets in a view page rather than in code. Because partials can’t contain behavior, they also work best when few or no decisions need to be made inside the partial regarding how to render the content. If you find yourself copying and pasting one snippet of HTML from one view to the next, that snippet is a great candidate for a partial.
The mechanism for rendering a partial is quite simple. We can use the RenderPartial method or the Partial method in a parent view, as shown in listing 10.2.
Listing 10.2. Rendering a partial from a parent view
<h2>Profiles</h2>
<table>
    <tr>
        <th>Username</th>
        <th>First name</th>
        <th>Last name</th>
        <th>Email</th>
    </tr>
    <% foreach (var profile in Model) { %>
        <% Html.RenderPartial("Profile", profile); %>
    <% } %>
</table>
In listing 10.2, we render a list of profiles in a table. For each row, we want to define a partial to render a single row. Even if content isn’t shared with other views, partials can be used to simplify and reduce the amount of markup seen in one view. In our example, it’s similar to extracting a method in a class file. Although that method may only be called once, it can make the view easier to understand.
The RenderPartial method takes a partial name and an optional model. The partial name is used to locate the partial markup by looking in specific, well-known search locations in the following order:
1.
2.
<Area>Shared<PartialName>.aspx and .ascx
3.
<Controller><PartialName>.aspx and .ascx
4.
Shared<PartialName>.aspx and .ascx
These search locations are similar to those used when searching for views by name, with the exception that we now look for a partial by the name specified in the Render-Partial method. We could’ve used <%= Html.Partial("Profile", profile) %> as well. The difference is that Html.Partial(...) returns, whereas Html.RenderPartial(...) renders the partial immediately to the response stream.
In our example in listing 10.2, the call to Render-Partial looks for a file named Profile, found in the controller-specific Views folder shown in figure 10.1.
Figure 10.1. The Profile partial located in our Profile Views folder
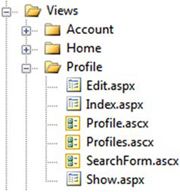
The Profile partial is an ASCX file, but we could use an ASPX file if need be. Using an ASPX file would allow us to build partials that could use master pages. Otherwise, the ASCX file will inherit from System.Web.Mvc.View-UserControl (or its generic counterpart).
We can develop strongly typed partials with the same access to the strongly typed view helpers by inheriting from ViewUserControl<T>, as shown in listing 10.3.
Listing 10.3. A partial to display a row for a Profile model
<%@ Control Language="C#"
Inherits="System.Web.Mvc.ViewUserControl<Profile>" %>
<tr>
     <td><%= Model.Username %></td>
     <td><%= Model.FirstName%></td>
     <td><%= Model.LastName%></td>
</tr>
With the strongly typed partial, the Model property now reflects a Profile object.
Partials work well for displaying common snippets of content for information already in the main model from the controller action. But for other widgets, we need to look at a new ASP.NET MVC 2 feature called child actions.
10.1.3. Child actions
Partials work well for displaying information already in the main view’s model, but they tend to break down when the model displayed needs to come from another source. For example, a logon widget might display the current user’s name and email, but the rest of the page likely displays information that has nothing to do with the current user. We could pass this unrelated model through the ViewDataDictionary, but now we’re back to magic strings in our action, with problems tracing the model back to its source.
For snippets of content that tend to have nothing to do with the main information displayed, we can instead spawn a miniature internal pipeline for a separate child action, as shown in listing 10.4.
Listing 10.4. Displaying a child action for a logon widget
<div id="logindisplay">
    <%= Html.Action("LogOnWidget", "Account") %>
</div>
In our master page, we want to display a common logon widget. If the user isn’t logged in, it should display a Login link. Otherwise, it can display common information about the current user, such as username and email, as well as a link to the user’s profile. But we don’t want to put the burden on every action that might somehow render this master page to supply this extra information. The profile information might need to be pulled from a persistent store, such as a database or session, so we don’t want to use a partial to do all of this.
In listing 10.4, we use the Action method to render the LogOnWidget action of the AccountController. Action is similar to other action-based HtmlHelper extensions, such as ActionLink, but Action will render the results of that action inline. Because Action will create another request to ASP.NET MVC, we can encapsulate complex widgets into a normal MVC pattern.
Authoring a child action is similar to other normal actions, as shown in listing 10.5.
Listing 10.5. Our logon widget child action

Although the logic behind rendering a logon widget is complex, we can encapsulate that complexity behind a normal controller
action. In our child action, we check to see if the user is logged in ![]() . If so, we pull up their profile using the IProfileRepository
. If so, we pull up their profile using the IProfileRepository ![]() . Finally, we render a strongly typed view by building up a LogOnWidgetModel and calling the View helper method
. Finally, we render a strongly typed view by building up a LogOnWidgetModel and calling the View helper method ![]() . To ensure that this action can only be rendered as a child action and not through an external request, we decorate our child
action with the ChildActionOnly attribute
. To ensure that this action can only be rendered as a child action and not through an external request, we decorate our child
action with the ChildActionOnly attribute ![]() .
.
The only difference between a normal controller action and a child action is the ChildActionOnly attribute. Otherwise, our controller still gets instantiated through the controller factory, all action filters are executed, and the expected view is displayed using the normal mechanism for locating views. For child actions, we typically use a ViewUserControl for the view, because master pages usually don’t apply in child action scenarios.
In the next section, we’ll examine how we can efficiently build parameter lists without resorting to anonymous objects or ugly dictionary syntax.
10.2. Building query-string parameter lists
You’ll often find yourself preparing query-string parameter lists when developing MVC views. In this section, you’ll learn how to build new URLs complete with query-string parameters.
The controller action for this example is simple, with only one parameter, as shown in listing 10.6.
Listing 10.6. The Edit profile action
public ViewResult Edit(string username)
{
    var profile = _profileRepository.Find(username);
    return View(new EditProfileInput(profile));
}
Listing 10.6 shows an action method that accepts a username and sends a view model to the default view. There are two options for building parameter lists in ASP.NET MVC: we can construct a RouteValueDictionary or an anonymous type, both of which are shown in listing 10.7.
Listing 10.7. Current options for building route-based URLs
<%=Html.ActionLink("Edit", "Edit",
    new RouteValueDictionary(new Dictionary<string, object>
    {
      {"username", Model.Username }
    }
    )) %>

<%=Html.ActionLink("Edit", "Edit", new { username = Model.Username }) %>
The first option, using the RouteValueDictionary, is quite ugly. It takes dozens of characters before you find that you’re trying to specify the username option. The second option is shorter but much less intuitive. The signature of that ActionLink overload accepts a parameter named routeValues but only of type object.
It’s up to the developer to determine when these overloads accepting object parameters are workarounds for the lack of decent dictionary initializer syntax in C#. Internally, the ActionLink method uses reflection to find the properties and values defined in the anonymous type. The ActionLink method then builds a dictionary from the properties defined and their values. The property names become route value keys, and the property values become the route values.
This works well as long as we already understand that the object overloads are using reflection to generate a dictionary. But this doesn’t address the duplication that this method introduces. For every link to a common action, we need to supply the names of the action parameters. If these values are scattered across many views, it can be difficult or impossible to change the parameter name in an action method. In our Edit action, for example, we might want to change the parameter name to name, causing us to search through our views and controllers to find places where we link to that action.
To address this duplication, we have two options. Our first option is to create strongly typed models for every action method that accepts parameters. The second is to encapsulate the building of parameter lists into a builder object. We could then use this parameter builder to build parameter lists in our views and controller actions. Typically, putting structure around query-string parameters is preferable, because it will help prevent typo bugs.
First, we need to create our parameter builder object, as shown in listing 10.8.
Listing 10.8. The ParamBuilder object
public class ParamBuilder : ExplicitFacadeDictionary<string, object>
{
    private readonly IDictionary<string, object> _params
     = new Dictionary<string, object>();

    protected override IDictionary<string, object> Wrapped
    {
        get { return _params; }
    }

    public static implicit operator RouteValueDictionary(
           ParamBuilder paramBuilder)
    {
        return new RouteValueDictionary(paramBuilder);
    }

    public ParamBuilder Username(string value)
    {
        _params.Add("username", value);
        return this;
    }
}
Our ParamBuilder class inherits from a special dictionary class, ExplicitFacadeDictionary. This class is an implementation of IDictionary<,>, where every method is explicitly implemented to ensure that users of the ParamBuilder don’t get bombarded with a multitude of dictionary methods. The abstract ExplicitFacadeDictionary class needs implementers to provide the wrapped dictionary object in the Wrapped property.
Next, we define an implicit conversion operator from ParamBuilder to a Route-ValueDictionary, making it possible for us to pass in a ParamBuilder object directly to methods expecting a RouteValueDictionary.
Finally, we define a Username method, meant to encapsulate the username action parameter. Because we may want to supply more than one action parameter, the Username method returns the ParamBuilder instance so that the developer can chain multiple parameters together.
To use the ParamBuilder class, we first need an instance of a ParamBuilder. Instead of instantiating a new builder in our views, we can define a new base view page to hold our new helper object. Our base view page class is shown in listing 10.9.
Listing 10.9. Our base view page class
public class ViewPageBase<TModel> : ViewPage<TModel>
{
    public ParamBuilder Param { get { return new ParamBuilder(); } }
}
To use this base view page class, we inherit from ViewPageBase<T> instead of View-Page<T>. Creating a base view page class is generally a good idea, because it allows us to build in site-wide view helper methods, similar to creating a site-wide controller layer supertype.
With our view now inheriting from ViewPageBase<T>, we can use the Param property to build parameter lists, as shown in listing 10.10.
Listing 10.10. Using the ParamBuilder in our view
<%=Html.ActionLink("Edit", "Edit", Param.Username(Model.Username)) %> |
<%=Html.ActionLink("Back to List", "Index") %>
In the Edit action link, we use the Param property to specify the Username member. Because we now control our parameters through a ParamBuilder object defined in our code base, we can build overloads to parameter methods to take a variety of types. All conversions from model objects to parameter values can be encapsulated in our ParamBuilder, cleaning up our views.
The default view engine in ASP.NET MVC is the WebFormViewEngine, but it’s definitely not the only view engine available. In the next section, we’ll examine the popular Spark view engine.
10.3. Exploring the Spark view engine
By default, an ASP.NET MVC application uses the WebFormViewEngine to locate and render views. But we aren’t forced to use Web Forms to design and render our views. One of the extension points of ASP.NET MVC is the ability to swap out the default view engine for a different implementation. With a different view engine, we get a different experience in defining and developing views.
Popular alternative view engines supported in ASP.NET MVC through various open source efforts include NHaml and Spark:
But why would we want to investigate other view engines? One issue with the WebFormViewEngine is that you don’t have many options for server-side coding except with complex languages such as C# and VB.NET. Although these languages are quite powerful, seeing code interspersed with markup can be difficult to manage. Creating a simple loop of HTML requires a foreach loop and curly braces mixed in with our HTML tags. For more complex view logic, it becomes nearly impossible to understand what’s going on. The WebFormViewEngine is still the favorite choice in the majority of cases, but it wasn’t built with MVC-style applications in mind, where we’re almost guaranteed to need code in our views. Although this code is strictly view-centric, it’s still unavoidable.
These alternative view engines are designed to be view engines, rather than holdovers from the Web Forms days. Each is optimized for designing an MVC view, and many are ported versions of other established view engines for other established MVC frameworks. For example, NHaml is a port of the popular (and extremely terse) Haml view engine (http://haml-lang.com/). Although the built-in view engine works well for most ASP.NET MVC applications, we’ll explore one of the alternatives here.
Spark is a view engine designed for ASP.NET MVC and MonoRail (www.castleproject.org/monorail/). Spark provides a unique blend of C# code inline with HTML, disguised as XML elements and attributes. There are disadvantages to some view engines, such as the lack of IntelliSense and a slightly less integrated feel in Visual Studio, but Spark provides integration with Visual Studio, including IntelliSense and a view compiler. The view compiler ensures that we don’t have to wait for runtime exceptions to expose typos and bugs in our views.
In this section, we’ll examine the major features of Spark to see the advantages it has over the default view engine. But first, let’s walk through the installation and configuration process.
10.3.1. Installing and configuring Spark
The latest Spark release can be found at Spark’s CodePlex site (http://sparkviewengine.codeplex.com/). The release includes the following:
- The Spark assemblies we need in our MVC project
- Documentation
- Samples
- Installer for Visual Studio IntelliSense
To get Spark running in your MVC project, you need only the binaries, but the Intel-liSense is quite helpful, so it’s good to run the installer before launching Visual Studio. Next, you need to add references to both the Spark and Spark.Web.Mvc assemblies to your project, as shown in figure 10.2.
Figure 10.2. Adding the Spark assembly references to our project

With the Spark assembly references added to your project, you can configure ASP.NET MVC to use Spark as its view engine.
Spark has additional configuration, which you can either place in your Web.config file or in code. For this example, we’ll configure Spark in code, but the Spark documentation has full examples of both options. Our Spark configuration is shown in listing 10.11.
Listing 10.11. Spark configuration code
var settings = new SparkSettings()
    .SetDebug(true)
    .AddAssembly("SparkViewExample")
    .AddNamespace("System")
    .AddNamespace("System.Collections.Generic")
    .AddNamespace("System.Linq")
    .AddNamespace("System.Web.Mvc")
    .AddNamespace("System.Web.Mvc.Html");

ViewEngines.Engines.Add(new SparkViewFactory(settings));
We place the configuration code into the Application_Start method in our Global.asax.cs file, because the Spark configuration and MVC view engine configuration only need to happen once per application domain.
In the first section, we create a SparkSettings object, configuring the compilation mode, and adding our project assembly and various assemblies for compilation. This section is similar to configuring the WebFormViewEngine in the Web.config file. Next, we add a new SparkViewFactory instance to the System.Web.Mvc.ViewEngines.Engines collection; the ViewEngines class allows additional view engines to be configured for our application. Then we pass our SparkSettings object to the SparkViewFactory instance. That’s all it takes to configure Spark!
Now that Spark is configured, we can move on to creating views for our example.
10.3.2. Simple Spark view example
On the controller and model pieces of our MVC application, we won’t see any changes as a result of our new view engine.
In our example, we want to display a list of Product model objects, as shown in listing 10.12.
Listing 10.12. A simple Product model
public class Product
{
    public string Name { get; set; }
    public string Description { get; set; }
    public decimal Price { get; set; }
}
Again, the Spark view engine places no specific constraints on our model or our controller action, as shown in listing 10.13.
Listing 10.13. A ProductController for displaying Product objects
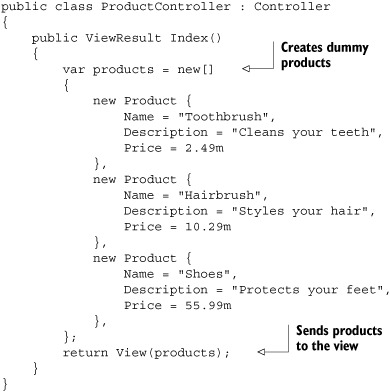
We provide only a dummy list of products for our Spark views to display.
To create our Spark views, we use a folder structure similar to our structure for other view engines. In the root Views folder, we create a Product folder to correspond to our ProductController. Additionally, we create Layouts and Shared folders, as shown in figure 10.3.
Figure 10.3. The complete folder structure for our Spark views

In Spark, view files use the .spark file extension. This is mainly so that the file extension doesn’t conflict with other view engines in the IDE or at runtime.
Spark supports the concept of layouts, which is equivalent to master pages. By convention, the default layout name is Application.spark, found in either the Layouts or Shared folder.
To start on our layout, we’ll create a text file in Visual Studio named Application.spark (instead of a Web Form or other template). This is shown in figure 10.4.
Figure 10.4. Adding an Application.spark layout for our views
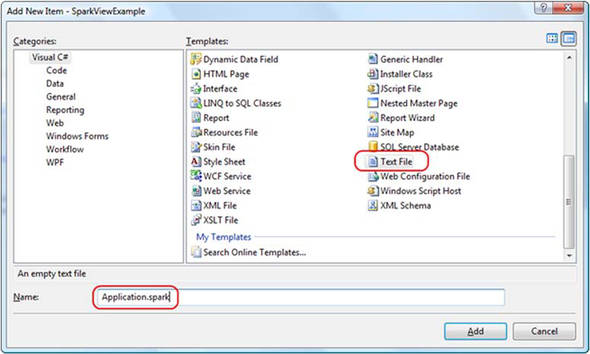
We chose the Text File template because we don’t want any of the built-in functionality provided by something like a Web Form template; we need only a blank file.
Inside our base layout, we need to place a couple of links and provide a placeholder for the actual child content. Our entire layout is shown in listing 10.14.
Listing 10.14. The entire Application.spark layout template
<!DOCTYPE html PUBLIC "-//W3C//DTD XHTML 1.0 Strict//EN"
"http://www.w3.org/TR/xhtml1/DTD/xhtml1-strict.dtd">
<html xmlns="http://www.w3.org/1999/xhtml">
<head>
    <title>Spark View Example</title>
    <link href="~/Content/Site.css" rel="stylesheet" type="text/css" />
</head>
<body>
    <div class="page">
        <div id="header">
            <div id="title">
                <h1>My MVC Application</h1>
            </div>
            <div id="logindisplay">
                Welcome!
            </div>
            <div id="menucontainer">
                <ul id="menu">
                    <li>${Html.ActionLink("Home", "Index", "Product")}</li>
                </ul>
            </div>
        </div>
        <div id="main">

            <use content="view"/>

            <div id="footer">
            </div>
        </div>
    </div>
</body>
</html>
The first interesting item in listing 10.14 is the link element linking to our CSS file. It uses the familiar tilde (~) notation to note the base directory of our website, instead of relative path notation (....). We can rebase our website and redefine what the tilde means in our Spark configuration if need be. This method is helpful in web farm or content-delivery network (CDN) scenarios.
The next interesting item is our familiar Html.ActionLink calls, but this time we enclose the code in the ${} syntax. This syntax is synonymous with the <%= %> syntax of Web Forms, but if we place an exclamation point after the dollar sign, using $!{} instead, any NullReferenceExceptions will have empty content instead of an error screen. This is one advantage of Spark over Web Forms, where a null results in an error for the end user, even though missing values are normal.
The last interesting piece of our layout is the <use content="view"/> element. The named content section, view, defaults to the view name from our action. In our example, this would be an Index.spark file in a Product folder. We can create other named content sections for a header, footer, sidebar, and anything else we might need in our base layout. We can nest our layouts as much as our application demands, just as we can with master pages.
With the layout in place, we can create our action-specific view, as shown in listing 10.15.
Listing 10.15. Spark view for the Index action

In the Index view, we want to loop ![]() through all of the Products in the model, displaying a row for each Product. With Web Forms, we’d need to put in <% %> code blocks for our for loop, but with Spark we have cleaner options. First, we use the <viewdata />
through all of the Products in the model, displaying a row for each Product. With Web Forms, we’d need to put in <% %> code blocks for our for loop, but with Spark we have cleaner options. First, we use the <viewdata /> ![]() element to tell Spark that we’re using a strongly typed view, and our model type is an array of Products. Spark also supports the key-based ViewData dictionary. Next, we create a local styles variable with the <var /> element
element to tell Spark that we’re using a strongly typed view, and our model type is an array of Products. Spark also supports the key-based ViewData dictionary. Next, we create a local styles variable with the <var /> element ![]() . Each attribute name becomes a new local variable, and the attribute value is the value assigned. These two variables will
help us create alternating row styles.
. Each attribute name becomes a new local variable, and the attribute value is the value assigned. These two variables will
help us create alternating row styles.
Next, we put normal HTML in our view, including a header, table, and header row. With Spark, special Spark XML elements are interspersed with HTML elements, making our view look cleaner without C#’s distracting angle brackets. After the header row, we create a counter variable to help in the alternating row styles.
We need to iterate through all the Products in our model, creating a row for each item. In Web Forms, this is accomplished with a foreach loop, but in Spark, we need only add an each attribute to the HTML element we want to repeat, giving the snippet of C# code to iterate in each attribute’s value. The class element in our row element is set to an alternating style, using a counter to switch between odd and even styles.
Inside our row, we use the ${} syntax to display each individual product. Because we installed the Spark Visual Studio integration, we get IntelliSense in our views, as demonstrated in figure 10.5.
Figure 10.5. IntelliSense in our Spark views is possible because of the Visual Studio add-in.

To complete the alternating row styles, we increment the count using the <set /> element. This element lets us assign values to variables we created earlier in our view. In addition to the each attribute and <set /> element, Spark provides complex expressions for conditional operators (if ... else), macros, and more.
With our Spark view complete, our view renders as expected in the browser, as shown in figure 10.6.
Figure 10.6. Our running Spark application

Because of the ASP.NET MVC architecture, we can swap out view engines without needing to change our controllers or actions. As we saw in this section with the Spark view engine, many view engines provide a cleaner way to create views in MVC applications. The Spark view engine gives us a terser, more readable markup, blending code and HTML seamlessly. Because Spark supports compiling views and IntelliSense, we don’t need to give up all the nice integration that Web Forms offers.
The decision to choose a different view engine is still quite important, because it has long-term technical and nontechnical ramifications. Alternative view engines should be another option to investigate for MVC applications, because they offer compelling alternatives to the default WebFormViewEngine.
10.4. Summary
With the release of ASP.NET MVC 2 came several more options for organizing content in our views. Child actions moved from the MVC Futures assembly to being first-class citizens, and the addition of templates has allowed us to build standardized content in our views. With master pages, partials, child actions, templates, and HtmlHelper extensions, we have many options for rendering our views beyond just a single page. Each has its sweet spot, and we can be assured that any duplication we encounter in our views can be easily addressed. The only question is how we want to address it. A query-string parameter builder is one of these ways.
Because of the extensibility of ASP.NET MVC, we can also swap out our view engine without affecting our controllers. The Spark view engine, optimized for code in markup, is a viable alternative to some of the ugliness that comes with mixing C# and markup in the traditional Web Forms view engine.
In the next chapter, we’ll take a look at securing our MVC applications.