
Chapter 12. Ajax in ASP.NET MVC
- Our view on Ajax
- Difficulties with Web Forms
- Getting to know JavaScript libraries
- Performing simple HTML replacement
- Using JSON and XML responses
Ajax (short for Asynchronous JavaScript and XML) is a term coined by Jesse James Garrett to describe a clever technique to make web applications more dynamic, and it has introduced a new era of web applications. It’s a technique that uses the browser’s JavaScript capability to send a request to the server asynchronously. This enables applications to become richer and more user-friendly by updating small sections of the page without requiring a brutal full-page refresh. In today’s web, the vast majority of major websites use this technique to their advantage. Users are demanding this type of rich, seamless interaction with websites. You aren’t going to let them down, are you?
Ajax is definitely here to stay. With ASP.NET Web Forms in .NET 1.1, developers often met with troubles on how to best apply Ajax to their sites. Many popular code samples and Ajax libraries worked well for the PHP and Ruby on Rails examples, but they didn’t translate as well to the ASP.NET platform. This was mainly due to the page-centric request lifecycle and the lack of control over HTML DOM identifiers. A Web Forms–friendly framework called ASP.NET Ajax was released by Microsoft in early 2007 and met with moderate success. Many developers found it overly complicated and cumbersome. ASP.NET Ajax and its associated control toolkit depended deeply on the post-back behavior of Web Forms. Subsequent releases have improved ASP.NET Ajax, and it now can be used easily with many server-side technologies.
In this chapter, we’ll examine how the Ajax technique is applied to ASP.NET MVC in a less complicated and more natural way than with Web Forms. You’ll see how to leverage an increasingly popular, lightweight JavaScript library called jQuery. You’ll learn a few methods commonly used with Ajax, along with the strengths and weaknesses of each. Although an introduction to Ajax is provided, you’ll be best served if you have at least a basic knowledge of the subject.
12.1. Diving into Ajax with an example
An example is the best way to describe how Ajax works. We’ll create a simple HTML page that has a button on it. When the button is clicked, an Ajax request will be sent to the server. The response will be a simple message, which we’ll display to the user. No browser refresh will occur.
Take a look at our HTML page in listing 12.1.
Listing 12.1. A simple HTML page
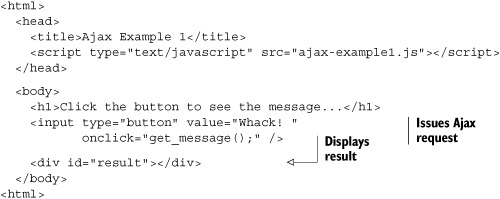
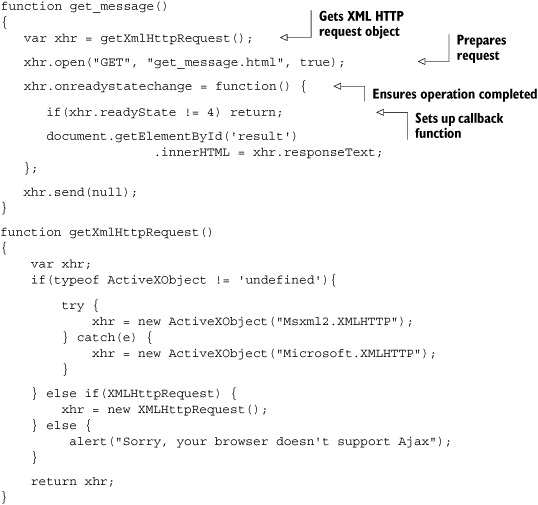
This is a basic HTML page with a button on it. When the user clicks the button, the server should get the message without refreshing the page and display it to the user. Listing 12.2 shows the contents of the referenced JavaScript.
Listing 12.2. Simple JavaScript file
The resulting page looks like figure 12.1.
Figure 12.1. The request is submitted asynchronously. Firebug (shown at the bottom of the browser window) allows us to inspect Ajax calls for better debugging.
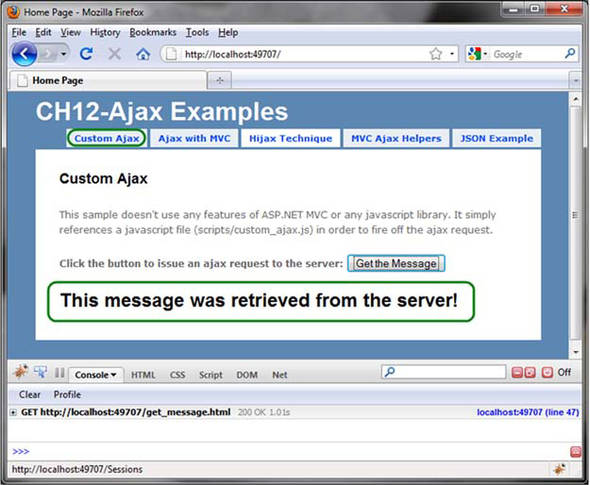
Note
Firebug, which is shown in figure 12.1, allows you to inspect Ajax calls; it’s invaluable when doing Ajax development. You can get Firebug at http://getfirebug.com/.
You might notice throughout this chapter that we prefer unobtrusive JavaScript. This means that JavaScript is better added separately, not intermingled with HTML content. Additionally, it can mean that the functionality of the page degrades gracefully in the absence of JavaScript. We also adhere to common cross-browser JavaScript standards, such as document.getElementById('myDiv') rather than the nonstandard document.myDiv or others.
Have you ever seen code that looks like this?
<a href="javascript:window.open('...')">info</a>
The href attribute is supposed to point to a document, not contain JavaScript code. Other times we see this:
<a href="javascript:void(0)" onclick="window.open(...)">info</a>
We still have that funky JavaScript string where it doesn’t belong, and this time we’re using the onclick handler of the tag. This is marginally better, but if you followed unobtrusive scripting, you’d end up with something like this:
<a href='info.html' class='popup'>info</a>
With JavaScript enabled, we can loop over all links with a class of popup and attach an onclick event handler that calls window.open() with the link’s href property. If JavaScript is disabled, the link functions normally and the user can still see the info.html page. We get the benefit of graceful degradation in the absence of JavaScript as well as separation of behavior from presentation.
In some cases, the examples in this chapter show what’s most easily displayed in book format; in practice, it’s worthwhile following the unobtrusive JavaScript principles. For more information on unobtrusive JavaScript, see Jeremy Keith’s excellent book, DOM Scripting: Web Design with JavaScript and the Document Object Model.
Note
If you’re thinking that the previous example contains a lot of code for a simple Ajax request, you’re not alone. The simple act of creating the XMLHttpRequest object isn’t consistent across browsers. We’ll see how to clean that up later. First, let’s see how this example would be applied in ASP.NET Web Forms.
12.2. Ajax with ASP.NET Web Forms
If we take the example in listings 12.1 and 12.2 and apply it to Web Forms, we may hit some bumps.
First is the issue of the actual web request. Earlier we specified the URL to be get_message.html, but in reality this is probably going to be a dynamic page. Let’s assume that we used get_message.aspx and that the message came from a database. ASP.NET pages go through the page lifecycle events and render the template (.ASPX) that we’ve defined. These templates represent a full HTML document, but we only want to render the message.
We could instead use a custom IHttpHandler to intercept a different file extension and not use the page template. This would look something like listing 12.3.
Listing 12.3. A custom Ajax HttpHandler
public class AjaxHandler : IHttpHandler
{
    public bool IsReusable
    {
        get { return true; }
    }

    public void ProcessRequest(HttpContext context)
    {
        if (context.Request.QueryString["operation"] == "get_message")
        {
            context.Response.Write("yuck");
            context.Response.ContentType = "text/plain";
        }

        context.Response.End();
    }
}
As you can see, using Response.Write() from our code is a cumbersome way to render content for an Ajax request when the logic is nontrivial. As the number and size of the Ajax requests and responses increase, Response.Write() becomes difficult to maintain. This Law of Demeter violation also increases the difficulty of unit testing this handler class. We’d like to use the templating power of ASPX without using full HTML documents.
Wikipedia provides a concise explanation of the Law of Demeter (http://en.wikipedia.org/wiki/Law_of_Demeter):
- The Law of Demeter (LoD) or Principle of Least Knowledge is a design guideline for developing software, particularly object-oriented
programs. In its general form, the LoD is a specific case of loose coupling. The guideline was invented at Northeastern University
towards the end of 1987, and can be succinctly summarized in one of the following ways:
- Each unit should have only limited knowledge about other units: only units “closely” related to the current unit.
- Each unit should only talk to its friends; don’t talk to strangers.
- Only talk to your immediate friends.
- The fundamental notion is that a given object should assume as little as possible about the structure or properties of anything else (including its subcomponents).
We might come across another bump in the road in the callback function. When the request comes back from the server, we get the element with the ID of result and update its contents with the response text. If our target element is a server control—such as a TextBox, Panel, or Label—ASP.NET will generate the ID for us so we won’t know what the ID will be at runtime. Thus, we’re forced to look up this ID by using <%= theControl.ClientID %>, which will give us the correct identifier. This means we need to either pass in the ID to the JavaScript function or generate the entire function definition inside our ASPX page so that we can execute the snippet in our example.
The X in Ajax stands for XML, but that doesn’t mean we have to return XML for our Ajax calls. There are multiple options for return values. Some are better for over-the-wire performance, some are easy to create on the server side, and some are easy to consume with JavaScript. You should choose the one that fits your needs best.
Simple return values can be passed, and partial HTML snippets can be returned to be added to the DOM, but often you need to work with structured data. XML documents can be returned, and although they’re easy to create on the server, they aren’t a common choice due to the additional overhead and complexity of parsing XML in the web browser with JavaScript. Using JSON is a better solution for representing data.
JSON strings are native representations of JavaScript objects. They only need to be passed to the eval() method to be evaluated as and returned as usable objects. For more information on the JSON format, see the JSON site (http://json.org).
When you want to take advantage of templates, you can return HTML fragments and update the HTML directly with the result. This option tends to be the simplest, because you don’t have to parse any data. But this approach can cause issues later on if you refactor your views; you’ll have to ensure that every piece of injectable HTML still works with the updated DOM of your new template.
Always choose the most appropriate method of response for your scenario.
With ASP.NET MVC we can do better. We have complete control over our HTML, and as such have responsibility for naming our elements in a way that won’t collide with other elements on the page. We can also use partial views to generate the template for our results so that we can return an HTML fragment for an Ajax call and not rely on Response.Write().
12.3. Ajax in ASP.NET MVC
In ASP.NET MVC our Ajax scenario is much cleaner. We have control over the rendered HTML, so we can choose our own element IDs and not rely on ASP.NET server controls to generate them for us. We can also choose to render views that can be plain text, XML, JSON, HTML fragments, or even JavaScript that can be run on the client. In this section, we’ll take a more complicated scenario and see how it looks in ASP.NET MVC.
But first, let’s take a quick look at jQuery.
12.3.1. Introducing jQuery
Most of the examples in this chapter will utilize an excellent JavaScript library called jQuery. jQuery is becoming increasingly popular for its simplicity and elegant syntax. It has become so popular, in fact, that Microsoft has included jQuery as one of the default JavaScript libraries for ASP.NET MVC projects. The Microsoft Ajax client library that comes with ASP.NET Ajax is also used for a few of the Ajax helpers, most notably <% Ajax.BeginForm() %>. We’ll see how this functions later in this chapter.
jQuery is a JavaScript library that makes JavaScript development more concise, more consistent across browsers, and more enjoyable. jQuery has a powerful selector system, where you use CSS rules to pinpoint and select elements from the DOM and manipulate them. The entire library is contained in a single minified JavaScript file (jquery.js) and can be placed in the /Scripts directory of your MVC project. ASP.NET MVC ships with jQuery, so you can use it right out of the box.
Note
You can use many other excellent JavaScript libraries with the ASP.NET MVC Framework as well. Prototype, script.aculo.us, Dojo, MooTools, YUI, and so on all have strengths and weaknesses; jQuery will be included in all MVC projects by default.
The following is a quick primer on how to use jQuery. As of this writing, the current version of jQuery is 1.4, so that’s the version used in this book.
To use jQuery, you must reference the jquery.js JavaScript file in the <head> element of your page. The $() function accepts a string and is used to do the following:
- Select elements by CSS selector (for example, $('#myDiv') would select <div id="myDiv" />)
- Select elements within a context (for example, $('input:button', someContainer))
- Create HTML dynamically (for example, $('<span>updating...</span>'))
- Extend an existing element with jQuery functionality (for example, $(textbox))
To have some code executed when the DOM is ready, rather than putting the script at the bottom of the page you can put it in the <head> like this:
$(document).ready(function() { /* your code here */ });
The preceding line is the same as this:
$().ready(function() { /* your code here */ });
It can be shortened even further, like so:
$(function { /* your code */ });
There’s usually a shorter way of doing anything in jQuery. The nice thing about $(document).ready is that it will fire as soon as the DOM is loaded, but it doesn’t wait for images to finish loading. This results in a faster startup time than with window.onload.
The $.ajax([options]) function can be used to send Ajax requests to the server. The $.get() and $.post() functions are also useful simplifications of the $.ajax() function. To serialize a form’s values into name1=val&name2=val2 format, use $(form).serialize().
This just scratches the surface. For a real introduction to jQuery, visit the jQuery website (http://docs.jquery.com). I also highly recommend the book jQuery in Action by Bear Bibeault and Yehuda Katz for more serious studies.
Our first example in this chapter used a button click to fire the request. There were no parameters sent to the server, so the same message would always be returned. This is hardly a useful way to build Ajax applications. A more realistic approach (and one that’s quite popular) is to take a form and hook into the onsubmit event. The form values are sent via Ajax instead, and the standard form submission is canceled. Jeremy Keith (author of the excellent DOM Scripting book) calls this technique Hijax.
12.3.2. Implementing the Hijax technique
The following example will be a conference application. This application will manage local, one-day conferences, and the conference administrator needs to be able to add sessions to the conference. We’ll implement the Hijax technique.
Let’s take a look at the user story for this feature:
As a potential speaker, I would like to add sessions to the conference (with a name and description) so that the organizer can review them and approve the ones that fit. I would like the interaction to be seamless so that I can add multiple sessions very quickly.
Note
If you aren’t familiar with user stories, they’re small requirements artifacts used in iterative development methods. You can learn more at http://en.wikipedia.org/wiki/User_story.
Figure 12.2 shows a form where viewers can add sessions to a conference. It consists of two text boxes, a drop-down list, and an Add button to submit the form. When the form is submitted, a session is created and added to the conference, and the page is rendered again with a styled list of current tracks.
Figure 12.2. These form values are serialized and sent to the server via Ajax. The result is a seamless method of adding sessions without a page refresh. When you disable JavaScript, it continues to work, but with page refreshes.
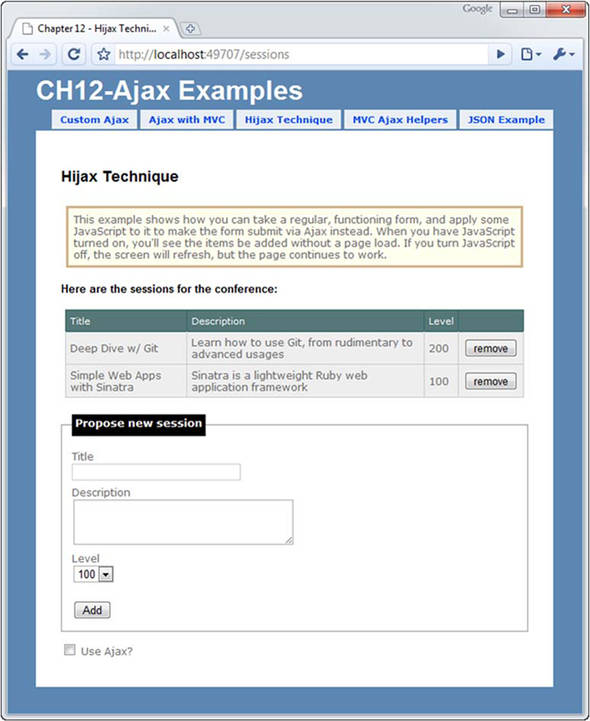
When you submit the form, the session is added, and the user is redirected back to /session/index to view the updated table. The markup in this view is shown in listing 12.4.
Listing 12.4. The view, which remains simple
<% using(Html.BeginForm(
    "add",
    "sessions",
    FormMethod.Post,
    new {@class="hijax"})) { %>
<fieldset>
    <legend>Propose new session</legend>
    <label for="title">Title</label>
    <input type="text" name="title" />

    <label for="description">Description</label>
    <textarea name="description" rows="3" cols="30"></textarea>

    <label for="level">Level</label>
    <select name="level">
        <option selected="selected" value="100">100</option>
        <option value="200">200</option>
        <option value="300">300</option>
        <option value="400">400</option>
    </select>

    <br />
    <input type="submit" value="Add" />
    <span id="indicator" style="display:none"><img src="../../content/
     load.gif" alt="loading..." /></span>
</fieldset>

<% } %>
It’s important to ensure that your application works without Ajax, because your users might decide to run with JavaScript turned off, or they might be using a mobile browser without JavaScript support. Our example works, so we can now focus on spot-welding Ajax onto this form without touching the HTML. We can apply a simple jQuery script that will hijack this form post and provide the seamless Ajax experience instead (when the user has enabled JavaScript). This is called progressive enhancement.
Let’s see how that’s implemented. When the user clicks the Add button, the browser physically posts to the server. We need to cancel this action so the browser doesn’t go anywhere. If we add an onsubmit JavaScript handler to the form and call event.preventDefault(), we can capture the form post and circumvent the actual post operation. We can then gather the form values and submit the form post instead with Ajax. Listing 12.5 shows the setup for the JavaScript.
Listing 12.5. The jQuery script that sets up the form hijacking

Warning
In listing 12.5 we called event.preventDefault(). This effectively removes the form submit behavior. You can also accomplish this by returning false from the function. But be careful when using return false in your event handlers. If an error occurs before the return false statement, it won’t be passed down to the caller, and the browser will continue with the form post behavior. At the very least, place this behavior in a try {} catch {} block and alert any errors that occur. Detecting and tracking down JavaScript errors after the browser has left the page is difficult and annoying. With jQuery, using event.preventDefault() is both easier and safer.
This script can reside in a separate file referenced by the page or in a script tag of the <head> element. It’s common to see <script> tags in the middle of the <body>, but it’s good to place scripts in the <head> to keep things tidy. These scripts are loaded before other DOM content, so if page load times become a problem, consider placing them at the bottom of the page.
Notice how the Ajax call is made. The $.ajax() method accepts a number of options for customizing the call. Isn’t this a lot cleaner than our manual approach (back in listing 12.2)? For more simplified Ajax calls, you might opt to use $.post() or $.get(). Read up on the jQuery documentation to see the various options available to you.
Figure 12.3 shows that now the form submits via Ajax when JavaScript is enabled, which is what we were aiming for. Nobody loses functionality in the absence of JavaScript, but the experience is enhanced with JavaScript. The best part about this Hijax technique is that it’s purely additive; you apply the extra JavaScript to a functioning form to enhance it with asynchronous behavior.
Figure 12.3. When an Ajax call is initiated, Firebug shows it in the Console. You can use this tool to inspect the actual request and response of an Ajax call.

Listing 12.6 shows the SessionController actions in detail. Notice how we’re reusing the same actions for both full layout and partial HTML requests. This is implemented as a partial view _list.ascx. This user control is embedded in the full layout and rendered independently for partial requests.
Listing 12.6. The actions for SessionController
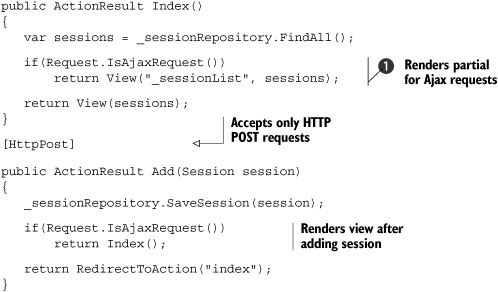
The Index action checks to see whether the request is an Ajax request. If so, it will render the user control that represents the HTML fragment being displayed. If it’s a regular request, the full HTML document (with the template) will be rendered.
The Add action is decorated with an HttpPost attribute ![]() to protect it from GET requests. If this is an Ajax request—which is defined by an extra HTTP header value in the request—the response needs to
be the updated session list HTML. In the standard case without Ajax, the browser should redirect to the Index action.
to protect it from GET requests. If this is an Ajax request—which is defined by an extra HTTP header value in the request—the response needs to
be the updated session list HTML. In the standard case without Ajax, the browser should redirect to the Index action.
The Ajax technique that we’ve applied here is both easy to implement (with the help of jQuery) and easy to understand. This is probably the most common method of applying Ajax. Don’t believe me? This is essentially what the beloved UpdatePanel does in ASP.NET Ajax. We hear advertisements for commercial Ajax components that provide “no-touch Ajax” or “zero-code Ajax” all the time, and this is basically the technique they’re using. We firmly believe that “no-code” solutions are great for some scenarios, but they break down and become difficult to work with in more complex situations. It’s often better to leverage a simple framework that lets you explicitly control the Ajax integration so you have the flexibility to adapt your application to increasingly complex functionality requirements. In this example, we’ve applied a simple script than can be reused to enhance other pages with Ajax.
This example returned a snippet of HTML to the client. Sometimes we don’t want HTML as our return value. HTML is the heaviest of the choices because it contains all of the formatting along with the data. Our example also returned the entire rendered table, and if over-the-wire performance is a concern (for example, if you have users on slow connections or you have a lot of data to transfer), you might opt for a lighter-weight representation of the data. If updated display information is needed, JavaScript can dynamically build DOM elements to represent the data. Although this is more difficult, the flexibility and power exists when necessary.
There are three common choices of data formats for JavaScript calls: XML, JSON, and plain text. JSON is much lighter weight than XML. Plain text is sometimes useful if you just need a single value or if you want to provide a custom data format.
12.3.3. Ajax with JSON
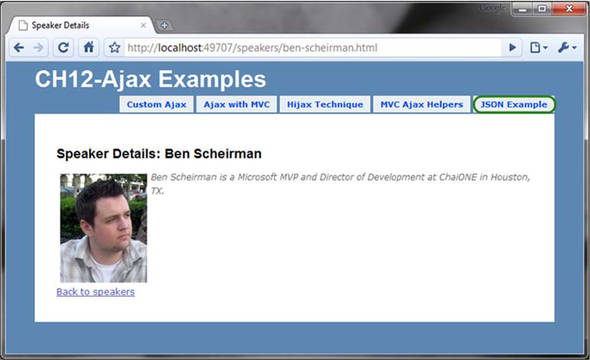
Our next example will continue with the conference theme and will list the names of the speakers who are giving sessions at a conference. If the user clicks a speaker’s name, he will be directed to a speaker detail page. Figure 12.4 illustrates the speaker list, and figure 12.5 shows the speaker detail page.
Figure 12.4. Listing the speakers. When you click a name, you’re directed to a speaker detail page.
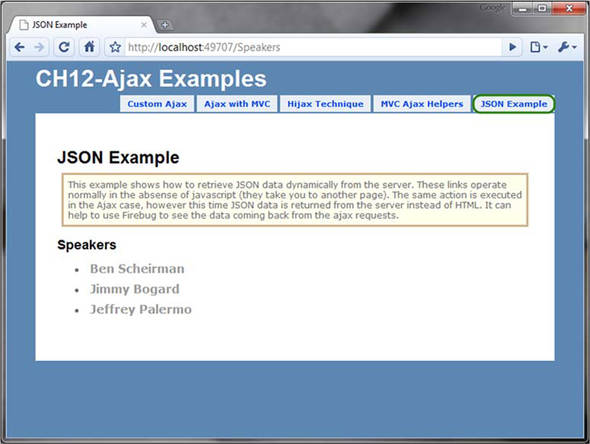
Figure 12.5. The speaker details are shown on a separate page.
Let’s provide a richer user experience by applying Ajax to the speaker listing page. We’d like to enhance the speaker listing to show the speaker details next to the name when the user clicks the name. We’ll prevent the browser from loading a whole new page and instead show the speaker information in a small <div> tag.
To accomplish this, we’ll leverage JSON as our transfer format. Why JSON? First off, our previous example used HTML, which we can all agree is verbose over the wire. If this is a concern, we should be transmitting data only, leaving presentation to the client.
One choice might be to represent the data using XML. Let’s take a look at a sample XML document in the following snippet:
<speaker>
   <id>313bd98d-525c-4566-bfa1-7a4f8b01ef7b</id>
   <firstName>Ben</firstName>
   <lastName>Scheirman</lastName>
   <bio>
    Ben Scheirman is a Principal Consultant
    with Sogeti in Houston, TX.
   </bio>
   <picUrl>/content/ben.png</picUrl>
</speaker>
There’s a lot of noise text in there (such as all of the closing tags). The same example represented in JSON looks like listing 12.7.
Listing 12.7. A JSON string representing a speaker
({
   "id":"313bd98d-525c-4566-bfa1-7a4f8b01ef7b",
   "firstName":"Ben",
   "lastName":"Scheirman",
   "bio":" Ben Scheirman is a Principal Consultant with Sogeti in Houston,
       TX.",
   "picUrl":"/content/ben.png"
})
The JSON format is easy to understand, once you grasp the basic rules. At the core, an object is represented as in figure 12.6.
Figure 12.6. The JSON object diagram shows us a simple way of understanding the format. Used with permission from http://json.org.

Isn’t the JSON representation more concise? Sure, it might be a tad harder to read, but this is primarily for machines to consume, not humans. JSON documents will require fewer bytes to transmit than XML, leading to less strain on the server and faster download times for your users.
But this isn’t the only reason that JSON is a better choice. JSON is JavaScript. Your result can be treated as a first-class JavaScript object. This evaluation is much faster than parsing XML as well. Take your pick: get a real JavaScript object, or deal with XML parsing and manipulation.
A number of .NET JSON libraries can make your life easier. We’ve used JSON.NET by NewtonSoft, which is free to use and works well. You can download it at http://json.codeplex.com. The ASP.NET MVC Framework also includes a mechanism for serializing objects into JSON, which we’ll see in a minute.
Now that we’ve settled on the JSON format for our Ajax feature, how do we get the controller to render it? Let’s see how we can accommodate different view formats in our controllers.
12.3.4. Adding alternate view formats to the controller
Currently we have a controller action that finds the speaker from our repository and renders a detail view, passing the speaker in as ViewData. We want to take advantage of this same action, but alter the view that gets rendered. We still want to get a speaker based on the URL key, but in our Ajax call we’d like the server to return a JSON string instead of an HTML document.
Listing 12.8 shows the original controller action.
Listing 12.8. The controller action before any modifications
public ActionResult Details(string urlKey)
{
    var speaker = _repository.FindSpeakerByUrlKey(urlKey);

    return View(speaker);
}
The urlKey parameter is a unique, URL-friendly identifier for retrieving a speaker. It’s more readable than some random integer or GUID primary key in the URL.
Note
The urlKey parameter is sometimes called a slug. As an alternative to the slug, we might also choose to add additional information to the route, such as the primary key. If we employed this technique, our URL would look like /speakers/13/ben-scheirman. The “13” would be a unique identifier, and the remaining segment of the URL would exist simply for the benefit of readability. Refer to chapter 16 for more information on creating custom routes like this.
In our Ajax case, we don’t want an entire view to be returned from the action. This would result in a large HTML document being returned in an Ajax call. For an Ajax call, we want to return the JSON data directly. We’ll use the same technique we did in listing 12.5 and notify the action about the type of request. We can also use this opportunity to allow for multiple formats to be rendered.
The modified controller action shown in listing 12.9 accepts an optional format as an argument. Valid values would be html (the default), partial (for HTML fragments), xml, and json. Our view can choose to respond to any one or all of those formats.
Listing 12.9. A modified controller action that accepts an optional format

The Json() method ![]() returns a JsonResult from the action and contains the object formatted as JSON. JsonRequestBehavior.AllowGet causes a GET request to work. By default, this would only work with POST requests.
returns a JsonResult from the action and contains the object formatted as JSON. JsonRequestBehavior.AllowGet causes a GET request to work. By default, this would only work with POST requests.
You can send anonymous objects to the Json() method and have your object serialized to JSON format correctly. This is useful when you want to return JSON data that doesn’t directly map to a class in your project. For example, this is valid:
return Json( new { Name="Joe", Occupation="Plumber" } );
By using the Json() method in your controller action, you’re instructing the ASP.NET MVC Framework to transform the object into JSON data, set the proper HTTP response headers, and send a valid JSON response back to the browser.
You can supply this new format parameter by appending it as a normal query string variable, like this:
?format=json
A better way would be to add a custom route and treat it like an extension. Open the Global.asax file and add the following route rule just above the default route:
routes.MapRoute("FriendlySpeakersUrl",
         "speakers/{urlKey}.{format}",
         new {controller = "Speakers", action = "details", format = "html"}
    );
You’ll learn more details of routing in chapter 16, but this route is in addition to the default routes in the Application_Start method. Instead of applying the format parameter as a value after the question mark, it will instead look like an extension.
To test our different rendering formats, we’ll open up the same speaker detail page from before, but this time we’ll add “.json” to the end of the URL, as shown in figure 12.7. We could easily add more formats, such as XML. In the event that format is omitted (as in our original URL) this action parameter will be null.
Figure 12.7. Our JSON result from the browser opened up in Notepad. The .json extension causes the response to be JSON instead of HTML.

Because we added the .json extension on the URL, the website returns the response data in JSON format. When opened up in Notepad, we can easily examine the contents of the JSON response.
Now that we have our JSON-enabled Ajax action ready for use, let’s see how we can modify the speaker listing page to consume this.
12.3.5. Consuming a JSON action from the view
The first task is to hook into the click event of each link. When the user clicks a list item, as coded in listing 12.10, an Ajax call will be made to get the speaker details (as JSON) and construct a small detail box alongside the link.
Listing 12.10. Hooking up click behavior on each of the links
$(document).ready(function() {
    $("ul.speakers a").click(function(e) {
        e.preventDefault();
        show_details(this);
    });
});
It may not be apparent at first glance, but the $("ul.speakers a") function in listing 12.10 is a CSS selector that returns multiple elements. We attach a handler to each element’s click event.
Next we have to do something when the user clicks the link. We added a hidden <div> tag on the page that serves as the container for the speaker’s detailed information. The show_details() function, in listing 12.11, should show this box along with an Ajax loading indicator. When the data comes back from the server, we’ll build elements to display the information.
Listing 12.11. When the user clicks on the link
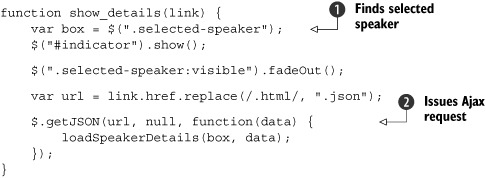
This function has a lot going on, so let’s break it down for each step. The link itself is passed into the function, and we
need to retrieve the box element to put the speaker details in, so we use the jQuery $() along with a CSS selector to retrieve it ![]() . We then show a spinning indicator to let the user know that something is happening.
. We then show a spinning indicator to let the user know that something is happening.
Next, we have to fade out the box if it’s already visible. This makes use of the :visible jQuery filter.
To retrieve the JSON object for the speaker details, we have to use the same URL as the link, but we need to replace the format to specify json, so we use a regular expression to do the replacement for us.
Finally, we issue an Ajax GET request for the URL ![]() . The callback for this Ajax operation is the next function, loadSpeakerDetails, shown in listing 12.12.
. The callback for this Ajax operation is the next function, loadSpeakerDetails, shown in listing 12.12.
Listing 12.12. Creating the HTML to display the speaker details

In this function, we’re simply creating a few HTML elements to display the user details, and we’re adding them to the box element.
Using jQuery in these examples has allowed us to be productive and expressive, while not worrying about cross-browser JavaScript quirks and incompatibilities. The resulting code is more durable and more concise. A good JavaScript library, such as jQuery, is a must in any web developer’s tool belt.
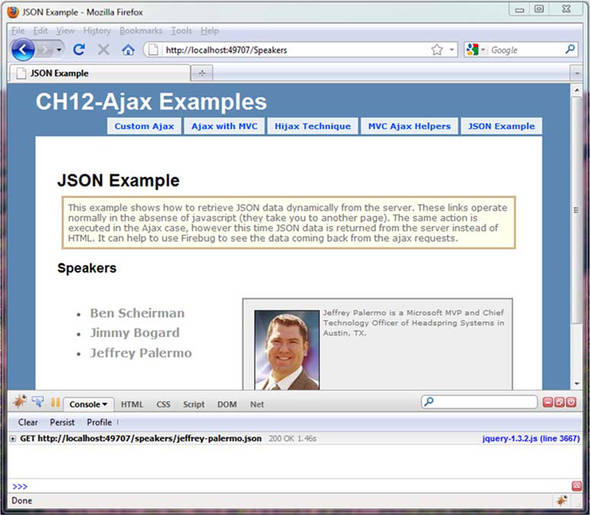
All of the pieces are now tied together, and we can see the results of our work. In figure 12.8 you can see the Ajax call at the bottom (in the Firebug window), and the page gives us the information we need without any page redirects or refreshes. How refreshing!
Figure 12.8. Our finished Ajax-enabled page
12.3.6. Ajax helpers
The ASP.NET MVC Framework ships with a couple of Ajax helpers that you can use to quickly create Ajax behaviors on your site. Just as the HTML helpers are accessed with <%= Html.SomeHelper() %>, the Ajax helpers are accessed via <%= Ajax.SomeHelper() %>. To utilize these helpers in your application, you must reference MicrosoftAjax.js and MicrosoftMvcAjax.js, which are included in the project template in the /scripts folder. It’s safe to reference them in combination with jQuery.
The first Ajax helper that we’ll examine is Ajax.ActionLink. This helper provides the ability to invoke an action asynchronously and update an element on the page. The usage is simple:
<%= Ajax.ActionLink("Click here", "GetMessage", new AjaxOptions {
      UpdateTargetId = "message_container",
      InsertionMode = InsertionMode.Replace
}) %>
This will render a link that displays the text “Click here.” When the user clicks the link, the GetMessage action will be invoked via Ajax. The response from this action (probably an HTML fragment) will be placed in an element with ID message_container. The available parameters you can pass to the AjaxOptions class to customize the behavior of the link are listed in table 12.1.
Table 12.1. Ajax options for the AjaxOptions class
|
Option |
Description |
|---|---|
|
HttpMethod |
Specifies the HTTP method, which can be GET or POST. The default is GET. |
|
UpdateTargetId |
Specifies the element that will receive the content. |
|
InsertionMode |
Sets the insertion mode, which can be InsertBefore, InsertAfter, or Replace. |
|
OnBegin |
Specifies the JavaScript function to be called before invoking the action. |
|
OnComplete |
Specifies the JavaScript function to be called after the response comes back. |
|
OnFailure |
Specifies the JavaScript function to be called in the event of an error. |
|
OnSuccess |
Specifies the JavaScript function to be called if no errors occur. |
|
Confirm |
Sets the confirmation message to be displayed in an OK/Cancel dialog box before proceeding. |
|
Url |
Specifies the URL to use if the anchor tag has a different destination than the Ajax request. |
|
LoadingElementId |
Specifies an element that displays Ajax progress. The element should be marked as visibility:hidden initially. |
Warning
It’s tempting to put a simple JavaScript expression in the OnBegin handler or its counterparts, but this causes a syntax error in the generated onclick handler for the anchor tag. Make sure you reference the JavaScript function by name (without parentheses) like this: OnBegin = "ajaxStart".
The Ajax link is just one of the helpers that invokes an action asynchronously. It’s useful in scenarios where the logic is simple, such as notifying the server of an action or retrieving a simple value. For more complicated scenarios, where there’s data to be sent to the server, an Ajax form is more appropriate.
The Ajax form is created with an Ajax helper called Ajax.BeginForm. It behaves much like the Hijax technique discussed in section 12.3.2. Its usage is similar to the Ajax action link:
<% using(Ajax.BeginForm("AddComment", new AjaxOptions{
    HttpMethod = "POST",
    UpdateTargetId = "comments",
    InsertionMode = InsertionMode.InsertAfter})) { %>

<!-- form elements here -->
<% } %>
The same AjaxOptions class applies to this helper and is used in the same way. In this example, the form is appending comments to an element on the page.
The using block might look a bit strange to you. It’s purely optional, but it does give you the benefit of automatically entering your closing form tag through the magic of the IDisposable interface.
You’re free to do it the other way, like this:
<% Ajax.BeginForm(); %>
</form>
Combining a call to BeginForm with a closing form tag looks a bit unbalanced. The choice is yours.
The Ajax helpers can quickly give you Ajax behaviors, although they have a couple of drawbacks that are difficult to ignore.
First, you can see that even simple examples require many lines of code—code that’s mixed in with your HTML markup. For more advanced scenarios, you can easily eat up 10 lines or more, which detracts from readability.
Second, the JavaScript is hidden from you, so you can’t reliably trap errors that occur as a result of your JavaScript handlers. Server errors will be trapped by the OnError handler, and if your OnBegin code throws an error, your Ajax behavior can’t be completed.
Because of these deficiencies, many choose to write the JavaScript by hand and get more control over the Ajax interaction. The jQuery samples in this chapter should have given you all you need to create the same effect with pure jQuery. That said, the Ajax helpers allow you to get quick Ajax functionality with minimal effort.
12.4. Summary
Ajax is an important technique to use with today’s web applications. Using it effectively means that the majority of your users will see a quicker interaction with the web server, but it doesn’t prevent users with JavaScript disabled from accessing the site. This is sometimes referred to as progressive enhancement. Unfortunately, with raw JavaScript the technique is cumbersome and error-prone. With good libraries such as jQuery and Microsoft Ajax, you can be much more productive.
In this chapter you’ve learned how to apply Ajax in different ways: using partial HTML replacement and JSON. You’ve learned how to hijack a form submission and provide a more seamless Ajax experience for those users who support Ajax, while continuing to provide functionality for those who don’t. Throughout this chapter, you’ve seen how to apply jQuery, a productive JavaScript library.
In the next chapter, you’ll learn how controller factories and dependency injection tools can help you manage application dependencies as your application grows larger.