Chapter 18. Mapping with AutoMapper
- Understanding AutoMapper
- Configuring AutoMapper
- Testing conventions
- Applying formatters to eliminate duplicative code
- Reducing markup to presentation only
- Ridding views of complexity
The open source AutoMapper library is a convention-based object-to-object mapper. It takes source objects of one type and maps them to destination objects of another type. This is useful in many contexts, but we’ll use it to map from a domain model to the model objects our views display—the presentation model.
We call it convention based because it doesn’t depend on configuring each type’s member’s mapping, but instead relies on naming patterns and sensible defaults. You can check out the code and read more documentation at the AutoMapper website: http://automapper.codeplex.com.
18.1. Introducing AutoMapper
Given a source type and destination type, AutoMapper will assign values from source members, properties, and methods to corresponding members on the destination. It does this automatically, based on member names. Let’s look at a couple of quick examples to get started.
In the first example, we want to map from an object named Source to an object named Destination. Listing 18.1 shows these two classes. The names match up, so AutoMapper will simply map the value (and call ToString() on the Source.Number property).
Listing 18.1. An introductory mapping

The output of the test in listing 18.1 is the string 3. AutoMapper just looks at the names, and when they match, it makes the assignment.
In reality, our objects are rarely this simple—they’re usually object hierarchies. AutoMapper can flatten graphs of objects, projecting the hierarchy to a new shape. In listing 18.2 AutoMapper flattens a simple hierarchy.
Listing 18.2. Flattening a simple hierarchy

Again, AutoMapper relies on the name of the destination property to figure out where the source value will come from. Because
our destination property is named ChildNumber, ![]() , AutoMapper will map from Child.Number
, AutoMapper will map from Child.Number ![]() .
.
AutoMapper can do much more than simple value assignments and flattening. Developers can configure special formatters and instruct AutoMapper to do other actions during the mapping process. Before we dive into AutoMapper, let’s see what life was like before this tool existed and how we arrived at the decision to use object mapping.
18.2. Life before AutoMapper
Imagine a view that renders information about a customer. In chapter 2 we discussed some trivial applications that may choose to use persistent, domain model objects as the data source for views. Listing 18.3 illustrates that scenario.
Listing 18.3. Working with the domain model
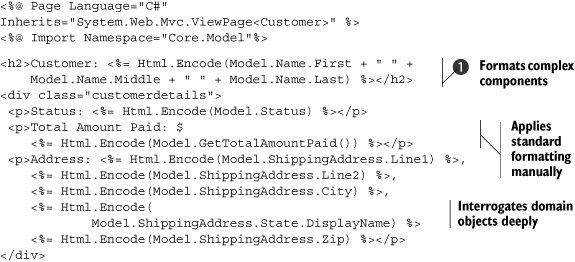
This is complex markup—overly complex for the simple display it’s rendering. It includes common formatting rules, like applying
the dollar sign to decimal values; some suspicious name formatting ![]() that will clearly look wrong if there’s a missing middle name; and repeated manual application of encoding rules.
that will clearly look wrong if there’s a missing middle name; and repeated manual application of encoding rules.
When the page is displayed, there’s not only the danger of the screen not looking right, but it may not render at all. What if the ShippingAddress is null? We’ll see a nasty null reference exception in the yellow screen of death that accompanies major ASP.NET errors. All these problems are caused by the view directly depending on the domain model—by the user interface knowing too much about the core logic of the software.
We know, from our examples in chapter 2 and the previous section, that in most scenarios it’s best to design a custom model for consumption by the view. Translating from the domain model—projecting it—to the presentation model is a straightforward programming task. Take the value from the source object and copy it to the right place on the destination object. Mix in some carefully applied formatting and flattening code, and our projection is complete. We can easily test this logic.
An example of a hand-rolled mapper is shown in listing 18.4.
Listing 18.4. Mapping objects by hand

The class in listing 18.4 is testable, and it separates the view from the complexity of our domain model. It allows the view to work with the data as it’s intended to be displayed.
Listing 18.5 shows our view, updated to work with CustomerInfo instead of Customer.
Listing 18.5. Working with the manually mapped presentation model

This is much better. The markup in listing 18.5 addresses more of the what and where and less of the how. We’re still encoding every property ![]() because there are global rules that must be applied.
because there are global rules that must be applied.
Although the manual mapping scenario we saw in listing 18.4 is a marked improvement over rendering the domain model directly, it’s still extremely tedious to write, expensive to maintain, error prone, and brittle. We can test it, but on a system featuring dozens of screens, this testing effort can bog down a project.
Now that you understand the problem AutoMapper solves, you can start to use it for some mapping tasks. AutoMapper allows us to forgo the manual mapping code, and gives us a hook to enable custom global or specific formatting rules. Instead of the imperative code we wrote in listing 18.4, we can declare the mapping and have AutoMapper perform the mapping behavior for us.
Imperative programming is the traditional code we usually write. It expresses actions as a series of lines of code indicating logical flow and assignment. Imperative code consists of complex algorithms and logical statements that direct an exact sequence of operations.
On the other hand, declarative programming specifies what’s to be done, not how to do it. Declarative code is simple—it’s just a statement, not an instruction set.
The canonical example in declarative programming is regular expressions. Imagine reproducing the text search represented by a complex regular expression with imperative if statements and loops. Avoiding that burden—and trusting good tools—is one path to rapid construction and hassle-free maintenance.
A sample AutoMapper configuration declaration is shown in listing 18.6.
Listing 18.6. A quick look at AutoMapper configuration code
CreateMap<Customer, CustomerInfo>()
    .ForMember(x => x.ShippingAddress, opt =>
    {
        opt.AddFormatter<AddressFormatter>();
        opt.SkipFormatter<HtmlEncoderFormatter>();
    });
We’ll return to listing 18.6 and cover AutoMapper basics in the next section.
18.3. AutoMapper basics
AutoMapper must be initialized and configured. It’s also important that developers have a way to test that the configuration is valid, because AutoMapper relies on naming conventions. We’ll cover all these aspects and more in this section.
18.3.1. AutoMapper Initialization
AutoMapper should be initialized before it’s used, when the application starts. For ASP.NET MVC 2 applications, one place this could happen is Global.asax.cs.
Listing 18.7 shows a sample class that initializes AutoMapper.
Listing 18.7. AutoMapper initialization

In this example, the AutoMapperConfiguration class declares a static Configure method that can be used to initialize AutoMapper ![]() by adding a profile to the AutoMapper configuration
by adding a profile to the AutoMapper configuration ![]() .
.
We’ll cover profiles next.
18.3.2. AutoMapper profiles
Profiles are the main vehicle for configuring AutoMapper—a profile is a collection of type-mapping definitions, including rules that apply to all maps defined in the profile. AutoMapper profiles are classes that derive from its Profile class.
Profiles are effective for grouping mappings by context. An application may have one profile for mapping from the domain model to a presentation model, and another profile for another purpose. Listing 18.8 shows a rich profile with several configuration directives.
Listing 18.8. Creating a sample profile

Let’s investigate this profile piece by piece. First, each profile must derive from Profile and choose a unique ProfileName ![]() .
.
The Configure method contains the configuration declarations. The first directive is AddFormatter<HtmlEncoderFormatter>() ![]() . This is a global instruction to AutoMapper, telling it to apply HTML encoding to every destination member. A second formatting
directive tells AutoMapper to use the NameFormatter whenever it’s mapping from a Name object
. This is a global instruction to AutoMapper, telling it to apply HTML encoding to every destination member. A second formatting
directive tells AutoMapper to use the NameFormatter whenever it’s mapping from a Name object ![]() (we’ll investigate NameFormatter in depth later in this chapter). There’s also a directive providing a special formatting expression that AutoMapper should
use when it’s attempting to map from decimal objects
(we’ll investigate NameFormatter in depth later in this chapter). There’s also a directive providing a special formatting expression that AutoMapper should
use when it’s attempting to map from decimal objects ![]() . This expression will use the standard formatting string to display decimals as currency.
. This expression will use the standard formatting string to display decimals as currency.
Finally, the CreateMap directive tells AutoMapper to plan to map from Customer to CustomerInfo. The ForMember method call tells AutoMapper to apply the Address-Formatter but skip the HtmlEncoderFormatter when mapping to the ShippingAddress destination property.
The rest of the CustomerInfo properties aren’t specified, because they’re mapped conventionally.
18.3.3. Sanity checking
A reliance on convention is a double-edged sword. On one hand, it helpfully eliminates the developer’s obligation to specify each member’s mapping. But there’s a danger if a property is renamed. If a source member is renamed, it might no longer correspond to the appropriate destination member, and the convention would be broken. Developers need fast feedback when changes like this happen. It’s not acceptable to experience a runtime error.
AutoMapper provides a method that will ensure its configuration is valid, checking that each destination member is mapped to a source member by convention or configuration. Listing 18.9 shows a profile that won’t work—someone made a typographical error.
Listing 18.9. Examining a potentially dangerous typo

To protect against typos like this, we can run a special helper test as part of our automated test suite. This helper test, AutoMapperConfigurationTester, is shown in listing 18.10.
Listing 18.10. Asserting AutoMapper is configured correctly
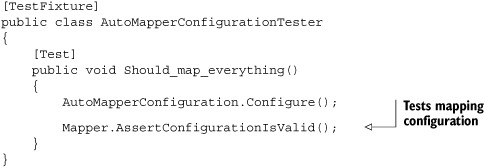
When this test is run against our broken profile in listing 18.10, we’ll get a helpful message indicating that the Typo property isn’t mapped.
18.3.4. Reducing repetitive formatting code
Earlier in this chapter we mentioned applying special formatters to member mappings. These formatters are all implementations of IValueFormatter, an AutoMapper interface that defines the contract between AutoMapper and our custom formatting code. Listing 18.11 shows this interface.
Listing 18.11. Examining the IValueFormatter interface
public interface IValueFormatter
{
    string FormatValue(ResolutionContext context);
}
Our custom formatting implementation will accept a ResolutionContext, which supplies the value of the view model property and other metadata. You can provide any transformation or mapping you deem necessary and simply return a string result.
To make it easier on client developers, a simple base class can be implemented. Listing 18.12 shows BaseFormatter, which pulls the source value out of the context and checks for null values.
Listing 18.12. Implementing IValueFormatter on the BaseFormatter class

Deriving from BaseFormatter makes writing a custom formatter straightforward. All we need to do is implement its abstract FormatValueCore method, which receives the strongly typed source value. AutoMapper will catch any null reference exceptions in formatters or in regular mapping and instead return an empty string or the default value.
Listing 18.13 shows the NameFormatter, which is discussed in section 18.3.2.
Listing 18.13. Deriving NameFormatter to handle combining properties
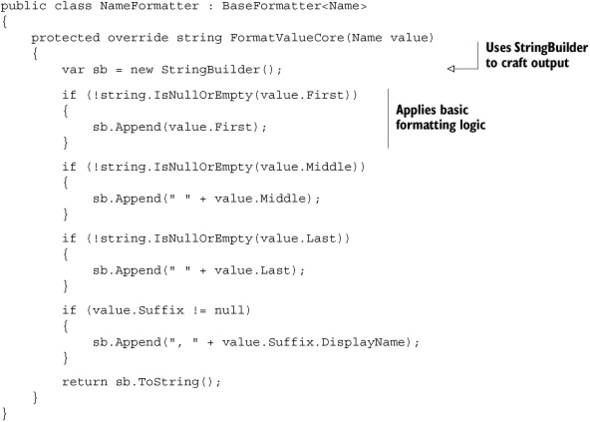
Harnessing AutoMapper allows the developer to write this code once and apply it in many places with just a declaration. When configured like the profile in listing 18.8, this formatter will be applied to all source members of type Name.
18.3.5. Another look at our views
With our configuration complete, our markup is focused only on layout. The tedious logic from listing 18.3 has been replaced. Listing 18.14 shows the resulting view.
Listing 18.14. The final view markup
<h2>Customer: <%= Model.Name %></h2>
<div class="customerdetails">
 <p>Status: <%= Model.Status %></p>
 <p>Total Amount Paid: <%= Model.TotalAmountPaid %></p>
 <p>Address: <%= Model.ShippingAddress %></p>
</div>
18.4. Summary
In this chapter, we looked at how views can quickly become unmanageable when they’re filled with logical checks and formatting that’s best handled elsewhere.
We first tried manually mapping custom presentation models, which worked well but is tedious and error prone. We then looked at AutoMapper, which maps values from one object to another according to its configuration. We saw how to initialize and configure AutoMapper, how to follow the conventions, and how to leverage AutoMapper hooks to globally apply formatting.
In the next chapter, we’ll look at how to keep controllers lightweight and under control. By striving to reduce duplication and eliminate developer friction, we’ll craft small and targeted controller actions.