Chapter 25. Customizing Visual Studio for ASP.NET MVC
- Creating custom T4 templates
- Using custom T4 templates
- Exporting a custom test project template
- Adding custom test project templates
Tooling within Visual Studio can make building ASP.NET MVC applications faster. Any task that we perform over and over is a candidate for automation and tooling. A computer can perform a task faster and with more accuracy than a human can, especially when the task is performed repeatedly. We’ll look at two quick ways of customizing these tools, specifically the controller, view, and project generators.
25.1. Creating custom T4 templates
T4 (Text Template Transformation Toolkit) is a little-known feature of Visual Studio. It’s a code-generation toolkit, and its templates allow us to customize how files are generated using a familiar syntax. Chapter 21 covered T4MVC, which is a set of T4 extensions provided by the CodePlex Foundation project, MvcContrib.
Under the covers, when we install ASP.NET MVC on top of Visual Studio, we get templates for adding items such as areas, views, and controllers. For instance, if we right-click an action, we’ll see an option to open the Add View dialog box, shown in figure 25.1. In this dialog box, we can choose the name of the view, the view model type, and the master page. If we select a strongly typed view, we have the option of choosing an automatic view template. The options are Empty, List, Create, Details, and Delete. figure 25.1 shows us selecting Create for our view content and Product for our view data class.
Figure 25.1. The Add View dialog box allows us to autogenerate scaffolding for our model.

The options in the View Content drop-down list are T4 templates that are located on a 64-bit system in C:Program Files (x86)Microsoft Visual Studio 9.0Common7 IDEItemTemplatesCSharpWebMVC 2CodeTemplates.
If we click Add, we’re given a complete form, generated for us by Visual Studio using the default template. Our view now looks like listing 25.1.
Listing 25.1. The autogenerated Create view based on the Product object

As you can see, lots of code is generated for us. Listing 25.1 contains the strongly typed declaration for Product ![]() and a basic form
and a basic form ![]() , with fields corresponding to the object, complete with validation
, with fields corresponding to the object, complete with validation ![]() , a submit button
, a submit button ![]() , and a back link
, and a back link ![]() . This can get us started building the application quickly. Of course, this is just a starting point, and you’re free to customize
it from here.
. This can get us started building the application quickly. Of course, this is just a starting point, and you’re free to customize
it from here.
To add a custom view template, we add a folder to our project called CodeTemplates, and then copy the contents of the default template folder into the new folder. We can create subfolders corresponding to the different types of templates (see figure 25.2).
Figure 25.2. Copy the templates from the default templates folder into a CodeTemplates folder in your project to customize them.
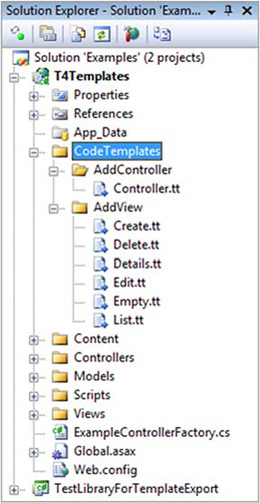
These templates will be effective for the current project only, and you’re free to alter them here for your project. You can also add more items to this list. Adding another .tt file in this folder will enable it for selection in the Add View dialog box, as shown in figure 25.3.
Figure 25.3. Adding new template files in the Add View folder enables them for selection in the Add View dialog box.

The templates themselves are fairly complex. Here’s an excerpt from the Controller.tt template:
<#@ template language="C#" HostSpecific="True" #>
<#
MvcTextTemplateHost mvcHost = (MvcTextTemplateHost)(Host);
#>
using System;
using System.Collections.Generic;
using System.Linq;
using System.Web;
using System.Web.Mvc;
namespace <#= mvcHost.NameSpace #>
{
public class <#= mvcHost.ControllerName #> : Controller
{
//
// GET: <#= (!String.IsNullOrEmpty(mvcHost.AreaName)) ? ("/" +mvcHost.AreaName) : String.Empty #>/<#= mvcHost.ControllerRootName #>/
...... more ....
As you can see, code blocks are denoted by <# #> blocks. Also, each template has a Host property that contains basic context information. For MVC templates, this Host is of type MvcTextTemplateHost, so we can see that the template is casting the Host property and storing it in a variable called mvcHost for use later in the template.
There are two main types of code generation. The first uses a technique that produces code that’s meant to be versioned in a version control system (VCS). The second uses a technique to generate the code in the build of the software. In other words, the generated code would never be tracked in a VCS.
T4 generation is of the first type. It allows you to quickly generate files, but then you have to version and maintain them yourself. We caution you to limit this type of code generation. It makes laying down code very easy, but it accelerates the rate at which you accumulate duplicate code.
Overall, it’s best to favor code-generation techniques where you never version or maintain the generated code. In this way, you can modify the templates and regenerate code at build time. Some code generators actually work at runtime, generating code right before executing it.
T4 templates can be a little intimidating, but you can do a lot with them. If you’re interested in customizing the templates, download Visual T4 Editor for Visual Studio 2008 Community Edition free from Clarius Consulting (www.visualt4.com/downloads.html). This will give you syntax highlighting, which is helpful when you find yourself writing code that writes code! To learn more about T4 template syntax and the ASP.NET MVC integration, check out “T4 Templates: A Quick-Start Guide for ASP.NET MVC Developers” on the Visual Web Developer Team Blog (http://mng.bz/g65j).
25.2. Adding a custom test project template to the new project wizard
When we first create an ASP.NET MVC project, we’re eventually greeted with the dialog box shown in figure 25.4.
Figure 25.4. When we create a new project, we’re asked if we want to create a unit-test project.

Unfortunately, the only available test framework that’s provided out of the box is the Visual Studio Unit Test framework. Developers who are experienced with testing will no doubt prefer NUnit, MbUnit, or xUnit.NET. But there’s hope! We can add our preferred framework to this dialog box (and simultaneously implement a custom project template).
The first step is to create a project that represents what we want when we create new ASP.NET MVC applications with the test project included. Make sure all third-party references (such as NUnit, MvcContrib.TestHelper, and Rhino Mocks) are set to Copy Local. Then, choose File > Export Template. Follow the wizard, which will result in a single zip file, and then copy this zip file to C:Program Files (x86)Microsoft Visual Studio 9.0Common7IDEProjectTemplatesCSharpTest.
Note
On 32-bit machines, the Program Files path is actually C:Program Files. Be sure to adjust for your system.
Once we’ve got the template in the right place, we close all instances of Visual Studio, open the Visual Studio 2008 Command Prompt (as Administrator if UAC is enabled), and run this command:
devenv /installvstemplates
This will take a few seconds and will install the project template into Visual Studio.
Now, we open regedit, and navigate to one of the following locations depending on our computer processor architecture:
- HKEY_LOCAL_MACHINESOFTWAREMicrosoftVisualStudio9.0MVC2 TestProjectTemplates
- HKEY_LOCAL_MACHINESOFTWAREWow6432NodeMicrosoftVisualStudio9.0 MVC2TestProjectTemplates
Note
On 32-bit machines, the registry path is slightly different (remove Wow6432Node).
In table 25.1, we’ll find the default Visual Studio Unit Test key String values. To create options for another test framework, we create a new key here and then add the String values in table 25.1.
Table 25.1. Registry values for configuring the unit-test project settings
|
Value |
Description |
|---|---|
|
Package |
Blank, unless we have a custom Visual Studio package GUID to register here. |
|
Path |
Usually CSharpTest. |
|
TestFrameworkName |
The name that we want to appear in the Unit Test Framework drop-down list. |
|
AdditionalInfo |
A URL that provides the user with more information about our framework or template. When the user clicks Additional Info, the browser will navigate to this URL. |
|
Template |
The name of the zip file that contains the template. |
Figure 25.5 shows a new template installed in this location.
Figure 25.5. Adding a registry entry for a new custom test project template. Note that this registry path is for 64-bit machines.

With all of this in place, we can launch Visual Studio, create a new ASP.NET MVC Web Application project, and be greeted with the message shown in figure 25.6.
Figure 25.6. Our new test template is now available in the Create Unit Test Project dialog box.

25.3. Summary
In this chapter, we’ve seen some of the ways to modify Visual Studio as it relates to the ASP.NET MVC Framework. We’ve seen how to use the built-in T4 templates to create controllers and actions and how to modify and create new T4 templates for new and interesting types of code files. We’ve also seen how to create and install custom test project templates. The industry will never standardize on a single test framework, but we now know the steps necessary to create and install the test template we need for a project.
Now that we’ve seen how to customize Visual Studio, the next chapter will cover some best practices we can apply while working with ASP.NET MVC.