
Chapter 5. Getting Started
In this chapter we will take a closer look at some of the prerequisites. Traffic lights are handled differently in different countries. Therefore, I will introduce some of the requirements to you first.
In this part we will be dealing with a second test framework, FitNesse, so I will provide a very brief introduction. If you want to dive deeper later, take a look at Appendix B for a more in-depth introduction.
FitNesse comes with another programming language to write the glue and support code in. We will also work on the production code in this part. Don’t be scared now. That is why we pair. I will provide you a brief introduction to the programming language in order to get you started.
We will also see how ATDD is supplemented with TDD. We will start with a test for the business functionality. After that, we will deal with a developer focus on classes and how to drive the design of the underlying source code. In fact, we use the acceptance tests as an approach to explore the domain, so that we can start writing production classes with a better understanding about the application domain and the resulting model.
Traffic Lights
In most larger cities I have visited, traffic lights for pedestrians are rather suggestions than part of the traffic rule system. While researching laws for traffic light systems, I found a variety of well-documented requirements and laws for these systems. Because these laws may differ by country, I will focus on the laws that I am used to: the German laws. You are not from Germany? No problem, these are the basics of a traffic light system that fulfills the requirements in Germany.
For pedestrians there are red and green lights with a little person who is either indicating to walk or to stop. We also have little traffic light men called Ampelmännchen in our capital Berlin. These are differently shaped traffic light men than you may find in the rest of the country. Yeah, you are right, I digress.
For vehicle drivers there are three colors: red, yellow, and green. The red and green lights have similar meaning as for pedestrians. The yellow light alone indicates that the traffic light is in the process of turning from green to red. This is a pre-cautious signal for drivers. Actually, you are not allowed to drive through a yellow traffic light, but few drivers abide by this law. If the red and yellow lights are shown together, the traffic light will shortly turn green. You are not allowed to drive yet, but you should be ready to move because this phase usually lasts only a partial second.
Concerning regulations, there is one hard rule: that at an intersection two traffic lights may never show green for both crossing directions. If this happens, the traffic light system has to shut down immediately. The system will turn to blinking yellow lights, thereby indicating that drivers have to take care of the traffic signs for who is allowed to drive now, or whether to grant other vehicles permission first. Our little traffic light controlling system has to take care of such error conditions as well. Right, I do not want to be involved in a car accident, just because the traffic control system showed green for two intersecting directions.
For traffic lights there are a variety of customizations in place. First, pedestrians may have to press a button in order to get a green light. The underlying controller will turn the traffic lights for the cars red first, then change the pedestrian lights to green—sometimes combined with a green signal for cars in the same direction depending on whether it’s a traffic light at a crossing or a stand-alone pedestrian light. But most of the pedestrian lights are triggered together with the car lights without a necessary interaction from the pedestrian.
For some pedestrian crossings, the traffic light system might indicate a green walking sign together with an audible signal for the vision impaired. Shortly before turning red again, the acoustic signal will indicate that people should hurry to the other side of the street. The continuous signal will turn into an interrupted signal for the final five seconds of the green phase.
Another extension to the basic scenario are traffic lights with special signals—for example, at an intersection of two major routes, left-turning vehicles may get a green arrow on a different interval in order not to hinder the main traffic with long waiting periods. This can help traffic control a lot at heavy traffic crossings. But it also might lead to other problems in the traffic control system—especially when this is introduced together with a special traffic light for the right-turning vehicles as well (see Figure 5.1).
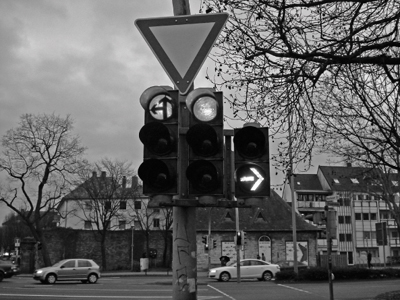
Figure 5.1. A traffic light calling for some refactoring
Yet another extension are induction loops that give the traffic lights a signal to turn green once a car arrives at a red light. The loop recognizes that a car has arrived, and the traffic light control system then schedules a green phase for that newly arrived car. Another option are induction loops in a row to measure the driving speed and slow down speeders by turning the next signal red if the car is too fast. If that’s not enough, imagine special radio signals sent to traffic light systems from ambulances, police cars, and busses that can turn traffic lights to green for their needs.
It seems that a traffic light system might look rather easy at first, but quickly turns into a complicated system. If our system should control the traffic lights of a major city, perhaps the mayor or public works director would be interested in usage statistics as well. With these he or she might be in the position to optimize the traffic flow based on the day and night time. Let’s keep these possible evolution points in mind while developing the initial system. Right, we should make sure to implement the basic requirements before bringing in more features.
There are many large corporations now involved in building traffic management solutions. They acquire many various traffic data to optimize the flow through cities. The problem these companies are trying to solve is a very dynamic and complex one. A traffic light control system is one piece of such larger system. So, we will build a first piece for solving this problem.
FitNesse
In this part we will use FitNesse to define the specifications for the first steps of the traffic light system. FitNesse is a wiki system in which tests can be defined in a hierarchical way using wiki pages. Because FitNesse is a wiki, we can put additional information there, too. As the number of tests grows, we can grow the most relevant documentation along-side.
Since FitNesse is a wiki server, tests are defined using wiki notation. The FitNesse user guide1 provides more information regarding the full markup language syntax. We will cover the essentials that you will need during this chapter. So, don’t worry too much if you are unfamiliar with FitNesse or a wiki system.
FitNesse provides the ability to execute wiki pages as part of a test system. Initially, FitNesse was built as an extension to the Framework for Integrated Tests (FIT). Since 2008 it supports its own test system called SLiM—Simple List Invocation Method—which does not restrict the code used for test automation to the GPLv2 license as FIT does. You are right, we should define the traffic lights tests using the SLiM test notation and implementation rather than the FIT style.
In this example we will use two tables: the decision table and the scenario table. A decision table denotes input values to the system, executes some operation on the system under test, and checks some output values from the system. Input values and output values are denoted in a table in different rows. The notation is similar to the one we saw in the first part with Cucumber, and therefore quite intuitive to read. See, for example, the Valet Parking examples from the first part in a decision table in SLiM in Listing 5.1.
Listing 5.1. The Valet Parking tests expressed as a decision table in SLiM
1 !|Parking costs for|Valet Parking |
2 | parking duration |parking costs? |
3 |30 minutes | $ 12.00 |
4 | 3 hours | $ 12.00 |
5 | 5 hours | $ 12.00 |
6 | 5 hours 1 minute | $ 18.00 |
7 | 12 hours | $ 18.00 |
8 | 24 hours | $ 18.00 |
9 | 1 day 1 minute | $ 36.00 |
10 | 3 days | $ 54.00 |
11 | 1 week |$ 126.00 |
A scenario table capsulates a common workflow more simply. You can think of it as a method or function that may accept parameters. We will describe different scenarios for different workflows that we will need. Scenario tables provide a way to abstract from lower-level details. We will keep our examples more readable with careful use of these scenario tables.
Supporting Code
In this part we will provide the production as well as the supporting code. The only difference from the airport example is that it will be developed using test-driven development. Since we are working in a Java example, we will use JUnit as unit test framework. Keep in mind that test automation is software development. We will apply guidelines for good code to the supporting code as well. After all, we can communicate our intent for the supporting code structure. Maintenance of the automated examples thereby becomes a no-brainer for whoever is going to maintain them—and this might be even you.
In JUnit we will use annotations to mark a method in a test class as a unit test (see line 4 in Listing 5.2). JUnit also provides assertions that ensure a certain state or behavior of the system or make the unit test fail if the behavior is not met. assertEquals(expected, actual) is the most used assertion (see line 6 in Listing 5.2). It checks that the expected value and the actual value are equal, or fails the test, providing a message that they mismatched.
Listing 5.2. An example of a unit test in Java
1 ...
2 public class LightStateTest {
3
4 @Test
5 public void testStateChange() {
6 assertEquals(LightState.RED_YELLOW, LightState
.RED.next());
7 }
8 }
As an advanced topic in JUnit, I will also use parameterized tests. These provide the possibility to separate the workflow and the tested data. The workflow is annotated as usual in a test method. The data for the tests is provided by a public static method with the proper annotation. We will work on this together as we reach this part of the problem.
Please note that a deeper introduction to JUnit is beyond the scope of this book. For more in-depth material on the topic Test-driven Development by Example [Bec02], xUnit Test Patterns [Mes07], and Growing Object-oriented Software Guided by Tests [FP09] are three references that I really enjoyed reading.
That should be everything we need to know in order to get started. Let’s get going.
Summary
We dealt with the German traffic light rules for pedestrians and vehicle drivers. For pedestrians there are green and red lights; for vehicles, we have a series of green, yellow, red, red and yellow, and green state changes. When something goes wrong, our traffic controller will have to turn the traffic lights to yellow blinking.
I gave you a very brief overview over the automation framework and our approach to the support code. Did you install a Java IDE on your own and play around with it? Maybe you also took a look into FitNesse? Anyways, even if not, let’s start with the implementation now. I will help you if necessary.