
6. Using the Writing Tools
In This Chapter
- Learn how to run a spell check and use Grammatik to check documents for grammatical errors.
- Use the 30,000-word dictionary to look up definitions.
- Learn how to switch to a different set of writing tools for other languages.
- Learn how to search (and replace) text, codes, or a combination of both.
- Use QuickCorrect, QuickWords, and Format-As-You-Go to make your typing efficient and accurate.
Word processors have evolved from glorified typewriters to document production engines. WordPerfect blurs the lines between word processors and desktop publishers by combining features designed for the placement and structure of graphics with features that allow you to manipulate text.
At the same time, the type of worker using word processors has evolved. Not everyone has the luxury of an assistant—most of us produce our own materials. People who have never typed their own documents are learning how to use spelling and grammatical checkers to improve the readability and credibility of their work. WordPerfect has an exceptional collection of productivity tools to help automate many common tasks performed by today’s office workers.
Recognizing WordPerfect’s Automatic Proofreading Features
You might notice that as you type a document, red underlines appear under some words. This is the Spell-As-You-Go feature working for you. Spell-As-You-Go has marked these words as possible misspellings.
Spell-As-You-Go is one of the two automatic proofreading features in WordPerfect—the other is Grammar-As-You-Go, which checks for grammatical errors. The theory behind these two features is that it’s faster to correct errors while you are typing than to go back and fix them later. If Grammar-As-You-Go is activated rather than Spell-As-You-Go, you might see blue dashes in the text as well.
 Note
NoteYou might notice that some menu items have a check mark next to them and other items have a bullet. Besides showing you which item is currently selected, is there any other difference? Yes!
Bullets tell you that only one of the options in the group can be selected at one time. Check marks tell you that more than one option in the group can be selected at one time.
To correct a word with Spell-As-You-Go
- Right-click a red underlined word to open a list of suggested replacement words from which you can choose (see Figure 6.1).
- Click the correctly spelled word in the list.
That’s it—you just corrected the misspelled word. Selecting a word from this list automatically replaces the underlined word with the word you chose.
If you find these proofing marks distracting, you can disable the Spell-As-You-Go and Grammar-As-You-Go features. If you opt to disable these features, you can run a spell check and/or grammar check on the entire document when you are finished editing.
To disable the automatic proofing features
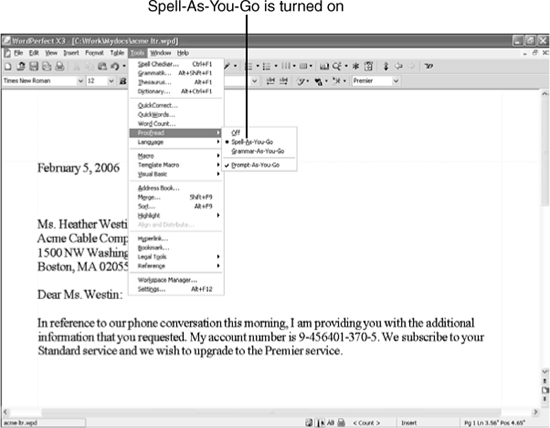
- Choose Tools, Proofread. Notice that Spell-As-You-Go has a bullet next to it—this means that it’s turned on (see Figure 6.2). Grammar-As-You-Go includes the Spell-As-You-Go feature, so you can select either Spell-As-YouGo or Grammar-As-You-Go, but you cannot select both from the Proofread submenu at the same time.
- Click Off to turn off both Spell-As-You-Go and Grammar-As-You-Go.
Figure 6.1 When you right-click a red underlined word, a list of suggested replacements appears.
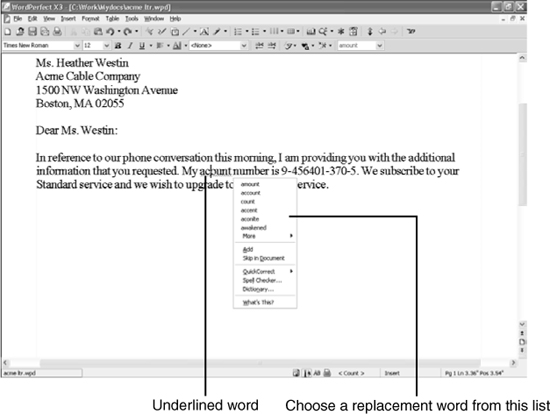
Figure 6.2 Choosing Grammar-As-You-Go activates both Grammar-As-You-Go and Spell-As-You-Go.
Spell Checking a Document
Who would have thought something as simple as a few misspelled words could undermine all your hard work? They can, and they will. Like it or not, readers will question the credibility of a writer if they find typos in the text. Save yourself the potential embarrassment by running Spell Checker on every document, no matter how short it is, before you send it off.
Develop a habit of saving documents before you run any of the writing tools such as the Spell Checker. This way, if you make some changes that you decide you don’t want to keep, you can always go back to the saved copy. Also, the writing tools may occasionally lock up your system, especially with long or complex documents, so it’s especially important that you have a good backup that you can revert to after you restart.
To start Spell Checker and correct mistakes in your document
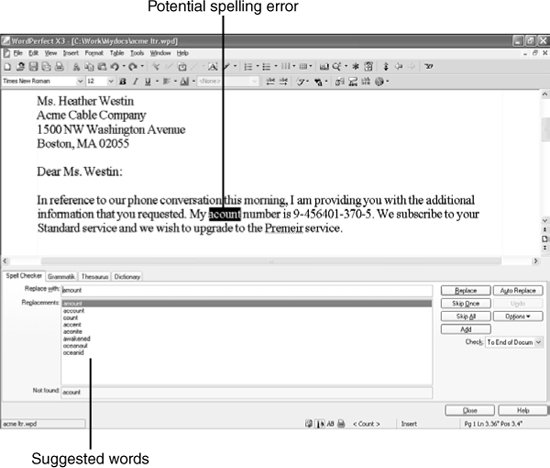
1. Choose Tools, Spell Checker, press Ctrl+F1, or click the Spell Checker button on the toolbar. The Writing Tools dialog box with tabs for Spell Checker, Grammatik, Thesaurus, and the Dictionary appears (see Figure 6.3). Spell Checker immediately begins checking the document. A potential error is highlighted, and suggested replacement words appear in the Replacements list box.
![]()
Figure 6.3 Spell Checker, Grammatik, Thesaurus, and the Dictionary are all integrated into the same dialog box. Click the appropriate tab to switch to another writing tool.
2. Choose from the following options to correct the misspelled word, add the word to the dictionary, or skip the word:
• To correct a misspelled word manually, click in the document window, correct the problem, and then click Resume to continue spell checking.
• To replace a misspelled word with the correctly spelled word, select the correctly spelled word in the Replacements list box and click Replace. In the case of duplicate words and irregular capitalization, select the single word, or the word with correct capitalization, in the Replacements list box. Alternatively, you can double-click the replacement word.
• If this is a frequently misspelled word, select the correct spelling in the Replacements list box, and then click Auto Replace to add the combination to the QuickCorrect list. (See “Adding and Deleting QuickCorrect Entries” later in this chapter for more information.)
• If the correct spelling doesn’t appear in the Replacements list, edit the word manually in the Replace with box, and then click Replace.
• To skip the word here but have Spell Checker stop if it finds the word again, click Skip Once.
• To skip the word here and for the rest of the document, click Skip All.
• To add this word to the active user word list, click Add. A user word list is a list that you can customize to supplement the built-in word list.
• If you accidentally replace the misspelled word with the wrong replacement word, click Undo.
Choosing Skip All adds the word to the document word list, which is saved with the document and doesn’t affect other documents. The strength of this feature becomes clear when you work with documents full of complex or technical terms. It takes only a few mouse clicks, and once you’ve built the list, Spell Checker runs faster because it isn’t stopping on those terms anymore.
By default, Spell Checker checks the entire document. If you don’t want to check the whole document, select the portion that you want to check first. Also, you can specify which portion of the document you want checked by selecting an option on the Check drop-down list.
Checking for Grammatical Errors
Grammatik is WordPerfect’s grammar checker. A grammar checker proofs documents for correct grammar, style, punctuation, and word use, and thus catches many errors that get by most spell checkers. Interestingly, Spell Checker is integrated into Grammatik, so you only need to run Grammatik to run both.
Grammatik uses grammatical rules when checking a document for problems. Many good writers, however, often bend these rules to make a point. You shouldn’t feel compelled to fix every problem or accept every suggested solution if it changes the meaning of your words.
To start Grammatik and check your document
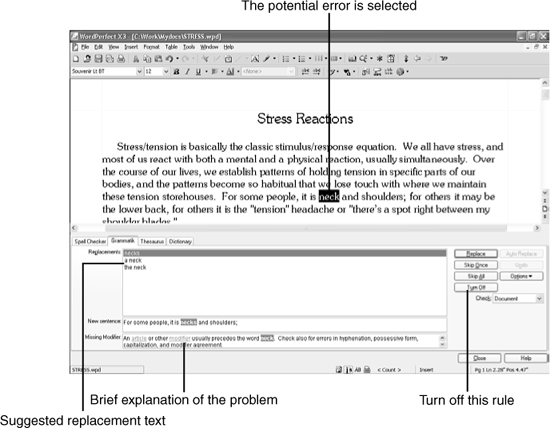
1. Choose Tools, Grammatik (Alt+Shift+F1) or if you already have the Writing Tools dialog box open, just click the Grammatik tab. Grammatik immediately starts checking the document and, like Spell Checker, stops and highlights a potential error (see Figure 6.4).
Figure 6.4 Grammatik has many of the same options as Spell Checker to correct a potential problem or move past it.
2. Choose from the following options to correct the error, skip the error, or turn off the rule:
• To correct a writing error manually, click in the document window, correct the problem, and then click Resume to continue the grammar check.
• To fix a writing error, select one of the suggestions in the Replacements list box, and then click Replace.
• To skip the writing error here but have Grammatik stop if it finds the error again, click Skip Once.
• To skip the writing error here and for the rest of the document, click Skip All.
• The rules by which Grammatik checks your document are organized into rule classes. To disable a particular rule class, click Turn Off. This change is temporary, so when you run Grammatik again, the rule will be turned back on.
• If you correct a problem and then change your mind, click Undo to reverse the last action taken by Grammatik.
![]()
By default, Grammatik checks the entire document. If you want to check only a portion of the document, click the Check drop-down list arrow and select an option.
Depending on the type of document you are working on, you might want to use a different set of grammatical rules to check your document. Grammatik offers 11 predefined checking styles, and if you’re really motivated, you can create your own.
By default, Grammatik uses the Quick Check style to check your documents. It’s pretty simple to switch to one of the other checking styles.
Because Spell Checker is integrated into Grammatik, when you run Grammatik, you will also correct errors found by Spell Checker.
To select a different checking style
- Choose Tools, Grammatik to open the Writing Tools dialog box. If you are prompted that the Grammar check is complete, answer No so that you don’t close the Grammatik dialog box.
- In the Grammatik tab, choose Options, Checking Styles to display the Checking Styles dialog box (see Figure 6.5).
Figure 6.5 Choose from one of the 11 predefined checking styles in the Checking Styles dialog box.
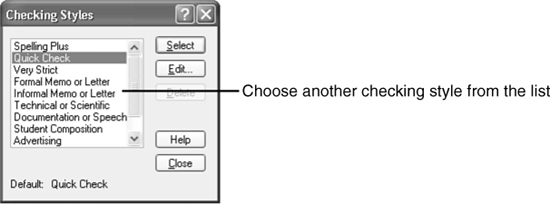
- To choose a checking style, select it in the list, and then click Select. Checking styles remain in effect until you choose another.
 Tip
TipYou can edit the built-in checking styles or create your own custom styles. Simply select a style and choose Edit. You will be taken to a dialog box where you can turn rule classes on and off, adjust thresholds, and change the formality level. You can then save that style under a new name, or save the changes, keeping the same name.
Looking Up Words in the Thesaurus
A thesaurus helps you find just the right word to describe something. Some concepts are more complex than others, and ideas can be expressed in a number of ways. Using the right words enables you to convey exactly the message you want to the reader.
WordPerfect’s Thesaurus looks up synonyms (that is, words with similar meanings), antonyms (words with opposite meanings), and related words. You can start the Thesaurus from a blank screen, but if you click on a word first, the Thesaurus looks up that word.
To look up a word in the Thesaurus
1. Choose Tools, Thesaurus (Alt+F1) or, if you already have the Writing Tools dialog box open, click the Thesaurus tab. The Thesaurus looks up the word and displays a list of synonyms by default and, if available, a list of antonyms and related words (see Figure 6.6).
2. Choose from the following options to look up words in the Thesaurus:
• If you selected a word in step 1, the Thesaurus looks up the word and displays the results in the window. Otherwise, you need to type the word you want to look up in the text box and then click Look Up.
• To see a list of words within a category, double-click the category or click the plus sign in the box. The left and right arrows on your keyboard can also be used to open and close categories.
• To look up one of the words in the list, double-click the word. A new window opens up for that word. If you double-click a word in the second window, a third window opens. When you fill up three windows, more windows are created (to the right). Click the scroll arrows to move one window to the left or right (see Figure 6.7).
Figure 6.6 The Thesaurus helps you improve your writing by showing you alternative words to use.
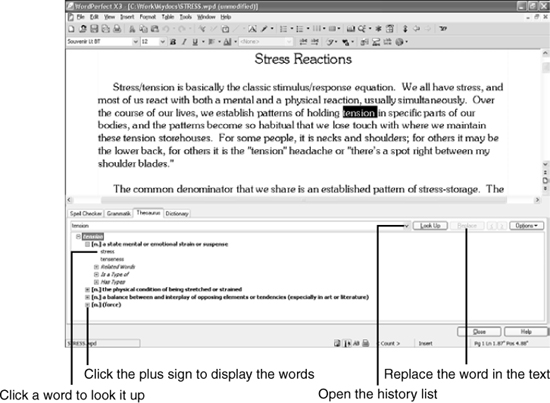
Figure 6.7 If you fill up more than three windows, use the scroll arrows to move back and forth in the windows.

• To replace the word in the document with the word from the Thesaurus, select the word, and then click Replace.
![]()
• If you change your mind about replacing a word, click the Undo button, or choose Edit, Undo (in the document window) to reverse the change.
• The Thesaurus has a history list, so you can jump back to a word that you typed in and looked up earlier. Click the drop-down list arrow next to the Look Up button to select from the history list.
Using the Dictionary
WordPerfect X3 includes an integrated version of the Oxford English Pocket Dictionary, which contains more than 30,000 words. You can look up the definition of a selected word in your document, or you can just type in a word.
To look up a word in the Dictionary
- Select the word in your document.
- Choose Tools, Dictionary (Alt+Ctrl+F1). Or, if you already have the Writing Tools dialog box open, click the Dictionary tab to display the Dictionary dialog box (see Figure 6.8).
Figure 6.8 The built-in Oxford English Pocket Dictionary contains definitions for more than 30,000 words.
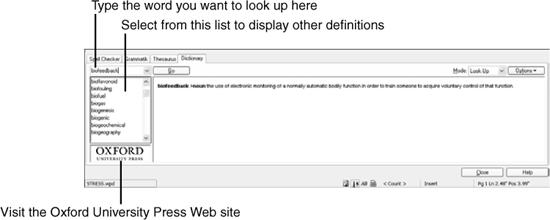
With a printed dictionary, you need to have some idea of how to spell the word, or you won’t be able to find it. The beauty of an electronic dictionary is that you can locate words by searching through the definitions. For example, you can locate all the terms that have the word “flower” in the definition. Also, if you know how to spell a part of the word, you have a much greater chance of locating it with an electronic search.
The built-in Oxford English Pocket Dictionary can be upgraded to the Oxford English Concise Dictionary, which contains 70,000 definitions. The Upgrade option on the Options menu takes you to the Corel store, where you can download the upgrade for a small fee.
To search through the dictionary
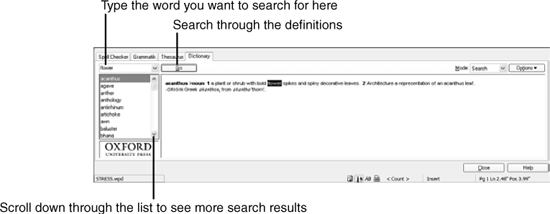
- With the Dictionary dialog box displayed, open the Mode drop-down list and click Search.
- Type the word that you want to search for in the text box underneath the writing tools tabs.
- Click Go. A list of terms that contain the search word in the definition appears in the window (see Figure 6.9).
Figure 6.9 With an electronic version of a dictionary, it’s simple to locate words by searching through their definitions.
Switching to a Different Language
We are truly working in a global marketplace. It’s not unusual to carry on business with companies located all across the globe. When you correspond in a different language, you must be able to do more than just enter, display, and print the non-English characters. You also must be able to correct spelling, check grammar, and look up terms in the Thesaurus in addition to using the proper date conventions and currency symbols. WordPerfect supports multiple languages in three ways:
- You can mark sections of a document as being in one of the more than 30 languages supported by WordPerfect. Additional language modules can be installed that support the Spell Checker, Grammatik, Thesaurus, Dictionary, and Hyphenation.
- A Language Resource File (LRS file), which comes with the program and each language module, contains the information for formatting numbers and footnote-continued messages, among other things. You can edit this file to customize these options.
- You can purchase WordPerfect in a different language so that the menus, prompts, messages, dictionaries, and thesauri are all in that language.
To switch to a different language
- If you want to mark only a section of text, select it first. Otherwise, click in the text where you want to switch to a different language.
- Choose Tools, Language, Settings. The Language dialog box appears, with a list of available language modules (see Figure 6.10).
- Scroll through the list and double-click the language you want.
Figure 6.10 You can disable the writing tools for sections of text that need to be checked in a different language.
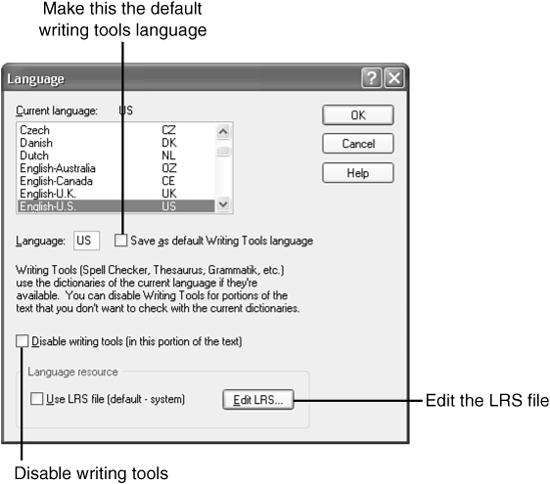
If you frequently switch back and forth between languages, you will love this feature. You can display the current language in the application bar. Right-click the application bar (at the bottom of the screen) and click Settings. Scroll down through the list, enable the check box next to Language, and click OK. A new Language button appears on the far-right side of the application bar. Click this button to open the Language dialog box, where you can choose another language.
You can switch to a different language when you’re using any of the writing tools. In the Spell Checker, Grammatik, or the Thesaurus, choose Options, Language to open the Select Language dialog box (see Figure 6.11).
Figure 6.11 Use the Select Language dialog box to switch to a different language when you’re using the writing tools.
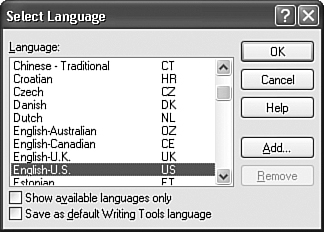
Click Show Available Languages Only to display only those languages supported by the current writing tool. Select the language you want. Click Save as Default Writing Tools Language if you want the setting to be permanent. If you purchase additional language modules, you can add them in the Select Language dialog box. Click the Add button to add a language. Choose OK when you are finished.
Searching and Replacing Text and Codes
The Find feature can locate a snippet of text, or a specific code in your document, in just a few seconds. The Replace feature takes the process a step further by allowing you to substitute something else for the search item.
Here’s an example of how you might use the Replace feature with Find: Let’s say that you accidentally misspelled someone’s name throughout a long document. You can search for all occurrences and replace them with the correct spelling. The same thing goes for codes. If you decide you want to search for a particular font and replace it with another one, you can do it with Find and Replace by searching for the code of the unwanted font and replacing it with the code of the desired font.
Searching for Text
Searching for text is fairly straightforward. You can do broad searches by searching for the first several characters in a word, or you can be very specific by searching for a particular sentence or phrase.
For the most part, I use Find to locate a particular word or phrase to quickly jump to the section of text that I need to work on. It’s faster than scrolling through a document to find the place where I need to start. With that said, don’t underestimate the Replace side of the Find and Replace feature. When it comes to making a global change throughout a document, nothing beats it for speed and accuracy.
To search for (and replace) text
- Choose Edit, Find and Replace (F2) to open the Find and Replace dialog box (see Figure 6.12).
Figure 6.12 With Find and Replace, you can quickly locate a section of text and, optionally, replace it with something else.
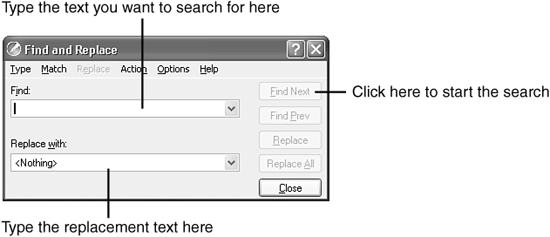
- Type the text you want to search for in the Find text box. This might be a complete or partial word, phrase, or number.
- (Optional) Type the replacement text in the Replace with text box. The replacement text must be exact because it will be inserted in the document exactly as it appears in the text box.
- Click Find Next to start the search.
If you want to delete selected instances of the search text, leave <Nothing> in the Replace with text box (or leave it blank). As you go through the search, you can selectively replace the search text with nothing, deleting it from the document.
When WordPerfect locates the search text, you have the following options:
- Click Find Next to continue the search.
- Click Find Prev to move back to the previous instance.
- Click Replace to replace the search text with the replacement text.
- Click Replace All to replace all the rest of the occurrences without further confirmation from you.
- Click Close if you’re just using Find to locate your place in a document and you want to get to work.
![]()
![]()
If you’ve already closed the Find and Replace dialog box, but you need to continue searching, you can use two shortcuts. Press Ctrl+Alt+N to find the next occurrence and Ctrl+Alt+P to find the previous occurrence. You also can use the QuickFind buttons on the property bar to move to the next or previous instance of the search text.
Searching for Codes
You can extend a search into the document codes to locate a particular code so that you can either edit or delete it. It’s much faster and more accurate to let WordPerfect do the searching.
To search for a code
1. Choose Edit, Find and Replace (F2) to open the Find and Replace dialog box.
2. Choose Match, Codes from the menu in the Find and Replace dialog box. This opens the Codes dialog box (see Figure 6.13).
Figure 6.13 Using Find and Replace, you can search for virtually any code in a document.
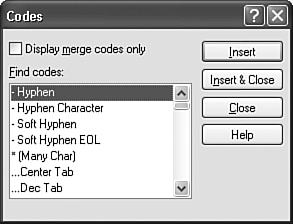
3. When you find the code you want to search for, select it and click Insert & Close.
4. Click Find Next. When WordPerfect stops, close the Find and Replace dialog box and then turn on Reveal Codes (View, Reveal Codes). The insertion point will be positioned right after the code.
5. At this point, you can either delete or edit the code:
• To delete the code, press Backspace or click and drag it out of the Reveal Codes window.
• To edit a code, double-click it.
You can also use Find and Replace to replace a certain code with another one. For example, if you often work with converted documents, Find and Replace can be your best friend. After you identify the codes you want to get rid of, you can search for the codes and delete them. Some documents are so poorly formatted that it’s quicker to clean out the codes and start over. Although this might take numerous find and replace operations, it’s still faster than manually deleting each code.
To find and replace a code
- Repeat the preceding steps 1–3.
- Select the Replace with text box.
- Choose Replace, Codes. The same Codes dialog box from Figure 6.13 opens. This time, only the codes that can replace the code you are searching for are available. All the others are grayed out. For example, you can’t replace a Center Tab code with a Date Format code.
- When you find the code you want, select it and then click Insert & Close.
- Click Find Next. When WordPerfect stops, click Replace to replace this code and move on to the next one; click Replace All to replace the rest of the codes without further confirmation.
You might not have thought of this yet, but you can combine text and codes in the Find text box to look for text followed (or preceded) by a certain code.
I mentioned earlier that you could search for a specific font and replace it with another. This is an example of searching for codes with a specific setting. Margin codes also have specific settings, as do line spacing and styles.
To find and replace codes with specific settings
- Choose Edit, Find and Replace, or press F2 to open the Find and Replace dialog box.
- Choose Type, Specific Codes to open the Specific Codes dialog box (see Figure 6.14).
Figure 6.14 To search for a code with a specific setting, select the code from the Specific Codes dialog box.
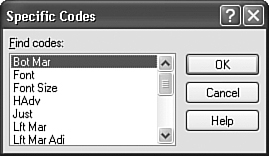
- Select a code from the list and click OK. Based on your selection, a modified Find and Replace dialog box appears with options for you to select the setting that you are searching for. Figure 6.15 shows the dialog box you get after choosing the Font code.
Figure 6.15 When you select Font from the Specific Codes dialog box, you get a Find and Replace Font dialog box.
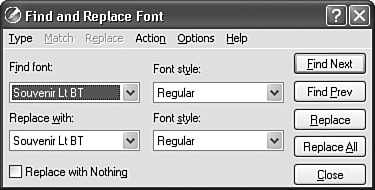
- Use the Find and Replace Font dialog box options to specify exactly what you want to find (and replace). For example, you could search for Arial Bold and replace it with Tahoma, or you could search for all the 14-point text and replace it with 16-point text. The possibilities are endless.
- Click Find Next to start the search.
In the modified Find and Replace dialog box, put a check mark in the Replace with Nothing check box if you want to replace the code with nothing, thus deleting it from the document.
Discovering the Power of QuickCorrect
The QuickCorrect feature is designed to correct common mistakes automatically, without any intervention from you. QuickCorrect cleans up extra spaces between words, fixes capitalization errors, corrects common spelling mistakes and typos, inserts special symbols, and replaces regular straight quotation marks with typeset-quality curly quotation marks. It also helps you create graphic lines, bulleted lists, ordinal numbers, hyperlinks to Internet or intranet addresses, files on your network, or files on a local hard drive. QuickCorrect has a lot to offer, so take a few minutes and learn what it can do for you.
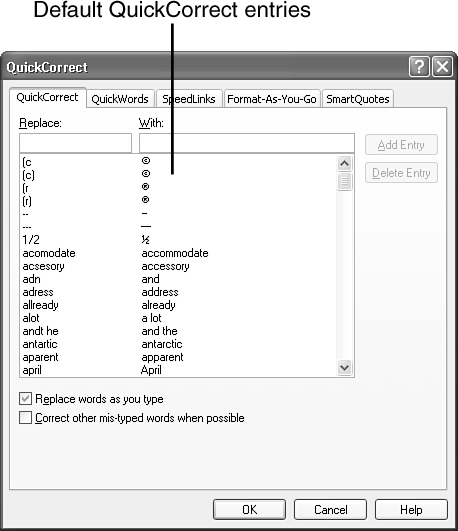
Choose Tools, QuickCorrect to open the QuickCorrect dialog box (see Figure 6.16). Tabs exist for all the different features that fall under the QuickCorrect umbrella.
Figure 6.16 In the QuickCorrect dialog box, you can add, delete, and edit the QuickCorrect entries. You also can disable QuickCorrect so that it won’t correct words while you type.
Adding and Deleting QuickCorrect Entries
QuickCorrect comes with a long list of frequently misspelled words and typos. After you add your own common typing mistakes to the QuickCorrect list, you will spend a lot less time proofing your documents.
To add words or phrases to QuickCorrect
- Choose Tools, QuickCorrect to open the QuickCorrect dialog box.
- Type the word or phrase that you frequently type incorrectly in the Replace text box.
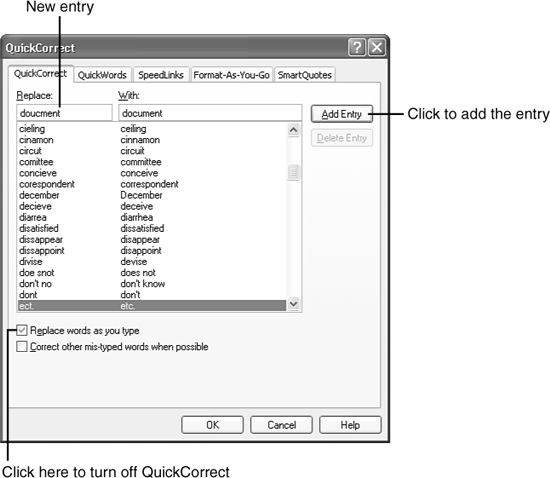
- Type the replacement word or phrase in the With text box (see Figure 6.17).
- Click Add Entry.
Think of ways you can use QuickCorrect to insert long or hard-to-type words when you type a few characters. For example, you could add an entry to replace “wpo13” with “WordPerfect Office X3” or “pab7” with “7th period Pre-AP Biology.”
If you would prefer not to use the QuickCorrect feature, you can turn it off completely. Choose Tools, QuickCorrect, and deselect the Replace Words as You Type check box (that is, remove the check mark).
A better solution might be to remove the entries that you don’t like so that you can continue to take advantage of those that are helpful. To remove an entry, select it in the list and click Delete Entry, Yes.
Figure 6.17 You can add your frequent misspellings and typos to the QuickCorrect list and let WordPerfect fix your mistakes automatically.
Customizing Format-As-You-Go
The Format-As-You-Go feature is designed to keep sentence structure accurate by cleaning up extra spaces and incorrect capitalization. There also are shortcuts for creating lists, graphic lines, ordinal numbers, and symbols.
To customize the Format-As-You-Go feature
- Choose Tools, QuickCorrect to open the QuickCorrect dialog box.
- Click the Format-As-You-Go tab. By default, all the options in the Sentence corrections section are selected, and End of Sentence Corrections is set to None (see Figure 6.18).
In addition to the sentence structure corrections, Format-As-You-Go has a variety of shortcuts for creating lists, lines, and ordinal numbers. A check mark in the box indicates that a tool is enabled. You can turn these tools on and off by enabling (add check mark) and disabling (remove check mark) the check boxes.
Figure 6.18 The Format-As-You-Go feature has six different tools to help you quickly create bulleted lists, graphic lines, ordinal numbers, en dashes, and em dashes.

Select from the following options:
- CapsFix—Fixes problems with capitalization when Caps Lock is on by mistake and you hold down the Shift key to capitalize the first letter (such as tHIS). CapsFix works only if Caps Lock is on.
- QuickBullets—Helps you quickly create bulleted lists. To quickly create a bulleted list or numbered list, you simply type a letter, number, or bullet character, followed by a Tab. Search for “QuickBullets” in the Help topics for a list of bullet characters.
- QuickIndent—Pressing Tab at the beginning of the first and second lines of a paragraph creates a left indent for that paragraph.
- QuickLines—Typing four dashes and then pressing Enter creates a single horizontal line from the left to the right margin; typing four equal signs and then pressing Enter creates a double horizontal line from the left to the right margin.
- QuickOrdinals—Typing ordinal text after a number converts the ordinal text to superscript when you press the spacebar. As a reminder, superscript text is smaller and set higher than the adjacent text.
- QuickSymbols—Typing two hyphens followed by a space inserts an en dash; typing three hyphens followed by a space inserts an em dash.
 Caution
The QuickBullets feature can be a problem for some users. Not everyone wants a numbered list turned into a code-oriented automatically updated numbered list! It’s easy enough to turn off, though—just remove the check mark next to it.
Inserting SpeedLinks
The SpeedLinks feature is designed to automatically generate a hyperlink whenever you type the beginning of an Internet address, such as www, ftp, http, or mailto. You can then give that hyperlink a friendlier name. For example, when you type the URL support.corel.com, SpeedLinks creates the hyperlink to the Web page. This also works for email addresses such as yourname@isp.com.
To create SpeedLinks
- Choose Tools, QuickCorrect; then click the SpeedLinks tab to display the SpeedLink options (see Figure 6.19).
- Type the friendlier name that you want to use to activate the hyperlink in the Link Word text box (the
@symbol is inserted automatically). - Type the location to link it to in the Location to Link to text box. If necessary, click the Files icon to browse your system (or the network) and select a drive, folder, or file.
Figure 6.19 Using SpeedLinks, you can create a link word that automatically creates a hyperlink to a Web page, email address, document, folder, or drive.
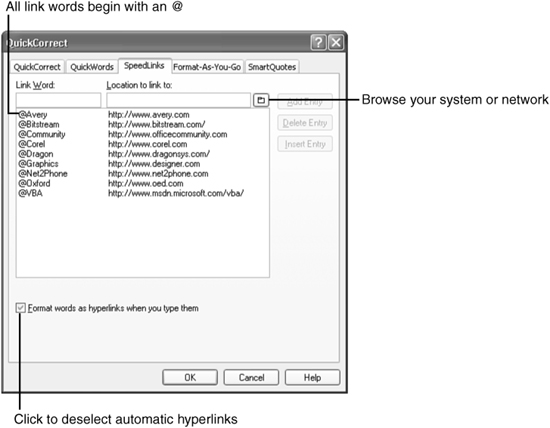
To insert a SpeedLinks entry in a document, type the @ symbol followed by the link word. When you press the spacebar or Enter, WordPerfect creates the hyperlink for you.
Creating QuickWord Entries
As you can see, QuickCorrect is really a collection of powerful features that help you automate your repetitive tasks. The QuickWords feature, which lets you insert frequently used text or graphics (such as a signature block or a logo) with just a few keystrokes, is the hidden jewel of QuickCorrect tools. If you are involved in heavy document production (and who isn’t?), you really need to take a look at this time-saving feature.
Here’s how it works:
- You assign an abbreviation to a word or phrase.
- You use the abbreviation when typing the document.
- You expand the abbreviation(s) either as you type or all at once.
QuickWords aren’t limited to words or phrases. You can create QuickWord text that includes formatting codes, such as font attributes, or graphics that you would use for logos.
You can assign entire paragraphs to a QuickWords entry and then use them to quickly build documents that consist of form paragraphs (such as wills, leases, contracts, and so on).
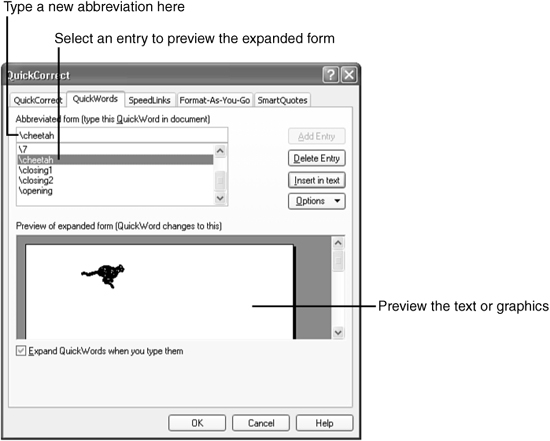
To create a QuickWord entry
- Select the text or graphic you want to assign to QuickWords. If you want to insert a graphic or logo with a QuickWords entry, turn on Reveal Codes and position the red cursor to the left of the box code. Press Shift+→ to select the box code.
- Choose Tools, QuickWords to display the QuickWords tab of the QuickCorrect dialog box (see Figure 6.20).
- Type the abbreviation you want to use in the Abbreviated Form text box. The abbreviation can be a few letters or a one- or two-word phrase.
- Click Add Entry.
Be sure you use words that won’t normally come up in your documents for QuickWords abbreviations. For example, you could use “compadd” to expand your company address, “clogo” for the company logo, or “sigblock” for your signature block. If you accidentally use a word or phrase that comes up naturally, QuickWords will expand the abbreviation and insert information in the wrong places.
Figure 6.20 With QuickWords, you can assign an abbreviation to text or graphics, and then simply type the abbreviation to insert it into a document.
Use one of the following methods to insert QuickWords in a document:
- Type the abbreviation; then press the spacebar, Tab, or Enter key. If this method doesn’t work, the Expand QuickWords When You Type Them option (in the QuickWords tab of the QuickCorrect dialog box) has been disabled. You can manually expand a QuickWord by pressing Ctrl+Shift+A.
- Open the QuickWords dialog box, select a QuickWord from the list, and then click Insert in Text.
It’s easy to update a QuickWords entry when the form text changes (in the case of form paragraphs) or if you want to insert a different graphic image with a certain QuickWords entry.
To replace a QuickWords entry
- Select the text or graphic.
- Choose Tools, QuickWords.
- From the list, select the QuickWords entry that you want to assign to the selected text or graphic.
- Click the Options button and click Replace Entry.
- Click Yes in the confirmation message box.
If you change the content of a QuickWord, it makes sense that you would want to assign a new QuickWord name.
To rename a QuickWord entry
- Choose Tools, QuickWords.
- Select the QuickWords entry.
- Choose Options, Rename Entry.
- Type the new name, then click OK.
Every now and then, it’s a good idea to go through the QuickWords entries and remove the ones you aren’t using anymore.
To delete a QuickWords entry
- Choose Tools, QuickWords.
- Select the QuickWords entry.
- Click Delete Entry.
If you’re creating a QuickWords entry for a graphic image, be sure that Expand As Text with Formatting is selected on the Options menu. Otherwise, the graphic won’t appear in the document.
Finally, you can turn off QuickWords if you don’t want to expand the QuickWords as you type. In the QuickWords dialog box, deselect Expand QuickWords When You Type Them.