
7. Working with Paragraphs
In This Chapter
- Learn how to use center and flush right to align text.
- Use the Justification feature to align paragraphs.
- Learn how to work with tabs and how to indent text.
- Adjust the spacing between lines and paragraphs to make long passages of text easier to read.
This is the first in a series of three chapters on formatting documents. This chapter covers formatting paragraphs, the second covers formatting pages, and the third explains how to use styles for consistent formatting.
Because this chapter discusses how to format paragraphs, now is a good time to clarify the definition of a paragraph as WordPerfect sees it. At first glance, you might think of a paragraph as several lines of text all together in one chunk. You’re right—that is a paragraph, but so is a single line. In fact, anything that ends with a hard return is considered to be a paragraph. (As a reminder, a hard return is inserted into the document each time you press the Enter key.) The hard return ends the current line and moves the insertion point down to the next line.
Aligning Text
One of the most common formatting tasks is centering a line of text. When you center text on a line, WordPerfect does the math and makes sure there is an equal amount of space on either side of the text. If you add or remove text, WordPerfect automatically adjusts the position of the text so that it is at the exact center of the page. Flush right is a little less common, but it still has an important place, especially in legal documents. Text that is flush right is aligned against the right margin, so it extends out to the left.
The Justification feature is also used to align text. In addition to Center and Flush Right, you can also justify text so that the left and right margins are smooth. Justification is used in situations in which a series of paragraphs needs to be aligned to either the left margin, the right margin, or both margins (full justification).
Using Center and Flush Right
When you issue the command to center or flush right text, the command works for only a single line. Pressing Enter after you type the text turns Center or Flush Right off, so the next line is aligned against the left margin. For this reason, the Center and Flush Right commands are well suited for aligning one or two lines at a time. If you need to align multiple lines or several paragraphs, you’re better off using the Justification feature, which is discussed next.
- To center a line of text, press Shift+F7 and type the text. If you’ve already typed the text, click at the beginning of the line, and then press Shift+F7.
- To align text against the right margin (flush right), press Alt+F7, and then type the text. If you’ve already typed the text, click at the beginning of the line, and then press Alt+F7.
- To center or flush right more than one line of existing text, select the text first; then press Shift+F7 for center or Alt+F7 for flush right.
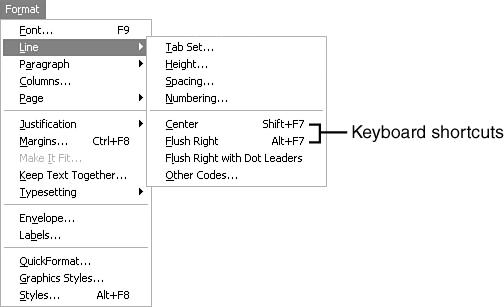
You can also find Center and Flush Right commands in the menus. Choose Format, Line (see Figure 7.1). Note the keyboard shortcuts listed next to the commands on the menu.
Figure 7.1 The Line menu has commands to make lines of text centered and flush right.
Justifying Text
Justification controls how text flows between the left and right margins. The Justification feature continues to center or flush right text, even after you press Enter. For this reason, it’s a better choice when you need to align multiple paragraphs. To use Justification, turn it on at a specific point in the document. It stays in effect until the end of the document or until you switch to a different justification setting.
The default setting in WordPerfect is left justification, which creates a smooth left margin and a ragged right margin. The result is an open, informal appearance that is accessible and easy to read. For that reason, this book has been formatted with left justification.
There are four other justification options that you might be interested in, especially if you work with columns, newsletters, and formal documents (see Figure 7.2).
 Note
NoteWhat’s the difference between Center and Justify Center? When you change the justification to Center, every line you create from then on is centered, until you change the justification to something else. This works great for title pages, where you have an entire page of centered text. It’s not the most efficient option for one or two lines. In this situation, the Center feature is the best choice.
Figure 7.2 This sample document illustrates the different justification settings.

WordPerfect offers the following justification options:
- Left—Text is aligned against the left margin so that the left margin is smooth and the right is ragged. It’s suitable for almost every type of document, especially those with long passages of text. To apply left justification, choose Format, Justification, Left (Ctrl+L).
- Right—Text is aligned against the right margin so that the right side is smooth and the left is ragged. The unique placement draws attention, but because it’s difficult to read, you might not want to use it on more than three or four lines unless you are using it to align a column of numbers. To apply right justification, choose Format, Justification, Right (Ctrl+R).
- Center—Text is centered between the left and right margins. Headings in contracts and other legal documents often are formatted using center justification. To apply center justification, choose Format, Justification, Center (Ctrl+E).
- Full—Text is aligned against the left and right margins, so both edges are smooth. Full justification gives documents a more formal and organized appearance. To apply full justification, choose Format, Justification, Full, or press Ctrl+J.
- All—This type of justification stretches lines of text between the left and right margins, regardless of their length. Whereas full justification adjusts the spacing between words, all justification adjusts the spacing between letters as well. This setting is used for letterhead, informal titles and headings, custom documents such as theater playbills, and special effects. To apply all justification, choose Format, Justification, All.
Before you choose which type of justification you want to use in your document, decide where you want the justification to take effect and then move the insertion point there. This might be at the top of the document, the top of a column, or the beginning of a paragraph. If you want to apply justification to a section of text, such as a multiline title, select the text first.
![]()
Instead of using the menus, you can click the Justification button on the property bar and then choose the justification setting from the popup list. This method offers an advantage over the others in that you get a RealTime Preview of each justification setting when you hover over it.
You might be wondering how full justification (a smooth left and right margin) is accomplished. WordPerfect makes slight adjustments to the spacing between words so that each line extends from the left to the right margin. Adjustments to the spacing are slight, so you won’t see huge gaps of space between words as you can with all justification.
Setting Tabs
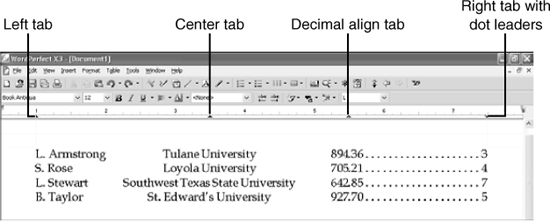
Tabs may be one of the most misunderstood features in a word processor. Most of us press the Tab key without really thinking about it. We want to move over a bit, and Tab does that for us. What most people don’t realize is that there is a lot more to the Tab feature than moving over a little. You can set specific tabs that simplify the process of typing text in columns. Four different types of tabs control how the text is placed at the tab setting. They are
- Left Align—Text flows from the right side of the tab stop. This is the “normal” tab.
- Center—Text is centered over the tab stop.
- Right Align—Text flows from the left side of the tab stop.
- Decimal Align—The numbers are aligned on their decimal points, which rest on the tab stop. You can change the alignment character to something other than a period (decimal point).
With justification set to Full, the last line in a paragraph won’t be justified if it doesn’t extend to the right margin (or pretty close to it). Refer to Figure 7.2 for an example of how this looks.
Figure 7.3 Using the ruler, you can set all types of tabs with just a few mouse clicks.
Turning on the Ruler
If you don’t see the ruler at the top of the screen, turn it on by choosing View, Ruler. The default tab settings (every 1/2 inch) are shown with triangles in the tab area of the ruler (see Figure 7.4). The gray area identifies the margin area; the white area is the text area.
Clearing the Default Tabs
In most cases, you want to clear the default tabs before you create tabs at specific settings. This way, you don’t have to move past the default tabs—you can go straight to the specific tabs that you set.
You can add dot leaders to each of the four tab types. Dot leaders are useful when the space between columns is wide because they help the reader’s eye travel across the gap. They are especially useful when preparing a table of contents.
To clear all tabs
- Right-click in the tab area of the ruler (refer to Figure 7.3) or right-click any tab marker to open the Tab QuickMenu (see Figure 7.5).
- Click Clear All Tabs to delete the default tabs.
Figure 7.4 Using the ruler, you can set all types of tabs with just a few mouse clicks.
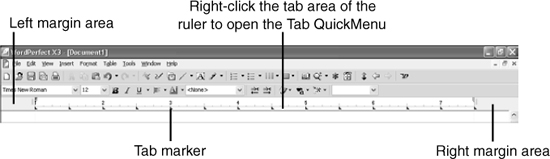
Figure 7.5 Using the Tab QuickMenu, you can clear the default tabs, set specific types of tabs, and return to the default settings.

Setting New Tabs
Setting new tabs is fast and easy. All you have to do is click on the ruler where you want a tab to be, and voilá!
To set a new tab
- Click in the tab area of the ruler, in the place where you want to create a tab. (This inserts the default tab, which is a left-aligned tab.)
- If you change your mind and you want to remove a tab, simply click and drag it off the ruler.
Changing the Tab Type
When you change the tab type, it stays selected until you select another tab type. So, if you change the tab type to Decimal, every time you click on the ruler, you will set a decimal tab.
To change the tab type
- Right-click the tab marker to open the QuickMenu.
- Choose a tab type from the QuickMenu.
- Click on the ruler where you want to set the tab.
Editing Tab Settings
When you set a tab (or modify the default tab settings in any way), a margin icon appears in the left margin area (refer to Figure 7.5). Click the margin icon to display a tab bar, which shows the tab settings for the current paragraph. You can make changes to the tabs on the tab bar using the same methods that you use for the ruler. When you’re finished, click anywhere in the document window to close the tab bar.
After you’ve typed the text, you might decide to move things around a bit. Good news! You don’t have to delete a tab and then create a new one—you can just move it instead. Before you do, select the tabbed text. That way, your changes will be applied to all the tabbed text, not just to the tabbed text after the insertion point.
Because the margin icon is located inside the left margin area, you might not be able to see it. Try switching to the Page view mode (choose View, Page) or set the Zoom to Page Width by clicking the Zoom button and selecting Page Width. Remember that you might need to use the horizontal scrollbar to scroll over to the left.
To move a tab
- Select the tabbed text.
- Click and drag the tab marker (on the ruler or on the tab bar). When you do, a bubble appears, telling you where the tab will fall when you release the mouse button, and a guideline appears in the text so that you can see the effect on existing text (see Figure 7.6).
- When you’re satisfied with the tab position, release the mouse button to drop the tab.
When you’re ready to return to default tab settings (so you can use regular tabs and indent later in the document), right-click in the document where you want to make the change and choose Default Tab Settings.
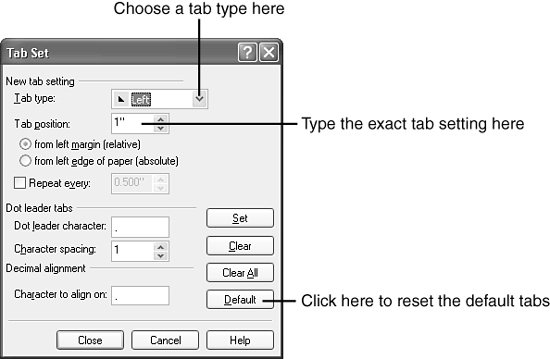
This is a good time to bring the Tab Set dialog box to your attention. Everything you can do from the ruler and more is available in this dialog box. Right-click the ruler, and then choose Tab Set to open the Tab Set dialog box (see Figure 7.7). Alternatively, choose Format, Line, Tab Set.
 Caution
When you’re working with tabs, it’s important that you select the text you want to work with first. You need to be sure that you are creating new tab settings exactly where you want them so that they don’t reformat the wrong text. Otherwise, some of the text is formatted with the original tab settings, and the rest of the text is formatted with the new tab settings. Believe me, it isn’t pretty. This is where Undo comes in handy.
Figure 7.6 Even if you’ve already typed the text, you can freely move the tabs around. The guideline shows you where the text will be as you click and drag the tab.
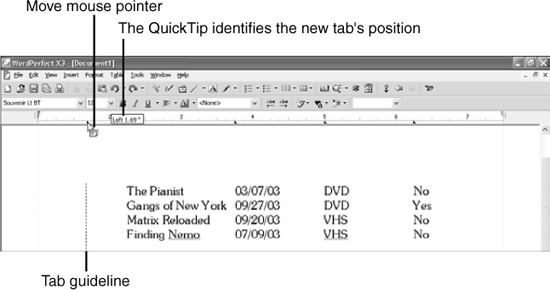
Figure 7.7 The Tab Set dialog box offers options that aren’t available when you use the ruler.
Indenting Text
Indentation is often used to set quotations apart from the rest of the text. It also is used to emphasize text or to place a paragraph in a subordinate position beneath another paragraph. When you create a bulleted or numbered list, WordPerfect inserts an Indent command after the bullet or number so that the text you type isn’t aligned under the bullet or number, but rather under the first word of the text. For more information on creating bulleted or numbered lists, see Chapter 11, “Creating Lists and Outlines.”
The four ways to indent text are as follows:
- Indent moves every line within a paragraph to the next tab setting (to the right). By default, this moves the text over 1/2 inch every time you choose Indent.
- Double Indent moves every paragraph line in from the left and right sides, to the next tab setting. By default, this indents the text by 1/2 inch on the left and 1/2 inch on the right.
- Hanging Indent leaves the first line at the left margin—all the other lines are indented (on the left side) by 1/2 inch.
- A Back Tab temporarily releases the left margin so that the first line of a paragraph starts at the tab setting inside the left margin; all other lines are aligned at the left margin.
The Indent feature uses the tab settings to indent your text. Changing the default tab settings affects how text is indented. If you plan on indenting text and setting specific tabs in the same document, don’t change the tabs at the top of the document. Change them just before you want to type the tabbed text. Then, after you’ve typed the text, restore the default tab settings.
To indent a new paragraph, choose Format, Paragraph, Indent (F7) and then type the text. Choose Format, Paragraph, Double Indent (Shift+Ctrl+F7) for a double indent or choose Format, Paragraph, Hanging Indent (Ctrl+F7) for a hanging indent (see Figure 7.8). As usual, if you’ve already typed the text, click in the paragraph before applying an indent style.
Figure 7.8 One of the Indent commands on the Paragraph menu, Back Tab, doesn’t have a shortcut key assigned to it.

If QuickIndent is enabled, you can quickly indent paragraphs with the Tab key. Type the text first, and then press Tab at the beginning of the first and second lines. QuickIndent converts those tabs into an indent. You can also quickly create a hanging indent by pressing Tab at the beginning of any line except the first line in a paragraph.
To turn the QuickIndent feature on and off, choose Tools, QuickCorrect. Click the Format-As-You-Go tab, and then enable or disable the check box next to QuickIndent (in the list of Format-As-You-Go choices).
If you want the first line of every paragraph to be indented automatically (rather than pressing Tab each time), use the First Line Indent option.
To set a first-line indent
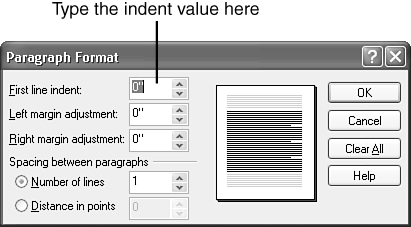
- Choose Format, Paragraph, Format to open the Paragraph Format dialog box (see Figure 7.9).
- Type the amount that you want the first line indented in the First Line Indent text box. (A tab indents the first line by 1/2 inch.)
- Click OK. All new paragraphs from this point on will have the first line indented.
- To remove a first-line indent, set the value back to
0(zero) inches.
Figure 7.9 Type the value for the first-line indent in increments of inches. For example, 1/4 inch would be .25”.
Adjusting the Spacing Between Lines and Paragraphs
As you might remember from Chapter 1, “Getting Started and Finding Help,” the default line spacing setting is single-spacing. Some types of documents, such as manuscripts, grants, and formal reports, require a certain line-spacing setting for submission.
The accepted standard is to leave a blank line between paragraphs, so you just press Enter twice after you type a paragraph, right? That’s not a problem—until you decide to change the line spacing to double. Now you’ve got the space of two lines between each paragraph. Furthermore, these extra lines leave space at the top of a page.
Making adjustments to the spacing between lines and paragraphs is another way to tailor your document to certain specifications and accepted standards.
Adjusting the Line Spacing
Let’s say that you want to print out a document for someone else to review. You might consider changing to double- or triple-spacing so that person has room for writing comments. After you incorporate that person’s changes, you just switch back to single-spacing.
To change line spacing
- Click where you want the change to take effect (or select the text you want to change).
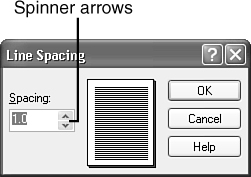
- Choose Format, Line, Spacing to open the Line Spacing dialog box (see Figure 7.10).
- Either type a value or click the spinner arrows to increase or decrease the value in the Spacing text box. Use 1 for single-spacing, 1.5 for one-and-a-half spacing, 2 for double-spacing, and so on.
Figure 7.10 You can specify the number of blank lines you want between each line of text by typing the value or clicking the spinner arrows.
The new line-spacing setting takes effect at the beginning of the paragraph where the insertion point is resting, and it remains in effect throughout the rest of the document, or until you change the line spacing again.
Adjusting the Spacing Between Paragraphs
Rather than insert extra blank lines, you can adjust the spacing between paragraphs. This way, you always get the same amount of space between each paragraph (no matter what you do to the line spacing), and you don’t have extra blank lines floating around.
To change the paragraph spacing setting
- Click where you want the change to take effect.
- Choose Format, Paragraph, Format to open the Paragraph Format dialog box (refer to Figure 7.9). In the Spacing Between Paragraphs section, you can enter the number of lines or the number of points that you want between each paragraph.
- Either type the value or click the spinner arrows to increase or decrease the value.
- Choose OK to close the dialog box.
Some documents might require more than one type of line spacing in them. For example, in a double-spaced document, you would typically switch to single-spacing for lists or quotations.
Keeping Text Together
As you create or revise a document, you never have to worry about running out of room. WordPerfect creates a new page for you as soon as you reach the bottom of the current page. It’s so transparent that you probably don’t even stop to think about it—that is, until you preview the document and realize that you have headings and paragraphs separated by a page break.
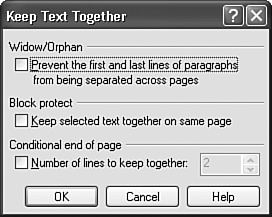
You can prevent this situation by identifying the text that should stay together when a page break is encountered. You can use three features to do this: Widow/Orphan Protection, Block Protect, and Conditional End of Page. Choose Format, Keep Text Together to display the Keep Text Together dialog box (see Figure 7.11).
Figure 7.11 The options in the Keep Text Together dialog box prevent important information from being separated by a page break.
Enabling Widow/Orphan Protection
Widow/Orphan Protection prevents a single line of a paragraph being left behind at the bottom of a page or getting pushed to the top of the next page. The first line of a paragraph that gets left behind at the bottom of a page is called an orphan. A widow is the last line of a paragraph that gets pushed to the top of a page.
To turn on Widow/Orphan Protection
- Position the insertion point where you want Widow/Orphan Protection to start (usually at the top of the document).
- Choose Format, Keep Text Together to open the Keep Text Together dialog box.
- Enable the check box in the Widow/Orphan section.
- Choose OK to close the dialog box.
Using Block Protect
Use the Block Protect feature when you want to keep a section of text together on the same page. As you edit the document, and the block moves near a page break, WordPerfect decides whether the block will fit on the current page. If it doesn’t fit, the entire block gets moved to the top of the next page. Block Protect works well for keeping figures or tables and explanatory text together. You can also use it to protect numbered paragraphs, lists, and outlines.
To turn on Block Protect
- Select the text (and figures or tables) that you want to keep together.
- Choose Format, Keep Text Together to open the Keep Text Together dialog box.
- Enable the Keep Selected Text Together check box.
- Choose OK to close the dialog box.
If you block protect large sections of text, you’re likely to have big chunks of whitespace in the middle of your document.
Setting a Conditional End of Page
The Conditional End of Page feature keeps a certain number of lines together when a page break is encountered. You might use Conditional End of Page at the beginning of a heading so that you can specify how many lines of the following paragraph you want to keep with the heading.
To turn on Conditional End of Page
- Position the insertion point at the beginning of the heading.
- Choose Format, Keep Text Together to open the Keep Text Together dialog box.
- Enable the Number of Lines to Keep Together check box.
- In the text box, type the number of lines that you want to keep together. Count the heading line as one of the lines, and if there is a blank line between the heading and the paragraph, count that, too.
- Choose OK to close the dialog box.