
Chapter 7: Infrastructure Security Automation Using Security Hub and Systems Manager
In this chapter, we will explore AWS Security Hub, which is one of the security services of AWS. We will learn how to implement solutions with the integration of Security Hub and various other AWS services to achieve security automation. We will implement three solutions. The first will be related to Elastic Container Registry (ECR) compliance and how we can ensure that a non-compliant image does not run in an Elastic Container Service for Kubernetes (EKS) cluster. The second solution will be importing an AWS Config rules evaluation as a finding in Security Hub using Lambda and AWS EventBridge rule. The third solution will be about the auto-creation of an incident in Incident Manager when there is a critical finding in Security Hub, and remediation using an OpsCenter runbook. Knowing how to use Security Hub will also help in the next chapter, where we will import Static Application Security Testing(SAST) tool findings in Security Hub.
This chapter contains the following main sections:
- Introduction to AWS Security Hub
- Deny execution of non-compliant images on EKS using AWS Security Hub and ECR
- Importing an AWS Config rules evaluation as a finding in Security Hub
- Integrating AWS Systems Manager with Security Hub to detect issues, create an incident, and remediate automatically
Technical requirements
To implement the solutions covered in this chapter, you need to clone the GitHub repository:
https://github.com/PacktPublishing/Accelerating-DevSecOps-on-AWS
Navigate to the chapter-07 folder. You also need to have an AWS account where you have permission to enable the AWS Config, AWS Systems Manager, and Security Hub services.
Introduction to AWS Security Hub
AWS Security Hub is a cloud security service that performs security best practice checks, aggregates all the security findings, and enables automated remediation. Before we dig deep into AWS Security Hub, let's understand the overall AWS cloud security strategy (shown in the following diagram), which is based on the National Institute of Standards and Technology (NIST) Cybersecurity Framework.
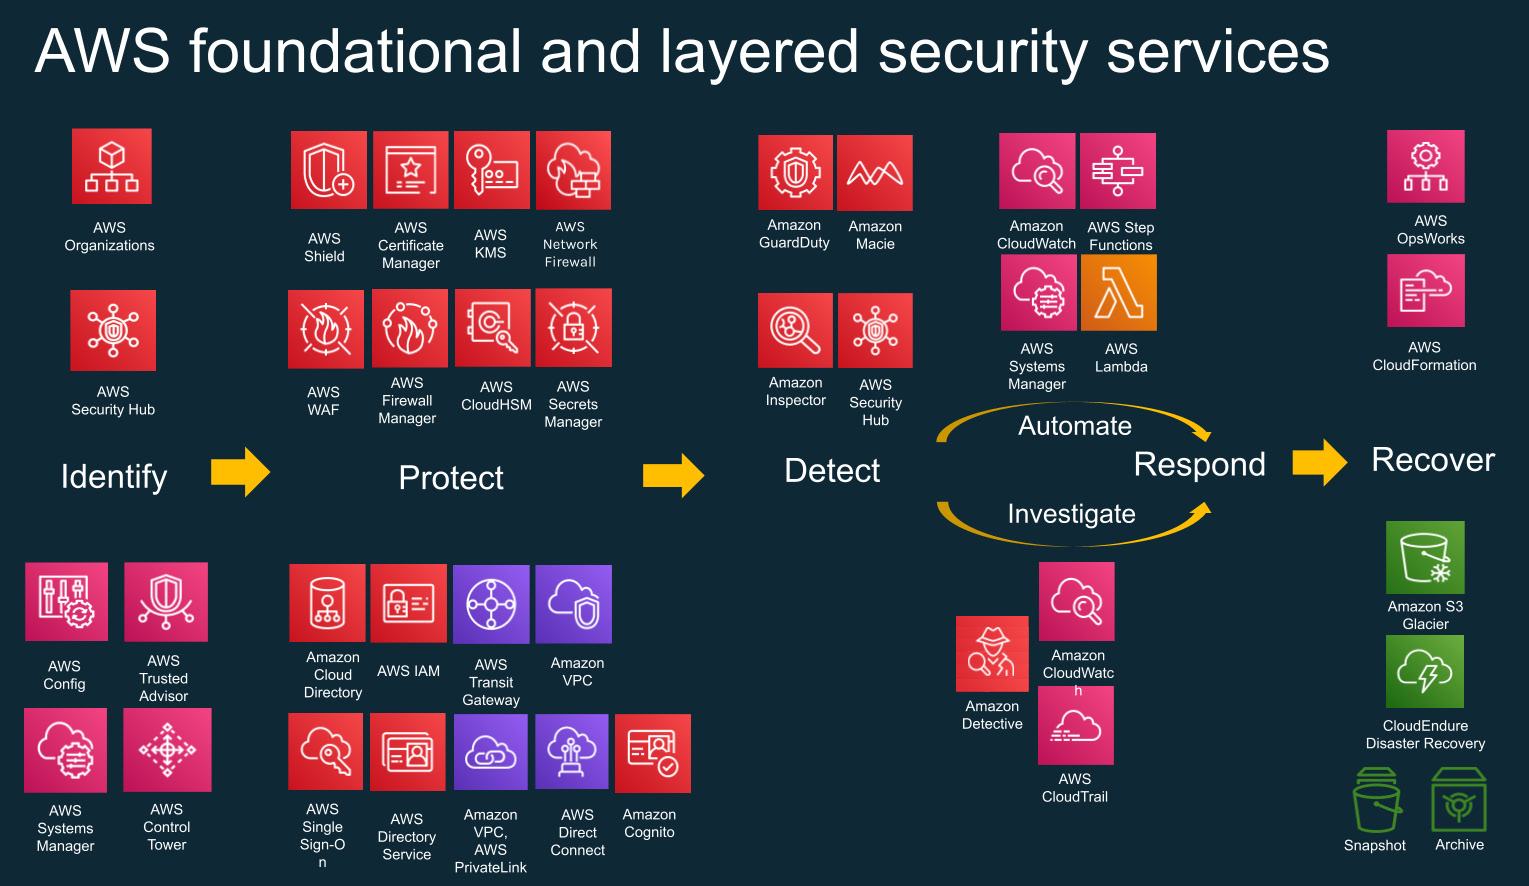
Figure 7.1 – AWS services aligned with the NIST Framework
There are five main core functions of the NIST Framework:
- Identify: This is all about identifying the key assets and resources in your AWS account. AWS has services such as AWS Systems Manager and AWS Config to help you understand what your resources are and how they are deployed within your AWS environment. You can't protect your resources until you properly identify them.
- Protect: This is about building a hard outer shell around your data, applications, users, and networks. AWS has services such as AWS Shield, which is an anti-DDoS service, and AWS WAF, which is a web application firewall that can protect your assets.
- Detect: This is all about detecting anomalies, unusual behaviors, and compliance issues inside your AWS environments. AWS has services such as GuardDuty, which is a threat detection service, and Security Hub, which helps you detect compliance drift and helps you identify what your most important alerts are, based on priority.
- Respond: This is about responding to alerts and findings. AWS has added two across path (see Figure 7.1, Automate and Investigate), which is to Automate the response. AWS has services such as Lambda and Step Functions to automate responses. Some alerts require human investigation, and for that AWS has services such as CloudWatch and CloudTrail, which helps us to see through the underlying activity to understand whether the alerts or findings that we have detected are true positives.
- Recover: If there are major incidents, then we need to recover using services such as EBS snapshots, golden images, and Glacier archives. You can quickly rebuild the resources that have been compromised.
AWS introduced AWS Security Hub because of the following issues:
- Compliance: Many AWS customers have both internal and external compliance requirements. Some of those are regulatory, such as the Health Insurance Portability and Accountability Act (HIPAA) and Payment Card Industry (PCI), and some of them are just internal industry best practices. Currently, AWS provides three security standards, as shown in the following figure:
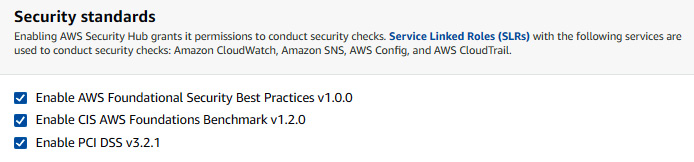
Figure 7.2 – Compliance standards provided by AWS Security Hub
- Multiple formats: When customers are using different security tools, the alert format of all those tools is different too, so the customers must parse and normalize this data into a common format so that they can start searching and analyzing the alerts. AWS Security Hub supports AWS Security Finding Format (ASFF), which eliminates the need for time-consuming data conversion. ASFF consists of approximately 100 JSON-formatted fields, but most of them are optional. The most important field is finding types. The finding type taxonomy is what we are using to categorize the findings. The following diagram explains the categorization of findings severity:

Figure 7.3 – Relationship between ASFF findings and severity
- Prioritization: If we receive thousands of alerts each day, then the problem becomes to prioritize all those alerts. AWS Security Hub helps in the prioritization of alerts.
- Visibility: If we want a single pane of glass, which means a single place where we can find all the security and compliance states, then Security Hub provides us with that feature.
AWS Security Hub continuously aggregates all the data and findings from services such as GuardDuty, Amazon Inspector, Amazon Macie, and AWS Config, and then assesses high-priority security alerts and the compliance status. It has amazing integration with AWS Systems Manager, which helps in incident creation and the auto-remediation of findings using a runbook. This was a basic overview of AWS Security Hub. In the next section, we will learn how to enable Security Hub in your AWS account and how to deny the execution of non-compliant images in an EKS cluster.
Deny execution of non-compliant images on EKS using AWS Security Hub and ECR
As we move toward application modernization, we are more likely to work with microservices and containers. In this digital era of high-speed application development, if you miss out on any security loophole, then it will make your application vulnerable and may impact your business. In the DevSecOps shift-left practice, we try to find out all the vulnerabilities long before deployment. In this section, we will learn how to automate a solution that denies the creation of EKS resources with non-compliant container images. The following diagram shows the flow of the solution and how all the components integrate with each other:
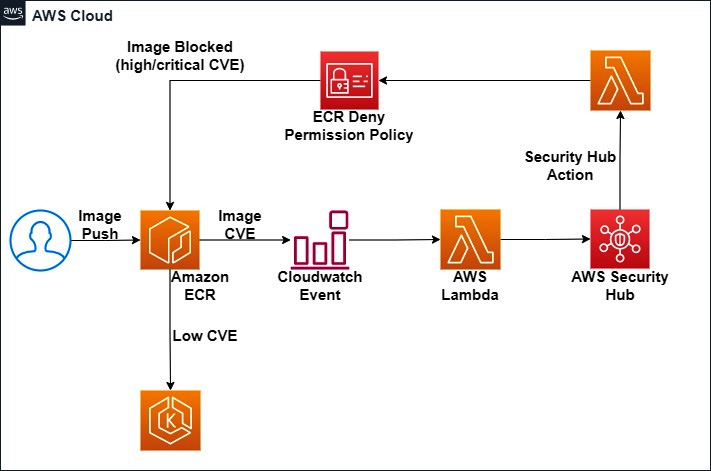
Figure 7.4 – Flow diagram of an ECR compliance solution
The preceding diagram illustrates the following steps:
- Whenever a developer builds an image and pushes it to ECR, ECR will scan the image. The scanning of the image takes place on either image push or manual scan. It depends on how have you configured your ECR repositories.
- Once the image scan completes, an event is created in AWS EventBridge, which triggers a Lambda function.
- The Lambda function translates the event from the image scan into ASFF and ingests it to AWS Security Hub.
- This solution also creates a Security Hub action, which triggers the Lambda function to attach the ECR Repository Deny Policy when the remediation action is invoked.
- Once the repository is attached to the policy, EKS won't be able to pull the image.
To set up this solution, we should perform the following steps:
- You need to enable Security Hub in the AWS account if you are using this service for the first time. Go to the AWS Security Hub console. Click on Go to Security Hub.
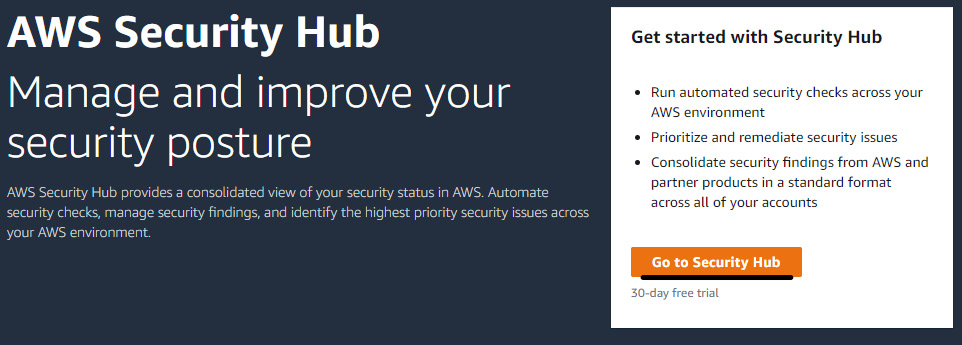
Figure 7.5 – The AWS Security Hub console
- The next page will show Security standards. For this exercise, we need to make sure that we have two standards selected, which are Enable AWS Foundation Security Best Practices v1.0.0 and Enable CIS AWS Foundation Benchmark v1.2.0. Then, click on Enable Security Hub. This will enable the Security Hub service in your AWS account. This step is shown in the following figure:
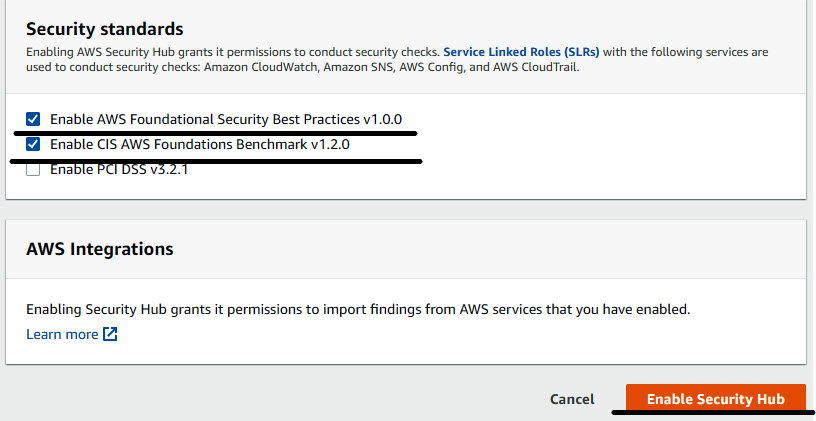
Figure 7.6 – Enabling Security Hub with security standards
- Once the Security Hub service is enabled in your account, you will be able to see the security scores of your AWS account, as shown in the following figure:
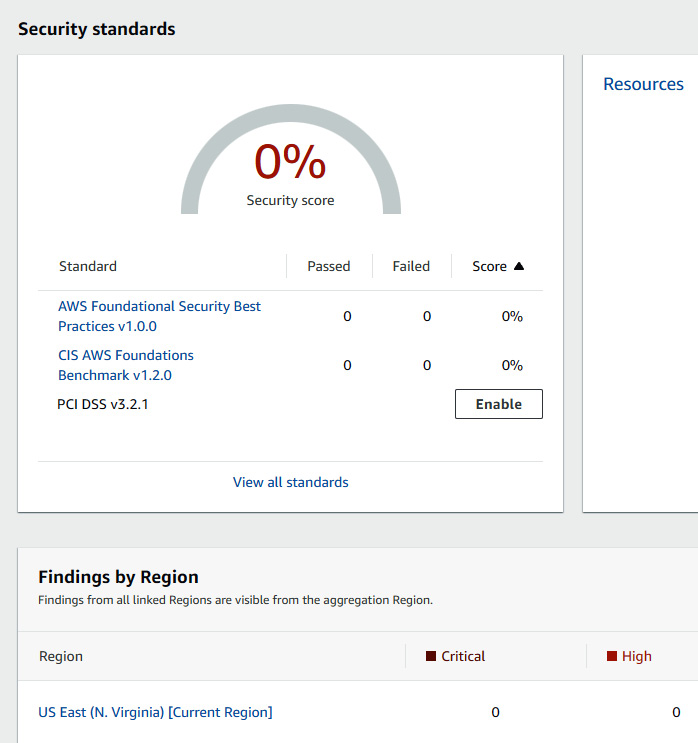
Figure 7.7 – AWS Security Hub dashboard showing the security score
- The next step is to set up the solution. We will use the following CloudFormation template to provision the resources:
$ wget https://raw.githubusercontent.com/PacktPublishing/Accelerating-DevSecOps-on-AWS/main/chapter-07/ecr-compliance.yaml
- Once you have this file in your local machine, go to the AWS CloudFormation console and click on Create stack.
- In the Create stack page, select Upload a template file in the Specify template section. Then click on Choose file and select the ecr-compliance.yaml file available in your local machine. Then click on Next. This step is shown in the following screenshot:
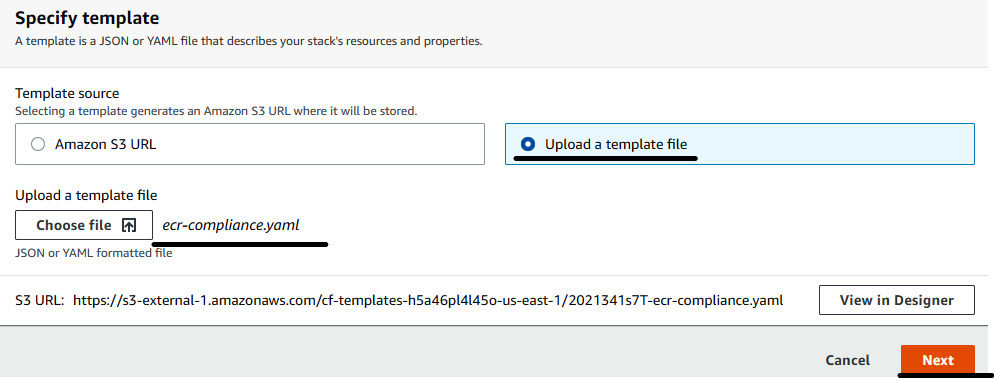
Figure 7.8 – Uploading the CloudFormation template
- Enter the stack name as ECR-Compliance and click on Next.
- Provide a tag to the stack and click on Next. On the next page, in the Capabilities section, check the acknowledgment box and click on Create stack, as shown here:
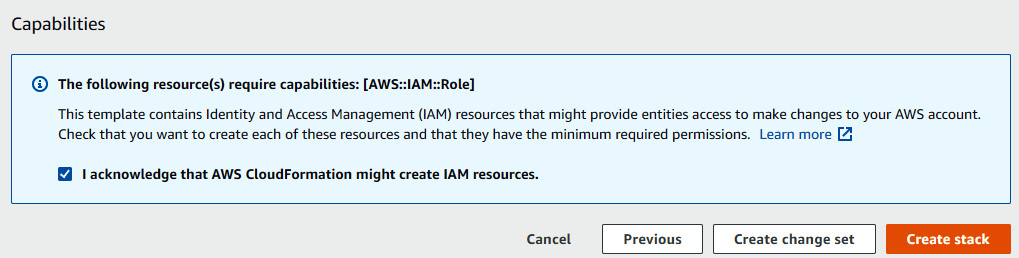
Figure 7.9 – Creating the CloudFormation stack
- It will take 3–5 minutes to spin up all the resources required to set up the solution.
- Once the solution setup is completed by CloudFormation, we need to verify the solution by pushing a vulnerable image into the ECR repository and trying to run that image in an EKS cluster. To create an ECR repository, go to the AWS ECR console. Click on Create repository. Set Repository Name to node, because we will push the node:10 Docker image, which has lots of vulnerabilities. Enable Scan on push and then click on Create repository.
- Once the node repository is created, we will push the node:10 Docker image to the repository by running the following commands:
$ docker pull node:10
#######Make sure you have configured aws keys##############
$ aws ecr get-login-password --region us-east-1 | docker login --username AWS --password-stdin <yourAWSAccount>.dkr.ecr.us-east-1.amazonaws.com
$ docker tag node:10 <yourAWSAccount>.dkr.ecr.us-east-1.amazonaws.com/node:latest
$ docker push <yourAWSAccount>.dkr.ecr.us-east-1.amazonaws.com/node:latest
- Once the image is pushed into the repository, you can see Scan status is In progress. After a while, Scan status will change to Complete, and you will be able to see the number of vulnerabilities, as shown here:

Figure 7.10 – Container image scanning status
- Now that the image scan has been completed, it will trigger the EventBridge rule CaptureECRScanEvent (created by the CloudFormation stack), and then run the target Lambda function, which captures the vulnerability findings and passes them to Security Hub. Go to the Security Hub console and click on Findings; you will be able to see that the Severity value of the vulnerability findings of the ECR image is CRITICAL, as shown here:
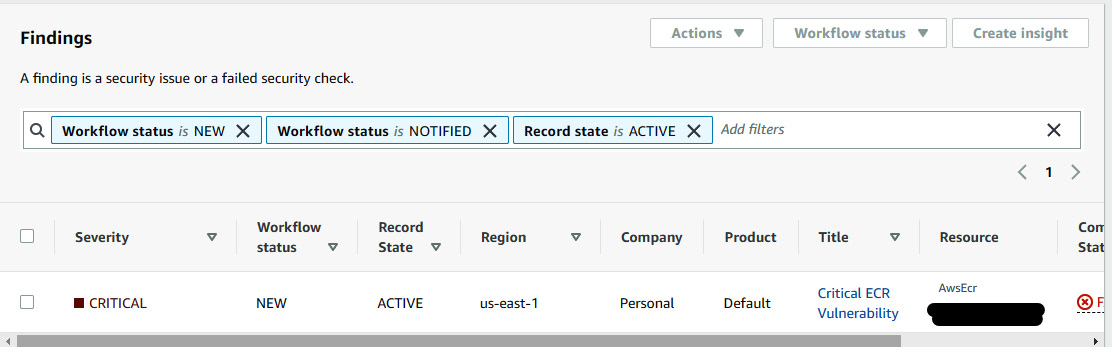
Figure 7.11 – AWS Security Hub shows the findings of the ECR vulnerability
- When a DevOps/DevSecOps engineer sees that an image is non-compliant and has critical vulnerabilities, they will then try to configure the settings such that image doesn't get pulled in any platform. To do that, select the finding and click on Actions, and then click on DENYECR, as shown here:
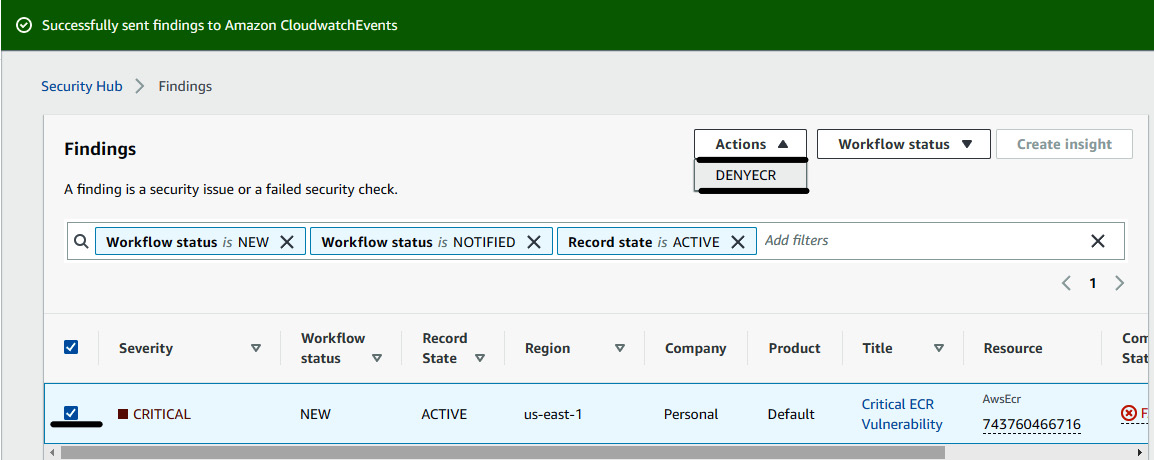
Figure 7.12 – Acting on the security findings
- Once you click on DENYECR, the findings from Security Hub will be sent to CloudWatch Events, which triggers the ECRAccessProhibitedLambda Lambda function. This Lambda function will modify the ECR repository permission policy. You can check this by clicking on the Permissions tab of the repository.
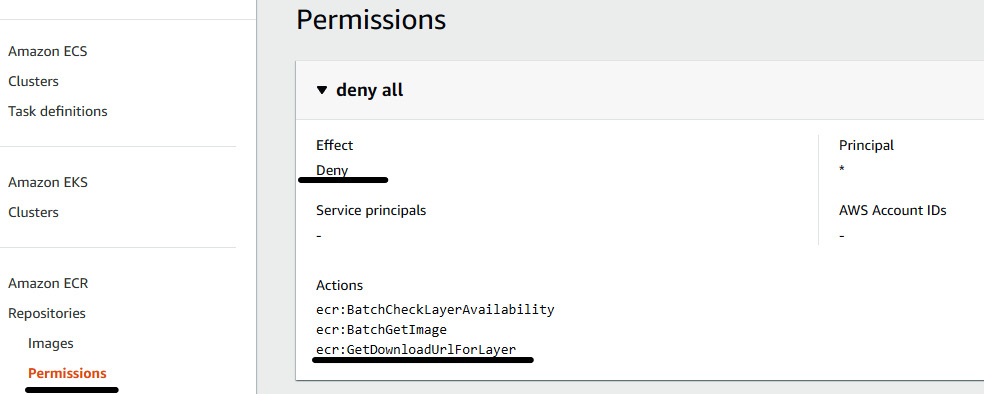
Figure 7.13 – ECR permissions showing the deny effect
- To verify the policy, we will issue a command in the EKS cluster to run the node:10 image:
###Spin up an EKS Cluster using eksctl
$ eksctl create cluster dsotest –region=us-east-1
$ kubectl run node --image=<yourAWSAccount>.dkr.ecr.us-east-1.amazonaws.com/node:latest
$ kubectl describe pod node
#### The bottom Events Section###
Events:
Type Reason Age From Message
---- ------ ---- ---- -------
Normal Scheduled 8s default-scheduler Successfully assigned default/node to ip-192-168-90-29.ec2.internal
Normal Pulling 7s kubelet Pulling image "670918263229.dkr.ecr.us-east-1.amazonaws.com/node:latest"
Warning Failed 7s kubelet Failed to pull image "670918263229.dkr.ecr.us-east-1.amazonaws.com/node:latest": rpc error: code = Unknown desc = Error response from daemon: pull access denied for 670918263229.dkr.ecr.us-east-1.amazonaws.com/node, repository does not exist or may require 'docker login': denied: User: arn:aws:sts::670918263229:assumed-role/NodeIAMRole/i-0101d8fab87c00077 is not authorized to perform: ecr:BatchGetImage on resource: arn:aws:ecr:us-east-1:670918263229:repository/node with an explicit deny in a resource-based policy
Warning Failed 7s kubelet Error: ErrImagePull
Normal BackOff 6s kubelet Back-off pulling image "670918263229.dkr.ecr.us-east-1.amazonaws.com/node:latest"
Warning Failed 6s kubelet Error: ImagePullBackOff
We can verify that the image is not able to run on EKS because access is denied on this image due to CRITICAL or HIGH CVE. So, in this section, we learned a cloud-native solution of blocking to run a non-compliant image on your EKS cluster. You can also explore other tools such as AquaSec and Prisma, which do an excellent job in container security. In the next section, we will implement a solution that collects AWS Config un-compliant status data to Security Hub.
Importing an AWS Config rules evaluation as a finding in Security Hub
In this section, we will implement a solution that imports a non-compliant AWS Config rules evaluation as a finding in Security Hub. This solution helps in showing the non-compliant resources in a single pane of the dashboard of Security Hub, which makes it easier to investigate. Once we receive the finding in Security Hub, we can also automate the taking of actions using Lambda. The following figure shows a flow diagram of the solution:

Figure 7.14 – Flow diagram of the solution
The preceding solution consists of the following steps:
- When we deploy or provision any non-compliant resources, the AWS Config rule will detect the changes and change the state from compliant to non-compliant.
- The moment the Config rule changes the resource state from compliant to non-compliant, the CloudWatch event rule will trigger the Lambda function.
- The Lambda function will gather the data and convert it into ASFF, and then it will be imported into AWS Security Hub.
To set up the solution, perform the following steps:
- You need to enable the AWS Config service if you are using it for the first time in your AWS account. Go to the AWS Config console and click on Get started.
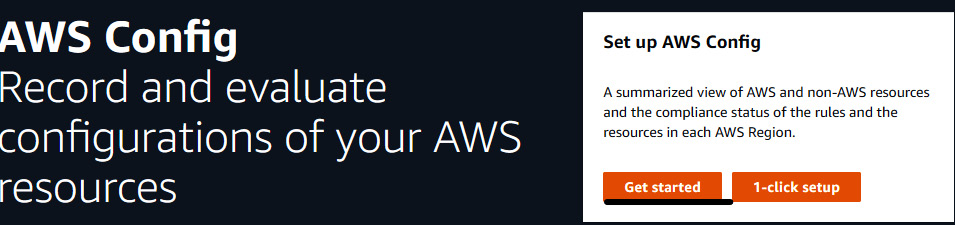
Figure 7.15 – AWS Config console setup page
- You can keep the default selection and click on Next to select the config rule.
- In the Rules page, you will find AWS Managed Rules. These rules detect the changes in the resources and show the compliance status. Go to the search box and search for SSH. You will find a rule with the name restricted-ssh. This rule checks whether security groups that are in use disallow unrestricted incoming SSH traffic. Select the rule and click on Next.
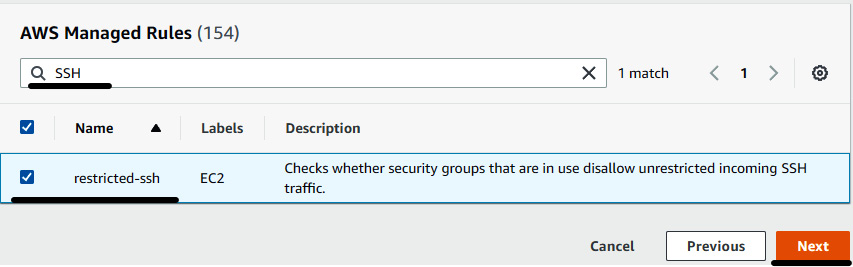
Figure 7.16 – Selecting restricted-ssh
- Click Confirm to enable Config with the selected rule.
- The next step is to enable Security Hub in your AWS account. You can refer to Step 1 and Step 2 of the Deny execution of the non-compliant Image on EKS using AWS Security Hub and ECR section to enable Security Hub.
- Once you have enabled Security Hub, you need to create a conf2sechubRole IAM role for the Lambda function with a policy of conf2sechubPolicy. The policy will contain the following snippet:
{
"Version": "2012-10-17",
"Statement": [
{
"Action": [
"securityhub:BatchImportFindings"
],
"Resource": [
"*"
],
"Effect": "Allow"
},
{
"Action": [
"logs:CreateLogGroup",
"logs:CreateLogStream",
"logs:PutLogEvents"
],
"Resource": "*",
"Effect": "Allow"
},
{
"Action": [
"config:DescribeConfigRules"
],
"Resource": "*",
"Effect": "Allow"
}
]
}
- Go to the AWS Lambda console and click on Create function. Select Author from scratch to create your function. In basic information, provide the following details:
- Function name: conf2SecHub.
- Runtime: Python 3.7.
- In Permissions, select Use an existing role and then select conf2sechubRole.
- Click on Create function.
- Once you have created the function, remove the existing code from the editor, copy the code from , and paste it into the editor. Then click on Deploy.
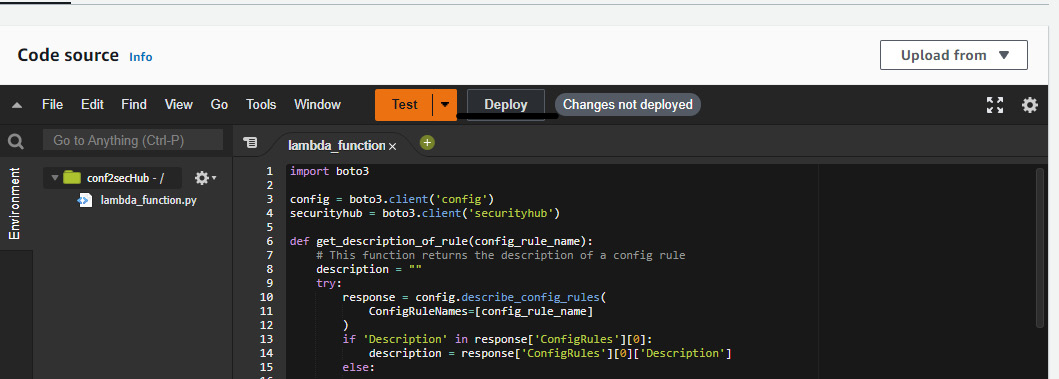
Figure 7.17 – Adding code in an AWS Lambda function
- Once you click on Deploy, the status will change from Changes not deployed to Changes deployed.
- The next step is to create an EventBridge rule. Go to the EventBridge console and click on Rules on the left side of the console. Then click on Create rule. Provide the following information on the Create rule page:
- Name: conf2sechubEvent.
- Select Event pattern in the Define pattern section.
- Select Custom pattern and provide the following snippet in the event pattern box, then click on Save:
{
"detail-type": ["Config Rules Compliance Change"],
"source": ["aws.config"],
"detail": {
"messageType": ["ComplianceChangeNotification"]
}
}
The following screenshot shows where to provide the event pattern snippet:
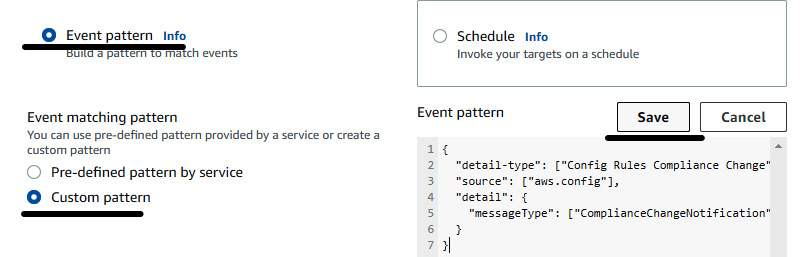
Figure 7.18 – Adding an event pattern in an EventBridge rule
- In Target, select the conf2secHub Lambda function. Then click on Create.
At this point, we have implemented the solution. Now, to test the solution, perform the following steps:
- Spin up an EC2 instance in the same region. Open port 22 to 0.0.0.0/0, just to test the solution.
- Go to the Config console and click on Rules. Select the restricted-ssh rule, and you will see a non-compliant resource, which is the security group in which we opened port 22 to 0.0.0.0/0.
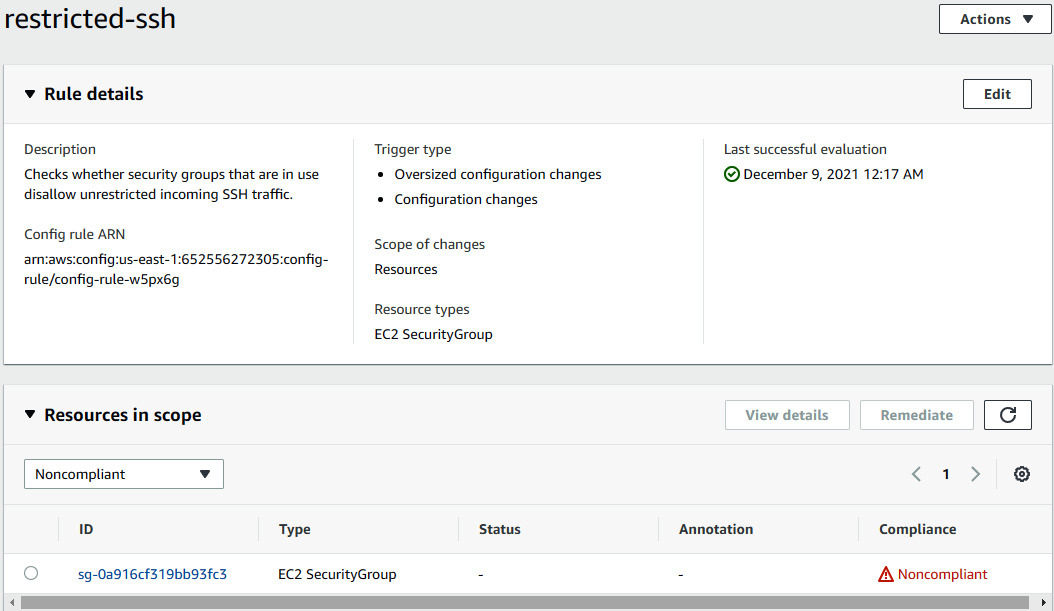
Figure 7.19 – Non-compliant resource showing under the restricted-ssh rule
- We can see the non-compliant resources here in the Config console, but the whole point of implementing the solution is to get this data visible in Security Hub. So, go to the Security Hub console and click on Findings. Click on Add filter and then select Title is restricted-ssh; then you will see one entry of restricted-ssh, whose resource is the non-compliant security group.
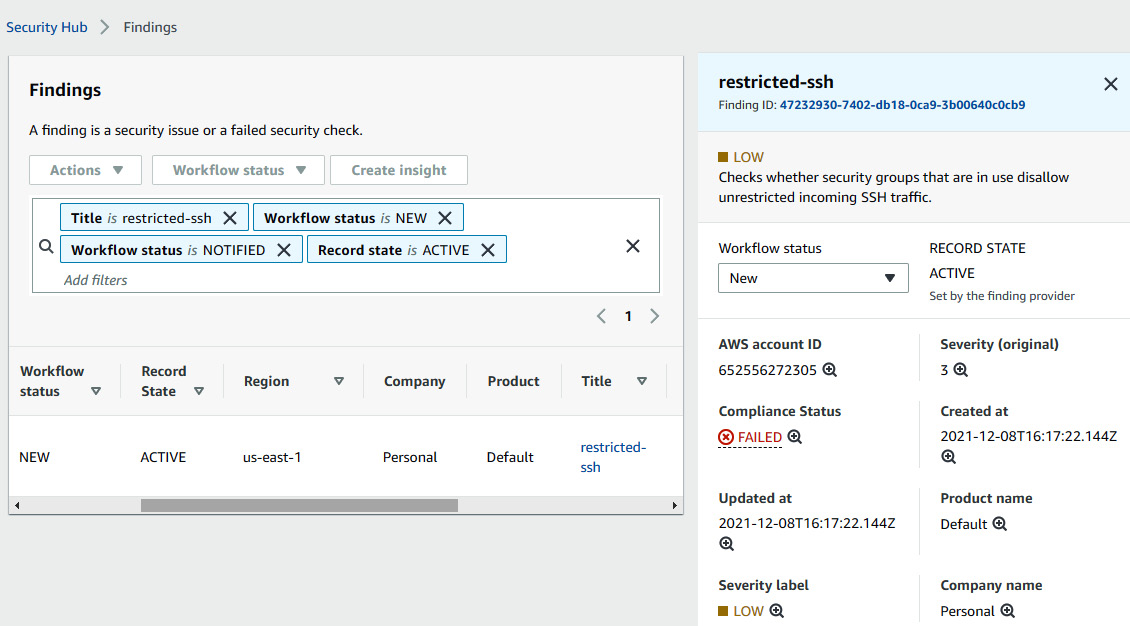
Figure 7.20 – Looking at the Config evaluation in the AWS Security Hub findings
This shows that our implemented solution works. This helps to collect all the security-related findings in a single dashboard, which helps security engineers to identify and act faster. In the next section of the chapter, we will implement a solution to auto-create a security incident in AWS Incident Manager using Security Hub and EventBridge and remediate the incident using the OpsCenter remediation runbook.
Integrating AWS Systems Manager with Security Hub to detect issues, create an incident, and remediate automatically
Based on the AWS Security Incident Response Guide, it is recommended to use security response automation, which increases both the scale and effectiveness of your security operations. With the help of automation, we can easily detect and alert the response team about an incident and, based on the specific runbook, which is an automation script, we can also remediate the incident. In this section, we will create a solution that helps us to detect security incidents and loopholes and alert the security operation team.
We will configure the AWS Systems Manager OpsCenter to aggregate all the security findings from AWS Security Hub into OpsCenter as issues. At the same time, we will configure an Event Bridge rule to check the event on the newly created finding in Security Hub and, based on that EventBridge rule, trigger the AWS incident response plan to create an incident. This incident will send an email and a message to the contact person. Now, if the response plan has a runbook configured, then the incident will resolve automatically. But if there is no runbook configured, then the response team needs to remediate the issue from OpsCenter and resolve the incident.
To implement the solution, perform the following steps:
- Make sure you have enabled AWS Config in your region. (You can refer to the Importing an AWS Config rules evaluation as a finding in Security Hub section to see the steps to enable it.)
- Make sure you have enabled AWS Security Hub in your region. (You can refer to the previous section to see the steps to enable it.)
- Once Config and Security Hub are enabled, we need to set up AWS Systems Manager. Go to the AWS Systems Manager console, click on Quick Setup, and then click on Create.
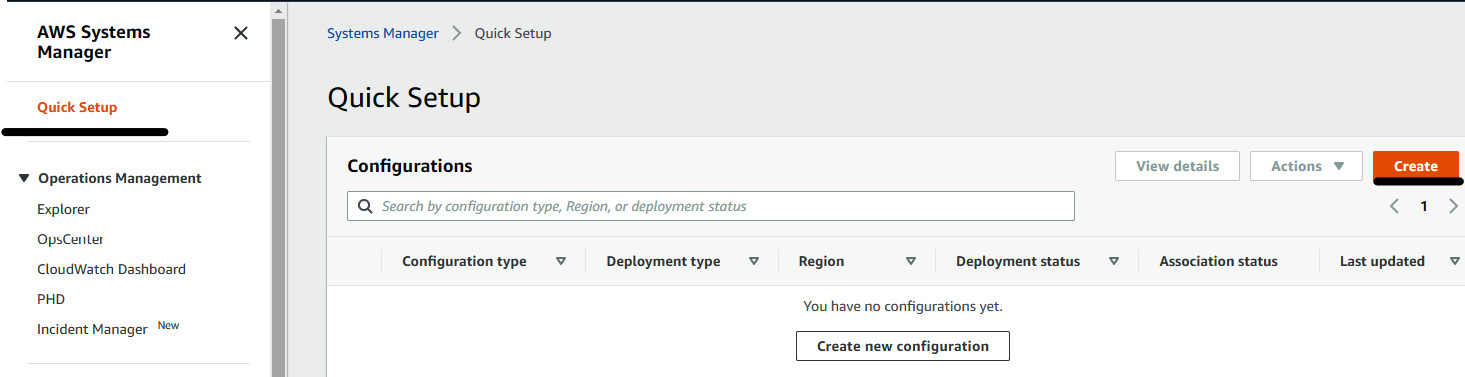
Figure 7.21 – Setting up AWS Systems Manager
- In Configuration type, click on Config Recording, which basically collects all the data from the AWS Config service, and click on Next.
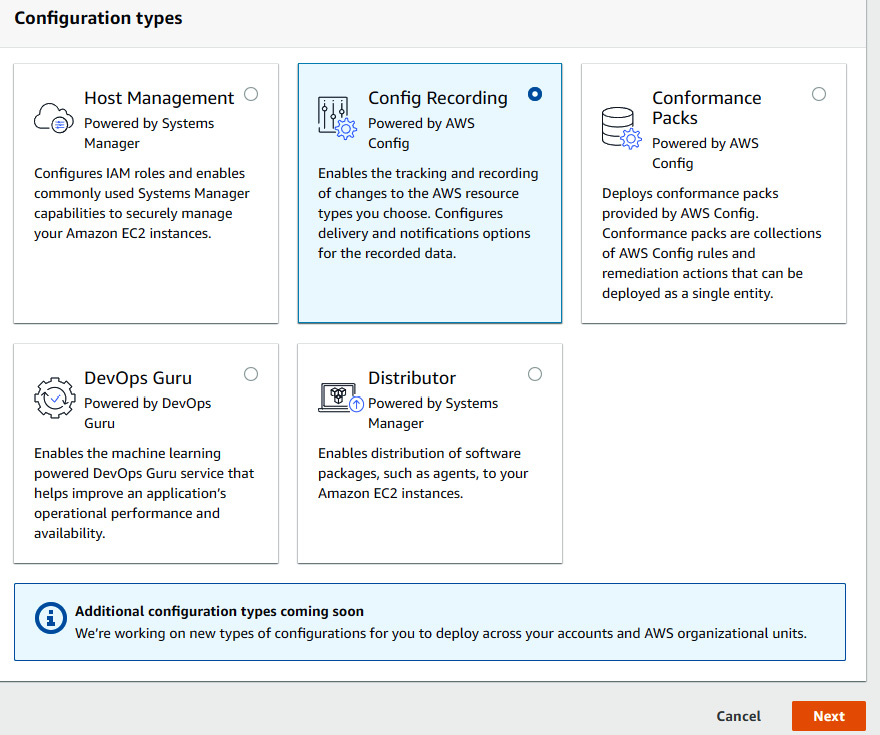
Figure 7.22 – Selecting Config Recording to set up AWS Systems Manager
- Keep the rest of the default selections and click on Create. Systems Manager will then start the deployment of the Config Recording configuration.
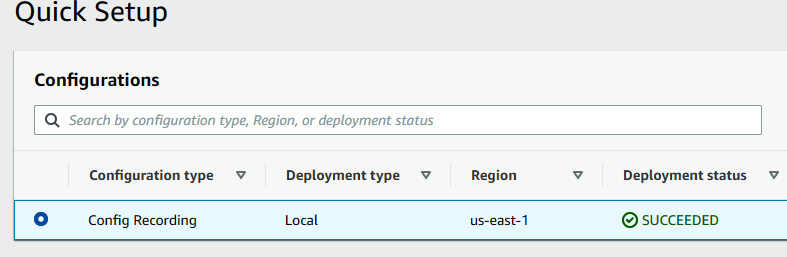
Figure 7.23 – Deployment status of the Systems Manager configuration
- Click on Explorer under Operation Management, to integrate the Explorer dashboard with OpsCenter. You will see the Explorer setup page, where you need to click on Enable Explorer. After that, click on Dashboard action and then select Configure Dashboard and enable Security Hub.
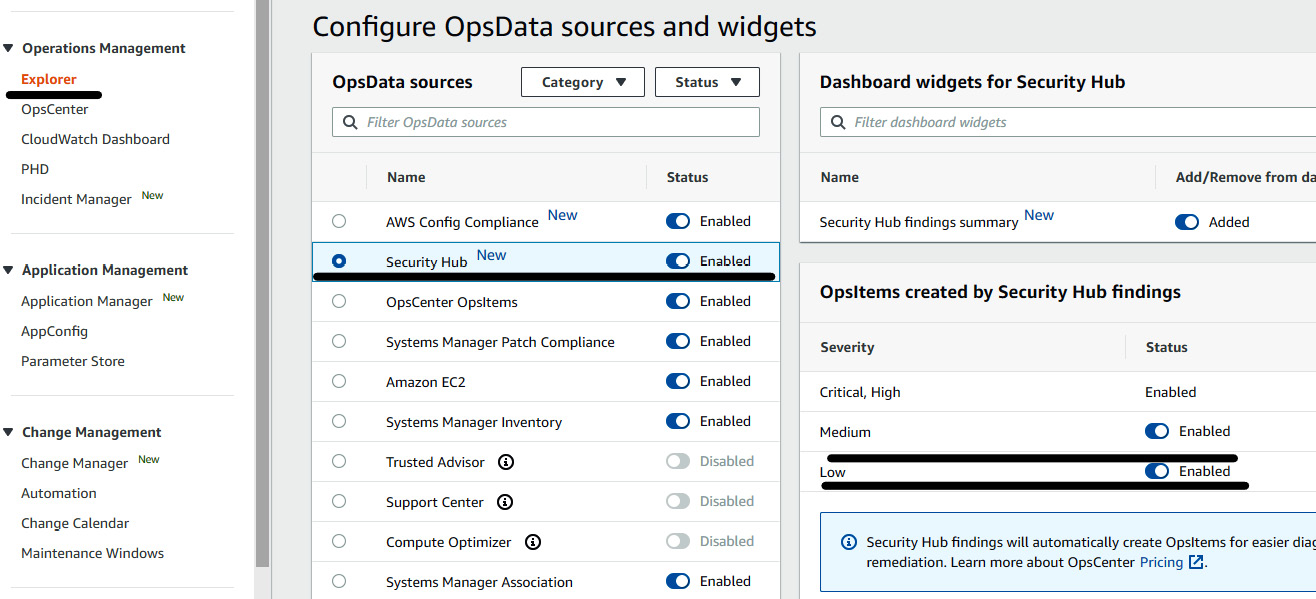
Figure 7.24 – Enabling Security Hub as the source in Explorer and OpsCenter
- Then click on OpsCenter under Operation Management on the left side of the console; you will then see the summary of the OpsItems count. (Make sure you have enabled OpsCenter.) These items came from Security Hub. So, at this stage, we have integrated Security Hub and the Systems Manager OpsCenter.
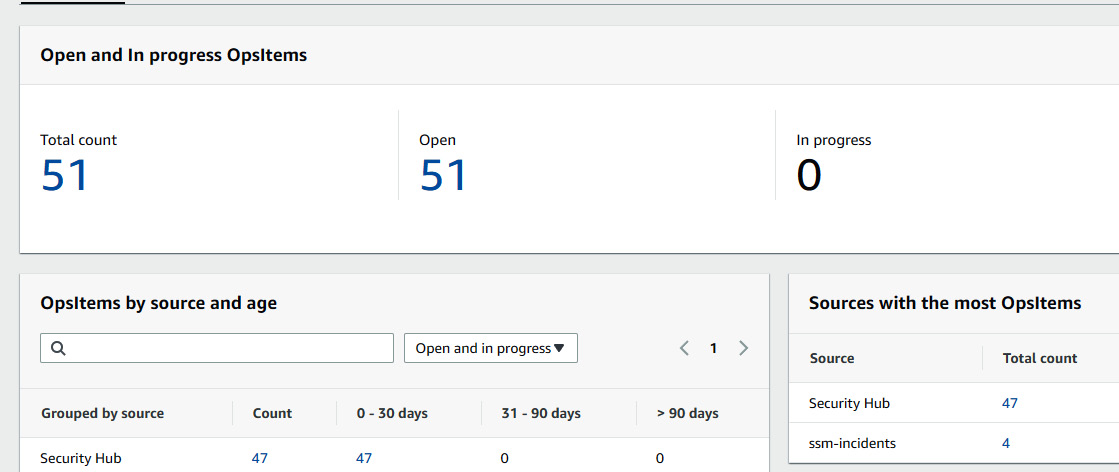
Figure 7.25 – OpsCenter showing the count of OpsItems received from Security Hub
- Now, to get an incident details of OpsItems, click on Incident Manager under Operation Management, and click on Get prepared.
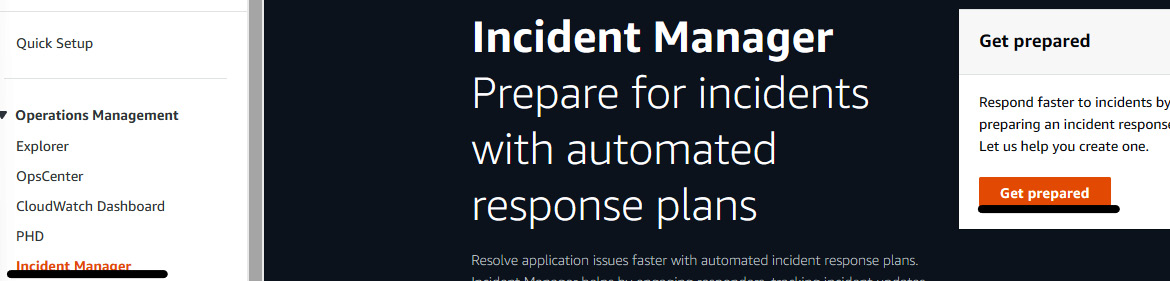
Figure 7.26 – The Incident Manager console
- You will see a Get prepared page, where we need to set up General settings and Response plan. Click on Set up under General settings.
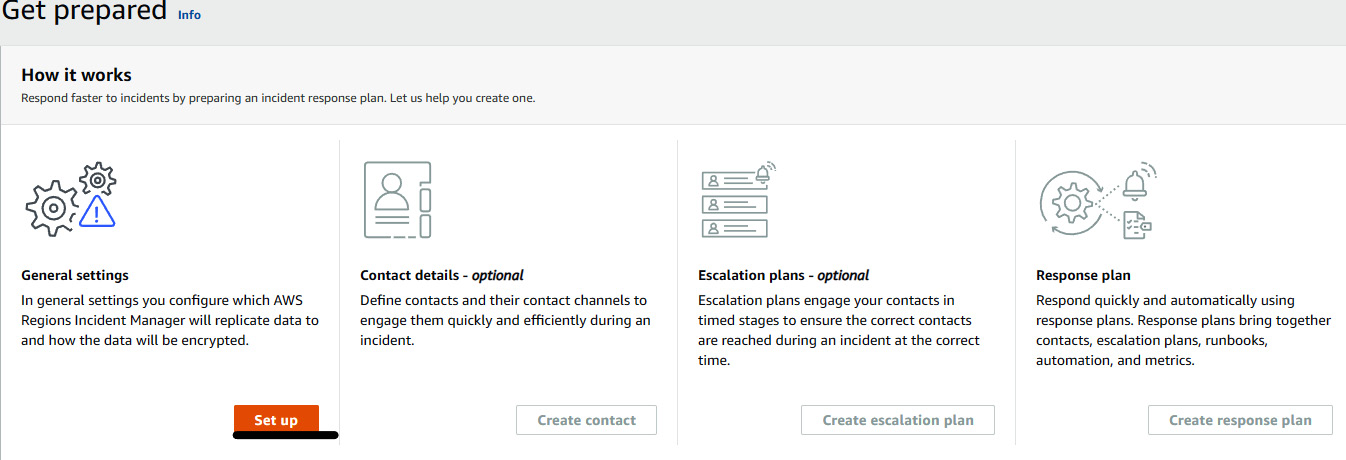
Figure 7.27 – Incident Manager setup steps
- On the next page, accept the terms and conditions and click on Next. Select another AWS Region in which you want the incidents to be replicated, but since this is an exercise, we can just leave the settings as default and click on Create.

Figure 7.28 – General setup of incident replication to another region
- You will be returned to the Get prepared page, where you need to click on Create contact.
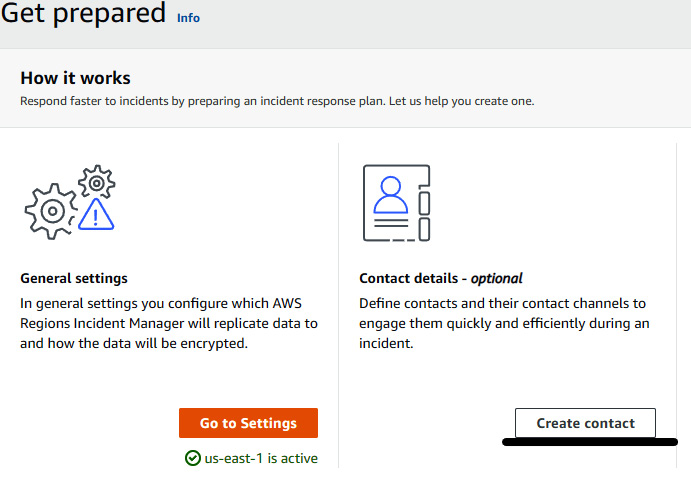
Figure 7.29 – Creating contact settings for Incident Manager
- On the contact information page, type SecOps Team for Name, and secops-responder-team for Unique alias. In Contact channel, set Type to Email, set Email as Channel Name, and then provide the email address. Again, select SMS under Type, SMS under Channel name, and provide a cellphone number in Detail. Under Engagement plan, enter 0 into the Engagement time field for Email, so that if there is an incident we get an email instantly, and 2 minutes for SMS. Click on Create. These two contact details will receive an activation code, which is required to verify the details.
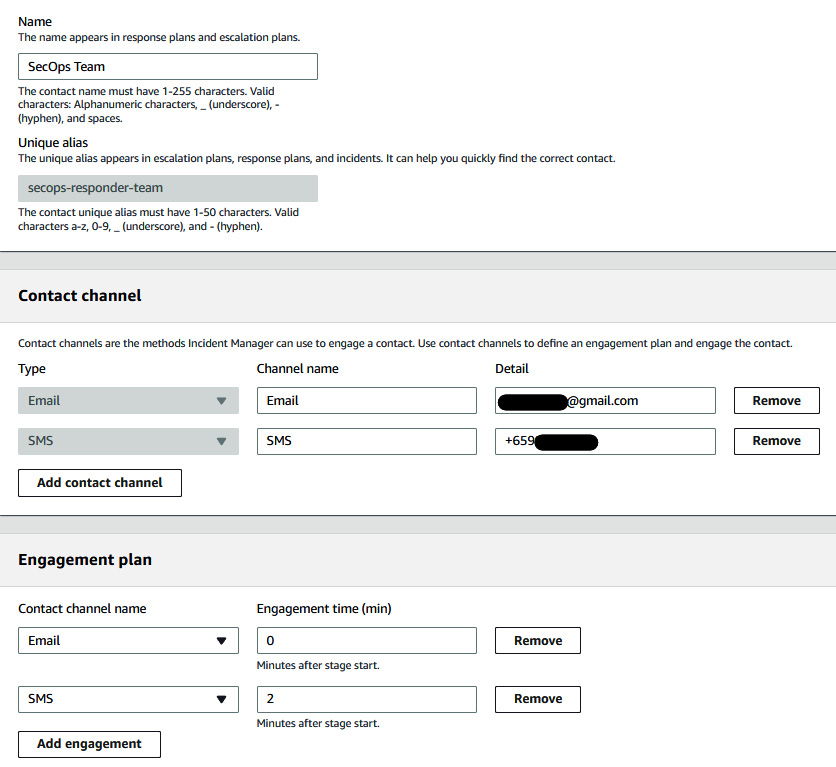
Figure 7.30 – Providing contact details in contact settings
- Now that the contact details have been created, click on Create response plan. Give SecOpsResponsePlan for Display name and SecOpsResponsePlan for Incident Title, and select High under Impact.
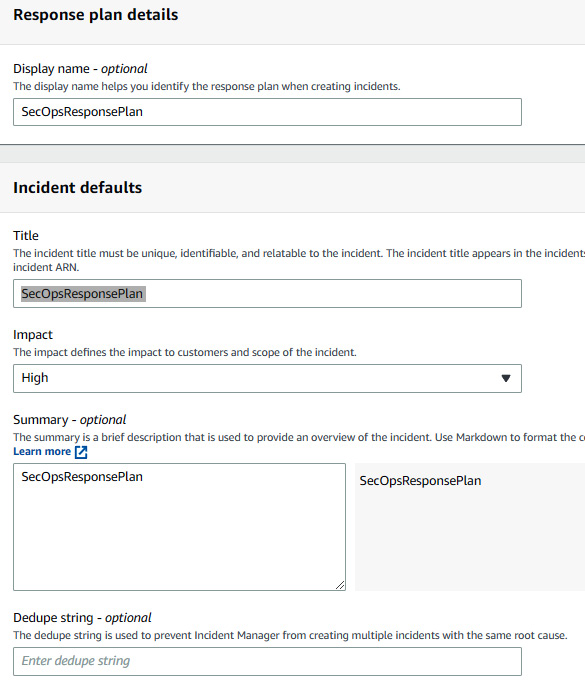
Figure 7.31 – Providing response plan details
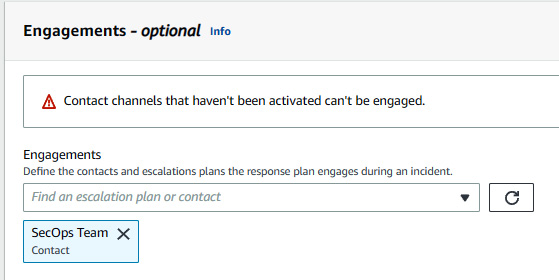
Figure 7.32 – Selecting the engagement contact team
- Once the response plan has been created, we need to create an event rule, which triggers the incident response plan, in case there is an event in Security Hub. Go to the EventBridge console, click on Rules, and click on Create rule. Give the name of the rule as SecurityGroupSSHRemediation, because we will test the solution using a security group later. Select Event pattern and click on Custom pattern and paste the following snippet and save it. In the Target section, select Incident Manager response plan. In Response plan, select the SecOpsResponsePlan response plan that we just created. Click on Create to create the rule.
{
"source": ["aws.securityhub"],
"detail-type": ["Security Hub Findings - Imported"],
"detail": {
"findings": {
"Compliance": {
"Status": ["FAILED"]
},
"RecordState": ["ACTIVE"],
"Severity": {
"Label": ["MEDIUM", "HIGH", "CRITICAL"]
},
"Workflow": {
"Status": ["NOTIFIED", "NEW"]
}
}
}
}
At this stage, we have implemented our solution. Now let's try to test the solution, by creating a security group, which will have port 22 open to 0.0.0.0/0. Perform the following steps to test the solution:
- Go to the EC2 console and create a security group named IncidentSSHSG with the inbound rule port 22 open to 0.0.0.0/0.
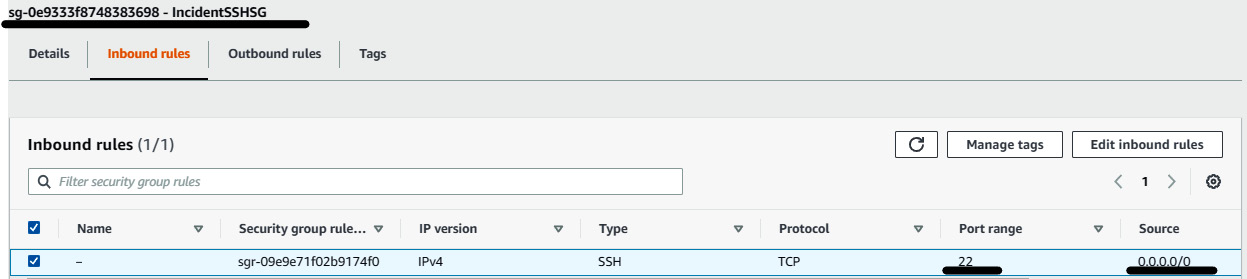
Figure 7.33 – Security group with SSH to all inbound rule
- After a while, go to the Security Hub console and click on Findings. Based on the sorted data of Updated at field, you will see an issue related to the security group with CRITICAL severity. (There might be a situation where you will see this non compliant finding with another severity level, so you need to filter it out by adding a filter with the incident name)

Figure 7.34 – Security group failed the compliance status with CRITICAL severity
- Now there will be an email notification sent to the email address given in the response plan with a code that will be used later in the incident response.
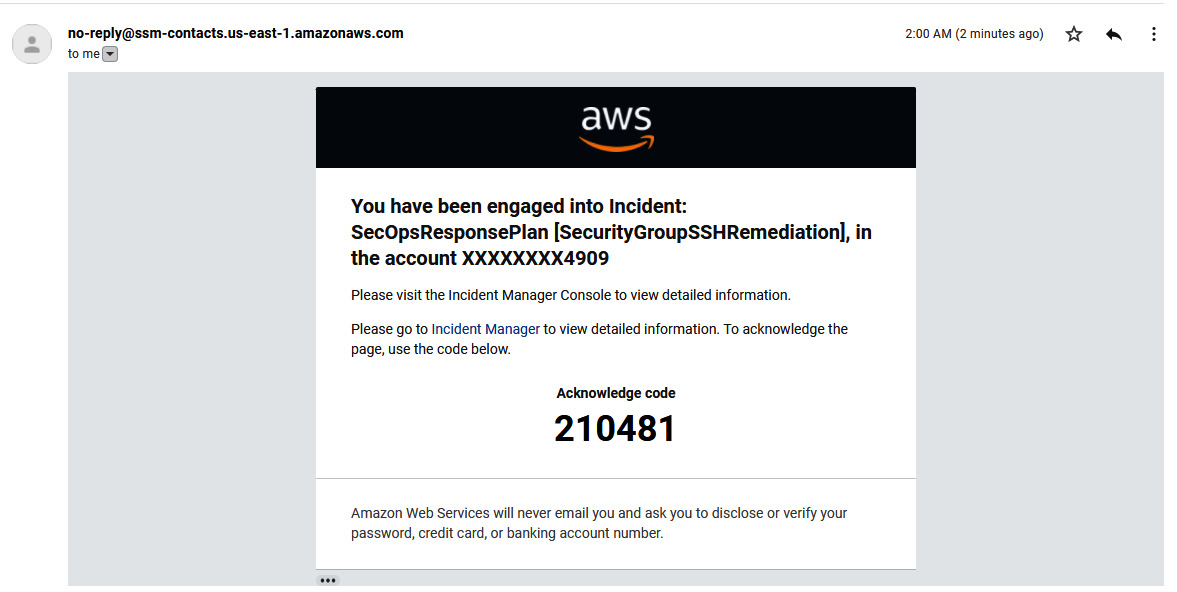
Figure 7.35 – Incident email alert
- If the incident is not acknowledged within 2 minutes, an SMS will be sent to the contact number provided in the response plan (you can see the email was sent at 2:00 AM and the SMS was sent at 2:02 AM).
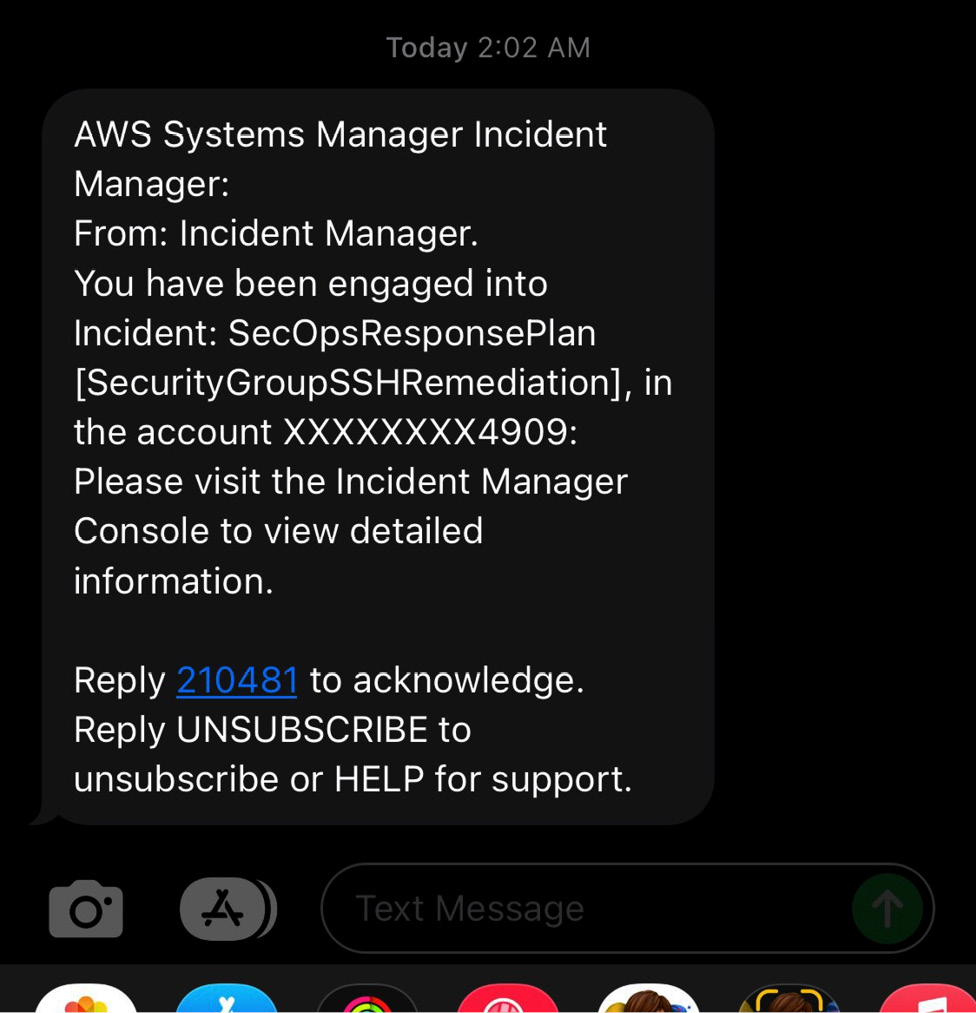
Figure 7.36 – Incident SMS alert
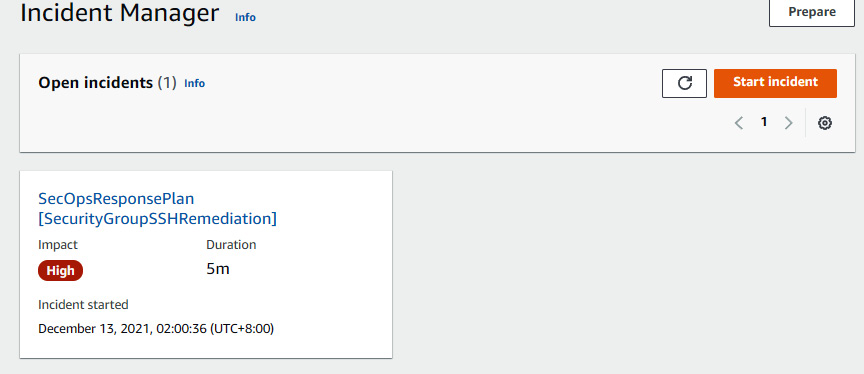
Figure 7.37 – Open incident in Incident Manager
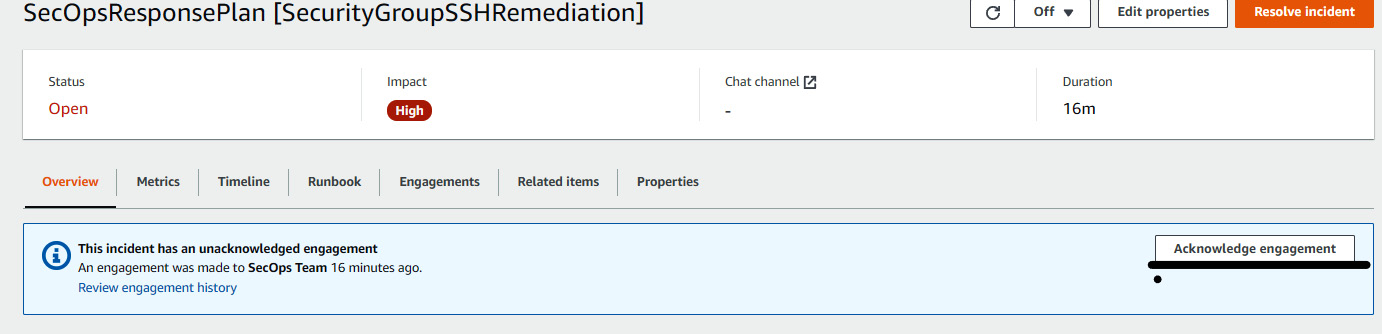
Figure 7.38 – Acknowledging the incident
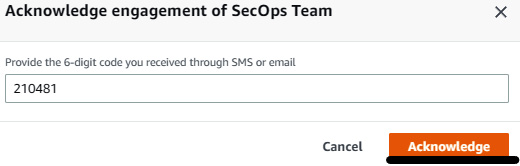
Figure 7.39 – Providing the acknowledgment code
- This incident would be auto remediated if we had associated any runbook with the response plan, but since there is no runbook associated with this response plan, we will auto remediate it using OpsCenter. Go to the OpsCenter page and click on the number below Open. (This number will vary based on your AWS account.)
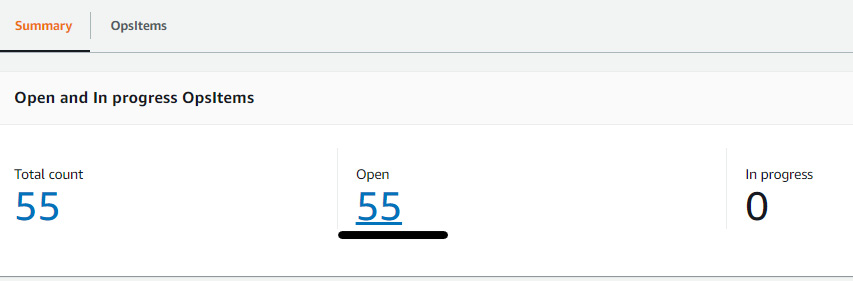
Figure 7.40 – Increased number of open OpsItems
- We can see the latest OpsItem is related to the security group that we just created. (It may take some time to appear in the OpsItem console.) Click on the OpsItem ID.

Figure 7.41 – OpsItem related to the security group with an Open status
- You will see an overview of the related resources. Click on the Related resource details tab next to Overview.
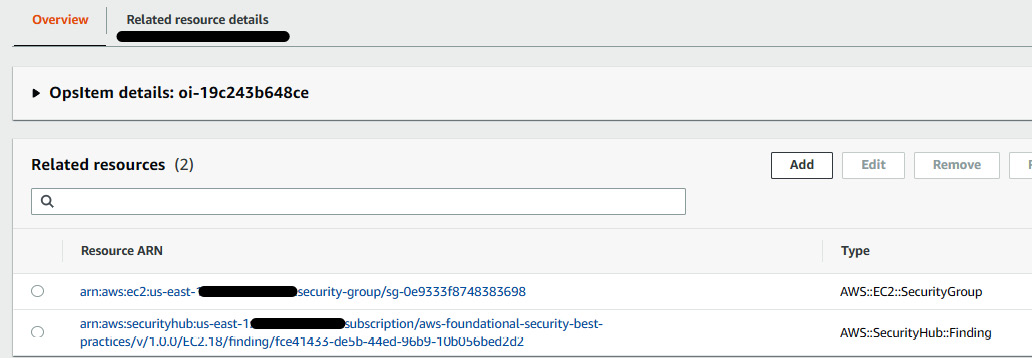
Figure 7.42 – Details of the open security group OpsItem
- Click on Run automation and select AWS-DisablePublicAccessForSecurityGroup, then click on Execute, which will run the automation runbook and remove the SSH rule from the security group.
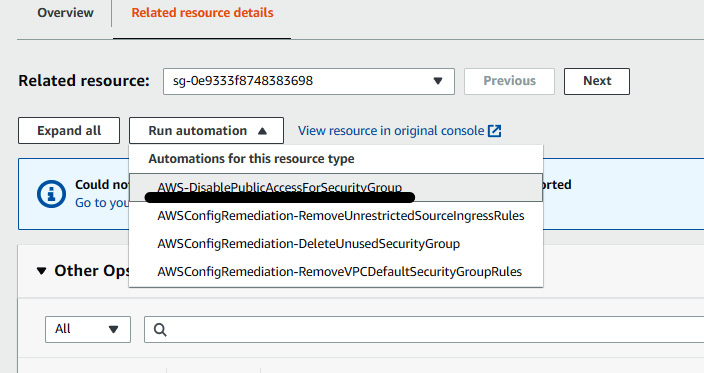
Figure 7.43 – Running the automation runbook for remediation
- You can see the green highlight at the top of the page. Click on View automation status, where you will see the executed steps and the status of the execution.
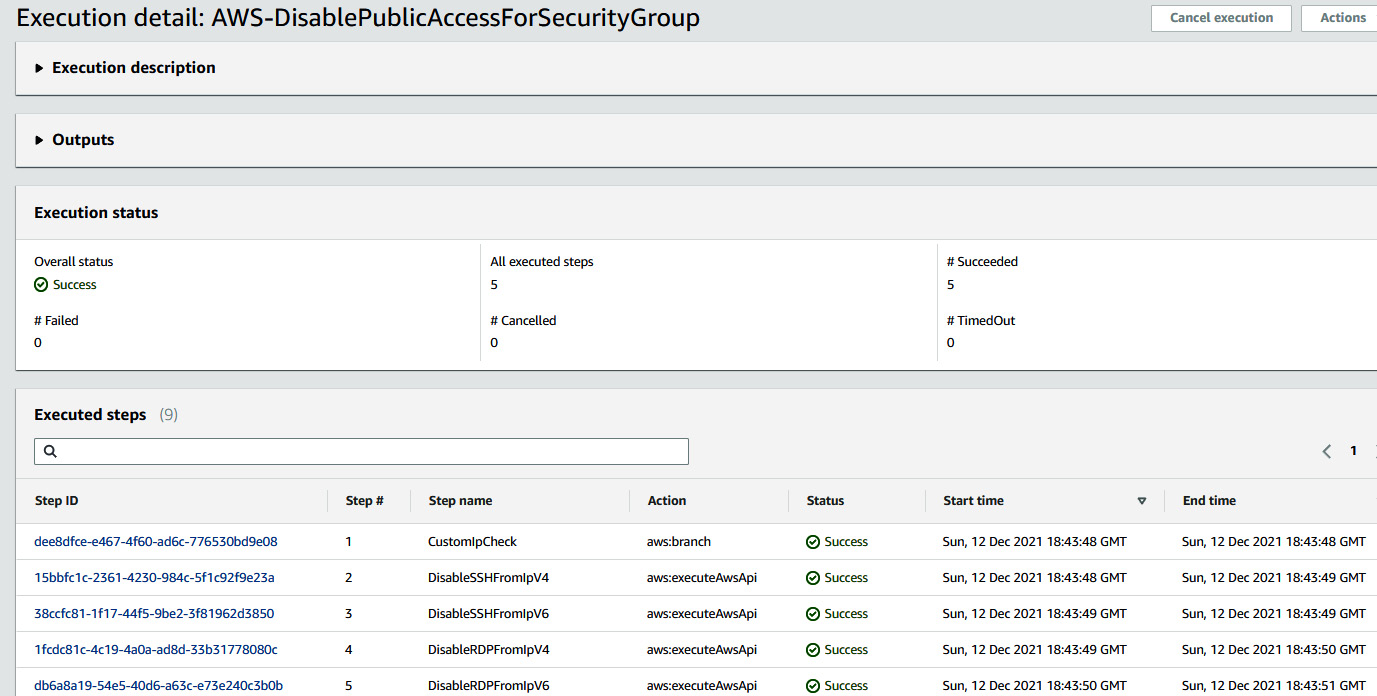
Figure 7.44 – Execution steps of the automation runbook
- Now you can go back to Security Hub and see that the related finding compliance status will be PASSED.

Figure 7.45 – Security group related finding status changed to PASSED
- Go to the security group inbound rules, and see that port 22 has been removed by the automation script.
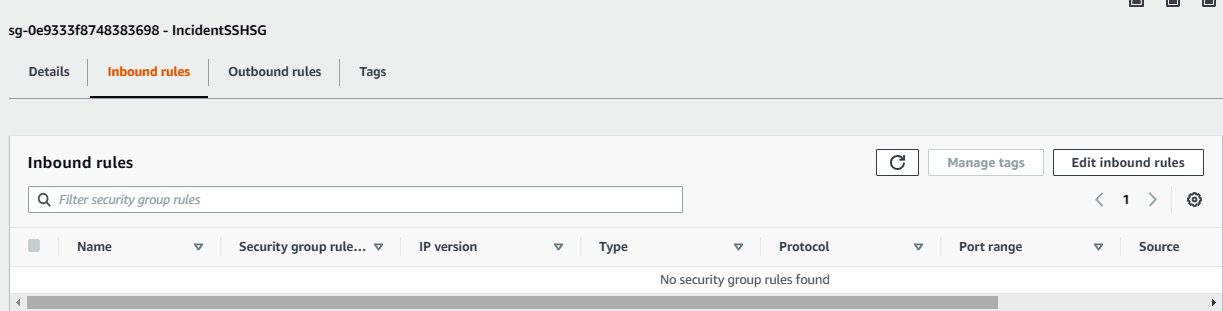
Figure 7.46 – SSH inbound rule has been removed by the automation script
- Even the OpsItem related to the security group will be removed. But we still need to resolve the incident. Go to the incident and click on Resolve incident. After that, we need to click on Create analysis. This is basically to give the details related to the incident. We mostly use the term Root Cause Analysis (RCA) in the industry.
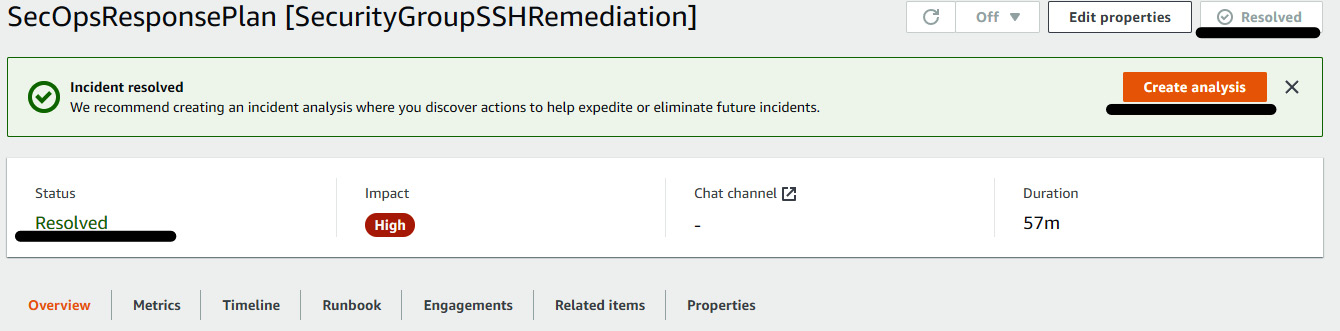
Figure 7.47 – Resolving the open incident
- Click on Create analysis, select the default template, and click on Create. Edit Incident summary and Impact, and then click on Complete to close the incident with RCA.
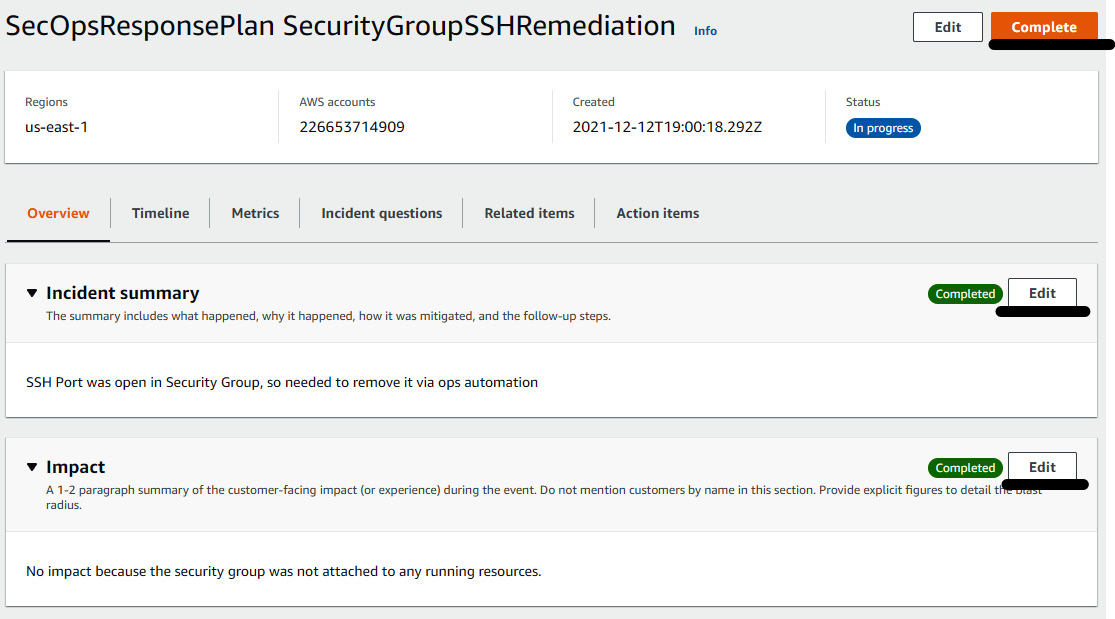
Figure 7.48 – Creating an RCA for the incident
This solution can be used and tweaked in many ways to play around with the incident response process. We can also integrate other security tools, for example, GuardDuty, to get more security findings and raise an incident in Incident Manager.
Summary
In this chapter, we learned about the NIST Framework and how AWS services are compatible with the NIST Framework core functions. We learned about how AWS Security Hub helps us with security compliance and prioritizing alerts. Then, we implemented three solutions in which we denied the execution of a non-compliant image on an EKS cluster and imported an AWS Config evaluation to the AWS Security Hub findings console. We also automated incident creation in Incident Manager whenever there were CRITICAL findings in AWS Security Hub. This chapter helped us get familiar with Security Hub and Systems Manager. In the next chapter, we will be ingesting SAST and DAST findings in Security Hub and deciding on the stages of the DevSecOps pipeline.
Integrating AWS Systems Manager with Security Hub to detect issues, create an incident, and remediate automatically
Integrating AWS Systems Manager with Security Hub to detect issues, create an incident, and remediate automatically
Integrating AWS Systems Manager with Security Hub to detect issues, create an incident, and remediate automatically
Integrating AWS Systems Manager with Security Hub to detect issues, create an incident, and remediate automatically
Integrating AWS Systems Manager with Security Hub to detect issues, create an incident, and remediate automatically
Integrating AWS Systems Manager with Security Hub to detect issues, create an incident, and remediate automatically
Integrating AWS Systems Manager with Security Hub to detect issues, create an incident, and remediate automatically
Integrating AWS Systems Manager with Security Hub to detect issues, create an incident, and remediate automatically