
Chapter 3: CI/CD Using AWS Proton and an Introduction to AWS CodeGuru
This chapter will introduce the new AWS Proton service and the need for it within the developer community. You will understand how AWS Proton helps both the developers and DevOps/infrastructure engineers with their work in the Software Development Life Cycle (SDLC). Then, we will look at the basic blocks of the Proton service, which helps create the environment and service template. We will learn how to use environment templates to spin up multiple infrastructure environments, and how to deploy container instances on those environments. This chapter will also walk you through the code review process in case any pull requests are raised, as well as how to scan the source code and find any vulnerabilities and secret leaks. We will use AWS CodeGuru Reviewer to review and perform static code analysis.
In this chapter, we are going to cover the following main topics:
- Introduction to the AWS Proton service
- Creating the environment template component
- Creating the service template component
- Deploying a containerized application by creating a service instance in Proton
- Introduction to AWS CodeGuru
- Integrating CodeGuru with AWS CodeCommit and analyzing the pull request report
Technical requirements
To get started, you will need an AWS account and the source code contained in the folder chapter-03-aws-proton-template, chapter-03-aws-proton, chapter-03-codeguru-sample:
- https://github.com/PacktPublishing/Accelerating-DevSecOps-on-AWS.git
- Create a separate repository in your github account as aws-proton and push the files present in chapter-03-aws-proton folder
Introduction to the AWS Proton service
The AWS Proton service was developed by AWS after they considered lots of feedback from customers, where the main issue was how to maintain infrastructure, build pipelines, and deploy applications at scale. Initially, when the service became generally available, it was difficult to understand the components of AWS Proton and how it is different from AWS Service Catalog and other developer tools. This service has a couple of components that will be a bit confusing to you if you are just reading the documentation and not looking at the template code. So, in this section, we will dive deep into how AWS Proton solves the problem of maintenance of infrastructure, as well as how it helps you build pipelines and application deployments at scale.
What is AWS Proton?
AWS Proton is a two-fork automation framework engine that does the following:
- Automates the infrastructure provisioning process using an environment template. This environment template includes shared infrastructure resources. A shared infrastructure means VPCs, subnets, ECS clusters, IGWs, and so on. An environment template can be used to provision multiple environments such as development, staging, and production by changing the parameters. There is a certain standard and format when it comes to creating environment templates, which will be covered in the next section.
- Automates the process of deploying container-based and serverless applications using a service template. The service template includes two sub-templates – one is an application that contains service-related files such as the task definition, load balancer target group, alarms, and more, while the other sub-template is a build and deploy pipeline template, which includes definitions related to developer tools such as CodeBuild, CodeDeploy, and CodePipeline. Using the service template, we can create multiple Proton services (that refer to their respective application branches), which will build the application and deploy it to a certain infrastructure environment. When the application services get deployed to an environment, they are known as service instances.
The following diagram simplifies these two points:
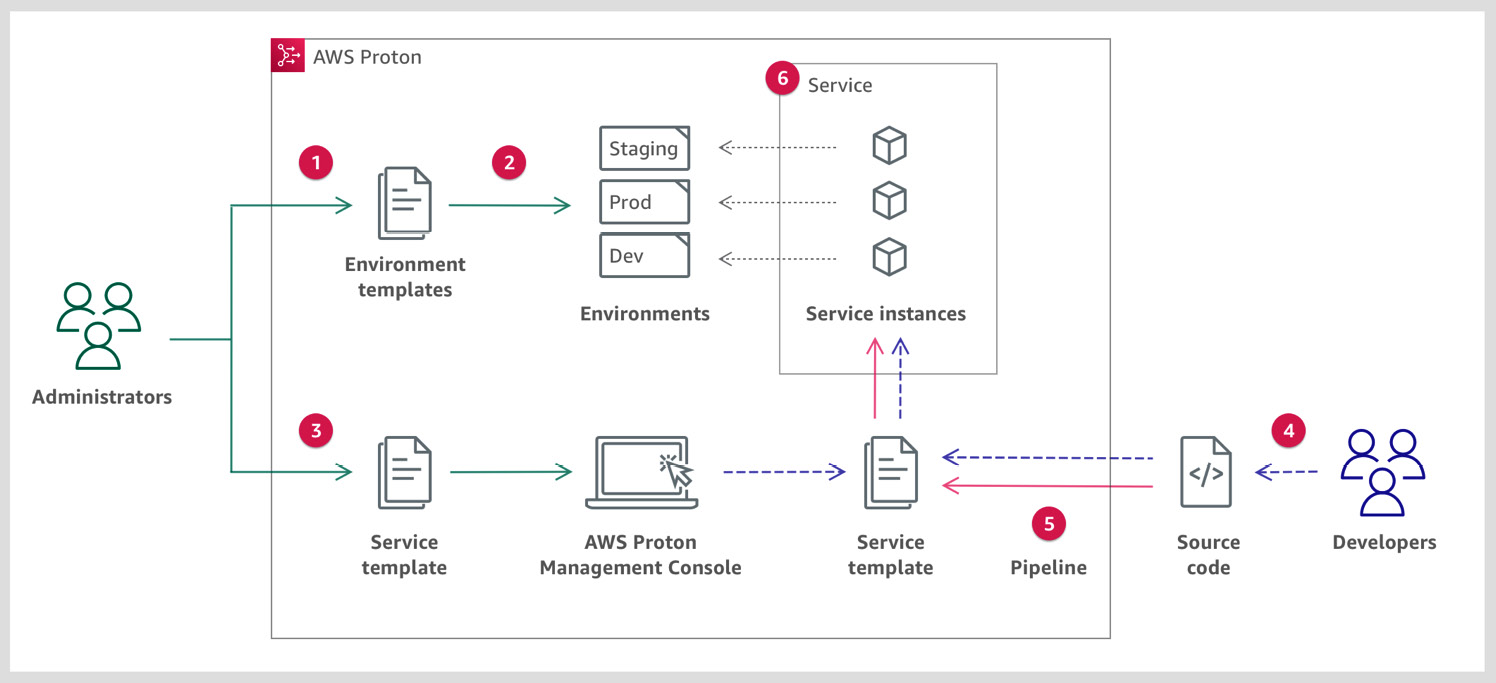
Figure 3.1 – AWS Proton workflow (from AWS Docs)
The target users for the Proton service are Administrators/DevOps and Developers. Admin/DevOps are responsible for creating environment template code (using CloudFormation). To create service template code (using CloudFormation), both DevOps and the Developers need to work together. Developer interaction is required because they will be aware of the build steps, which will be embedded into the service template code. The workflow for AWS Proton is as follows:
- Administrators/DevOps create an environment template using CloudFormation. Then, They register the environment template with AWS Proton.
- Administrators/DevOps get the request of spinning up three environments for a new application. They can use this environment template to create three different environments; that is, Dev, Staging, and Prod.
- Now, as DevOps, you will coordinate with Developers and prepare a service template using CloudFormation. As we mentioned previously, this service template will include a definition related to the application instance and the build pipeline. Once the service template has been prepared, then DevOps need to register it with AWS Proton.
- Next, Developers log into the AWS Proton service, and they need to deploy a container-based application in the development environment. The development environment that's launched from the environment template is ECS. The developer wants to deploy the container using AWS Fargate, so they also need to provide the size of the task. Their application source code is in GitHub in the development branch. Now, to deploy the application in the development ECS cluster, as a Fargate container, they need to create a service using the service template; for example, service-dev.
- The moment Developers create the service-dev service, CI/CD pipeline resources will start spinning up.
- The CI/CD pipeline will now pull the code from the development branch and deploy it into the development environment.
Now, suppose the developer needs to deploy the application in the staging environment. Here, the code should be from the staging branch. Then, the developer just needs to create another service using the same service template and configure it with the staging environment. This way, you don't need to create another pipeline manually; the service template will create another staging CI/CD resource for you, and then deploy it to the staging environment.
The following diagram shows a flow representation of the preceding steps.
We will see the preceding stages in action in the next section. Based on the aforementioned points, you may have gotten the idea as to how Proton resolves the issue of maintaining infrastructure, building pipelines, and deploying applications at scale.
There are some additional features in AWS Proton that make it more robust to use in terms of its capabilities, such as version management and cross-account support. You can manage multiple versions of the environment template and update all the environments with the latest version with a single click. AWS Proton also supports cross-account access, which means that if an admin wants to, they can use the environment template of account A (Management account) and create an environment infrastructure in account B (Environment account). Similarly, a developer can also deploy the services from account A to the environment infrastructure of account B:
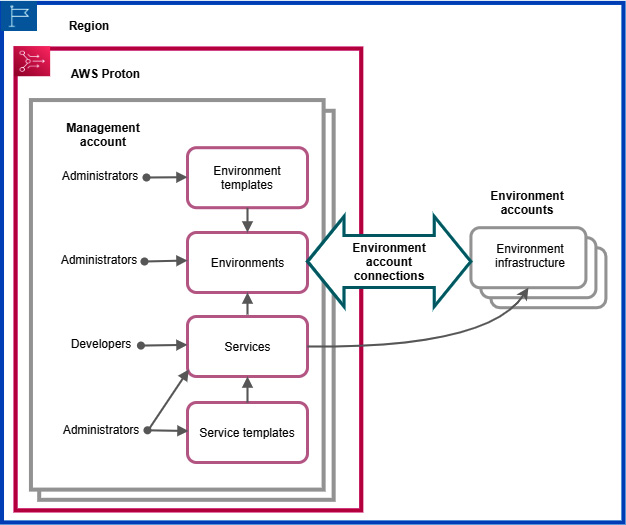
Figure 3.2 – AWS Proton cross-account connections (from AWS Docs)
Apart from writing templates in CloudFormation and template versioning, there are some new features in the roadmap of AWS Proton that adds more capabilities, such as the following:
- Defining templates in Terraform
- Template sync with a source code repository (at the time of writing, we manually upload it to an AWS S3 bucket and Proton picks the template from there)
- Template modules
- Custom infrastructure
Now that we've gotten an idea of what AWS Proton is and its components, as well as the environment template and the service template, let's look at the Proton environment template.
Creating the environment template bundle
In this section, we will learn how to create an environment template bundle for a standard environment and the tips we should use while writing an effective template. After that, we will register an environment template in AWS Proton and create multiple environments using an environment template. We will be using the aws-proton-template repository, which was mentioned in the Technical requirements section.
Writing an environment template
As we mentioned previously, in AWS Proton, the environment template defines the shared infrastructure that's used by multiple resources. With an environment template, we can create multiple environment infrastructures. An environment template typically includes resources related to compute, storage, and network. In our case, the environment template that we will be registering contains the following resources:
- A VPC and subnets
- Internet gateway and route
- An ECS cluster and security group
- The ECS TaskExecution role
To register an environment template, we need to create an environment template bundle. The environment template directory structure looks like this:
/infrastructure
cloudformation.yaml
manifest.yaml
/schema
schema.yaml
As you can see, the infrastructure directory includes two files – cloudformation.yaml and manifest.yaml. The Cloudformation.yaml file defines the compute, storage, and network resources. If you go to the chapter-03-aws-proton-template folder, you will see an environment folder. If you navigate to infrastructure/cloudformation.yaml, then you will be able to see the content inside cloudformation.yaml, which defines the infrastructure resources, as shown here:
AWSTemplateFormatVersion: '2010-09-09'
Description: AWS Fargate cluster running containers in a public subnet. Only supports
public facing load balancer, and public service discovery namespaces.
Mappings:
# The VPC and subnet configuration is passed in via the environment spec.
SubnetConfig:
VPC:
CIDR: '{{environment.inputs.vpc_cidr}}'
PublicOne:
CIDR: '{{environment.inputs.subnet_one_cidr}}'
PublicTwo:
CIDR: '{{environment.inputs.subnet_two_cidr}}'
Resources:
VPC:
Type: AWS::EC2::VPC
Properties:
EnableDnsSupport: true
EnableDnsHostnames: true
CidrBlock: !FindInMap ['SubnetConfig', 'VPC', 'CIDR']
There are certain processes you must follow to create an environment template bundle that defines infrastructure resources. These processes are as follows:
- We need to identify which infrastructure resources will be used to create environments. For example, in our case, we need to deploy a containerized app, so we need any resources that can help us run containers, such as ECS, and other resources, such as a VPC and subnets.
- We need to identify customization parameters. Customization parameters are parameters that will be required by the end user as input while creating the environment. For example, in the following template, the VPC and subnet configuration will be passed in via the user input. To reference a customization parameter in the CloudFormation infrastructure, you must attach a namespace to it. The format for the environment namespace is as follows:

Table 3.1 – Environment namespace mapping
The following code explains how to use the customization parameter.
The following are the necessary mappings:
# The VPC and subnet configuration is passed in via the environment spec.
SubnetConfig:
VPC:
CIDR: '{{environment.inputs.vpc_cidr}}' #customization param
PublicOne:
CIDR: '{{environment.inputs.subnet_one_cidr}}'
PublicTwo:
CIDR: '{{environment.inputs.subnet_two_cidr}}'
Now, we need to identify the resource-based parameters. Resource-based parameters are those parameters that reference output parameters from other infrastructure template files. For example, the output values of the infrastructure template can be used in the service template as resource parameters. The following snippet can explain more:
Outputs:
ClusterName:
Description: The name of the ECS cluster
Value: !Ref 'ECSCluster'
ECSTaskExecutionRole:
Description: The ARN of the ECS role
Value: !GetAtt 'ECSTaskExecutionRole.Arn'
The preceding snippet contains the output values of the infrastructure template. The values of the preceding outputs (ClusterName) can be used in the following service template as resource parameters:
Service:
Type: AWS::ECS::Service
DependsOn: LoadBalancerRule
Properties:
Cluster: '{{service_instance.environment.outputs.ClusterName}}' # imported resource parameter
LaunchType: FARGATE
DeploymentConfiguration:
MaximumPercent: 200
MinimumHealthyPercent: 75
Once you have identified the resources and parameters, you can define a schema, which serves as the customization parameter interface between AWS Proton and the infrastructure template files. AWS Proton uses the Jinja templating engine to handle parameters values in the schema file and the cloudformation file. The following diagram explains how the AWS Proton backend works. After this, we will have a look at the relationship between the schema file and the cloudformation file:
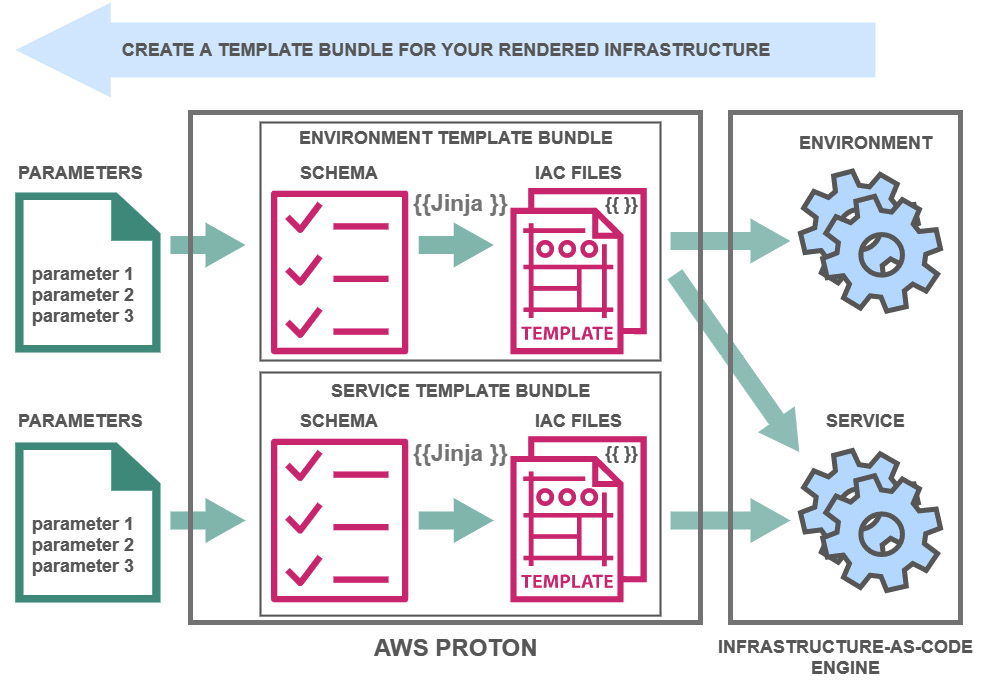
Figure 3.3 – AWS Proton engine workflow (from AWS Docs)
The schema file, which is shown on the left, shows one input property, vpc_cidr, which is used in the cloudformation file in the Mappings section:
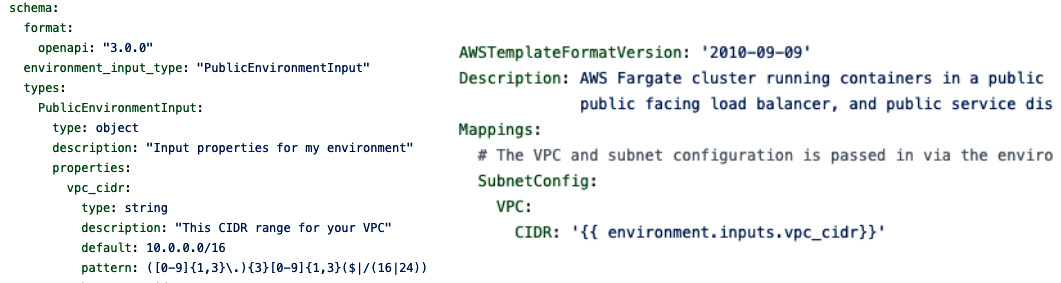
Figure 3.4 – Schema file (on the left) and CloudFormation file (on the right)
Once you have your infrastructure CloudFormation and schema files, you must organize them into directories. You also need to create a manifest file that lists the infrastructure files and needs to adhere to the format and the content, as shown in the following snippet:
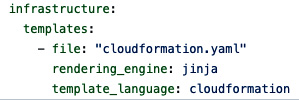
Figure 3.5 – Manifest file
The preceding points will help you create an environment template bundle that includes the cloudformation.yaml, manifest.yaml, and schema.yaml files. To use the environment template bundle in AWS Proton, we need to perform the following steps:
- Clone the GitHub repository, which contains the environment template in the chapter-03-aws-proton-template folder:
$git clone https://github.com/PacktPublishing/Accelerating-DevSecOps-on-AWS.git
- Go to your Terminal and enter the following command to create an S3 bucket. This S3 bucket will contain the tarball of the environment template:
# Assuming you already have awscli configured
$aws s3api create-bucket –bucket "proton-cli-templates-${account-id}"
- Create the tarball of the environment folder and upload it to the S3 bucket:
$ cd Accelerating-DevSecOps-on-AWS/chapter-03-aws-proton-template
$ tar -zcvf env-template.tar.gz environment/
$ aws s3 cp env-template.tzr.gz s3://proton-cli-templates-${account-id}/env-template.tar.gz
- Create an IAM role that will be used by AWS Proton to provision the resources:
# creating IAM Role
$aws iam create-role --role-name aws_proton_svc_admin --assume-role-policy-document file://policy/proton-service-assume-policy.json
#attaching policy to the role
$aws iam attach-role-policy --role-name aws_proton_svc_admin --policy-arn arn:aws:iam::aws:policy/AdministratorAccess
#Allowing Proton to use this role
$aws proton update-account-settings --pipeline-service-role-arn "arn:aws:iam::${accountid}:role/aws_proton_svc_admin"
- Since we have an environment template in an S3 bucket and an IAM role created, go to the AWS Proton console and click on Environment templates in the Templates section:
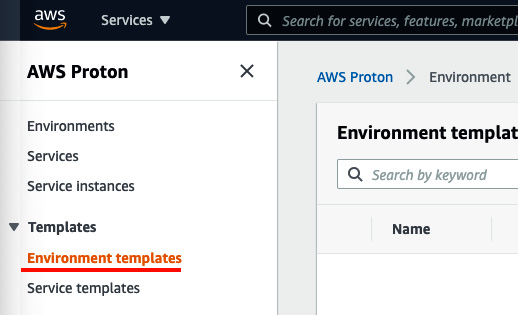
Figure 3.6 – The AWS Proton console
- Click on Create environment template. For Template options, choose Create a template for provisioning new environments. For Template bundle source, choose Use your own template bundle:
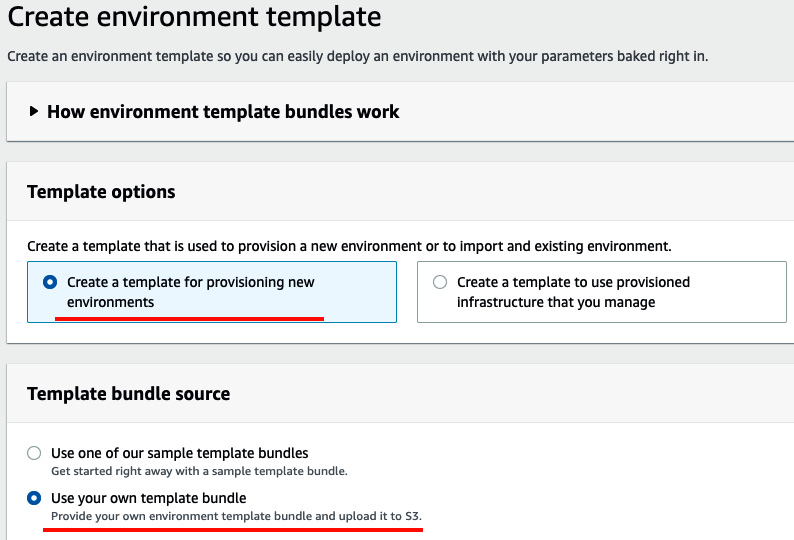
Figure 3.7 – Create environment template
- Next, you will see S3 bundle location. Here, you need to click on Browse S3 and then select the bucket where you will upload the environment template (in our case, it's proton-cli-templates-account-id/env-template.tar.gz):

Figure 3.8 – Selecting the environment template via S3
- Under Template details, use stark-env-temp for Template name and Template display name. You can fill in Template description as you like. Then, click on Create environment template:
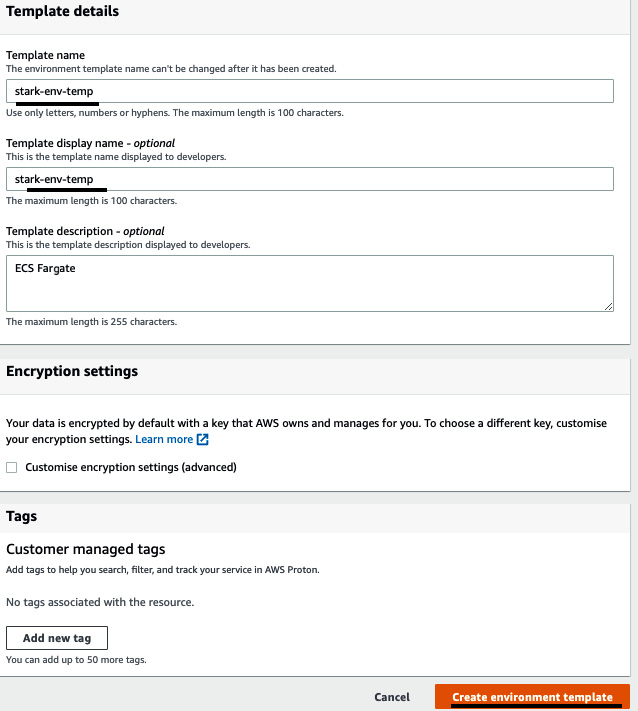
Figure 3.9 – Template details
- Once you click on Create environment template, the environment template will go into draft status. To use it, we need to publish it first by clicking on Publish v1.0:
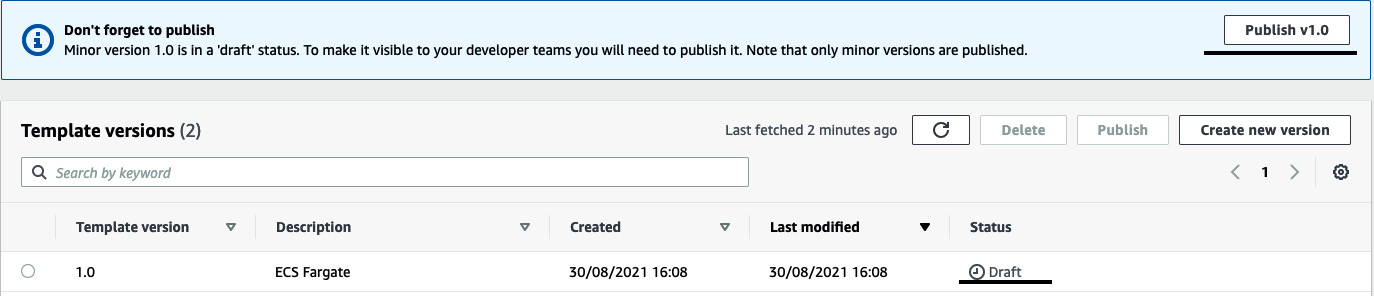
Figure 3.10 – Publishing the environment template
- Once your environment template has been published, you can use it to provision two infrastructure environments (staging and dev). Click on the Environments section, then Create environment:

Figure 3.11 – The Environments console
- You will be able to see the environment template, which we published in Step 9. Select stark-env-temp and click on Configure:
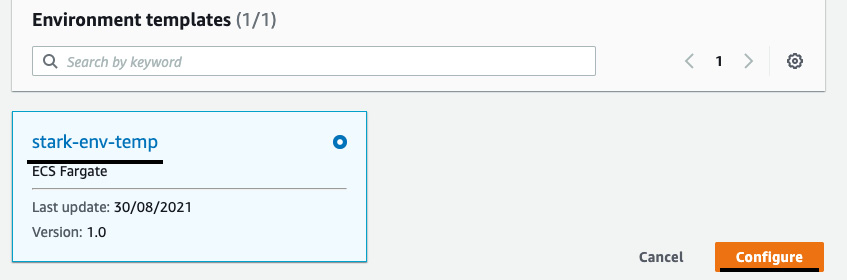
Figure 3.12 – Environment templates
- Under Deployment account, click on This AWS account since we are going to provision the environment in this account. Set Environment name to stark-env-staging. For Environment roles, click on Existing service role and select the IAM role that we created in Step 4. Then, click Next:
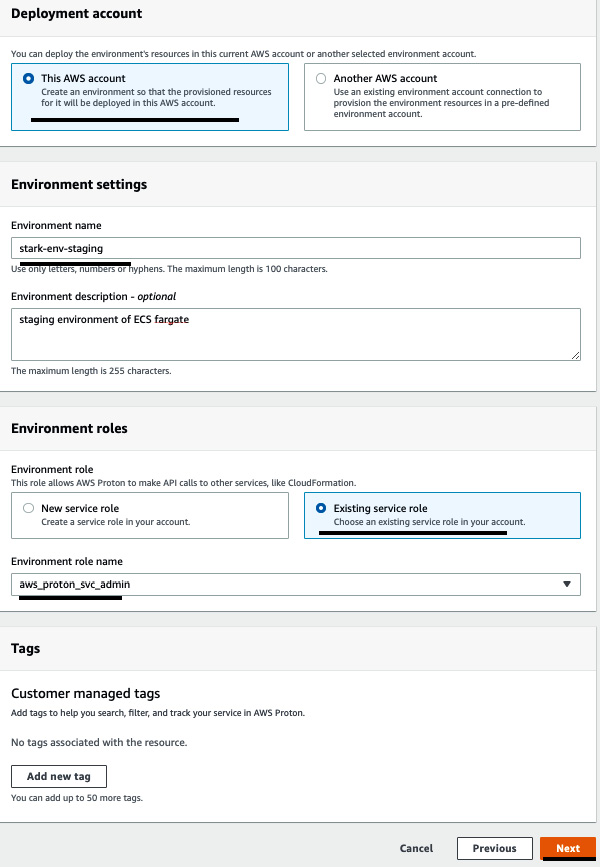
Figure 3.13 – Providing environment template information
- You will see the Configure custom settings page, which came from the schema file. Leave it as-is and click on Next:
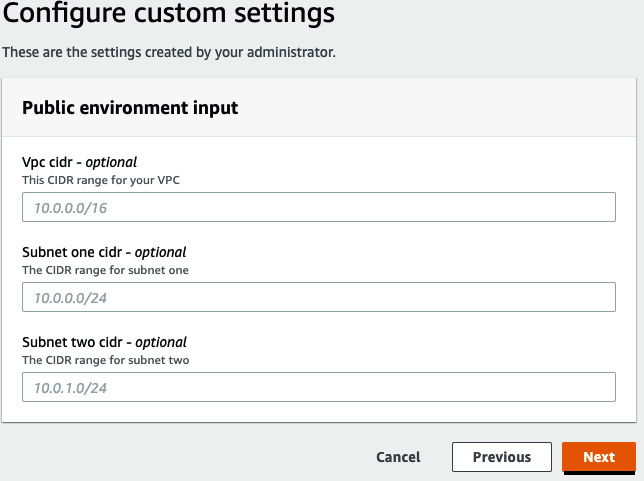
Figure 3.14 – Configure custom settings
- You will be redirected to the Review page, where you need to verify all the data and then click on Create. Then, you will see an Environment details section, where you can see our Deployment status:
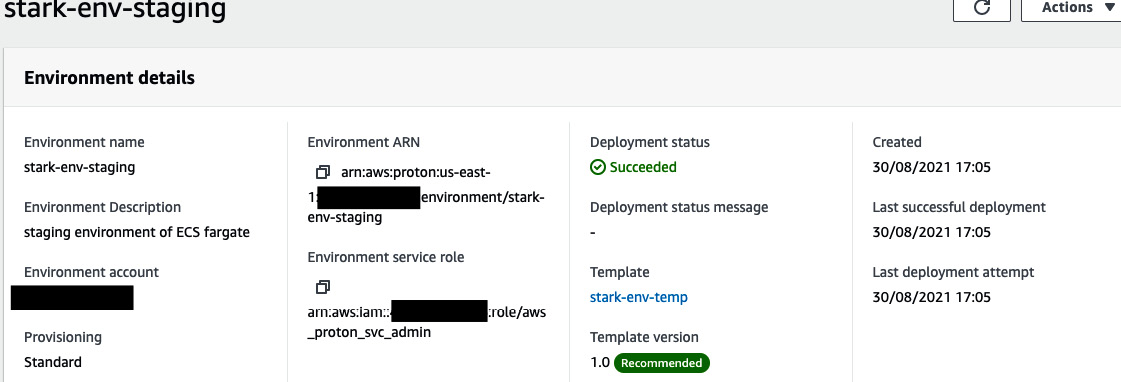
Figure 3.15 – The Environment details page
- You can also see the provisioned environment in the ECS console:

Figure 3.16 – ECS cluster
With that, we have just created two environments using the same environment template via AWS Proton. In the next section, we will learn how to create service templates and deploy services in these environments.
Creating the service template bundle
So far, we have learned how to create an environment template bundle. In this section, we will learn how to create a service template bundle and register it with AWS Proton. After that, we will learn how to create a service and service instance that will be deployed in both the staging and dev environments.
Writing the service template
At the beginning of this chapter, we provided a brief overview of the service template. The service template includes two sub-templates – one is an application-service related file that contains information regarding the task definition, load balancer target group, alarms, and so on, while the other sub-template is a build and deploy pipeline template that includes definitions related to developer tools such as CodeBuild, CodeDeploy, and CodePipeline. Using a service template, we can create multiple Proton services (that refer to their respective application branches), which will build the application and deploy it to a certain infrastructure environment. Application services that are deployed to an environment are known as service instances.
A service template bundle consists of the cloudformation.yaml and manifest.yaml files, in both the instance_infrastructure and pipeline_infrastructure folder. It also includes schema files:
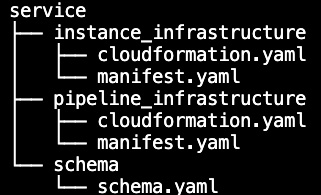
Figure 3.17 – The tree structure of the service folder
The tips and recommendations for writing service templates are the same as those for writing environment templates, such as using customization and resource parameters. The service template is also in this book's GitHub repository. To use the service template bundle with AWS Proton, perform the following steps:
- Go to the repository folder that you cloned (chapter-03-aws-proton-template) and create a tarball of the service folder:
$ cd chapter-03-aws-proton-template
$ tar -zcvf svc-template.tar.gz service/
- Upload the tarball in the same S3 bucket that we created in the previous section (proton-cli-templates-account-id):
$ aws s3 cp svc-template.tar.gz s3://proton-cli-templates-${account_id}/svc-template.tar.gz
- Once you have uploaded the service template tarball into the S3 bucket, you need to register the service template by clicking on Service templates, then Create service template:

Figure 3.18 – The Service templates page
- Under Template bundle source, select Use your own template bundle. You will then see S3 bundle location, where you need to click on Browse S3 and select the bucket where you upload the service template (in our case, it's proton-cli-templates-account-id/svc-template.tar.gz):
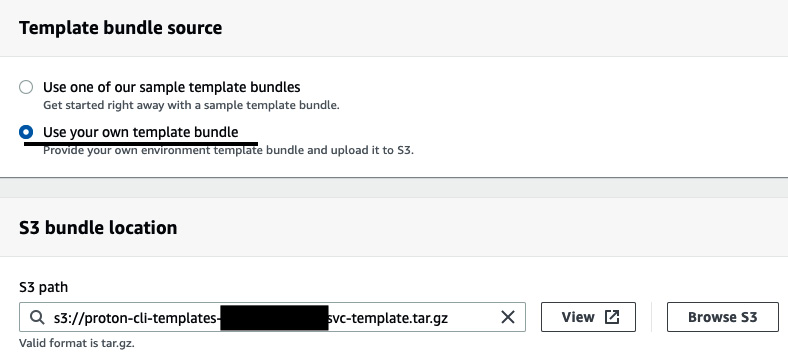
Figure 3.19 – Providing the service template's path
- Under Template details, use stark-svc-temp as Template name and Template display name. Then, we need to associate this template with the environment it's compatible with. In our case, the service template that we are creating is compatible with the environment template we created in the previous section (stark-env-template). Now, click on Create service templates:
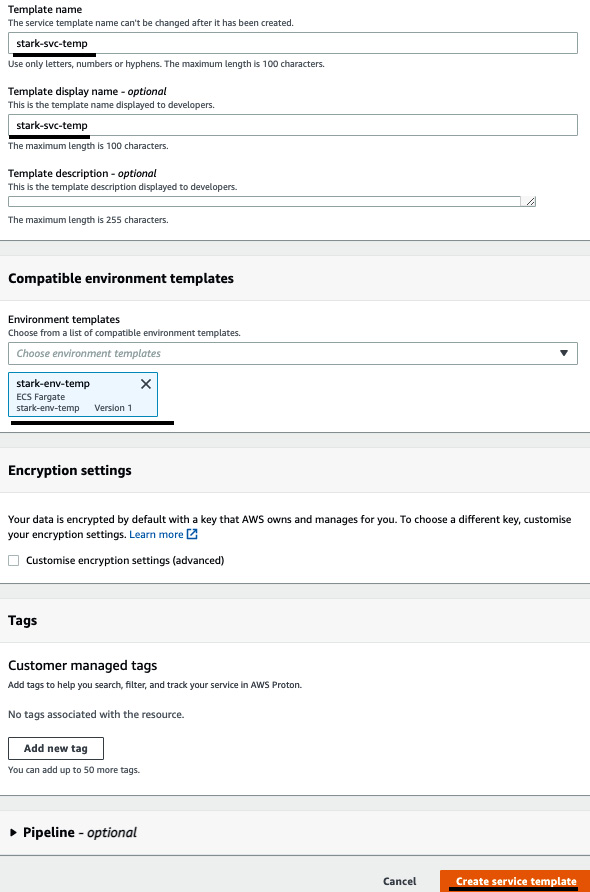
Figure 3.20 – Providing service template details
- Now, we need to click on Publish to publish the service template so that we can create a service instance:
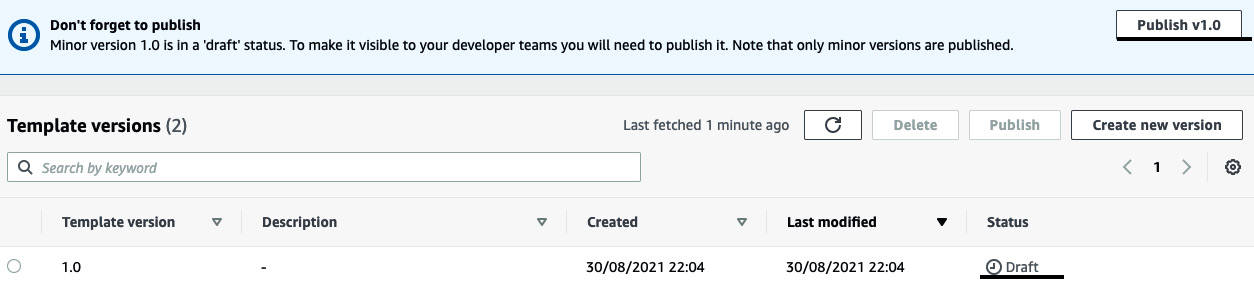
Figure 3.21 – Publishing the service template
Once the service template has been published, the developer can use this service template to create a service instance, which helps deploy the application to the environment. We will deploy the containerized application in the next section.
Deploying the containerized application by creating a service instance in Proton
In this section, we will create a service instance to deploy the containerized application on both environments. First, we will create a source connection to the application repository (This repository you need to create in Github and push the files of chapter-03-aws-proton folder in the master branch. In my case I have created a repo aws-proton in Github) so that it can be used by AWS Proton. You also need to create a dev branch out of master branch and edit the line 93 of index.html file. You need to replace the string Staging to Dev. We will deploy the application from dev branch to stark-env-dev and then deploy the master branch to stark-env-staging.
Creating a source connection (GitHub)
To create a source connection with your VCS (GitHub, though you can use Bitbucket or GitLab as well), perform the following steps:
- Go to the AWS Proton console and click on Source connections under Settings:
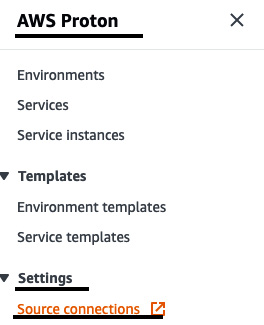
Figure 3.22 – Creating a source connection
- Click on Create connection to link the VCS repository:

Figure 3.23 – Source connection page
- Under Select a provider, click on GitHub and set github-awsproton as Connection name. Then, click on Connect to GitHub:
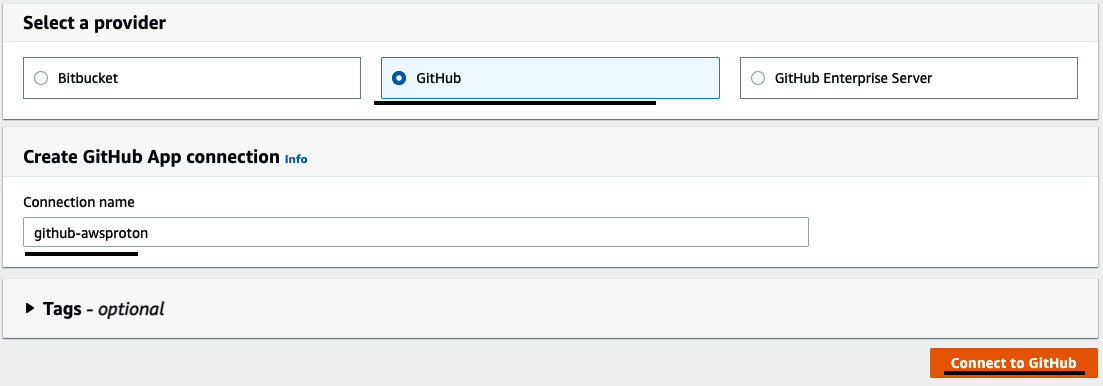
Figure 3.24 – Providing a connection name
- You will be redirected to the Connect to GitHub page, where you need to click on Install a new app:
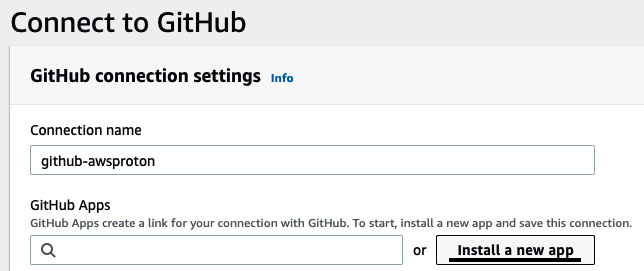
Figure 3.25 – Invoking GitHub from AWS
- Then, you need to authorize your GitHub account to install AWS Connector and configure your account:
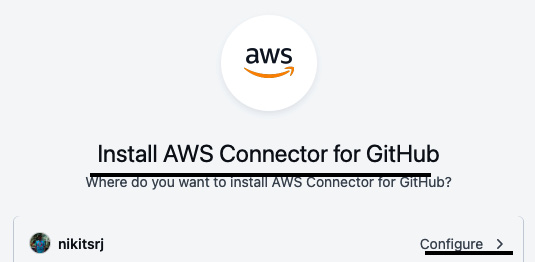
Figure 3.26 – Installing AWS connector in GitHub
- Under Repository access, select Only select repositories, and then select the aws-proton repository. Click on Save:
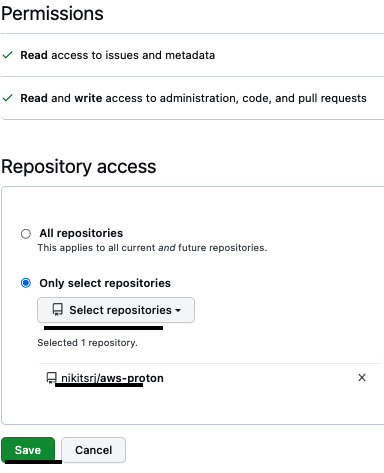
Figure 3.27 – Selecting the repository to link to AWS
- You will be redirected to the AWS Connection page, which contains the GitHub Apps ID. Click on Connect to create your source connection:
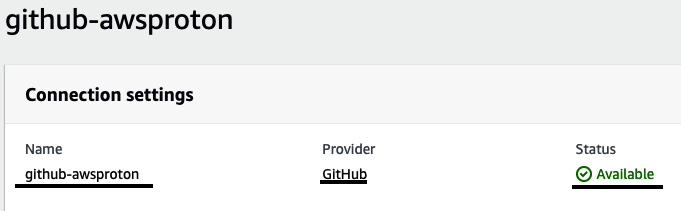
Figure 3.28 – Source connection status
Now that we've created the source connection, let's deploy the application by creating a service instance.
Deploying the application by creating a service instance
To deploy the application on the environment, perform the following steps:
- Go to the AWS Proton Console and click on Services. Then, click on Create service:

Figure 3.29 – The Services page
- You will be asked to choose Service templates. You will see stark-svc-temp, which we created in the previous section. Select stark-svc-temp, and then click on Configure:
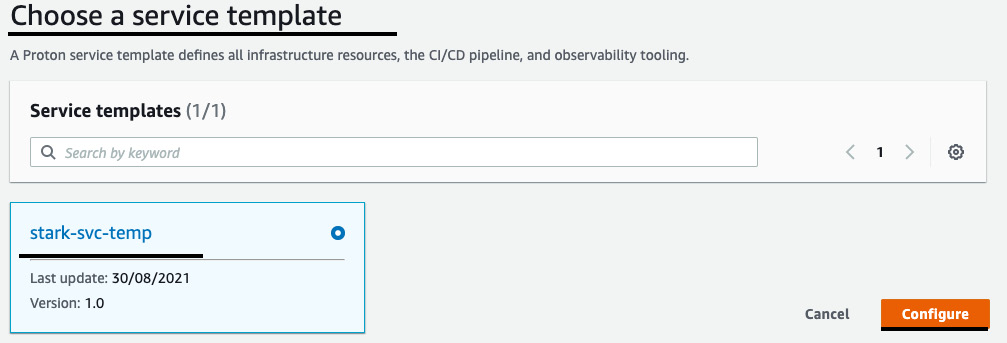
Figure 3.30 – Selecting the service template
- Under Service settings, provide neonapp-staging as Service name. Give master as Branch Name and <repo-username/repository name> as Repository Id. Then, select Repository Connection and click on Next:
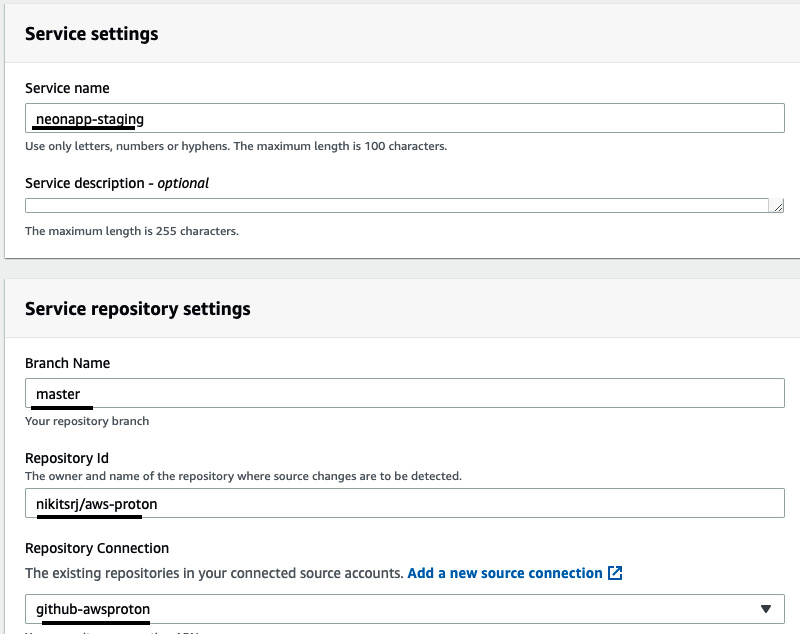
Figure 3.31 – Service repository settings
- Under Configure custom settings, set neonapp-staging as Name. Select stark-env-staging as Environment. Then, set Task size to X small and click on Next:
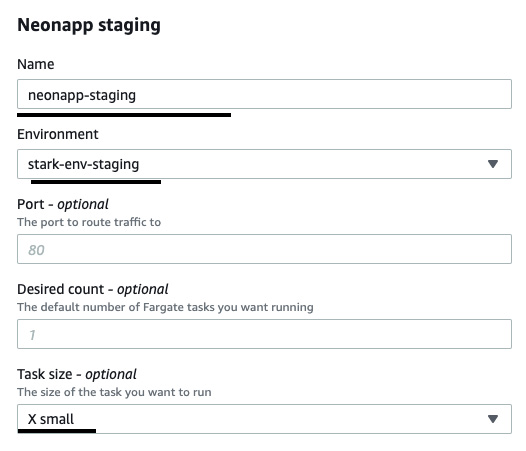
Figure 3.32 – Providing service instance details
- Review the service template and click on Create. Proton will start creating the service instance, which will run the cloudformation template to spin up the pipeline resources and deploy the application to the infrastructure environment. You can visit the CloudFormation Console to check the resources that have been created by the neonapp-staging stack.
- You can also see the CodePipeline that was created by CloudFormation and the application's deployment flow. Go to the CodePipeline console and click on the neonapp pipeline:
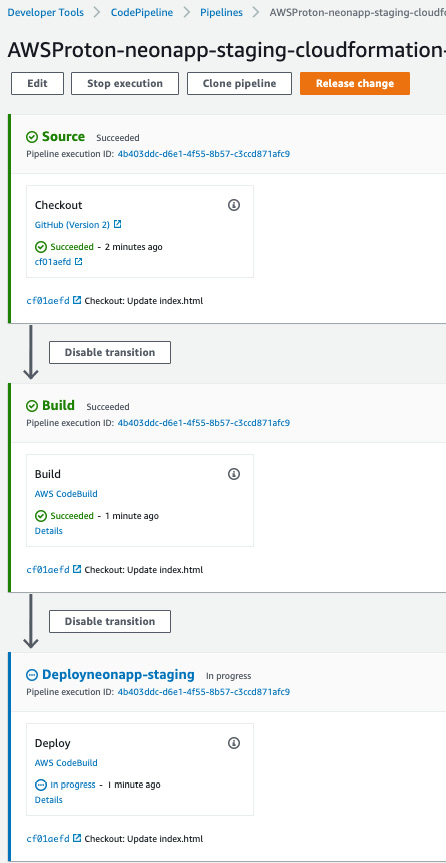
Figure 3.33 – CodePipeline created by CloudFormation
- If you look at Deployment status of the neonapp-staging service instance, it will be In progress. Once Deployment status is Succeeded, you can go to the ServiceEndpoint link to see the application running:
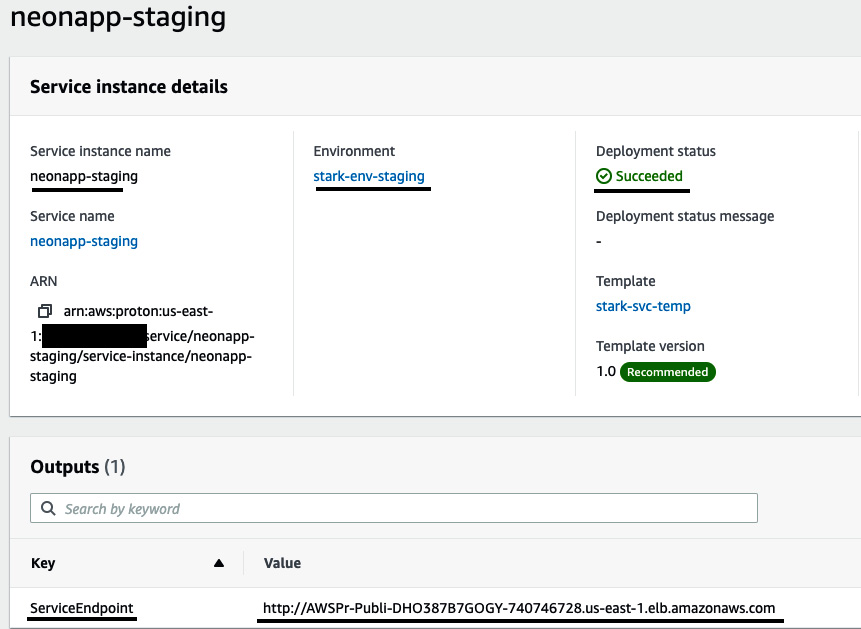
Figure 3.34 – The Service instance details page
- Once you go to the ServiceEndpoint link, you will see the application, which is running in the ECS staging environment:

Figure 3.35 – Application running in the staging environment
- Now, to deploy the dev branch in the dev environment, we need to create another service instance with the branch name dev (Step 3) and select stark-env-dev as the environment (Step 4). Once you have created the service instance, you will see that the application running in the dev environment is different:
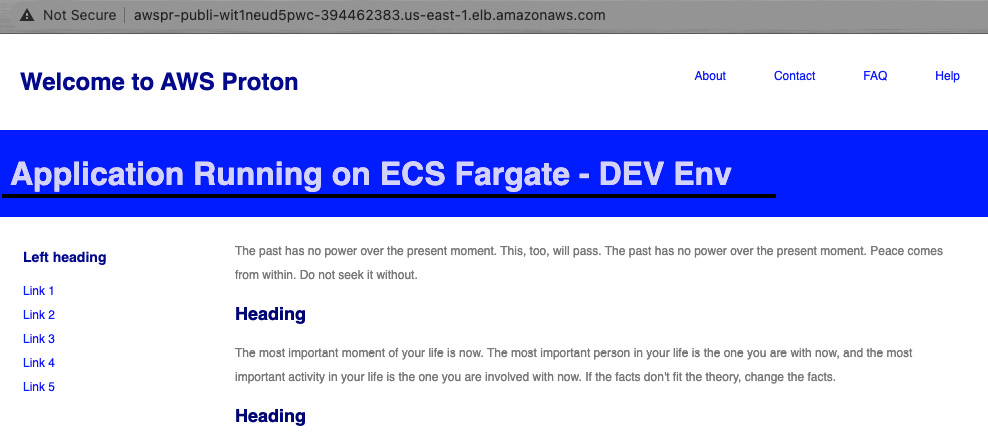
Figure 3.36 – Application running in the dev environment
It was so straightforward to deploy the application related to the dev branch in the dev environment, without even writing a separate task definition file for ECS. Instead, we leveraged the service template. This is the power of templating and the AWS Proton service, where we can spin up multiple infrastructure environments or deploy multiple instances of the application on the environment at scale. Now, we can make this environment secure by making sure that the template we are using passes the CloudFormation guard checks. In the next section, we will learn how to scan the application code using AWS CodeGuru.
Introduction to Amazon CodeGuru
In the software development life cycle, a code review process takes place when all the developers write their code and raise a pull request to merge to an upstream branch. The code review is generally done by the team leader of the project, but it could be a slow process to eyeball the entire code. The code review process is important, but it shouldn't increase the workload for reviewers and become a bottleneck in development. By using code review tools, we can automate the process of reviewing the code. Some famous tools in the market do this magic for us, such as SonarQube. Recently, Amazon launched a new service called Amazon CodeGuru, which can perform code reviews as well as provide application performance. This not only helps in improving the reliability of the software but also lets us dig deep and cut down on the time spent finding difficult issues, such as sensitive data, race conditions, undefined functions, and slow resource leaks.
CodeGuru is empowered by machine learning, best practices, and a big code base. It learned from the millions of code reviews that are used in open source projects, as well as internally at Amazon.
CodeGuru provides the following two functionalities:
- Reviewer: Automated code analysis and reviews for static code
- Profiler: Visibility as well as recommendations about application performance during runtime
The following diagram shows the capabilities of Amazon CodeGuru:

Figure 3.37 – Capabilities of CodeGuru
At the time of writing, CodeGuru supports two languages: Java and Python. It works with the following VCSes:
- AWS CodeCommit
- Bitbucket
- GitHub
- GitHub Enterprise Cloud
- GitHub Enterprise Server
- Amazon S3
We will use CodeGuru Reviewer to review the code in the CodeCommit repository in the next section.
Integrating CodeGuru with AWS CodeCommit and analyzing the pull request report
In this section, we will be creating a CodeCommit repository and pushing the code to the repository. We will associate the CodeCommit repository with CodeGuru. We will create another branch and modify the code in the new branch and raise a pull request. Then, we will look at the recommendation provided by CodeGuru on the pull request.
To get the recommendation from CodeGuru in the CodeCommit repository, perform the following steps:
- Go to the AWS CodeCommit console to create a repository. Call it codeguru-sample-app. Click on Enable Amazon CodeGuru Reviewer for Java and Python. This will enable CodeGuru to review the code that we push into the repository:
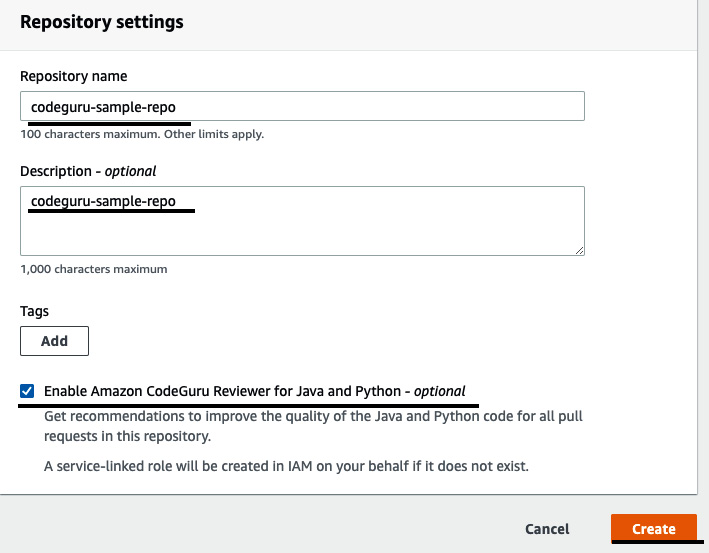
Figure 3.38 – Creating a CodeCommit repository and enabling CodeGuru
- Before pushing the messy code into the repository, go to the CodeGuru console and click on Repositories to see the associated repositories that we just created:
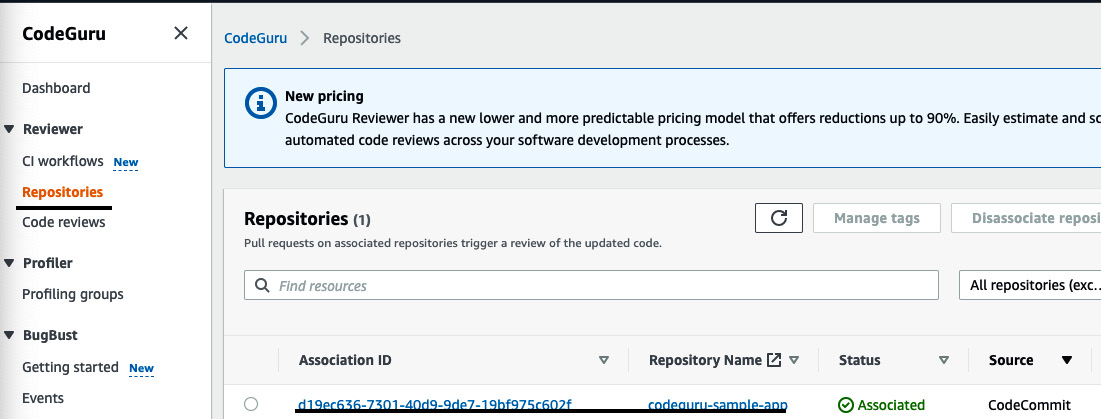
Figure 3.39 – The CodeGuru console showing the associated repository
- Now push the files of chapter-03-codeguru-sample into the codecommit empty repository called codeguru-sample-app, as shown in the following code block (you will need to generate the codecommit HTTPS Git credential by going to https://docs.aws.amazon.com/codecommit/latest/userguide/setting-up-gc.html):
$ git clone https://git-codecommit.us-east-1.amazonaws.com/v1/repos/codeguru-sample-app
$git clone https://github.com/PacktPublishing/Modern-CI-CD-on-AWS.git
$ cd Modern-CI-CD-on-AWS/chapter-03-codeguru-sample
$ cp -rpf *codeguru-sample-app
$ cd codeguru-sample-app
$ git add .
$ git commit -m "initial push"
$ git push origin master
- Now, let's create another branch, called dev, modify the code, and push it back to the repository. After that, we will raise a pull request from dev to master:
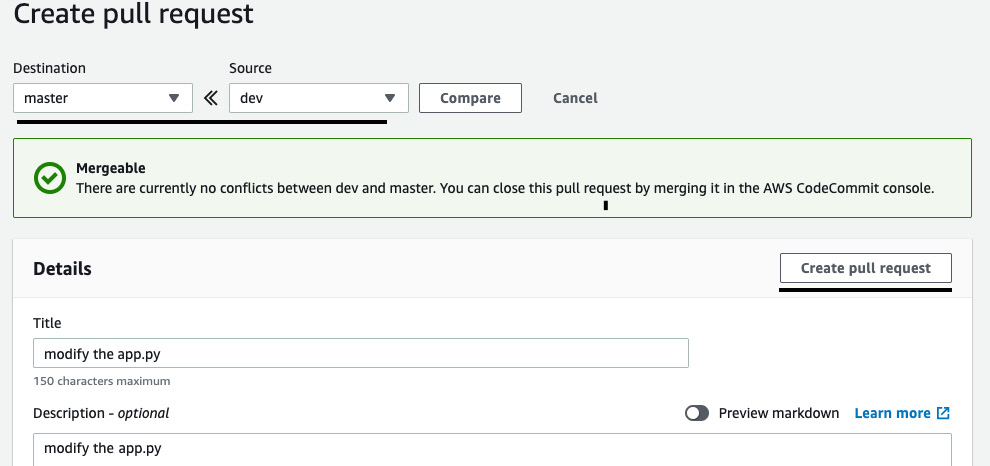
Figure 3.40 – Raising a pull request
- Once you've done this, in the Details section of the pull request, you will see a notification, stating that the CodeGuru Reviewer feature has been enabled. It will provide recommendations whenever you raise a pull request:
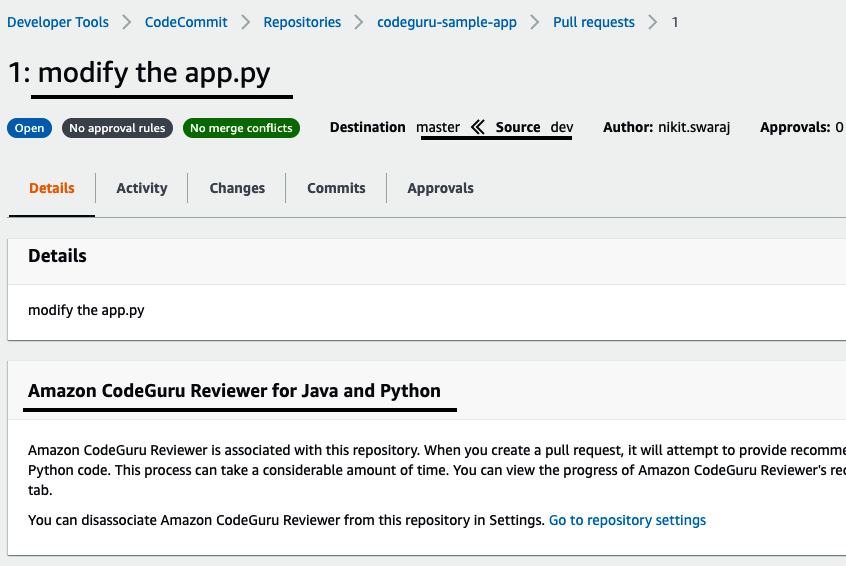
Figure 3.41 – The status of the pull request
- Now, go to the CodeGuru Dashboard page. You will see 1 under Pull requests in the Service overview section because we just raised a pull request. In the Code Reviews tab, Review Status is Pending. This is because CodeGuru takes 10-15 minutes to analyze the entire source code and give the recommendation:

Figure 3.42 – The status of the code review
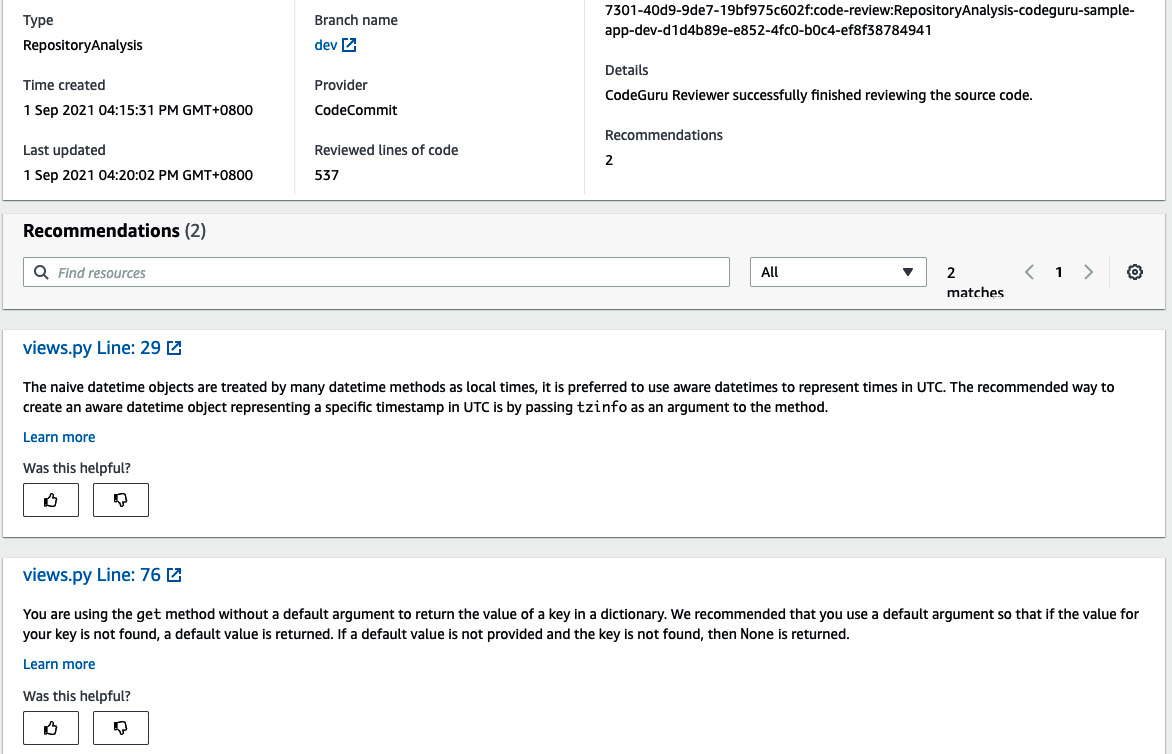
Figure 3.43 – Recommendation from CodeGuru
Based on the recommendation provided by CodeGuru, the reviewer can easily ask the person to fix the code and then raise the pull request again. This saves lots of time, as well as manual work. We will learn more about CodeGuru in Chapter 9, DevSecOps Pipeline with AWS Services and Tools Popular Industry-Wide, where we will be implementing a full CI/CD pipeline with security in place.
Summary
AWS Proton is an amazing service when it comes to automating the process of codifying your infrastructure and application deployment at scale. We learned how to create an environment and service template bundle and covered various writing tips. We also spun up multiple environments using a single environment template and deployed the containerized application from a different branch in the respective environment using a service instance. When it came to reviewing the code, we learned how Amazon CodeGuru can give amazing recommendations, even at the time of raising pull requests.
The next chapter will cover how we can implement a service mesh in an EKS cluster and restrict network and API communication between services and pods.