Chapter 10: Configuring Fundraising Features
In Chapter 9, Installing Nonprofit Cloud Solutions, we installed NPSP and did the required configurations for everything except the fundraising features.
Why did we do so? We did this because fundraising is at the very heart of NPSP. There are many ways to configure NPSP, as can be seen from the variety of use cases we have already discussed. Although we may not cover every configuration in detail, in this chapter, we will walk through the configurations of the most common use cases.
By the end of this chapter, we will have the following knowledge base:
- How to implement the required configurations in NPSP for fundraising
- How to implement the recommended configurations in NPSP for fundraising
- How to configure the most commonly used NPSP features for fundraising
- Use cases for other commonly used NPSP fundraising features
As we work through each of these areas, it is a good practice to remember how vitally important it is to truly understand the organization and what its goals are as regards the Nonprofit Cloud implementation. In Chapter 9, Installing Nonprofit Cloud Solutions, we began with the installation of NPSP and the post-installation configuration. Here, in Chapter 10, Configuring Fundraising Features, we will complete the configuration of NPSP and discuss any use cases for the features that we are implementing.
Required configurations for NPSP fundraising
Since you have already installed NPSP in Chapter 9, Installing Nonprofit Cloud Solutions, you will need to complete these additional configurations to adequately set up and test NPSP for your use cases. These steps are required before we can begin to refine what is required:
Note
Whether you are using a new instance or are installing NPSP in an already existing instance of Salesforce, check to make sure the post-installation configuration is done.
- Log in to your Salesforce instance and you should be back at the Get Started with NPSP - Admin page.
- You can refer to the following screenshot:
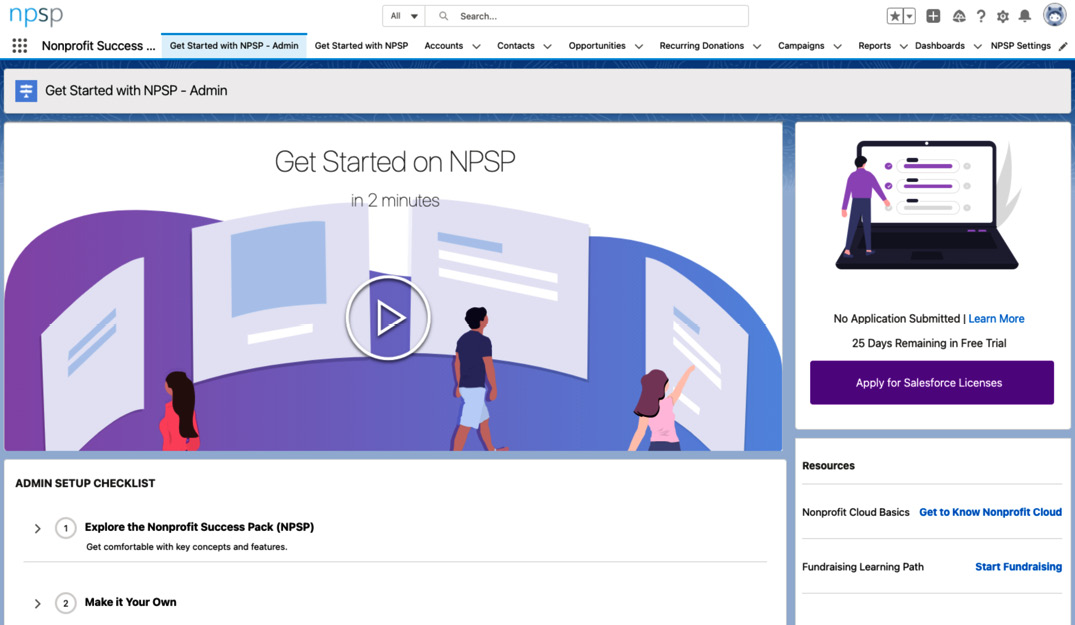
Figure 10.1 – Get Started with NPSP – Admin landing page when you log in to Salesforce
Once you are done with this, let's finish up the required configurations.
Opportunity stages
As a Salesforce administrator, you are already familiar with the standard object, Opportunity. In a Salesforce instance with NPSP, you should confirm that the following picklist values exist for opportunities based on the use cases you will use.
Go to Setup > Object Manager > Opportunity > Fields & Relationships to edit or add new stages as per the recommended stages list in the following table:

Table 10.1 – Recommended settings for the stage value in the Opportunity object
These are the suggested stages for opportunities when using NPSP. Additional stages may be required depending on specific use cases.
Sales processes
NPSP has four different sales processes that come as part of the standard package:
- Donation
- Grant
- In-Kind Gift
- Major Gift
You need to confirm that they are available in your Salesforce instance by going to Setup > Sales Processes, as shown in Figure 10.2:
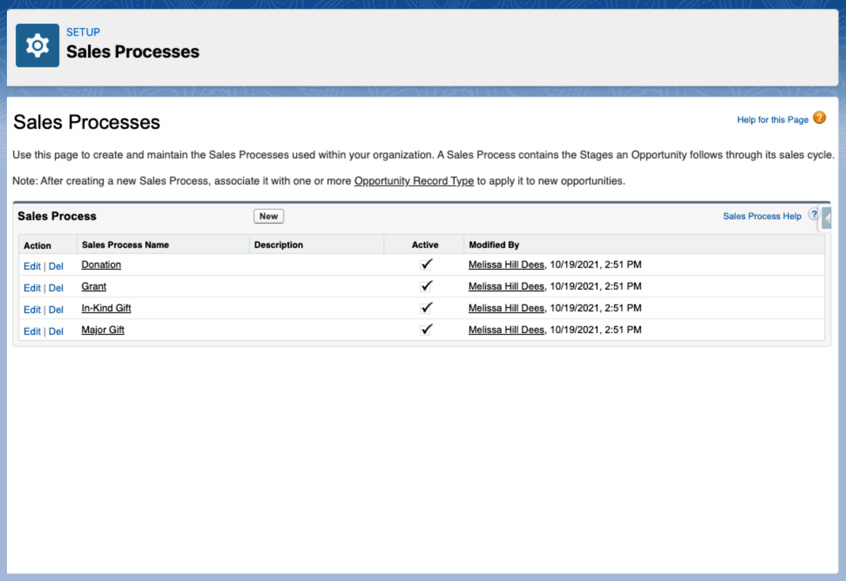
Figure 10.2 – Example of the sales processes that are present to use in NPSP
Each sales process may use a specific set of opportunity stages based on the business process the organization has shared. The recommended settings are listed here:
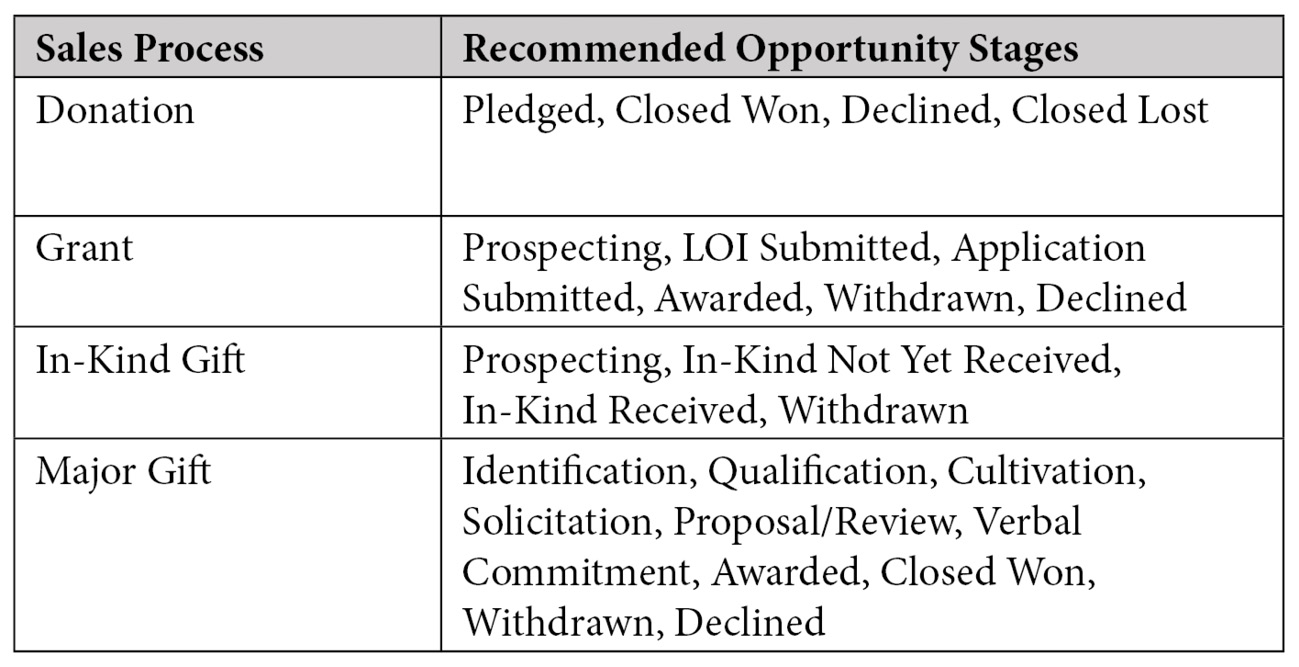
Table 10.2 – Sales process examples with correlating recommended opportunity stages
Additional sales processes may exist in the Salesforce instance for reasons outside of NPSP, while additional sales processes may be added to NPSP if the business processes are required.
Opportunity record types
NPSP also comes with six different opportunity record types as part of the standard package. Check to confirm that each of the six record types exists in the Salesforce instance by going to Setup > Object Manager > Opportunity > Record Type:
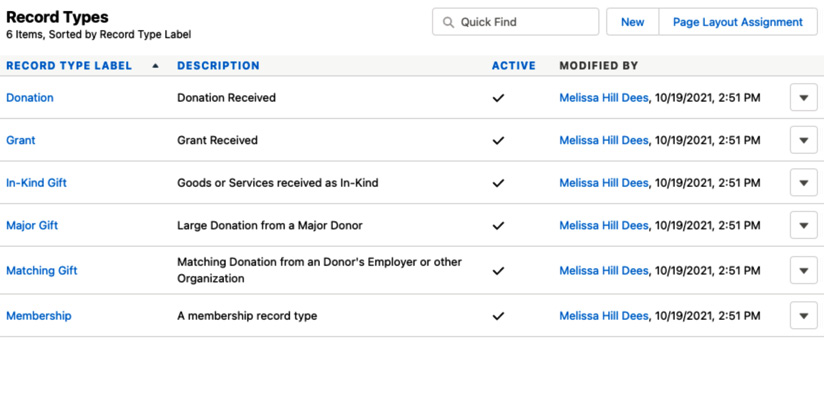
Figure 10.3 – Recommended Opportunity record types for standard NPSP
For each record type, you can create unique page layouts, picklist values, and business processes and enable those record types as the default for users of various profiles in Salesforce. There may be additional opportunity record types in the Salesforce instance, particularly if it has been in use for some time.
Note
This is an excellent reason to create a sandbox in an existing Salesforce instance. Some Opportunity record types may be duplicates in what they accomplish. Also, be aware of the Opportunity record type that is set as the default for existing users.
New button on the Opportunity-related list
Confirm that the New button on the opportunity-related list is working as expected by following these configuration steps:
- Click Setup > Object Manager > Accounts > Page Layout > Organization (or Account) Layout. Scroll down through the related list to Opportunities.
- Click the wrench and then scroll down to the section marked Buttons.
- Click the + sign to open this section.
- Be sure that the New button is checked and move the New Account Donation to the Selected Buttons section.
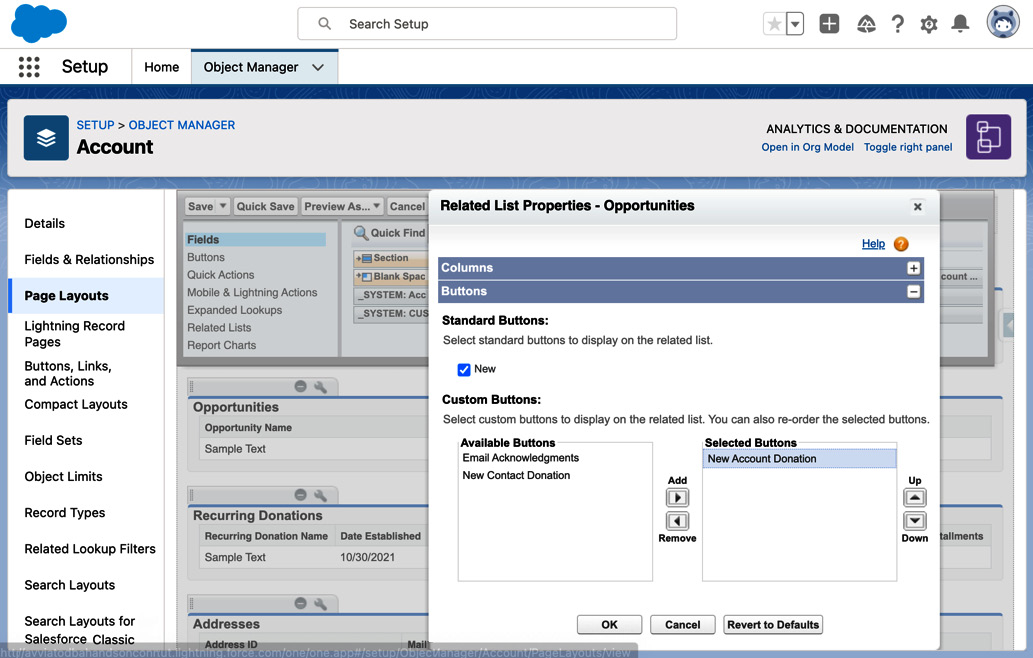
Figure 10.4 – This figure shows how the setup should look when you are finished
Once you have updated or confirmed these configurations, click OK.
New and Edit buttons on Contact
You need to confirm that the following button lists exist on the Contact record:
- New Donation
- New In-Kind Gift
- New Major Gift
- New Membership
- New Open Recurring Donation
There may be additional buttons on the page layout. The buttons listed here are the ones that are necessary for the fundraising feature configuration:
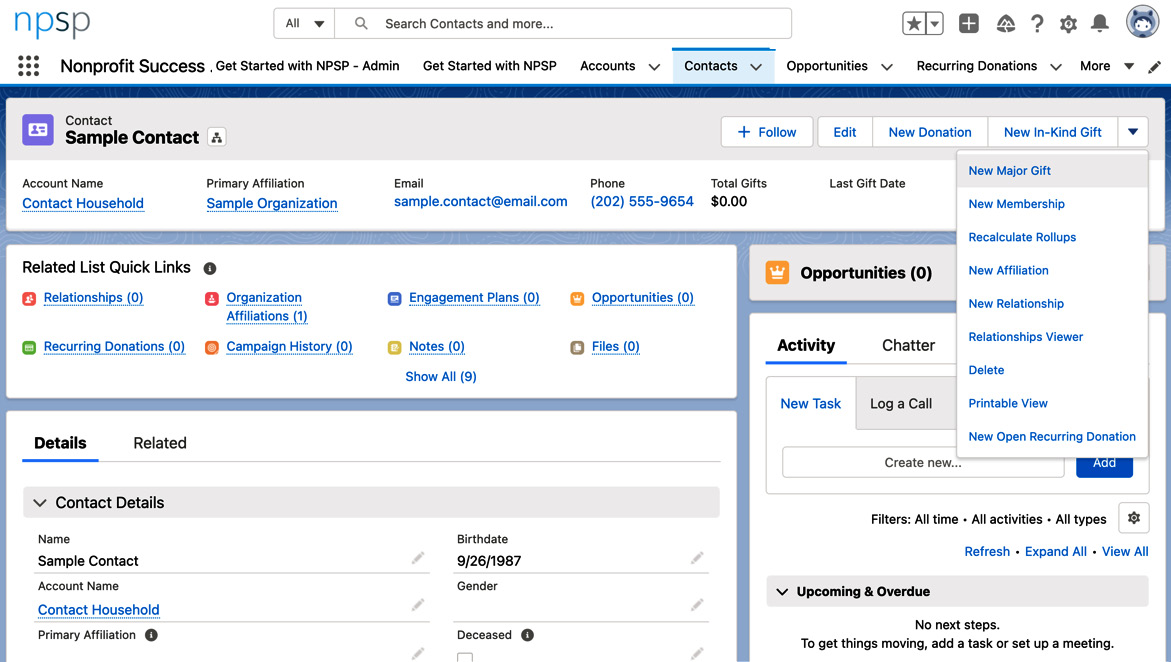
Figure 10.5 – Buttons that should exist on the Contact record
If these buttons do not exist in the Salesforce instance, you may need to create Quick Actions for each Opportunity record type and add these buttons to the Contact record.
Opportunity Contact Roles
Opportunity Contact Roles are used to connect Opportunities and Contacts. Although you can create whatever is appropriate for the nonprofit, the most commonly used roles are as follows:
- Donor
- Household Member
- Soft Credit
- Matched Donor
- Honoree
- Notification Recipient
- Grant Manager
- Decision Maker
- Influencer
- Solicitor
- Workplace Giving
- Other
To add, edit, or deactivate any Contact Roles, go to Setup > Feature Settings > Sales > Contact Roles on Opportunities.
Enabling Opportunity workflow rules
There are two helpful workflow rules in NPSP that are inactive by default when NPSP is installed. The workflow rules are as follows:
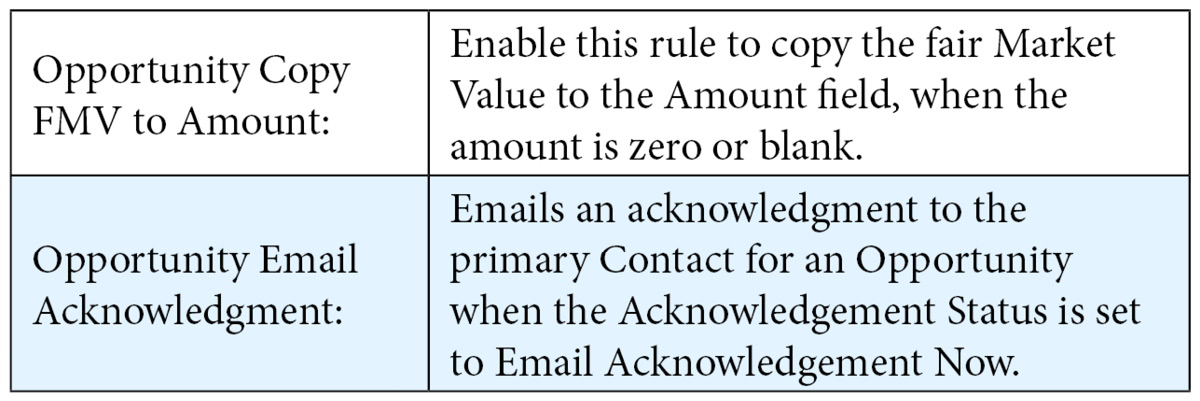
Table 10.3 – Opportunity workflow rules that need to be activated during configuration
To enable these workflow rules, go to Setup > Process Automation > Workflow Rules. Activate these two workflow rules. These two automations streamline the work done in fundraising and conclude the required configurations. Next, we begin the recommended configurations.
Recommended configurations for NPSP fundraising features
Now that the required and standard configurations for NPSP fundraising features are complete, the next step is to apply the recommended configurations. Applying some of these configurations will depend on the nonprofit's use case. Let's get started and look at what can be configured.
Helpful list views
One of the most helpful configurations is the list view. Salesforce comes with default list views already created. For Nonprofit Cloud users, the following list views are recommended for Accounts and Opportunity:
The table shows the recommended name of the list view, the record type to be used as a filter (if applicable), and the fields to be included in the list view.
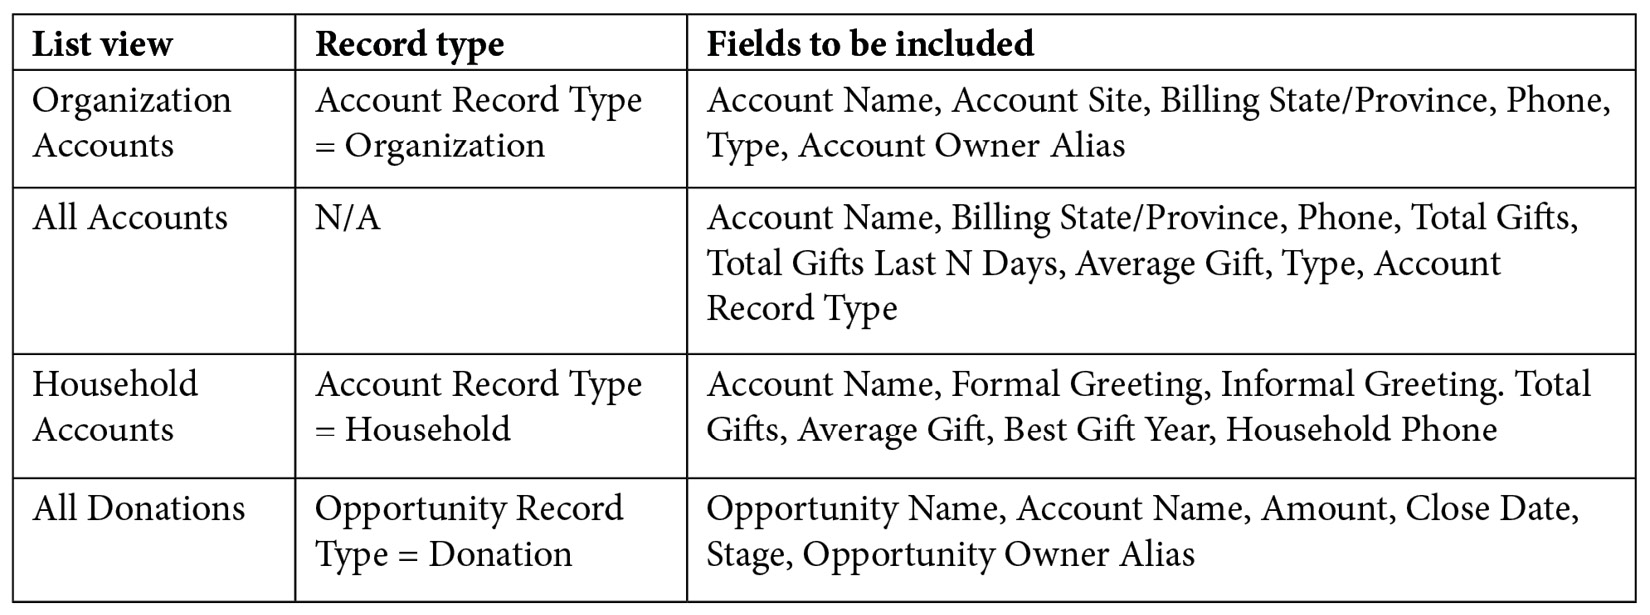
Table 10.4 – Recommended list view names, record types, and included fields for helpful list views
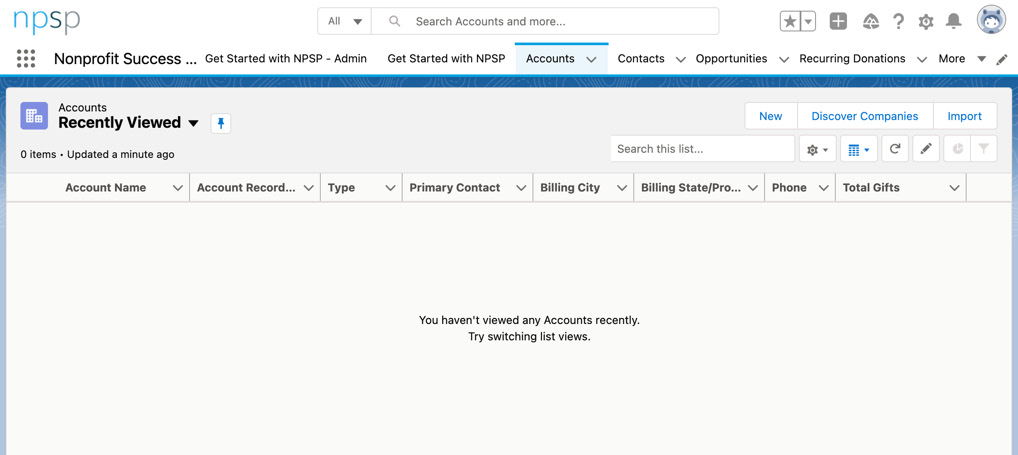
Figure 10.6 – This is what you should see when you click the Accounts object tab in NPSP
- Click List View Controls cog and then click New.
- Enter the appropriate name. Salesforce will automatically create the API name. Allow all users access.
- Click Save.
- Next, update the display fields for the list view.
- Open the list view and click List View Controls cog.
- Click Select Fields to Display and move the appropriate fields from available to visible.
- Click Save.
- Finally, open the list view and click the filter. Click Add Filter.
The All-Accounts list view does not require a filter. For the rest of the list views, select record type as the field, equals as the operator, and appropriate record type name as the value.
- Click Done.
- Click Save.
Your helpful list views should now be configured appropriately. Don't forget that you can pin the single most used list view so that the page automatically opens on that list view. Let's continue to Compact Layouts. List views that are filtered by one record type make inline editing available for many fields.
Configuring Compact Layouts
Already in this chapter and in Chapter 9, Installing Nonprofit Cloud Solutions, page layouts have had some updates. NPSP also adds new Compact Layouts to the Salesforce instance. Some of the Compact Layouts installed by NPSP are as follows:
- Contact: NPSP Contact Compact Layout
- Account: NPSP Household Account, NPSP Organization Account
- Opportunity: NPSP Donation Compact Layout
- Campaign: NPSP Compact Layout
These can be used as they are installed, or you can clone them to create more customized versions that work better for the use case.
Configuring fundraising features for specific use cases
As of the time of publication of this book, NPSP offers 20 different features that can be configured for specific use cases. The features are listed here. We are going to look at the most common features used in fundraising:

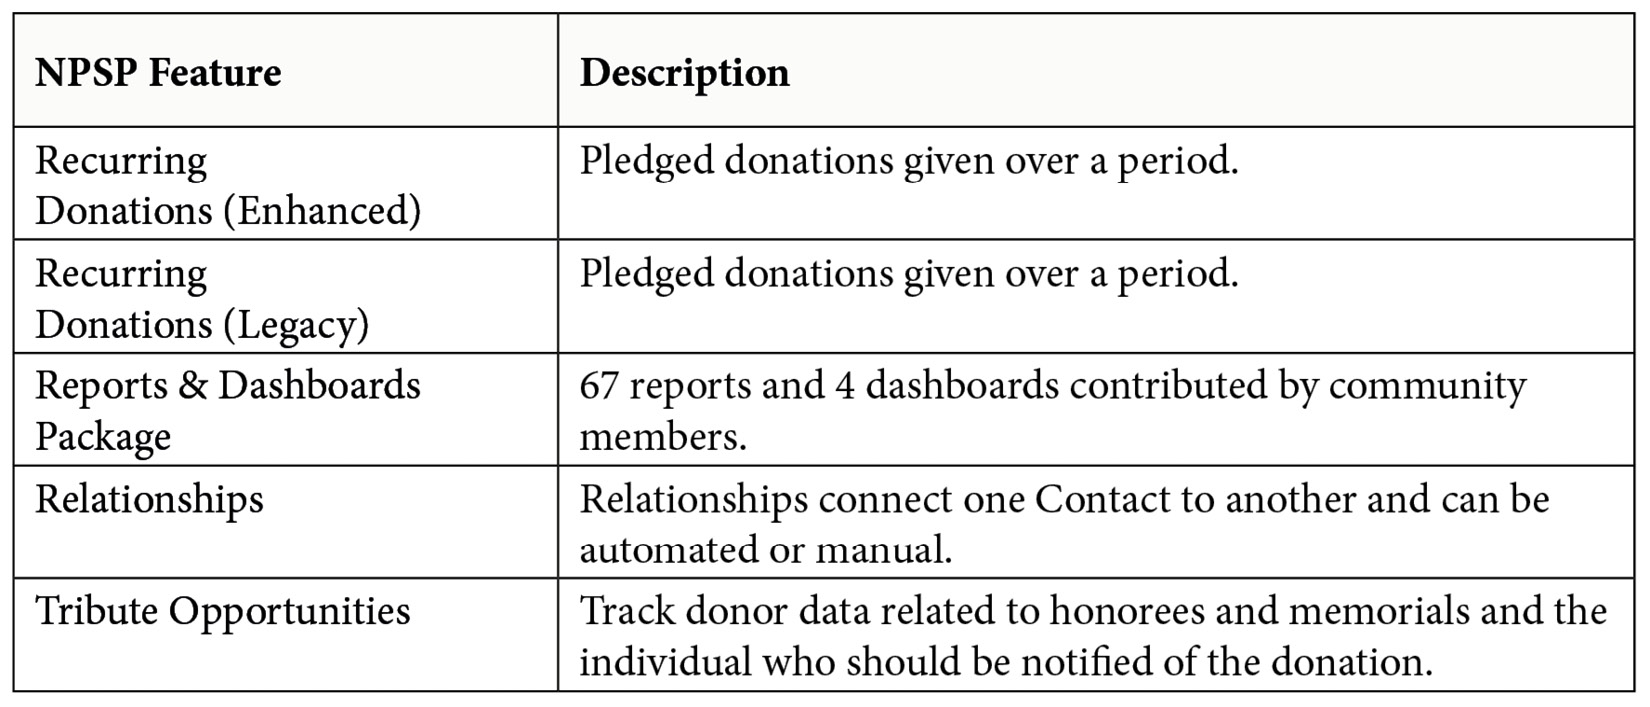
Table 10.5 – Fundraising features available in NPSP
Of these features, the most commonly used are as follows:
- Automated and manual soft credits
- Donation allocations
- Gift entry
- Recurring donations
Let's address configuring each of these in the next section.
Configuring automated and manual soft credits
In Chapter 2, What Is NPSP?, we discussed soft credits to track a donor's influence on donations that are made to the nonprofit. We outlined a situation where Diana, a board member with a nonprofit, donates to the nonprofit. Her employer matches her donation. For the donation from the employer, Diana should receive soft credit for that donation. So how do we configure NPSP to make that happen? Let's see.
Firstly, we need to confirm that the Advanced Mapping for Data Import and Gift Entry system tools are enabled.
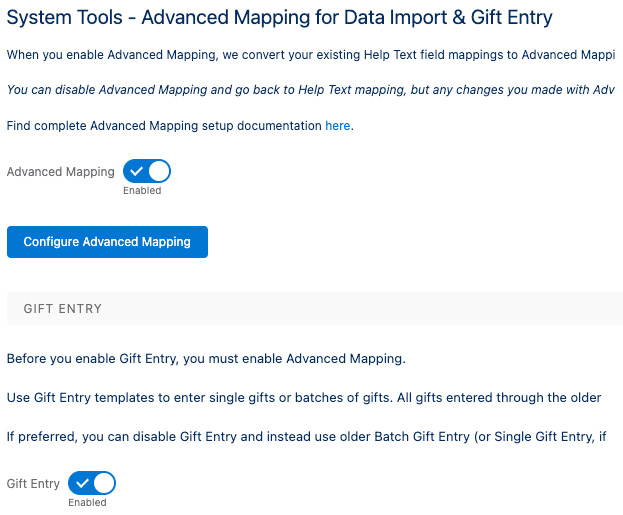
Figure 10.7 – NPSP Settings page where the Advanced Mapping and Gift Entry settings are enabled
With these tools enabled, there are several steps yet to confirm:
- Confirm the appropriate roles have been activated on the Opportunity Contact Role object based on the nonprofit's use case. For Diana's soft credit, the Matched Donor role should be available and assigned.
- Confirm that the soft credit fields are enabled on Contacts, Relationships, and Affiliations by checking the field-level security and the page layouts.
- Confirm that the Manage Soft Credits button is available on the Opportunity page layout for the profiles who need access to the feature.
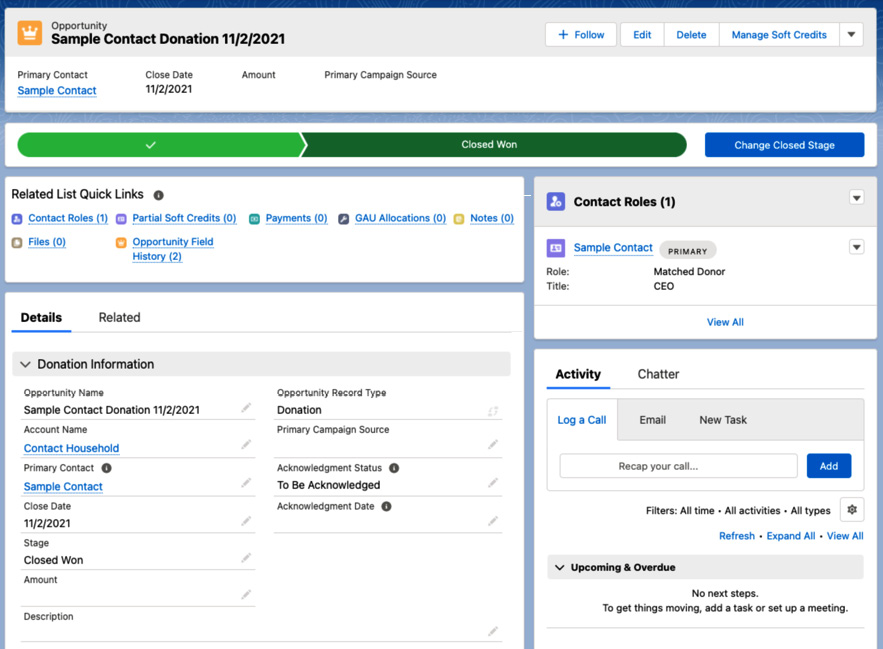
Figure 10.8 – Sample Opportunity record showing the related Contact Roles and Manage Soft Credits dropdowns
Other available configurations include the following:
- Enabling automated household member soft credits
- Enabling contact role for organizational opportunities
- Enabling relationship and affiliation soft credits
- Enabling partial soft credits
- Enabling account soft credits
Determine which of these will be needed using the tools for discovery as discussed in Chapter 8, Requirements - User Stories – Business Processes – What Is Your Organization Trying to Achieve?. Resources for additional configurations are listed at the end of this chapter.
Remember
A best practice is to only reveal what is needed. Less complexity aids in easy user adoption. Additional features can be configured as demand requires.
Configuring donation allocations
Another important feature that will automate manual processes is the ability to define General Accounting Units (GAUs) that correlate to a nonprofit's chart of accounts. Donations are then assigned and tracked based on the allocation. The objects involved in donation allocations are as follows:
- General Accounting Unit: Chart of accounts represented
- GAU Allocation: Connects the donation to the GAU
- Campaign: Tracks groups of donations
- Opportunity: Tracks the amount for each donation
- Recurring Donation: Tracks the amount for recurring donations
There are several steps involved in confirming configurations for donation allocations:
- Confirm that every profile that needs access to GAUs has access to the GAU tab.
- Confirm that every profile that needs access to GAUs has access to the objects, fields, and, specifically, the visualforce page entitled npsp.ALLO_ManageAllocations.
- Confirm that the GAU Allocations-related list has been added to the appropriate page layouts.
- To use donation allocations, you need to create at least one GAU.
- Additionally, you can add custom fields via the Manage Allocations and Additional Fields fieldset if the nonprofit's business processes require them to manage allocations.
Let's now see the steps to automate allocations:
- Go to NPSP Settings > Donations > GAU Allocations and click Edit.
- Select the Default Allocations Enabled checkbox and select GAU for the default.
- Click Save.
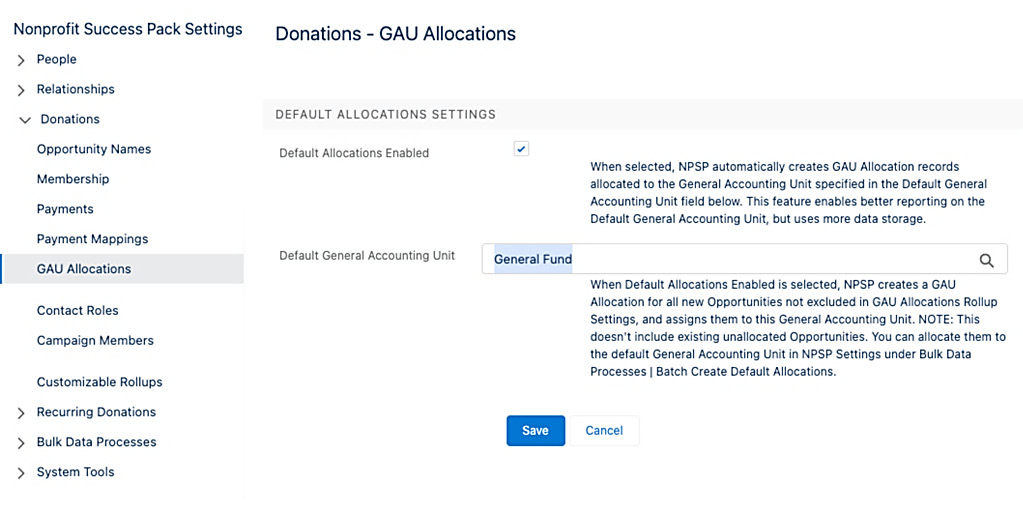
Figure 10.9 – Example of a standard GAU Allocation configuration
With this configuration, all incoming donations are automatically allocated to General Fund. Rollups for Allocations in NPSP are pre-defined. If you choose to customize allocation rollups, you can exclude specific Opportunity record types using filters and set day values or fiscal years. These settings are available to edit in NPSP Settings > Donations > Customizable Rollups.
Configuring gift entry
Gift Entry is an important tool for facilitating the entry of donations in Salesforce and maintaining consistent data integrity. By default, Gift Entry is disabled in NPSP.
To enable Gift Entry, you can follow these four steps:
- Go to NPSP Settings > System Tools > Advanced Mapping for Data Import & Gift Entry.
- Confirm that Advanced Mapping is enabled.
- Then, enable Gift Entry.
- Replace the New Donation button in page layouts with the New Gift button or add the New Gift button in the Mobile & Lightning Actions section of the page layouts for Accounts and Contacts.
Confirm that the users have the Gift Entry Recommended permission set assigned so they can access the appropriate tools. There is an extensive list of standard permissions that should be confirmed for the Gift Entry Recommended permission set; see the Resources and additional reading section at the end of this chapter. Additional permissions may be granted based on the nonprofit's specific use cases.
In the Gift Entry tab, you can update the list view for Batches. You can also edit or create a new template for Gift Entry, which is specifically based on the nonprofit's business processes.
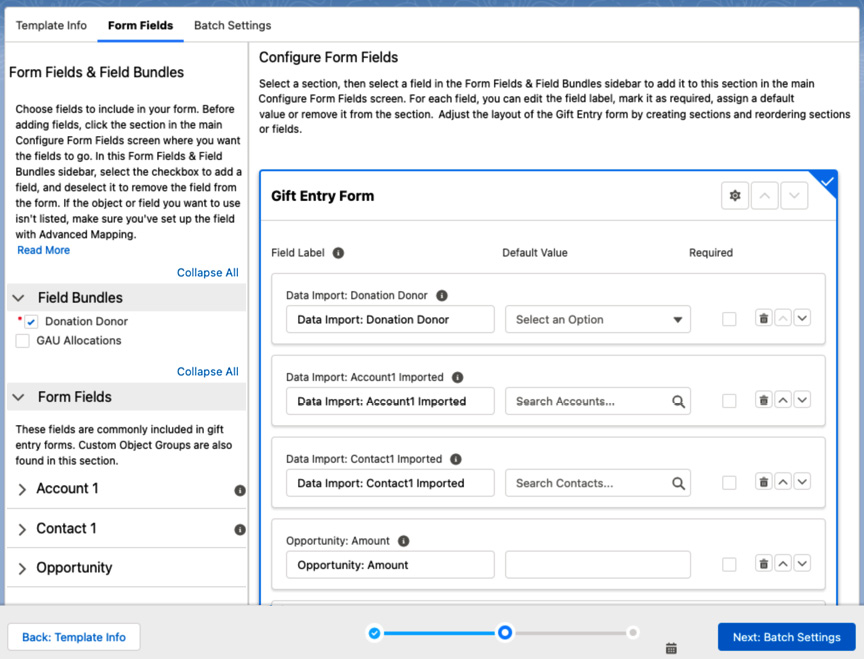
Figure 10.10 – New gift entry template creator in NPSP
Advanced options for configuration include adjusting Gift Entry and advanced mapping so that a contact's address field is autopopulated in the Gift Entry form. Advanced options are documented in the Resources section for Configure Gift Entry.
Configuring recurring donations
Recurring donations are what every nonprofit hopes for – donors who pledge to give over and over on a recurring basis. NPSP needs to be configured to accept and track those recurring gifts. Because recurring donations are so important, NPSP introduced Enhanced Recurring Donations in March 2021. To configure the ability to track gifts that donors have pledged (monthly, quarterly, yearly, and even custom schedules), the Recurring Donation and Opportunity objects are used.
The Recurring Donation object is where the donation schedules and amounts are set; this object also related the donor to the donation. The Opportunity object tracks each installment paid per the schedule and amount set in the Recurring Donation field.
To configure Recurring Donations, review the settings in NPSP Settings > Recurring Donations > Recurring Donations.
The settings are editable based on the nonprofit's business processes; however, NPSP does provide default settings. You will also need to confirm that Recurring Donations users have the appropriate object, field, and Apex class permissions, specifically for the Recurring Donations and Opportunities objects. There is no default Recurring Donation permission set installed; you may want to create your own based on the detailed information supplied in the Resources section of this chapter.
You also need to confirm that the Active Schedules and Upcoming Installments components are visible on the Recurring Donations lightning record pages.
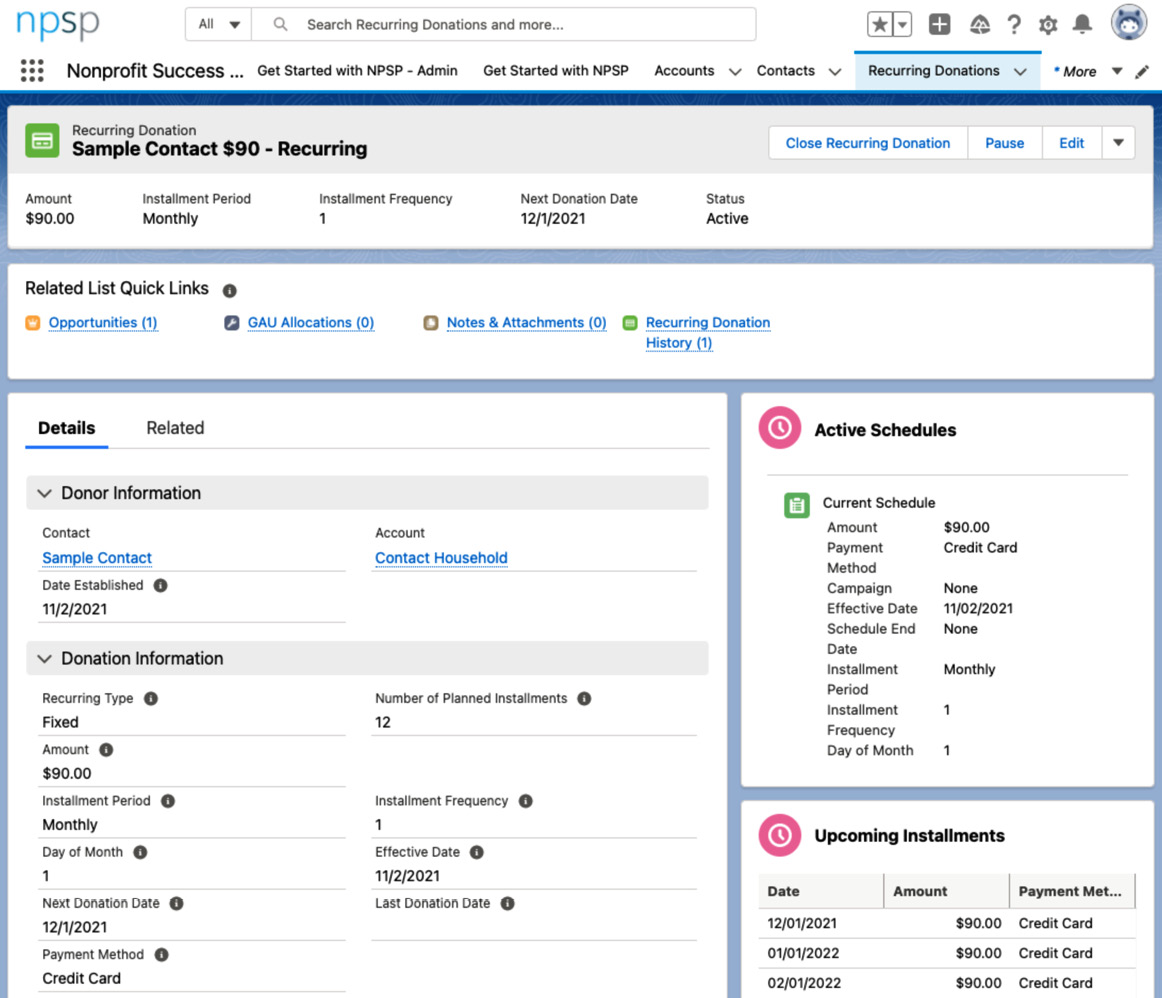
Figure 10.11 – Sample recurring donation record page with the Active Schedules and Upcoming Installments components
Recurring Donations is a simple way to visualize these vital gifts as well as project future income based on pledged funds.
Summary
In this chapter, we have gone much deeper into the actual setup and configuration of the fundraising features of NPSP. The commonly used features include applying soft credits, donation allocations, gift entry, and recurring donations. We have outlined how to enable and configure each of those fundraising features in general.
There are additional, more self-explanatory, configurable settings in the NPSP settings based on the nonprofit's use cases and business processes. There are also additional configurations documented for less-used features. In Chapter 12, Declarative Tools and Modules, we will take a deeper dive into Customizable Rollups and Matching Gifts that we touched on in this chapter. And then, in Chapter 13, To Customize or Not to Customize, we will learn the advanced configuration of Table-Driven Trigger Management (TDTM) and its use cases.
Before we start more advanced studies, let's finish configuring the standard PMM, case management, and V4S applications, and address data management and security in Chapter 11, Configuring Additional Features and Security.
Resources and additional reading
- Nonprofit Success Pack Upgrade Guide: https://s3-us-west-2.amazonaws.com/sfdo-docs/npsp_upgrade_guide.pdf
- Convert to the Nonprofit Success Pack Household Account Model: https://s3-us-west-2.amazonaws.com/sfdo-docs/npsp_account_model_conversion.pdf
- Feature Configuration Overview: https://powerofus.force.com/s/article/NPSP-Feature-Configuration-Overview#topic-3670
- Create Global Quick Actions: https://help.salesforce.com/articleView?id=creating_global_actions.htm
- Configure Automated and Manual Soft Credits: https://powerofus.force.com/s/article/NPSP-Configure-Automated-Soft-Credits
- Configure Gift Entry: https://powerofus.force.com/s/article/NPSP-Configure-Gift-Entry#topic-9135
- Configure Recurring Donations: https://powerofus.force.com/s/article/NPSP-Configure-Recurring-Donations
|
Sales Process |
Recommended Opportunity Stages |
|
Donation |
Pledged, Closed Won, Declined, Closed Lost |
|
Grant |
Prospecting, LOI Submitted, Application Submitted, Awarded, Withdrawn, Declined |
|
In-Kind Gift |
Prospecting, In-Kind Not Yet Received, In-Kind Received, Withdrawn |
|
Major Gift |
Identification, Qualification, Cultivation, Solicitation, Proposal/Review, Verbal Commitment, Awarded, Closed Won, Withdrawn, Declined |