1. Getting to know the Workflow
Lesson overview
• Create a project and import footage.
• Create compositions and arrange layers.
• Navigate the Adobe After Effects interface.
• Use the Project, Composition, and Timeline panels.
• Apply basic keyframes and effects.
• Preview your work using standard and RAM previews.
• Customize the workspace.
• Adjust preferences related to the user interface.
• Find additional resources for using After Effects.

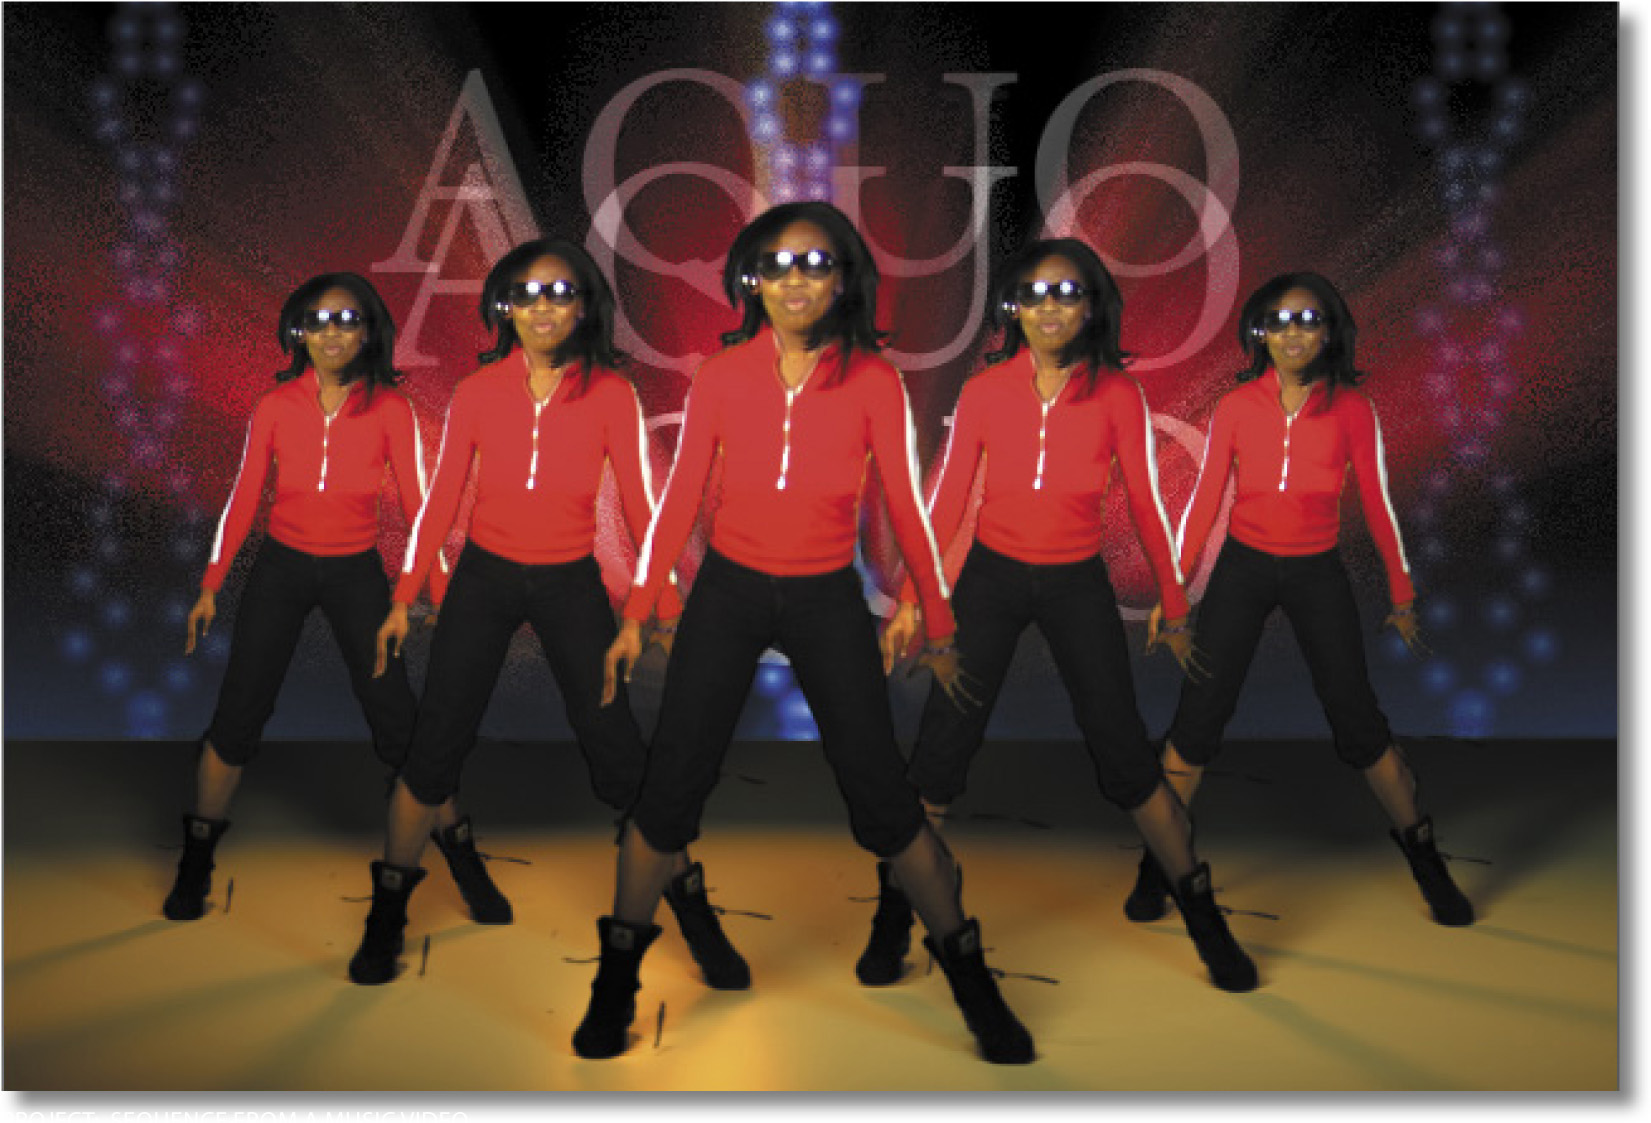
PROJECT: SEQUENCE FROM A MUSIC VIDEO
Whether you use After Effects to animate a simple DVD title sequence or to create complex special effects, you generally follow the same basic workflow. The After Effects interface facilitates your work and adapts to each stage of production.
Getting started
A basic After Effects workflow follows six steps: importing and organizing footage, creating compositions and arranging layers, adding effects, animating elements, previewing your work, and rendering and outputting the final composition so that it can be viewed by others. In this lesson, you will create a simple animated video using this workflow, and along the way, you’ll learn your way around the After Effects interface.
First, you’ll preview the final movie to see what you’ll create in this lesson.
1. Make sure the following files are in the AECC_CIB/Lessons/Lesson01 folder on your hard disk, or download them from your Account page at www.peachpit.com now:
• In the Assets folder: bgwtext.psd, dancers.mov, gc_adobe_dance.mp3, kaleidoscope_waveforms.mov, pulsating_radial_waves.mov
• In the Sample_Movie folder: Lesson01.mov
2. Open and play the Lesson01.mov sample movie to see what you will create in this lesson. When you are done, quit QuickTime Player. You may delete this sample movie from your hard disk if you have limited storage space.
Creating a project and importing footage
When you begin each lesson of this book, it’s a good idea to restore the default preferences for After Effects. (See “Restoring default preferences” on page 2.) You can do this with a simple keyboard shortcut.
1. Start After Effects, and then immediately hold down Ctrl+Alt+Shift (Windows) or Command+Option+Shift (Mac OS) to restore default preferences settings. When prompted, click OK to delete your preferences.
2. Click Close to close the Welcome screen.
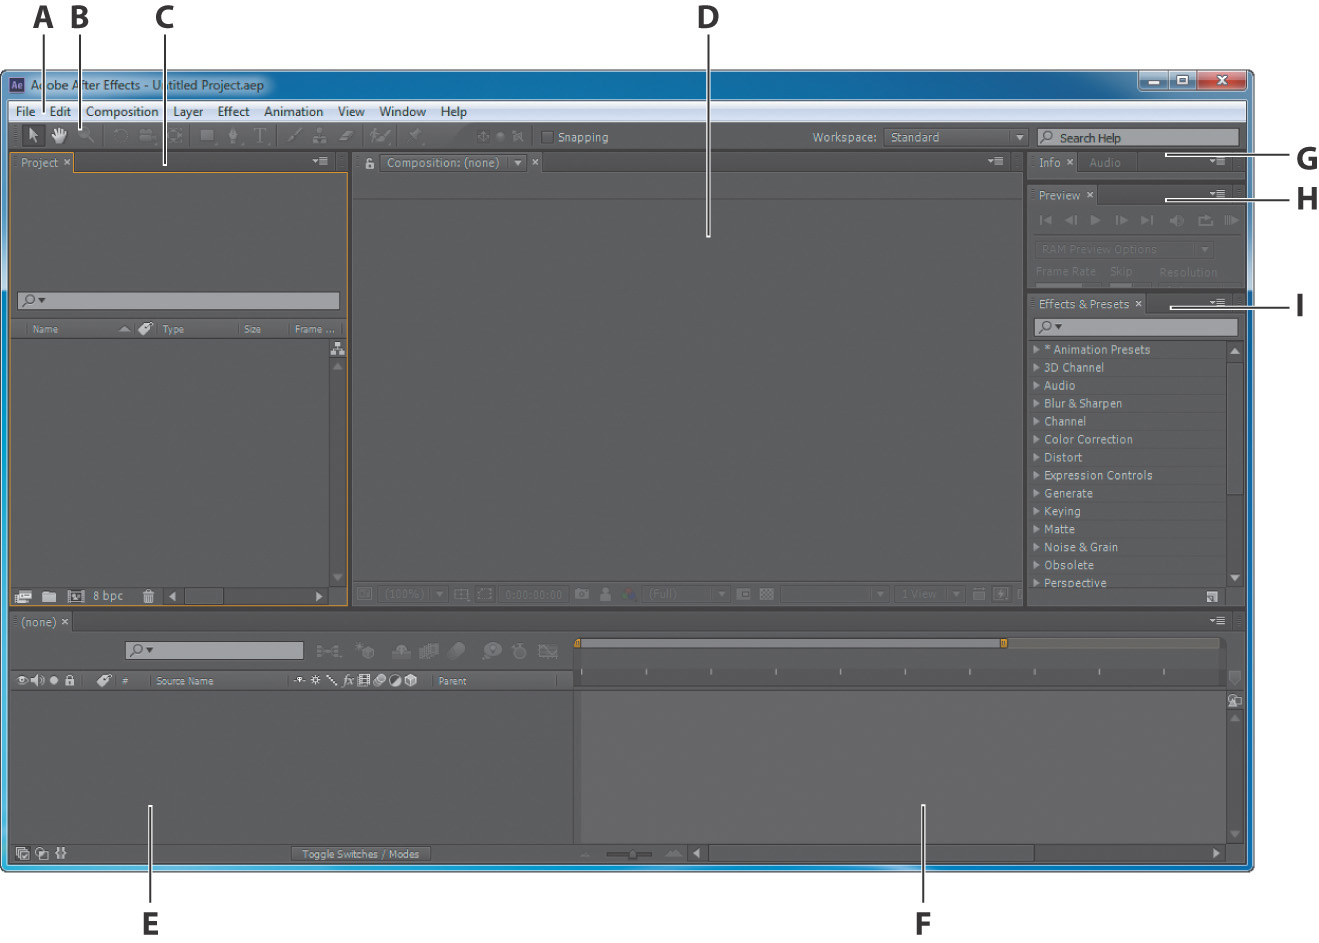
After Effects opens to display an empty, untitled project.
![]() Tip
Tip
Restoring default preferences can be tricky in Windows, especially if you’re working on a fast system. Press the keys after you double-click the application icon but before After Effects begins to list the files it’s activating.
An After Effects project is a single file that stores references to all the footage you use in that project. It also contains compositions, which are the individual containers used to combine footage, apply effects, and, ultimately, drive the output.
When you begin a project, often the first thing you’ll do is add footage to it.
3. Choose File > Import > File.
4. Navigate to the Assets folder in your AECC_CIB/Lessons/Lesson01 folder. Shift-click to select the dancers.mov, gc_adobe_dance.mp3, kaleidoscope_ waveforms.mov, and pulsating_radial_waves.mov files (all the files except bgwtext.psd). Then click Import or Open.
![]() Tip
Tip
To quickly maximize a panel, position the pointer over it and press the accent grave (`) key—the unshifted character under the tilde (~) on standard US keyboards. Press the ` key again to return the panel to its original size.
A footage item is the basic unit in an After Effects project. You can import many types of footage items, including moving-image files, still-image files, still-image sequences, audio files, layered files from Adobe Photoshop and Adobe Illustrator, other After Effects projects, and projects created in Adobe Premiere® Pro. You can import footage items at any time.
As you import assets, After Effects reports its progress in the Info panel.
Because one of the footage items for this project is a multilayer Photoshop file, you’ll import it separately as a composition.
5. Double-click in the lower area of the Project panel to open the Import File dialog box.
6. Navigate to the Lesson01/Assets folder again, and select the bgwtext.psd file. Choose Composition from the Import As menu, and then click Import or Open.
![]() Tip
Tip
You can also choose File > Import > Multiple Files to select files located in different folders, or drag and drop files from Explorer or the Finder. You can use Adobe Bridge to search for, manage, preview, and import footage.
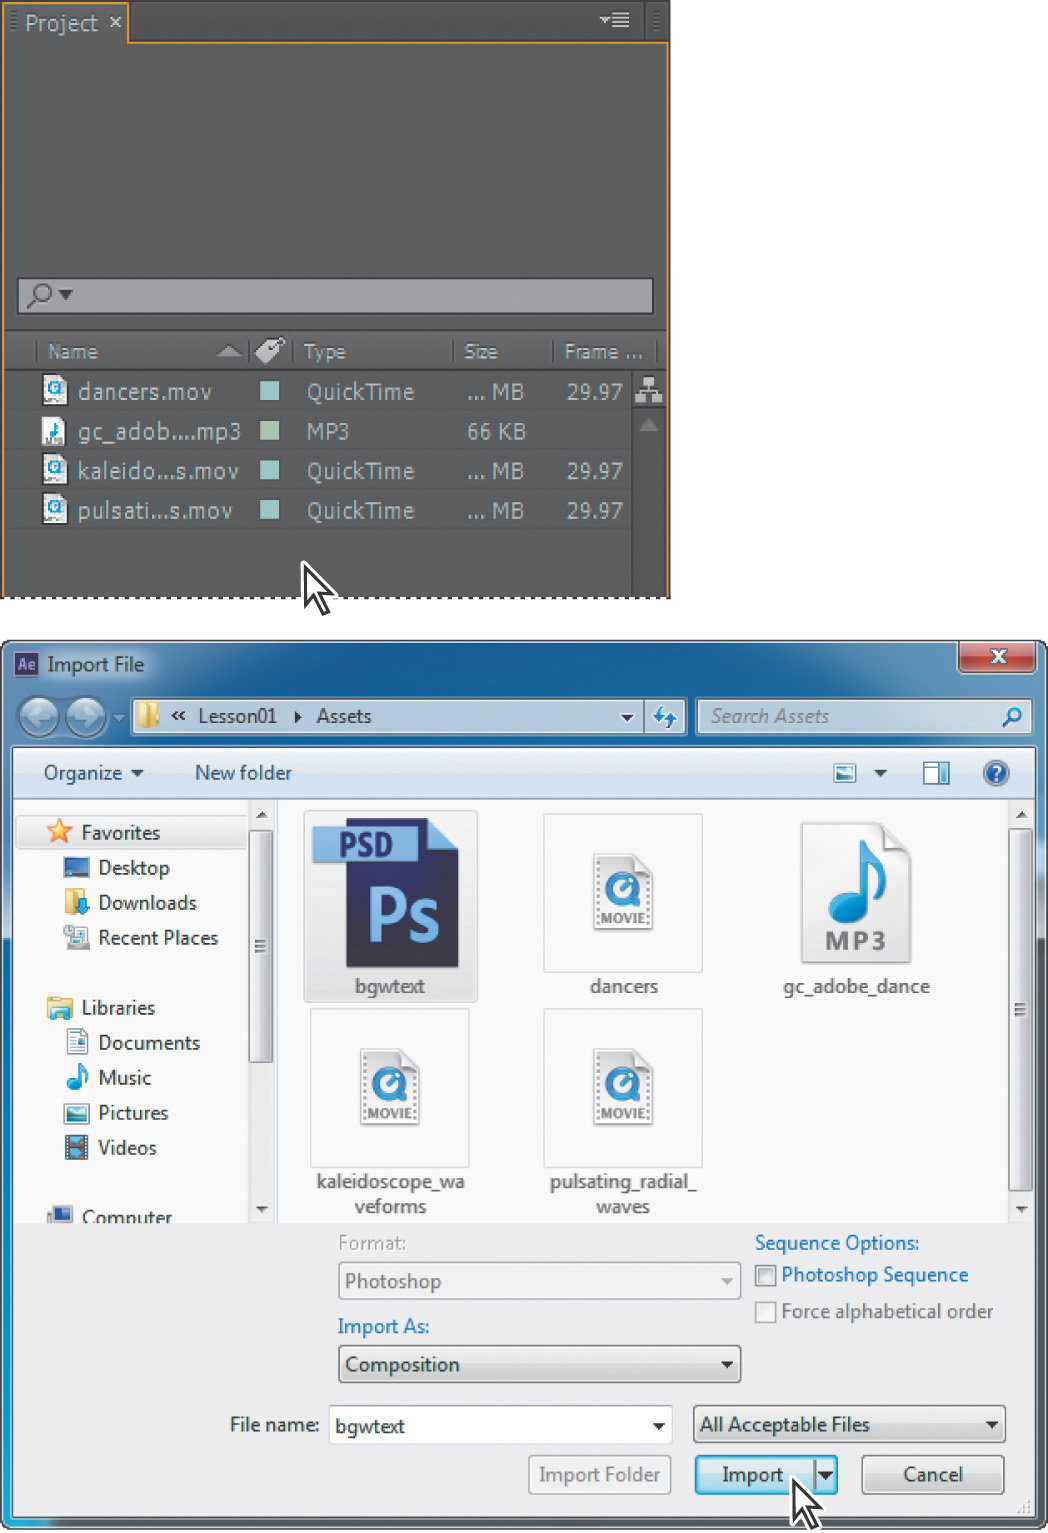
After Effects opens an additional dialog box with options for the file you’re importing.
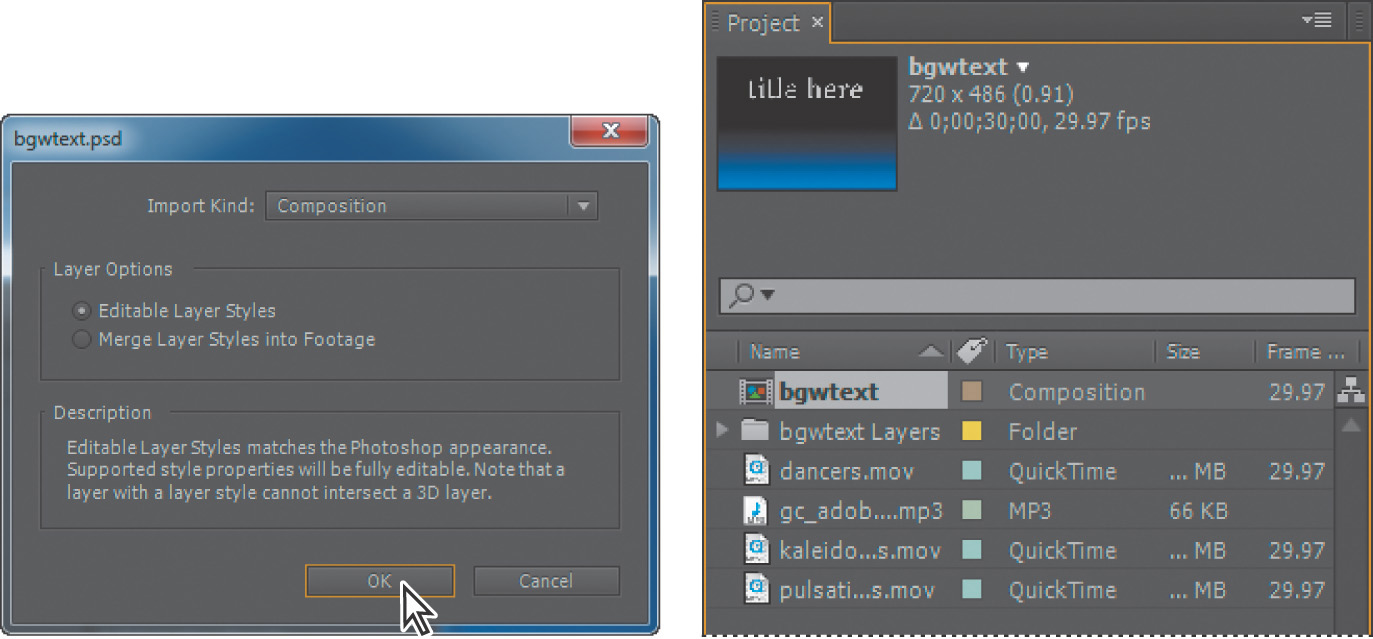
7. In the bgwtext.psd dialog box, choose Composition from the Import Kind menu to import the layered Photoshop file as a composition. Select Editable Layer Styles in the Layer Options area, and then click OK. The footage items appear in the Project panel.
8. In the Project panel, click to select different footage items. Notice that a thumbnail preview appears at the top of the Project panel. You can also see the file type and size, as well as other information about each item, in the Project panel columns.
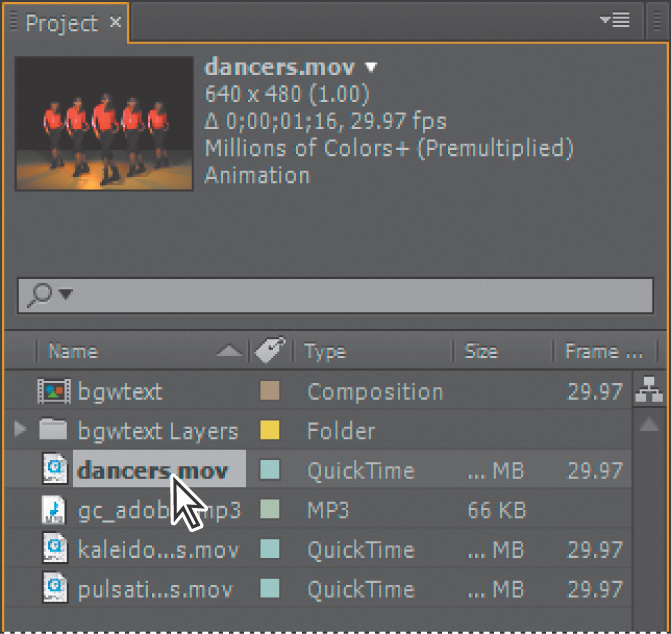
When you import files, After Effects doesn’t copy the video and audio data itself into your project. Instead, each footage item in the Project panel contains a reference link to the source files. When After Effects needs to retrieve image or audio data, it reads it from the source file. This keeps the project file small, and allows you to update source files in another application without modifying the project.
If you move a file or if After Effects can’t access its location, it will report that the file is missing. To find missing files, choose File > Dependencies > Find Missing Footage. You can also type Missing Footage into the Search box in the Project panel to look for the missing assets.
To save time and minimize the size and complexity of a project, import a footage item once, and then use it multiple times in a composition. In some cases, you may need to import a source file more than once, such as if you want to use it at two different frame rates.
![]() Tip
Tip
You can locate missing fonts or effects the same way. Choose File > Dependencies, and then choose Find Missing Fonts or Find Missing Effects. Or just type Missing Fonts or Missing Effects into the Search box in the Project panel.
After you’ve imported footage, it’s a good time to save the project.
9. Choose File > Save. In the Save As dialog box, navigate to the AECC_CIB/
Lessons/Lesson01/Finished_Project folder. Name the project Lesson01_ Finished.aep, and then click Save.
Creating a composition and arranging layers
The next step of the workflow is to create a composition. You create all animation, layering, and effects in a composition. An After Effects composition has both spatial dimensions and a temporal dimension (time).
Compositions include one or more layers, arranged in the Composition panel and in the Timeline panel. Any item that you add to a composition—such as a still image, moving-image file, audio file, light layer, camera layer, or even another composition—becomes a new layer. Simple projects may include only one composition, while elaborate projects may include several compositions to organize large amounts of footage or intricate effects sequences.
To create a composition, you’ll drag the footage items into the Timeline panel, and After Effects will create layers for them.
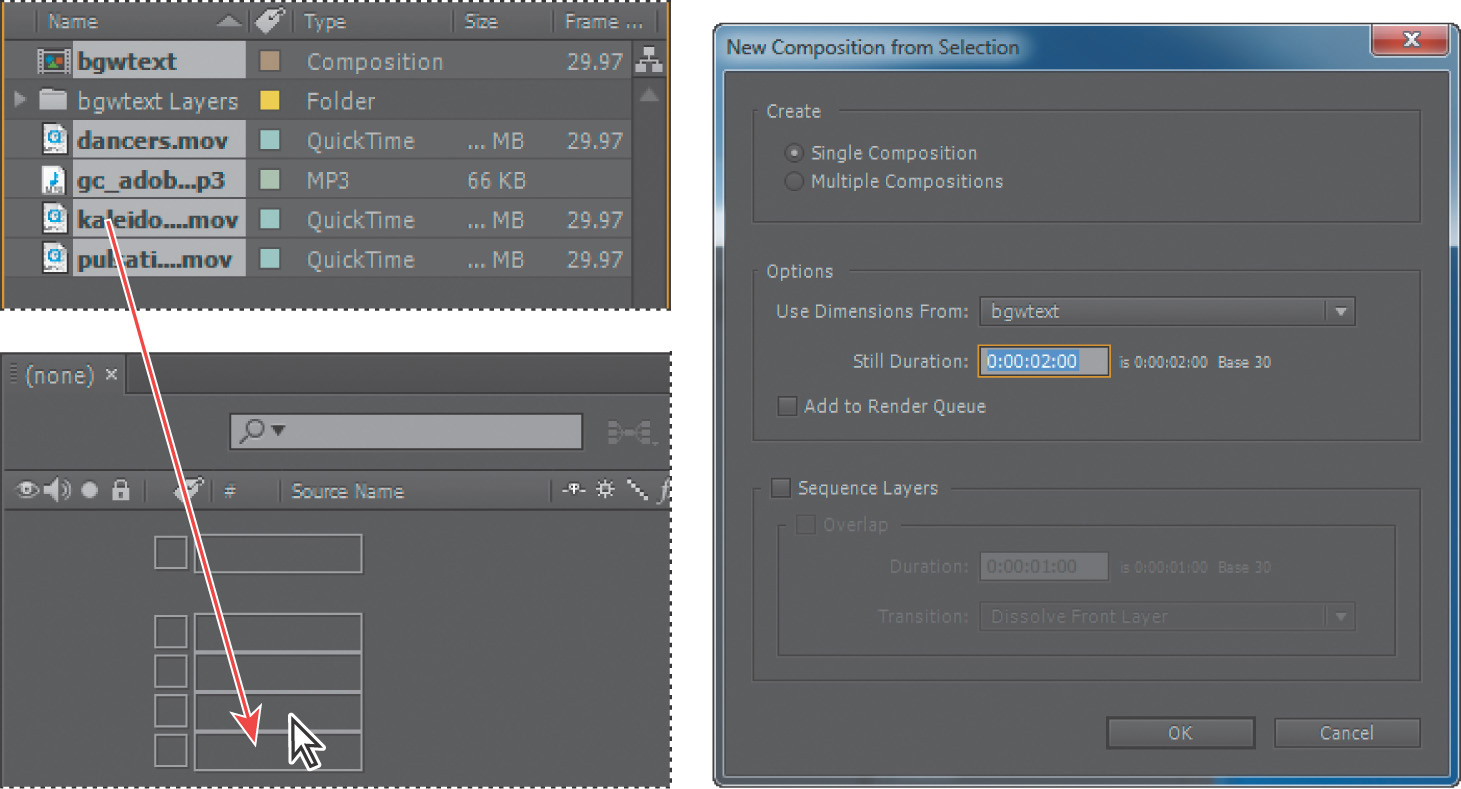
1. In the Project panel, Ctrl-click (Windows) or Command-click (Mac OS) to select the bgwtext composition as well as the dancers, gc_adobe_dance, kaleidoscope_waveforms, and pulsating_radial_waves footage items.
2. Drag the selected footage items into the Timeline panel. The New Composition From Selection dialog box appears.
After Effects bases the dimensions of the new composition on the selected footage. In this example, all of the footage is sized identically, so you can accept the default settings.
3. Click OK to create the new composition.
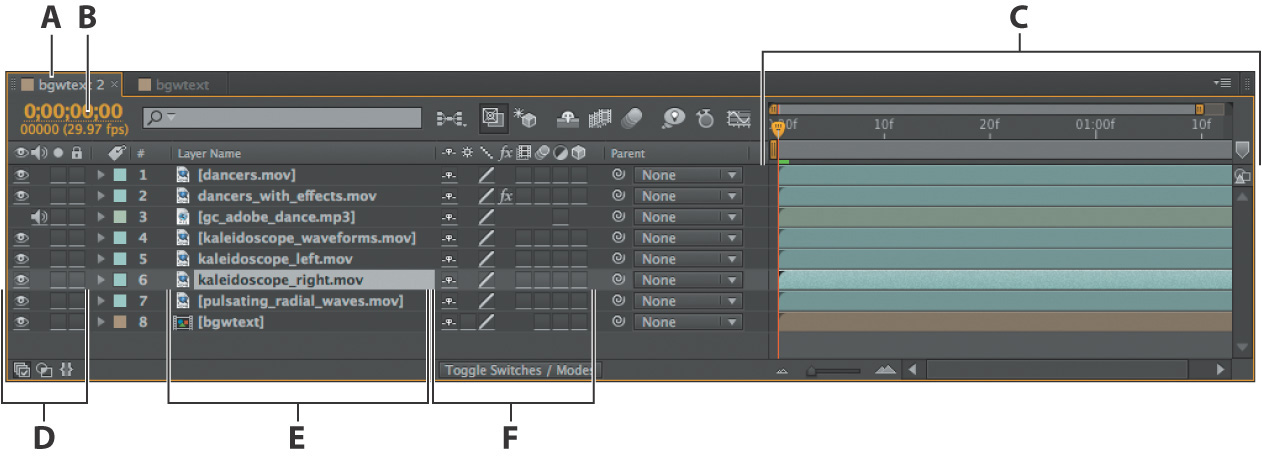
The footage items appear as layers in the Timeline panel, and After Effects displays the composition, named bgwtext 2, in the Composition panel.
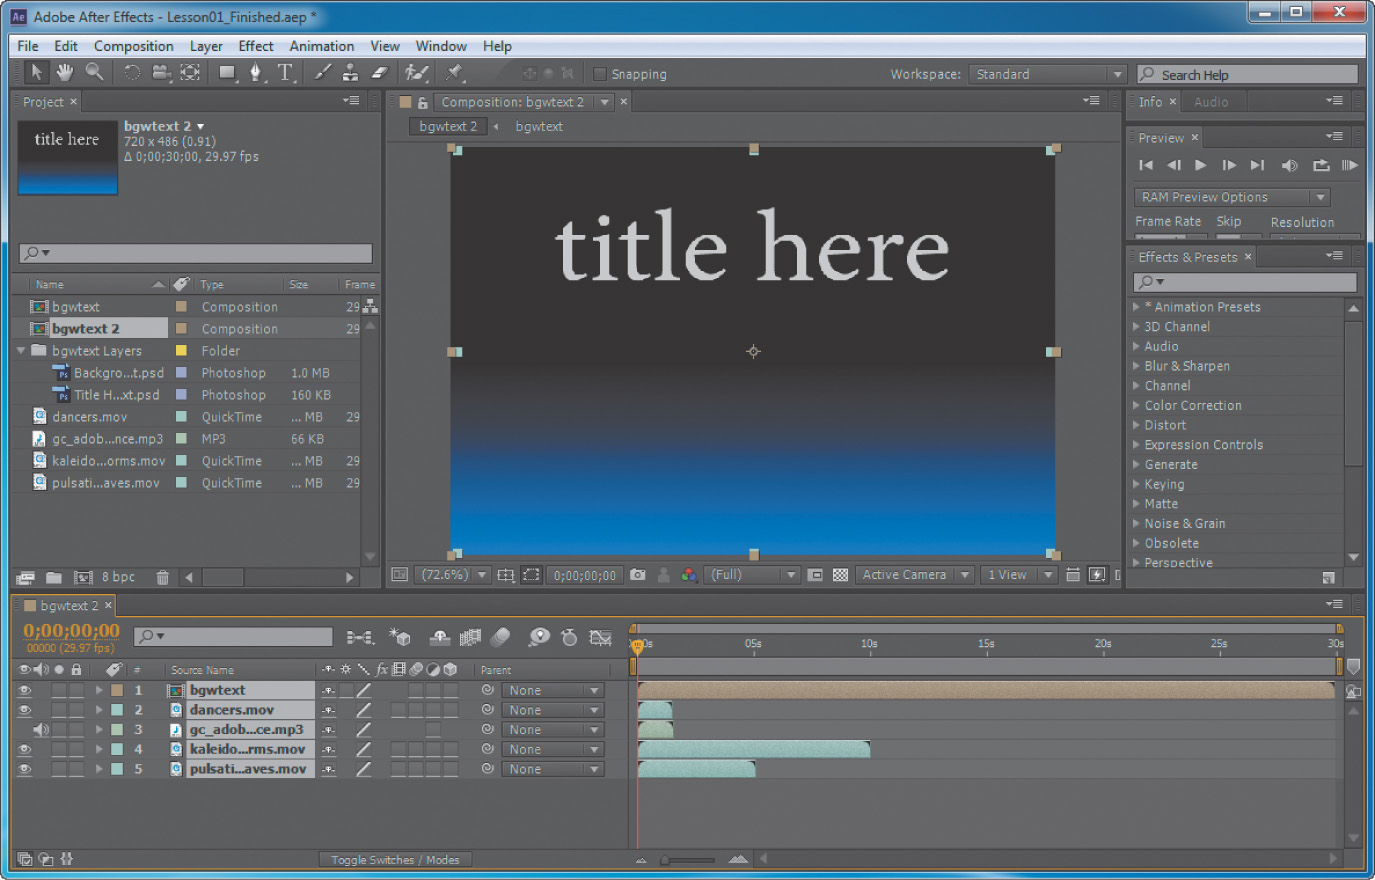
When you add a footage item to a composition, the footage becomes the source for a new layer. A composition can have any number of layers, and you can also include a composition as a layer in another composition, which is called nesting.
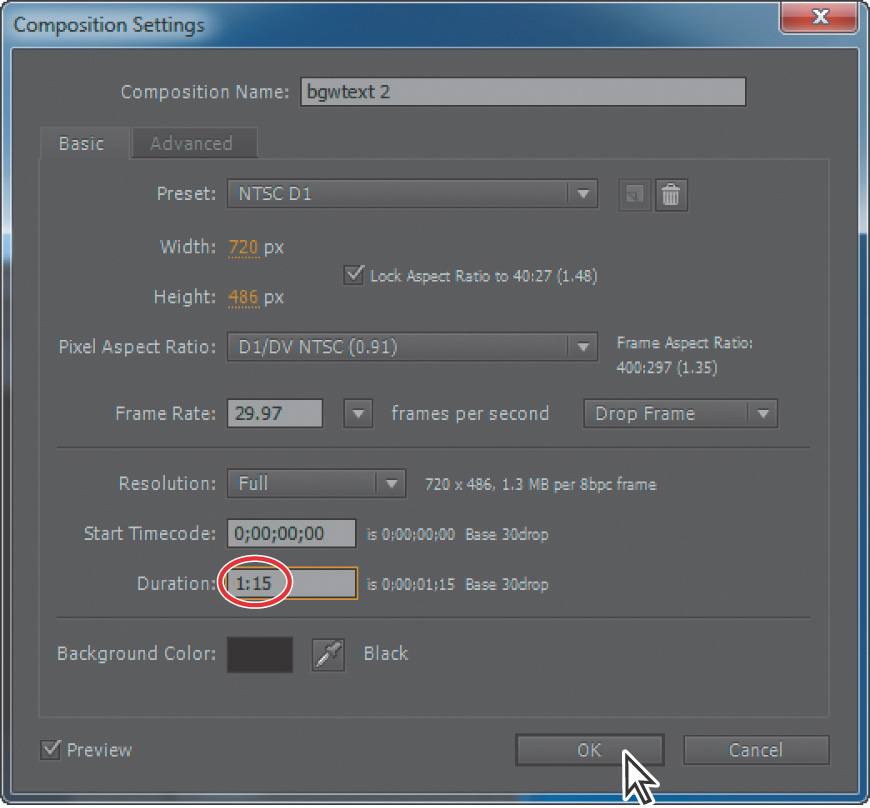
Some of the assets are longer than others, but you want them all to appear only as long as the dancers are on the screen. You’ll change the length of the entire composition to 1:15 to match the dancers.
4. Choose Composition > Composition Settings.
5. In the Composition Settings dialog box, type 1:15 for the Duration, and then click OK.
The Timeline panel displays the same duration for each of the layers.
In this composition, there are five footage items, and therefore five layers in the Timeline panel. Depending on the order in which the elements were selected when you imported them, your layer stack may differ from the one shown on the previous page. The layers need to be in a specific order as you add effects and animations, however, so you’ll rearrange them now.
6. Click an empty area of the Timeline panel to deselect the layers, and then drag bgwtext to the bottom of the layer stack if it is not already there. Drag the other four layers so that they’re in the order shown in the figure.
![]() Note
Note
You may need to click a blank area of the Timeline panel or press F2 to deselect layers before you can select an individual layer.
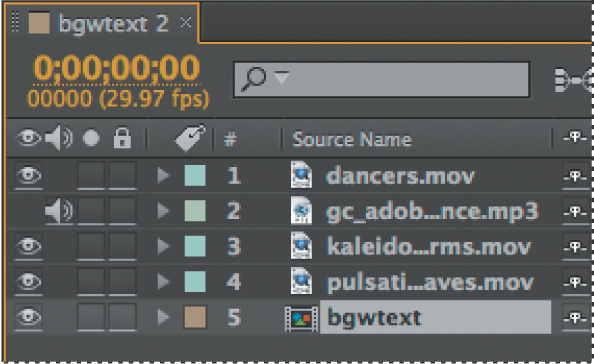
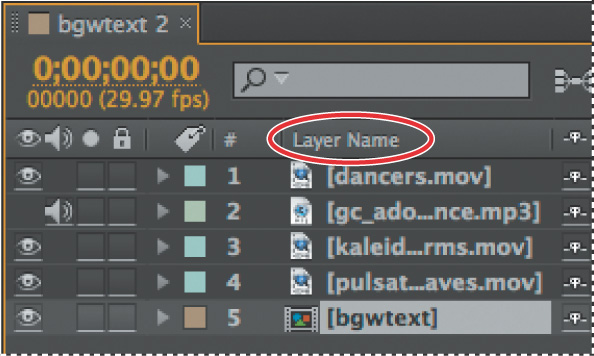
From this point forward in the workflow, you should be thinking about layers, not footage items. You’ll change the column title accordingly.
7. Click the Source Name column title in the Timeline panel to change it to Layer Name.
8. Choose File > Save to save your project so far.
Adding effects and modifying layer properties
Now that your composition is set up, you can start having fun—applying effects, making transformations, and adding animation. You can add any combination of effects and modify any of a layer’s properties, such as size, placement, and opacity. Using effects, you can alter a layer’s appearance or sound, and even generate visual elements from scratch. The easiest way to start is to apply any of the hundreds of effects included with After Effects.
![]() Note
Note
This exercise is just the tip of the iceberg. You will learn more about effects and animation presets in Lesson 2, “Creating a Basic Animation Using Effects and Presets,” and throughout the rest of this book.
Preparing the layers
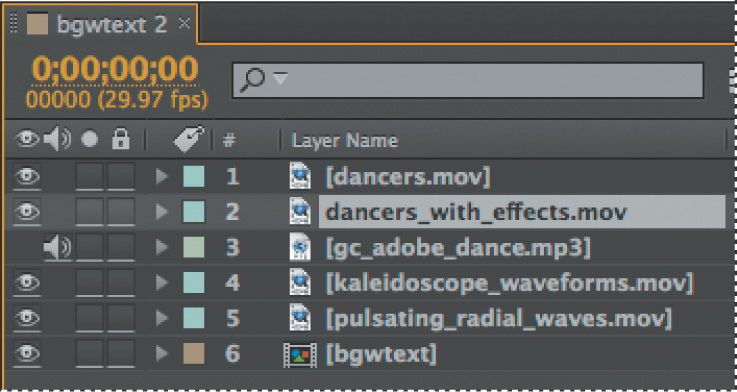
You’ll apply the effects to duplicates of selected layers—the dancers layer and the kaleidoscope_waveforms layer. Working with duplicates lets you apply an effect to one layer and then use it in conjunction with the unmodified original.
1. Select the first layer, dancers.mov, in the Timeline panel, and then choose Edit > Duplicate. A new layer with the same name appears at the top of the stack, so the first two layers are now both named dancers.mov.
2. Select the second layer, and rename it to avoid confusion: Press Enter (Windows) or Return (Mac OS) to make the name editable, and type dancers_with_effects.mov. Then press Enter or Return again to accept the new name.
![]() Tip
Tip
You can make the Layer name column wider in order to see the full layer name, if you need to.
3. Select the kaleidoscope_waveforms layer, and make two duplicates. Rename the duplicates kaleidoscope_left.mov and kaleidoscope_right.mov.
![]() Tip
Tip
Use the keyboard shortcut Ctrl+D (Windows) or Command+D (Mac OS) to copy the layers quickly.
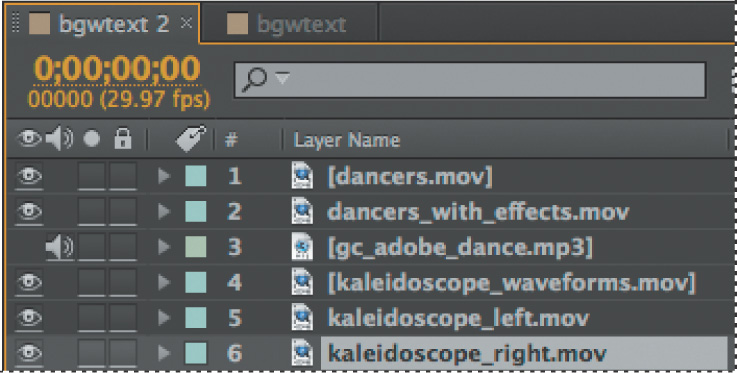
4. Drag if necessary to rearrange the layers in the Timeline panel so that they’re in the order shown.
Adding a Radial Blur effect
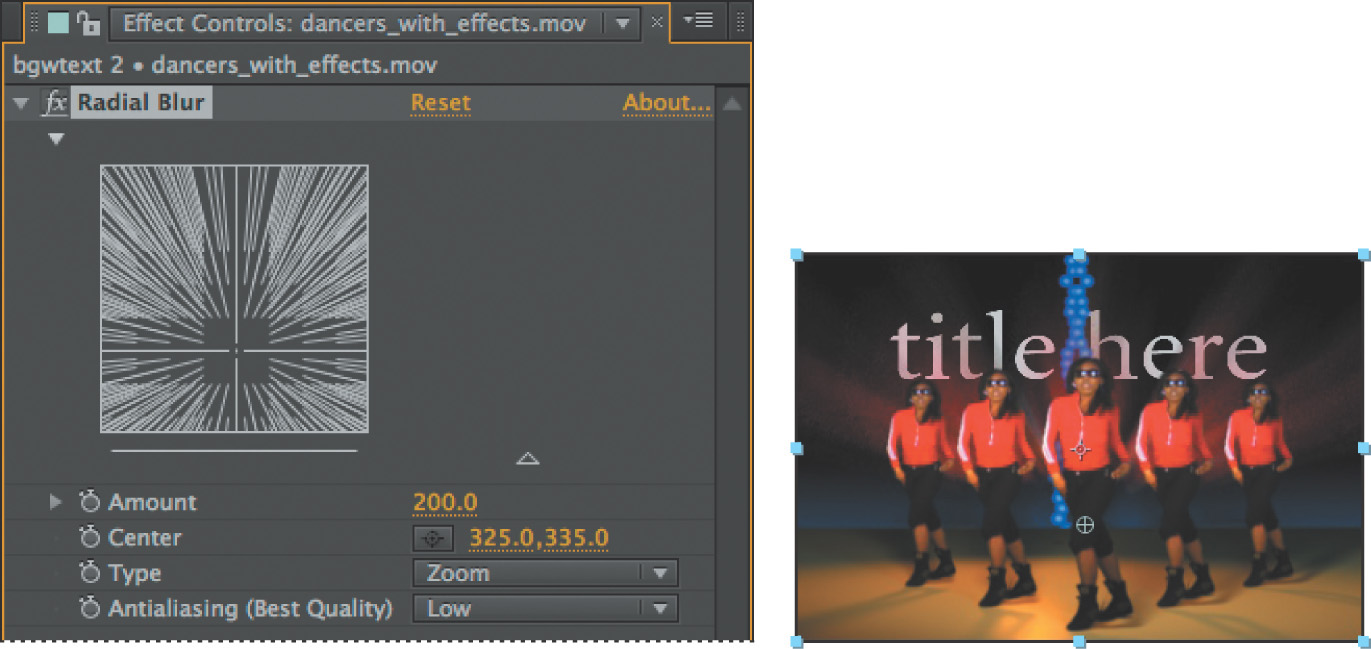
The Radial Blur effect creates blurs around a specific point in a layer, simulating the effects of a zooming or rotating camera. You’ll add a Radial Blur effect to the dancers.
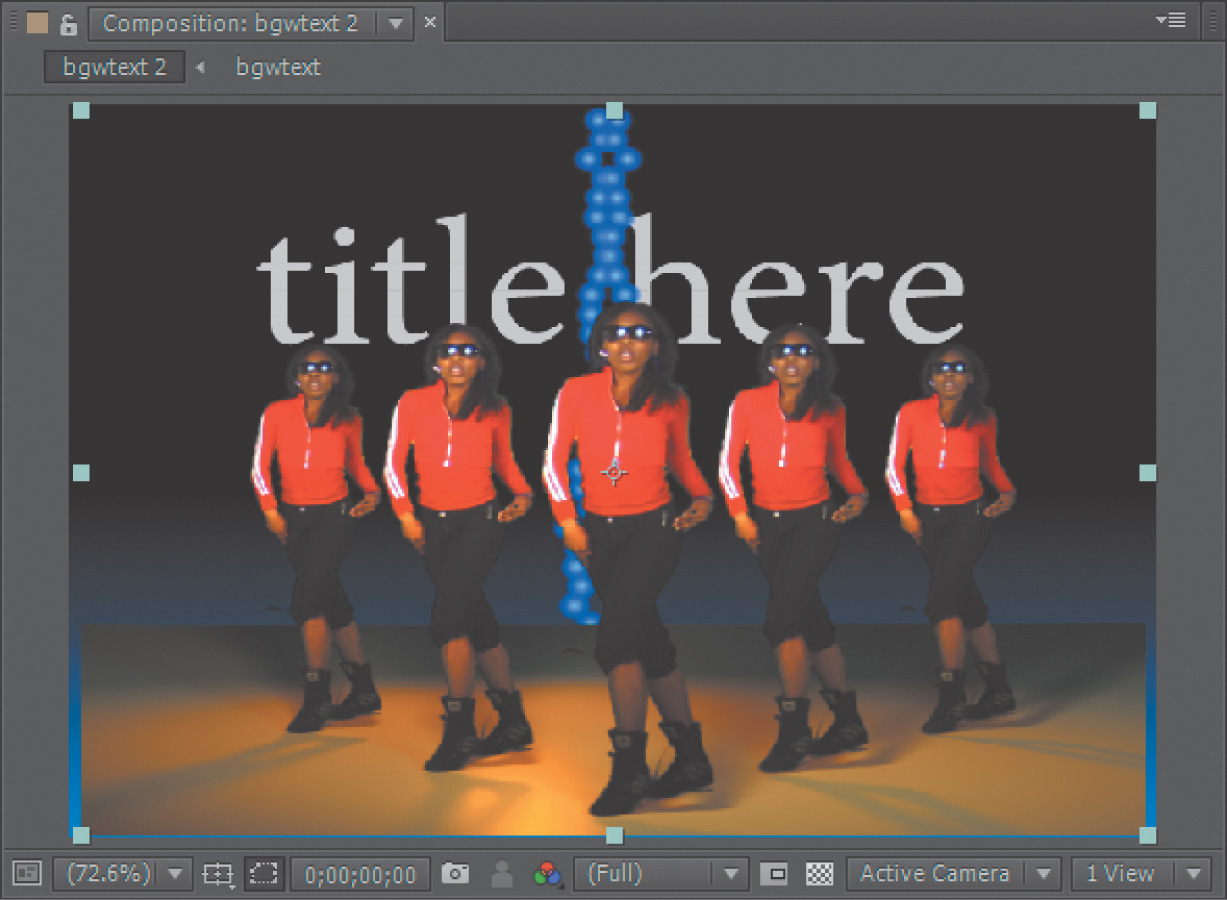
1. Select the dancers_with_effects layer in the Timeline panel. Notice that layer handles appear around the layer in the Composition panel.
![]() Note
Note
If you double-click a layer in the Timeline panel, it appears in the Layer panel. To return to the Composition panel, click the Composition tab.
2. In the Effects & Presets panel at the right side of the application window, type radial blur in the search box.
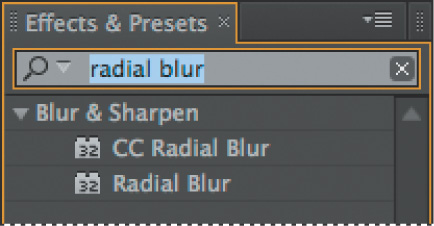
After Effects searches for effects and presets that contain the letters you type, and displays the results interactively. Before you have finished typing, the Radial Blur effect—located in the Blur & Sharpen category—appears in the panel.
3. Drag the Radial Blur effect onto the dancers_with_effects layer in the Timeline panel. After Effects applies the effect and automatically opens the Effect Controls panel in the upper left area of the workspace.

Now you’ll customize the settings.
4. In the Effect Controls panel, choose Zoom from the Type menu.
5. In the Composition panel, move the center point of the blur lower by dragging the center cross-hair (![]() ) down until it’s at the horizon line. As you drag the cross-hair, the Center value updates in the Effect Controls panel. The left and right values are x and y coordinates, respectively. Center the blur at approximately 325, 335.
) down until it’s at the horizon line. As you drag the cross-hair, the Center value updates in the Effect Controls panel. The left and right values are x and y coordinates, respectively. Center the blur at approximately 325, 335.
6. Click the number next to Amount, type 200, and press Enter or Return.
![]() Tip
Tip
You can also type the x and y values directly into the coordinate fields in the Effect Controls panel, or you can position the pointer over the fields to see the double-arrow icon (![]() ), and then drag right or left to increase or decrease the values, respectively. Dragging to change values is sometimes called scrubbing.
), and then drag right or left to increase or decrease the values, respectively. Dragging to change values is sometimes called scrubbing.
Adding an exposure effect
To punch up the brightness of this layer, you will apply the Exposure color-correction effect. This effect lets you make tonal adjustments to footage. It simulates the result of modifying the exposure setting (in f-stops) of the camera that captured the image.
1. Click the x in the search box in the Effects & Presets panel to clear it, and then locate the Exposure effect by doing one of the following:
• Type Exposure in the search box.
• Click the triangle next to Color Correction to expand the list of color-correction effects in alphabetical order.
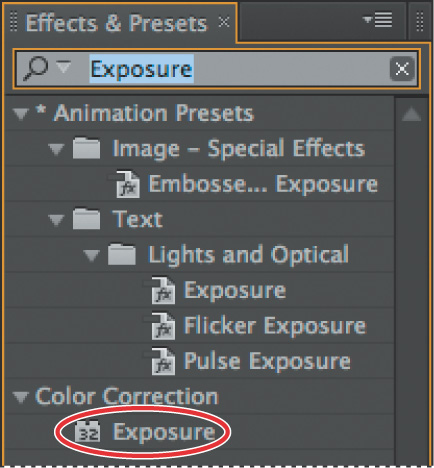
2. Drag the Exposure effect in the Color Correction category onto the dancers_ with_effects layer name in the Timeline panel. After Effects adds the Exposure settings to the Effect Controls panel under the Radial Blur effect.
3. In the Effect Controls panel, click the triangle next to the Radial Blur effect to collapse those settings so that you can see the Exposure settings more easily.
4. For Master Exposure, enter 1.60. This will make everything brighter in the layer to simulate an overexposed image.
![]() Tip
Tip
Make sure to select the Exposure effect in the Color Correction category, not the Exposure animation preset in the Lights And Optical category.

Transforming layer properties
The dancers look smashing, so you can turn your attention to the kaleidoscope waveforms that are part of the background. You’ll reposition the copies you created earlier to create an edgy effect.
1. Select the kaleidoscope_left layer (layer 5) in the Timeline panel.
2. Click the triangle to the left of the layer number to expand the layer, and then expand the layer’s Transform properties: Anchor Point, Position, Scale, Rotation, and Opacity.
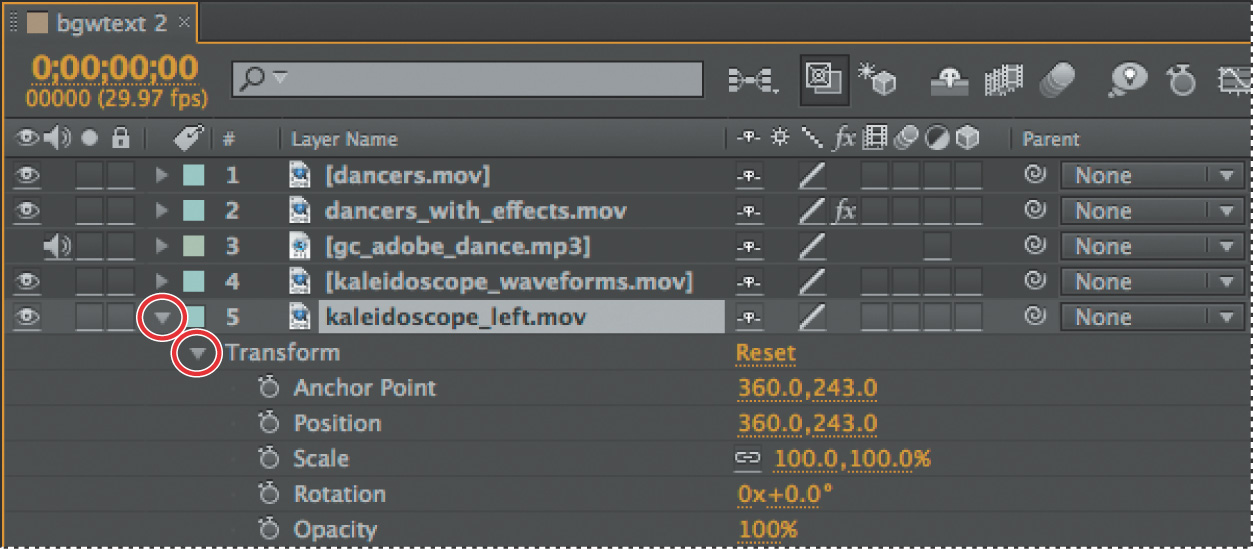
3. If you can’t see the properties, scroll down the Timeline panel using the scroll bar at the right side of the panel. Better yet, select the kaleidoscope_left layer name again and press P. This keyboard shortcut displays only the Position property, which is the only property you want to change for this exercise.
You’ll move this layer to the left about 200 pixels.
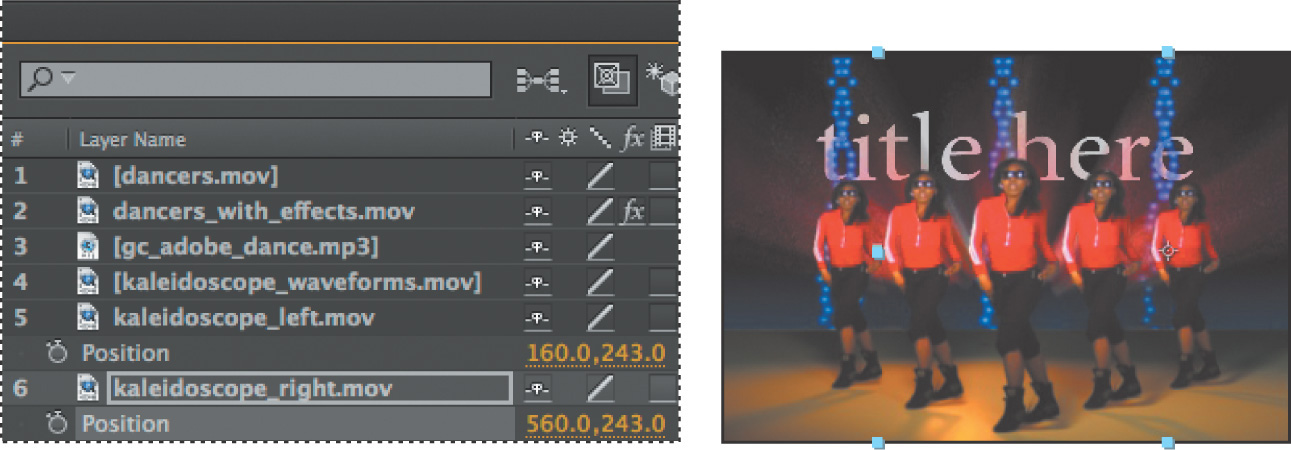
4. Change the x coordinate for the Position property to 160. Leave the y coordinate at 243.
![]() Tip
Tip
With any layer selected in the Timeline panel, you can display any single Transform property by pressing a keyboard shortcut: P displays Position; A displays Anchor Point; S displays Scale; R displays Rotation; T displays Opacity.

5. Select the kaleidoscope_right layer (layer 6), and press P to display its Position property. You will move this layer to the right.
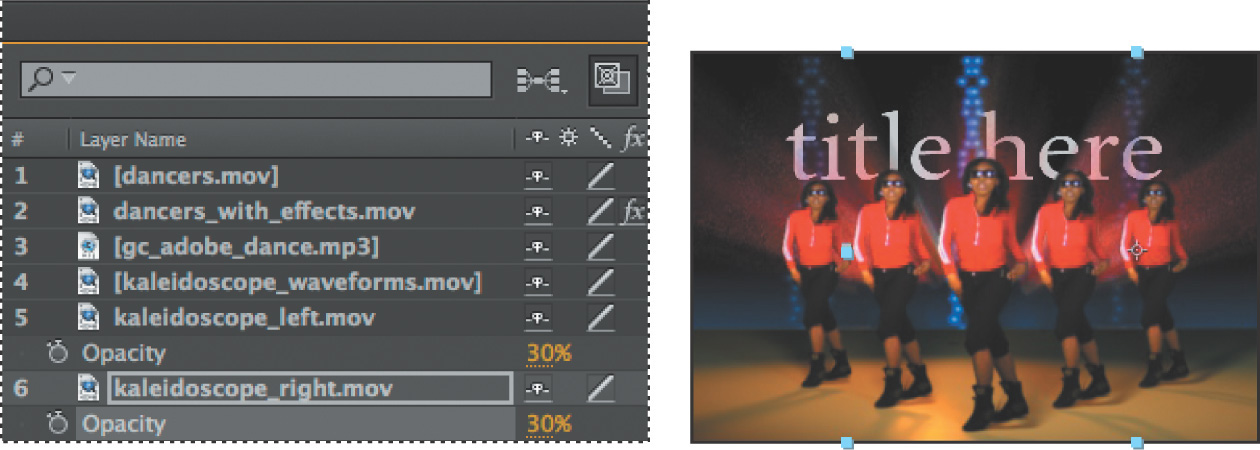
6. Change the x coordinate for the kaleidoscope_right Position property to 560. Leave the y coordinate at 243. Now you can see the three waveforms—left, center, and right—in the Composition panel, hanging like a beaded light curtain.
To contrast the left and right waveforms with the center waveform, you will reduce their opacity.
7. Select the kaleidoscope_left layer in the Timeline panel, and press T to reveal its Opacity property. Set it to 30%.
8. Select the kaleidoscope_right layer in the Timeline panel, press T to reveal its Opacity property, and set it to 30%.
![]() Tip
Tip
To change the Opacity property for multiple layers at once, select the layers, press T, and change the property for one of the selected layers.
9. Choose File > Save to save your work so far.
Animating the composition
So far, you’ve started a project, created a composition, imported footage, and applied some effects. It all looks great, but how about some movement? You’ve applied only static effects.
In After Effects, you can change any combination of a layer’s properties over time using conventional keyframing, expressions, or keyframe assistants. You’ll explore many of these methods throughout the lessons of this book. For this exercise, you will animate the Position property of a text layer using keyframes, and then use an animation preset so that the letters appear to rain down on the screen.
Preparing the text composition
For this exercise, you’ll work with a separate composition—the one you imported from a layered Photoshop file.
1. Select the Project tab to display the Project panel, and then double-click the bgwtext composition to open it as a composition in its own Timeline panel.
![]() Note
Note
If the Project tab isn’t visible, choose Window > Project to open the Project panel.
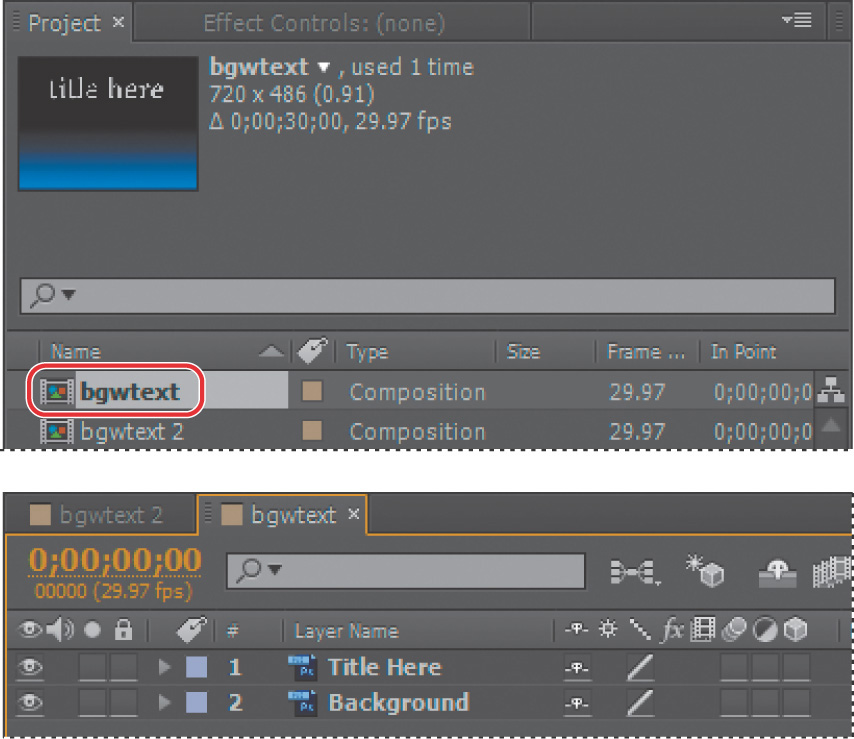
This composition is the layered Photoshop file you imported. Two layers—Title Here and Background—appear in the Timeline panel. The Title Here layer contains placeholder text that was created in Photoshop.
At the top of the Composition panel is the Composition Navigator bar, which displays the relationship between the main composition (bgwtext 2) and the current composition (bgwtext), which is nested within the main composition.

You can nest multiple compositions within each other; the Composition Navigator bar displays the entire composition path. Arrows between the composition names indicate the direction in which information flows.
Before you can replace the text, you need to make the layer editable.
2. Select the Title Here layer (layer 1) in the Timeline panel, and then choose Layer > Convert To Editable Text.
![]() Note
Note
If you see a warning about missing fonts or layer dependencies, click OK.

A T icon appears next to the layer name in the Timeline panel, indicating that it is now an editable text layer. The layer is also selected in the Composition panel, ready for you to edit.
Animating text with animation presets
You’ll start by replacing the placeholder text with real text. Then you’ll animate it.
1. Select the Horizontal Type tool (![]() ) in the Tools panel, and drag over the placeholder text in the Composition panel to select it. Then type AQUO.
) in the Tools panel, and drag over the placeholder text in the Composition panel to select it. Then type AQUO.
![]() Note
Note
After Effects offers robust character and paragraph formatting controls, but the default settings—whatever typeface appears when you type—should be fine for this project. You’ll learn more about type in Lesson 3, “Animating Text.”

2. Select the Title Here layer in the Timeline panel again, and make sure you’re at the first frame of the animation by doing one of the following:
• Drag the current-time indicator all the way to the left of the time ruler, to 0:00.
• Press the Home key on your keyboard.
3. Select the Effects & Presets tab to display the panel. Then type bubble in the search box.
4. Select the Zoom-Bubble effect in the Transitions-Movement category, and drag it onto the AQUO text in the Composition panel.
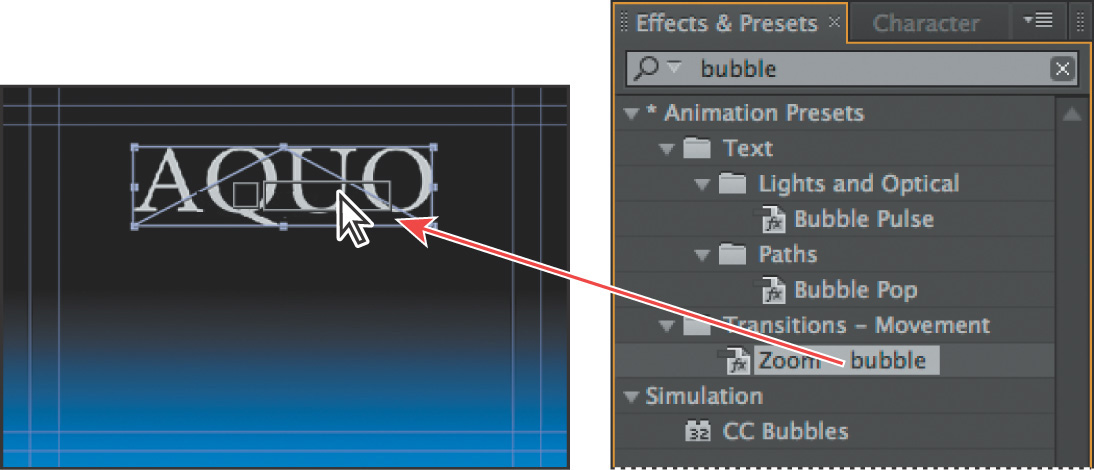
After Effects adds the effect, and displays its settings in the Effect Controls panel. You can change effect settings in this panel or in the Timeline panel. You’ll add keyframes in the Timeline panel.
5. In the Timeline panel, expand the Title Here layer, and then expand Effects > Zoom-bubble to reveal the Transition Completion setting.
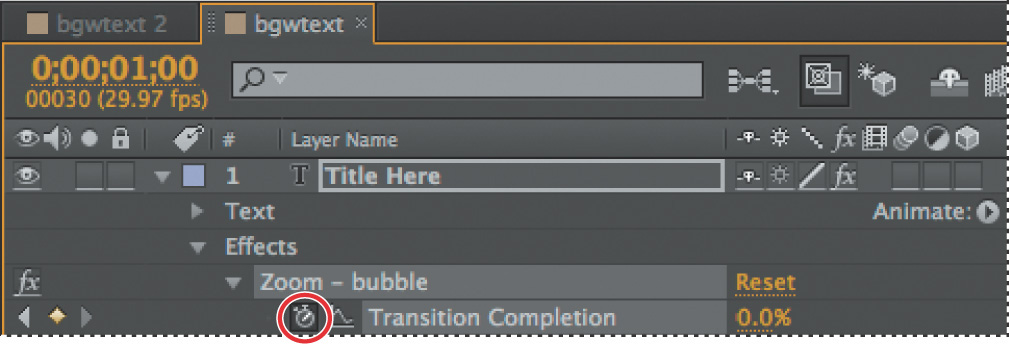
The stopwatch icon (![]() ) next to Transition Completion is selected, and the value is 0%. A diamond appears in the Transition Completion bar for the layer in the time graph, indicating the keyframe that After Effects created when you added the effect.
) next to Transition Completion is selected, and the value is 0%. A diamond appears in the Transition Completion bar for the layer in the time graph, indicating the keyframe that After Effects created when you added the effect.
![]() Note
Note
Don’t select the Transition Completion property, as that will select both keyframes, and you want to change only the value of the second one.
6. Go to 1:00 in the timeline by clicking the Current Time field in the Timeline panel and typing 100, or by dragging the current-time indicator to 1:00.
7. Change the Transition Completion value to 100%.
Even though this is a simple animation, you’ll learn good animation practices right away by adding ease-in controls using the Easy Ease feature. Easing into (and out of) animations keeps the motion from appearing to be too sudden or robotic.
8. Right-click or Control-click the keyframe at 1:00, and choose Keyframe Assistant > Easy Ease In.
![]() Tip
Tip
To see greater detail in the Timeline panel, move the time zoom slider at the bottom of the panel.
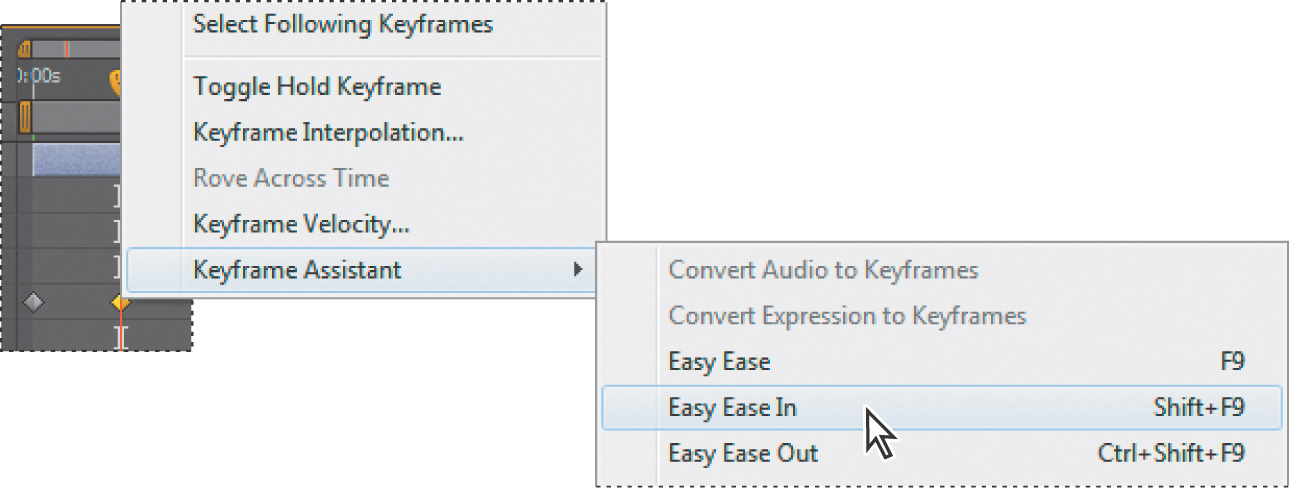
Keyframes are used to create and control animation, effects, audio properties, and many other kinds of changes that occur over time. A keyframe marks the point in time where you specify a value, such as spatial position, opacity, or audio volume. Values between keyframes are interpolated. When you use keyframes to create a change over time, you must use at least two keyframes—one for the state at the beginning of the change, and one for the state at the end of the change.
9. Manually preview the effect by moving the current-time indicator from 0 to 1:00.
Changing preset settings in the effect Controls panel
You’ll add another animation preset to the type layer, but this time, you’ll adjust its settings in the Effect Controls panel.
1. Go to the beginning of the time ruler by doing one of the following:
• Drag the current-time indicator to the left in the time ruler so that it’s positioned at 0:00.
• Click the Current Time field in the Timeline panel or Composition panel, and type 00. If you clicked in the Current Time field in the Composition panel, click OK to close the Go To Time dialog box.
2. Type channel blur in the search box in the Effects & Presets panel.
3. Drag the Channel Blur effect onto the type in the Composition panel. After Effects adds the Channel Blur effect to the Timeline panel and displays its settings in the Effect Controls panel.
4. In the Effect Controls panel, click the triangles next to Zoom-bubble, Spherize, and Transform to hide their settings so you can focus on the Channel Blur settings.
5. Set the Red Blurriness, Green Blurriness, Blue Blurriness, and Alpha Blurriness values to 50.
6. Click the stopwatch icon next to each of the settings you changed to create initial keyframes.
7. From the Blur Dimensions menu, choose Vertical.

8. Go to 1:00 in the timeline.
9. Change the values as follows:
• Red Blurriness: 75
• Green Blurriness: 25
• Blue Blurriness: 0
• Alpha Blurriness: 0

The blue lines at the top, bottom, and sides of the Composition panel indicate title-safe and action-safe zones. Television sets enlarge a video image and allow some portion of its outer edges to be cut off by the edge of the screen. This is known as overscan. The amount of overscan is not consistent between television sets, so you should keep important parts of a video image, such as action or titles, within margins called safe zones. Keep your text inside the inner blue guides to ensure that it is in the title-safe zone, and keep important scene elements inside the outer blue guides to ensure that they are in the action-safe zone.
Previewing your work
You’re probably eager to see the results of your work. After Effects provides several methods for previewing compositions, including standard preview, RAM preview, and manual preview. (For a list of manual preview controls, see After Effects Help.) All three methods are accessible through the Preview panel, which appears on the right side of the application window in the Standard workspace.
Using standard preview
Standard preview (commonly called a spacebar preview) plays the composition from the current-time indicator to the end of the composition. Standard previews usually play more slowly than real time. They are useful when your composition is simple or in its early stages and doesn’t require additional memory for displaying complex animations, effects, 3D layers, cameras, and lights. You’ll use it now to preview the text animation.
1. In the Bgwtext Timeline panel, collapse the Title Here layer, and deselect both layers.
2. Make sure that the Video switch (![]() ) is selected for the layers that you want to preview—in this case, the Title Here and Background layers.
) is selected for the layers that you want to preview—in this case, the Title Here and Background layers.
3. Press the Home key to go to the beginning of the time ruler.
![]() Tip
Tip
Click the pasteboard of the Composition panel if you want to hide the motion path for this preview.

4. Do one of the following:
• Click the Play/Pause button (![]() ) in the Preview panel.
) in the Preview panel.

• Press the spacebar.
5. To stop the standard preview, do one of the following:
• Click the Play/Pause button in the Preview panel.
• Press the spacebar.

Using ram preview
RAM preview allocates enough RAM to play the preview (with audio) as fast as the system allows, up to the frame rate of the composition. Use RAM preview to play footage in the Timeline, Layer, or Footage panel. The number of frames played depends on the amount of RAM available to the application.
In the Timeline panel, RAM preview plays either the span of time you specify as the work area, or from the beginning of the time ruler. In the Layer and Footage panels, RAM preview plays only untrimmed footage. Before you preview, check which frames are designated as the work area.
You’ll preview the entire composition—the animated text plus graphic effects—using a RAM preview.
1. Click the Bgwtext 2 tab in the Timeline panel to bring it forward.
2. Make sure that the Video switch (![]() ) is turned on for all of the layers in the composition, and press F2 to deselect all layers.
) is turned on for all of the layers in the composition, and press F2 to deselect all layers.
3. Drag the current-time indicator to the beginning of the time ruler, or press the Home key.
4. Click the RAM Preview button (![]() ) in the Preview panel, or choose Composition > Preview > RAM Preview.
) in the Preview panel, or choose Composition > Preview > RAM Preview.
A green progress bar indicates which frames are cached to RAM. When all of the frames in the work area are cached, the RAM preview plays back in real time.
![]() Tip
Tip
You can interrupt the caching process at any time by pressing the spacebar, and the RAM preview will play back only the frames that have been cached to that point.

5. To stop the RAM preview, press the spacebar.
The more detail and precision you want to see, the more RAM is required for RAM preview. You can control the amount of detail shown in either the standard or RAM preview by changing the resolution, magnification, and preview quality of your composition. You can also limit the number of layers previewed by turning off the Video switch for certain layers, or limit the number of frames previewed by adjusting the composition’s work area.
6. Choose File > Save to save your project.
Optimizing performance in After Effects
How you configure After Effects and your computer determines how quickly After Effects renders projects. Complex compositions can require a large amount of memory to render, and the rendered movies can take a large amount of disk space to store. Refer to “Improve Performance” in After Effects Help for tips that can help you configure your system, After Effects preferences, and your projects for better performance.
Rendering and exporting your composition
When you’re finished with your masterpiece—as you are now—you can render and export it at the quality settings you choose, and create movies in the formats that you specify. You will learn more about exporting compositions in subsequent lessons, especially in Lesson 14, “Rendering and Outputting.”
Customizing workspaces
In the course of this project, you may have resized or repositioned some panels, or opened new ones. As you modify a workspace, After Effects saves those modifications, so the next time you open the project, the most recent version of a workspace is used. However, you can choose to restore the original workspace at any time by choosing Window > Workspace > Reset “Standard.”
Alternatively, if you find yourself frequently using panels that aren’t part of the Standard workspace, or if you like to resize or group panels for different types of projects, you can save time by customizing the workspace to suit your needs. You can save any workspace configuration, or use any of the preset workspaces that come with After Effects. These predefined workspaces are suitable for different types of workflows, such as animation or effects work.
1. If you closed the Lesson01_Finished.aep project, open it—or any other project—to explore the workspaces.
2. Choose Window > Workspace > Animation.
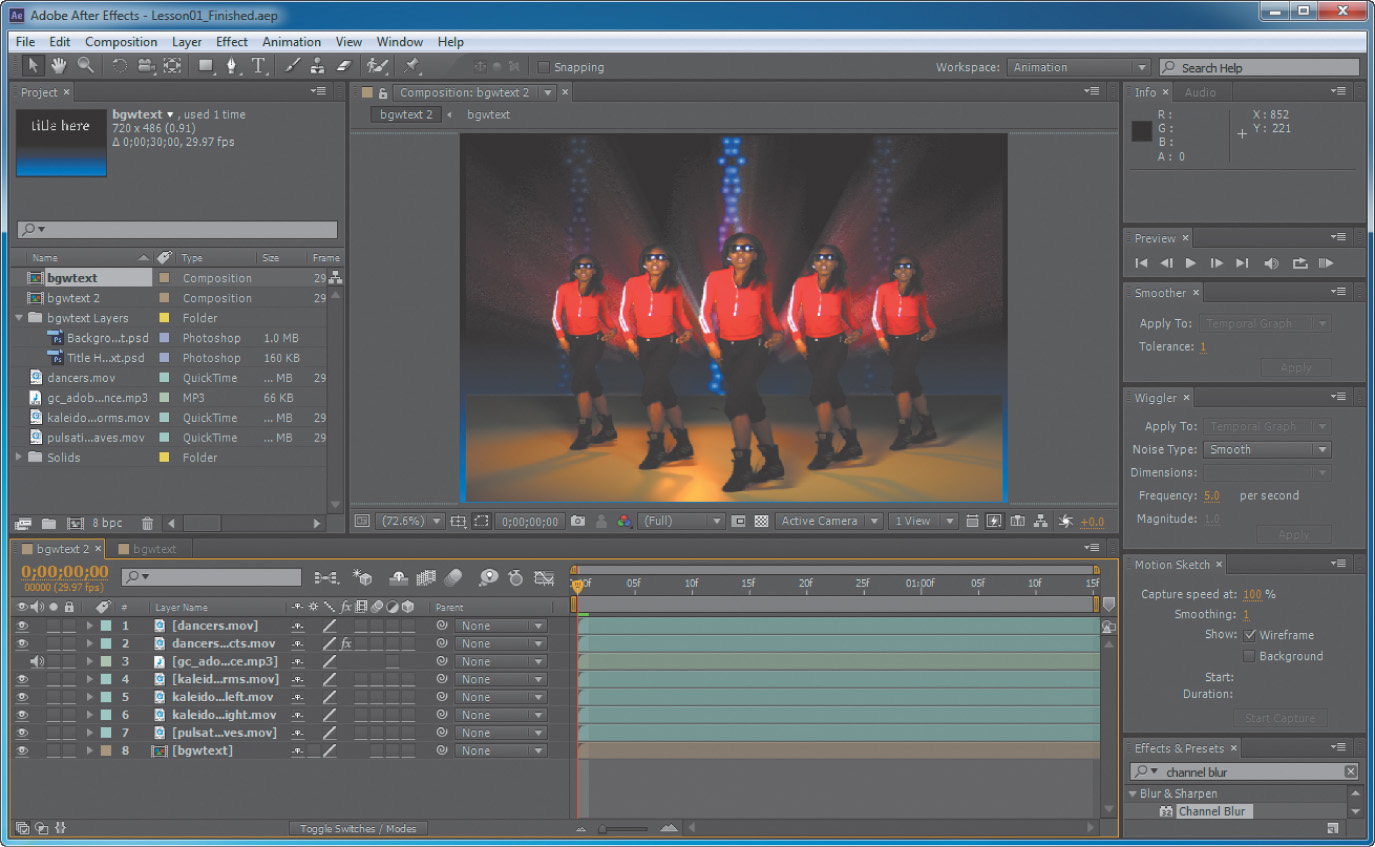
After Effects opens the following panels at the right side of the application window: Info and Audio (grouped), Preview, Smoother, Wiggler, Motion Sketch, and Effects & Presets.
You can also change workspaces using the Workspace menu at the top of the application window.
3. Choose Paint from the Workspace menu at the top of the application window, next to the Search Help box.
The Paint and Brushes panels open. The Composition panel is replaced by the Layer panel, for easy access to the tools and controls you need to paint in your compositions.
Saving a custom workspace
You can save any workspace, at any time, as a custom workspace. Once saved, new and edited workspaces appear in the Window > Workspace submenu and in the Workspace menu at the top of the application window. If a project with a custom workspace is opened on a system other than the one on which it was created, After Effects looks for a workspace with a matching name. If After Effects finds a match (and the monitor configuration matches), it uses that workspace; if it can’t find a match (or the monitor configuration doesn’t match), it opens the project using the current local workspace.
1. Close the Paint and Brushes panels by clicking the small x next to the panel names.
2. Choose Window > Effects & Presets to open that panel, and then drag it into a group with the Preview panel.
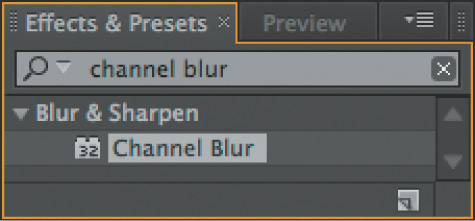
3. Choose Window > Workspace > New Workspace. Enter a name for the workspace and click OK to save it, or click Cancel if you don’t want to save it.
4. Choose Standard from the Workspace menu.
Controlling the brightness of the user interface
You can brighten or darken the After Effects user interface. Changing the brightness preference affects panels, windows, and dialog boxes.
1. Choose Edit > Preferences > Appearance (Windows) or After Effects > Preferences > Appearance (Mac OS).
2. Drag the Brightness slider to the left or right, and notice how the screen changes.
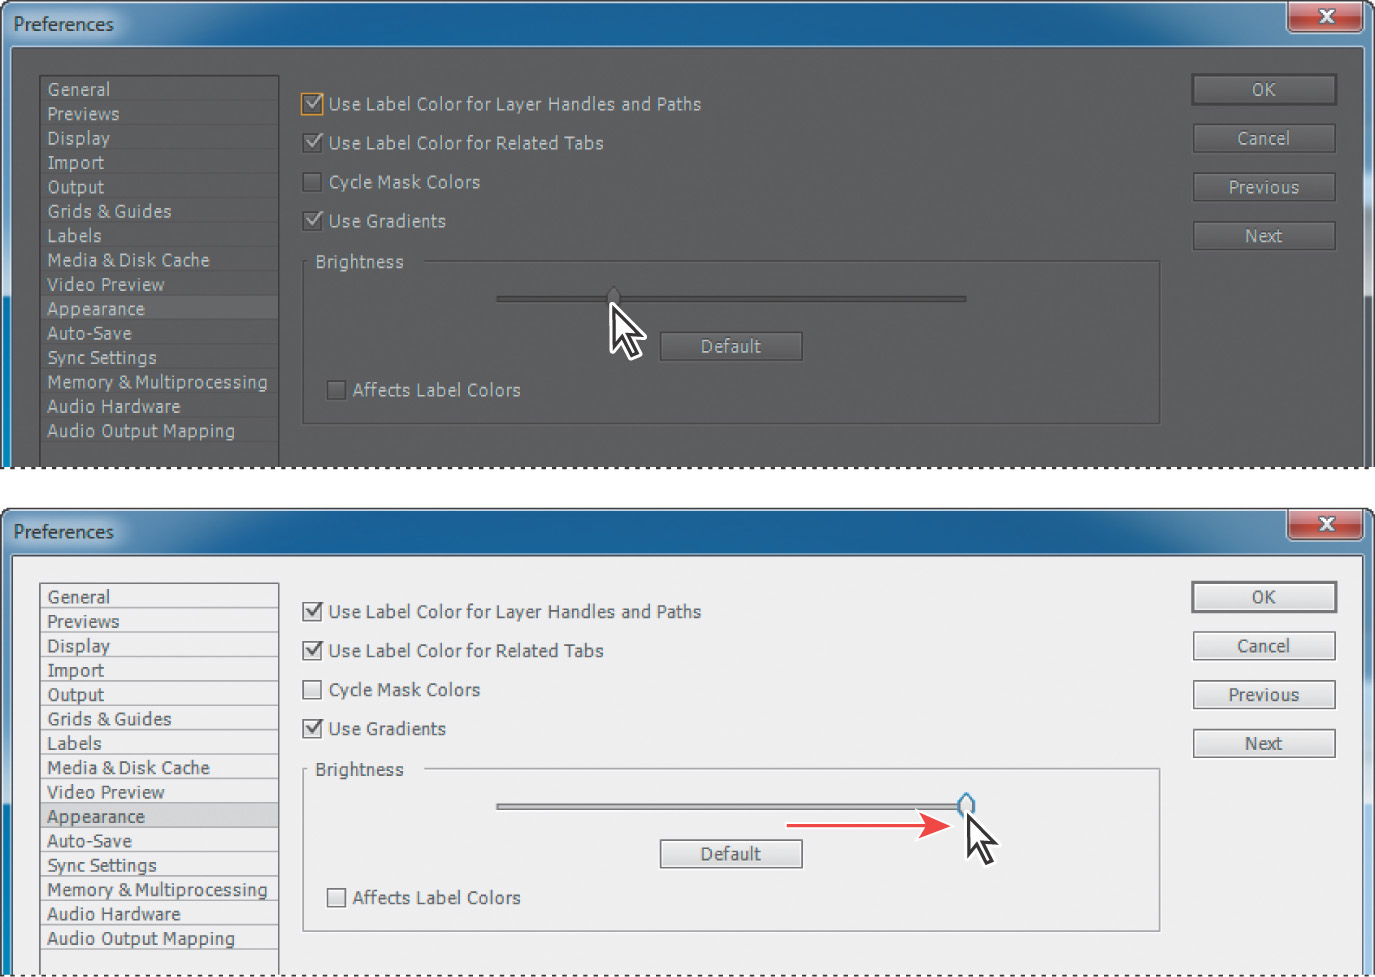
3. Click OK to save the new brightness setting or Cancel to leave your preferences unchanged. You can click Default to restore the default brightness setting.
Finding resources for using After Effects
For complete and up-to-date information about using After Effects panels, tools, and other application features, visit the Adobe website. To search for information in After Effects Help and support documents, as well as on other websites relevant to After Effects users, simply enter a search term in the Search Help box in the upper right corner of the application window. You can narrow the results to view only Adobe Help and support documents.
For additional resources, such as tips and techniques and the latest product information, check out the After Effects Help And Support page at www.adobe.com/support/aftereffects.
Review questions
1. What are the basic components of the After Effects workflow?
2. What is a composition?
3. How can you find missing footage?
4. Describe three ways to preview your work in After Effects.
5. How can you customize an After Effects workspace?
Review answers
1. Most After Effects workflows include these steps: importing and organizing footage, creating compositions and arranging layers, adding effects, animating elements, previewing your work, and rendering and exporting the final composition.
2. A composition is where you create all animation, layering, and effects. An After Effects composition has both spatial and temporal (time) dimensions. Compositions include one or more layers—video, audio, still images—arranged in the Composition panel and in the Timeline panel. Simple projects may include only one composition, while elaborate projects may include several compositions to organize large amounts of footage or intricate effects sequences.
3. To locate missing footage, choose File > Dependencies > Find Missing Footage. Or type Missing Footage into the Search field in the Properties panel.
4. You can manually preview your work in After Effects by moving the current-time indicator, or you can view either a standard or RAM preview. A standard preview plays your composition from the current-time indicator to the end of the composition, usually more slowly than real time. A RAM preview allocates enough RAM to play the preview (with audio) as fast as the system allows, up to the frame rate of the composition.
5. You can customize an After Effects workspace by dragging the panels into the configuration that best suits your working style. You can drag panels to new locations, move panels into or out of groups, place panels alongside each other, and undock a panel so that it floats above the application window. As you rearrange panels, the other panels resize automatically to fit the application window. You can save custom workspaces by choosing Window > Workspace > New Workspace.

