
Instruction-based Editing
When you work with a photo in Carousel’s Develop mode, what you are really doing is creating a set of instructions that Carousel will apply to the photo you see onscreen and any copies you export out of the app. That set of instructions is stored in a database in the Carousel cloud and references the original unedited photo. This is how Carousel can be non-destructive even when you crop away half the pixels in a photo and then convert it to black and white. In that instance, you are simply creating a set of instructions that says, “OK, when a copy is created, make a copy of the original photo and crop away these pixels, and then convert it to black and white.”
That set of instructions can be rewritten, modified, or completely undone at any time. This means you can feel free to play with all of Carousel’s developing tools without fear of doing irreversible damage to your photos. You can always go back. Since anyone you share your Carousel with has full editing ability, you also don’t need to worry that someone else might make a change that you don’t like, since you can always revert back to the original. This is total editing freedom. As we explore the Develop interface, we’ll discuss all the ways you can modify a set of develop instructions.
The Develop Interface
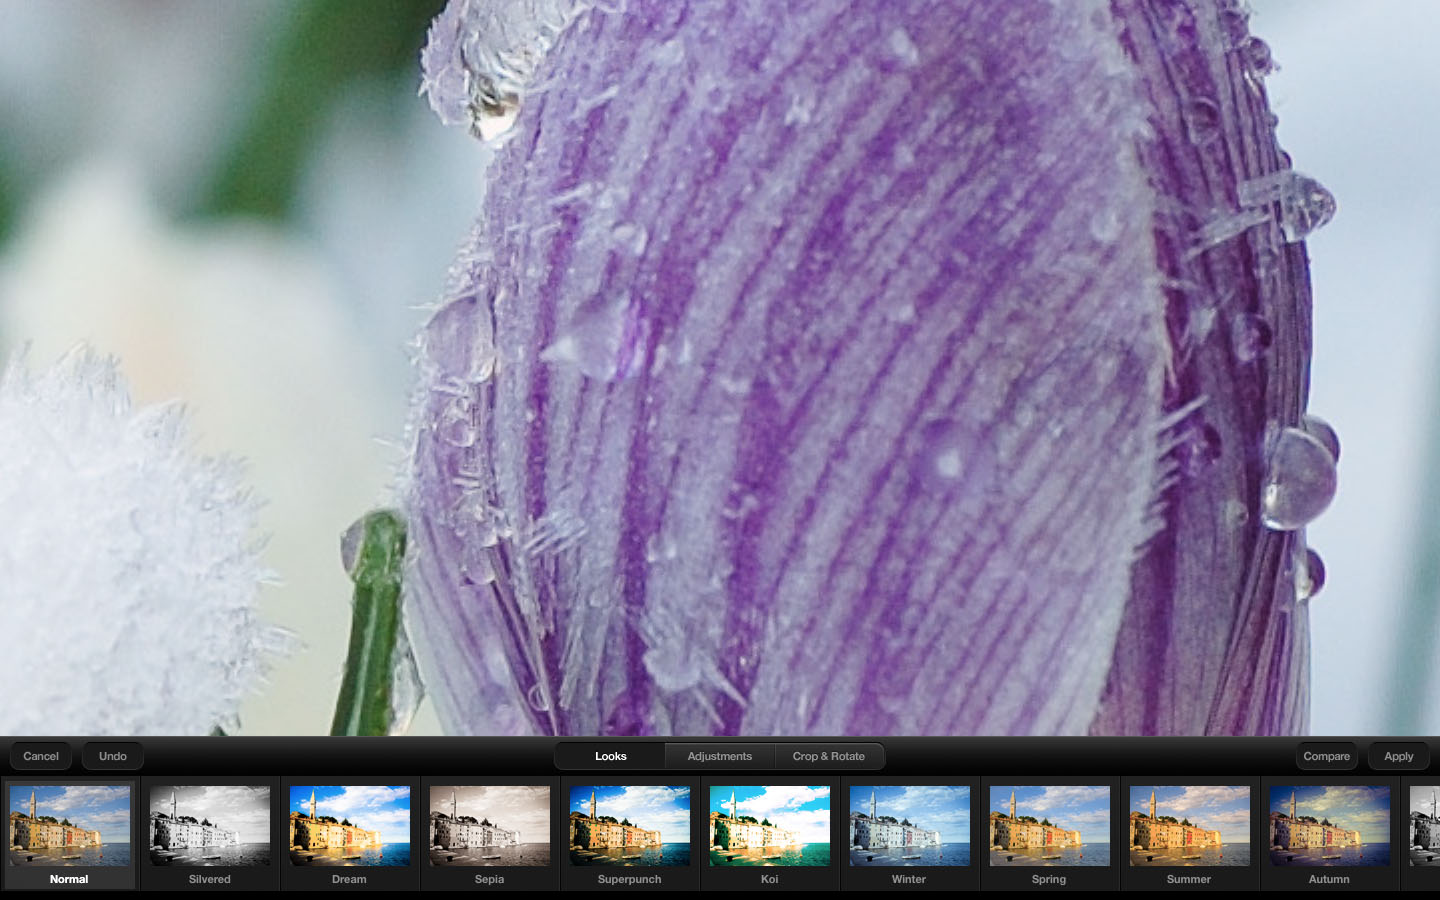
The path to the develop tools is the same on every device. Select the photo you want to develop, click or tap to move to Loupe view, then click or tap the Develop button to start editing. The only difference is that the Develop button on your Mac is the plus or minus icon (+/- ) at the top of the interface, while in your iDevice there is a button labeled Develop on the bottom of the photo. Once you are in Develop, you have the same set of tools on all devices. The interface has three sections: the workspace where the photo displays, the toolbar, and the toolstrip that contains the set of tools that changes based on the type of adjustments you are making (Figure 5.1).
Figure 5.1 The Develop interface.
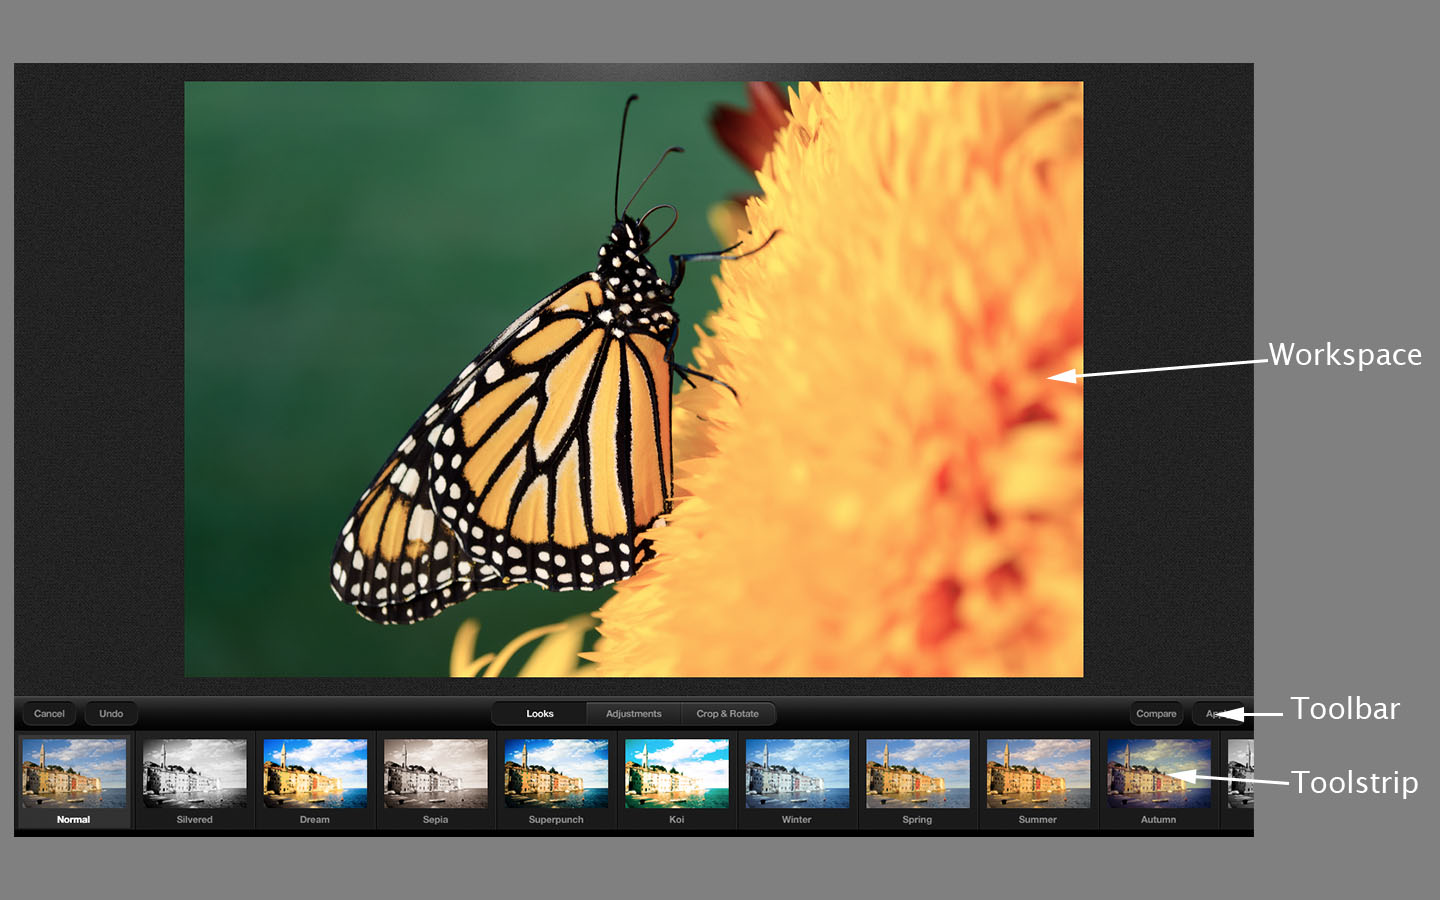
The toolbar is a consistent feature no matter what type of adjustments you are making (Figure 5.2). In the center of the toolbar are the three buttons that provide access to different sets of tools:
Figure 5.2 The Mac toolbar on top and the iPad below.

• Looks: A collection of adjustment recipes that can be applied with a single click.
• Adjustments: A set of controls for manually adjusting the brightness and colors of your photos.
• Crop & Rotate: All the tools needed to crop away unwanted portions of a photo, straighten a crooked horizon, or change the orientation of your photos.
The toolbar is also home to four other buttons:
• Cancel: Undo all the changes made in that editing session and return to the last saved state in Loupe view.
• Undo/Redo: Undo removes only the last adjustment that was applied, while Redo only reapplies that one adjustment. On your iDevice this is the icon with the arrow curving to the left for Undo and to the right for Redo. The Redo button only appears after you click Undo.
• Compare: Allows you to switch between the current developed view and the last saved state prior to entering Develop. Press and hold to see the previous state, then release to get back to work. This is the icon of the two photos side by side on the iPad Toolbar.
• Apply: Saves all the changes you’ve made to the photo during that editing session and exits Develop.
The Develop Workflow
While the types of adjustments you make to your photos may vary with each photo, the steps of the workflow follow the same pattern each time.
1. Select a photo and enter Develop.
2. Choose the set of tools you want to work with first.
3. Make the desired adjustments.
In the course of making adjustments, you might use the Undo button to undo your last adjustment because you didn’t like the effect, or just to compare against how the photo looked before that adjustment. If you decide you like the adjustment, you can tap Redo and reapply and move on. You might also use the Compare button to remind yourself how the photo looked before you started developing.
You can switch between any of the various sets of tools in any order based on what you want to do. You might start with a crop, then tweak exposure, and finish with one of the look styles.
4. Tap the Apply button to save all your work and apply those settings to the photo, which is then synchronized across all of your devices. Or, tap the Cancel button to throw away all those settings and return to the way the photo looked before you entered Develop.
A Few Develop Tips
Before we drill down into how each of the Develop tools work, I wanted to mention a few tips to keep in mind as you work.
Duplicates
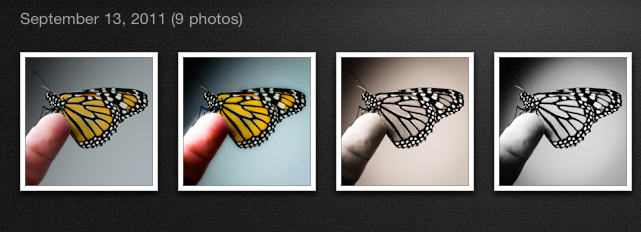
Remember that you have the option to create a duplicate of any photo (covered in Chapter 3). This way you can develop multiple different-looking versions of any one photo. When a photo is duplicated, it includes all of the Develop instructions that may have been applied to it up to that point in time. For example, imagine you start to develop a photo by cropping it to a square and increasing exposure just a bit, then click Apply to save your changes. Now you might duplicate that photo a few times to create a new version with those same baseline changes so that you can experiment with a few different look styles, but still have those baseline changes in all versions (Figure 5.3). You can always delete unwanted versions later.
Figure 5.3 Creating different versions with some settings in common.
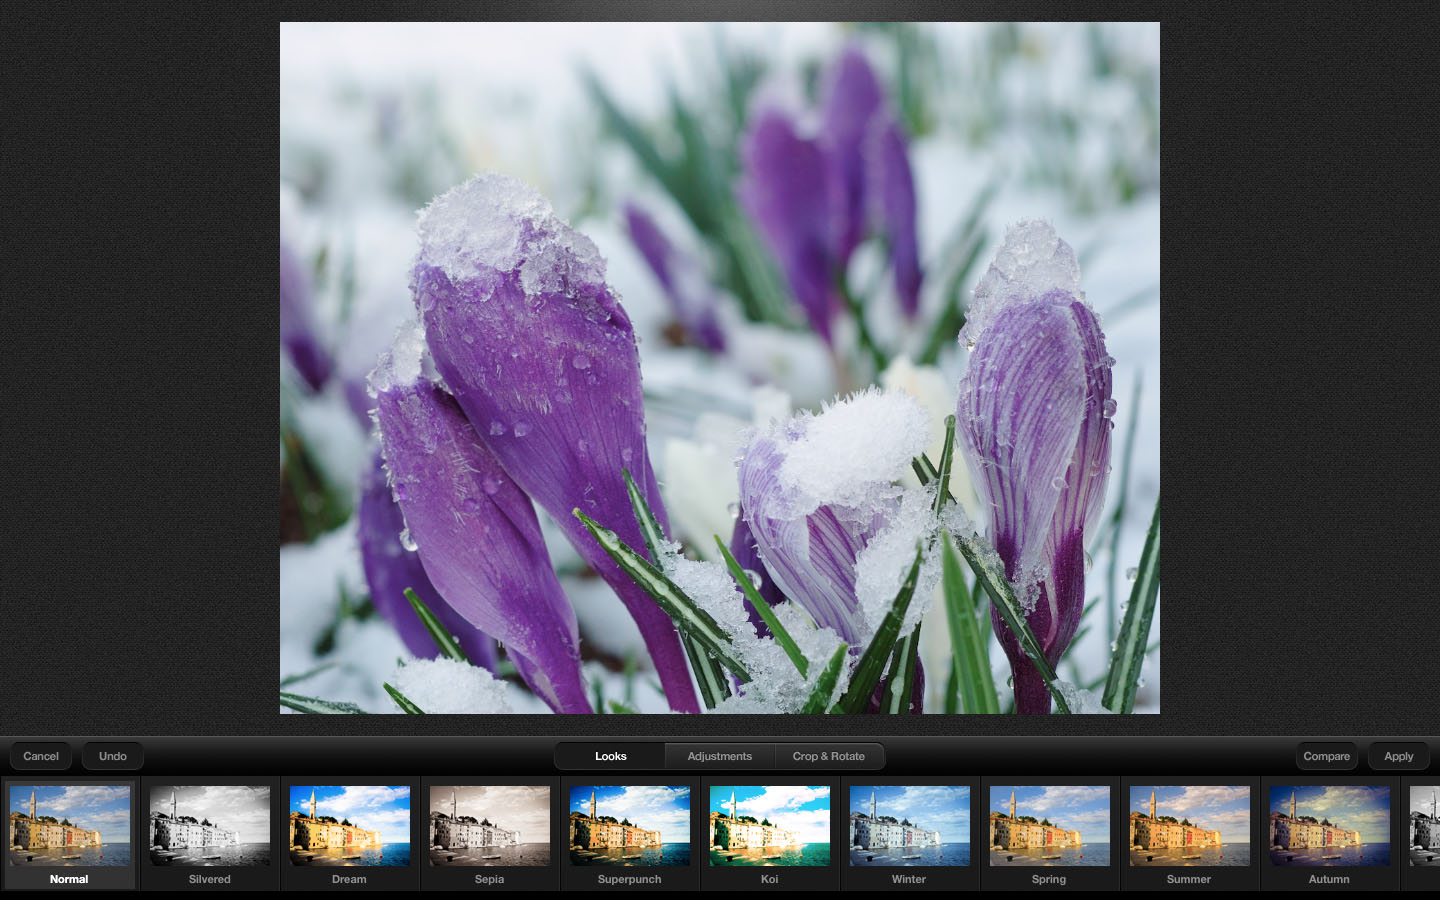
Zooming
You’ll spend most of the time seeing your photos in Fit view (Figure 5.4), where you can see the entire photo, but sometimes it really helps to be able to zoom in on the details in your photo when you are editing or when you are trying to decide if a photo is worth keeping. Once you are in Develop, you can zoom in on your Mac or on any of your other devices. However, there are some differences in how the zoom function works between devices.
Figure 5.4 Fit view shows you the entire photo.
On your Mac, you can double-click the photo once to zoom in to 1:1 or 100% view (Figure 5.5). If you double-click the photo a second time, you will zoom back out to Fit view, where you can see the entire photo again. Alternatively, you can hold the CMD key and press the plus key (+) to zoom in first to Fill view (where the photo fills the screen from edge to edge), then to 1:1, and then to zoom to 2:1 view (Figure 5.6). Hold CMD and press the minus key (-) to zoom back out in the opposite order.
Figure 5.5 Zoom in to 1:1 to check focus and see important detail.
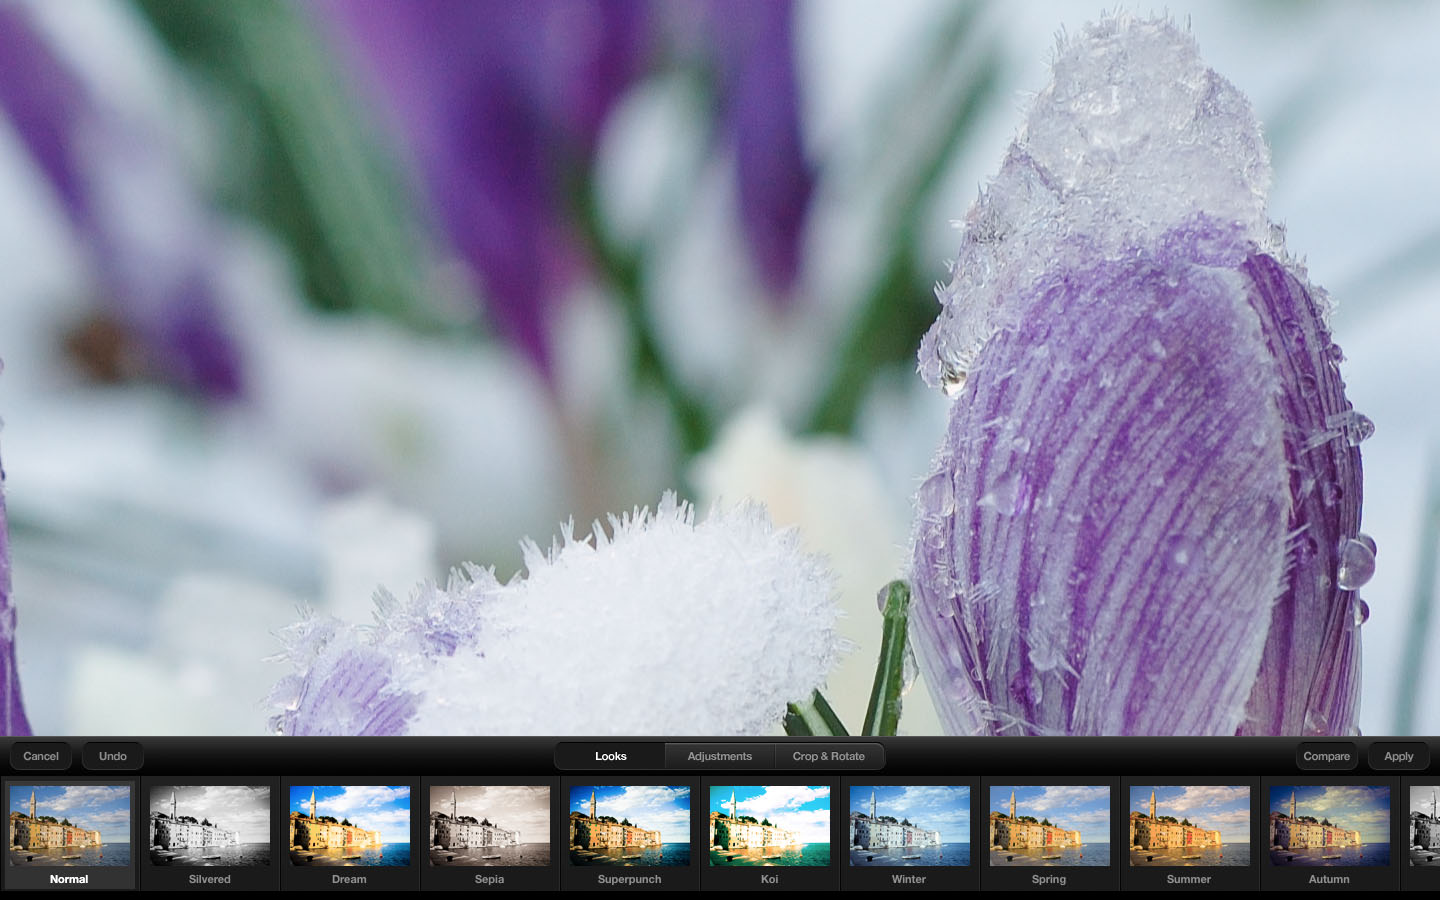
Figure 5.6 You can get right up close and personal at 2:1.
On your iPad, iPhone, or iPod touch, you can double-tap the photo to zoom in to 1:1, and double-tap again to zoom back out to Fit view. Instead of using keyboard shortcuts, you can also pinch your fingers out to manually zoom in closer, or pinch your fingers in to zoom back out.
On any device, once you are zoomed in you can pan around the image to change which part of the photo you are seeing. On your Mac, you click and drag the image to pan, while on your other devices it is a swipe gesture.
Reconcile Edits Made by Others
Due to the nature of sharing a carousel, it is possible that more than one person could be developing the same photo at the same time on a different device. Carousel can handle this just fine behind the scenes. For example, imagine you take a photo into Develop and start to work at the same time your son/daughter/significant other grabs that same photo on his/her iPad and heads to Develop. Now you’re both working on that same photo and applying your own creative vision for how you’d like to see it look. She finishes before you and taps Apply to save her set of instructions. This has no effect on you or your edits. After you click Apply to save your changes and return to thumbnail view, you will see an exclamation point on the thumbnail of the photo you just edited (Figure 5.7).
Figure 5.7 An indication that someone else edited that photo while you were working.

Click the exclamation point icon to see what is happening. A dialog box will pop up to explain that there are conflicting versions (or sets of instructions) of that photo (Figure 5.8). Now you can decide what you want to do about the conflict. In this example, “RobiPad” is the version edited on the iPad and “MacBook Pro” is my Mac, but the names of your devices will vary. There are three choices:
1. Keep RobiPad’s Version: Keep the version edited on the iPad and throw out the instructions created on the MacBook Pro.
2. Keep MacBook Pro’s Version: Keep the version edited on the MacBook Pro and throw out the instructions created on the iPad.
3. Keep Both Versions: Create a duplicate of the photo and keep one version with the MacBook Pro’s edits and the other version with the iPad’s version.
Figure 5.8 Conflicting versions means it is time for a decision.
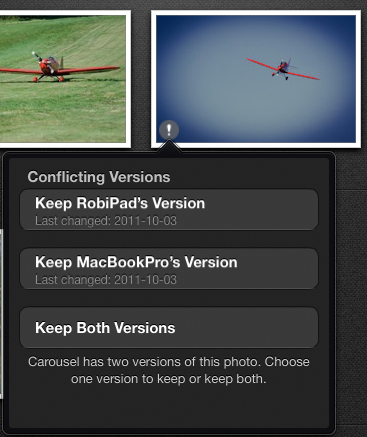
When in doubt, the safest choice is to keep both versions. This way you can see them both side by side and decide which version you like better or just decide to keep them both. Otherwise, choose the version you want to keep and be done with it.
This only happens if both photos are open in Develop at the same time and both people apply their changes to that photo.
The exclamation point only appears on the device that was last to save the changes, so that person is the one who gets to make the decision about what to keep. You might want to discuss the options with the other people who can access your carousel, so that everyone is on the same page regarding these types of changes.
Revert to Original
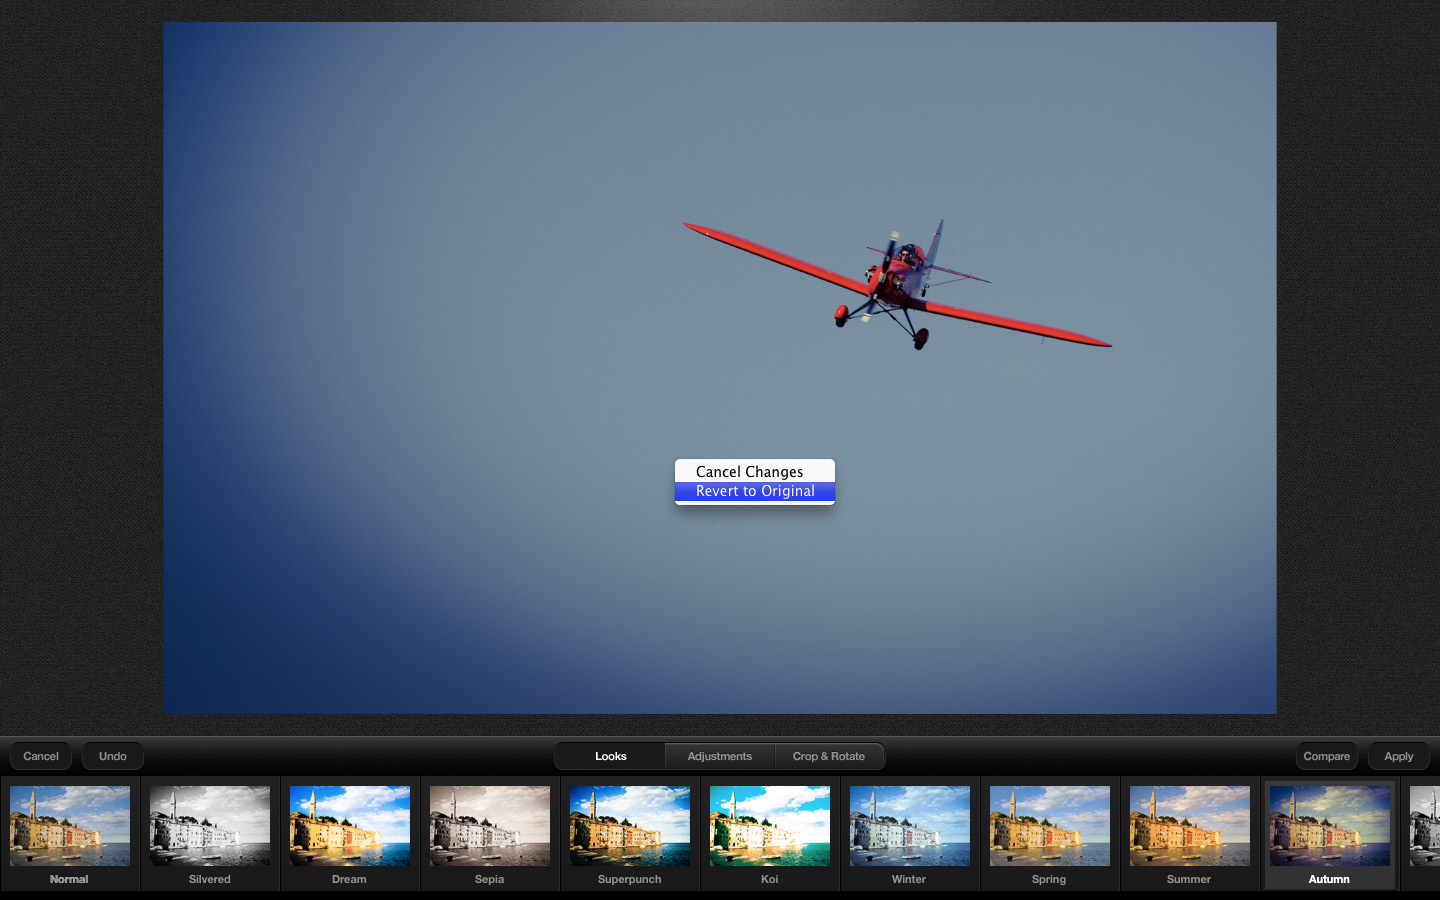
I really want to encourage you to move every slider and try each of the looks as you explore the Develop tools. The best way to learn is to make extreme adjustments and see what happens to your photo. Go crazy and really put Carousel through its paces. I mentioned the Undo and Cancel buttons previously, and those are handy when you just want to abandon the adjustments you made on a given work session. However, if after you’ve applied any number of changes you decide you want to go all the way back to the original unedited-as-imported version, you can ctrl-click the photo on your Mac or do a long tap on your iDevice to access a pop-up menu (Figure 5.9) with the following choices:
• Cancel Changes: Undo all of the changes you’ve made in that session, but remain in Develop. Just like the Cancel button, but without exiting Develop. Great when you want to wipe the slate clean but keep working in Develop.
• Revert to Original: Removes all develop settings that have ever been applied in Carousel.
Figure 5.9 Cancel or revert to original?
Now that you are comfortable in the knowledge that you can always go back to the original version (as long as you don’t delete it from Carousel), let’s take a look at each set of tools within Develop.