
18. Exporting Frames, Clips, and Sequences
Lesson overview
In this lesson, you’ll learn about the following:
• Choosing the right export options
• Exporting single frames
• Creating movie, image sequence, and audio files
• Using Adobe Media Encoder
• Exporting to Final Cut Pro
• Exporting to Avid Media Composer
• Working with edit decision lists
• Recording to tape
This lesson will take approximately 60 minutes.
Exporting your project is the final step in the video production process. Adobe Media Encoder offers multiple high-level output formats, including the Adobe Flash, QuickTime, and MPEG formats. Within those formats you have dozens of options and can also export in batches.
Getting started
One of the best things about editing video is the feeling you have when you can finally share it with your audience. Adobe Premiere Pro CC offers a wide range of export options—methods of recording your projects to tape or converting them to additional digital files.
![]() Note
Note
Adobe Premiere Pro can export clips selected in the Project panel, as well as sequences or ranges within sequences or the Source panel. The content that’s selected when you choose File > Export is what Adobe Premiere Pro will export. Make sure that the item you want to export is selected so you do not waste precious time rendering content from the Project panel rather than your desired sequence.
Increasingly, the primary form of distribution is the use of digital files. To create these files, you can use Adobe Media Encoder. Adobe Media Encoder is a stand-alone application that handles exports in batches, so you can export in several formats simultaneously and process in the background while you work in other applications, including Adobe Premiere Pro and Adobe After Effects.
Overview of export options
Whether you’ve completed a project (or just want to share an in-progress review), you have a number of export options:
• You can select a whole sequence as a single file to post to the Internet or burn to a disc.
• You can export a single frame or a series of frames to post to the Internet or attach to an email.
• You can choose audio-only, video-only, or full audio/video output.
• Exported clips or stills can also be reimported back into the project automatically for easy reuse.
• You can export directly to videotape.
Beyond the actual export formats, you can set several other parameters as well:
• You can choose to create files in a similar format, and at the same visual quality and data rate as your original media, or you can compress them to a smaller size and lower quality.
• You can transcode your media from one format to another to make it easier to exchange with other people involved in the postproduction process.
• You can customize the frame size, frame rate, data rate, or audio and video compression techniques if a particular preset doesn’t fit your needs precisely.
You can use exported files for further editing, in presentations, as streaming media for Internet and other networks, or as sequences of images to create animations.
Exporting single frames
While an edit is in progress, you may want to quickly export a still frame to send to a team member or client to review. Additionally, you could choose to export a specific thumbnail image to use as the thumbnail of your video file when you post it to the Internet. Adobe Premiere Pro offers a simplified workflow for still-image export.
Let’s look at the Export Frame function. To select a frame, simply place the playhead over the frame you want to use. You can use the Export Frame function in two ways:
• You can load a clip from the Project panel into the Source Monitor. When you’re using the Export Frame function from the Source panel, Adobe Premiere Pro will create a still image that matches the resolution of the source video file.
• You can move the playhead in the Timeline or Program Monitor to choose a frame. When you’re using the Export Frame function from the Timeline, Adobe Premiere Pro will create a still image that matches the resolution of the selected video sequence.
Let’s give it a try.
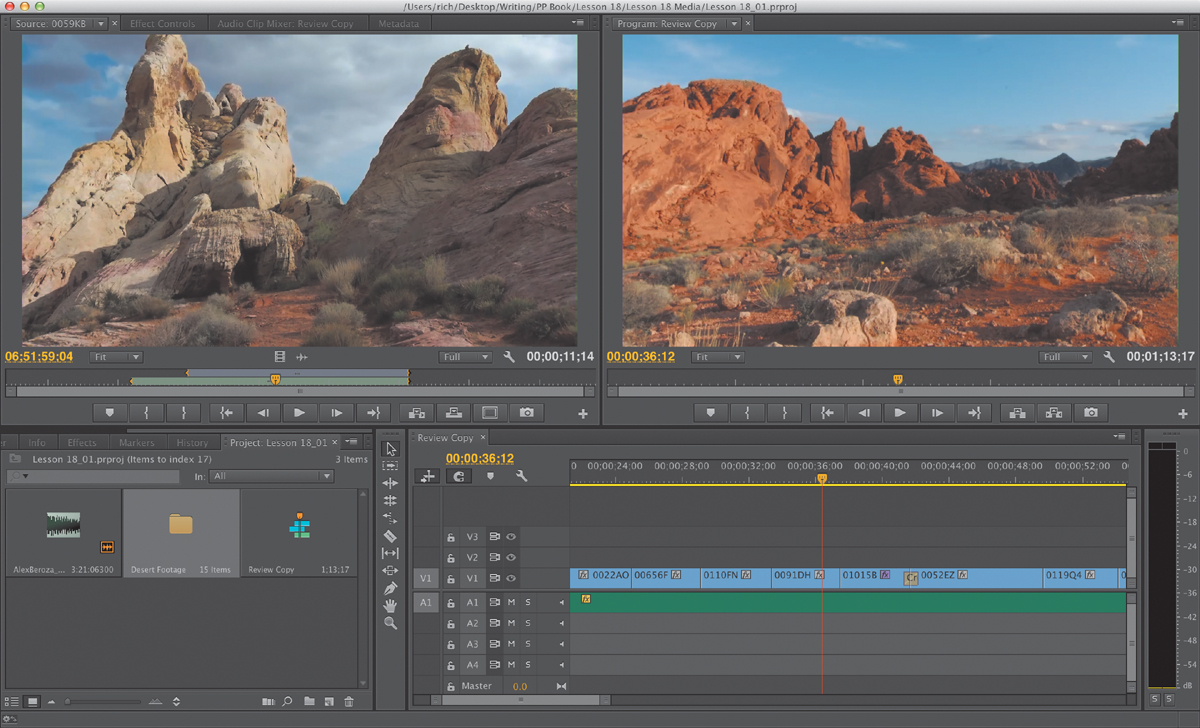
1. Start Adobe Premiere Pro, and open Lesson 18_01.prproj.
2. Click somewhere in the Review Copy Timeline to select the sequence. Drag to find a desirable frame for export.
![]() Note
Note
The music in this project is entitled “Tell Somebody,” by Alex featuring AdmiralBob. Licensed under Creative Commons Attribution 3.0.
3. In the Program Monitor, click the Export Frame button on the lower right.
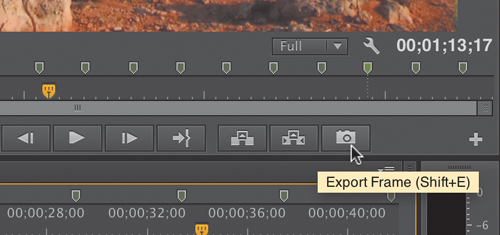
If you don’t see the button, it may be because you’ve customized the panel’s buttons. You can select the Program Monitor and press Shift+E to manually invoke the command.
4. In the Export Frame dialog, enter the desired filename.
5. Using the pop-up menu, choose the correct still-image format for your needs.
• JPEG, PNG, GIF, and BMP work well for compressed graphic workflows (like Internet delivery).
• TIFF and Targa are suitable for print and animation workflows.
• DPX is often used for digital cinema or color-grading workflows.
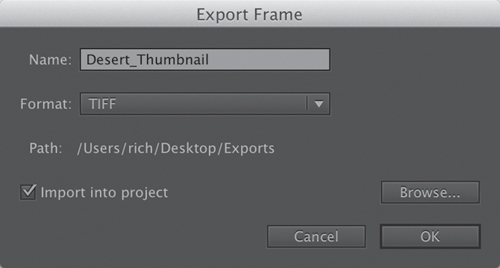
6. Click the Browse button to open the Browse for Folder dialog. Create a folder named Exports on the desktop, and select it.
7. Leave the Import into Project check box selected to add the still graphic back into your current project.
8. Click OK to export the frame.
![]() Note
Note
In Windows, you can export to the BMP, DPX, GIF, JPEG, PNG, TGA, and TIFF formats. On the Mac, you can export to the DPX, JPEG, PNG, TGA, and TIFF formats.
Exporting a master copy
Creating a master copy allows you to make a pristine digital copy of your edited project that can be archived for future use. A master copy is a self-contained digital file that contains all of the content of your sequence at its highest resolution and best quality. Once created, you can then use that file to produce other compressed output formats.
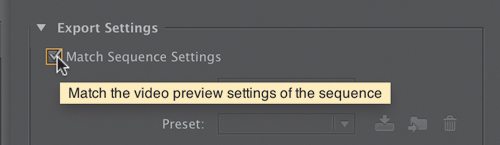
Matching sequence settings
Ideally, your master file will closely match the settings (frame size, frame rate, and codec) of the primary material in your sequence. Adobe Premiere Pro makes this fairly easy by allowing you to choose to match sequence settings, which makes it simple to create a file that matches your edit. There is no guesswork, provided you chose the right sequence preset (or let your sequence autoconform to the primary file format).
1. Continue working with Review Copy in Lesson 18_01.prproj.
2. With the sequence selected (in either the Project or Timeline panel), choose File > Export > Media.
![]() Note
Note
In some cases, the Match Settings option cannot write an exact match of the original camera media. For example, XDCAM EX will write to a generic MPEG2 file. In most cases, the file written will have an identical format and closely match the data rate of the original sources.
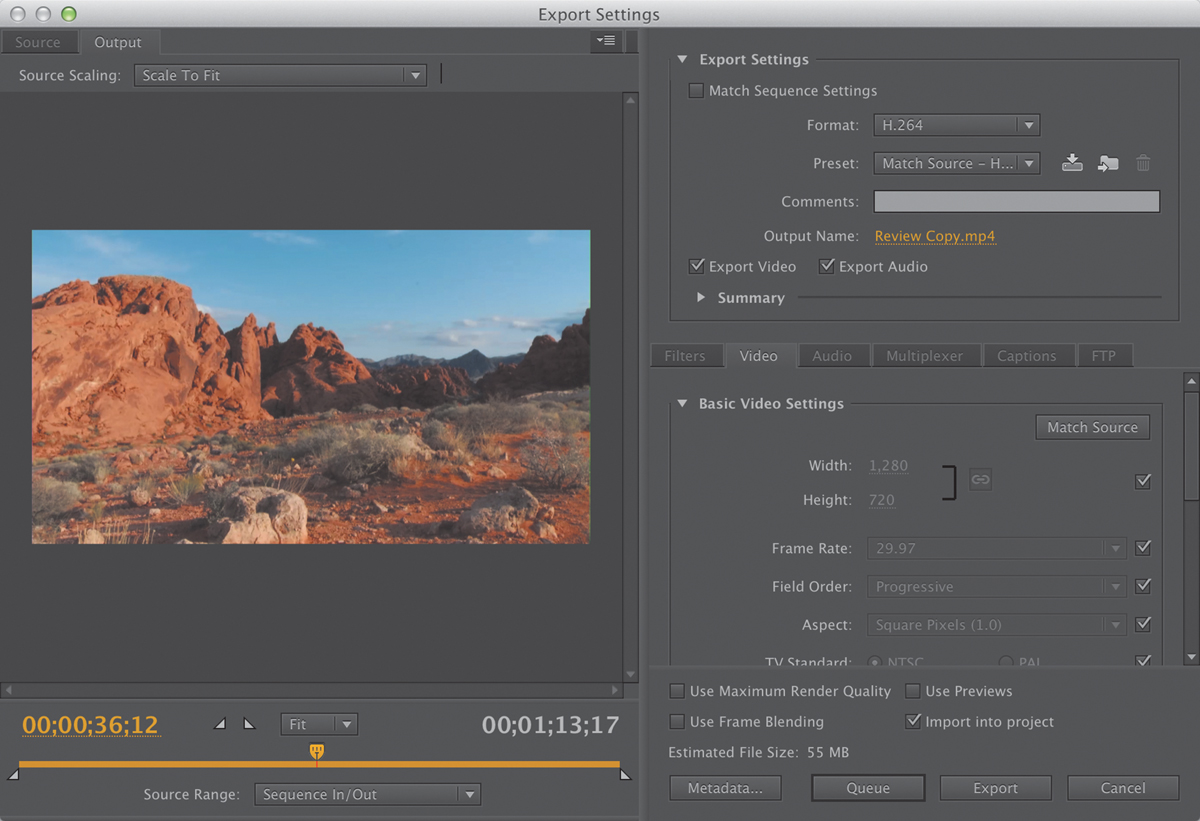
The Export Settings dialog opens. We’ll explore this interface in-depth later in this lesson.
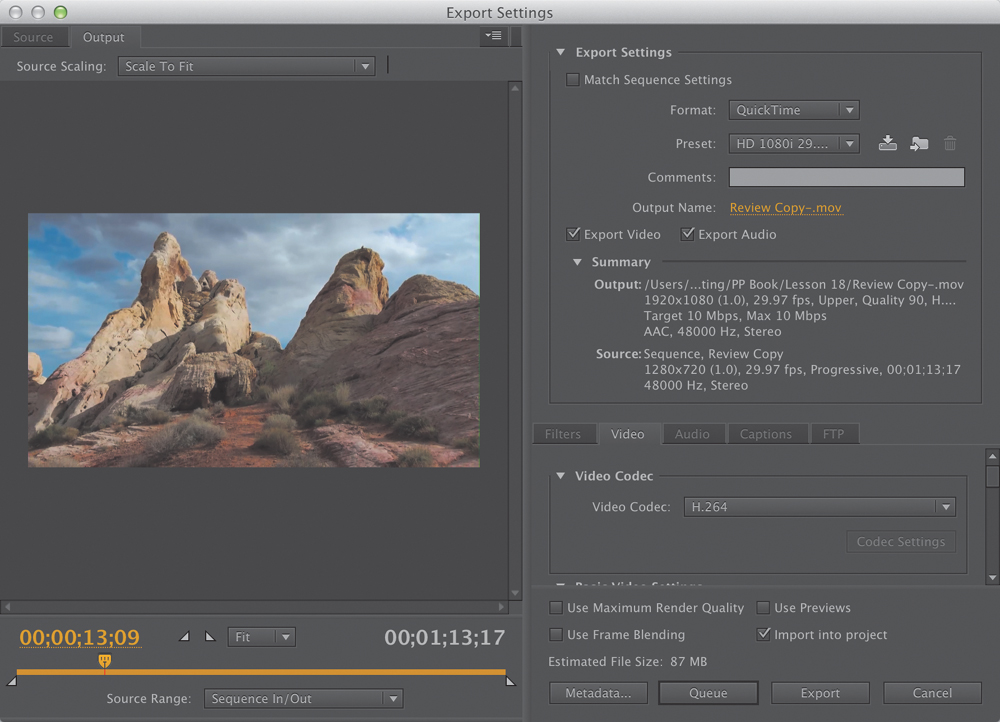
3. In the Export Settings dialog, select Match Sequence Settings.
4. Click the gold hypertext for the Output Name option to choose a target.

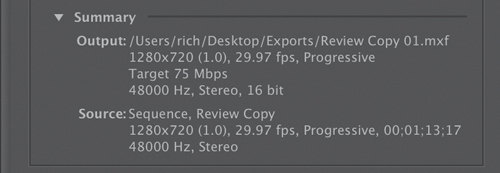
5. Choose a target (such as the Exports folder created earlier), and name the sequence Review Copy 01.mxf.
6. Click Save.
7. Examine the text in the Summary area to confirm that the output format matches the sequence settings. In this case, you should be using DNxHD media (as MXF files) at 29.97fps.
8. Click the Export button to write a single file that is a digital clone of the sequence.
![]() Tip
Tip
If your sequence to export has a lot of items that are scaled (such as photos or mixed-resolution video, or if your output file will be lower resolution than your sequence), you can use the Maximum Render Quality option. This is much slower but produces excellent results.
Choosing another codec
When you export a project as a self-contained movie, you can change the codec that is used. Some camera formats (such as DSLR and HDV) are heavily compressed. Using a higher-quality mastering codec can better preserve the quality of the master file you created.
1. Use the same project as the previous exercise.
2. Choose File > Export > Media or press Control+M (Windows) or Command+M (Mac OS).
3. In the Export Settings dialog, click the Format pop-up menu and choose QuickTime as the format.
4. Click the output name (the gold text), and give the file a new name, Review Copy 02.mov. Save it to the same destination as the previous exercise.
5. Click the Video tab near the bottom of the window.
6. Choose a mastering codec that you have installed.
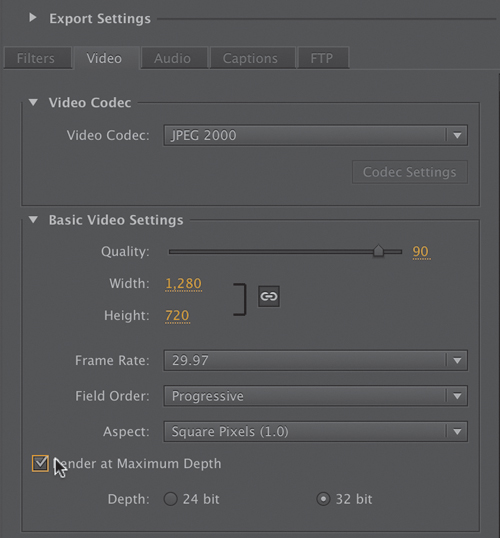
One option that should be installed on your system is the JPEG2000 codec. This file produces a very high-quality (but reasonably sized) file. Check the frame size and frame rate to match your source settings. You may need to scroll the window or resize the panel to make it easier to see. Use the settings you see here.
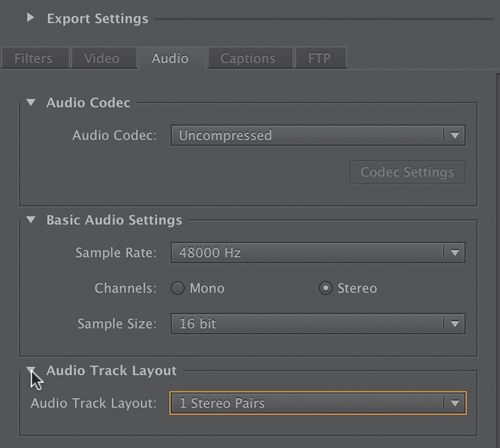
7. Click the Audio tab and choose Uncompressed for the audio codec. In the Basic Audio Settings section, choose 48000 Hz as the sample rate, Stereo for Channels, and 16 bit for Sample Size. Set the Audio Track Layout to 1 Stereo Pairs.
8. Click the Export button at the bottom of the dialog to export the sequence and transcode it to the specified file format.
Working with Adobe Media Encoder
Adobe Media Encoder is a stand-alone application that can run independently or can be launched from Adobe Premiere Pro. One advantage to using Adobe Media Encoder is that you can submit a job directly from Adobe Premiere Pro and then continue working as the encoding is processed.
Choosing a file format for export
Adobe Premiere Pro and Adobe Media Encoder can export in a number of formats; let’s run through them quickly to identify when you should use them.
• AAC Audio: The Advanced Audio Coding format is the audio-only format that is often used with most H.264 encoding.
• Audio Interchange File Format: This is an audio-only file format popular on the Mac.
• DNxHD MXF OP1a: This format is included primarily for providing compatibility with Avid editing systems. It is, however, a high-quality, cross-platform file format for professional editing.
• DPX: DPX (Digital Picture Exchange) is a high-end image sequence format for digital intermediate and special-effects work.
• F4V: This is a newer version of the Flash video format, which is a popular way to distribute video online. F4V files use the H.264 video codec/AAC audio codec.
• FLV: This is the more compatible Flash video format for use with older computers. FLV files use the VP6 video codec/MP3 audio codec.
• H.264: This is the most flexible and widely used format today, with options for devices such as the iPod and Apple TV and TiVo Series3 SD and HD, and for services such as YouTube and Vimeo. H.264 files produced via this option can also be transmitted to smartphones, such as Android, Blackberry, and iPhone devices, or used as high-quality, high-bit-rate intermediate files for working in other video editors.
• H.264 Blu-ray: This option produces H.264 files specifically for Blu-ray discs.
• JPEG: This setting will create a sequential series of images at the target destination.
• MP3: This compressed audio format is very popular on the Internet.
• MPEG2: This older file format is primarily used for DVDs and Blu-ray discs. Presets in this group allow you to produce files that can be distributed for playback on your own or other computers. Some broadcasters also use MPEG2 as a format for digital delivery.
• MPEG2 Blu-ray: This will create a Blu-ray-compliant MPEG2 video and audio file from your HD material.
• MPEG2-DVD: Use this preset to create standard-definition DVDs.
• MPEG4: Selecting this codec produces lower-quality H.263 3GP files for distribution to older cell phones.
• MXF OP1a: These presets let you create files compatible with several systems including AVC-INTRA, DV, IMX, and XDCAM.
• P2 Movie: This output option is used for rendering sequences back to P2 format.
• PNG: This is a lossless but efficient still-image format for Internet use or for image sequences that contain transparency.
• QuickTime: This container format can store files using multiple codecs. All QuickTime files use the .mov extension. It is the preferred format for use on Macintosh computers.
• Targa: This is a rarely used uncompressed still-image file format.
• TIFF: This popular high-quality still-image format offers both lossy and lossless compression options.
• Waveform Audio: This uncompressed audio file format is popular on Windows computers using the .wav formats.
The following formats are available only on Windows:
• Microsoft AVI: This “container format,” available only in the Windows version of Adobe Premiere Pro, can store files using multiple compression technologies, or codecs. While not officially supported by Microsoft for a number of years, it is still in widespread use in Windows systems primarily for large intermediate files within an editing project, such as renders transferred between applications in a Windows-only environment. It is rarely, if ever, used for distribution of video files to the public.
• Windows Bitmap: This is an uncompressed, rarely used still-image format with a .bmp extension. It’s available only on the Windows version of Adobe Premiere Pro.
• Animated GIF and GIF: These compressed still-image and animated formats are used primarily on the Internet. They’re available only on the Windows version of Adobe Premiere Pro.
• Uncompressed Microsoft AVI: This is a very high-bit-rate intermediate format that is not widely used and is available only on the Windows version of Adobe Premiere Pro.
• Windows Media: This option produces WMV files for playback using the Windows Media Player. It is used in some playout server applications and is ideal for Microsoft Silverlight applications (Windows only).
That’s only a brief overview of the formats, but it should provide some useful direction when it’s time to produce your videos.
Configuring the export
To export from Adobe Premiere Pro with Adobe Media Encoder, you’ll need to queue the project. The first step of this involves using the Export Settings dialog to make initial choices about the file you’re going to export.
1. If necessary, open Lesson 18_01.prproj.
2. Choose File > Export > Media.
It’s best to work through the Export Settings dialog from the top down, first choosing your format and presets, then picking the output, and finally deciding whether you’d like to export audio, video, or both.
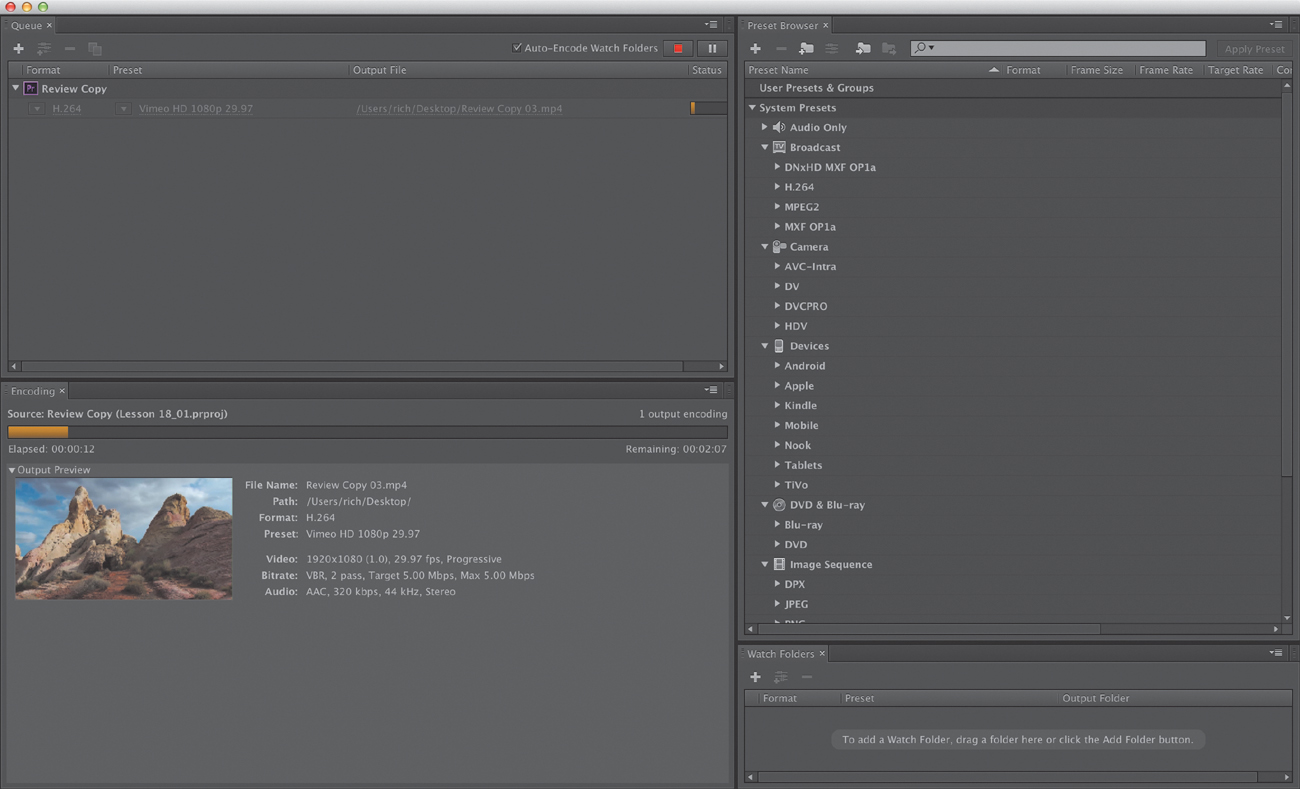
3. Choose the H.264 format from the Format preset. This format is a popular choice for creating files for uploading to video-sharing websites. Choose the Vimeo HD 1080p 29.97 preset.
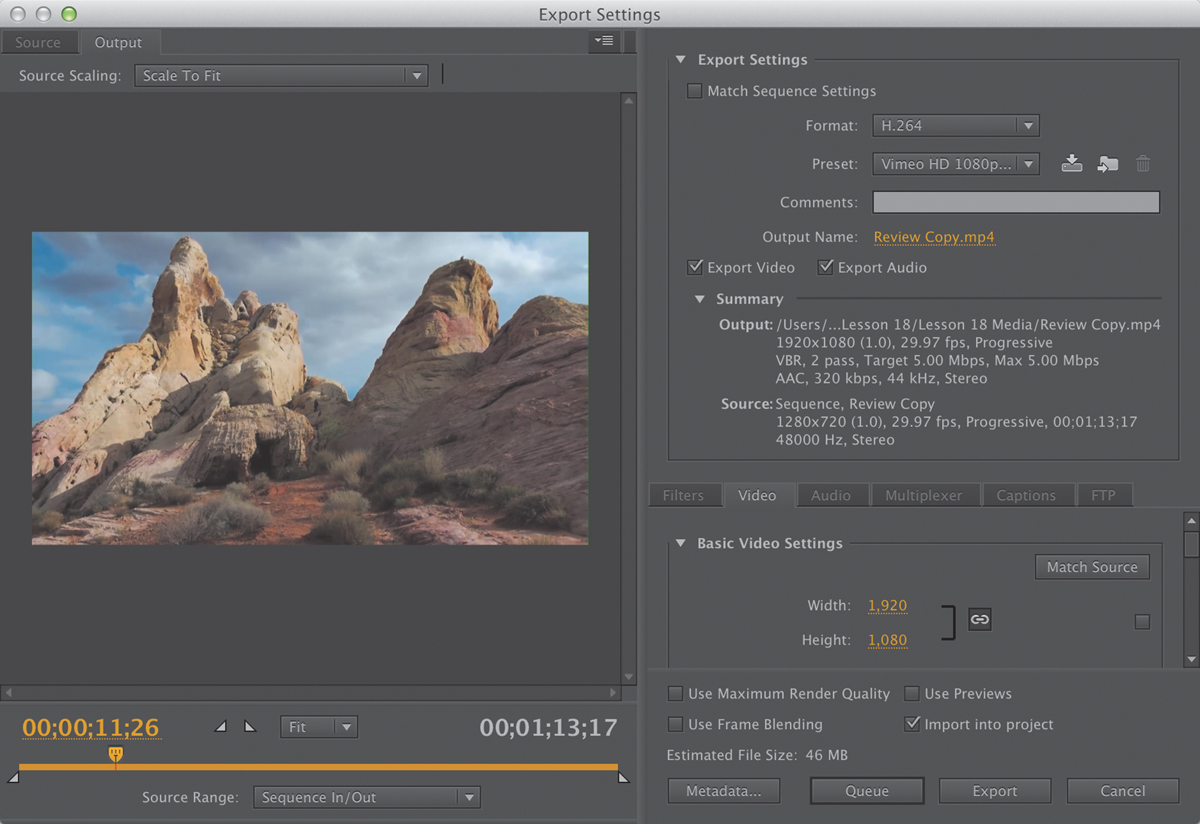
This correctly loads the settings that match the frame size and frame rate of the source footage. It also adjusts the codec and data rate to match the requirements of the Vimeo website.
4. Click the output name (the gold text), and give the file a new name, Review Copy 03.mp4. Save it to the same destination as the previous exercise.
5. Examine the Summary section below the preset lists to see the effects of choices so far. Note that the tabs presented on the bottom right of the Export Settings dialog will vary by format. Most of the critical options are contained on the Format, Video, and Audio tabs, and the options here will vary by format as well. Here’s an overview of the various tabs:
• Filters: The filter available for encoded output is Gaussian Blur. Enabling this filter reduces the video noise introduced by slightly blurring the video. Export the project without this filter to see whether noise is a problem. If it is, increase noise reduction in small amounts; increasing noise reduction too much will make the video blurry. Judicious use of Gaussian Blur is often a very good way to reduce a file’s bit rate (particularly with very detailed high-resolution material that is scaled down considerably for distribution). It can remove some of the excessive fine detail that can result in “ringing” or “shimmering.”
• Video: The Video tab allows you to adjust the frame size, frame rate, field order, and profile. The default values are based on the preset you chose.
• Audio: The Audio tab allows you to adjust the bit rate of the audio and, for some formats, the codec. The default values are based on the preset you chose.
• Multiplexer: These controls let you determine whether the encoding method is optimized for compatibility with a specific device (like an iPod or PlayStation Portable). This can also control if the audio is combined with the video or delivered as separate files.
• FTP: This tab primarily allows you to specify an FTP server for uploading the exported video when it is finished encoding. Fill in the appropriate FTP values supplied by your FTP host if you want to enable this feature. This FTP information can be tied to a custom output preset or watch folder, so the video file will output and upload automatically.
Source and Output panels
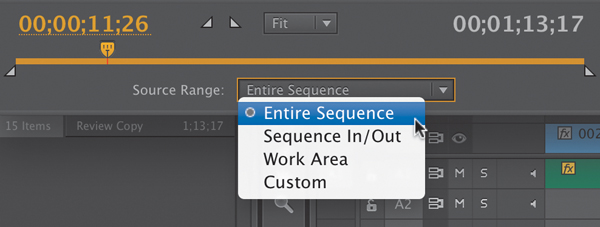
Moving to the left side of the Export Settings dialog, look over the Source Range drop-down list, where you can choose to export the Work Area bar selected in the sequence, a range you selected by placing an In point and an Out point on your sequence, a region selected using the handles directly above the drop-down list, or the entire sequence. This is useful when you want to export selected regions on the Timeline rather than the entire sequence.
Also on the left, note the Source and Output tabs, the latter of which shows a preview of the video to be encoded. It’s useful to view the video on the Output tab to catch errors such as unwanted letterboxing or distortion caused by the irregularly shaped pixels used in some video formats.
Queuing the export
When you’re ready to export your sequence or selected range, you’ll need to look over a few last items that will determine important details about your exported file. Be sure to closely analyze the impact of each of these settings on your export.
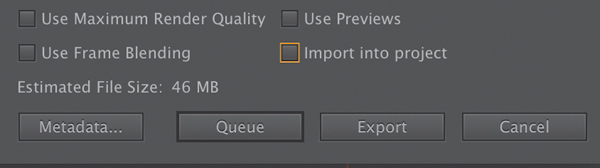
• Use Maximum Render Quality: Consider enabling this setting whenever scaling from larger to smaller formats during rendering, but note that this option requires more RAM than normal rendering and can slow rendering by a factor of four or five. This option is not often needed except in situations that involve scaling and where the highest-quality output is needed.
• Use Previews: This option uses previews created while producing your project as the starting point for the final rendered file, rather than rendering all video and effects from scratch. This can shorten encoding time but can also degrade quality when rendering to a format different from your sequence preset. Use this option when you need only draft-quality output and you’re in a big rush.
• Use Frame Blending: Enable this option to smooth motion whenever you change the speed of a source clip in your project or render to a different frame rate than your sequence setting.
• Import into project: This option brings the exported video file or still image into the current project as a media asset. This is particularly useful when making freeze frames.
• Metadata: Click this button to open the Metadata Export panel. You can specify a wide range of settings, including information about copyright, creator, and rights management. You can even embed useful information such as markers, script, and speech transcription for advanced delivery options like Flash authoring.

![]() Note
Note
On the Video tab, you’ll also find a Render at Maximum Depth check box. This can improve the visual quality of your output by using a wider gamut to generate colors when rendering. However, choosing this option can add significantly to the render time.
• Queue: Click the Queue button to send the file to Adobe Media Encoder, which should open automatically.
• Export: Select this option to export directly from the Export Settings dialog rather than rendering via Adobe Media Encoder. This is a simpler workflow, but you won’t be able to edit in Adobe Premiere Pro until the rendering is complete.
![]() Note
Note
If working with a professional mastering format (such as MXF OP1a, DNxHD MXF OP1a, or QuickTime), you can export up to 32 channels of audio where the format allows. The original sequence must use a multichannel master track with the corresponding number of tracks.
Click the Queue button to launch Adobe Media Encoder and submit the file.
Additional options in Adobe Media Encoder
Working with Adobe Media Encoder has several additional benefits. Although it involves a few extra steps beyond simply clicking the Export button in the Export Settings panel of Adobe Premiere Pro, the extra options are worth it.
Here are some of the most useful features you’ll find in Adobe Media Encoder:
• Add additional stand-alone files: You can add stand-alone files to Adobe Media Encoder by choosing File > Add Source.
• Import Adobe Premiere Pro sequences directly: You can choose File > Add Premiere Pro Sequence to select an Adobe Premiere Pro project file and choose sequences (without ever launching Adobe Premiere Pro).
• Render After Effects compositions directly: You can import and encode compositions from Adobe After Effects by choosing File > Add After Effects Composition. This method is similar to the previous in that you don’t need to open Adobe After Effects.
![]() Note
Note
Adobe Media Encoder does not have to be used from Adobe Premiere Pro. You can launch Adobe Media Encoder on its own.
• Use a Watch Folder: If you’d like to automate some encoding tasks, you can create watch folders by choosing File > Add Watch Folder and then assigning a preset to that watch folder. Source files dragged into the folder later will be automatically encoded to the format (or formats) specified in the preset.
• Modify an item: You can add, duplicate, or remove any tasks by using the like-named buttons and dragging any tasks that haven’t yet started encoding to any place in the queue. If you haven’t set the queue to start automatically, click the Start Queue button to start encoding. Adobe Media Encoder encodes files serially rather than in parallel, and if you add any files to the queue after starting encoding, they’ll be encoded as well.
• Modify presets: You can choose a format/preset separately with each approach. Once the encoding tasks are loaded into Adobe Media Encoder, administration is straightforward. To change any encoding setting, click the target task and then the Settings button on the right.
Exchanging with other editing applications
Collaboration is often essential in video post-production. Fortunately, Adobe Premiere Pro can both read and write project files that are compatible with many of the top editing and color-grading tools on the market.
Exporting a Final Cut Pro XML file
The use of Final Cut Pro XML allows you to exchange an Adobe Premiere Pro project with many applications. You can bring your project directly into Final Cut Pro 7 and 6 or convert it to Final Cut Pro X using 7toX for Final Cut Pro from Assisted Editing. You can also export your project to applications such as DaVinci Resolve and Grass Valley Edius. Exporting from Adobe Premiere Pro to Final Cut Pro—and importing the XML file into Final Cut Pro—is simple.
1. In Adobe Premiere Pro, choose File > Export > Final Cut Pro XML. Click Yes to save your project.
2. In the Final Cut Pro XML - Save Converted Project As dialog, name the file, choose a location, and click Save. Adobe Premiere Pro will let you know whether there were any issues exporting the XML file.
This file can now be imported into another application. You will likely need to import or capture the media into the other application and relink it.
Exporting to OMF
Open Media Framework (OMF) has become a standard way of exchanging audio information between systems (typically for audio mixing). When you export an OMF file, the typical method is to create a single file with all your audio tracks inside. When the OMF file is open by a compatible application, it will show all of the tracks.
Here’s how to create an OMF file:
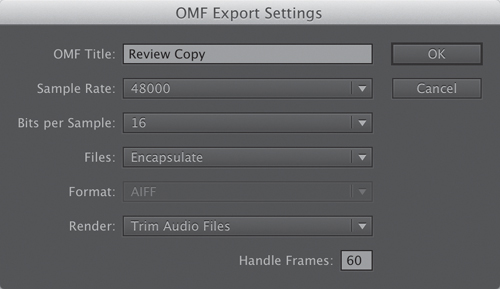
1. With a sequence selected, choose File > Export > OMF.
2. Enter a name for the file in the OMF Title field.
3. Check that the Sample Rate and Bits per Sample settings match your footage; 48000 Hz and 16 bits are the most common settings.
4. From the Files menu, choose one of the following:
• Encapsulate: This option exports an OMF file that contains the project metadata and all the audio for the selected sequence. Encapsulated OMF files typically are large.
• Separate Audio: This option exports individual mono AIFF files into an omfiMediaFiles folder.
5. If you’re using the Separate Audio option, choose between the AIFF and Broadcast Wave formats. Both are high quality, but check with the system you need to exchange with. AIFF files tend to be the most compatible.
6. Using the Render menu, choose either Copy Complete Audio Files or Trim Audio Files (to reduce the file size). You can specify that handles (extra frames) be added to give you some flexibility when modifying the clips.
7. Click OK to generate the OMF file.
8. Choose a destination, and click Save. You can target your lesson folder for now.
Exporting to AAF
Another way to exchange files is the Advanced Authoring Format (AAF). This method is typically used to exchange both project information and source media with Avid Media Composer.
1. Choose File > Export > AAF.
2. In the AAF - Save Converted Project As dialog box, choose a location and click Save.
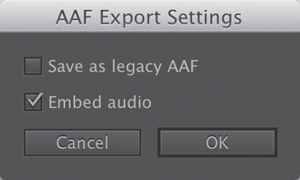
3. In the AAF Export Settings dialog box, you have two additional choices:
• Save as legacy AAF: This makes a file more compatible but doesn’t support as many features.
• Embed audio: This option attempts to embed audio into the file to reduce the need for relinking.
4. Click OK to save the sequence to an AAF file at the specified location. The AAF Export Log dialog box opens to report any issues.
Working with edit decision lists
• EDLs work best with projects that contain no more than one video track, no more than two stereo (or four mono) audio tracks, and no nested sequences.
• Most standard transitions, freeze frames, and clip-speed changes work well in EDLs.
• Adobe Premiere Pro supports a key track for titles or other content. That track has to be immediately above the video track selected for export.
• You must capture and log all the source material with accurate and unique timecode information.
• The capture card must have a device control that uses a timecode.
• To ensure there are no breaks in the timecode, videotapes must each have a unique reel number and be formatted with the timecode before you shoot the video.
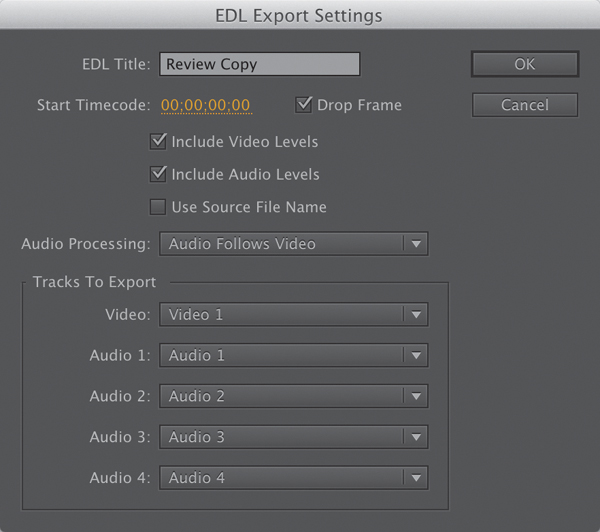
• EDL Title: This specifies a title to appear in the first line of the EDL file. The title can be different from the filename. After clicking OK in the EDL Export Settings dialog, you will have the opportunity to enter a filename.
• Start Timecode: Here you set the starting timecode value for the first edit in the sequence.
• Include Video Levels: This includes video-opacity-level comments in the EDL.
• Include Audio Levels: This includes audio-level comments in the EDL.
• Audio Processing: Here you specify when audio processing should occur. Options are Audio Follows Video, Audio Separately, and Audio At End.
• Tracks To Export: This specifies which tracks to export. The video track directly above the video track selected for export is designated as the key track.
Send to Adobe SpeedGrade
Adobe offers its own robust color-grading utility: SpeedGrade. It offers a comprehensive tool set for manipulating and improving color. You should send files to Adobe SpeedGrade only when you’re near the very end of a project and you have “picture lock.” You should not use SpeedGrade when you still intend to make edits to the content or duration of your project.
1. Choose File > Save to capture any changes in your sequence.
2. Choose File > Send to Adobe SpeedGrade.
3. In the dialog, choose a destination to save the new file.
4. Click Save.
A new SpeedGrade project file is generated, and an image sequence (using the DPX file format) is created for each clip in your project.
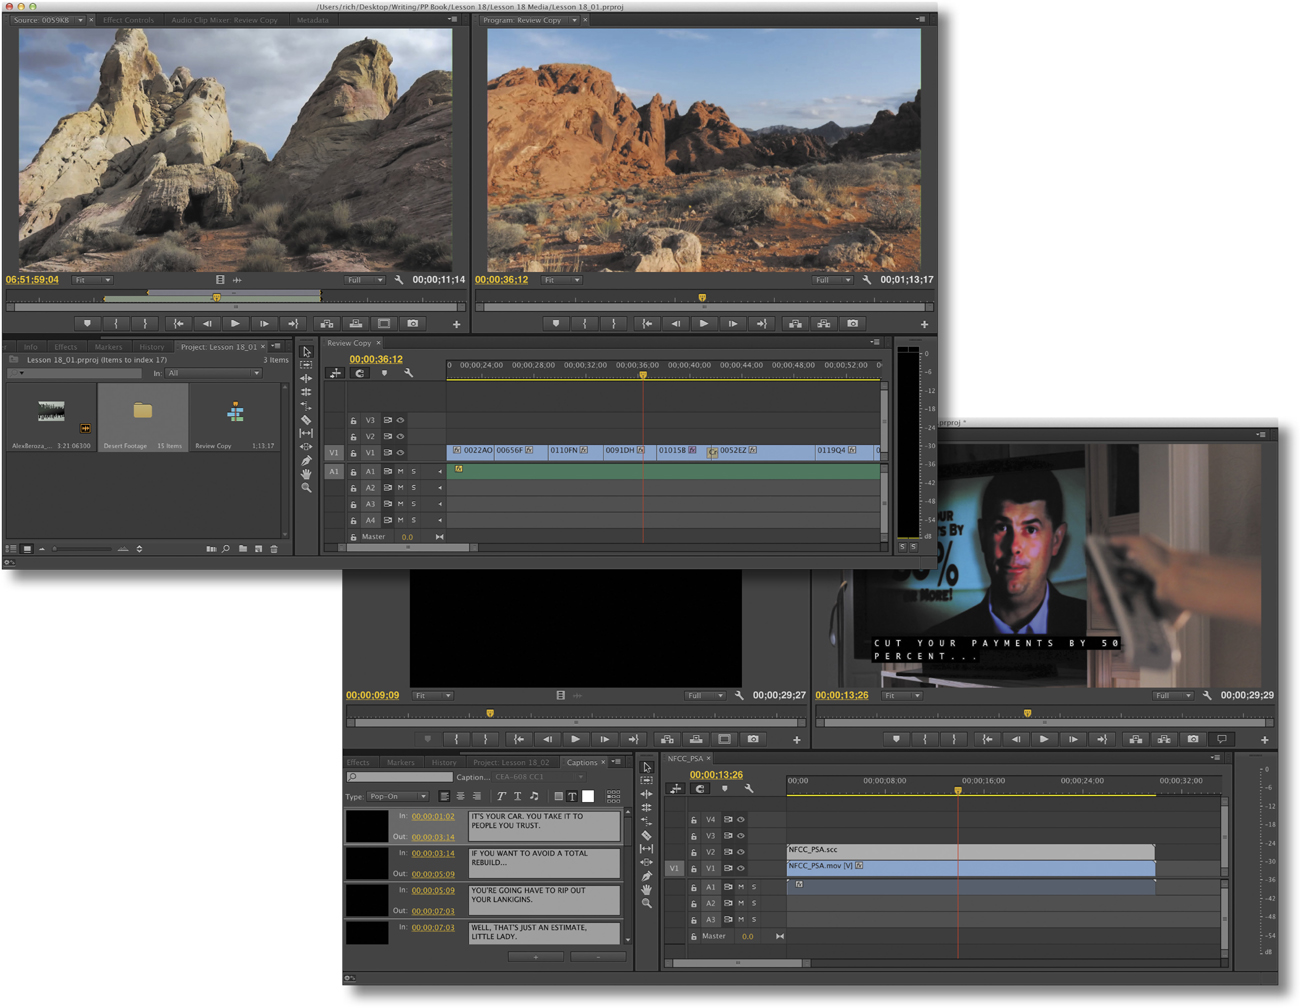
Using closed captioning
![]() Note
Note
This public service announcement was produced by RHED Pixel and is provided courtesy of the National Foundation for Credit Counseling.
![]() Note
Note
Using the Button Editor, you can customize the Program Monitor by adding a Closed Captioning Display button for easy access to toggling viewable captions.
1. Close the current project (do not save), and open Lesson 18_02.prproj.
2. Click the Timeline for the sequence NFCC_PSA.
3. Choose File > Import, and navigate to a prepared caption file (the .scc and .mcc formats are supported). You’ll find a sample file in the Lesson 18 folder.
4. Edit the closed captions clip to a track above the uppermost video track.
5. Click the Settings button in the Program Monitor (the wrench icon), and choose Closed Captioning Display > Enable.
6. Play the sequence to see the captions.

7. Edit the captions using the Captions panel (Window > Captions). You can adjust the timing and formatting of captions using the panel’s controls.
1. Choose File > New > Closed Captions. The New Closed Captions dialog opens.
2. The settings are prepopulated to match the current sequence. These default values are fine, so click OK.
3. Another dialog opens, asking for advanced settings for broadcast workflows. The CEA-608 standard is the most commonly used standard in NTSC countries (also known as Line 21). The TeleText option is used in PAL countries (Line 16). This clip is NTSC, so for this clip choose CEA-608.
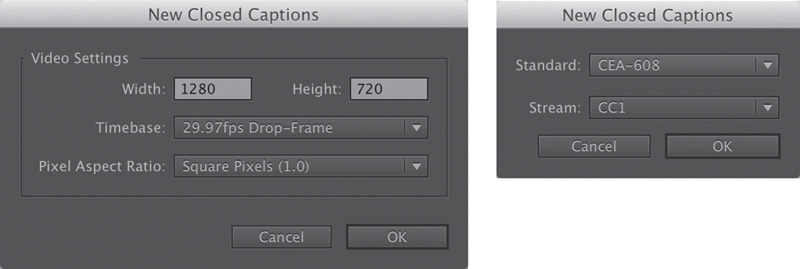
4. Choose CC1 from the Stream menu to specify the first stream of closed captions (up to four streams can be added). Click OK. A new Synthetic item called Closed Captions is added to the Project panel.
5. Edit the closed caption file onto track V2. It will be too short for the sequence (by default it is 3 seconds long).
6. Highlight the closed caption clip, and choose the Captions panel (Window > Captions).
7. Enter text that matches the dialogue and/or narration being spoken.
8. Adjust the In and Out durations for the caption to adjust its length for each caption block.
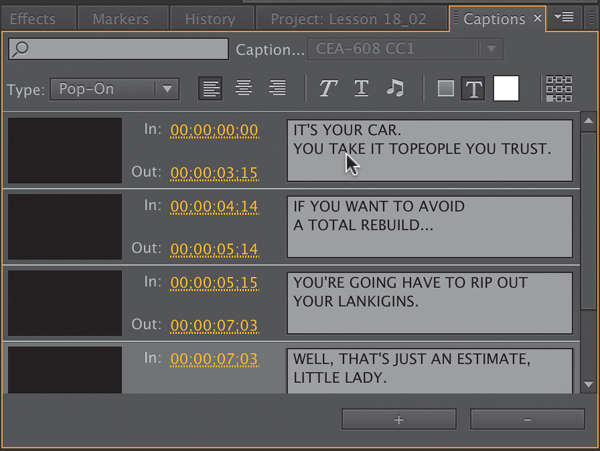
9. Use the formatting controls at the top of the Captions panel to adjust the appearance of each caption.
Recording to tape
Although tape is becoming less and less common, there are industries and parts of the world where it remains the preferred output method. For example, many broadcasters require master tapes on formats like HDCAM SR or DVCPRO HD. If you shot on a format like DV or HDV, tape is a popular choice to back up the project.
If you own a tape deck or camera, you can use the project Lesson 18_03.prproj. This contains both a DV and an HDV sequence that can be output.
Preparing a project for tape output
To play a project out to tape, you need to be able to play back the sequence perfectly. This means no dropped frames or untendered effects. You’ll need to ensure that you have fast enough hard drives and a well-tuned machine. Here are a few other details to check:
• Device Control settings: Make sure Adobe Premiere Pro can see your recording deck. Open Adobe Premiere Pro Preferences and choose Device Control. In the Devices menu, choose the appropriate type of device control for your deck. Click the Options button and attempt to match your device as closely as possible. If you’re using a professional deck or capture card, you may need to install additional drivers.
• Audio channel assignments: You should check that the audio channels in the sequence are assigned to the correct output. Some decks, like DV, allow for only two channels of audio, whereas other formats can support 4, 8, or even 16 channels. Using the Audio Mixer, you can assign each audio track in your sequence to a specific output.
Preparing a tape for output
To record to tape, you need to prepare the tape first. Typically, this is called striping or blacking a tape. This process sets the timecode on the tape and ensures that it is ready to record to.
This process varies greatly from deck to deck, so be sure to check the owner’s manual of your hardware. It is common to start a tape at 00:58:00:00 to accommodate bars, tone, slate information, and a countdown. The primary video will typically start at exactly 1:00:00:00.
Recording to a DV or HDV deck
Out of the box, Adobe Premiere Pro has the ability to connect to a DV or HDV deck. If you captured your original video from DV or HDV tape, you may want to write the finished project back to tape for safekeeping. If so, follow the steps listed here:
1. Connect your DV or HDV camcorder to your computer, just as you did when you captured the video.
2. Turn it on, and set it to VCR or VTR (not to Camera, as you might expect).
3. Cue the tape to where you want to start recording.
4. Select the sequence you want to record.
5. Choose File > Export > Tape.
If you’re working with a DV camcorder, you’ll see the Export to Tape dialog.
Here’s a rundown of the options:
• Activate Recording Device: When you select this option, Adobe Premiere Pro will control your DV device. Deselect it if you want to record to a device that you’ll control manually.
• Assemble at timecode: Select this option to pick an In point on the tape where you want recording to begin. When this option is not selected, recording will begin at the current tape location.
• Delay movie start by x frames: This is for the few DV recording devices that need a brief period of time between receiving the video signal and recording it. Check your device’s manual to see what the manufacturer recommends.
• Preroll x frames: Most decks need little or no time to get to the proper tape-recording speed. To be on the safe side, select 150 frames (5 seconds), or add black video to the start of your project.
The remaining options are self-explanatory.
6. Click Record (or Cancel if you don’t want to make a recording).
If you haven’t rendered your project (by pressing Enter [Windows] or Return [Mac OS] for playback instead of the spacebar), Adobe Premiere Pro does that now. When rendering is complete, Adobe Premiere Pro starts your camcorder and records your project to it.
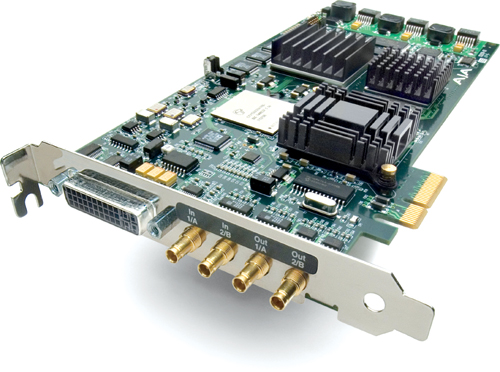
Using third-party hardware
Video Input/Output devices are available from companies such as AJA, Blackmagic Design, Bluefish444, and Matrox. These cards let you connect professional-quality video decks to your computer.
The following features are useful when working with professional decks:
• SD/HD-SDI: Serial Digital Interface (SDI) carries standard-definition or high-definition video and up to 16 channels of digital audio. Over a single cable, you can output your video to a deck, as well as all of the audio that you might need.
• Component video: Some decks still rely on other connection types. You can use component video for both analog (Y’PrPb) and digital (Y’CbCr) connections. Component connections can carry only a video signal, not audio.
![]() Tip
Tip
To learn more about supported hardware cards, visit www.adobe.com/products/premiere/extend.html.
• AES and XLR audio: If you’re not relying on an embedded SDI audio signal, then many decks also offer dedicated audio connections. The two most common are AES (either XLR OR BNC types) or analog XLR audio.
• RS-422 deck control: Professional decks employ a type of device control known as RS-422. This serial connection is used for frame-accurate control of the deck.
Review questions
1. What is an easy way to export digital video if you want to create a self-contained file that closely matches the original quality of your sequence?
2. What Internet-ready media options are available in Adobe Media Encoder?
3. What encoding format should you use when exporting to most mobile devices?
4. Must you wait for Adobe Media Encoder to finish processing its queue before working on a new project?
Review answers
1. Use the Match Sequence Settings option in the Export dialog.
2. This varies by platform. Both operating systems include Flash (FLV|F4V), H.264, and QuickTime, and the Windows version includes Windows Media as well.
3. H.264 is the encoding format used when exporting to most mobile devices.
4. No. Adobe Media Encoder is a stand-alone application. You can work in other applications or even start a new Adobe Premiere Pro project while it’s processing its render queue.