
1. Touring Adobe Premiere Pro Creative Cloud
CLICK HERE TO GAIN ACCESS TO THE LESSON FILES.
Lesson overview
In this lesson, you’ll learn about the following:
• What’s new in Adobe Premiere Pro
• Nonlinear editing in Adobe Premiere Pro
• Standard digital video workflow
• Enhancing the workflow with high-level features
• Incorporating Adobe® Creative Cloud® into your workflow
• The Adobe Creative Cloud workflow
• The Adobe Premiere Pro workspace
• Customizing your workspace
This lesson will take approximately 45 minutes.
Before you begin, you’ll walk through a brief overview of video editing and an explanation of how Adobe Premiere Pro functions as the hub of the video production workflow. Even experienced editors will find this tour a useful guide to Adobe Premiere Pro.
Adobe Premiere Pro is a video editing system that supports the latest technology and cameras with powerful tools that are easy to use and that integrate perfectly with almost every video acquisition source.
Getting started
Today we’re seeing an increasing demand for high-quality video content as well as an ever-changing landscape of old and new technologies. Despite all this rapid change, however, the goal of video editing is the same: You want to take your footage and shape it using your original vision so that you can effectively communicate with your audience (or even the world).
In Adobe Premiere Pro CC, you’ll find a video editing system that supports the latest technology and cameras with powerful tools that are easy to use and that integrate perfectly with almost every video acquisition source, as well as a wide range of plug-ins and other post-production tools.
You’ll begin by reviewing the essential workflow that most editors follow. Next you’ll see how Premiere Pro fits into Adobe Creative Cloud. Finally, you’ll learn about the main components in the Adobe Premiere Pro interface and how to create your own custom workspaces.
Nonlinear editing in Adobe Premiere Pro
Premiere Pro is a nonlinear editor (NLE). Like a word processor, Premiere Pro lets you place, replace, and move footage anywhere you want in your final edited video. You can also adjust any parts of the video clips you use at any time. You don’t need to perform edits in a particular order, and you can make changes to any part of your video project at any time.
You’ll combine multiple clips to create a sequence that you can edit simply by clicking and dragging with your mouse. You can edit any part of your sequence, in any order, and then change the contents, move clips so that they play earlier or later in the video, blend layers of video together, add special effects, and more.
You can work on any part of your sequence, in any order, and even combine multiple sequences. You can jump to any moment in a video clip without needing to fast-forward or rewind. It’s as easy to organize clips as it is to organize files on your computer.
Adobe Premiere Pro supports both tape and tapeless media formats, including XDCAM EX, XDCAMHD 422, DPX, DVCProHD, AVCHD (including AVCCAM and NXCAM), AVC-Intra, and DSLR video. It also supports the latest in raw video formats, with enhanced RED camera and ARRI Alexa support.
Presenting the standard digital video workflow
As you gain editing experience, you’ll develop your own preference for the order in which to work on the different aspects of your project. Each stage requires a particular kind of attention and different tools. Also, some projects call for more time spent on one stage than another.
Whether you skip through some stages with a quick mental check or spend hours (even days!) dedicated to perfecting an aspect of your project, you’ll work through the following steps:
1. Acquire the video. This can mean recording original footage or gathering assets for a project.
2. Capture (transfer or ingest) the video to your hard drive. With tape-based formats, Adobe Premiere Pro (with the appropriate hardware) can convert the video into digital files. With tapeless media, Adobe Premiere Pro can read the media directly, with no need for conversion. If you’re working with tapeless media, be sure to back up your files to a second location.
3. Organize your clips. These days, there can be quite a lot of video shots to choose from in your project. Spend the time to organize clips together into special folders (called bins) in your project. You can also add color labels and other metadata (additional information about the clips) to help keep things organized.
4. Combine the parts of the video and audio clips you want as a sequence and add them to the Timeline.
5. Place special transition effects between clips, add video effects, and create combined visual effects by placing clips on multiple layers (tracks).
6. Create titles or graphics, and add them to your sequence in the same way you would add video clips.
7. Mix your audio tracks to get the combined level just right, and use transitions and special effects on your audio clips to improve the sound.
8. Export your finished project to videotape, to a file for a computer or for Internet playback, to a mobile device, or to a DVD or Blu-ray Disc.
Adobe Premiere Pro supports each of these steps with industry-leading tools.
Enhancing the workflow with Adobe Premiere Pro
Adobe Premiere Pro has easy-to-use tools for standard video editing. It also provides advanced tools for manipulating, adjusting, and fine-tuning your projects.
You may not incorporate all of the following features in your first few video projects. However, as your experience and understanding of nonlinear editing grows, you’ll want to expand your capabilities.
The following topics will be covered in this book:
• Advanced audio editing: Adobe Premiere Pro provides audio effects and editing unequaled by any other nonlinear editor. Create and place 5.1 surround-sound audio channels, make sample-level edits, apply multiple audio effects to audio clips or tracks, and use the included state-of-the-art plug-ins as well as third-party Virtual Studio Technology (VST) plug-ins.
• Color correction: Correct and enhance the look of your footage with advanced color-correction filters. You can also make secondary color-correction selections that allow you to adjust isolated colors and adjust parts of an image to improve the composition.
• Keyframe controls: Adobe Premiere Pro gives you the precise control you need to fine-tune visual and motion effects without exporting to a compositing or motion graphics application. Keyframes use a standard interface design, so learn how to use them once, and you’ll know how to use them in all Adobe Creative Cloud products in which they’re available.
• Broad hardware support: Choose from a wide range of dedicated capture cards and other hardware to assemble a system that best fits your needs and budget. Adobe Premiere Pro system specifications extend from low-cost computers for digital video editing up to high-performance workstations capturing full HD, 4K, and 3D stereoscopic video.
• Mercury Playback Engine graphics card acceleration: The Mercury Playback Engine operates in two modes: software-only and GPU acceleration. The GPU acceleration mode requires a graphics card that meets minimum specifications in your workstation. See www.adobe.com/products/premiere/tech-specs.html for a list of compatible graphics cards.
• Multicam editing: You can easily and quickly edit productions shot with multiple cameras. Adobe Premiere Pro displays multiple camera sources in a split-view monitor, and you can choose a camera view by clicking the appropriate screen or using shortcut keys. You can even automatically sync multiple camera angles based on clip audio.
• Project Management: Manage your media through a single dialog box. View, delete, move, search for, and reorganize clips and bins. Consolidate your projects by moving just the media actually used in a project and copying that media to a single location. Then reclaim drive space by deleting unused media.
• Metadata: Adobe Premiere Pro supports Adobe XMP, which stores additional information about media as metadata that can be accessed by multiple applications. This information can be used to locate clips or communicate valuable information such as preferred takes.
• Creative titles: Create titles and graphics using the Premiere Pro Title Designer. You can also use graphics created in almost any suitable software, plus Adobe Photoshop documents can be used as automatically flattened images or as separate layers you can incorporate, combine, and animate selectively.
• Advanced trimming: Use special trimming tools to adjust each clip and cut point in a sequence. Adobe Premiere Pro CC includes significant improvements to its trimming tools, allowing you to make complex trimming adjustments to multiple clips.
• Media encoding: Export your sequence to create a video and audio file that is perfect for your needs. Use the advanced features of Adobe Media Encoder CC to create multiple copies of your finished sequence in several different formats.
Expanding the workflow
Although it is possible to work with Adobe Premiere Pro as a stand-alone application, it is really meant to be a team player. Adobe Premiere Pro is part of Creative Cloud, which means you have access to a number of other specialized tools, including Adobe After Effects, Adobe SpeedGrade, and Adobe Prelude. Knowing how the software components work together will improve your efficiency and expand your capabilities.
Incorporating other components into the editing workflow
Adobe Premiere Pro is a versatile video and audio post-production tool, but it is just one component of Adobe Creative Cloud, Adobe’s complete design for print, web, and video environments that includes video-focused software for the following:
• High-end 3D motion effects creation
• Complex text animation generation
• Layered graphics production
• Vector artwork creation
• Audio production
To incorporate one or more of these features into a production, you can use other components of Adobe Creative Cloud. The software set has everything you need to produce advanced, professionally finished videos.
Here’s a brief description of the other components:
• Adobe After Effects CC: The tool of choice for motion graphics and visual effects artists.
• Adobe Photoshop CC: The industry-standard image-editing and graphic-creation product. You can work with photos, video, and 3D objects to prepare them for your project.
• Adobe Audition CC: A powerful tool for audio editing, audio cleanup, audio sweetening, music creation, and automatic speech alignment.
• Adobe Encore CS6: A high-quality DVD authoring application. Encore produces DVDs, Blu-ray Discs, and interactive SWF files.
• Adobe Illustrator CC: Professional vector graphics creation software for print, video production, and the Web.
• Adobe Dynamic Link: A cross-product connection that allows you to work in real time with media, compositions, and sequences shared natively between After Effects and Adobe Premiere Pro.
• Adobe Bridge CC: A visual file browser that provides centralized access to your Creative Suite project files, applications, and settings.
• Adobe Flash Professional CC: The industry standard for creating rich, interactive web content.
• Adobe SpeedGrade CC: Professional, sophisticated color grading/finishing with support for high-end and 3D (visual stereo) video formats.
• Adobe Prelude CC: Ingest, transcode, and add metadata, markers, and tags to file-based footage. Then create rough cuts you can share with Adobe Premiere Pro directly, or with other NLEs via XML.
• Adobe Media Encoder CC: Batch-process files to produce content for any screen from Premiere Pro and Adobe After Effects.
Adobe pro video workflow
Your Premiere Pro/Creative Cloud workflow will vary depending on your production needs. Here are a few scenarios:
• Use Photoshop CC to touch up and apply effects to still images from a digital camera, a scanner, or a video clip. Then use them in Adobe Premiere Pro.
• Create a layered graphic in Photoshop CC, and then open it in Adobe Premiere Pro. You can opt to work with each layer independently, allowing you to apply effects and animation to selected layers.
• Import large numbers of media files with Adobe Prelude CC, adding valuable metadata, temporal comments, and tags. Create sequences from subclips in Adobe Prelude and send them to Adobe Premiere Pro to continue editing them.
• Send a clip straight from the Adobe Premiere Pro timeline to Adobe Audition for professional audio cleanup and sweetening.
• Send your Adobe Premiere Pro sequence to Adobe Audition to complete a professional audio mix. Premiere Pro can create an Adobe Audition session based on your sequence, with mixed-down video so you can compose based on the action.
• Using Dynamic Link, open Adobe Premiere Pro video clips in After Effects CC. Apply special effects and animation, and then view the results in Adobe Premiere Pro. You can play After Effects compositions in Adobe Premiere Pro without waiting to render them and also benefit from After Effects CC Global Cache, which saves RAM previews for later use.
• Use After Effects CC to create and animate text in ways far beyond the capabilities of Adobe Premiere Pro. Use those compositions in Adobe Premiere Pro with Dynamic Link. Adjustments made in After Effects appear inside Adobe Premiere Pro immediately.
• Export video projects as Blu-ray–compliant H.264 files using built-in presets, and use them in Encore CS6 to create a DVD, a Blu-ray Disc, or an interactive Flash application.
Most of this book will focus on a standard workflow involving only Adobe Premiere Pro. However, several lessons and sidebars will demonstrate how you can use Adobe Creative Cloud components as part of your workflow for powerful effects work and fine finishing.
Touring the Adobe Premiere Pro workspace
It’s helpful to begin by getting familiar with the editing interface so you can recognize the tools as you work with them in the following lessons. To make it easier to configure the user interface, Adobe Premiere Pro offers workspaces. Workspaces quickly configure the various panels and tools onscreen in ways that are helpful for particular activities, such as editing, special effects work, or audio mixing.
![]() Note
Note
It’s best to copy all the lesson assets from the DVD to your hard drive and leave them there until you complete this book; some lessons refer to assets from previous lessons.
To begin with, you’ll take a brief tour of the Editing workspace. In this exercise, you’ll use an Adobe Premiere Pro project from this book’s companion DVD. Be sure to copy the lesson files from the DVD to your computer’s hard drive for best performance.
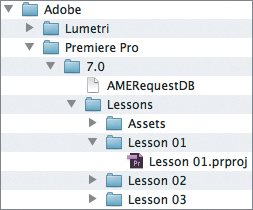
1. Make sure you’ve copied all the lesson folders and contents from the DVD to your hard drive. The suggested directory is My Documents/Adobe/Premiere Pro/CC/Lessons (Windows) or Documents/Adobe/Premiere Pro/CC/Lessons (Mac OS).
2. Launch Adobe Premiere Pro.
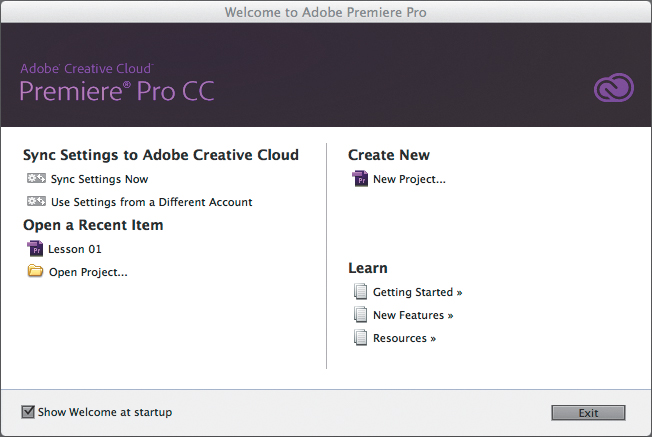
On the welcome screen of Adobe Premiere Pro, you can start a new project or open a saved one.
![]() Note
Note
You may be prompted with a dialog box asking where a particular file is. This will happen when the original files are saved on a hard drive (or hard drive letter) different from the one you’re using. You’ll need to tell Adobe Premiere Pro where the file is. In this case, navigate to the Lessons/Assets folder, and select the file that the dialog box is prompting you to open. Adobe Premiere Pro will remember this location for the rest of the files.
4. In the Open Project window, navigate to the Lesson 01 folder in the Lessons folder, and then double-click the Lesson 01.prproj project file to open the first lesson in the Adobe Premiere Pro workspace.
![]() Note
Note
All Adobe Premiere Pro project files have a .prproj extension.
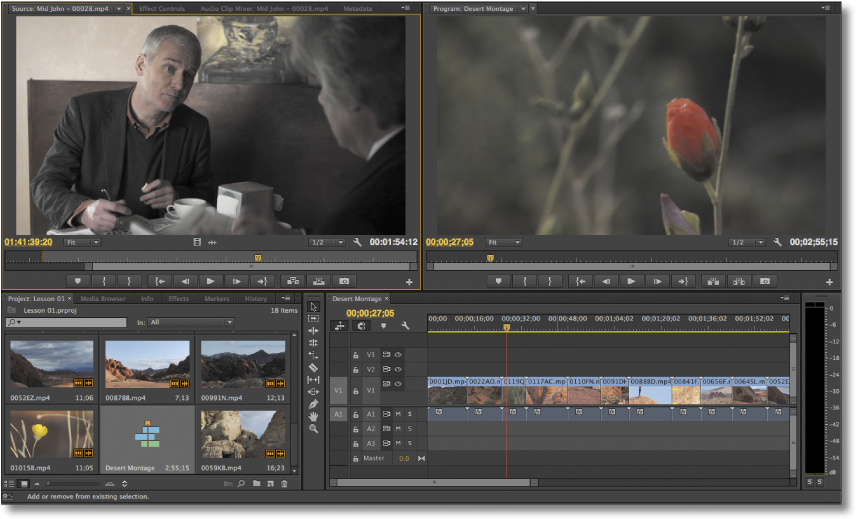
The workspace layout
Before you begin, make sure you are looking at the default workspace. Choose Window > Workspace > Editing. Then, to reset the Editing workspace, choose Window > Workspace > Reset Current Workspace. Click Yes in the confirmation dialog.
If you’re new to nonlinear editing, the default workspace might look like an awful lot of buttons. Don’t worry. Things become much simpler when you know what the buttons are for. The interface is designed to make video editing easy. The principal elements are shown here.
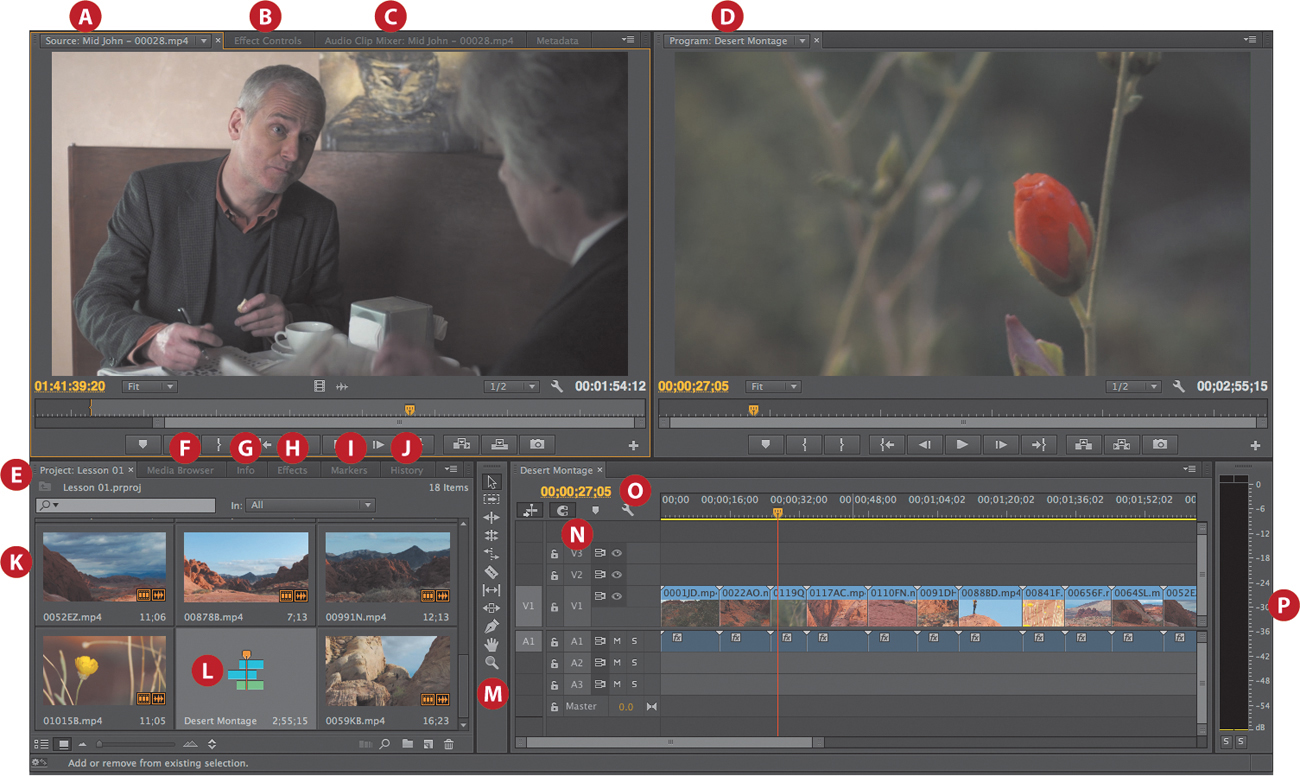
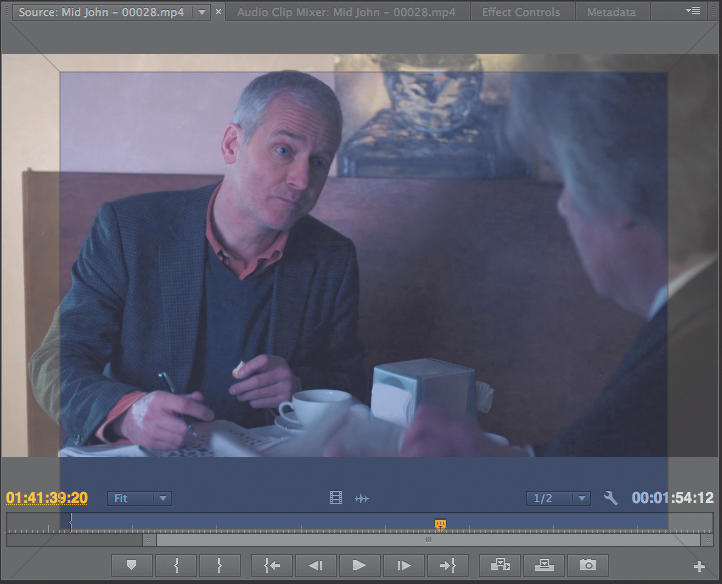
A Source Monitor
B Effect Controls panel (hidden)
C Audio Mixer (hidden)
D Program Monitor
E Project panel
F Media Browser (hidden)
G Info panel (hidden)
H Effects panel (hidden)
I Markers panel (hidden)
J History panel (hidden)
K Clips
L Sequence
M Tools panel
N Tracks
O Timeline
P Audio Master meters
Each workspace item appears in its own panel, and multiple panels can be combined into a single frame. Some items with common industry terms stand alone, such as Timeline, Audio Clip Mixer, and Program Monitor. The main user interface elements are as follows:
• Timeline panel: This is where you’ll do most of your actual editing. You view and work on sequences (the term for edited video segments or entire projects) in the Timeline panel. One strength of sequences is that you can nest them (place sequences inside other sequences). In this way, you can break up a production into manageable chunks or create unique special effects.
• Tracks: You can layer—or composite—video clips, images, graphics, and titles on an unlimited number of tracks. Video clips on upper video tracks cover whatever is directly below them on the Timeline. Therefore, you need to give clips on higher tracks some kind of transparency or reduce their size if you want clips on lower tracks to show through.
• Monitor panels: You use the Source Monitor (on the left) to view and trim raw clips (your original footage). To view a clip in the Source Monitor, double-click it in the Project panel. The Program Monitor (on the right) is for viewing your sequence. Some editors prefer working with only one monitor screen. The lessons throughout this book reflect a two-monitor configuration. You can change to a single-monitor view if you choose. Click the Close button on the Source tab to close that monitor. In the main menu, choose Window > Source Monitor to open it again.
• Project panel: This is where you place links to your project’s media files: video clips, audio files, graphics, still images, and sequences. You can use bins—similar to folders—to organize your assets.
• Media Browser: This panel helps you browse your hard drive to find footage. It’s especially useful for file-based camera media.
• Effects panel: This panel contains all the clip effects you will use in your sequences, including video filters, audio effects, and transitions (docked, by default, with the Project panel). Effects are grouped by type to make them easier to find.
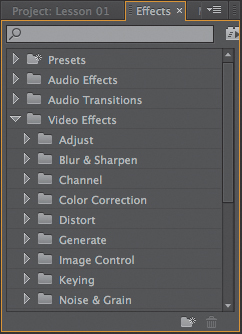
Effects panel
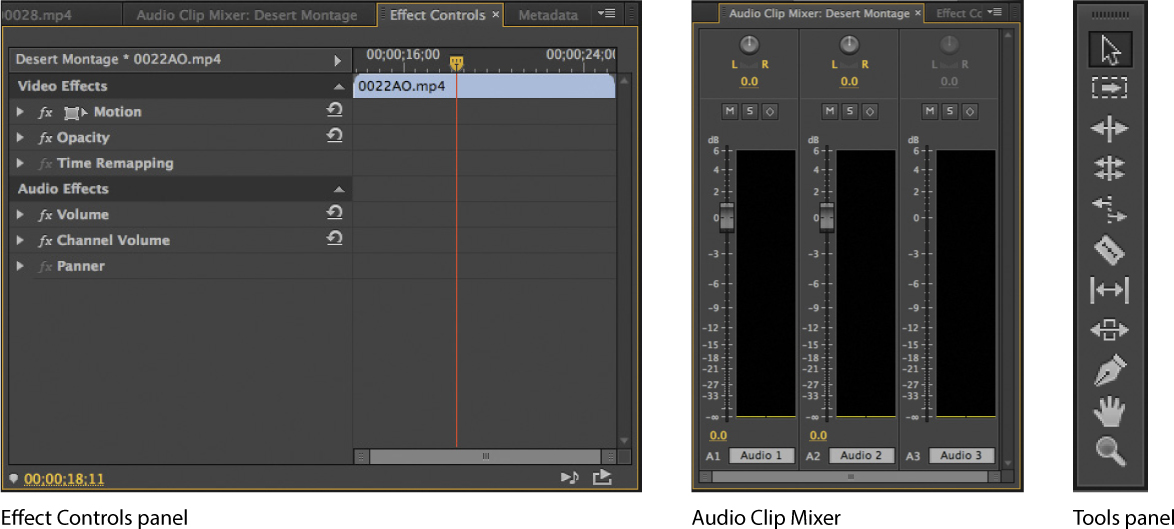
• Audio Clip Mixer: This panel (docked, by default, with the Source, Metadata, and Effect Controls panels) is based on audio production studio hardware, with volume sliders and panning knobs. There is one set of controls for each audio track on the Timeline. The adjustments you make are applied to audio clips. There is also a dedicated Audio Track Mixer, for applying audio adjustments to tracks.
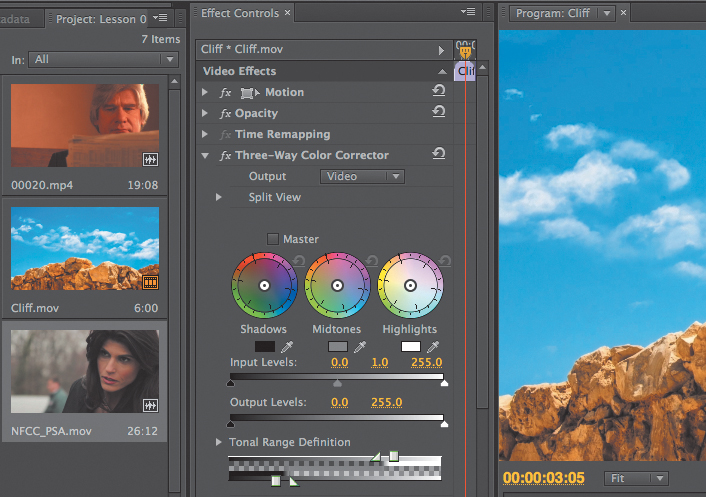
• Effect Controls panel: This panel (docked, by default, with the Source, Audio Clip Mixer, and Metadata panels, or accessible via the Window menu) displays the controls for any effects applied to a clip you select in a sequence. Motion, Opacity, and Time Remapping controls are always available for visual clips. Most effect parameters are adjustable over time.
• Tools panel: Each icon in this panel represents a tool that performs a specific function, typically a type of edit in a sequence. The Selection tool is context-sensitive, which means it changes appearance to indicate the function that matches the positioning. If you find your cursor doesn’t work as you expect, it might be because you have the wrong tool.
• Info panel: The Info panel (docked, by default, with the Project panel and Media Browser, or accessible via the Window menu) presents information about any asset you select in the Project panel or any clip or transition selected in a sequence.
• History panel: This panel (docked, by default, with the Effects and Info panels) tracks the steps you take and lets you back up easily. It’s a kind of visual Undo list. When you select a previous step, all steps that came after it are also undone.
Customizing the workspace
In addition to customizing the default workspaces (based on tasks), you can adjust the position and location of panels to create a workspace that works best for you. You can then store a workspace or even create multiple workspaces for different tasks.
• As you change the size of a frame, other frames change size to compensate.
• All panels within frames are accessible via tabs.
• All panels are dockable—you can drag a panel from one frame to another.
• You can drag a panel out of a frame to become a separate floating panel.
![]() Note
Note
As you move a panel, Adobe Premiere Pro displays a drop zone. If the panel is a rectangle, it will go into the selected frame as an additional tab. If it’s a trapezoid, it will go into its own frame.
In this exercise, you’ll try all these functions and save a customized workspace.
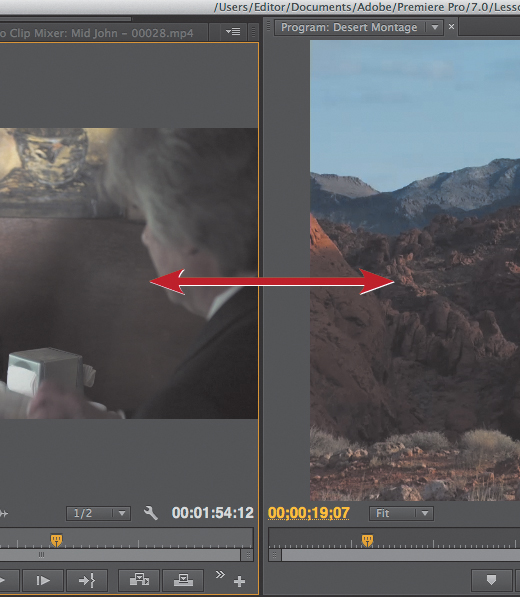
1. Click the Source Monitor panel (selecting its tab if necessary), and then position your pointer on the vertical divider between the Source Monitor and the Program Monitor. Then, drag left and right to change the sizes of those frames. You can choose to have different sizes for your video displays.
2. Place the pointer on the horizontal divider between the Source Monitor and the Timeline. Drag up and down to change the sizes of these frames.
3. Click the gripper area in the upper-left corner of the tab for the Effects panel (to the left of the name), and drag it to the middle of the Source Monitor to dock the Effects panel in that frame.
When many panels are combined in a single frame, you may not be able to see all the tabs. A navigation slider appears above the tabs to navigate between them. Slide it left or right to reveal hidden tabs. You can also display a panel by choosing it in the Window menu.
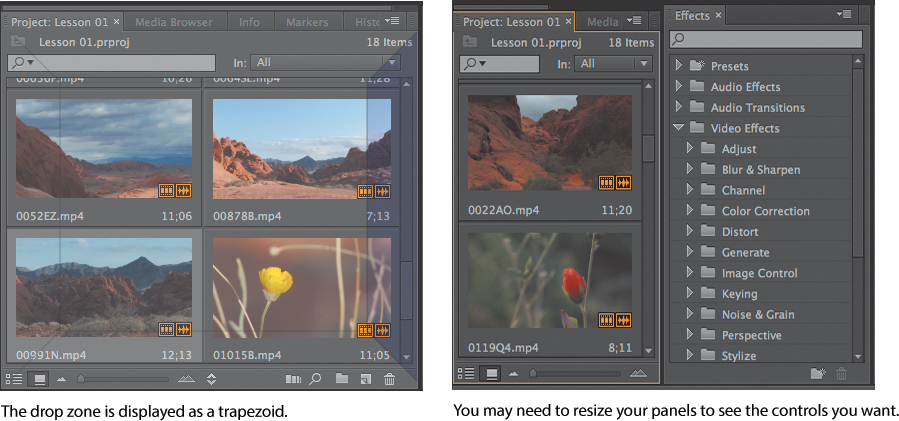
4. Drag the Effects drag handle to a point near the right of the Project panel to place it in its own frame.
The drop zone is a trapezoid that covers the right portion of the Project panel. Release the mouse button, and your workspace should look something like the example in the previous figure.
![]() Note
Note
As you move a panel, Adobe Premiere Pro displays a drop zone. If the panel is a rectangle, it will go into the selected frame as an additional tab. If it’s a trapezoid, it will go into its own frame.
You can also pull panels out into their own floating panel.
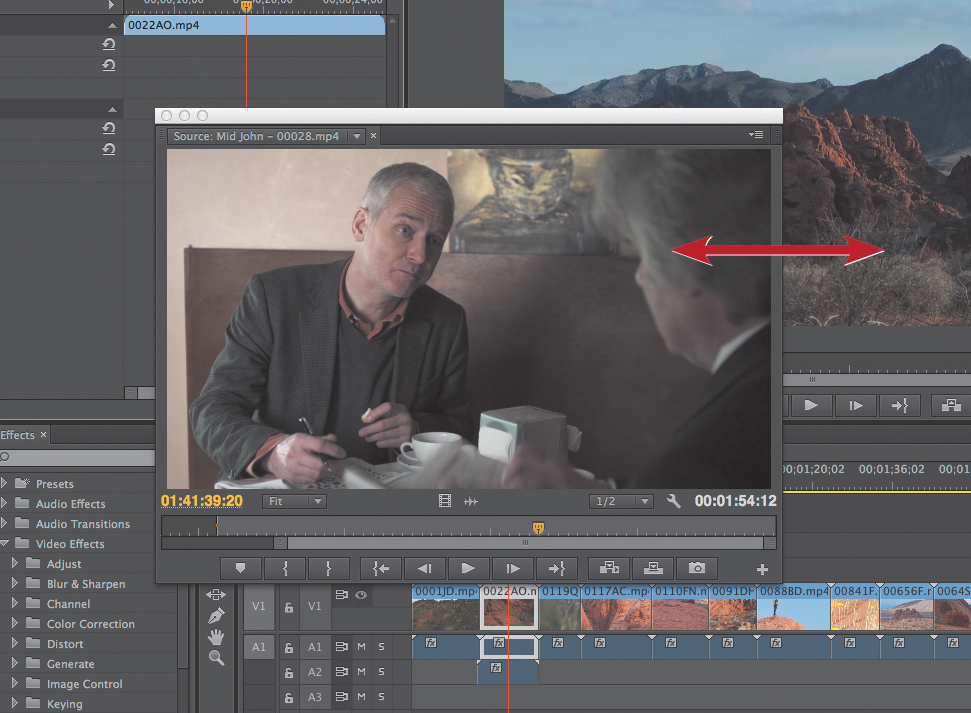
5. Click the Source Monitor’s drag handle, and hold down the Control (Windows) or Command (Mac OS) key while dragging it out of its frame. Its drop zone image is much more distinct, indicating that you are about to create a floating panel.
6. Drop the Source Monitor anywhere, creating a floating panel. Resize it by dragging from a corner or a side like any other panel.
7. As you gain experience, you might want to create and save the layout of your panels as a customized workspace. To do so, choose Window > Workspace > New Workspace. Type a name, and click OK.
8. If you want to return a workspace to its default layout, choose Window > Workspace > Reset Current Workspace. To return to a recognizable starting point, choose the preset Editing workspace and reset it.
Introducing preferences
The more you edit video, the more you’ll want to customize Adobe Premiere Pro to match your specific needs. There are several types of preferences, all grouped into one panel for easy access. Preferences will be covered in depth as they relate to the individual lessons in this book. Let’s look at a simple one:
1. Choose Edit > Preferences > Appearance (Windows) or Premiere Pro > Preferences > Appearance (Mac OS).
2. Drag the Brightness slider to the left or right to suit your needs. When you’re done, click OK, or click Cancel to return to the default setting.
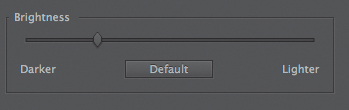
The default brightness is a neutral gray to help you see colors correctly.
![]() Tip
Tip
Notice as you approach the darkest setting, the text switches to white on gray. This is to accommodate those editors who work in editing bays in darkened rooms.
Moving, backing up, and syncing user settings
User preferences include a number of important options. The defaults work well in most cases, but as you become more familiar with the editing process, it’s likely you’ll want to make a few adjustments.
Adobe Premiere Pro CC includes a new option to share your user preferences between multiple machines: When installing Adobe Premiere Pro, you will have entered your Adobe ID to confirm your software license. You can use the same ID to store your user preferences in Creative Cloud, allowing you to sync and update them from any installation of Adobe Premiere Pro.
You can sync your preferences on the Welcome screen by choosing Sync Now, or you can sync your preferences while working with Adobe Premiere Pro using menus by choosing Premiere Pro > Your Adobe ID > Sync Settings now (Windows) or File > Premiere Pro > Your Adobe ID > Sync Settings now (Mac OS).
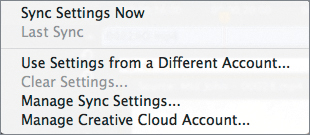
The Sync Settings menu gives shortcuts to several options relating to Creative Cloud.
This new option to sync preferences between multiple machines makes it easier than ever to move your creative work from one location to another.
Review questions
1. Why is Adobe Premiere Pro considered a nonlinear editor?
2. Describe the basic video-editing workflow.
3. What is the Media Browser used for?
4. Can you save a customized workspace?
5. What is the purpose of the Source Monitor? What is the purpose of the Program Monitor?
6. How can you drag a panel to its own floating panel?
Review answers
1. Adobe Premiere Pro lets you place video clips, audio clips, and graphics anywhere in a sequence; rearrange items already in a sequence; add transitions; apply effects; and do any number of other video-editing steps in any order that suits you.
2. Shoot your video; transfer it to your computer; create a sequence of video, audio, and still-image clips on the Timeline; add effects and transitions; add text and graphics; mix your audio; and export the finished product.
3. The Media Browser allows you to browse and import media files without having to open an external file browser. It is particularly useful when you’re working with file-based camera footage.
4. Yes. You can save any customized workspace by choosing Window > Workspace > New Workspace.
5. You use the monitor panels to view your original clips and your sequence. You can view and trim your original footage in the Source Monitor and use the Program Monitor to view the Timeline sequence as you build it.
6. Drag the panel with your mouse while holding down Control (Windows) or Command (Mac OS).