
13. Creating Forms with Acrobat Pro
Acrobat Pro has long provided tools that let you define interactive form fields that can collect data from a reader and send that data back to you.
We could write an entire book (or two) about creating Acrobat forms. This chapter will introduce you to the basics of creating a functioning form with Acrobat. Happily, you can get very far with just the basics. Acrobat has added a large number of automated processes that create useful forms without your necessarily having to become an expert.
Much of this ease of use is a result of integration between Acrobat and Adobe LiveCycle Designer, a visual form editor that lets you create a form with the ease of laying out a page in a desktop publishing application. LiveCycle Designer is a separate program that ships with the Windows version (only) of Acrobat 8 Pro; it may also be purchased as a stand-alone forms generator.
Note that LiveCycle Designer isn’t available in the Macintosh version of Acrobat. Bummer, but true. The biggest impact of this is that the Macintosh lacks access to Acrobat’s form templates (more about these later). Still, the Mac version of Acrobat lets you create forms from electronic files and images, and it provides full support of the important form-distribution features. We’ll talk about those as we go.
About LiveCycle Designer
Acrobat, together with LiveCycle Designer, lets you create forms from four sources:
• Templates. Acrobat provides a large collection of form templates that can be customized to your needs. This functionality is Windows only, because it requires LiveCycle Designer.
• Electronic documents. You can convert regular PDF files and scanned images of paper forms into interactive forms.
• Excel spreadsheets. Acrobat can convert Excel spreadsheets into forms. Again, this is Windows only.
• Scanner. Acrobat uses your scanner to convert a paper form into an image and from there to a PDF form.
We won’t be discussing in detail the conversion of spreadsheets or scanning to a form. Once you understand the templates and, especially, converting electronic documents, the procedures for spreadsheets and scanners are relatively easy.
 Tip
Tip
• Forms created with LiveCycle Designer can’t be dependably filled out with Acrobat 6 or earlier; the recipients of your form must have Acrobat 7 or later. If you need to make a form that is compatible with earlier versions of Acrobat, you must create your form fields by hand using the traditional Forms toolbar. This chapter ends with a brief introduction to this toolbar.
Using Form Templates
Most of the actions you’ll take regarding forms—creating, distributing, collecting—are accessible through the aptly named Forms menu.
Let’s start by creating a form from one of the large number of templates Acrobat supplies. This will give us an opportunity to examine LiveCycle Designer.
Again, the templates aren’t available on the Macintosh.
To create a form from a template
- Choose Forms > Create New Form.
Acrobat will display the first panel of the Create a New Form wizard (Figure 13.1).
Figure 13.1. When you choose Forms > Create New Form, you are presented with a dialog box that lets you specify your starting point in the process.
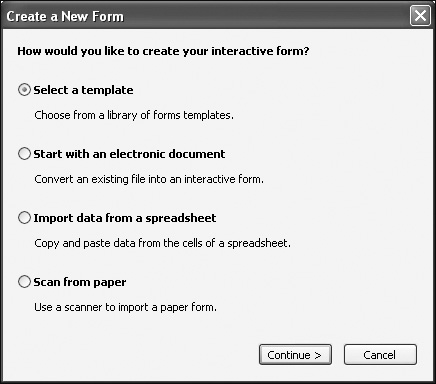
- Choose “Select a template,” and click Continue.
Acrobat displays an informational panel telling you about LiveCycle Designer (Figure 13.2). You should read this the first couple times, but then make use of the “Do not show again” check box.
Figure 13.2. Acrobat reminds you that you are using LiveCycle Designer. Once you’ve read this a few dozen times, use the “Do not show again” check box.
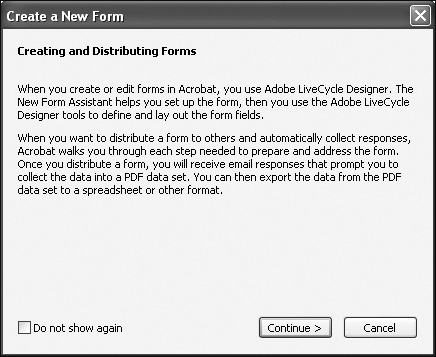
- Click Continue.
The next panel of the Create New Form Wizard opens (Figure 13.3), and asks you to pick a template.
Figure 13.3. The second step in the wizard is to pick a template.
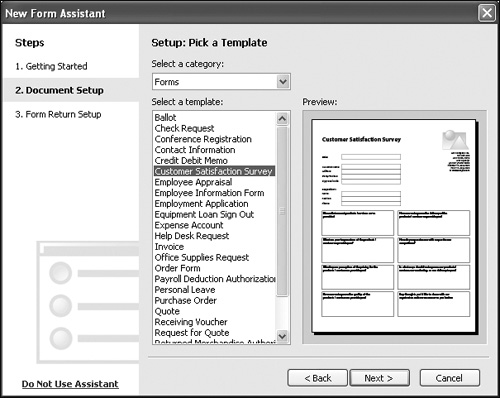
Acrobat ships with an awe-inspiring collection of templates for everything from invoices to requests for unpaid leave.
There is also a None selection, which drops you directly into LiveCycle Designer with a blank form.
- Choose a category and a template within that category.
The preview in the dialog box displays the template you choose.
- Click Next.
The next step in the Create New Form wizard opens (Figure 13.4), which asks for your company name.
Figure 13.4. Acrobat needs to collect some information about your company for incorporation into the template. This includes your company’s name and contact information.
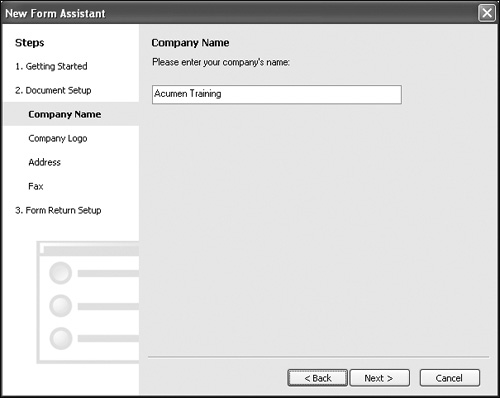
- Type your company’s name into the text, field and click Next.
The next panel asks for an image file containing your company’s logo (Figure 13.5).
Figure 13.5. You can supply an image file that contains your company logo.
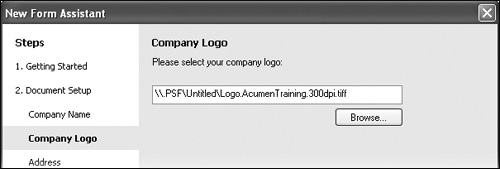
- Click the Browse button, and choose the TIFF, JPEG, or other image file that contains your logo.
- Click Next.
The next two panels ask for your company’s contact information: address, telephone number, email address, and Web address.
- Supply your company’s address, and click Next.
- Supply your telephone number and email and Web addresses, and click Next.
The final panel in the series asks whether your form should include an email button, a print button, or both (Figure 13.6).
Figure 13.6. Finally, you specify whether you want an email button, a print button, or both.
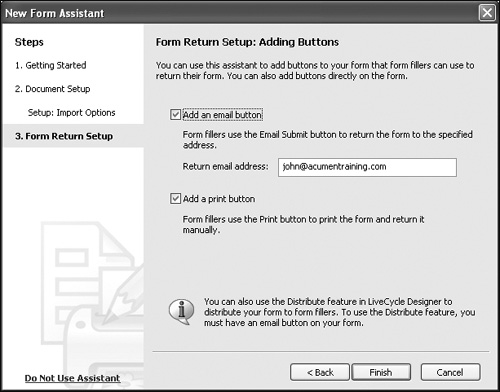
- Choose the “Add an email button” check box, and type your email address into the text box.
The email button allows recipients of the form to email their filled-out form to you. They click the Submit by Email button, and Acrobat uses their mail client to send you their responses.
You do want an email button; Acrobat’s automated distribution and collection of forms depends on it.
- If you want a print button, choose the “Add a print button” check box.
This button, of course, prints the form. The recipient can then send you the printed form by post or by fax.
- Click Finish.
Acrobat thinks for a short while and then shows you your new form in LiveCycle designer (Figure 13.7).
Figure 13.7. The LiveCycle Designer has three panes. Clockwise from left, these are the Design pane, the How To pane, and the Library pane.

- Reposition and resize the form fields by dragging the fields and their handles (Figure 13.8).
Figure 13.8. When you create a form field, you can move it and resize it by dragging its border and its handles. You can also edit the label.

You can also edit the field labels as you would any other text.
- Choose File > Save to save the form.
Editing Forms with LiveCycle Designer
When you have a form open in LiveCycle Designer, as at the end of the previous task, you’re looking at a graphic representation of your form (Figure 13.7). The window has three panes:
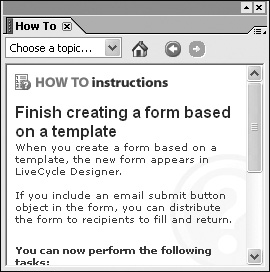
How To (Figure 13.9). This pane presents a complete and useable help system for LiveCycle Designer. Refer to this early and often.
Figure 13.9. The How To pane supplies access to a complete, easy-to-use help system.
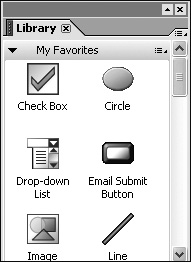
Library (Figure 13.10). This pane supplies form fields and controls you can place on your Acrobat page. Choose a control type, and then click the form page to place a form field. (We’ll discuss this more later.)
Figure 13.10. The Library pane provides tools to place various type of form fields on the page.
Design. This pane presents a view of your form’s page. Two views are available here; select one by clicking the appropriate tab at the top of the pane:
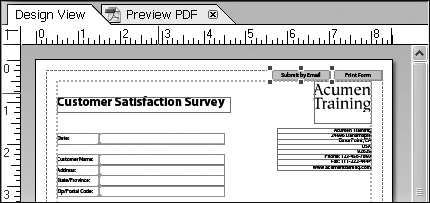
• The Design View pane presents the page in editable format. This is the view you use to place your form fields (Figure 13.11).
Figure 13.11. The Design pane shows you your form in an editable state. You can move, resize, and otherwise edit the form fields.
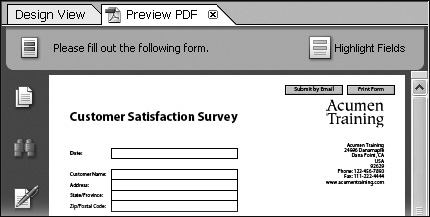
• The Preview PDF pane shows what the final form will look like when filled out in Acrobat (Figure 13.12).
Figure 13.12. The Preview PDF pane shows you how the form will look to the person who fills it out.
Most of the time, you’ll use LiveCycle Designer to adjust the position and size of form fields created by one of the templates, as you did in the previous section. You can also place your own form fields on the page.
Tip
• The Library pane supplies controls (such as push buttons) as well as data fields (like check boxes and lists). In Acrobat parlance, these are all referred to as form fields.
To place a form field on the page
- In the Library pane, click the form field type that you want to add to the page.
- Click the page in the Design View pane to indicate where you want the control to go.
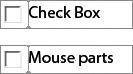
Acrobat places the new control on the page with a generic label (Figure 13.13).
Figure 13.13. When you first place a form field, it has a generic label (top). Edit this label text so it’s the way you want it on the form.
- Select the label’s text as you would in a text editor, and change the label to whatever you want (Figure 13.13).
- Click the border of the control to get a border rectangle and handles (Figure 13.14).
Figure 13.14. You can reposition and resize the form field by dragging the border or its handles.

- Reposition and resize the form field by dragging the border and its handles.
Tip
• If you reduce the width of your control too much, LiveCycle Designer wraps the label to a second line (Figure 13.15).
Figure 13.15. If you make the label’s box too short, the label may wrap to multiple lines.

Having placed your form field, you can modify quite a few of its visual characteristics by right-clicking the field. For example, you can specify the font of the form field and its label.
To change a field’s text properties
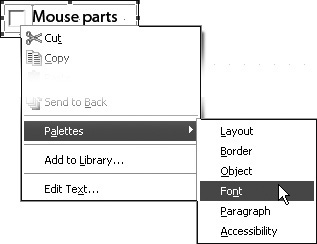
- Right-click the form field to display its contextual menu.
- Choose Palettes > Font (Figure 13.16).
Figure 13.16. You can change a variety of a control’s properties with contextual-menu options. Here we’re changing the font.
The Font palette opens (Figure 13.17).
Figure 13.17. The Font palette lets you change the font, size, and style of the form field’s label.

- From the pop-up menus, choose the font and size you want for the label’s text.
You can also choose from a variety of styles, such as bold and italic.
- Click the Windows close box to dismiss the palette when you’re finished.
Tips
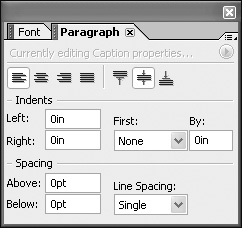
• If you click the Paragraph tab in the Font palette, you can change a number of properties affecting the placement of the label text (Figure 13.18). Many of these paragraph properties have an effect only if the label text has wrapped to multiple lines.
Figure 13.18. If you click the Paragraph tab, you can specify the label’s aligment, as well as other, less-frequently used properties.
• There are a number of other palettes available from the contextual menu (Figure 13.16). The most routinely useful one is the Border palette, which lets you change the appearance of the form field’s border.
Converting Electronic Documents to Forms
Many corporations today find themselves with a collection of paper forms that they want to convert to PDF forms that can be filled out electronically.
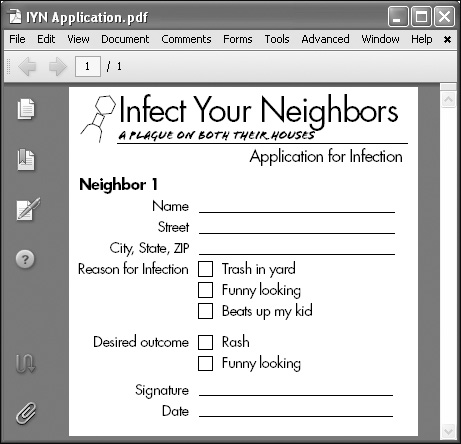
Acrobat 8 has made this a much easier task than it was in earlier versions. The only prerequisite is that the form must be in electronic format. It must be scanned or, if it was designed with software, it must be exported to PDF. The resulting PDF or image file looks like a form (Figure 13.19), but there are no active form fields on the page; the lines are just graphic lines.
Figure 13.19. When you convert an electronic document to a form, your starting document looks like a form but isn’t one. The lines and squares are just lines and squares, not form fields.
Converting the electronic file to a PDF interactive form is easy. Acrobat 8’s new Form Field Recognition feature opens the file, analyzes it, and automatically places appropriate form fields on the new PDF page. You’ll probably need to add some additional form fields manually using LiveCycle Designer or the Acrobat Forms toolbar; the analysis often fails to recognize some of the fill-in spaces in the original document.
Still, Acrobat does an amazingly good job for a first pass; you’re left, relatively speaking, with just clean-up.
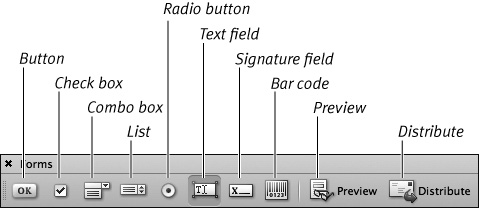
I’m pleased to report that this feature is available on the Macintosh as well as in Windows. Mac users need to do their touch-up with the Acrobat Forms tools (Figure 13.20) rather than with LiveCycle Designer. That’s all right, because it’s arguably easier to lay form fields on top of existing artwork using the Acrobat Forms tools than it is with LiveCycle Designer. You’ll see how to do this later in the chapter.
Figure 13.20. Because Acrobat doesn’t supply LiveCycle Designer for the Macintosh, Mac users touch up converted documents with the Forms toolbar.
To convert an electronic file into a form
- Choose Forms > Create New Form.
The Create a New Form dialog box opens (Figure 13.21).
Figure 13.21. To convert a PDF file or scanned paper form to an Acrobat form, choose “Start with an electronic document.”
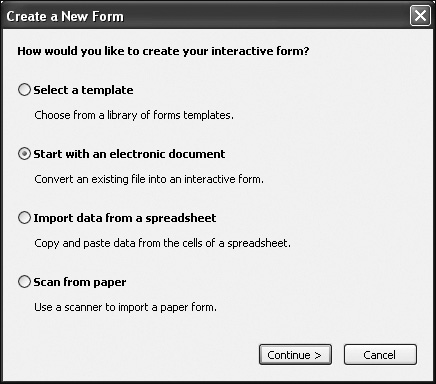
- Choose the “Start with an electronic document” radio button, and click Continue.
Acrobat presents you with the first pane in the Create a New Form wizard, which asks you to locate the document you want to convert (Figure 13.22).
Figure 13.22. The first step of the wizard asks you to pick the document you want to convert.
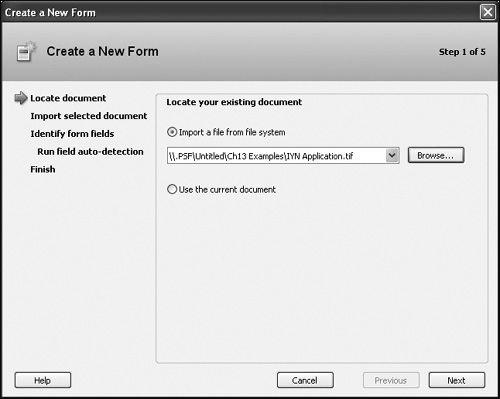
- Click the Browse button, and choose the PDF or image file you want to convert; then, click the Next button.
Acrobat displays a progress bar and spends some time importing the document. Although this process is usually fast, it can sometimes take a remarkably long time, so don’t cancel the process until several minutes have elapsed.
- When Acrobat is finished processing the file, click the Next button.
Acrobat takes you to step 3 of the wizard (Figure 13.23), which asks if Acrobat should automatically place form fields on the page or if you want to place them all by hand.
Figure 13.23. Acrobat then asks if you want it to automatically place form fields on the page. You do.
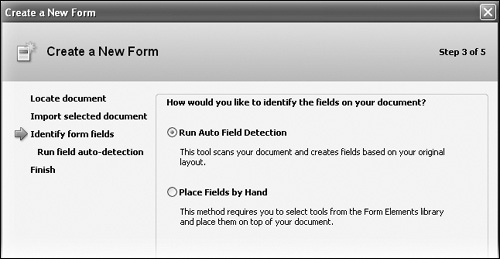
You want to use auto-detection. It always gives you a head start and rarely can hurt you. Plus, it’s cool.
- Choose the Run Auto Field Detection radio button, and click Next.
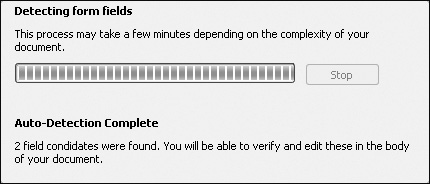
Acrobat spends some time (usually not much) analyzing the file and placing form fields where it thinks they should go. Eventually, it tells you it’s done (Figure 13.24).
Figure 13.24. Acrobat presents a progress bar while it analyzes your document and places form fields on the page.
- Click the Next button.
A final message appears, with a Done button at the bottom.
- Click the Done button.
In Windows, Acrobat opens your new form in LiveCycle Designer. On the Mac, Acrobat opens the new form in a document window and makes the Forms toolbar visible (Figure 13.25).
Figure 13.25. Having added form fields to the page, Acrobat opens the page in LiveCycle designer or, on the Mac, makes the Forms toolbar visible.
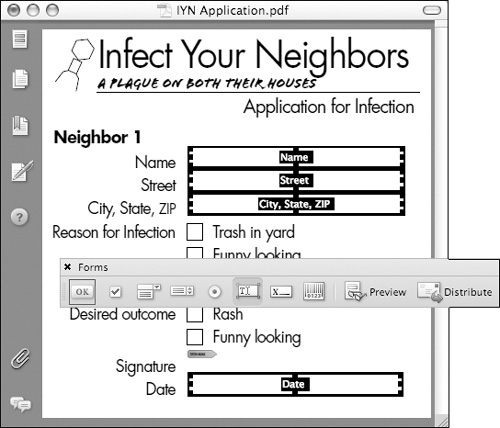
You see form fields placed on the page in all the places Acrobat decided form fields should go. It may miss some, but it does a good job overall.
- Add the missing form fields using either LiveCycle Designer (Windows) or the Forms toolbar (Mac).
I consider this easier to do with the Forms toolbar; since the artwork is already on the page, the Forms tools are more streamlined for this stage of the task. We’ll look at creating a form field with the Forms tools later in the chapter.
- Reposition and resize the existing form fields.
- When all is to your liking, save the PDF form by selecting File > Save.
Tips
• If you have a document already open in Acrobat when you start the wizard, you can choose the “Use the current document” button, located just below the pathname field in Figure 13.22.
• LiveCycle Designer uses a different internal format for its form fields than the longstanding PDF format. As a result, you can’t edit forms created with LiveCycle Designer with the Acrobat Forms toolbar. However, LiveCycle designer can edit form fields created with the Forms toolbar.
Adding a Form Field with the Forms Toolbar
Before LiveCycle Designer, there was the Forms toolbar. This is how form fields have been added to PDF pages since Acrobat 4.
The tools in this toolbar let you create form fields, move them around the page, and otherwise do the tasks essential to creating a form. The Forms tools presume that the labels and other artwork already exist on the PDF page. You use the tools to lay form fields on top of the artwork.
We’ll look at the basic steps involved in creating a form field. These are all you need for the most common fields: check boxes and text fields.
To add a form field using the Forms toolbar
- With your PDF file open, in the Forms toolbar, click the type of form field you want to add (Figure 13.20).
The mouse pointer turns into a crosshairs.
- Drag out a rectangle corresponding to the new form field’s position (Figure 13.26).
Figure 13.26. As you drag out your form field, it appears as a red rectangle with handles.

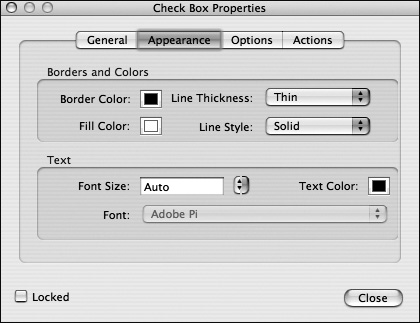
The Field Properties dialog box opens (Figure 13.27). This dialog box has tabs that differ for the different form field types, although the General, Appearance, and Actions tabs are always present.
Figure 13.27. The Field Properties dialog box (here for a check box) lets you specify the appearance and other properties of a form field.
For a basic form field, as we’re constructing here, you can ignore most of the controls; the default values are fine. We’ll look at the controls you’ll most frequently want to change for a simple check box or text field.
- Click the Appearance tab (Figure 13.27).
- Choose a Border Color and a Fill Color, if you want one of them.
You’ll probably want to set these to None; remember that you’re laying these fields over existing artwork.
- Choose a font and size for the text in your field.
For text fields, you may choose any font on your system and any size you wish. A size of “Auto” uses the largest font size that lets the text fit vertically in the text field.
You can’t choose a font or a size for a check box; these are dictated by the needs of the field.
- Click OK to finish your form field definition.
Your form field is still visible on the document page as a red rectangle with handles (Figure 13.26).
- Reposition and resize the form field to make it match the page’s artwork.
- Click the Acrobat Hand tool (or any other tool) to finish your field definition.
The form field is now in place on the page (Figure 13.28).
Figure 13.28. When you return to the Acrobat Hand tool, your form field is in place and functioning on the page.

Tip
• In step 7, you can use the arrow keys to nudge the position of the form field by 1 pixel. If you hold down the Shift key, the arrows nudge the field’s size.
Adding a Submit Button Using the Forms Toolbar
One important field that Macintosh users need to add to their forms is a Submit button that submits the form to an email address. Acrobat needs one of these to be able to automatically distribute and collect forms. Creating the button isn’t hard, but it does entail a fair number of steps.
Buttons frequently don’t have corresponding artwork already on the page. The following steps assume that the page is blank where the button should go.
The following task also assumes your form file is open in Acrobat and the Forms toolbar is visible.
To create a Submit button
- Click the Button tool in the Forms toolbar.
The mouse pointer turns into a crosshairs.
- Drag out a rectangle corresponding to where you want the button to go.
The Button Properties dialog box opens (Figure 13.29). You can accept the default values for most of this dialog box’s controls, but to make a Submit button, you need to make some specific selections. Any controls I don’t mention may be left with their default values.
Figure 13.29. To create a Submit button, set the Border Color to black, the Fill Color to whatever is pretty, and the Line Style to Beveled.
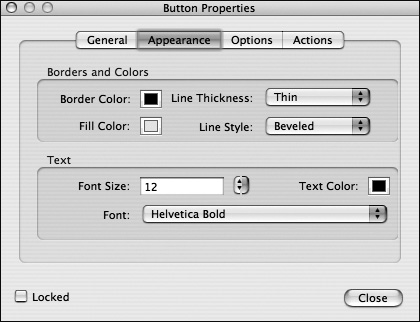
- In the Appearance tab, set the Border Color to black and the Fill Color to whatever looks nice to you.
- Set the Line Style pop-up menu to Beveled and set the Font and Font Size to whatever you wish.
- Click the Options tab.
Acrobat displays controls specific to a button’s appearance (Figure 13.30).
Figure 13.30. In the Options pane for your Submit button, set the Behavior to Push, and type
Submitinto the Label text box.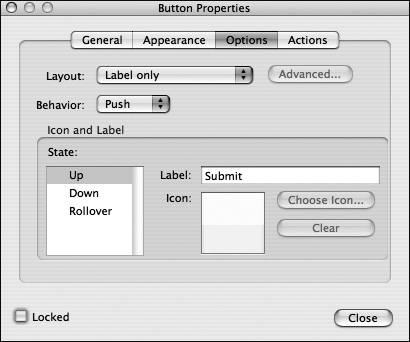
- In the Behavior pop-up menu, choose Push and in the Label text box, type the label you want for the button.
Submitis a reasonable choice. - Click the Actions tab.
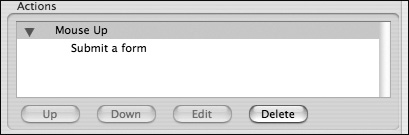
These controls specify what the button should do (Figure 13.31).
Figure 13.31. In the Submit button’s Actions pane, choose “Submit a form” for the Action, and then click the Add button.
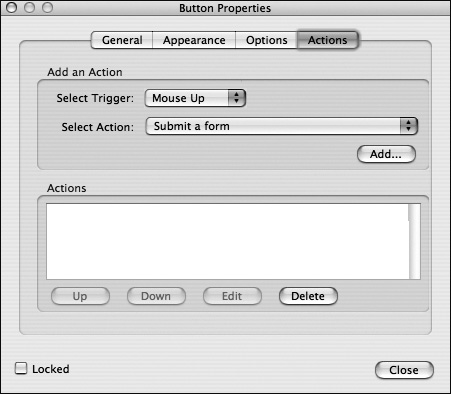
- In the Select Trigger pop-up menu, choose Mouse Up and in the Select Action pop-up menu, choose “Submit a form,” then click the Add button.
The Submit Form Selection dialog box opens (Figure 13.32).
Figure 13.32. In the Options for the Submit a Form action, type your email address into the URL text box and choose the “PDF The complete document” radio button.
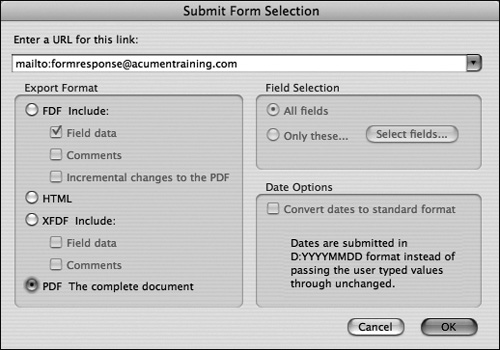
- In the “Enter a URL for this link” text box, type the form’s return email address preceded by
mailto:.Thus, if the return email address is [email protected], you type
mailto:[email protected]. - For Export Format, choose the “PDF The complete document” radio button then click OK.
Acrobat returns you to the Button Properties dialog box, now showing your “Submit a form” action in the Actions area (Figure 13.33).
Figure 13.33. When you return to the Button Properties dialog box, “Submit a form” appears as the button’s action.
- Click Close.
Acrobat returns you to your document, now showing your button as a red rectangle with handles (Figure 13.34).
Figure 13.34. Returning to the document page, reposition and resize the button.

- Reposition and resize the button as you wish by dragging the rectangle and its handles.
- Click the Acrobat Hand tool (or any other tool) to see your functioning Submit button (Figure 13.35).
Figure 13.35. When you return to the Acrobat Hand tool, your Submit button, fully functional, resides on the page.

Whew! When the user clicks this button, Acrobat emails the form and its data to the address you specified.
Distributing Forms
In times past, one of the most troublesome parts of using Acrobat for your forms was distributing them and then somehow getting information back from your respondents.
Acrobat 8 has made it admirably simple to distribute a form and collect its responses by email. The one requirement is that your form must have a Submit button created in LiveCycle Designer or the Forms toolbar. (See Acrobat Help for more instructions on creating buttons.)
When you distribute a form, Acrobat creates a dataset file that it uses to keep track of responses returned for the form. Acrobat does all the bookkeeping associated with collecting and collating the form data. At any time, you can open the dataset file in Acrobat and see all the responses that have been returned so far.
As one who has worked with people for years setting up form distribution and response workflows, let me assure you this is way cool.
The following task assumes you have your form document open in Acrobat.
To distribute a form by email
- Choose Forms > Distribute Form.
The Form Distribution Options dialog box opens (Figure 13.36). This dialog box allows you to choose between having Acrobat email the form to its recipients immediately or saving the file so you can email it yourself later.
Figure 13.36. When you choose Forms > Distribute a Form, Acrobat presents you with a dialog box that lets you distribute your form by email.
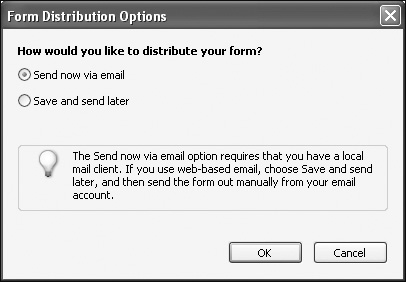
- Choose “Send now via email,” and then click OK.
Acrobat displays step 1 of the Distribute Form Wizard (Figure 13.37). It asks for the email address to which responses should be returned.
Figure 13.37. The first step in the Distribute Form Wizard asks for your return email address. This is where responses will be sent.
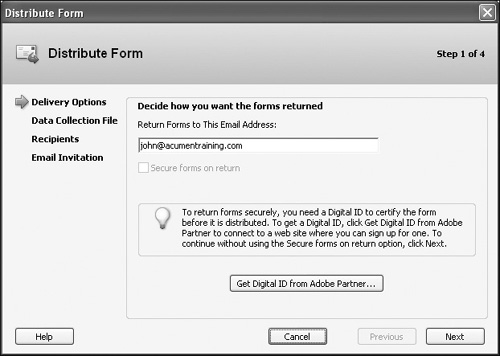
- Type the email address for responses into the pane, and click Next.
Step 2 of the wizard appears (Figure 13.38), which asks for the name and location of the dataset file.
Figure 13.38. In step 2, the Distribute Form Wizard asks you to name the data collection file that Acrobat will use to keep track of incoming responses.

- Click the Browse button, and specify a location and name for the dataset file in the Save dialog box.
- Click Next.
The next step in the wizard (Figure 13.39) asks you for the email addresses of the form’s recipients. This step will be missing if you earlier opted to email the form yourself rather than let Acrobat do it.
Figure 13.39. In step 3, you supply the email addresses of the people to whom the form should be sent.
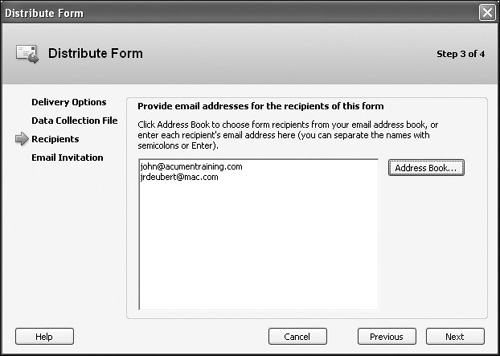
- Type into the text field the email addresses of all the people to whom the form should be sent.
The addresses may be on separate lines within the field or separated by semicolons. Note that you can also click the Address Book button and take addresses from your system’s address book.
- Click Next.
Acrobat takes you to the final step in the wizard, which asks for a subject and message body for your email message (Figure 13.40).
Figure 13.40. Finally, you provide text for the outgoing email’s subject and message body. When you click the Done button, your form is sent.
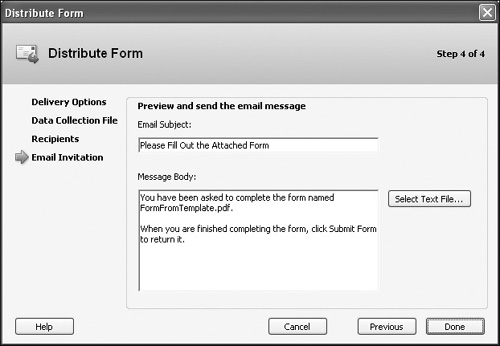
- Type a subject and message into the appropriate fields, and click Done.
Acrobat mails your form as an attachment to the email addresses you provided.
When recipients receive the emailed form and open it in Acrobat, they see an instruction panel at the top of the document panel (Figure 13.41). This text is pretty basic, telling the recipient to fill out the form.
Figure 13.41. A person who receives your form sees a brief set of instructions at the top of the form’s page.
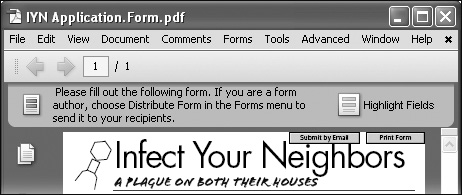
Having filled out the form, the recipient clicks the Submit by Email button; Acrobat uses the recipient’s mail client to send the completed form back to you (or, rather, to the email address you supplied when you distributed the form).
Receiving Forms
Acrobat 8 also makes it remarkably easy to receive and compile responses to your form. The secret is the bookkeeping it maintains in the form’s dataset, which is created when you distribute the form. As you receive emailed responses, Acrobat checks to see to which dataset they belong and adds the responses to all the others for that form.
The whole process has become a breeze instead of a chore.
To receive a completed form
- In your mail software, open the email with the attached, completed form.
- Open the attached PDF file.
In most systems, you can do this directly from the email client. In other systems, you may need to download the attachment to a file and then open that.
A dialog box opens, notifying you that the form belongs to a dataset and asking permission to add the form to that dataset (Figure 13.42).
Figure 13.42. When you open a completed form, Acrobat asks you if it may add the form’s data to the dataset it created when you distributed the form. Tell it OK.
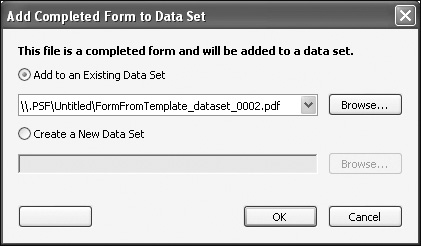
- Click OK.
Acrobat adds the form’s responses to the dataset. You’re now looking at the completed form, which you can examine, if you wish.
To view the responses from all the forms returned so far, you open the dataset in Acrobat. The software will display a document window that has a pane listing of all of the recipients. Click on an entry in the list to see that responder’s form entries.
To view the responses for all returned forms
- Choose Forms > Compile Returned Forms.
The Compile Data dialog box opens (Figure 13.43).
Figure 13.43. The Compile Data dialog box asks you to choose the dataset whose responses you want to browse.
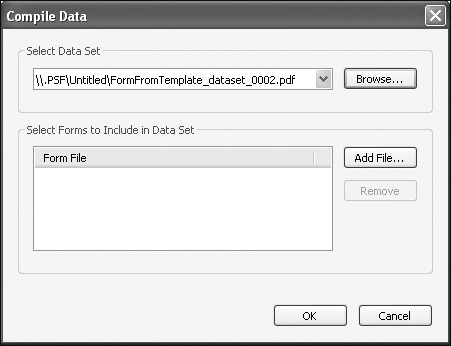
- Click the Browse button, and choose the dataset whose responses you want to view.
- If you want to add additional, individual PDF form files to the dataset (that you haven’t opened and added already), click the Add File button, and choose the individual PDF files from the resulting Open dialog box.
- Click OK.
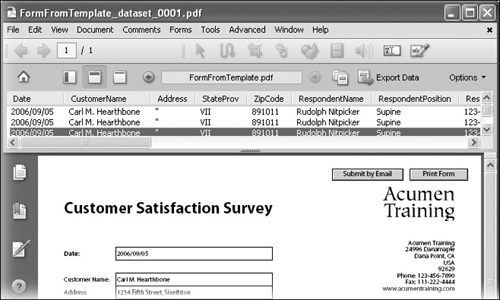
Acrobat displays a PDF document window that has a pane listing the recipients whose data are in the dataset (Figure 13.44).
Figure 13.44. When browsing a form’s responses, a list of recipients appears at the top of the form window. Clicking a name in the list displays that person’s data.
- Click a recipient’s name in the list to see that person’s responses.
- Close the window when you’re done.
Tips
• You can click any of the headings in the list of customers in Figure 13.44 to sort the list by that field, such as CustomerName or RespondentPosition.
• If you click the Export Data button, which is above the list in Figure 13.44, a standard Save dialog box opens that lets you save the image data as comma-delimited text. This file is suitable for importing into a spreadsheet or a database manager so you can further analyze the data.