
6 Using Acrobat on Mobile Devices
Lesson overview
In this lesson, you’ll do the following:
Learn how to access and download Acrobat apps.
Comment on PDFs in the Acrobat Reader app.
Work with PDF files in Document Cloud.
Edit PDF files in the Acrobat Reader app (tablet only).
Use the Fill & Sign app to complete a form on a mobile device.
This lesson will take approximately 45 minutes to complete. Download the project files for this lesson, following the instructions in the Getting Started section under “Accessing the lesson files and Web Edition,” if you haven’t already done so. As you work on this lesson, you’ll preserve the start files. If you need to restore the start files, download them from your Account page.

Many of the tools you use to work with PDF files in Acrobat on the desktop are also available on Document Cloud and in the Acrobat mobile apps, so you can keep working wherever you are.
About the Acrobat mobile apps
Adobe Document Cloud and its family of mobile apps let you work on PDF files from anywhere. Many of the features of Acrobat for desktop are available when you access Document Cloud on a web browser or use the Adobe Acrobat Reader app, the Adobe Fill & Sign app, and the Adobe Sign app. The Adobe Scan app extends the power of Acrobat so that you can scan a document using the camera on your mobile device.
The user interfaces on the apps are slightly different in iOS and Android.
Adobe Document Cloud - Adobe Document Cloud includes Adobe Acrobat DC, as well as the mobile apps, the Acrobat interface on your browser, and cloud storage space. You can use Document Cloud online to work with your documents from any computer or device that has Internet access. To access Document Cloud in a browser, visit documentcloud.adobe.com, and then sign in with your Adobe ID.
Adobe Acrobat Reader app - The free Acrobat Reader app lets you view, organize, export, print, and comment on PDF files on mobile devices. On an iPad or Android tablet, you can also use the app to edit PDF files.
Adobe Fill & Sign app - You can use the Fill & Sign app on a mobile device just as you use the Fill & Sign tool in Acrobat DC. Open or take a picture of a form, and then complete it, sign it, and then submit it.
Adobe Sign app - This straightforward but powerful app lets you send documents for electronic signature through the Adobe Sign service, sign documents yourself, and track documents. You can also set up a form to get a signature in person.
Adobe Scan app - Your mobile phone or tablet becomes your scanner, instantly converting physical documents into PDFs. You can crop or rotate the document in Adobe Scan, or make other changes in Acrobat Reader or Acrobat DC.
Download any of the apps from the App Store (iOS) or Google Play (Android). The apps are all free; to take full advantage of the features available with your Document Cloud or Creative Cloud subscription, sign in using your Adobe ID.
Getting Started
In this lesson, you’ll work with PDF documents in apps and in your browser. First, you’ll upload the documents to Document Cloud so they’re available to you in the apps.
Download and install the Adobe Acrobat Reader, Adobe Fill & Sign, and Adobe Scan apps onto your mobile device(s) if you haven’t already. You can access the apps in the App Store (iOS) or Google Play (Android).

In Acrobat DC, choose File > Open, and navigate to the Lesson06/Assets folder.
Shift-select Postcard.pdf and Tickets.pdf, and click Open.
With Postcard.pdf active, choose File > Save As, and navigate to the Lesson06/Finished_Projects folder. Name the file Postcard_final.pdf, and click Save.
Click the Upload To Document Cloud button in the toolbar.

Select the Tickets.pdf tab to make the PDF file active.
Choose File > Save As, navigate to the Lesson06/Finished_Projects folder, name the file Tickets_final.pdf, and click Save.
Click the Upload To Document Cloud button in the toolbar.
Both PDF documents are now available on Document Cloud, so you can open and work with them on any device using a web browser or an Acrobat app. The original versions remain untouched in your Lesson06/Assets folder.
Using the Acrobat Reader app
You’ll view the Postcard PDF file and comment on it in the Acrobat Reader app. If you’re using the app on a tablet, you’ll make some simple edits to the document as well. Changes you make to the PDF file will be saved to the version stored on Document Cloud, which is accessible from the other apps, the web, and Acrobat DC.
You can view, annotate, share, or print PDF files. You can also rotate or delete pages in a document using the Organize Pages tool, combine documents into one PDF using the Combine Files tool, and convert native documents to PDF using the Create PDF tool, all available in the app on both phones and tablets.
Opening PDF files in the Acrobat Reader app
You can open PDF files that are already stored on your phone or tablet, PDFs from Document Cloud, or PDFs from Dropbox, Google Drive, or other remote accounts. You’ll open the Postcard_final PDF file you just uploaded to Document Cloud.
Open the Acrobat Reader app on a mobile device. You’ll have access to a few more features on a tablet, but most are available on a mobile phone.
Sign in to Document Cloud using your Adobe ID if you’re prompted to do so. Click Home if the Home view isn’t active.
The Home view opens. It displays your recent files, including files you’ve recently worked with on or saved to Document Cloud.

Tap Files at the bottom of the screen to see other documents. Then, tap Document Cloud. (On a tablet, tap Locations first.)
From the list of documents on Document Cloud, select Postcard_final.

Acrobat Reader displays both pages of the postcard.
Tap the View Settings button at the top of the screen, and choose Single Page (iOS) or Page-By-Page (Android).

A single page of the document appears.
Turn the device sideways, if it isn’t already, so you can see the wide postcard. Tap the PDF to display it without menus.
Swipe to the left to see the back of the postcard (the second page).

Tap the PDF to display the menus again, and then tap the View Settings button, and select Continuous (iOS) or Continuous Pages (Android).
You’ll be commenting on the file in the next exercise, and it’s easier to highlight or select text in Continuous Pages view.
Commenting on PDF files in Acrobat Reader
You can comment on PDF files in a document sent to you through a shared review process, but you can add notations to any PDF file. You’ll add a comment to this draft of the postcard. Changes you make to the document are saved to the version on Document Cloud immediately.
Tap the Edit button in the lower right corner, and choose Comment.

Tap the Sticky Note tool, and then click near the end of the text on the second page, and type Where can they get tix? Click Post to apply the note.

Tap the Highlight tool, and then tap, hold, and drag your finger over some text to highlight it.
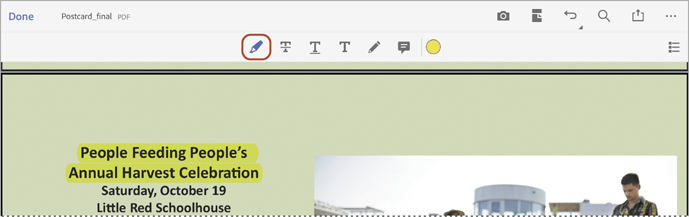
You can add sticky notes, highlight text, strike through or underline text, add text, and draw on the page. Unlike the commenting tools in Acrobat DC on the desktop, you can add comments only to sticky notes and add text notations.
Tap the Undo button (
 ) at the top to undo the highlighting.
Tap Done (iOS) or the Check mark button (Android) in the top left corner to accept your notations and exit commenting mode. Acrobat Reader saves your changes to the document on Document Cloud.
Editing PDF files in Acrobat Reader (tablet only)
If you’re using the Acrobat Reader app on a tablet, you can make simple text and image edits to PDF files. You’ll correct a spelling error and adjust the size and position of an image on the postcard.
Tap the Edit button in the lower right corner, and choose Edit PDF.
Scroll to see the second page. Click the text block, and then tap an insertion point before the v in Hors d’oervres, which is spelled wrong.
Backspace to delete the letter r, and then type u.
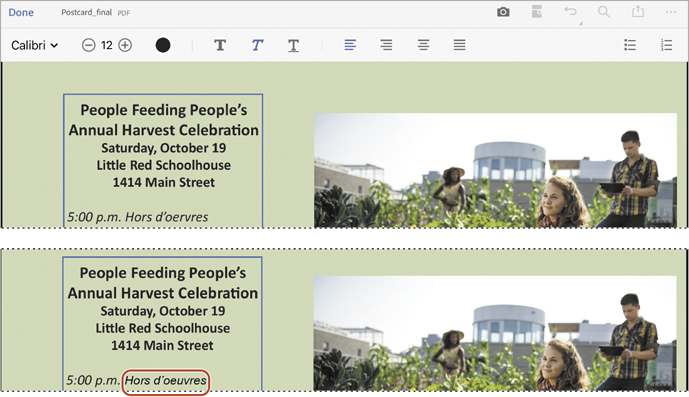
Tap and hold your finger down over the photo to select and highlight it. Then drag it up slightly on the page. Drag the lower left corner handle down and to the left to make the image larger.
When you’re satisfied with the changes you’ve made, tap Done or the Check mark button at the top of the screen to exit editing mode. Acrobat saves the changes to Document Cloud.
Tap the Back button at the top of the screen to return to the Home view.
Using Document Cloud in a web browser
Document Cloud in a browser includes the same Home view you see in Acrobat DC on the desktop and in the Acrobat Reader app, but it also provides a Quick Start set of tools to help you do what you want to do quickly. Unlike Acrobat Reader, in Document Cloud, commenting tools are available only if the PDF has been shared for review. You also cannot edit text or objects in a PDF file using Document Cloud in a browser.
You can access Document Cloud in a browser on a computer or on a device. It provides some features that aren’t available in the Acrobat Reader app, such as the ability to send documents for review. You’ll use Document Cloud to share the Postcard PDF file for review.
Open Document Cloud in a browser on a computer or a device. Document Cloud is at documentcloud.adobe.com.
Sign in with your Adobe ID if you’re prompted to do so.
Document Cloud displays the Home view.
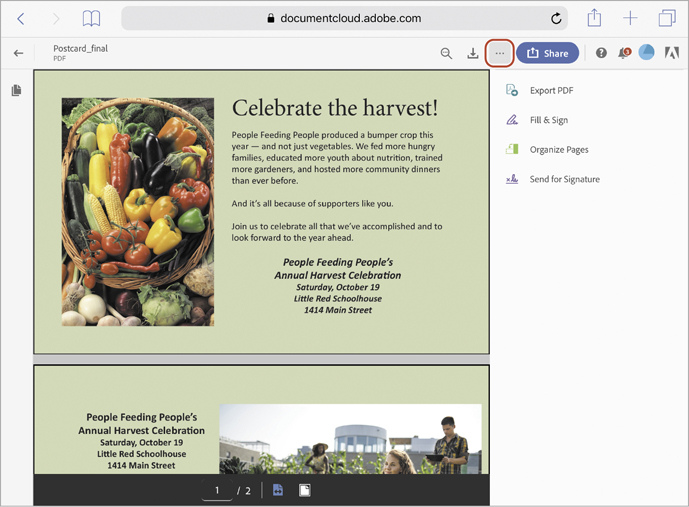
Click the Postcard_final file in the Recent files list to open it.

Document Cloud displays both pages of the Postcard_final document.
Click the menu button in the toolbar to see a list of available tools, if they aren’t already displayed.
Document Cloud displays the Export PDF, Fill & Sign, Organize Pages, and Send For Signature tools.
Click the menu button to close the list of tools.
Click the Share button. Then, select Review File, and enter an email address for a reviewer. (You can enter your own email address or a colleague’s.) Enter a personalized message if you want to, and then click Send.

Document Cloud sends the PDF for review and reports its status.
Click Go To Review.
Document Cloud displays the PDF file in Review mode, with existing comments listed on the side near their placement on the page. Now you have access to the same commenting tools you have in Acrobat Reader.

Click Done to exit Review mode, and then click I’m Finished.
You’ll learn more about commenting and shared review processes in Lesson 10, “Using Acrobat in a Review Cycle.”
In the Home view, select the Tickets_final.pdf file. Then select the Fill & Sign tool.
You could use the Fill & Sign tool in the browser, but you’ll use the app so you can set up a profile. Selecting the Fill & Sign tool in Document Cloud in the browser lets Document Cloud recognize the document as a form.
Click Close, and then click the Back button to return to the Home view.
Using the Fill & Sign app
The Adobe Fill & Sign app performs the same function as the Fill & Sign tool in Acrobat DC or the Acrobat Reader app. Because it’s available on your mobile device, you can complete forms wherever you are. The Fill & Sign app also lets you create a profile that you can use to quickly complete standard form fields. You’ll use the Fill & Sign app to complete the ticket order form for an event.
Open the Fill & Sign app on your device. Sign in to Document Cloud if you aren’t already signed in.
The app displays forms that have been accessed recently in Document Cloud or on your device. The app displays only the PDF files it recognizes as forms.
Select the Profile button at the top left corner of the screen.
Enter a full name, first name, last name, and information for any other fields you’d like to be able to complete quickly.
The profile includes standard identity and contact information. You can add custom fields that you encounter frequently, too.
![]() Note
Note
If the Tickets_ final PDF file isn’t listed, email it to yourself and open it from your device’s drive.
Tap elsewhere on the screen to close the Profile window.
Tap the Tickets_final PDF to open it.
Tap at the beginning of the Name field to click an insertion point. Then tap the Profile button at the bottom of the screen, and select Full Name to enter it.
Tap next to Adults to insert text, and type the number 2. Tap the small capital A to reduce the text size; tap the large capital A to increase the size of the text.
Tap the Will Call box, and then tap the menu button (…) in the floating toolbar. Tap the check mark to add it to the box.
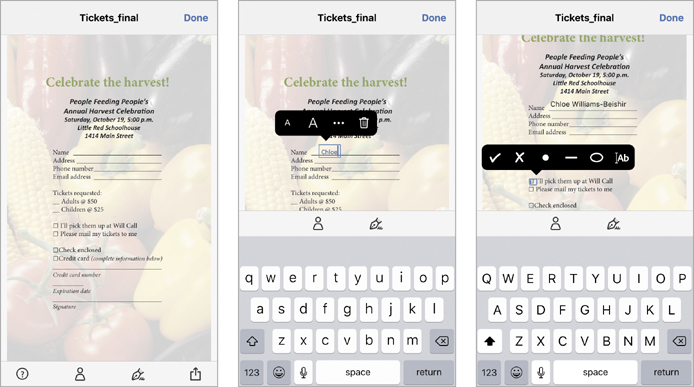
Tap the signature field, and then tap the Signature button at the bottom of the screen. Tap Create Signature, sign a name, and then click Done.

You can save your signature in your profile for use online in other apps.
Tap the Share button in the lower right corner of the screen, and tap your Mail app icon to email the completed form. You can log in to your email account and send the form to yourself, or tap the back button to return to Adobe Fill & Sign.
Click Done to return to the Home view of the Adobe Fill & Sign app.
Had you been ordering tickets, you’d have completed the entire form, and you could submit it using email, print it, or save it to Document Cloud and then upload it to a website.
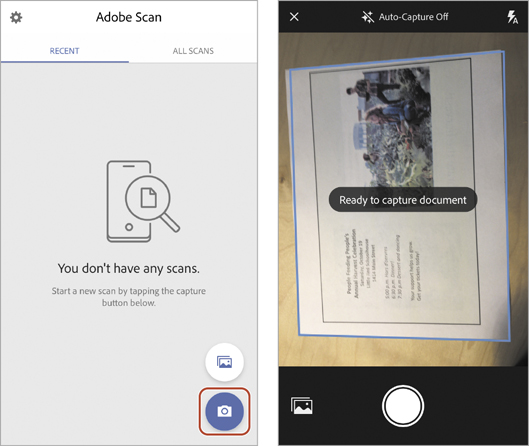
Using the Adobe Scan app
You can use the Adobe Scan app to use the camera on your phone or tablet as a scanner. Once you’ve scanned a document, you can use Acrobat DC to recognize text, share the document, convert it into a form, and generally do anything you can do with any other PDF file.
You can open Adobe Scan directly, and you can also access Adobe Scan from within the Acrobat Reader app by tapping Scan in the tools menu.
Open Adobe Scan on your device.
Tap the Settings button in the upper left corner.
Tap Preferences, and make sure Run Text Recognition is enabled if you want to scan text-based documents into editable PDF documents. If you want to save the original scans to your photos, tap Save Originals To Photos.
Close the Settings menu to return to the Home view.
Tap the Camera button in the lower right corner to activate your camera. Give permission for the app to use your camera if prompted.
Tap the Auto-Capture button (
 ) to disable it.
When Auto-Capture is enabled, the Adobe Scan app identifies documents and takes the photo automatically. When it’s disabled, you must press the Capture button manually.
Position your device over a document, and press the Capture button.
Tap the Scans button in the lower right corner to see the scan.
Tap the Crop button in the bottom toolbar to adjust the borders of the image. Tap the check mark when you’re done.
Tap the Rotate button to rotate the scanned image one-quarter turn clockwise, if necessary.

Tap the Color button to change the color and contrast of the image.
Tap Save PDF when you’re satisfied with the scan. The scan is saved to Document Cloud.
Review questions
Which commenting tools are available in the Acrobat Reader app?
How can you use Document Cloud in a web browser?
Why would you want to save a profile in the Fill & Sign app?
Review answers
The Acrobat Reader app includes the Sticky Note, Highlight, Strikethrough, Underline, Add Text, and Pencil tools for commenting on PDF documents.
You can use Document Cloud in a web browser to view and work with your PDF documents from any computer or device. When you make changes to a PDF in the Acrobat Reader app, those changes are saved to Document Cloud.
A profile can help you complete form fields much faster, as you can select previously designated answers to populate fields.