11 Editing Video
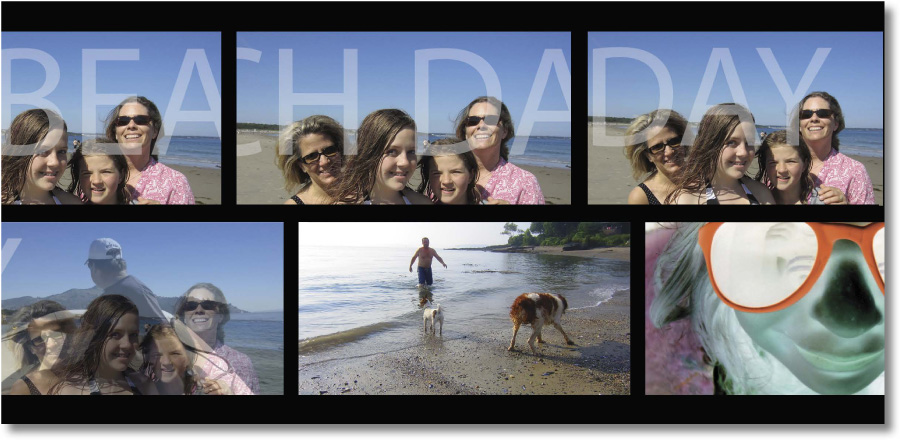
PROJECT: FAMILY VIDEO FROM MOBILE PHONE
You can edit video files in Photoshop using many of the same effects you use to edit image files. You can create a movie from video files, still images, Smart Objects, audio files, and type layers; apply transitions; and animate effects using keyframes.
Lesson overview
In this lesson, you’ll learn how to do the following:
Create a video timeline in Photoshop.
Add media to a video group in the Timeline panel.
Add motion to still images.
Animate type and effects using keyframes.
Add transitions between video clips.
Include audio in a video file.
Render a video.
This lesson will take about 90 minutes to complete. Please log in to your account on peachpit.com to download the lesson files for this chapter, or go to the Getting Started section at the beginning of this book and follow the instructions under “Accessing the Lesson Files and Web Edition.”
As you work on this lesson, you’ll preserve the start files. If you need to restore the start files, download them from your Account page.
Getting started
In this lesson, you’ll edit a video that was shot using a smartphone. You’ll create a video timeline, import clips, add transitions and other video effects, and render the final video. First, look at the final project to see what you’ll be creating.
Start Photoshop, and then immediately hold down Ctrl+Alt+Shift (Windows) or Command+Option+Shift (Mac) to restore the default preferences. (See “Restoring Default Preferences” on page 5.)
When prompted, click Yes to delete the Adobe Photoshop Settings file.
Choose File > Browse In Bridge.
In Bridge, select the Lessons folder in the Favorites panel. Then, double-click the Lesson11 folder in the Content panel.
Double-click the 11End.mp4 file to open it in the default video player for your system, such as QuickTime Player (Mac) or Movies & TV (Windows).
 Note
NoteIf Bridge isn’t installed, you’ll be prompted to install it when you choose Browse In Bridge. For more information, see page 3.
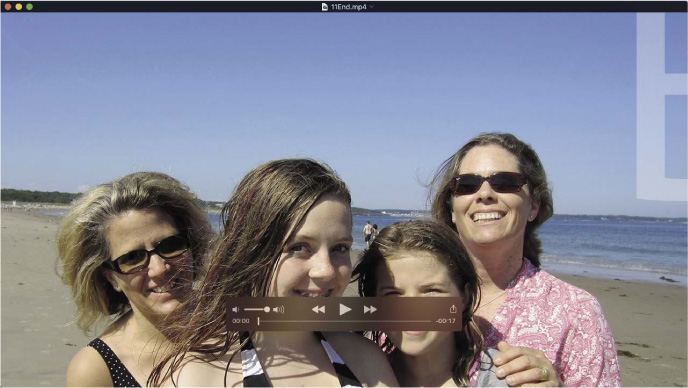
Click the Play button to view the final video.
The short video is a compilation of clips from a day at the beach. It includes transitions, layer effects, animated text, and a musical track.
Close the video player, and return to Bridge.
Double-click the 11End.psd file to open it in Photoshop.
About the Timeline panel
If you’ve used a video-editing application such as Adobe Premiere® Pro or Adobe After Effects®, the Timeline panel is probably familiar. You use the Timeline panel to assemble and arrange video clips, images, and audio files for a movie file. You can edit the duration of each clip, apply filters and effects, animate attributes such as position and opacity, mute sound, add transitions, and perform other standard video-editing tasks without ever leaving Photoshop.
Choose Window > Timeline to open the Timeline panel.
Each video clip or image included in the project is represented in a box in the Timeline panel and as a layer in the Layers panel. Video clips have a blue background in the Timeline panel; image files have a purple background. At the bottom of the Timeline panel is the audio track.

A. Play button B. Playhead C. Image file D. Video clip E. Audio track F. Render Video button G. Current time H. Frame rate I. Control Timeline Magnification slider
The timeline contents should appear visible as in the figure above. If they’re collapsed against the left side so that content titles and previews aren’t visible, drag the magnification slider (below the timeline) to the right to see time in more detail.
Click Play in the Timeline panel to view the movie.
The playhead moves across the time ruler, displaying each frame of the movie.
Press the spacebar to pause playback.
Drag the playhead to another point in the time ruler.
The playhead’s time location determines what appears in the document window.
When you work with video, Photoshop displays guidelines across the document window. To minimize the chance that your content will be cut off along the edges of some televisions, keep important content within the center area marked by the guides.
When you’ve finished exploring the end file, close it, but leave Photoshop open. Don’t save any changes you might have made.
Creating a new video project
Working with video is a little different from working with still images in Photoshop. You may find it easiest to create the project first, and then import the assets you’ll be using. You’ll choose the video preset for this project, and then add nine video and image files to include in your movie.
Creating a new file
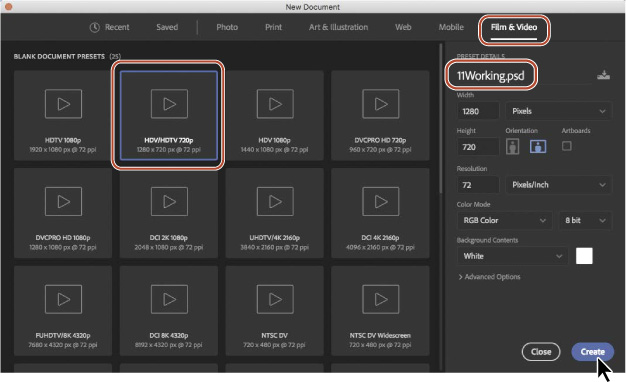
Photoshop includes several film and video presets for you to choose from. You’ll create a new file and select an appropriate preset.
In the Start workspace, click the Create New button, or choose File > New.
Name the file 11Working.psd.
Click Film & Video in the document type bar at the top of the dialog box.
In the Blank Document Presets section, choose HDV/HDTV 720p.
Accept the default settings for the other options, and click Create.
 Note
NoteThe video in this lesson was shot using an Apple iPhone, so one of the HDV presets is appropriate. The 720p preset provides good quality without providing too much data for easy online streaming.
Choose File > Save As, and save the file in the Lesson11 folder.
Importing assets
Photoshop provides tools specifically for working with video, such as the Timeline panel, which may already be open because you previewed the end file. To ensure you have access to the resources you need, you’ll select the Motion workspace and organize your panels. Then you’ll import the video clips, images, and audio file you need to create the movie.
Choose Window > Workspace > Motion.
Pull up the top edge of the Timeline panel so that the panel occupies the bottom half of the workspace.
Select the Zoom tool (
 ), and then click Fit Screen in the options bar so that you can see the entire canvas within the top half of the screen.
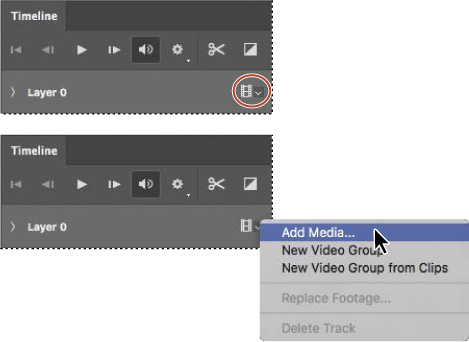
In the Timeline panel, click Create Video Timeline. Photoshop creates a new video timeline, including two default tracks: Layer 0 and Audio Track.

Click the Video menu in the Layer 0 track, and choose Add Media.
Navigate to the Lesson11 folder.
Shift-select the video and photo assets numbered 1–6, and click Open.

![]() Note
Note
If the media appear in reverse order, choose Edit > Undo, and when you choose Add Media again, make sure you select 1_Family.jpg first and then Shift-select 6_Sunset.jpg. Also, it will be easiest to Shift-select the media if the files are sorted by name.
Photoshop imports all six of the assets you selected onto the same track, now named Video Group 1, in the Timeline panel. It displays still images with a purple background and video clips with a blue background. In the Layers panel, the assets appear as individual layers within the layer group named Video Group 1. You don’t need the Layer 0 layer, so you’ll delete it.
Select Layer 0 in the Layers panel, and click the Delete Layer button at the bottom of the panel. Click Yes to confirm the deletion.

Changing the duration and size of clips in the timeline
The clips are of very different lengths, meaning they’d play for different amounts of time. For this video, you want all the clips to be the same length, so you’ll shorten them all to 3 seconds. The length of a clip (its duration) is measured in seconds and frames: 03:00 is 3 seconds; 02:25 is 2 seconds and 25 frames.
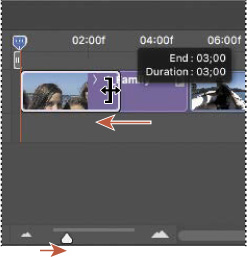
Drag the Control Timeline Magnification slider to the right at the bottom of the Timeline panel to zoom in on the timeline. You want to be able to see a thumbnail of each clip and enough detail in the time ruler that you can accurately change the duration of each clip.
 Note
NoteYou’re shortening each clip to the same length here, but you can have clips of varying lengths, depending on what’s appropriate for the project.
Drag the right edge of the first clip (1_Family) to 03:00 on the time ruler. Photoshop displays the end point and the duration as you drag so that you can find the right stopping point.
Drag the right edge of the second clip (2_BoatRide) to a duration of 03:00.
Shortening a video clip this way doesn’t change its speed; it removes part of the clip from the video. In this case, you want to use the first three seconds of each clip. If you wanted to use a different portion of a video clip, you would shorten the clip from each end. As you drag the end point of a video clip, Photoshop displays a preview so you can see which part of the clip is included.
Repeat step 3 for each of the remaining clips so that each has a duration of 3 seconds.
![]() Tip
Tip
To quickly change the duration of a video clip, click the arrow in the upper right corner, and then type a new Duration value. This option isn’t available for still images.

The clips are now the right duration, but some of the images are the wrong size for the canvas. You’ll resize the first image before continuing.
Select the 1_Family layer in the Layers panel. The clip is also selected in the Timeline panel.
Click the triangle in the upper right corner of the 1_Family clip in the Timeline panel to open the Motion panel.
 Tip
TipThe arrow on the left side of a clip (next to the clip’s thumbnail) reveals the attributes you can animate using keyframes. The arrow on the right side of a clip opens the Motion panel.
Choose Pan & Zoom from the menu, and make sure Resize To Fill Canvas is selected. Then click an empty area of the Timeline panel to close the Motion panel.

The image resizes to fit the canvas. However, you applied the effect only to quickly resize the image and not to pan and zoom, so you’ll remove the effect.
Open the Motion panel from the 1_Family clip again, and choose No Motion from the menu. Click an empty area of the Timeline panel to close the Motion panel.
Choose File > Save. Click OK in the Photoshop Format Options dialog box.
Animating text with keyframes
Keyframes let you control animation, effects, and other changes that occur over time. A keyframe marks the point in time where you specify a value, such as a position, size, or style. To create a change over time, you must have at least two keyframes: one for the state at the beginning of the change and one for the state at the end. Photoshop interpolates the values for the positions in between so that the change takes effect smoothly over the specified time. You’ll use keyframes to animate a movie title (Beach Day) from left to right over the opening image.
Click the Video pop-up menu in the Video Group 1 track, and choose New Video Group. Photoshop adds Video Group 2 to the Timeline panel.

Select the Horizontal Type tool (
 ), and then click on the left edge of the image, about halfway down from the top.
Photoshop creates a new type layer, named Layer 1, in the Video Group 2 track. The type layer initially includes “Lorem Ipsum” placeholder text.
In the options bar, select a sans serif font such as Myriad Pro, set the type size to 600 pt, and select white for the type color.
Type BEACH DAY, replacing the selected placeholder text. Click the check mark (
 ) in the options bar to commit the text to the layer.
The text is large enough that it doesn’t all fit on the image. That’s okay; you’ll animate it to move across the image.
In the Layers panel, change the opacity for the BEACH DAY layer to 25%.
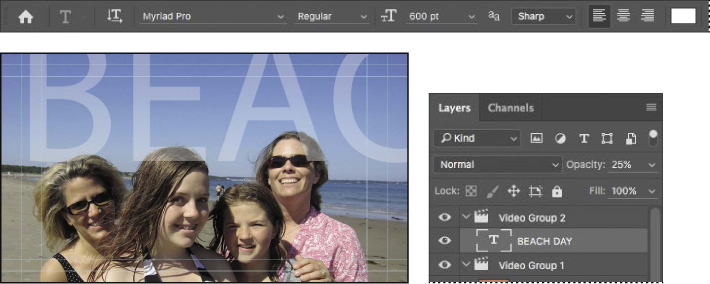
In the Timeline panel, drag the end point of the type layer to 03:00 so that it has the same duration as the 1_Family layer.
Click the arrow to the left of the BEACH DAY clip title to display the clip’s attributes.
Make sure the playhead is at the beginning of the time ruler.
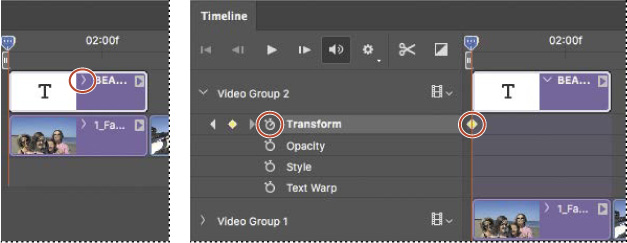
Click the stopwatch icon (
 ) next to the Transform property to set an initial keyframe for the layer.
The keyframe appears as a yellow diamond in the timeline.
Select the Move tool (
 ), and use it to drag the type layer over the canvas so that the tops of each letter are slightly clipped at the edge of the canvas. Drag it to the right so that only the left edge of the letter “B” in the word “BEACH” is visible on the canvas. The keyframe you set in step 9 ensures that the text will be in this position at the beginning of the movie.
Move the playhead to the last frame of the first clip (02:29).
Press the Shift key as you drag the type layer to the left over the canvas so that only the right edge of the “Y” in the word “DAY” is visible. Pressing the Shift key ensures that the type moves straight across as you drag.
![]() Tip
Tip
Photoshop displays the playhead’s location in the lower left corner of the Timeline panel.
Because you’ve changed the position, Photoshop creates a new keyframe.
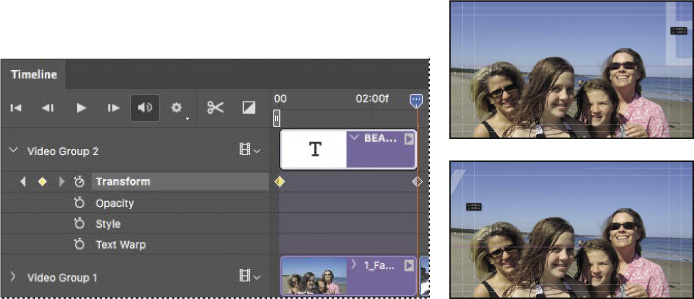
Move the playhead across the first three seconds of the time ruler to preview the animation. The title moves across the image.
Click the arrow to the left of the title of the BEACH DAY text clip to close the clip’s attributes, and then choose File > Save to save your work so far.
Creating effects
One of the benefits of working with video files in Photoshop is that you can create effects using adjustment layers, styles, and simple transformations.
Adding adjustment layers to video clips
You’ve used adjustment layers with still images throughout this book. They work just as well on video clips. When you apply an adjustment layer in a video group, Photoshop applies it only to the layer immediately below it in the Layers panel.
Select the 3_DogAtBeach layer in the Layers panel.
In the Timeline panel, move the playhead to the beginning of the 3_DogAtBeach layer so you can see the effect as you apply it.
In the Adjustments panel, click the Black & White button.
 Note
NoteIf you had imported the video file using the Place command, so that it was not in a video group, to limit the adjustment layer to a single video layer you would have to set up the adjustment layer as a clipping mask, as you did on page 98.
In the Properties panel, leave the default preset, and select Tint. The default tint color creates a sepia effect that works well for this clip. You can experiment with the sliders and the tint color to modify the black-and-white effect to your taste.
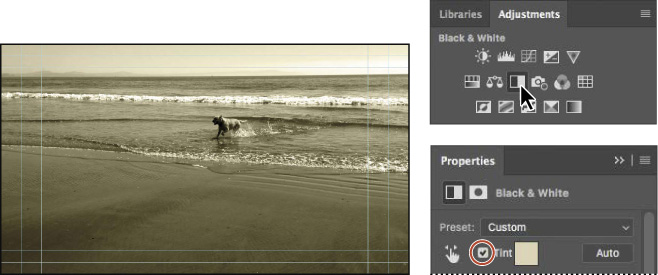
Move the playhead across the 3_DogAtBeach clip in the Timeline panel to preview the effect.
Animating a zoom effect
Even simple transformations become interesting effects when you animate them. You’ll use animation to zoom in on the 4_Dogs clip.
Move the playhead to the beginning of the 4_Dogs clip in the Timeline panel (09:00).
Click the arrow at the top right corner of the 4_Dogs clip to display the Motion panel.
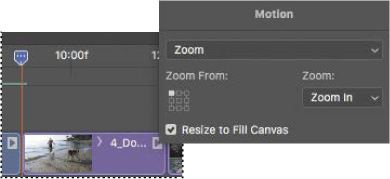
Choose Zoom from the pop-up menu, and choose Zoom In from the Zoom menu. On the Zoom From grid, select the upper left corner to zoom in from that point. Make sure Resize To Fill Canvas is selected, and then click an empty area of the Timeline panel to close the Motion panel.
Drag the playhead across the clip to preview the effect.
You’ll enlarge the image in the last keyframe to make the zoom more dramatic.
Click the arrow to the left of the title of the 4_Dogs clip to reveal the attributes for the clip.
There are two keyframes, which appear as yellow diamonds under the clip on the timeline: one for the beginning of the Zoom In effect, and one for the end.
Click the right triangle next to the Transform attribute (under Video Group 1 on the left side of the Timeline panel) to move the playhead to the last keyframe if it’s not already there, and choose Edit > Free Transform. Then enter 120% for Width and Height in the options bar. Click the Commit Transform button (
 ) to confirm the transformation.
 Tip
TipYou can move to the next keyframe by clicking the right arrow next to the attribute in the Timeline panel. Click the left arrow to move to the previous keyframe.

Drag the playhead across the 4_Dogs clip in the time ruler to preview the animation again.
Choose File > Save.
Animating an image to create a motion effect
You’ll animate another transformation to create the appearance of motion. You want the image to begin with the diver’s legs and end with his hands.
Move the playhead to the end of the 5_Jumping clip (14:29), and select the clip. Press Shift while you move the image down in the document window so that the hands are near the top of the canvas, putting the diver in the final position.
Click the arrow to the left of the clip title to display the clip’s attributes, and click the stopwatch icon for the Position attribute to add a keyframe (a yellow diamond icon) under the clip.
Move the playhead to the beginning of the clip (12:00). Press Shift while you move the image up so that the feet are near the bottom of the canvas.
Photoshop adds a second keyframe under the clip to complete the animation.
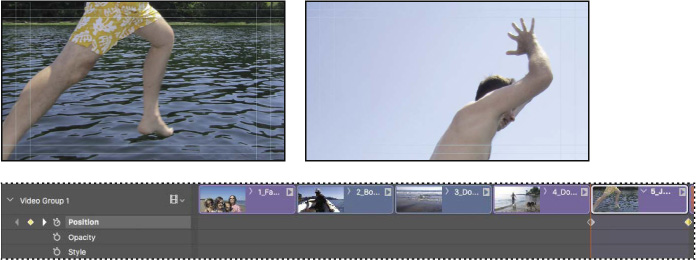
Move the playhead across the time ruler to preview the animation.
Close the clip’s attributes. Then choose File > Save to save your work so far.
Adding the Pan & Zoom effect
You can easily add features similar to the pan and zoom effects used in documentaries. You’ll add them to the sunset to bring the video to a dramatic close.
Move the playhead to the beginning of the 6_Sunset clip.
Click the arrow at the top right corner of the clip to display its Motion panel. Choose Pan & Zoom from the pop-up menu, choose Zoom Out from the Zoom menu, and make sure Resize To Fill Canvas is selected. Then click an empty area of the Timeline panel to close the Motion panel.
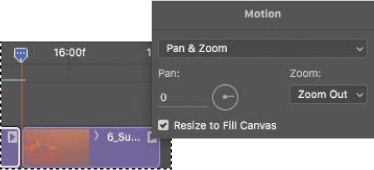
Move the playhead across the last clip to preview the effects.
Adding transitions
Simply drag and drop to add transitions, such as fading one clip into another.
Click the Go To First Frame button (
 ) in the upper left corner of the Timeline panel to return the playhead to the beginning of the time ruler.
Click the Transition button (
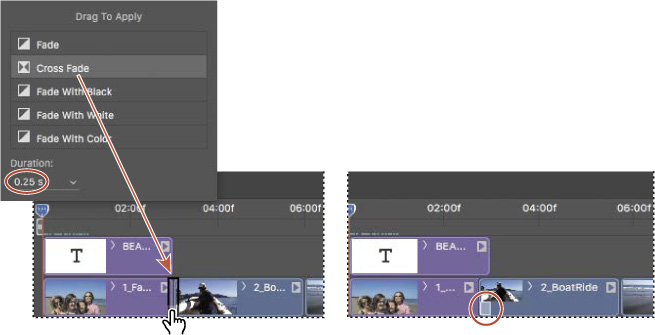
 ) near the upper left corner of the Timeline panel. Select Cross Fade, and change the Duration value to .25 s (a quarter of a second).
Drag the Cross Fade transition and drop it where the 1_Family and 2_BoatRide clips meet.
![]() Note
Note
At low Timeline magnifications, transition icons may be condensed into small rectangles. For better visibility and control of transitions, use the Timeline magnification slider to magnify the Timeline.
Photoshop adjusts the ends of the clips to apply the transition and adds a white transition icon in the lower left corner of the second clip.
Drag Cross Fade transitions between each of the other clips.
Drag a Fade With Black transition onto the end of the final clip.
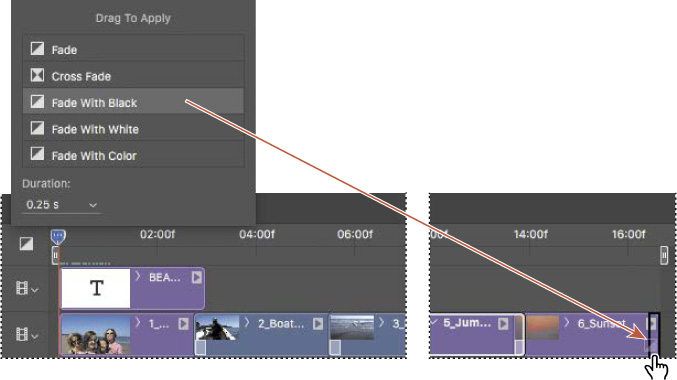
To make the transition smoother, extend the Fade With Black transition by stretching its left side to about one-third the total length of the clip.

Choose File > Save.
Adding audio
You can add a separate audio track to a video file in Photoshop. In fact, the Timeline panel includes an audio track by default. You’ll add an MP3 file to play as the soundtrack for this short video.
Click the musical-note icon in the Audio Track at the bottom of the Timeline panel, and choose Add Audio from the pop-up menu.
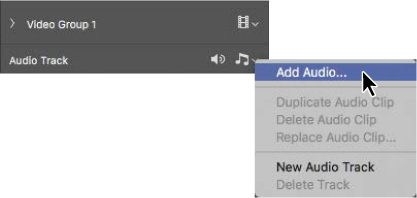
Select the beachsong.mp3 file from the Lesson11 folder, and click Open.
![]() Tip
Tip
You can also add an audio track by clicking the + sign at the far right end of the track in the Timeline panel.
The audio file is added to the timeline, but it’s much longer than the video. You’ll use the Split At Playhead tool to shorten it.
Move the playhead to the end of the 6_Sunset clip. With the audio file still selected, click the Split At Playhead tool (
 ) in the Timeline panel.
The audio file is clipped at that point, becoming two audio clips.

Select the second audio file segment, the one that begins after the end of the 6_Sunset clip. Press the Delete key on your keyboard to delete the selected clip.
Now the audio file is the same length as the video. You’ll add a fade so that it ends smoothly.
Click the small arrow at the right edge of the audio clip to open the Audio panel. Then enter 3 seconds for Fade In and 5 seconds for Fade Out.
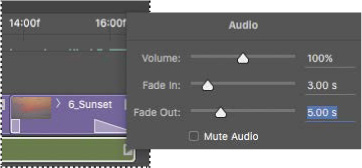
Click an empty area of the Timeline panel to close the Audio panel, and save your work so far.
Muting unwanted audio
So far, you’ve previewed portions of the video by moving the playhead across the time ruler. Now you’ll preview the entire video using the Play button in the Timeline panel, and then mute any extraneous audio from the video clips.
Click the Play button (
 ) in the upper left corner of the Timeline panel to preview the video so far.
It’s looking good, but there is some unwanted background noise from the video clips. You’ll mute that extra sound.
Click the small triangle at the right end of the 2_BoatRide clip.
Click the Audio tab to see audio options, and then select Mute Audio. Click an empty area of the Timeline panel to close the Audio/Video panel.
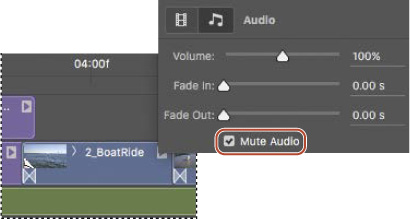
Click the small triangle at the right end of the 3_DogAtBeach clip.
Click the Audio tab to see audio options, and then select Mute Audio. Click an empty area of the Timeline panel to close the panel.
Play the timeline to check your audio changes, and then save your work.
Rendering video
You’re ready to render your project to video. Photoshop provides several rendering options. You’ll select options appropriate for streaming video to share on the YouTube website. For information about other rendering options, see Photoshop Help.
Choose File > Export > Render Video, or click the Render Video button (
 ) in the lower left corner of the Timeline panel.
Name the file 11Working.mp4.
Click Select Folder, and then navigate to the Lesson11 folder, and click OK or Choose.
From the Preset menu, choose YouTube HD 720p 29.97.
Click Render.
![]() Note
Note
The choices in the Preset menu depend on the selection in the Format menu. For the YouTube options to be available in the Preset menu, the Format menu must be set to H.264.

 Depending on your system, this may take a while.
Photoshop displays a progress bar as it exports the video. Depending on your system, the rendering process may take several minutes.
Save your work.
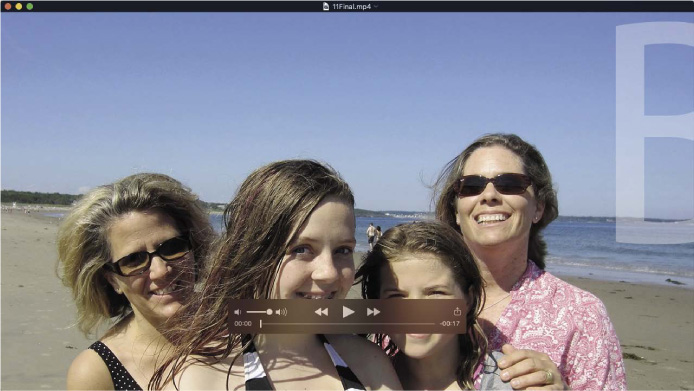
Locate the 11Working.mp4 file in the Lesson11 folder in Bridge. Double-click it to view the video you made using Photoshop!
![]() Tip
Tip
When a video is selected in Bridge, you can play it inside Bridge by pressing the spacebar on your keyboard. This plays the video in the Preview panel in Bridge. Double-clicking a video opens it in your system’s default video player.
Review questions
1 What are keyframes, and how do you use them to create an animation?
2 How do you add a transition between clips?
3 How do you render a video?
Review answers
1 A keyframe marks the point in time where you specify a value, such as a position, size, or style. To create a change over time, you must have at least two keyframes: one for the state at the beginning of the change and one for the state at the end. To create an initial keyframe, click the stopwatch icon next to the attribute you want to animate for the layer. Photoshop creates additional keyframes each time you change the values of that attribute.
2 To add a transition, click the Transition button near the upper left corner of the Timeline panel, and then drag a transition onto a clip.
3 To render a video, choose File > Export > Render Video, or click the Render Video button in the lower left corner of the Timeline panel. Then select the video settings that are appropriate for your intended output.
