8 Vector Drawing Techniques

PROJECT: COFFEE SHOP SIGN
Unlike bitmap images, vector graphics retain their crisp edges when you enlarge them to any size. You can draw vector shapes and paths in your Photoshop images and add vector masks to control what is shown in an image.
Lesson overview
In this lesson, you’ll learn how to do the following:
Differentiate between bitmap and vector graphics.
Draw straight and curved paths using the Pen tool.
Save paths.
Draw and edit shape layers.
Draw custom shapes.
Import and edit a Smart Object from Adobe Illustrator.
Use Smart Guides.
This lesson will take about 90 minutes to complete. Please log in to your account on peachpit.com to download the lesson files for this chapter, or go to the Getting Started section at the beginning of this book and follow the instructions under “Accessing the Lesson Files and Web Edition.”
As you work on this lesson, you’ll preserve the start files. If you need to restore the start files, download them from your Account page.
About bitmap images and vector graphics
Before working with vector shapes and vector paths, it’s important to understand the basic differences between the two main categories of computer graphics: bitmap images and vector graphics. You can use Photoshop to work with either type of graphic; in fact, you can combine both bitmap and vector data in an individual Photoshop image file.
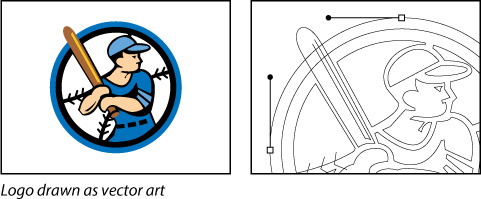
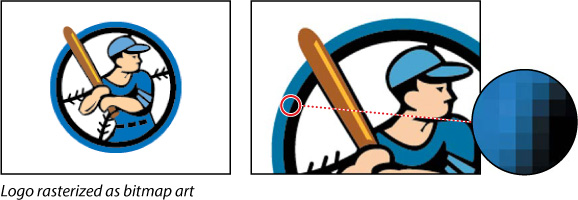
Bitmap images, technically called raster images, are based on a grid of dots known as pixels. Each pixel is assigned a specific location and color value. In working with bitmap images, you edit groups of pixels rather than objects or shapes. Because bitmap graphics can represent subtle gradations of shade and color, they are appropriate for continuous-tone images such as photographs or artwork created in painting programs. A disadvantage of bitmap graphics is that they contain a fixed number of pixels. As a result, they can lose detail and appear jagged when scaled up on screen or printed at a lower resolution than they were created for.
Vector graphics are made up of lines and curves defined by mathematical objects called vectors. These graphics retain their crispness whether they are moved, resized, or have their color changed. Vector graphics are appropriate for illustrations, type, and graphics such as logos that may be scaled to different sizes.
About paths and the Pen tool
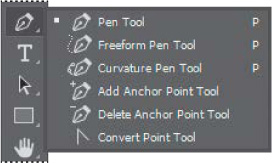
In Photoshop, the outline of a vector shape is called a path. A path is a curved or straight line segment you draw using the Pen tool, Freeform Pen tool, Curvature Pen tool, or a shape tool. The Pen tool draws paths with the greatest precision; shape tools draw rectangles, ellipses, and other shape paths; the Freeform Pen tool draws paths as if you were drawing with a pencil on paper.
Paths can be open or closed. An open path (such as a wavy line) has two distinct endpoints. A closed path (such as a circle) is continuous. The type of path you draw affects how it can be selected and adjusted.
Paths that have no fill or stroke do not print when you print your artwork. This is because paths are vector objects that contain no pixels, unlike the bitmap shapes drawn by the Pencil tool and other painting tools. If you want a path to have a fill or stroke, create it as a shape. A shape is a layer based on vector objects instead of pixels. Unlike a path, you can apply colors and effects to a shape layer.
Getting started
In this lesson, you’ll draw a path around a coffee cup in an image, and create another path inside the handle. You’ll subtract one selection from the other so that a lightning bolt shape (provided in the Shapes panel) knocks out of the cup shape. Finally, you’ll import an Illustrator title treatment as a Smart Object and apply a color and emboss effect.
Before you begin, you’ll view the image you’ll be creating—a sign for a fictitious coffee shop.
Start Photoshop, and then immediately hold down Ctrl+Alt+Shift (Windows) or Command+Option+Shift (Mac) to restore the default preferences. (See “Restoring Default Preferences” on page 5.)
When prompted, click Yes to delete the Adobe Photoshop Settings file.
Choose File > Browse In Bridge.
In the Favorites panel, click the Lessons folder, and then double-click the Lesson08 folder in the Content panel.
Select the 08End.psd file, and press the spacebar to see it in full-screen view.
To create this sign, you’ll trace the coffee cup in an image, and use that tracing to make a vector logo. You’ll resize that logo and combine it with an Illustrator typographic logo imported as a Smart Object. First, you’ll practice making paths and selections using the Pen tool.
When you’ve finished looking at the 08End.psd file, press the spacebar again. Then double-click the 08Practice_Start.psd file to open it in Photoshop.
Choose File > Save As, rename the file 08Practice_Working.psd, and click Save. If the Photoshop Format Options dialog box appears, click OK.
Drawing with the Pen tool
You’ll use the Pen tool to select the coffee cup. The cup has long, smooth, curved edges that would be difficult to select using other methods.
![]() Tip
Tip
The Curvature Pen tool offers a potentially simpler way to draw precise vector paths; consider learning it if you find the Pen tool to be challenging to use. The Pen tool is taught here because it’s a traditional way to precisely draw the vector paths and shapes that are used in many applications.
The Pen tool works a little differently from most Photoshop tools. We’ve created a practice file which you can use to get familiar with the Pen tool before making your Kailua Koffee sign.
Paths include anchor points (smooth and corner) and segments (straight and curved). You’ll get a feel for the Pen tool by drawing a straight path, a simple curve, and then an S-curve before you practice tracing the coffee cup.

First, you’ll configure the Pen tool options and the work area.
In the Tools panel, select the Pen tool (
 ).
).In the options bar, select or verify the following settings:
Choose Shape from the Tool Mode pop-up menu.
In the Path Options menu, make sure that Rubber Band is not selected.
Make sure that Auto Add/Delete is selected.
Choose No Color from the Fill pop-up menu.
Choose a green color from the Stroke pop-up menu.
Enter 4 pt for the stroke width.
In the Stroke Options window, choose Center (the second option) from the Align menu.

A. Tool Mode menu B. Stroke Options menu C. Path Options menu
Drawing a straight line
You’ll start by drawing a straight line. Anchor points mark the ends of path segments; the straight line you’ll draw is a single path segment with two anchor points.
Click the Paths tab to bring that panel to the front of the Layers panel group.
The Paths panel displays thumbnail previews of the paths you draw. Currently, the panel is empty, because you haven’t started drawing.
If necessary, zoom in so that you can easily see the lettered points and blue dots on the shape template. Make sure you can see the whole template in the image window, and be sure to reselect the Pen tool after you zoom.
Click point A on the first shape, and release the mouse button. You’ve created an anchor point.
 Note
NoteIf a tutorial pop-up for the Curvature Pen tool appears, you do not need to read it at this time. It will probably close on its own, or you can close it.
Click point B. You’ve created a straight line with two anchor points.
Press Enter or Return to stop drawing.

![]() Tip
Tip
It can be useful to see both the Paths and Layers panels at the same time, so if they’re currently overlapping each other, consider pulling them apart so you can see them simultaneously.
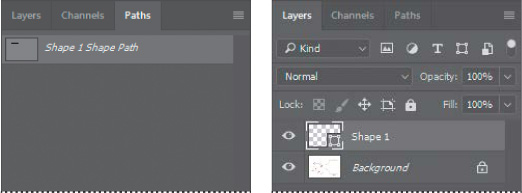
The path you drew appears in the Paths panel and as a new layer in the Layers panel.
Drawing curves
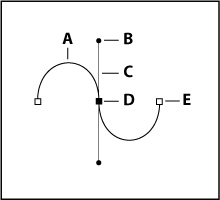
On curved segments, selecting an anchor point displays two direction lines (smooth points) or one direction line (corner point). Direction lines end in direction points, and the positions of the direction lines and direction points determine the size and shape of the curved segment. You’ll create curved lines, using smooth points.
Click A on the semicircle, and release the mouse to create the first anchor point.
Click point B, but don’t release the mouse button. Instead, drag the cursor to the blue dot to the right of point B to create a curved path segment and a smooth anchor point. Then release the mouse button.

Smooth anchor points have two linked direction lines. When you move one, the curved segments on both sides of the path adjust simultaneously.
Click point C, and drag down to the blue dot below. Then release the mouse button. You’ve created a second curved path segment and another smooth point.
Click point D, and release the mouse to create the final anchor point. Press Enter or Return to complete the path.

When drawing a freehand path using the Pen tool, use as few points as possible to create the shape you want. The fewer points you use, the smoother the curves are—and the more efficient your file is.
Using the same techniques, you’ll draw an S-shaped curve.
Click point A, and then click point B; then drag the cursor to the first blue dot.
Continue with points C, D, E, and F, in each case clicking the point and then dragging to the corresponding blue dot.
Click point G to create the final anchor point, and then press Enter or Return to complete the path.

This shape is on its own layer in the Layers panel. Only one path is in the Paths panel because the work path for the second shape overwrote the work path for the first one.
Notice that the curves you drew with the Pen tool are much smoother and easier to precisely control than if you had drawn them freehand.
Drawing a more complex shape
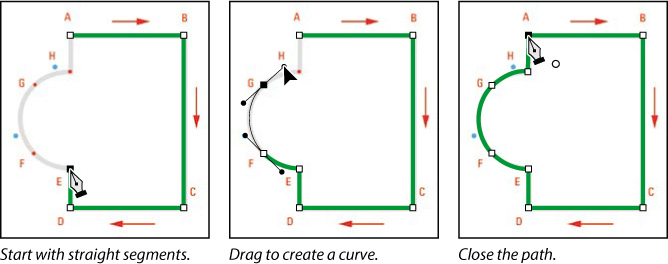
Now that you’ve got the idea, you’ll have a chance to draw a more complex object: the outline of a coffee cup.
Click point A on the shape on the right side to set the first anchor point.
Press the Shift key as you click point B. Pressing the Shift key constrains the line so that it is perfectly straight.
Press the Shift key as you click points C, D, and E to create straight path segments.
Click point F, and drag to the blue dot to create a curve. Then release the mouse button.
Click point G, and drag to the blue dot to create another curve. Then release the mouse button.
Click point H. Then press Alt (Windows) or Option (Mac) as you click point H again to create a corner point.
![]() Tip
Tip
Why is it useful to create paths using points and handles, instead of drawing directly as with a real pen or pencil? Because it’s difficult for most people to draw curves and straight lines without bumps or other errors. Points and handles let you draw absolutely perfect curves and straight lines. If you prefer to draw normally, use the Freeform Pen tool.
When you move a direction line on a corner point, only the curve on the same side of the point as the direction line is adjusted, so you can create a sharp transition between two segments.
Click point A to draw the final path segment and close the path. Closing a path automatically ends the drawing; you don’t need to press Enter or Return.
Close the file without saving changes.
Tracing a shape from a photo
Now you’re ready to draw a path around the coffee cup in the image. You’ll use the techniques you’ve practiced to draw a path around the outside of the cup and another one inside the handle.
Open the 08Start.psd file in Photoshop.
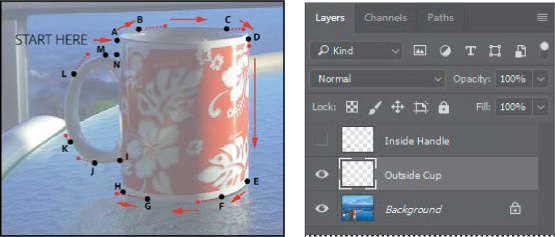
The image includes three layers: the background layer and two template layers to guide you as you draw shapes.
Choose File > Save As, rename the file 08Working.psd, and click Save. Click OK in the Photoshop Format Options dialog box.
With the Pen tool selected, click point A. Photoshop creates a new layer for the shape.
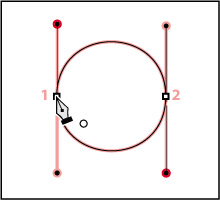
Click point B, and drag the cursor to the red dot on the right to create the initial curve.
 Tip
TipWhen tracing, adjust the magnification of the document window so you can clearly see the outline that you’re tracing.
 Tip
TipIf you’d like to try tracing the cup without using the dots to guide you, hide the Outside Cup layer in the Layers panel.

Click point C, and drag to the red dot to its right.
Continue tracing the cup, clicking each point, and dragging the cursor to the corresponding red dots when you need to create a curve.
 Tip
TipIf the path is difficult to see as you draw it, click the Path Options menu (the gear) in the options bar, and customize Thickness and Color. These options affect only the visibility of the path while drawing; they do not affect the Fill and Stroke settings that determine how the shape appears when printed or exported.
Close the shape by clicking point A again.

Evaluate your path. If you want to adjust any segments, use the Direct Selection tool to select a point, and then move its direction lines to edit the segment.
Press Enter or Return to deselect the path, and save your work so far.
Adding a second shape to a path
You’ve drawn a path that outlines the exterior of the cup, but you want the inside of the handle to be transparent. You’ll draw a shape to isolate the inside of the cup handle.
Hide the Outside Cup layer, and make the Inside Handle layer visible.
Make sure Shape 1 is selected in the Layers panel, and then, in the Paths panel, select Shape 1 Shape Path.
Make sure the Pen tool is selected, and choose Subtract Front Shape from the Path Operations pop-up menu in the options bar.

Options in the Path Operations menu determine how multiple shapes interact with each other in a path. After you draw the cup outline, you’ll subtract the inside of the handle from it.
Click point A to begin drawing. Then click point B, drag to the next red dot, and release the mouse button.
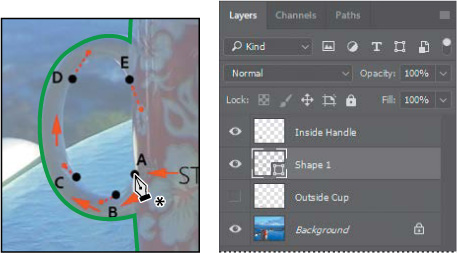
 Note
NoteIf your green cup outline and Layers panel don’t appear exactly as they do in the figure at the left, choose Edit > Step Backward until Shape 2 disappears from the Layers panel, press Enter or Return to deselect the path, and start again at step 2.
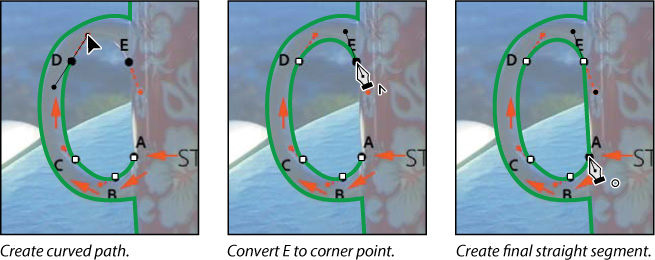
Continue drawing, clicking and dragging as indicated at points C and D.
Click point E, drag slightly down to the red dot, and release. Then, press Alt (Windows) or Option (Mac) as you click point E again, to convert the point to a corner point.
Converting point E to a corner point enables you to draw a straight path segment between it and point A. If point E remained a smooth point, the path between points E and A would be slightly curved.
Click point A to close the shape and stop drawing.
Now you’ll save the path to use later.
In the Paths panel, double-click Shape 1 Shape Path, type Cup Outline in the Save Path dialog box, and click OK to save it; then, still in the Paths panel, click in an empty area to deselect all paths.

You won’t need the Shape 1, Outside Cup, and Inside Handle layers any more, so you’ll delete them.
![]() Tip
Tip
When you want to delete a range of contiguous layers, Shift-click the first and last layers in the range to select them, and then click the Delete Layer icon in the Layers panel.
In the Layers panel, select the Shape 1 layer, and then click the Delete Layer icon (
 ) at the bottom of the Layers panel. Click Yes if you’re asked to confirm the deletion. This will also remove the Shape 1 Shape Path from the Paths panel. In the same way, delete the Inside Handle and Outside Cup layers.
Choose File > Save to save your work.
Working with defined custom shapes
Photoshop includes several predefined custom shapes in the Custom Shape Picker, but you can also create your own.
Converting a path to a shape
You’ll define the cup outline path as a custom shape that you can use for the logo. The shape will be available in the Custom Shape Picker.
Select the Cup Outline path in the Paths panel.
Choose Edit > Define Custom Shape.
Name the shape Coffee Cup, and click OK.

Select the Custom Shape tool (
 ), hidden under the Rectangle tool (
 ) in the Tools panel.
In the options bar, click the Shape icon to open the Custom Shape Picker, and scroll to the bottom of the picker. The shape you added should be the last one displayed. Click to select the Coffee Cup shape.
Position the Custom Shape tool near the top left corner of the document. Hold down the Shift key to maintain original proportions, and start dragging down and to the right. When the logo is about 2 inches tall, release the mouse button, and then release the Shift key.
 Note
NoteAdding a custom shape proportionally works only if you press Shift before you begin to drag.

Double-click the name of the Shape 1 layer in the Layers panel, and name it Coffee Cup.
Changing the fill color of a shape layer
You’ve created a custom shape from your path, and you’ve used the Custom Shape tool to draw the shape on the image. But it’s just an outline. You’ll add a fill.
Make sure the Coffee Cup layer is selected in the Layers panel.
Select the Pen tool (
 ) in the Tools panel.
In the options bar, select Black for the Fill color and No Color for the stroke.
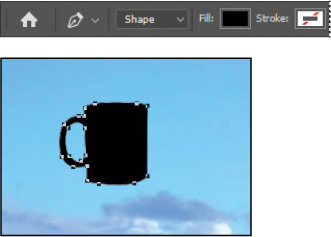
The coffee cup shape is now solid black.
Press Enter or Return to deselect the coffee cup path.
Subtracting shapes from a shape layer
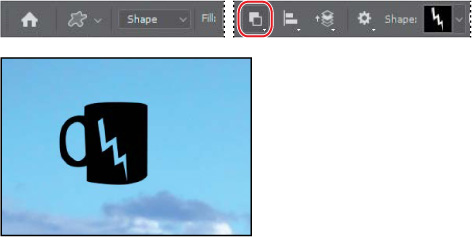
After you create a shape layer, you can subtract new shapes from it. You’ll add some interest to the coffee cup shape by subtracting a lightning bolt shape from it, allowing the background to show through.
In the Tools panel, select the Custom Shape tool.
In the Paths panel, select Coffee Cup Shape Path.
In the options bar, choose Subtract Front Shape from the Path Operations menu. The pointer now appears as cross-hairs with a small minus sign (
 ).
).Select the lightning bolt from the Custom Shape Picker (it’s in the second row). Position the pointer at the upper left corner of the black coffee cup.
Start at the upper left corner of the black coffee cup, and drag down to the bottom right.
Importing a Smart Object
Smart Objects are layers that you can edit in Photoshop nondestructively; that is, changes you make to the image remain editable and don’t affect the actual image pixels, which are preserved. Regardless of how often you scale, rotate, skew, or otherwise transform a Smart Object, it retains its sharp, precise edges.
You can import vector objects from Adobe Illustrator as Smart Objects. If you later edit the original object in Illustrator, the changes will be reflected in the placed Smart Object in your Photoshop image file.
When you place a file as a Smart Object, you can link it or embed it. If you link it, Photoshop remembers the folder path to the placed file so that you can easily update it by editing the original file, and it includes a preview image of the Smart Object in the Photoshop file. If you embed a Smart Object, Photoshop includes the entire object in the Photoshop file without storing the path to the original file. However, you can convert an embedded Smart Object to a linked Smart Object; this exports the embedded object as a linked file stored in a folder you choose.
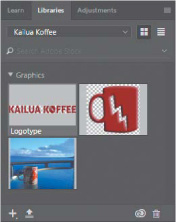
You’ll work with a Smart Object now by placing a Kailua Koffee logotype that was created in Illustrator.
Select the Move tool (
 ) in the Tools panel.
Select the Coffee Cup layer, and choose File > Place Linked. Select the Logotype.eps file in the Lesson08 folder, and click Place.
![]() Tip
Tip
You can place a file as a linked Smart Object by holding down Alt (Windows) or Option (Mac) as you drag and drop the file into a Photoshop document window.
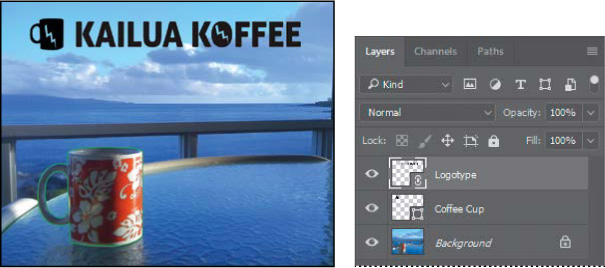
The Kailua Koffee logotype is added to the middle of the composition, inside a bounding box with adjustable handles. A new layer, Logotype, appears in the Layers panel.
Drag the logotype object to the upper left corner of the sign, just to the right of the coffee cup logo, and then drag a corner to make the text object larger—large enough that it fills the top portion of the image, as in the following illustration. When you’ve finished, confirm the transformation using any of the methods you have learned, such as clicking away from the layer.
![]() Note
Note
A placed file always imports with a transformation bounding box active, so that you can scale and position it. You must apply it even if you make no changes.
When you apply the transformation, the layer thumbnail icon changes to show a link icon, indicating that the Logotype layer is a linked Smart Object.
![]() Tip
Tip
When a linked Smart Object is selected in the Layers panel, you can see and adjust its options in the Properties panel, including the path to the linked file.
As with any shape layer or Smart Object, you can continue to edit its size and shape if you’d like. Simply select the layer, choose Edit > Free Transform to access the control handles, and drag to adjust them. Or, select the Move tool (![]() ), and select Show Transform Controls in the options bar. Then adjust the handles.
), and select Show Transform Controls in the options bar. Then adjust the handles.
Adding color and depth to a shape using layer styles
You created the shape with a black fill. Now you’ll make it snazzier by changing the fill color and adding a Bevel & Emboss effect.
With the Logotype layer selected, choose Color Overlay from the Add A Layer Style menu (
 ) at the bottom of the Layers panel.
In the Layer Style dialog box, choose a dark red or burgundy color.
Click Bevel & Emboss on the left side of the Layer Style dialog box to add another layer style. Accept the defaults for the Bevel & Emboss layer style, and click OK.
![]() Note
Note
Be sure to click the words “Bevel & Emboss.” If you click only the check box, Photoshop applies the layer style with its default settings, but you won’t see the options.
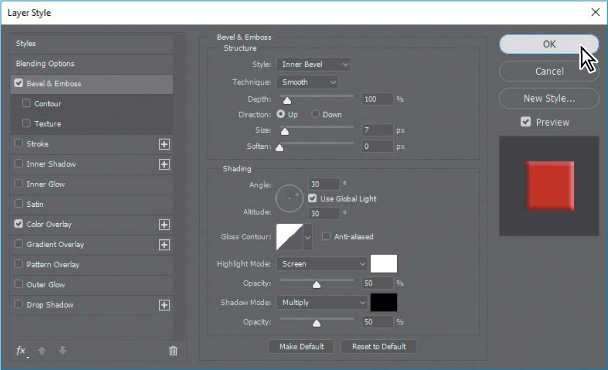
The Color Overlay and Bevel & Emboss layer styles affect the Logotype layer. You’ll copy them to the Coffee Cup layer.
Press Alt (Windows) or Option (Mac) as you drag the layer effects indicator (
 ) from the Logotype layer onto the Coffee Cup layer.
Clean up the Paths panel by deleting the Cup Outline path.
Choose File > Save to save your work. The coffee shop sign is complete.
Close the file.
Review questions
1 What is the difference between a bitmap image and a vector graphic?
2 How can you create a custom shape?
3 What tool can you use to move and resize paths and shapes?
4 What are vector Smart Objects, and what is the benefit of using them?
Review answers
1 Bitmap, or raster, images are based on a grid of pixels and are appropriate for continuous-tone images such as photographs or artwork created in painting programs. Vector graphics are made up of shapes based on mathematical expressions and are appropriate for illustrations, type, and drawings that require clear, smooth lines.
2 To create a custom shape, select a path, and then choose Edit > Define Custom Shape. Name the shape; it will appear in the Custom Shape Picker.
3 You use the Direct Selection tool to move, resize, and edit shapes. You can also modify and scale a selected shape or path by choosing Edit > Free Transform.
4 Vector Smart Objects are vector objects that you can place and edit in Photoshop without a loss of quality. Regardless of how often you scale, rotate, skew, or otherwise transform a vector Smart Object, it retains sharp, precise edges. A great benefit of using vector Smart Objects is that you can edit the original object in its original application, such as Illustrator, and the changes will be reflected in the placed Smart Object in your Photoshop image file.


