13 Preparing Files for the Web
PROJECT: MUSEUM WEBSITE
It’s often necessary to create separate images for buttons or other objects in a website. The Export As workflow makes it easy to save layers, layer groups, and artboards as separate image files.
Lesson overview
In this lesson, you’ll learn how to do the following:
Use the Frame tool to create a placeholder for a layout.
Create and stylize a button for a website.
Use layer groups and artboards.
Optimize design assets for the web.
Record an action to automate a series of steps.
Play an action to affect multiple images.
Save entire layouts and individual assets using Export As.
Design for multiple screen sizes with multiple artboards.
This lesson will take about an hour to complete. Please log in to your account on peachpit.com to download the lesson files for this chapter, or go to the Getting Started section at the beginning of this book and follow the instructions under “Accessing the Lesson Files and Web Edition.”
As you work on this lesson, you’ll preserve the start files. If you need to restore the start files, download them from your Account page.
Getting started
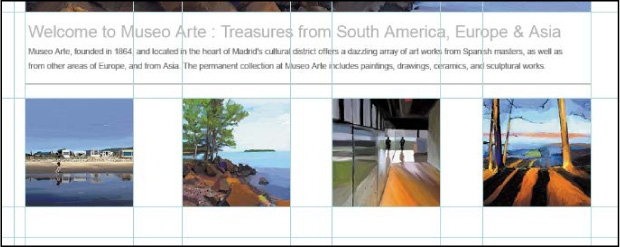
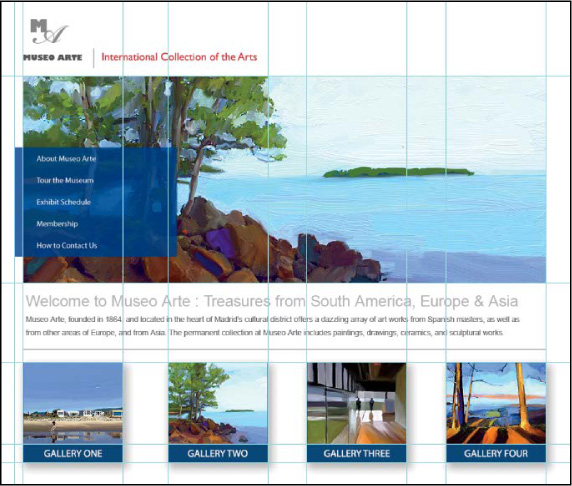
In this lesson, you will build buttons for the home page of an art museum’s website, and then generate appropriate graphics files for each button. You’ll use layer groups to assemble the buttons, and then create actions to prepare a set of images for use as a second group of buttons. First, you’ll view the final web design.
Start Photoshop, and then immediately hold down Ctrl+Alt+Shift (Windows) or Command+Option+Shift (Mac) to restore the default preferences. (See “Restoring Default Preferences” on page 5.)
When prompted, click Yes to delete the Adobe Photoshop Settings file.
Choose File > Browse In Bridge.
In Bridge, click Lessons in the Favorites panel. Double-click the Lesson13 folder in the Content panel.
View the 13End.psd file in Bridge.
![]() Note
Note
If Bridge isn’t installed, you’ll be prompted to install it when you choose Browse In Bridge. For more information, see page 3.
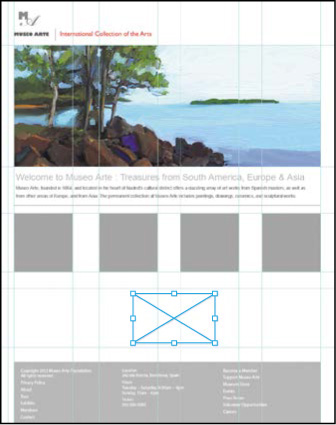
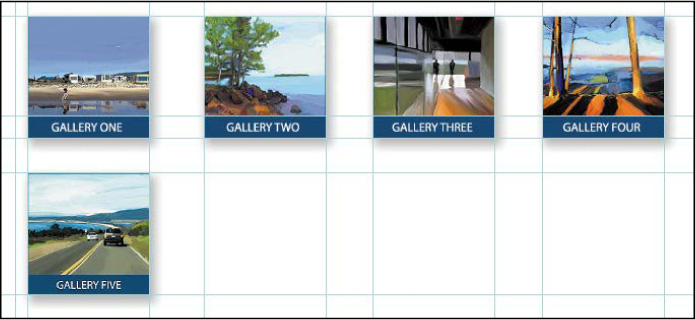
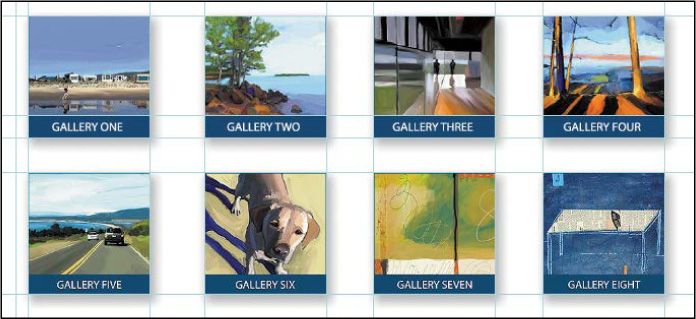
There are eight buttons at the bottom of the page, arranged in two rows. You’ll transform images into buttons for the top row, and use an action to prepare the buttons for the second row.
Double-click the 13Start.psd thumbnail to open the file in Photoshop. Click OK if you see the Missing Profile dialog box.

Choose File > Save As, rename the file 13Working.psd, and click Save. Click OK in the Photoshop Format Options dialog box.
Creating placeholders with the Frame tool
When you lay out objects for a print, web, or mobile device project, it’s common to design the layout before you have the final graphics for it. You could add temporary graphics that you plan to replace later with final graphics, but this requires additional file management. You can simplify the design process by creating placeholder shapes, called frames, during the early stages of design. As you refine the design and as final graphics become available, it’s easy to place graphics directly into a placeholder frame.
You create frames using the Frame tool. A frame can contain an imported graphic, Smart Object, or a pixel layer. When you create a frame, it appears in the Layers panel, because a frame is like a layer group with a vector mask.
The document 13Working.psd contains empty gray boxes. The gray boxes exist only to help you position new frames that you’ll create for this lesson. When you create your own designs, you can design using the Frame tool alone.
Choose Edit > Preferences > Units & Rulers (Windows) or Photoshop CC > Preferences > Units & Rulers (Mac). In the Units area of the dialog box, choose Pixels from the Rulers menu, and then click OK.
![]() Tip
Tip
A quick way to change the unit of measure is to right-click (Windows) or Control-click (Mac) the rulers.
You want to work in pixels because this document is intended to be a web page.
Choose Window > Info to open the Info panel.
![]() Tip
Tip
To customize the Info panel display of the color values under the pointer, click either of the eyedropper icons in the Info panel, and choose the display option you want.
The Info panel displays information dynamically as you move the pointer or make selections. Which information it displays depends on the tool that is selected. You’ll use it to determine the position of the ruler guide (based on the Y coordinate) and the size of an area you select (based on the width and height). It’s also very handy for seeing the values of colors under the pointer.
If the rulers aren’t visible, choose View > Rulers.
![]() Tip
Tip
The keyboard shortcut for showing or hiding rulers is Ctrl+R (Windows) or Command+R (Mac).
Adding a frame
Frames are easy to add, because you create them in the same way you’d create a shape such as a rectangle or circle.
In the Tools panel, select the Frame tool (
 ).
).Drag to create a rectangular frame over the large gray rectangle at the top of the document.
![]() Tip
Tip
You can create an elliptical or circular frame by selecting the Elliptical Frame icon in the options bar for the Frame tool.
![]() Tip
Tip
To create a frame of any shape, such as a star, first draw the shape using the Pen tool or a shape tool. Then, with the shape layer selected in the Layers panel, choose Layer > New > Convert to Frame.
The frame appears as a rectangle with an X inside it. The X indicates that it’s not just a vector shape, but a placeholder frame. As a placeholder, it’s ready to contain a graphic at any time.
Adding a graphic to a frame
When you finalize the images and other graphics that go into a document, you can add them to the placeholder frames you’ve created.
In the Layers panel, make sure the Frame 1 layer is still selected.
Choose File > Place Linked.
Navigate to the Lesson13/Art folder, select the NorthShore.jpg file, and click Place.

The JPEG image you selected appears inside the selected frame, and is automatically sized to fit the frame.
You can also drag an image from Bridge or the desktop and drop it into a frame in a Photoshop document window; this embeds the image. To link the image, hold down Alt or Option while dragging it into Photoshop.
Editing frame attributes with the Properties panel
When a frame is selected in the Layers panel, you can see and edit frame attributes in the Properties panel. You can take advantage of this to change a frame after you create it.
With the Frame tool, draw a rectangle frame between the row of four gray squares and the bottom of the document. The exact size and position isn’t important, because you’re about to edit it.
With the frame selected, enter the following values in the Properties panel:
Width: 180
Height: 180
X: 40
Y: 648
![]() Tip
Tip
As in the Control panel, you can change the unit of measure in a Properties panel field by right-clicking (Windows) or Control-clicking (Mac) the field. Or you can override a field’s unit of measure by typing the unit after the value; for example, 4 in.
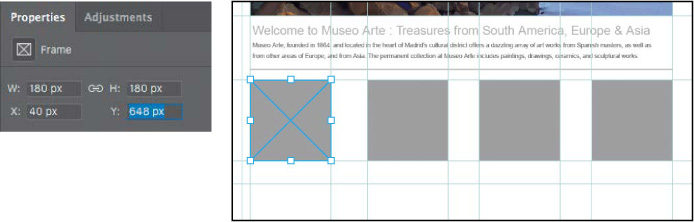
After you apply all of the values, the size and position of the frame should now match the first gray square.
Duplicating frames
The other three squares in the row are the same size, so instead of drawing all four squares manually, you can simply duplicate them. Duplicating a frame is similar to duplicating a layer, because frames appear in the Layers panel.
In the Layers panel, drag the Frame 1 layer, and drop it on the Create a New Layer button (
 ). The duplicate layer, Frame 1 Copy, appears in the Layers panel.
With the Frame 1 Copy layer selected, in the Properties panel change the X value to 300: This makes the duplicate square frame line up with the second gray square.
Repeat step 2 to create two more duplicate frames. In the Properties panel, change the X value of the third frame to 550 and the X value of the fourth frame to 800.
You’ve created a complete row of four placeholder frames.

Adding images to frames
When graphics become available to use in the layout, you can quickly add them to each frame. One convenient way is by using the Properties panel.
Make sure the first square frame is selected.
In the Properties panel, click the Inset Image menu, and choose Place from Local Disk - Linked.
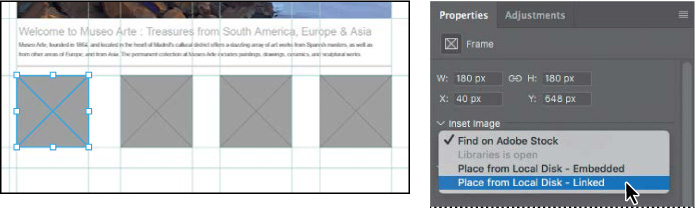
Navigate to the Lesson13/Art folder, select the Beach.jpg file, and click Place.
The Beach.jpg file is scaled to fit the frame, the name of the frame changes to Beach Frame, and the folder path to the placed document is displayed in the Properties panel.

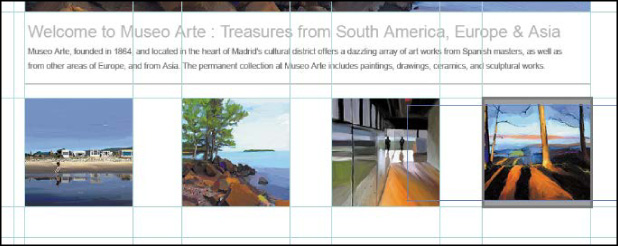
Repeat step 3 for the other three square frames, placing the files NorthShore.jpg, DeYoung.jpg, and MaineOne.jpg. Remember that you can also add a linked image to a frame by Alt-dragging (Windows) or Option-dragging (Mac) an image from the desktop and dropping it into a frame.
In the Layers panel, click to select the frame layer thumbnail (the right thumbnail with the link icon) of the MainOne Frame layer. This selects just the contents of the frame. (Clicking the left thumbnail would select the frame.)
Choose Edit > Free Transform, and as needed, drag the image or its corner handles to improve the composition of the image within the frame.
![]() Tip
Tip
If you want to select just the frame, click the frame edge with the Move tool. This works best when there aren’t nearby objects or guides that might become selected instead.
![]() Note
Note
If you can’t select a frame or its contents with the Move tool, make sure Auto-Select Layer is enabled in the options bar when the Move tool is selected. When Auto-Select Layer is not enabled, you must click the thumbnail of the frame or the contents in the Layers panel.
After adding graphics to frames, it’s always a good idea to inspect all of the frames to make sure the graphics are well-composed within them. Feel free to adjust any of the other images within their frames.
Using layer groups to create button graphics
Layer groups make it easier to organize and work with layers in complex images, especially when there are sets of layers that work together. You’ll use layer groups to assemble the layers that make up each button, and they’ll come in handy when you export assets later.
The four frames you created now serve as the basis for buttons. You’ll add a label to each, identifying the gallery it represents, and then add a drop shadow and a stroke.
Choose Window > Info to open the Info panel, if it isn’t already open.
Position the pointer over the horizontal ruler, and drag a ruler guide down until the Y value in the Info panel is 795 pixels.
![]() Tip
Tip
If you have trouble positioning the horizontal ruler guide precisely, zoom in.

You’ll use this guide to draw a band across the bottom of the image for the label.
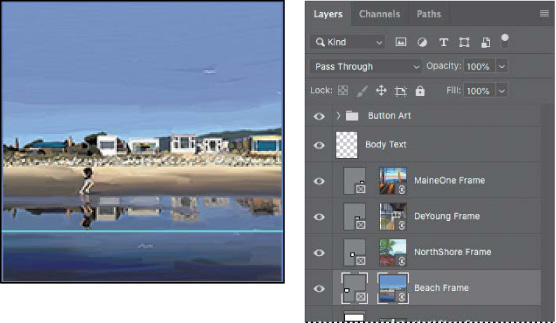
Zoom in on the first square image, of the man on the beach. Then select Beach Frame in the Layers panel.
You’ll use this image to design the first button.
Click the New Layer button (
) at the bottom of the Layers panel. The new layer is named Layer 2 and appears directly above the Beach Frame layer. Rename it band.Select the Rectangular Marquee tool (
 ) in the Tools panel. Then, drag a selection across the bottom of the image, as indicated by the guides. The selection should be 180 pixels wide and 33 pixels high. Make sure the selection lines up with the frame along the sides and bottom.
Choose Edit > Fill. In the Fill dialog box, choose Color from the Contents menu, and then, in the Color Picker, select a dark blue (R=25, G=72, B=121). Click OK to close the Color Picker, and then click OK to close the Fill dialog box and apply the fill.
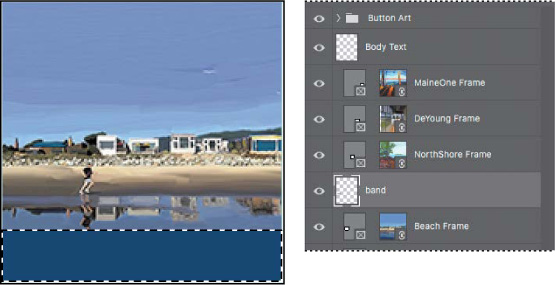
A dark blue band appears at the bottom of the image, where you made your selection. You’ll add text to it next.
Choose Select > Deselect.
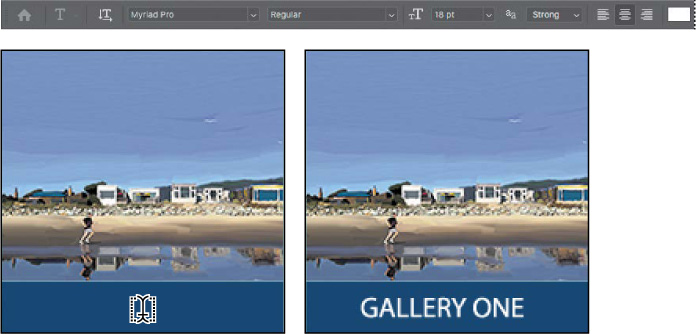
Select the Horizontal Type tool, and select the following settings in the options bar:
Font Family: Myriad Pro
Font Style: Regular
Font Size: 18 pt
Anti-aliasing: Strong
Alignment: Center
Color: White
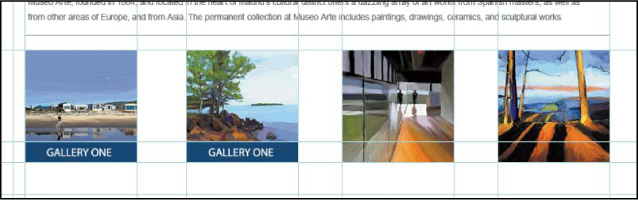
Click in the center of the blue band, and type GALLERY ONE. Use the Move tool to adjust the position of the type layer if necessary.
 Note
NoteIn some versions of Photoshop CC 2019, a new text layer may be created with left alignment even if you specified another alignment before clicking the Horizontal Type tool. You can fix this by applying center alignment after the text layer is created.
Select the GALLERY ONE and band layers in the Layers panel, and choose Layer > Group Layers.
![]() Tip
Tip
The keyboard shortcut for creating a layer group out of selected layers is Ctrl+G (Windows) or Command+G (Mac).
Photoshop creates a group named Group 1.
Double-click the Group 1 layer group, and rename it Gallery 1. Then expand the group. The layers you selected are indented, indicating they’re part of that group.
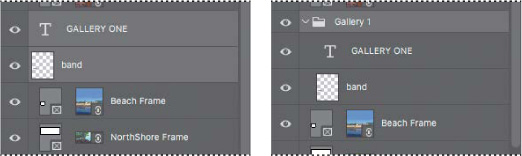
Drag the Gallery 1 layer group up so that it’s above all of the frame layers.
Choose File > Save.
Duplicating button bands and text
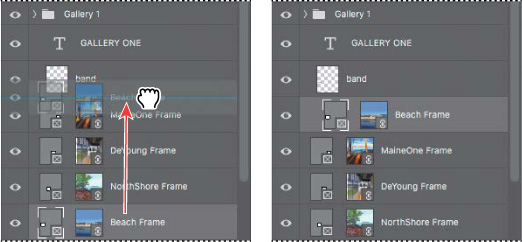
You’ve designed the label for one button. You could go through all those steps again to create the band and text for each of the other buttons, but it will be faster to duplicate the layer group you created for the first band and text, and then edit the copies as needed.
In the Layers panel, make sure the Gallery 1 layer group is selected.
With the Move tool selected, make sure Auto-Select is not selected in the options bar.

With the Move tool, hold down the Alt (Windows) or Option (Mac) key as you drag the Gallery One button to the right, and drop it when it snaps into alignment with the second square frame and its guides.
Holding down Alt or Option creates a copy of the selected layer group as you drag it with the Move tool. When you release the mouse button, the copy (Gallery 1 copy) should be selected in the Layers panel.
Repeat step 2 by Alt-dragging (Windows) or Option-dragging (Mac) a copy of the second button over the third square frame, and then do it one more time to copy the third button over the fourth square frame, completing the row.
Now edit the text in the three copies to match their images.
With the Horizontal Text tool, select the ONE text in the second button, and change ONE so that it now says GALLERY TWO.

Repeat step 5 for the third and fourth buttons so that they say GALLERY THREE and GALLERY FOUR, respectively.
After you finish editing the GALLERY FOUR text, commit the last text edit by selecting the Move tool.
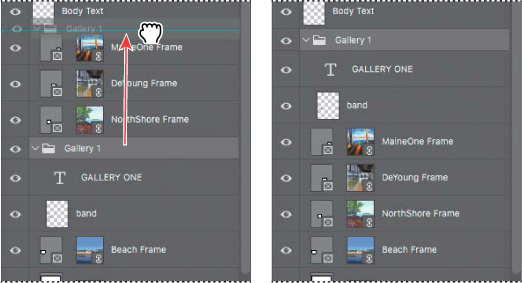
In the Layers panel, rename the layer groups to be consistent with their contents:
Double-click the name of the “Gallery 1 copy” layer group, and name it Gallery 2.
Double-click the name of the “Gallery 1 copy 2” layer group, and name it Gallery 3.
Double-click the name of the “Gallery 1 copy 3” layer group, and name it Gallery 4.
![]() Tip
Tip
These steps are easier if you make the Layers panel taller, so that you can see multiple expanded layer groups at once.
Now move each button image into its layer group.
![]() Note
Note
When dragging layers in step 9, position the pointer over the layer name, not the thumbnails, before dragging.
In the Layers panel, do the following:
Drag the Beach Frame layer into the Gallery 1 layer group, below the GALLERY ONE and band layers.
Drag the upper NorthShore Frame layer into the Gallery 2 layer group, below the GALLERY TWO and band layers.
Drag the DeYoung Frame layer into the Gallery 3 layer group, below the GALLERY THREE and band layers.
Drag the MaineOne Frame layer into the Gallery 4 layer group, below the GALLERY FOUR and band layers.
Click the arrow next to each of the Gallery layer group icons to collapse them, simplifying the Layers panel display.

Now you’ll add a drop shadow and stroke to improve the appearance of the button.
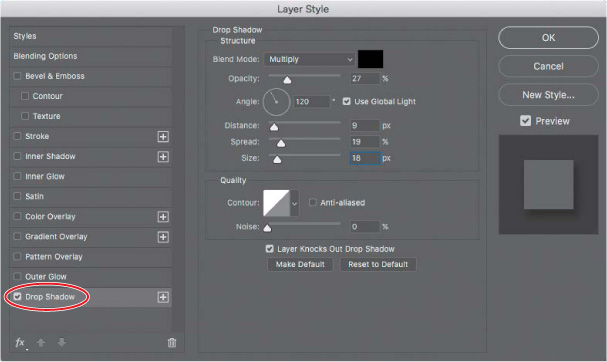
Select the Gallery 1 layer group in the Layers panel. Then, click the Add Layer Style button (
 ) at the bottom of the Layers panel, and choose Drop Shadow.
In the Layer Style dialog box, change the following settings in the Structure area:
Opacity: 27%
Distance: 9 px
Spread: 19%
Size: 18 px
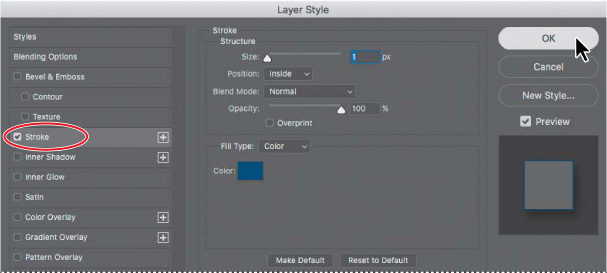
With the Layer Style dialog box still open, select Stroke on the left, making sure that it’s enabled, and apply the following settings:
Size: 1 px
Position: Inside
Color: Click the color swatch to open the Color Picker. Then click the blue band to sample its color, and click OK to select it.
Click OK to apply both layer styles.
![]() Note
Note
Be sure to click the word Stroke. If you click only the check box, Photoshop applies the layer style with its default settings, but you won’t see the options.
The drop shadow and stroke appear on the button’s layer group in the document, and also in the Layers panel.
In the Layers panel, position the pointer over the fx icon next to the Gallery 1 layer group. Then hold down the Alt (Windows) or Option (Mac) key as you drag the fx icon and drop it on the Gallery 2 layer group. This is a quick way to copy layer effects to another layer or layer group.
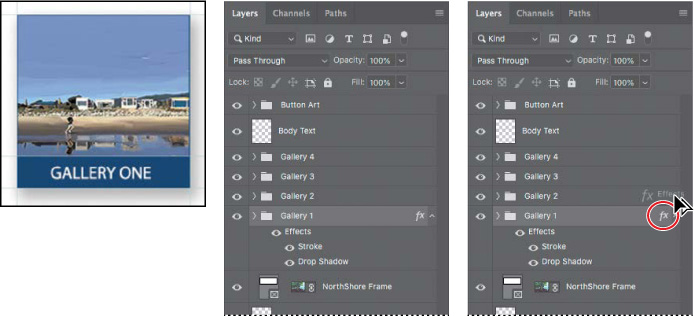
Repeat step 15 to copy the layer effects to the Gallery 3 and Gallery 4 layer groups.
In the Layers panel, expand the Button Art layer group, and then click the eye icon for the Navigation layer to make it visible. Then collapse the Button Art layer group.
This layer represents the navigation among sections of the museum website.
Save the file, and then close it.
Automating a multistep task
![]() Tip
Tip
You can create conditional actions that change their behavior based on criteria you define.
An action is a set of one or more commands that you record and then play back to apply to a single file or a batch of files. In this exercise, you’ll create an action to prepare a set of images to serve as buttons for additional galleries on the web page you’re designing.
Recording an action
You’ll start by recording an action that resizes an image, changes its canvas size, and adds layer styles, so that the additional buttons match the ones you’ve already created. You use the Actions panel to record, play, edit, and delete individual actions. You also use the Actions panel to save and load action files.
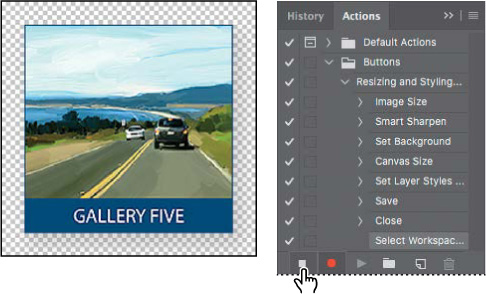
There are four images in the Buttons folder that will serve as the basis for new gallery buttons on your website. The images are large, so the first thing you’ll need to do is resize them to match the existing buttons. You’ll perform each of the steps on the Gallery5.jpg file as you record the action. You’ll then play the action to make the same changes on the other images in the folder automatically.
Choose File > Open, and navigate to the Lesson13/Buttons folder. Double-click the Gallery5.jpg file to open it in Photoshop.
Choose Window > Actions to open the Actions panel. Close the Default Actions set (folder); you’ll create and use your own set for this lesson.
Click the Create New Set button (
 ) at the bottom of the Actions panel. In the New Set dialog box, name the set Buttons, and click OK.
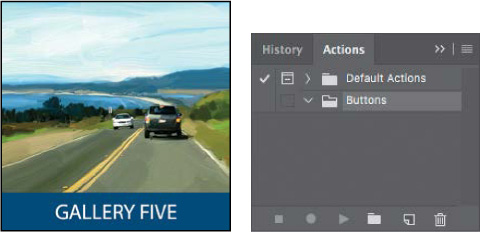
Photoshop comes with several prerecorded actions, all in the Default Actions set. You can use action sets to organize your actions so that it’s easier to find the one you want.
Click the Create New Action button (
) at the bottom of the Actions panel. Name the action Resizing and Styling Images, and click Record.
It’s a good idea to name actions in a way that makes it clear what the actions do, so you can find them easily later.
At the bottom of the Actions panel, the Begin Recording button turns red to let you know that recording is in progress.

Don’t let the fact that you’re recording rush you. Take all the time you need to perform the procedure accurately. Actions don’t record in real time; they record steps as you complete them, but they play them back as quickly as possible.
You’ll start by resizing and sharpening the image.
Choose Image > Image Size, and do the following:
Make sure Resample is selected.
For Width, choose Pixels from the units menu, and then change the Width to 180.
Confirm that the Height has changed to 180 pixels. It should, because original proportions are preserved using the Constrain Aspect Ratio link icon to the left of the Width and Height values, which is selected by default.
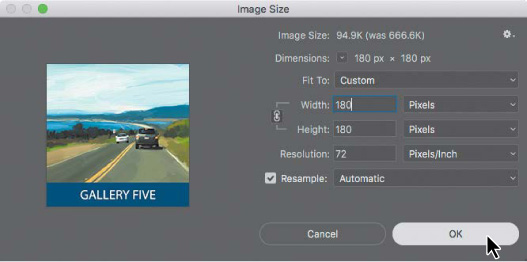
Click OK.
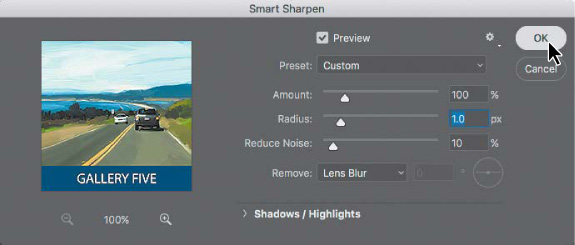
Choose Filter > Sharpen > Smart Sharpen, apply the following settings, and click OK:
Amount: 100%
Radius: 1.0 px
You need to make some additional changes to the image that you can’t make as long as the Background layer is locked. You’ll convert it to a regular layer.
Double-click the Background layer name in the Layers panel. In the New Layer dialog box, name the layer Button, and click OK.
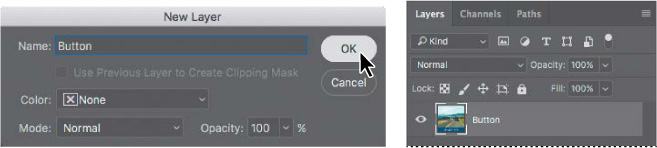
When you rename a Background layer, you’re converting it to a regular layer, so Photoshop displays the New Layer dialog box. But no layers are added; the Background layer becomes the new layer.
![]() Tip
Tip
If you want to convert a background layer to a regular layer and you don’t need to name it, simply click the Background layer’s lock icon in the Layers panel.
![]() Tip
Tip
Use Canvas Size when you want to add area to or remove area from a document; use Image Size when you want to resample, change the physical dimensions, or change the resolution of a document.
Now that you’ve converted the Background layer, you can change the canvas size and add layer styles.
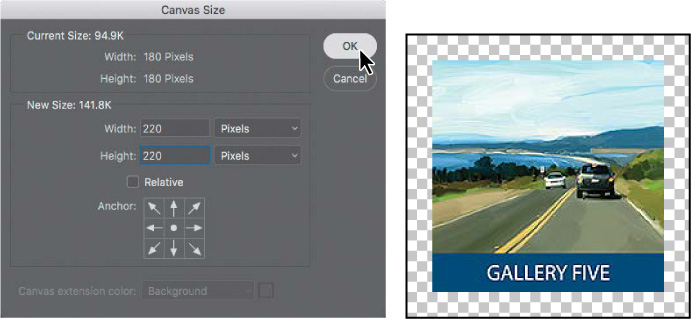
Choose Image > Canvas Size, and do the following:
Make sure the unit of measure is set to Pixels.
Change the Width to 220 pixels and the Height to 220 pixels.
Click the center square in the anchor area to ensure the canvas is extended evenly on all sides.
Click OK.
Choose Layer > Layer Style > Drop Shadow.
In the Layer Style dialog box, apply the following settings:
Opacity: 27%
Angle: 120°
Distance: 9 px
Spread: 19%
Size: 18 px

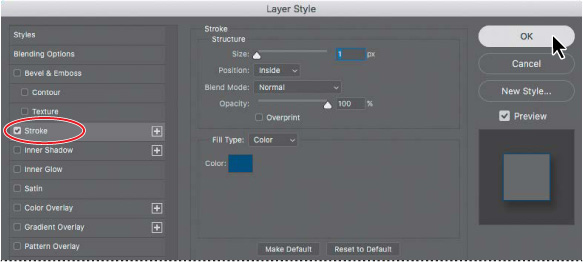
With the Layer Style dialog box still open, select Stroke on the left, and apply the following settings:
Size: 1 px
Position: Inside
Color: If the color swatch doesn’t already match the other blue band you made, click the color swatch and sample the blue band as you did earlier.
NoteBe sure to click the word Stroke. If you click only the check box, Photoshop applies the layer style with its default settings, but you won’t see the options.
Click OK to apply both layer styles.
Choose File > Save As, choose Photoshop for the Format, and click Save. Click OK if the Photoshop Format Options dialog box appears.
Close the file. The Start workspace appears, so click the Back button at the top left corner of the Start workspace (to the left of the Photoshop icon) so that you can see the Actions panel again.

Click the Stop Recording button at the bottom of the Actions panel.
![]() Tip
Tip
As you review an action, you can edit the sequence by dragging steps, edit steps by double-clicking them (if applicable), or remove unneeded steps by deleting them.
The action you just recorded (Resizing and Styling Images) is now saved in the Buttons set in the Actions panel. Click the arrows to expand different sets of steps. You can examine each recorded step and the specific selections you made.
Batch-playing an action
Applying actions is a timesaving process for performing routine tasks on files, but you can streamline your work even further by applying actions to multiple files at once. You’ll apply the action you’ve created to the three remaining images.
Choose File > Open, and navigate to the Lesson13/Buttons folder. Ctrl-select (Windows) or Command-select (Mac) the Gallery6.jpg, Gallery7.jpg, and Gallery8.jpg files, and click Open.
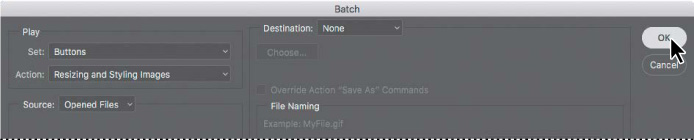
Choose File > Automate > Batch.
In the Batch dialog box, do the following:
Confirm that Buttons is chosen in the Set menu and Resizing and Styling Images—the action you just created—is chosen in the Action menu.
Choose Opened Files from the Source menu.
Make sure None is chosen for the Destination.
Click OK.
![]() Note
Note
If you get an error when running an action, click Stop. There may be a problem with the action that was recorded, especially if you had to correct a mistake while recording. Try troubleshooting or re-recording the action.
Photoshop plays the action, applying its steps to all the files that are open. You can also apply an action to an entire folder of images without opening them.
Because you saved the file and closed it while you were recording the action, Photoshop saves each of the images as a PSD file in its original folder, and then closes the file. After Photoshop closes the last file, Photoshop displays the Start workspace.
Placing files in Photoshop
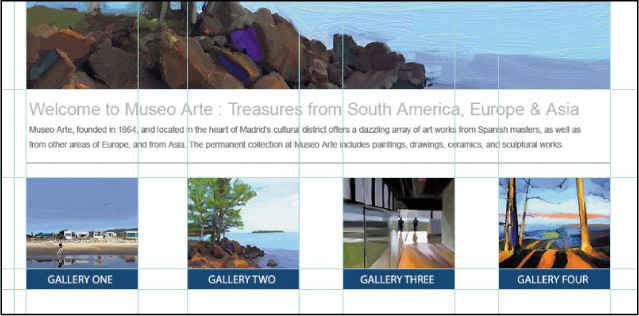
The four additional button images are ready to be placed into the design. You probably noticed that each already has a blue band with its gallery name included in the image, so you don’t need to perform those steps. They’re ready to go.
If the file 13Working.psd is in the Recent list in the Start workspace, click its name to reopen it. If not, choose File > Open to open it.
In the Layers panel, select a layer group name or the Logo layer. This ensures that the files about to be placed are not added inside any layer groups, because new layers are added above the selected layer.
Choose File > Place Embedded.
You’ll place these files as embedded Smart Objects. Because they’re embedded, the entire image is copied into the Photoshop file.
In the Place Embedded dialog box, navigate to the Lesson13/Buttons folder, and double-click the Gallery5.psd file.
Photoshop places the Gallery5.psd file in the center of the 13Working.psd file. But that’s not where you want it to go, so you’ll move it.
Drag the image into position below the Gallery One button. Use the guides to align the image with the one above. When it’s in position, commit the change by pressing Enter or Return, or by clicking outside the image.
NoteThe bounding box of the placed image is larger than the button, because the bounding box includes the complete extent of the drop shadow.
Repeat steps 3–5 to place the Gallery6.psd, Gallery7.psd, and Gallery8.psd files so that they line up below the Gallery Two, Gallery Three, and Gallery Four buttons.
 Tip
TipYou can also place embedded files by dragging them into the Photoshop document from the desktop or from other applications. You can drag multiple images to place at once; after you commit one image the next will be placed.
Close the file and save your work.
Designing with artboards
![]() Tip
Tip
If you need advanced control over how layers are exported for web and mobile user interfaces, you may be interested in Adobe Generator. When Adobe Generator is on, Photoshop automatically exports and optimizes layers based on how the layers are named.
When you’re designing websites or user interfaces for mobile devices, you may need to create separate image files for buttons and other content. In Photoshop, you can use the Export As feature to export an entire document or individual layers to web- and mobile-friendly formats including PNG, JPEG, GIF, or SVG. In addition to being able to export multiple layers to individual files at once, Export As makes it possible to export to multiple sizes at once if you need to produce sets of images for low- and high-resolution displays.
You may need to coordinate different ideas for a single design, or design variations for different display sizes. This is easier when you use artboards, which are like multiple canvases in a single Photoshop document. You can also use Export As to export entire artboards.
![]() Tip
Tip
You may notice or have been taught to use the older Save for Web command in Photoshop. Although that command is still available under File > Export > Save for Web (Legacy), Save for Web can’t export multiple layers, artboards, or resolutions, while Export As can.
With Export As, you control what gets exported by selecting artboards or layers in the Layers panel.
Duplicating an artboard
You’ll use artboards to adapt the design of the museum website for a different screen size. Later, you’ll export both designs at once.
In the Photoshop Start workspace, click Open. Navigate to the Lesson13 folder, and open the file 13Museo.psd.

Choose File > Save As, rename the file 13Museo_Working.psd, and click Save. Click OK in the Photoshop Format Options dialog box.
This is a web page that’s being adapted for a responsive web design so that it will work well on display sizes from desktops to smartphones.
Choose Select > All Layers.
Choose Layer > New > Artboard From Layers, name the new artboard Desktop, and click OK. The artboard name appears above the new artboard, and also on its new artboard group in the Layers panel.
Make sure the Artboard tool (
 ) is selected; it’s grouped with the Move tool in the Tools panel. Then Alt/Option-click the Add Artboard button to the right of the artboard to duplicate both the Desktop artboard and its contents.
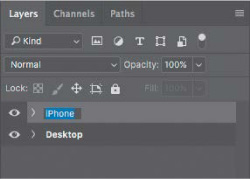
In the Layers panel, double-click the name of the Desktop Copy duplicate artboard, and name it iPhone.
In the Properties panel, click the Set Artboard to Preset menu, and choose iPhone 6. That artboard preset applies the pixel dimensions of an iPhone 6, iPhone 7, and iPhone 8 (750 pixels wide by 1334 pixels tall). Now you can develop a design for that iPhone size, using the elements of the Desktop design. It will also be easier to maintain design consistency, since both the desktop and mobile designs are in the same document.
Save your work.
![]() Tip
Tip
You can choose artboard presets from the Size menu in the options bar when the Artboard tool is selected.
Creating a design variation with artboards
You now have different artboards for desktop and smartphone display sizes; the next task is to fit the desktop-sized objects within the width of the smartphone display’s pixel dimensions.
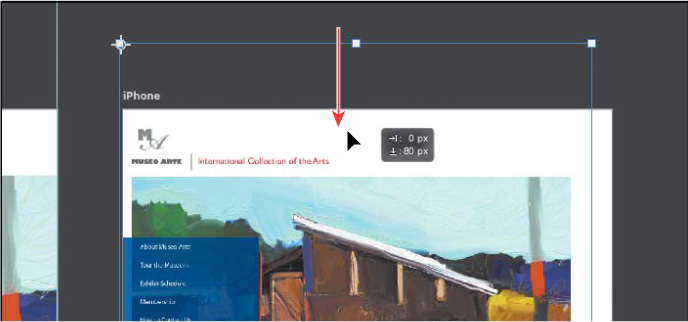
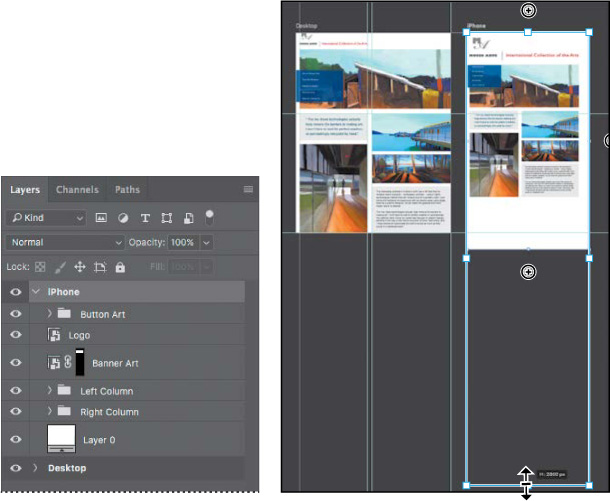
In the Layers panel, expand the iPhone artboard, and Shift-select the first and last layers in that artboard only. Don’t select the artboard name itself.

Choose Edit > Free Transform.
In the options bar, do the following:
Click the Toggle Reference Point checkbox to select it; this makes the reference point visible in the transformation bounding box, and makes it possible for you to reposition the reference point.
Select the top left square of the reference point location option. Scaling, rotating, or other transformations will now be performed from the top left corner of the bounding box (instead of the center) until the transformation is committed.
Make sure the Maintain Aspect Ratio button (the link icon) is selected, so that the selected layers will scale proportionally.
Enter 726px for Width.

TipYou can position the reference point anywhere inside or outside the transformation bounding box by dragging it.
Press Enter or Return to apply the new settings. (Press Enter or Return only once, to apply the value in the options bar. If you press Enter or Return a second time it will commit the transformation.)
Those settings proportionally scale the selected layers to 726 pixels wide, from the top left corner of the selection, to better fit the artboard.
Position the pointer inside the Free Transform bounding box, and then Shift-drag the selected layers down until you can see the entire Museo Arts logo at the top of the page.
Press Enter or Return to exit Free Transform mode, and choose Select > Deselect Layers.
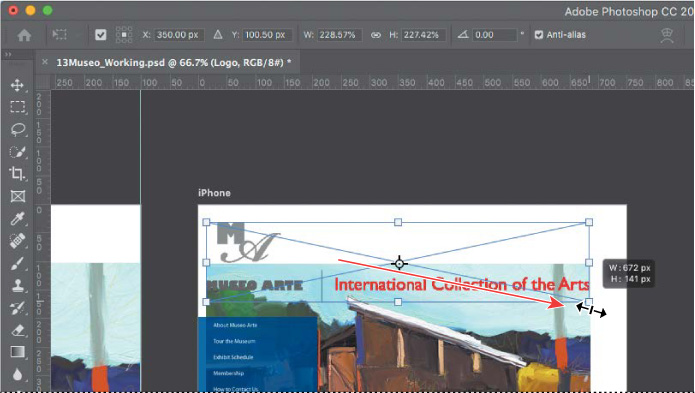
In the Layers panel, select the Logo layer, and choose Edit > Free Transform.
Drag the bottom right handle on the Free Transform bounding box until the transformation values next to the pointer indicate that the logo is 672 pixels wide, matching the width of the other elements. Then press Enter or Return. This width makes the logo more readable on a smartphone screen.
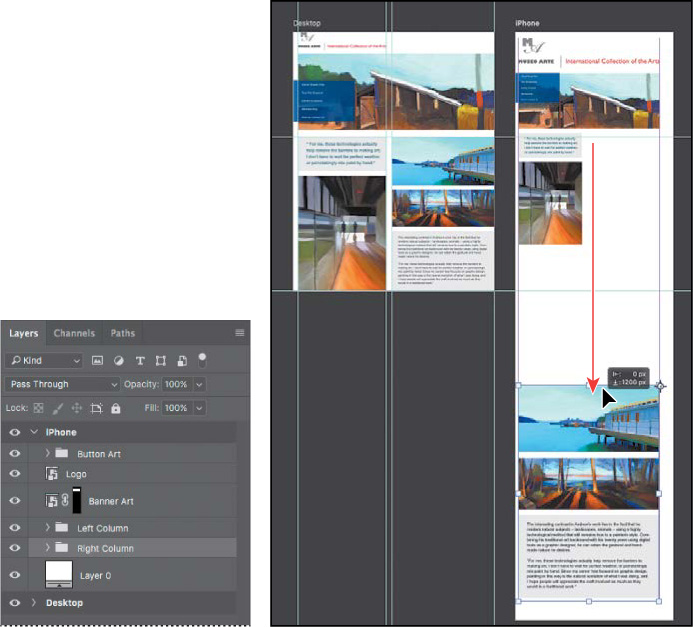
In the Layers panel, select the Banner Art, Left Column, and Right Column layers.
With the Move tool, Shift-drag the selected layers down until the top is even with the top of the blue button stack on the left.

Now you’ll take the two-column layout and make each column fill the width of the artboard. But first you’ll need to accommodate them by making the artboard taller.
Select the iPhone artboard in the Layers panel, and then, with the Artboard tool, drag the bottom handle of the iPhone artboard until the transformation values next to the pointer indicate that it’s 2800 px tall.
TipYou can also change the height of an artboard by entering a new Height in the Properties panel when an artboard is selected.
NoteOnce you start using artboards, resize them only using the Artboard tool. The Image > Image Size and Image > Canvas Size commands work best with a Photoshop document that doesn’t use artboards.
Select the Right Column layer group in the Layers panel, and then choose Edit > Free Transform.
In the options bar, do the following:
Make sure the Toggle Reference Point checkbox is selected, and then select the top right square of the reference point location option.
Make sure the Maintain Aspect Ratio (link) button is selected, and enter 672px for Width.
Press Enter or Return to apply the new width.

Position the pointer inside the Free Transform bounding box, and then Shift-drag the selected layer group down until the transformation values next to the pointer indicate a vertical move of 1200 px (the Y value in the options bar should say about 1680 px when the top right square of the reference point locator is selected). Press Enter or Return to commit and exit the transformation.
Select the Left Column layer group in the Layers panel, and then choose Edit > Free Transform.
In the options bar, do the following:
Make sure the Toggle Reference Point checkbox is selected, and then select the top left square of the reference point location option.
Make sure the Maintain Aspect Ratio (link) button is selected, and enter 672px for Width.
Press Enter or Return to apply the new width.
Then press Enter or Return to commit and exit the transformation.

![]() Tip
Tip
To nudge selected layers or layer groups when the Move tool is active, press the arrow keys. When Free Transform is active, you can also nudge by clicking in a number field and pressing the up arrow or down arrow key.
Feel free to adjust the positioning and the vertical spacing among the layer groups and layers.
Choose View > Fit on Screen to see both artboards at once, and then save your work.

You’ve adapted a desktop-sized multi-column web page layout for a single-column smartphone-sized layout, and both layouts exist on two artboards in one Photoshop document.
Exporting artboards with Export As
When it’s time to have a client review your designs, you can use the Export As command to easily export any artboard, layer, or layer group into its own file. You’ll export the complete desktop and smartphone artboards, and then you’ll export the layers of each artboard to their own folder.
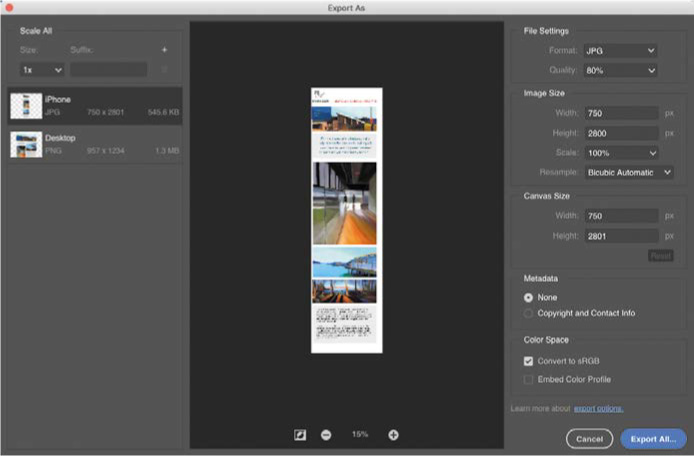
Choose File > Export > Export As. This command exports each whole artboard, so you see each artboard in the list on the left side of the Export As dialog box.
![]() Note
Note
The Export As dialog box doesn’t preview multiple Scale All options. Artboards are previewed at 1x.
You can preview the exported dimensions and file size of each item; the preview is determined by the settings on the right side of the Export As dialog box.
![]() Tip
Tip
If you frequently use the Export As command with the same settings, choose File > Export > Export Preferences, and specify the settings you use the most. Now you can export to those settings in one step by choosing File > Export > Quick Export As, or choosing Quick Export As from the Layers panel menu.
In the list on the left, click the iPhone artboard to select it, and then set the Export As options to the following:
In the Scale All section, make sure Size is set to 1x and the Suffix field is empty.
In the File Settings section, choose JPG from the Format menu, and enter 80% for Quality.
In the Color Space section, select Convert to sRGB.
Other settings can be left at defaults.
In the list on the left, click the Desktop artboard to select it, and apply the same settings as in step 2.
Click Export All, navigate to the Lesson13 folder, double-click the Assets folder, and then click Save or Open.
Switch to the desktop or Bridge, and open the Assets folder in the Lesson13 folder to see the Desktop.jpg and iPhone.jpg files representing each artboard. The filenames are based on the artboard names. You can send those files off for client review.
Switch back to Photoshop.
Exporting layers as assets with Export As
![]() Tip
Tip
The File > Export > Export As command exports entire artboards. If you want to export specific layers, select them in the Layers panel and choose Export As from the Layers panel menu, not the File menu. Exporting selected layers is useful for updating parts of a design.
If the client approves the design, you can then use Export As to create assets for each layer on each artboard, such as images or buttons. Those assets can be used by a web or application developer who executes the design in code.
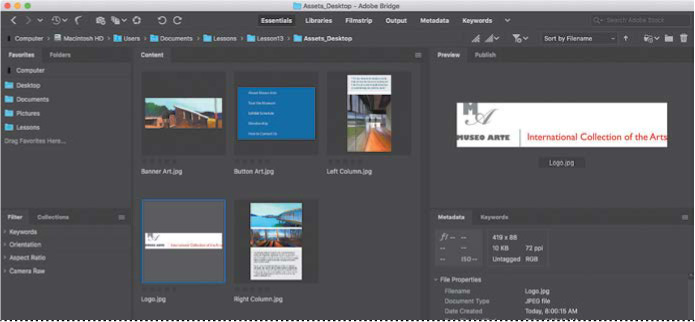
In the Layers panel, Shift-select all layers of the Desktop artboard.
In the Layers panel menu, choose Export As. (Do not choose File > Export As.)

Notice that in the Export As dialog box, each layer is listed separately, because they will export separately.
In the Export As dialog box, use the same settings as you did in step 2 of the previous section (on page 340).
Click Export All, navigate to the Assets_Desktop folder in the Lesson13 folder, and click Select Folder or Save.
You have exported all assets for the Desktop artboard into a single folder.
Repeat steps 1–3 for the iPhone artboard.
Click Export All, navigate to the Assets_iPhone folder in the Lesson13 folder, and click Export.
In Photoshop, choose File > Browse in Bridge.
Navigate to the Assets_Desktop folder in the Lesson13 folder, and inspect the images by browsing each folder with the Preview panel open. If you want, you can also inspect the assets you exported to the Assets_iPhone folder.
![]() Tip
Tip
If a developer asks for assets at multiple scale factors (for Retina/HiDPI display resolutions), in the Export As dialog box click the plus button in the Scale All section to add and specify additional scale factors (Size) such as 2x or 3x. Those will be exported at the same time. Be sure to specify the proper option in the Suffix field for each scale factor.
Each layer you exported is in its own file. Just by using the Export As command, you’ve created JPG images of complete artboards for two different display sizes, as well as assets for the individual layers of each artboard.
In Photoshop, save your changes, and close the document.
Review questions
1 What is a layer group?
2 What is an action? How do you create one?
3 How can you create assets from layers and layer groups in Photoshop?
Review answers
1 A layer group is a group of layers. Layer groups make it easier to organize and work with layers in complex images, especially when there are sets of layers that work together.
2 An action is a set of one or more commands that you record and then play back to apply to a single file or a batch of files. To create one, click the Create New Action button in the Actions panel, name the action, and click Record. Then perform the tasks you want to include in your action. When you’ve finished, click the Stop Recording button at the bottom of the Actions panel.
3 Use the Export As command to create assets from layers and layer groups in Photoshop. Create images of each whole artboard by choosing File > Export > Export As, or, to create assets from selected layers and layer groups, choose Export As from the Layers panel menu.