
Chapter 11
Precision Edges with Vector Paths
IN THIS CHAPTER
![]() Understanding vector artwork
Understanding vector artwork
![]() Creating objects with shapes
Creating objects with shapes
![]() Making a new path
Making a new path
![]() Changing the shape of an existing path
Changing the shape of an existing path
![]() Editing the shapes of type characters
Editing the shapes of type characters
Most of the images with which you work in Photoshop — digital photos and scanned artwork, layers on which you paint, and filled selections — are created with pixels. There’s also another type of artwork: vector art, which you create by defining a path (an outline) and adding color within and along that path. That path has a very precise edge, enabling vectors (when printed appropriately) to give you very crisp, clean lines in your artwork.
Typically, vector art consists of specific elements (objects) that are uniform in color (although vector art can also include gradients and patterns). You might have, for example, a red triangle, a blue square, and a green circle as your logo (boring!). These three solid-color objects are best defined as vector artwork. Vectors, however, are not appropriate for photographic images and other such imagery that include subtle transitions among colors.
In Photoshop, you have tools that create predefined shapes, you have tools that create freeform shapes, and you have tools to edit the paths that define those shapes. You also have a shape picker and a bunch of menu commands. You can even bring in artwork from Adobe Illustrator and create your own shapes, too. After reading this chapter, you’ll have a solid understanding of all these bits and pieces. I even tell you where to find dozens, or even hundreds, of custom shapes already on your computer — absolutely free!
Pixels, Paths, and You
The vast majority of the artwork with which you work (or play) in Photoshop is raster artwork. Raster imagery consists of uniformly sized squares of color (pixels), placed in rows and columns (the raster). Digital photos, scanned images, and just about anything that you put on a layer in Photoshop consists of pixels. When you edit the image, you’re changing the color of the individual pixels, sometimes in subtle ways and sometimes in dramatic ways.
Vector artwork is a horse of another color. Rather than pixels, vector art consists of a mathematically defined path to which you add color. In Photoshop, as in Adobe Illustrator, the path produces the shape of the object, and you can add color both along the path (stroke) and within the path (fill) to make the shape become an object.
Figure 11-1 shows a fine example of vector artwork. Observe that each element in the image consists of a single color. Each section of the image is easily identifiable as an individual object, consisting of a specific color. (Remember, though, that vector objects can be filled with gradients rather than color.)

FIGURE 11-1: Each element in vector art has a single specific color.
Each element in the artwork is defined by its path, which consists of a number of path segments. In Figure 11-2, you see the path that defines the tongue. (You read about the anatomy of a path later in this chapter, in the section “Understanding paths.”)

FIGURE 11-2: Paths define the outline of an object — the snake’s tongue, in this case.
 When artwork is defined by pixels, the little square corners of the individual pixels can be noticeable along curves and diagonal lines. With vector artwork, the path is sharp and the edges are well defined. However, to truly get the best appearance from vector art or vector type, the artwork must be printed to a PostScript-capable device, such as a laser printer. PostScript is a page-description language that takes advantage of the mathematical descriptions of vector art. When you print to an inkjet printer, the vector art is converted to pixels. If you print to such a non-PostScript device, use a high image resolution for best output — 300 pixels per inch (ppi) is usually good. If you know you’ll be outputting to a non-PostScript device, before you start creating shapes, go to Photoshop’s Preferences ⇒ Tools and make sure to select Snap Vector Tools and Transformation to Pixel Grid.
A vector path can be scaled (changed in size) almost infinitely without losing its appearance. A vector logo can be used for both a business card and a billboard without loss of quality because the path is mathematically scaled before the stroke or fill is added. Raster art, on the other hand, can be severely degraded by such scaling. For a simple demonstration of the difference between scaling rasterized text and scaling Photoshop’s vector type, see Figure 11-3.

FIGURE 11-3: Using text as an example shows the advantage of vector artwork when scaling.
Easy Vectors: Using Shapes
If you made it through the preceding section, you’re officially an expert on the theory of vector graphics. It’s time to see how you can actually create these little devils in your artwork. The easiest way to create a shape in Photoshop is with the aptly named shape tools, which automatically create a vector shape that you can stroke with a solid, dashed, or dotted line, and fill with color, a gradient, or a pattern. Could you have it any easier? Just drag a tool and create a vector-based object!
Your basic shape tools
Rectangles, rectangles with rounded corners (rounded rectangles), circles and ovals, multisided polygons, straight lines and arrows, and a whole boatload of special custom shapes are all at your command with a simple click-drag. Select the appropriate tool in the Toolbox, select the desired options on the Options bar, and click-drag to create your object. (The various shape tools are nested in the Toolbox, as shown in Figure 11-4.) Sounds simple, right? It is — no tricks. Here are some additional features to make things even easier for you:
- Use the Shift key. Pressing the Shift key (both Mac and Windows) while you drag constrains proportions (maintains the width-to-height ratio). With the Shift key, the Rectangle tool creates squares; the Ellipse tool creates circles; the Polygon tool creates proportional polygons; the Line tool creates horizontal or vertical lines (or lines at 45° angles). When using custom shapes, pressing the Shift key ensures that the shape retains the width-to-height ratio with which it was originally defined.
- Use the Option (Mac) or Alt (Windows) key. The Option/Alt key creates the object centered on the point at which you click. Without the Option/Alt key, the object is created in whichever direction you drag.
- Use the Shift and Option/Alt key. Pressing Shift and Option/Alt together creates a proportionally constrained object, centered on the point at which you click.
- Click the shape tool. If you click rather than drag, you’ll open a small dialog box that allows you to enter precise dimensions for your new shape. Click OK and the shape is created to the lower right of (or centered on) the point where you clicked. The dialog box for the Rectangle tool is visible in Figure 11-4.
- Use the spacebar. While you’re dragging a shape, keep the mouse button down and press the spacebar. You can then drag to reposition the object while you create it. Still keeping the mouse button down, release the spacebar and finish dragging the object.
- Check the Options bar. When you switch from shape tool to shape tool, the Options bar changes to fit your needs. For example, with the Rounded Rectangle tool active, you choose the radius of the rounded corners. The Polygon tool offers a simple field in which you choose the number of sides for the shape. When you’re using the Line tool, choose the thickness (weight) of the line on the Options bar. Click the Gear button to the left of the Weight field on the Options bar to add arrowheads to the lines.
- Change the layer content. With a shape layer selected in the Layers panel, select any shape tool and change the shape’s attributes on the Options bar. You can easily change (or remove) both the fill and the stroke.
- Edit the vector path. As you can see later in this chapter (in the section “Adding, deleting, and moving anchor points”), you can use the Direct Selection tool to change the course of the path, customizing the appearance of the shape.
- Create work paths or pixel-filled shapes. Using the three options in the menu to the left on the Options bar, you can elect to create shapes, work paths (temporary paths used to make selections or masks), or add pixels in the selected shape to your currently active layer.

FIGURE 11-4: The shape tools are collected in one spot in Photoshop’s Toolbox.
You can easily spot a shape layer in the Layers panel — especially when the default layer name starts with the word Shape. (You can, of course, change the layer name by double-clicking it in the Layers panel.) You can see in the Layers panel shown in Figure 11-5 that the shape layer thumbnail includes the shape badge in the lower-right corner. When a shape layer is selected in the Layers panel, that shape’s path is visible in the Paths panel.

FIGURE 11-5: Dragging a shape tool creates both a shape layer and the path that defines the shape.
The Custom Shape tool
Although the basic shape tools are great for circles and squares and lines and arrows, you’ll probably get the most use out of the Custom Shape tool. With this tool selected, you click the triangle to the right of the sample shape on the Options bar to open the Custom Shape picker, as shown in Figure 11-6. The Custom Shape picker offers a number of ready-to-use shapes. When you click the triangle in the upper-right corner, you can choose from a variety of other sets of shapes listed at the bottom of the Custom Shape picker menu. Also on the Options bar, click the Fill field and the Stroke field to open their options, and the More Options button enables you to customize the stroke.

FIGURE 11-6: The Fill and Stroke options are available for all shape-creation tools.
When you select a set of custom shapes from the menu (or use the Load Shapes command to add a set of shapes not in the menu), you are asked whether you want to add the new shapes to the current content of the Custom Shape picker (Append), replace the current shapes (OK), or not add the shapes after all (Cancel). When you select All from the Custom Shape picker menu and click OK, you’ll load over 300 custom shapes, ranging from signs and symbols to animals and cartoon talk balloons.
Note to the far right of the Options bar the check box for Align Edges. Using that option ensures that the edges of your vector shapes align to the pixel grid and print more precisely when using a non-PostScript printer (such as an inkjet printer).
More custom shapes — free!
The custom shapes already available in Photoshop cover a wide range, but they might not fill all your needs. You can purchase commercial collections of custom shapes from a couple of sources. You can create custom paths and define shapes from them, too. But you’ve already got bunches of custom shapes on your computer, just waiting for you to use them. Select Photoshop’s Type tool and take a look in your Font menu. Check out the fonts already there with names like Wingdings, Webdings, Symbol, and MT Extra. (Your font list may vary.) These are all examples of symbol fonts, which are fonts that have shapes and symbols rather than letters and numbers. Many more typical fonts also have special characters available when you use the Shift key, the Option/Alt key, and the Shift key in combination with the Option/Alt key.
Here’s how you can define a custom shape from a symbol:
-
Choose File ⇒ New to open a new document.
The document can be virtually any size and can be either grayscale or color.
-
Select the Type tool and pick a font.
With the Type tool active, choose a symbol font from either the Options bar or the Character panel. The font size doesn’t matter much because you’re creating a vector-based shape that you can easily scale. The foreground color doesn’t matter either because shape tools rely on the foreground color active at the time you create the shape.
-
Type a single symbol and then end the editing session.
Click the check mark button to the right on the Options bar, switch tools in the Toolbox, or press ⌘ +Return (Mac) or Ctrl+Enter (Windows) to end the editing session. (The symbol visible in Figure 11-7 can be produced by pressing the V key when using the Webdings font.)
-
Convert the type character to a shape layer.
With the type layer active in the Layers panel, choose Type ⇒ Convert to Shape.
-
Define a custom shape.
Choose Edit ⇒ Define Custom Shape, give your new shape a name in the Shape Name dialog box (shown in Figure 11-7), and save it. Your new shape is added to the Custom Shape picker, ready to use.

FIGURE 11-7: Name your new shape and click OK.
 Later in this chapter, after you master using the Pen tool, remember this section. You can also define a custom shape from paths that you create with the Pen tool — any shape at all!
 Remember that your custom shapes aren’t truly saved until you use the Custom Shape picker menu command Save Shapes (to save all the shapes in the picker as a single set) or the Edit ⇒ Presets ⇒ Preset Manager command (to save a set of selected shapes). In the Preset Manager dialog box, ⌘ +click/Ctrl+click each custom shape and then click the Save Set button to save them as a set. (See Figure 11-8.) Until you take this step, the shapes exist only in Photoshop’s Preferences file. If the Preferences become corrupt, you could lose all your custom shapes. This holds true, too, for custom brushes, layer styles, swatches, and the like — use the Preset Manager to save all your custom items.

FIGURE 11-8: Use the Preset Manager to save sets of your custom shapes.
When saving custom shapes (or layer styles or brushes or any of your other custom bits and pieces) with the Preset Manager, save them in a folder outside the Photoshop folder. That prevents accidental loss should you ever need to (gasp!) reinstall Photoshop. Figure 11-8 shows one possible folder structure for saving and organizing your custom bits and pieces.
When you installed Photoshop, you were offered the option of migrating presets from earlier versions of the program. If you did not do so then, you can add those older presets to Photoshop’s new Presets folders by choosing Edit ⇒ Presets ⇒ Migrate Presets.
Changing the appearance of the shape layer
After you use any one of the numerous shape tools in the Photoshop arsenal to add a shape layer to your artwork, you have a number of ways that you can enhance, adjust, and simply change its appearance:
- Add a layer style. Layer styles, such as bevels, glows, and shadows (applied through the Layer ⇒ Layer Style menu), can certainly spice up a shape layer. Compare, for example, the pair of shapes in Figure 11-9. (Layer styles are presented in Chapter 12.) By working with blending modes and opacity, you can combine a Gradient Overlay or a Pattern Overlay effect with a shape’s gradient or pattern (or color) fill.
- Change the layer content. As with any shape, you can use a shape tool’s Options bar to make changes to fill, stroke, and other custom shape attributes.
- Edit the path shape. Click a path with the Direct Selection tool and drag to change the path’s shape. (This is discussed in more detail later in this chapter.)
- Change the layer blending mode or opacity. By default, your shape layer’s blending mode is Normal, and the Opacity is set to 100%. Your shape layer blocks and hides the content of every layer below. By changing the blending mode or opacity, you can make your shape layer interact with the layers below in interesting ways. Experiment with different blending modes to find one that suits your artistic vision. (Blending modes are covered in more detail in Chapter 10.)

FIGURE 11-9: A simple layer style makes your shape jump off the page.
Simulating a multicolor shape layer
Shapes can be filled with a single solid color, a gradient, or a pattern. Sometimes, however, you’re better served with a multicolor shape. Take a look at Figure 11-10 and compare the pair of shapes to the left with the same shapes to the right.

FIGURE 11-10: Dressing up the shapes can make a world of difference.
In addition to the layer styles applied, layer masks hide parts of the more elaborate pair of shapes on the right. A layer mask determines what areas of the layer are visible. You can use layer masks with shapes, as you can see for three of the four layers in Figure 11-11.

FIGURE 11-11: Layer masks determine layer visibility.
Comparing the shapes’ color in the left thumbnail in the Layers panel to the artwork helps you identify what you see in Figure 11-11:
- Shape 1 copy: This is the top layer and would normally hide everything on the layers below. The shape, as you can tell from the left thumbnail in the Layers panel, is green. The thumbnail to the right is the layer mask. By painting with black in the layer mask, you can hide parts of the layer. In this case, only the left part of the shape is visible.
- Shape 2 copy: You can see that the shape is an entire pair of gray scissors. The thumbnail to the right shows that most of the layer is hidden by a layer mask, leaving only the blades of the scissors shape visible.
- Shape 2: This layer requires no layer mask for the artwork. The shape layer just above hides what would be black scissors blades.
- Shape 1: The layers above partially hide the red shape layer. Notice how, because of the order of the layers in the Layers panel, the blades of the scissors appear to be in front of the red part of the object and behind the green part of the object.
Adding a layer mask to your shape is as easy as clicking the Add Layer Mask button at the bottom of the Layers panel (third button from the left) and then painting with black to hide, white to show, and gray to partially hide. You can also make a selection in your image and use the Layer ⇒ Layer Mask menu commands. You can add layer masks to any layer except those named Background. (You can’t have transparent areas on a background layer, but you can convert it to a regular layer by clicking the Lock icon to the right of the layer name in the Layers panel.)
Using Your Pen Tool to Create Paths
Even with all the custom shapes available, you might need to create a path that’s unique to a specific image. For that, Photoshop offers the Pen tool and its associated tools. Before you start creating paths willy-nilly, you can probably benefit from a little bit of background information about paths.
Understanding paths
As you click and click-drag, you place anchor points, which connect the path segments that create your path. Path segments can be straight or curved. You control those curves not with diet and exercise but rather with direction lines and control points. A straight path segment is bordered on either end by corner anchor points, and a curved path segment is bordered by two smooth anchor points or one of each type. As shown in Figure 11-12, Photoshop helps you differentiate between path segments and direction lines by using squares (hollow and filled) for anchor points and diamond shapes for control points.

FIGURE 11-12: Paths have square anchor points and diamond-shaped control points.
Only smooth anchor points have direction lines and control points. The angle and length of the direction line determine the shape of the curve. When you create a curved path segment between a corner anchor point and a smooth anchor point, only the smooth point’s direction lines adjust the curve. When you create a curved path segment between two smooth anchor points, both points’ direction lines affect the curve.
Here’s another important way to classify paths in Photoshop:
- An open path has two distinct and visible endpoints; think of it as a pencil line or piece of string.
- A closed path has no beginning or end — like a circle or an unbroken rubber band.
When you use a shape tool, you’re creating closed paths. When you click-click-click with the Pen tool, you create an open path — unless, that is, your final click is back on the very first anchor point.
 At long last (and many years of begging and pleading), you can now change the thickness and color of a path! Simply click the Gear button on a pen tool’s Options bar and set the color and thickness you desire to make your path more visible.
Clicking and dragging your way down the path of knowledge
All that theory about how paths work is fine, but you’ll get a better understanding by playing around with the Pen tool. Open a new document (any size, resolution, and color mode will do) and select the Pen tool. On the Options bar, click the menu to the left (as shown in Figure 11-13) and select Path so that the tool creates work paths rather than shapes, and then start clicking around. Randomly click in various places in the image, adding new straight path segments as you go.

FIGURE 11-13: Use the menu to the left on the Options bar to determine whether the Pen tool creates a shape or a work path.
The third option in the menu, Pixels, is used only with Shape tools.
I’m sure Picasso would be proud, but it’s time to let go of your new artwork and move on — press Delete (Mac) or Backspace (Windows) twice. The first time deletes the most recent anchor point; the second time deletes the rest of the path.
Now, in that same canvas, start click-dragging to create curved path segments. Watch how the distance and direction in which you drag control the segment’s curve. Just because it’s fun, try a click-drag and, with the mouse button held down, move the mouse around and around in a circle. “Path Jump Rope!” Press Delete/Backspace twice to delete the path.
Now, to get a feel for how to control your curved path segments, follow these steps:
- Choose File ⇒ New to open a new document.
-
Click Web at the top of the panel, choose 1024x768, and click Create.
A reasonable size to work with, it fits on your screen at 100% zoom.
-
Show the Grid.
Press ⌘ +’ (apostrophe; Mac) or Ctrl+ ’ (apostrophe; Windows) to show the Grid in the image. The Grid makes it easier to control the Pen tool as you drag. You can also show the Grid by choosing View ⇒ Show ⇒ Grid. In Photoshop’s Preferences ⇒ Guides, Grid & Slices, the Grid shown in Figure 11-14 is set to Gridline every: 1 inch and Subdivisions: 6.
- Select the Pen tool in the Toolbox.
-
Click and click-drag as shown in Figure 11-14.
Don’t worry about precision — you won’t be creating a work of art this time. Click the dots in numeric order; where you see a dashed line, click-drag in that direction for approximately that distance.
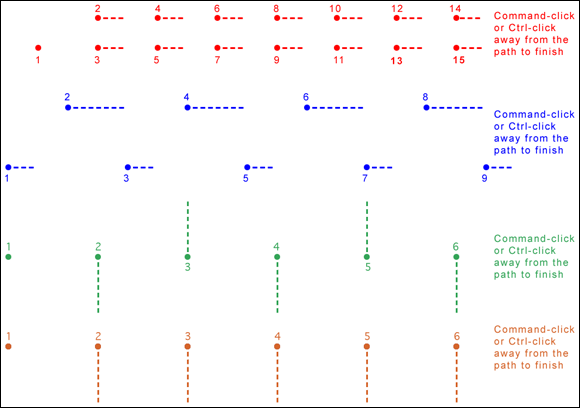
FIGURE 11-14: You don’t need to be precise; just more or less follow the four patterns.
You’ve just created four of the more useful scallops and curve sets! These sorts of paths can be used in a variety of ways, including stroking, filling, and creating selections (all of which I discuss later in this chapter) to create decorative borders and artistic elements in your images.
You should know about a couple of other features of the Pen tools before you move on. With the Freeform Pen tool active, take a look at the Options bar (or look at Figure 11-15, which shows the Options bar).

FIGURE 11-15: The Pen tool has a couple of tricks up its sleeve!
With a path active in the Paths panel, the Pen tool’s Options bar enables you to load the path as a selection and create a layer mask. (A Background layer is automatically converted to a layer that supports transparency.) You can also create a shape from the path. Note, too, that when the Freeform Pen tool is active, the Options bar offers a Magnetic option — more on that option in a bit.
When you have the Freeform Pen tool selected in the Toolbox you can click and drag around your image, creating a path as you go. It’s much like painting with the Brush tool or drawing lines with the Pencil tool — wherever you drag the tool, the path is created. When you need to make a path (or selection) around the outside of something of uniform color in your image, using the Magnetic option forces the path to look for and follow edges. Take a look at Figure 11-16, which shows an example of an appropriate use for the Freeform Pen and the Magnetic option.

FIGURE 11-16: Tracing around an object that contrasts with the background is simple when using the Freeform Pen with the Magnetic option.
Photoshop has another pen tool, one you may never need. The new Curvature Pen tool functions much like the Pen tool with which you’re already familiar. There are a couple of differences. By default, the Curvature Pen tool assumes you want to create a curved path segment, so you click, move the cursor, click, move the mouse, and click a third time, and a curved path appears through the three anchor points. If you need a corner anchor point, double-click or Option/Alt+click. Press the Escape key to finish a path. You can click and drag an anchor point to move it (no need for ⌘ /Control as you would with the Pen tool).
A closer look at the Paths panel
You can save, duplicate, convert, stroke, and delete paths via the Paths panel (which, like all panels, you can show and hide through the Window menu). You can even create a path from a selection by using the Paths panel. Without the Paths panel, your paths have no meaning or future and probably won’t get into a good university or even a good collage (pun intended).
Pick a path, any path
The Paths panel can hold as many paths as you could possibly want to add to your artwork. You can also see the seven buttons across the bottom of the panel that you use to quickly and easily work with your paths. You can classify paths in five different ways, as shown in Figure 11-17.

FIGURE 11-17: The Paths panel is your key to organizing and controlling vectors in your artwork.
You might not use them all, but it’s good to know the five types of paths:
- Unsaved Path: As you create a path, Photoshop generates a temporary work path. You can have multiple paths in a single work path. They are even preserved when you save and close your artwork. However, it’s usually best to double-click the Work Path name and give your path a meaningful name.
- Clipping Path: Clipping paths are used primarily with some page layout programs, such as QuarkXPress. Much like how a vector path determines what parts of the layer are visible, a clipping path identifies what part of the image as a whole is visible. You won’t need a clipping path when you work with Adobe InDesign — simply create your artwork on a transparent background and place that Photoshop file into an InDesign document. To create a clipping path, first make your path, give it a name in the Paths panel, and then use the Paths panel menu command Clipping Path.
- Saved Path: Much like working in the Layers panel, you can double-click the name of any path and rename it in the Paths panel.
- Shape Path: When a shape is active in the Layers panel, its path is visible in the Paths panel. If you want to customize a shape’s path, you need to make the layer active first. When a shape path is visible, you can drag it to the New Path button at the bottom of the panel to create a duplicate. (It’s the second button from the right.)
- Layer Vector Mask: When a regular layer has a vector mask assigned and that layer is visible in the Layers panel, the layer’s mask path is visible in the Paths panel.
When creating a clipping path, leave the Flatness field completely empty unless your print shop specifically instructs you to use a specific value. The Flatness value overrides the output device’s native setting for reproducing curves. Using the wrong value can lead to disastrous (and expensive!) mistakes.
To activate a path in the Paths panel, click it. You can then see and edit the path in the image window. With the exception of shape layer and vector mask paths, the paths in the Paths panel are independent of any layer. You could create a path with the Background layer active and then later use that path as the basis for some artwork on, for example, Layer 3.
You can Shift+click (or ⌘ +click/Control+click) multiple paths to select more than one. You might then use the Path Selection tool to move all of the paths at the same time or perhaps scale them uniformly by choosing Edit ⇒ Transform Path ⇒ Scale.
The Paths panel buttons
The seven buttons across the bottom of the Paths panel (refer to Figure 11-17) do more than just simple panel housekeeping. Use them to create artwork from a path and to convert back and forth between paths and selections.
- Fill Path: Click a path in the Paths panel and then use this button to fill the area inside the path on the active layer with the foreground color. If you fill an open path (a path with two distinct endpoints), Photoshop pretends that there’s a straight path segment between the endpoints. If a shape layer or a type layer is selected in the Layers panel, the Fill Path button isn’t available. You can see filled (and stroked) paths in Figure 11-18.
- Stroke Path: Click a path in the Paths panel and then click this button to add a band of the foreground color along the course of the path. Most often, you can think of it as painting the path itself with the Brush tool. If you have a different brush-using tool active in the Toolbox (Clone Stamp, Healing Brush, Dodge, Burn, Eraser, and so on), the path is stroked with that tool. Like a fill, a stroke is added to the currently active layer in the Layers panel. (Strokes are added to shapes on the Options bar.) Take a look at Figure 11-18 to see how stroking and filling can be used in combination with each other.
- Selection from Path: When you have a path selected in the Paths panel, you click this button, and voilà! An instant — and very precise — selection is at your disposal. You can create a selection from any path. If you want to add feathering while making the selection, use the Paths panel menu command Make Selection rather than clicking the Selection from Path button.
- Path from Selection: You can create a work path from any selection simply by clicking this button. If the path isn’t as accurate as you’d like, or if it’s too complex because it’s trying to follow the corner of every pixel, use the Paths panel menu command Make Work Path and adjust the Tolerance setting to suit your needs.
- Vector Mask from Path: If the layer active in the Layers panel supports transparency and you have a saved or work path selected, you can add a vector layer mask to the layer.
- New Path: You’ll likely use this button primarily to duplicate an existing path. Drag any path to the button, and a copy is instantly available in the Paths panel. When you click this button, you’re not creating (or replacing) a work path but rather starting a new saved path.
- Delete Path: In the Paths panel, drag a path to the Delete Path button or click the path and then click the button. Either way, the path is eliminated from the panel and from your artwork.

FIGURE 11-18: Think about whether you want to stroke first (left) or fill first (right).
The order in which you stroke and fill a path can make a huge difference in the appearance of your artwork. The stroke is centered on the path, half inside and half outside. The fill extends throughout the interior of the path. If you stroke a path and then add a fill, the fill covers that part of your stroke that’s inside the path. As you can see in Figure 11-18, that’s not always a bad thing.
Rather than using the buttons at the bottom of the Paths panel to fill and stroke, you can also use the Paths panel menu commands Fill Path and Stroke Path. The commands open dialog boxes that offer more options than simply using the current foreground color. When using the Stroke Path command, you can choose from any of the brush-using tools, which enables you to, for example, very precisely dodge, burn, or clone along a path you create. When using Fill Path, you can add color or a pattern within the path, or fill to a designated state in the History panel.
Sometimes the easiest and fastest way to create a complex path is to make a selection and convert the selection to a path. You might, for example, click once with the Magic Wand and then click the Path from Selection button at the bottom of the Paths panel.
When using the Shape tools to create shapes (rather than paths), you should use the Fill and Stroke features on the Options bar. If you later edit the shape, the fill and stroke conform to the shape’s new path. Using the Fill and Stroke options in the Paths panel with paths (rather than shapes) results in pixels added to the active layer. If you later change the path shape, the fill and stroke don’t change with the new path shape.
Customizing Any Path
Photoshop gives you a lot of control over your paths, not just when creating them, but afterward as well. After a path is created, you can edit the path itself. While the path is active in the Paths panel, the Edit ⇒ Transform Path commands are available, giving you control over size, rotation, perspective, skewing, and even distortion. But there’s also much finer control at your fingertips. You can adjust anchor points, change curved path segments, add or delete anchor points, and even combine multiple paths into compound paths, in which one path cuts a hole in another. (Think donut.)
Adding, deleting, and moving anchor points
Photoshop provides you with a number of tools with which to edit paths, although you might never use a couple of them. Consider, for example, the Add Anchor Point and Delete Anchor Point tools shown in Figure 11-15. Now take a look at the Option bar’s Auto Add/Delete option. With the Pen tool active, you automatically switch to the Delete Anchor Point tool when over an anchor point, and automatically switch to the Add Anchor Point tool when the cursor is over a path segment. Smart tool, eh? The Convert Point tool, on the other hand, can be invaluable … or valuable, at least. Click a smooth anchor point to convert it to a corner anchor point. You can also click-drag a corner anchor point to convert it to a smooth point.
Nested in the Toolbox with the Path Selection tool (which you use to select and drag a path in its entirety), the Direct Selection tool lets you alter individual path segments, individual anchor points, and even the individual direction lines that control curved path segments. (When you click a shape with the Direct Selection tool, the Options bar can also be used to change the shape’s attributes, including fill, stroke, and size.)
When you click an anchor point with the Direct Selection tool, you can drag it into a new position, altering the shape of the path. If it’s a smooth anchor point, clicking it with the Direct Selection tool makes the point’s direction lines visible (as well as those of immediately neighboring smooth anchor points). When manipulating paths, the Direct Selection tool follows a few simple rules of behavior (which you can see illustrated by pairs of “before” and “after” paths in Figure 11-19):
- Drag a path segment. Drag a path segment with two corner anchor points, and you drag those points along with you. If the path segment has one or two smooth points, you drag the segment (reshaping the curve), but the anchor points remain firmly in place. Note in Figure 11-19 (upper left) that when you drag a curved path segment, the adjoining direction lines change length, but they retain their original angles.
- Drag a corner anchor point. Click a corner anchor point and drag, and the Direct Selection tool pulls the two adjoining path segments along with it. As you can see in Figure 11-19 (upper center), the other two anchor points (and the path segment between them) are unchanged.
- Drag a smooth anchor point. When you drag a smooth anchor point, all four of the direction lines associated with the path segments on either side retain both their lengths and their angles. The direction lines don’t change; only the curved path segments connected at the smooth anchor point are altered. In Figure 11-19 (upper right), the path continues to flow smoothly through the anchor point, even as the point moves.
- Drag a smooth point’s direction line. Dragging a direction line changes the curves on either side of the anchor point so that the path still flows smoothly through the point. (Remember that you click the control point at the end of a direction line to drag it.) Figure 11-19 (lower left) illustrates how the path segments on either side of the smooth point adjust as the direction line is changed. However, paths don’t always flow smoothly through a smooth anchor point — not if you use the following trick!
- Option+drag/Alt+drag a direction line. Hold down the Option/Alt key and drag a smooth anchor point’s direction line, and you’ll break the flow of the path through that point. With the Option/Alt key, you change only the path segment on that side of the anchor point, leaving the adjoining path segment unchanged. In Figure 11-19 to the lower left, the direction line on the left is being dragged without the Option/Alt key (as described in the preceding bullet point). To the lower right, adding the modifier key preserves the appearance of the adjoining path segment.

FIGURE 11-19: The pairs of paths are shown in color for illustrative purposes only — paths are generally black or light gray when active.
You can hold down the Shift key with the Direct Selection tool to ensure that you’re dragging in a straight line. You can also hold down the Shift key to select multiple anchor points before you drag.
Combining paths
As you’ve probably noticed through the course of this chapter, some paths are very simple (like the paths in the preceding figure) and some paths are more complex (like the shapes shown earlier in Figure 11-11). Complex paths are often compound paths: that is, paths that contain two or more paths (called subpaths) that interact with each other. Think about a pair of circles, different sizes, centered on top of each other. What if the smaller circle cut a hole in the middle of the larger circle, creating a wheel (or, depending on how early you’re reading this, a bagel)? Take a look at Figure 11-20.

FIGURE 11-20: Two (or more) paths can interact with each other, creating a compound path, consisting of two or more subpaths.
Two (or more) paths can interact in several ways. Complete this sentence with terms from the following list: “The second path can (fill in the blank) the original path.”
- Combine Shapes with: The areas within the two subpaths are combined as if they were within a single path (although they remain two subpaths).
- Subtract Front Shape from: The second path is used like a cookie cutter to delete an area from within the first path. (When you need to make a bagel, this is the option!)
- Intersect Shape Areas with: Only the area where the two subpaths overlap is retained.
- Exclude Overlapping Shapes from: All the area within both subpaths is retained except where the two paths overlap.
When any shape tool, the Pen tool, the Path Selection tool, or Direct Selection tool is active, the Options bar presents you with four options to determine the behavior of multiple paths. (The first path that you create is always a normal path. The options don’t come into play until you add additional subpaths.) Figure 11-21 shows each option name and provides a simple graphic representation to demonstrate the interaction. The upper-left path is the original, with the lower-right path showing how each option controls the interaction between subpaths.

FIGURE 11-21: The buttons control how a second path (and any subsequent paths) interacts with your original path.
As you can see in Figure 11-21, when a tool is set to create a shape, the New Layer option is available. Using the Merge Shape Components option merges overlapping paths, creating a single path rather than a compound path. (In Figure 11-21, compare the black line to the right of Merge Shape Components to the pair of black lines to the right of Combine Shapes.)
Tweaking type for a custom font
I want to show you one more little thing you can do with vectors in Photoshop — a last bit of fun before this chapter ends. Each individual character in a font consists of paths. You can convert the type to shape layers (or work paths) and change the appearance of the individual characters by editing their paths with the Direct Selection tool. Follow these steps:
- Open a new document in Photoshop.
- Create a new document measuring 800x600 pixels.
-
Select the Horizontal Type tool in the Toolbox and set the font.
From the Options bar, choose Arial, set the font style to Bold, set the font size to 72, choose Sharp for anti-aliasing, left-align, and click near the lower left of your document.
Okay, in all honesty, you can use just about any settings you want — but if you use these settings, your image will look a lot like mine.
- Type the word Billiards in your image.
- Press ⌘ +Return/Ctrl+Enter to end the text editing session.
-
Choose Type ⇒ Convert to Shape.
This changes the type layer (editable text on its own layer) to a shape.
- Activate the Direct Selection tool.
-
Edit the shapes of the Ls and the D to simulate billiard cues.
Drag the uppermost anchor points even farther upward to create cue sticks.
See the result in Figure 11-22.

FIGURE 11-22: You can convert vector type to shapes and edit the individual character shapes with the Direct Selection tool.