
8 Vector Drawing Techniques
Lesson overview
In this lesson, you’ll learn how to do the following:
Differentiate between bitmap and vector graphics.
Draw straight and curved paths using the Pen tool.
Save paths.
Draw and edit shape layers.
Draw custom shapes.
Use Smart Guides.

This lesson will take about 90 minutes to complete. Please log in to your account on peachpit.com to download the lesson files for this chapter, or go to the Getting Started section at the beginning of this book and follow the instructions under “Accessing the Lesson Files and Web Edition.”
As you work on this lesson, you’ll preserve the start files. If you need to restore the start files, download them from your Account page.
PROJECT: PROMOTIONAL POSTCARD
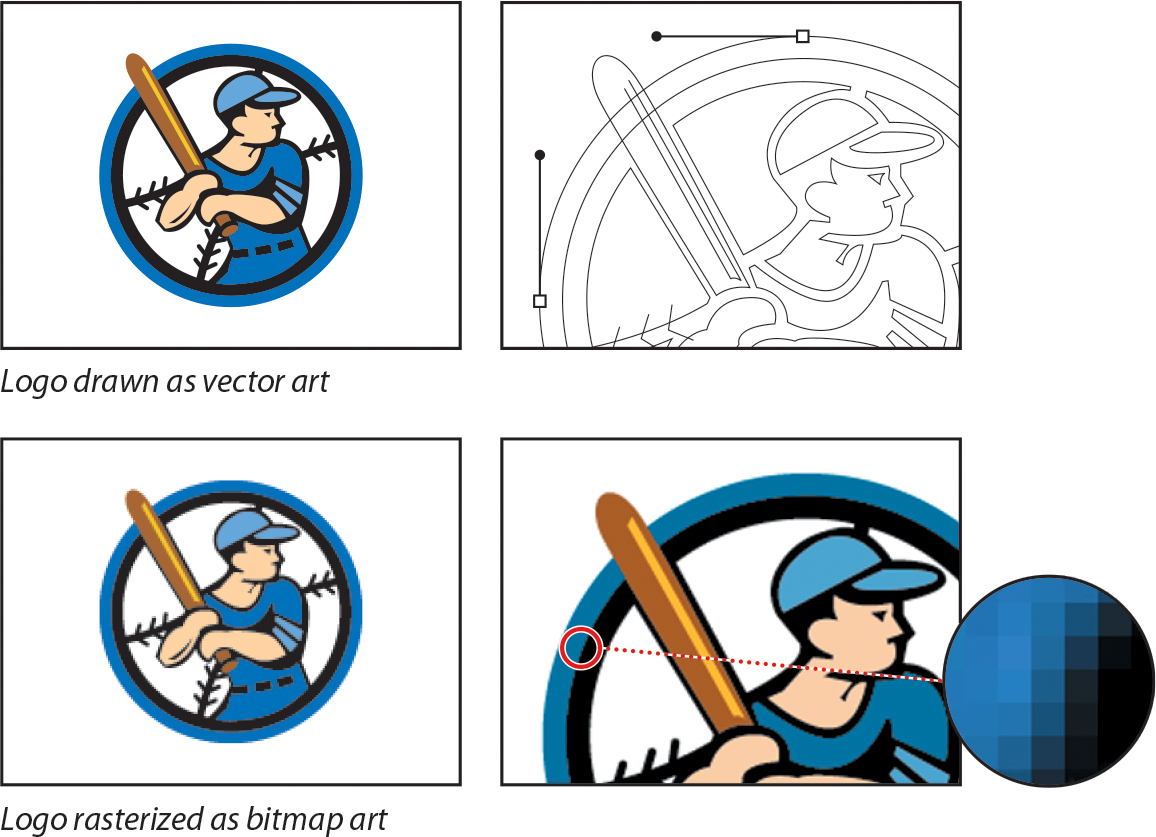
Unlike bitmap images, vector graphics retain their crisp edges when you enlarge them to any size. You can draw vector shapes and paths in your Photoshop images and add vector masks to control what is shown in an image.
About bitmap images and vector graphics
Before working with vector shapes and vector paths, it’s important to understand the basic differences between the two main categories of computer graphics: bitmap images and vector graphics. You can use Photoshop to work with either kind of graphic; in fact, you can combine both bitmap and vector data in an individual Photoshop image file.
Bitmap images, technically called raster images, are based on a grid of dots known as pixels. Each pixel is assigned a specific location and color value. In working with bitmap images, you edit groups of pixels rather than objects or shapes. Because bitmap graphics can represent subtle gradations of shade and color, they are appropriate for continuous-tone images such as photographs or artwork created in painting programs. A disadvantage of bitmap graphics is that they contain a fixed number of pixels. As a result, they can lose detail and appear jagged when scaled up onscreen or printed at a lower resolution than they were created for.
Vector graphics are made up of lines and curves defined by mathematical objects called vectors. These graphics retain their crispness whether they are moved, resized, or have their color changed. Vector graphics are appropriate for illustrations, type, and graphics such as logos that may be scaled to different sizes.
About paths and the Pen tool
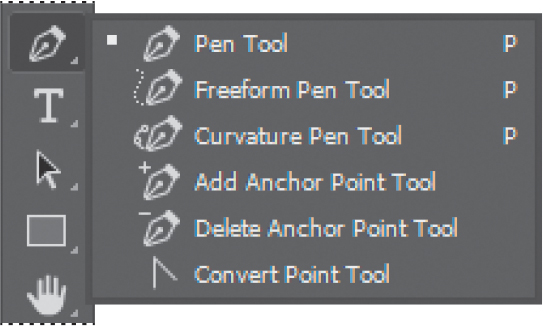
In Photoshop, the outline of a vector shape is called a path. A path is a curved or straight line segment you draw using the Pen tool, Freeform Pen tool, Curvature Pen tool, or a shape tool. The Pen tool draws paths with the greatest precision; shape tools draw rectangles, ellipses, and other shape paths; the Freeform Pen tool draws paths as if you were drawing with a pencil on paper.
Paths can be open or closed. An open path (such as a wavy line) has two distinct endpoints. A closed path (such as a circle) is continuous. The type of path you draw affects how it can be selected and adjusted.
Paths that have no fill or stroke do not print when you print your artwork. This is because paths are vector objects that contain no pixels, unlike the bitmap shapes drawn by the Pencil tool and other painting tools. If you want a path to have a fill or stroke, create it as a shape. A shape is a layer based on vector objects instead of pixels. Unlike a path, you can apply colors and effects to a shape layer.
Getting started
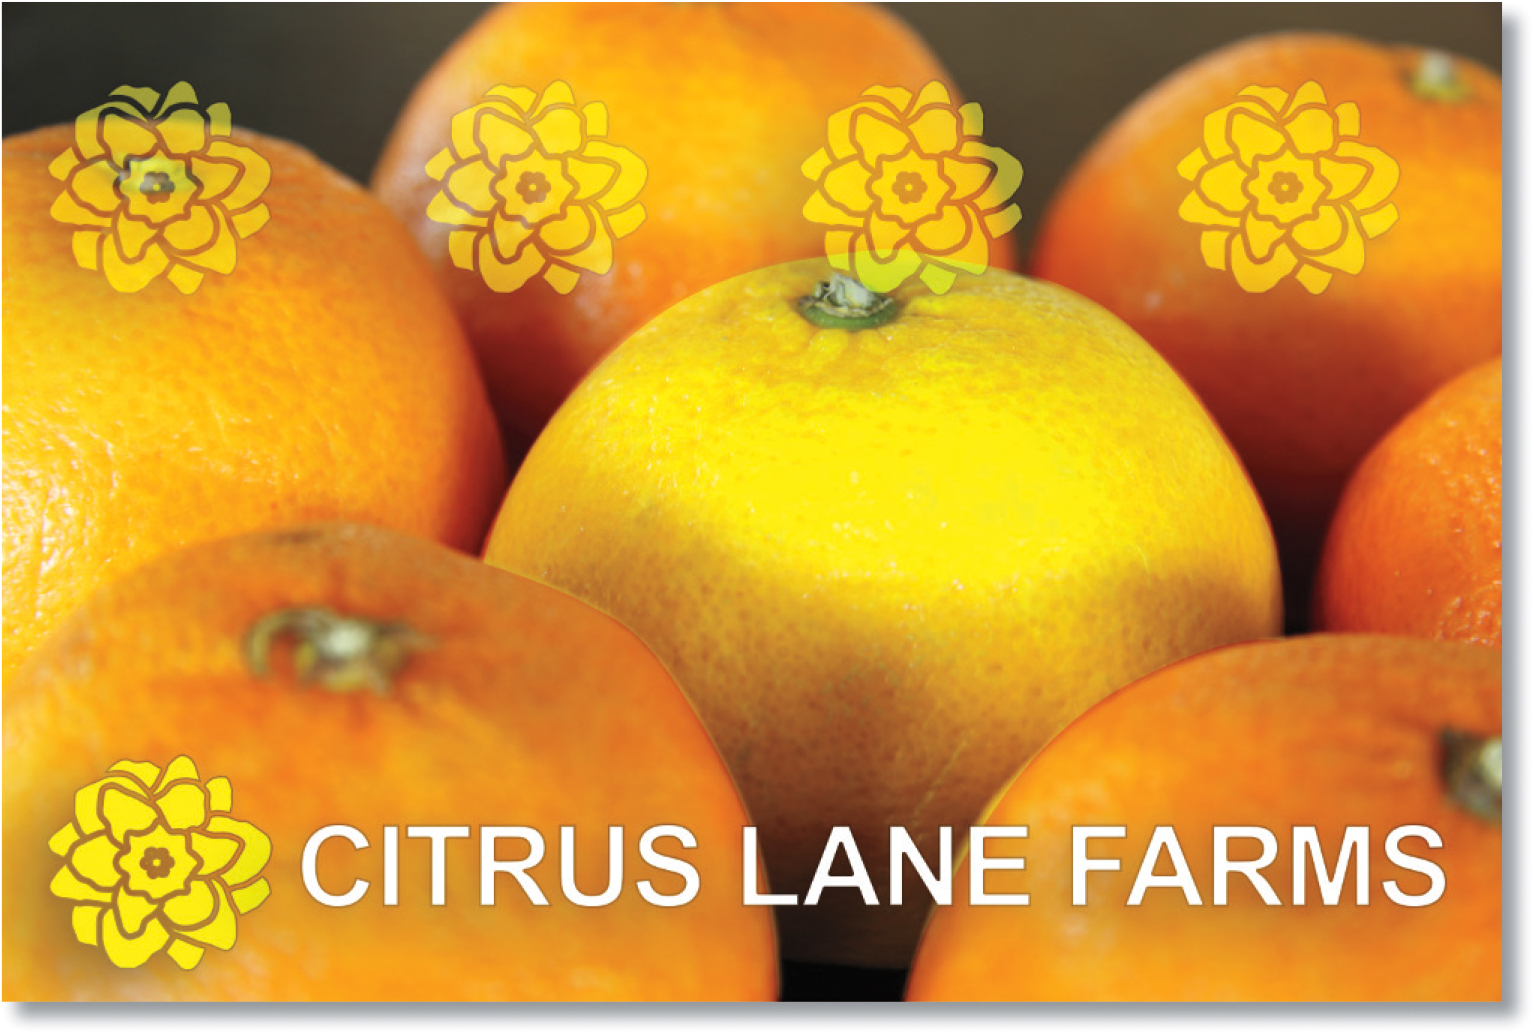
In this lesson, you’ll create a postcard that will help promote a citrus fruit farm. You’ve been given an image of oranges, but because the farm wants to convey the idea that they grow more than just oranges, it’s been decided that one of the oranges will be recolored to look like a lemon. Recoloring one item requires isolating it by creating a mask of its outline, and in this case, the quickest way to create a clean outline of that item is using the Pen tool to draw a vector path.
Before you begin, view the image you’ll be creating.
Start Photoshop, and then immediately hold down Ctrl+Alt+Shift (Windows) or Command+Option+Shift (Mac) to restore the default preferences. (See “Restoring Default Preferences” on page 5.)
When prompted, click Yes to delete the Adobe Photoshop Settings file.
![]() Note
Note
If Bridge isn’t installed, the File > Browse in Bridge command in Photoshop will start the Creative Cloud desktop app, which will download and install Bridge. After installation completes, you can start Bridge. For more information, see page 3.
Choose File > Browse In Bridge.
In the Favorites panel, click the Lessons folder, and then double-click the Lesson08 folder in the Content panel.
Select the 08End.psd file, and press the spacebar to see it in full-screen view.
To create this postcard, you’ll trace an image, and use that tracing to make a vector mask that lets you change the color of one of the oranges. First, you’ll practice making paths and selections using the Pen tool.
When you’ve finished looking at the 08End.psd file, press the spacebar again. Then double-click the 08Practice_Start.psd file to open it in Photoshop.
![]() Note
Note
If Photoshop displays a dialog box telling you about the difference between saving to Cloud Documents and Your Computer, click Your Computer. You can also select Don’t Show Again, but that setting will deselect after you reset Photoshop preferences.
Choose File > Save As, rename the file 08Practice_Working.psd, and click Save. If the Photoshop Format Options dialog box appears, click OK.
Drawing a shape with the Pen tool
The Pen tool is one of the most commonly used tools for creating vector graphics on a personal computer. You find the Pen tool in many applications, including Adobe Illustrator (which first featured the Pen tool in 1987), Adobe Photoshop, and Adobe InDesign. Even video applications such as Adobe Premiere Pro and Adobe After Effects include the Pen tool because it provides such a high degree of control and precision when drawing many kind of lines, from shapes to masks to motion graphics paths. The Pen tool may not be easy to learn, but trust us: Knowing how to use the Pen tool is worth the effort and investment to master, partly because it’s a marketable skill across many creative digital disciplines.
![]() Tip
Tip
The Curvature Pen tool offers a potentially simpler way to draw precise vector paths; consider learning it if you find the Pen tool to be challenging to use. The Pen tool is taught in this chapter because it’s a traditional and industry-standard tool for precisely drawing vector graphics.
The Pen tool works a little differently than a brush or pencil tool. We’ve created a practice file that you’ll use to learn how to draw a straight path, a simple curve, and an S-curve with the Pen tool.
Creating paths with the Pen tool
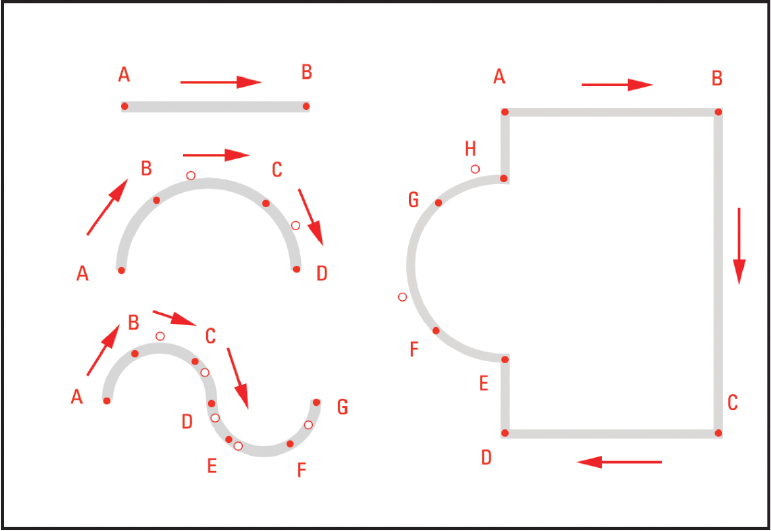
You can use the Pen tool to create paths that are straight or curved, open or closed. If you’re unfamiliar with the Pen tool, it can be confusing to use at first. Understanding the elements of a path and how to create those elements with the Pen tool makes paths much easier to draw.
Creating a straight line
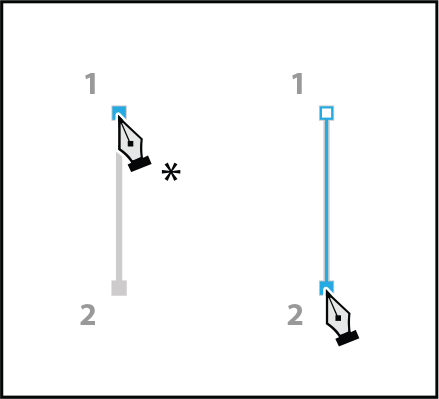
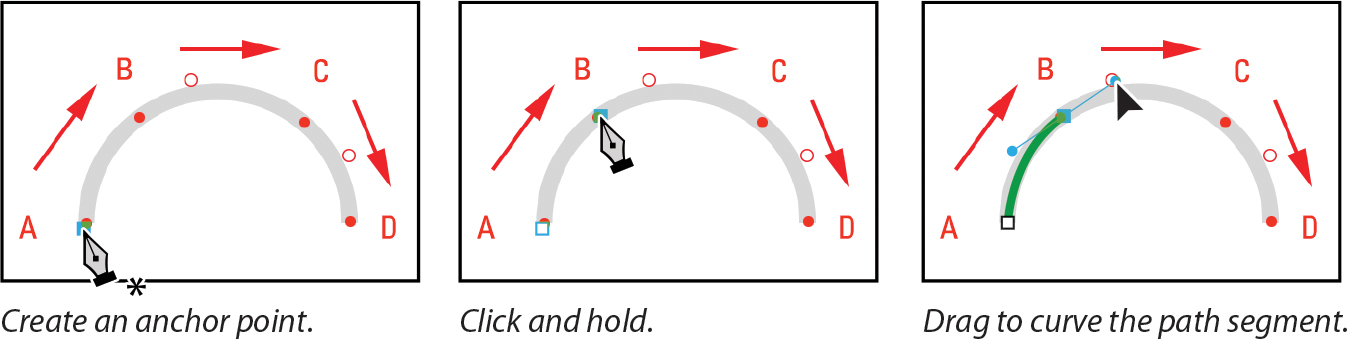
To create a straight path, click the mouse button. The first time you click, you set the first anchor point. Each time that you click thereafter, a straight line is drawn between the previous anchor point and the current one. To draw complex straight-segment paths with the Pen tool, click each time you want to add a new segment.
To create a curved path, click to place an anchor point, drag to create a direction line for that point, and then click to place the next anchor point. Each direction line ends in two direction points; the positions of direction lines and points determine the size and shape of the curved segment. Moving the direction lines and points reshapes the curves in a path.
Smooth curves are connected by anchor points called smooth points. Sharply curved paths are connected by corner points. When you move a direction line on a smooth point, the curved segments on both sides of the point adjust simultaneously, but when you move a direction line on a corner point, only the curve on the same side of the point as the direction line is adjusted.
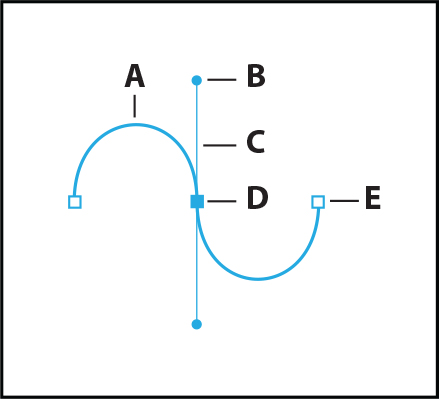
A. Curved line segment
B. Direction point
C. Direction line
D. Selected anchor point
E. Unselected anchor point
You can move path segments and anchor points, either individually or as a group. When a path contains multiple segments, you can drag individual anchor points to adjust individual segments of the path, or select all anchor points in a path to edit the entire path. Use the Direct Selection tool (![]() ) to select and adjust an anchor point, a path segment, or an entire path.
) to select and adjust an anchor point, a path segment, or an entire path.
Creating a closed path differs from creating an open path in the way that you end it. To end an open path, press Enter or Return. To create a closed path, position the Pen tool pointer over the starting point, and click. Closing a path automatically ends the path. After the path closes, the Pen tool pointer appears with a small *, indicating that your next click will start a new path.

Creating a closed path
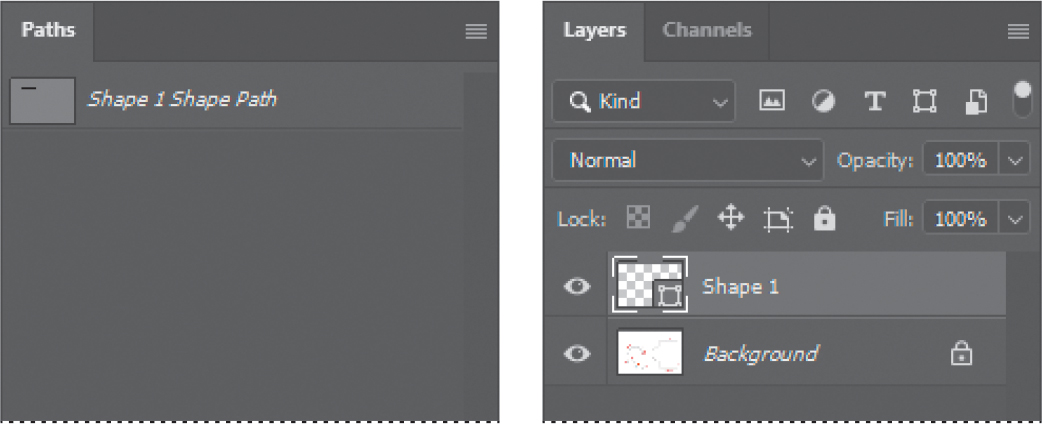
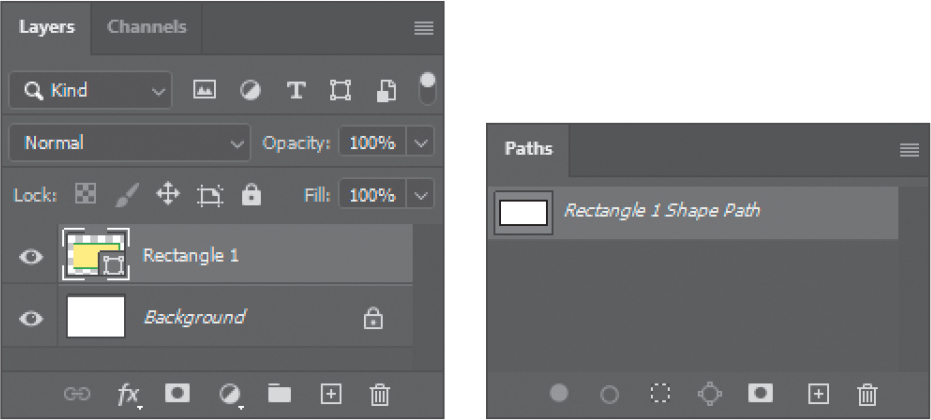
When you first draw a path, it appears in the Paths panel as a temporary object called Work Path. Save any work path you want to use again in the future, especially if you want to use multiple paths in the same document. To save a work path, double-click it in the Paths panel, type a name in the Save Path dialog box, and click OK. It’s added as a new named path in the Paths panel, and remains selected. If you don’t save a work path, it’s lost as soon as you deselect it and then start drawing again. (Saving the path isn’t necessary when you draw a path as a shape, because a shape is created as a named layer.)
First, you’ll configure the Pen tool options and the work area.
In the Tools panel, select the Pen tool (
 ).
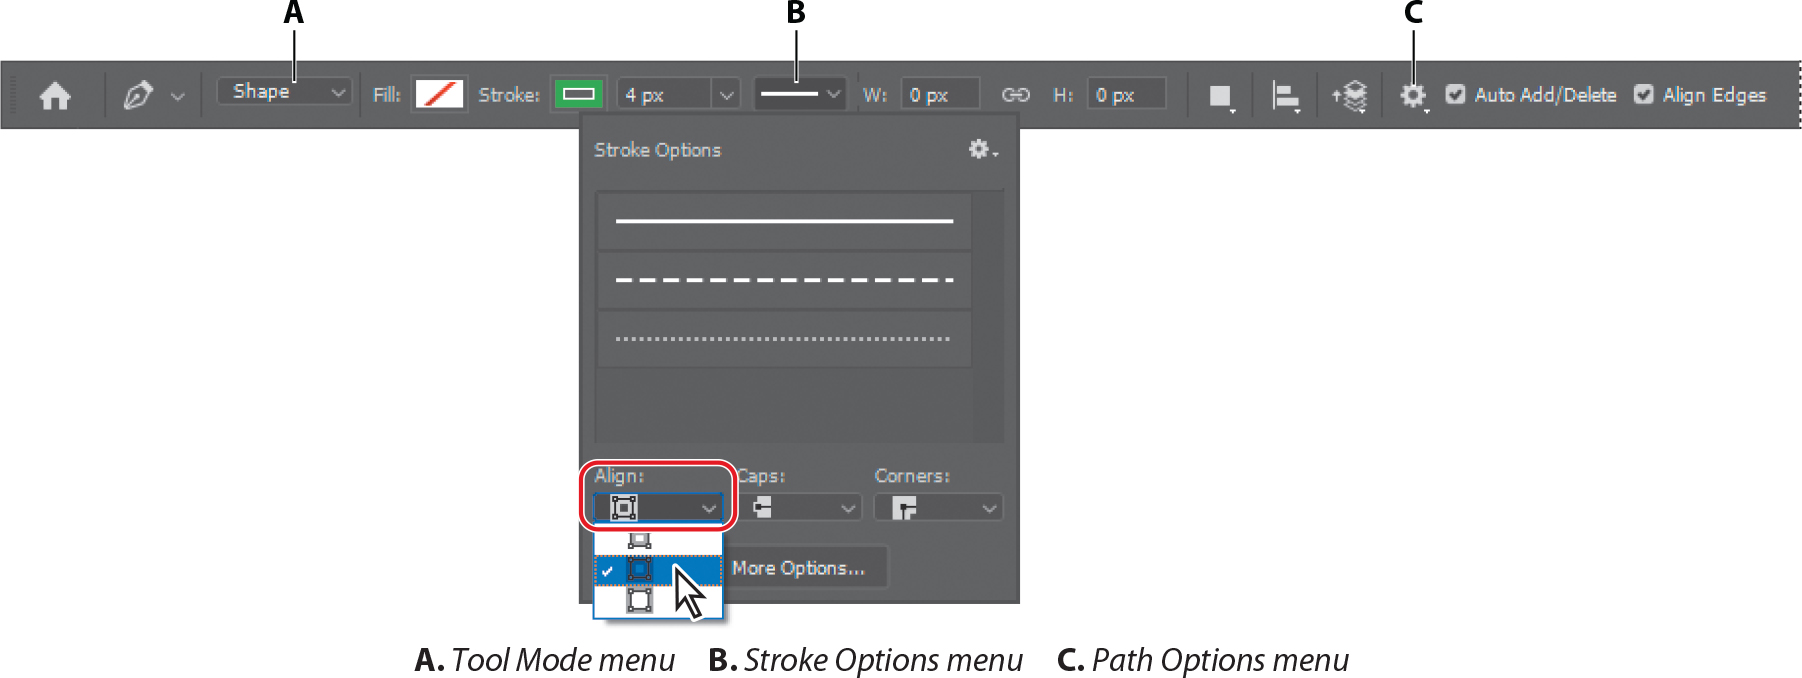
).In the options bar, select or verify the following settings:
Choose Shape from the Tool Mode pop-up menu.
In the Path Options menu, make sure that Rubber Band is not selected.
Make sure that Auto Add/Delete is selected.
Choose No Color from the Fill pop-up menu.
Choose a green color from the Stroke pop-up menu. We used the green swatch in the CMYK presets group.
Enter 4 pt for the stroke width.
In the Stroke Options window, choose Center (the second option) from the Align menu.
![]() Tip
Tip
The Align stroke option controls whether the stroke width sits entirely to one side of a path or the other, or is centered over the path.
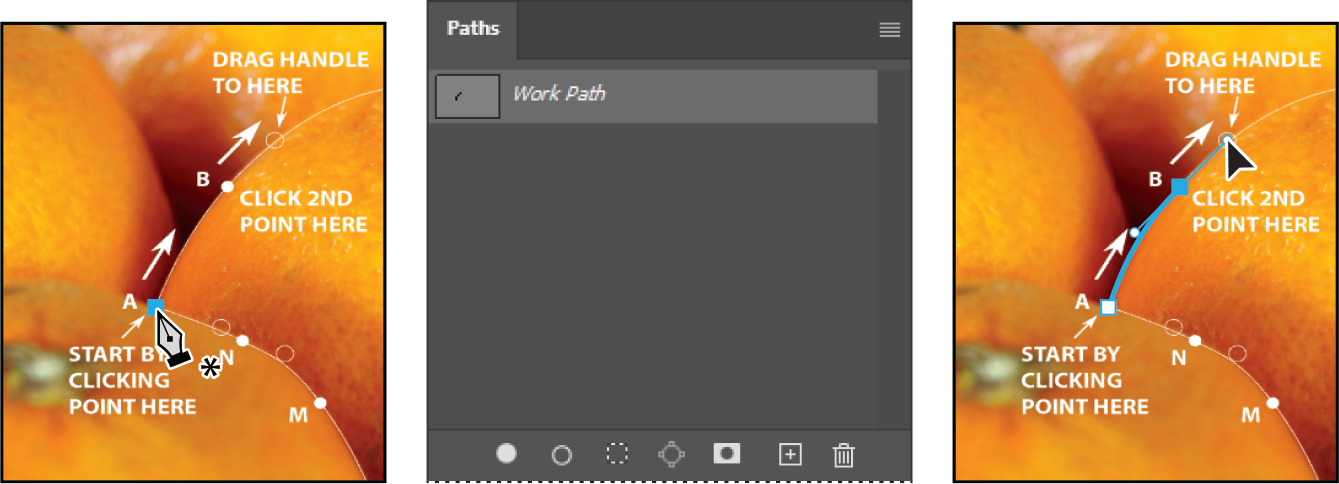
Drawing a straight line
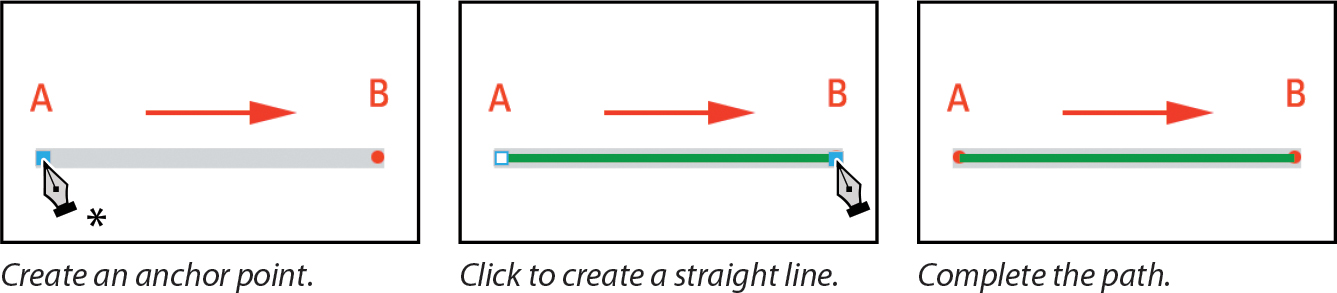
You’ll start by drawing a straight line. Anchor points mark the ends of path segments; the straight line you’ll draw is a single path segment with two anchor points.
Drag the Paths panel tab out of the Layers panel group so that you can see both it and the Layers panel at the same time. You can dock the Paths panel with another panel group.
The Paths panel displays thumbnail previews of the paths you draw. Currently, the panel is empty, because you haven’t started drawing.
If necessary, zoom in so that you can easily see the lettered points and red circles on the shape template. Make sure you can see the whole template in the image window, and be sure to reselect the Pen tool after you zoom.
![]() Note
Note
If a tutorial pops up for the Curvature Pen tool, you don’t need to read it at this time. It will probably close on its own, or you can close it.
On the first shape, click point A, and release the mouse button. You’ve created an anchor point.
Click point B. You’ve created a straight line with two anchor points.
Press Enter or Return to stop drawing.
![]() Note
Note
The new path appears in both the Paths and Layers panels because the Tool Mode menu in the options bar is set to Shape, so drawing a new path also creates a new shape layer. If the Tool Mode menu was set to Path, the new path would be added to the Paths panel only.
The path you drew appears in the Paths panel, and as a new layer in the Layers panel.
Drawing curves
On curved segments, selecting an anchor point displays one or two direction lines, depending on the shapes of adjacent segments. You adjust the shape of a curved segment by dragging the direction point at the end of a direction line, and the direction line shapes the curve. You’ll create curved lines, using smooth points.
Click A on the semicircle, and release the mouse to create the first anchor point.
![]() Tip
Tip
The red circles indicate where you should stop dragging an anchor point’s direction point to form the desired shape of the curve. If you drag the direction point to a different location, the curve will have a different shape.
Click point B, but don’t release the mouse button. Instead, drag to the red circle to the right of point B to create a curved path segment and a smooth anchor point. Then release the mouse button.
Smooth anchor points have two linked direction lines. When you move one, the curved segments on both sides of the path adjust simultaneously.
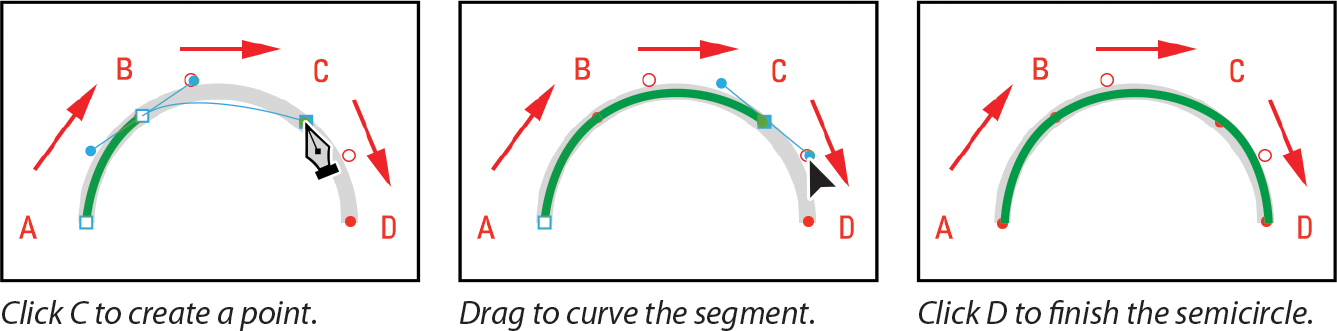
Position the pointer over point C, click and drag down to the red circle below, and then release the mouse button. You’ve created a second curved path segment and another smooth point.
Click point D, and release the mouse to create the final anchor point. Press Enter or Return to complete the path.
![]() Tip
Tip
What’s the advantage of drawing paths using points and handles, instead of drawing directly as with a real pen or pencil? For most people, it’s difficult to draw curves and straight lines without bumps or other errors. Points and handles let you draw perfect curves and straight lines. If you prefer to draw normally, you can use the Freeform Pen tool.
When drawing a freehand path using the Pen tool, use as few points as possible to create the shape you want. The fewer points you use, the smoother the curves are—and the more efficient your file is.
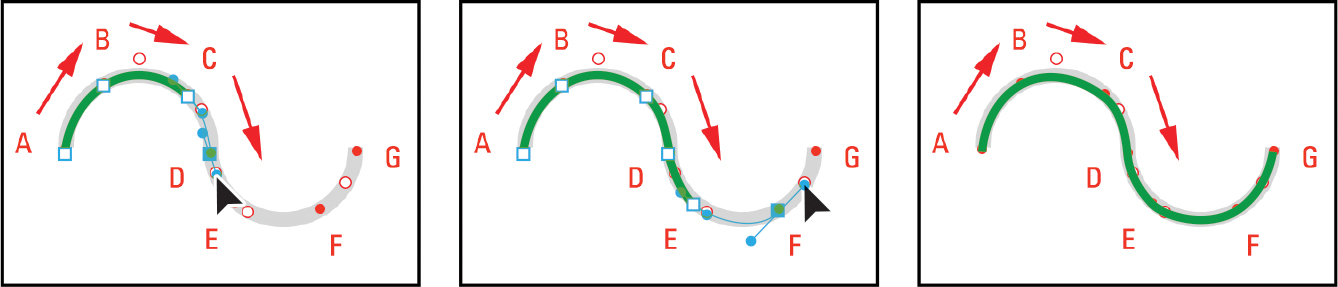
Using the same techniques, you’ll draw an S-shaped curve.
Click point A, and then click and drag from point B to the first red circle.
Continue with points C, D, E, and F, in each case clicking the point and then dragging to the corresponding red circle.
Click point G to create the final anchor point, and then press Enter or Return to complete the path.
Each of the three shapes is on its own layer in the Layers panel. Only one path is in the Paths panel, because the Paths panel shows only the Shape Path for the layer that’s currently selected in the Layers panel.
Notice that the curves you drew with the Pen tool are much smoother and easier to precisely control than if you had drawn them freehand.
Drawing a more complex shape
Now that you’ve got the idea, you’ll have a chance to draw a more complex object.
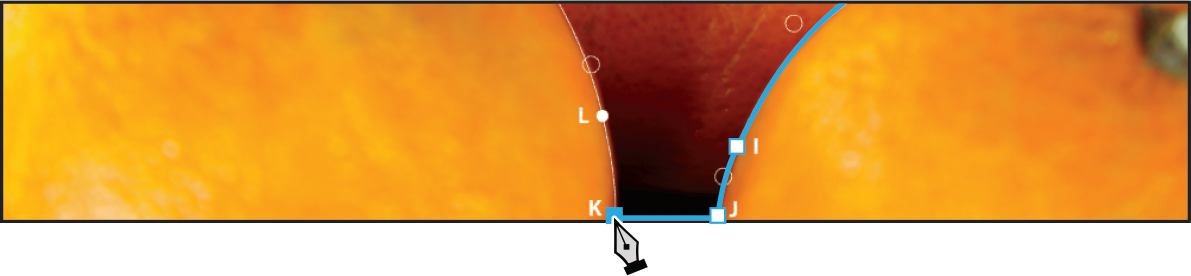
Click point A on the shape on the right side to set the first anchor point.
Press the Shift key as you click point B. Pressing the Shift key constrains the line to 45-degree angles, which in this case ensures you’ll get a horizontal line.
![]() Tip
Tip
If you notice that you slightly missed the red dot on the template while dragging a curve point, you can reposition the point without starting over. Keeping the mouse button down, hold down the spacebar and drag until the point is in the right place. Then release the spacebar to continue dragging the direction lines of that anchor point.
Press the Shift key as you click points C, D, and E to create straight path segments.
Click point F, and drag to the red circle to create a curve. Then release the mouse button.
Click point G, and drag to the red circle to create another curve. Then release the mouse button.
Click point H to create a corner point.
When you move a direction line on a corner point, only the curve on the same side of the point as the direction line is adjusted, so you can create a sharp transition between two segments.
Click point A to draw the final path segment and close the path. Closing a path automatically ends the drawing; you don’t need to press Enter or Return.

Close the file without saving changes. You have successfully used the Pen tool to draw both curves and straight lines.
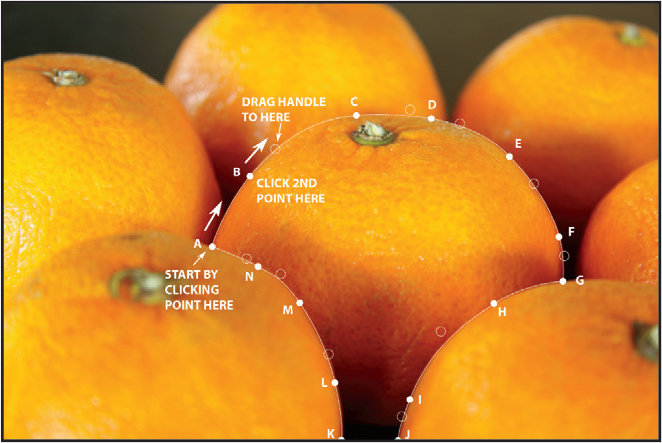
Drawing a path traced from a photo
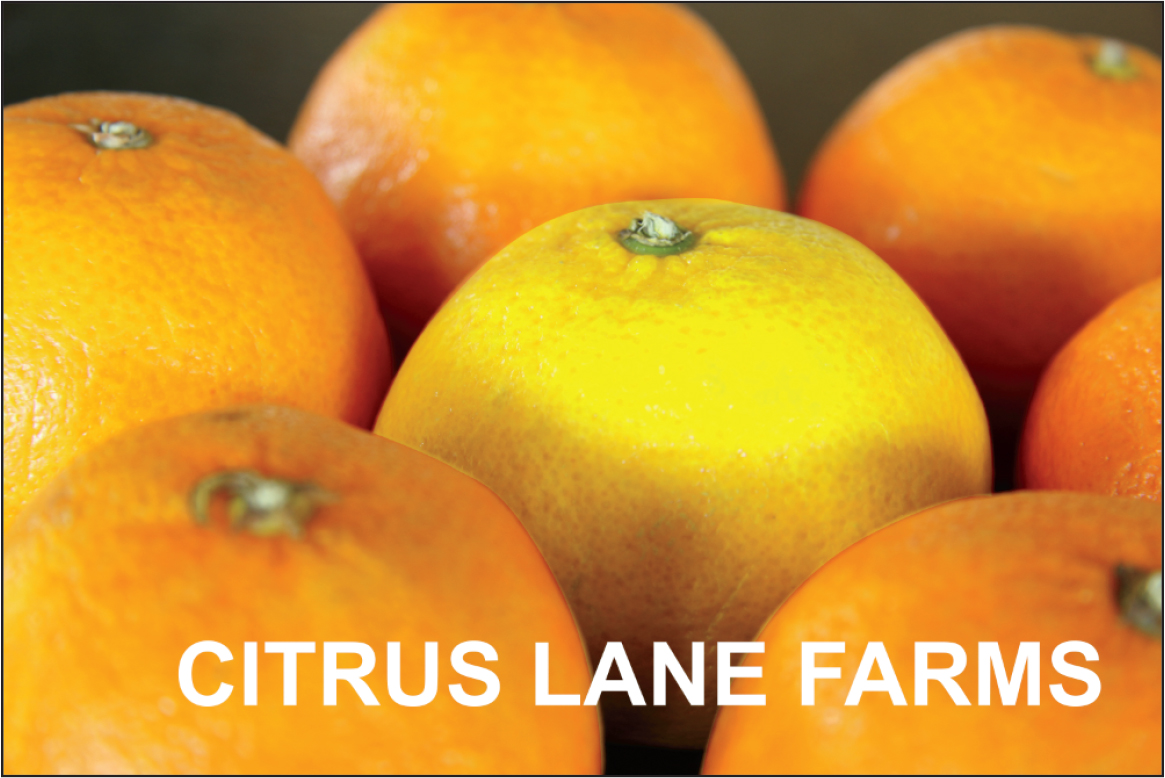
Now you’re ready to draw a path around a real object. You’ll use the techniques you’ve practiced to draw a path around the edge of one orange out of several. The path you draw will later be converted into a layer mask, so that you can change the color of that orange. The orange is partially covered by surrounding oranges, so the path you draw will be a combination of curved and straight segments, like the shapes you’ve practiced on. Later, you’ll combine the altered image with text and a shape layer to create a promotional postcard for a citrus farm.
From Photoshop or Bridge, open the 08Start.psd file.
The image includes two layers: the background layer, and a template layer named Path Guide that you will trace to draw the path.
Choose File > Save As, rename the file 08Working.psd, and click Save. If the Photoshop Format Options dialog box appears, click OK.
Select the Pen tool, and then, in the options bar, choose Path from the Tool Mode pop-up menu.

Because Path is now selected in the options bar instead of Shape, what you see when you draw will be different than in the practice exercise. You’ll be drawing a path, not a shape. The path you draw will appear as a temporary work path in the Paths panel, and a shape layer won’t be created.
The reason you’re switching to a path is because you won’t need to print or export the path you’re about to draw. You’ll be creating a mask from the path, so the path itself doesn’t need to be a visible part of the final document. For more information about shapes and paths, see the sidebar “Comparing shapes, paths, and pixels.”
Comparing shapes, paths, and pixels
When you use the Pen tool or the tools grouped with it, or the Rectangle tool or any of the tools grouped with it, a menu in the options bar lets you choose whether you want the tool to draw a shape, a path, or, in some cases, pixels.

This is an important decision, because each option has different advantages:
Shape. A shape is a vector object created on its own layer in the Layers panel. You can apply the same layer effects, masks, and other properties that you would to a pixel layer. The difference is that you can continue to edit the shape as a vector path, using path editing tools such as the Pen tool and the Direct Selection tool. You can’t edit a shape layer using pixel-based tools such as brushes.
Because a shape is a layer, it’s always visible when its layer visibility is enabled, and it will print and export. When it’s selected in the Layers panel, you can apply and change its fill and stroke color.
A selected shape layer also displays its path in the Paths panel.
Path. A path is a vector object that doesn’t display, print, or export, so it doesn’t appear in the Layers panel. It lives only in the Paths panel. But the path is useful there, because you can use it as the basis for selections, clipping paths, type on a path, and other “backstage” roles.
Because a path is not a layer, it’s visible in the document window only when it’s selected in the Paths panel, and it can’t have a stroke and fill. If it’s hard to see, you can improve its visibility by clicking the Path Options menu (the gear) in the options bar, and adjusting the path’s Thickness and Color. Because a path isn’t visible in a printed or exported image, those options affect only the visibility of the path while drawing in Photoshop.
Pixels. Some tools, such as the Rectangle tool and the tools grouped with it, also offer a Pixels option. Drawing with the Pixels option creates pixels on the currently selected layer, without creating a vector path or shape layer.
Because the Pixels option creates a pixel layer and not a vector path or shape, you won’t be able to edit the resulting layer using path editing tools. You edit the layer using pixel-based tools such as the brushes, eraser, and selection tools.
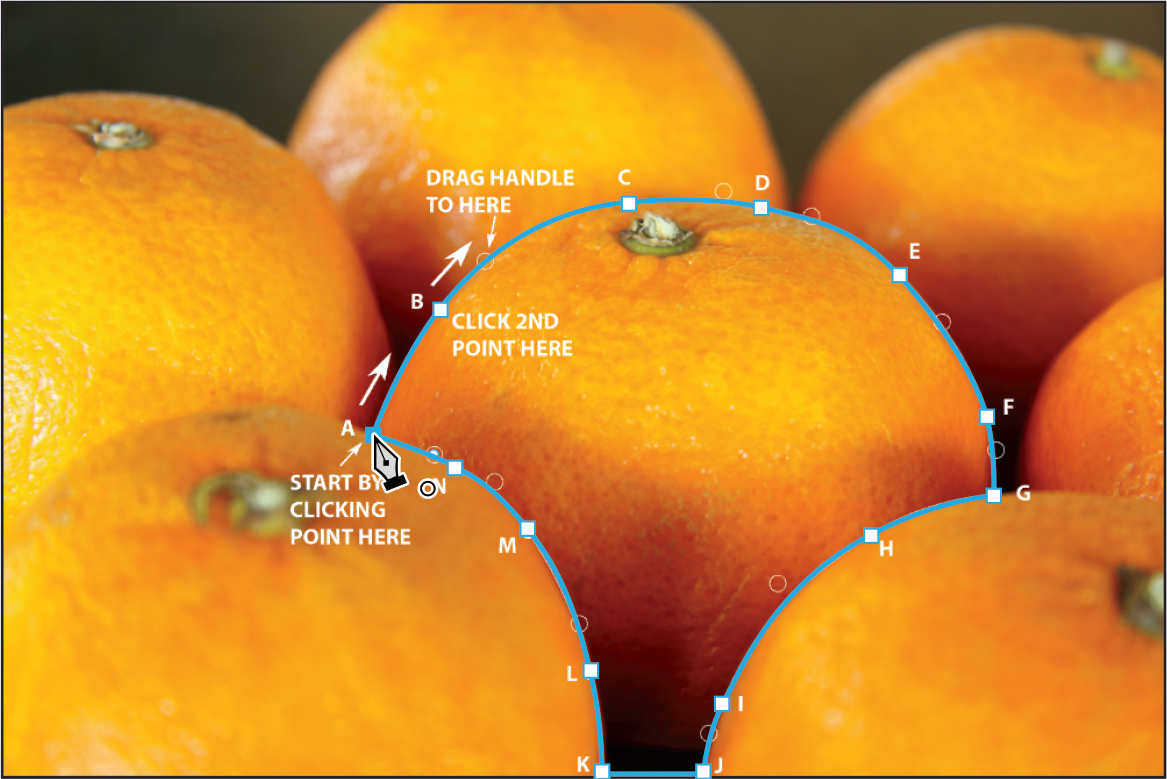
With the Pen tool selected, click point A. A new temporary Work Path appears in the Paths panel.
Click point B, and drag to the open circle on the right to create the initial curve.
Click point C, and drag to the open circle to its right.
Continue tracing the orange, clicking and dragging curve segments for points D through F.
Click point G (do not drag). This creates the corner at point G.
At points H and I, click and drag to their corresponding open circles to create their curved segments.

Click point J to create a corner.
Hold down Shift to create a perfectly level segment as you click point K.
At points L, M, and N, click and drag to their corresponding open circles to create their curved segments.
Position the pointer over point A, and when you see a small circle by the Pen tool pointer, click to close the path. The circle indicates that the pointer is close enough to close the path.
![]() Tip
Tip
To move the entire path, drag it with the Path Selection tool, grouped with the Direct Selection tool.
Evaluate your path. If you want to adjust any segments, do step 15; otherwise skip to step 16.
Select the Direct Selection tool (
 ) (grouped with the Path Selection tool (
 )), and then press the Esc key (or click in the document window away from the path) so that no points are selected, but you can still see the path. Then do any of the following with the Direct Selection tool as needed:
To reposition a point or a straight segment, drag it.
To change the shape of a curved segment between two points, drag the segment (not points).
To change the shape of a curved segment extending from a point, drag its direction point to adjust the angle of that direction line.
When you’re done, leave the path selected, and save your work so far.
Converting a path to a selection and a layer mask
![]() Tip
Tip
If you’d prefer to create a mask that you can always edit as a path, create a vector mask for the layer instead. Skip step 2, and then, in step 4, make sure the Lemon path is selected in the Paths panel when you add the new Hue/Saturation adjustment layer.
Using the Pen tool made it easy to create a precise outline of the orange in the center of the image. But the goal is to change the color of that orange without changing the others, through a layer mask. Creating the layer mask requires making a selection. Fortunately, it’s easy to convert a path to a selection.
The path was a work path, which is temporary; it will be replaced if you draw another path. You can still create a selection from a work path, but first, it’s a good practice to save any path you might want to use again in the future.
In the Paths panel, double-click Work Path. In the Save Path dialog box, type Lemon for the name, and click OK.
Make sure the Lemon path is selected in the Paths panel, and then click the Load Path as a Selection button (
 ) at the bottom of the Paths panel.
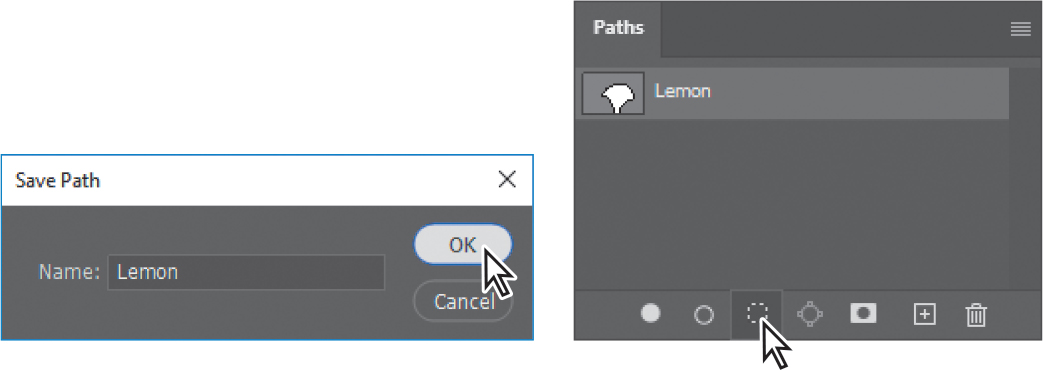
You’re going to change the color of the selected orange to lemon yellow, using a Hue/Saturation adjustment layer through a layer mask of the orange. You currently have an active selection for this orange. That will make it quick and easy to create the layer mask, because an active selection is automatically converted to a layer mask when you add an adjustment layer.
![]() Tip
Tip
It’s just as easy to convert a selection to a path. When a selection is active, click the Make Work Path from Selection button in the Paths panel; it’s the button to the right of the one you clicked in step 2.
In the Layers panel, hide the Path Guide layer, because you no longer need it, and select the Background layer.
In the Adjustments panel, click the Hue/Saturation button (
 ) to add a new Hue/Saturation adjustment layer in the Layers panel. It automatically includes a layer mask, created from your selection.
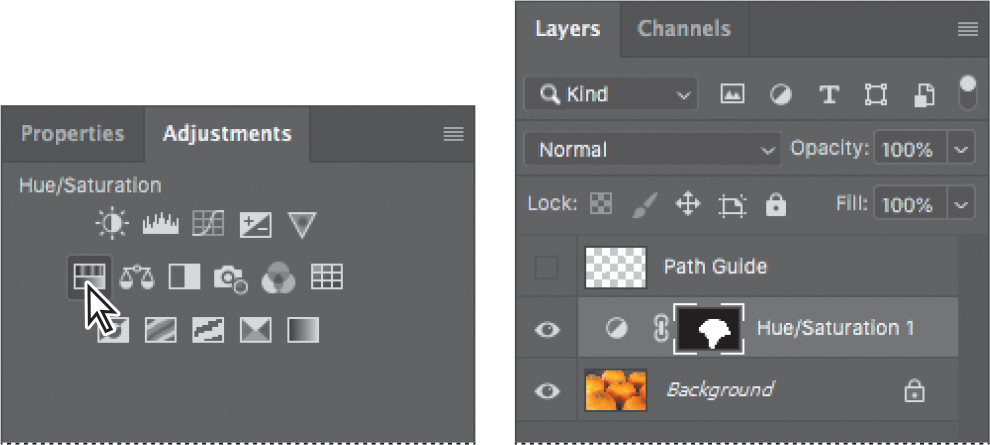
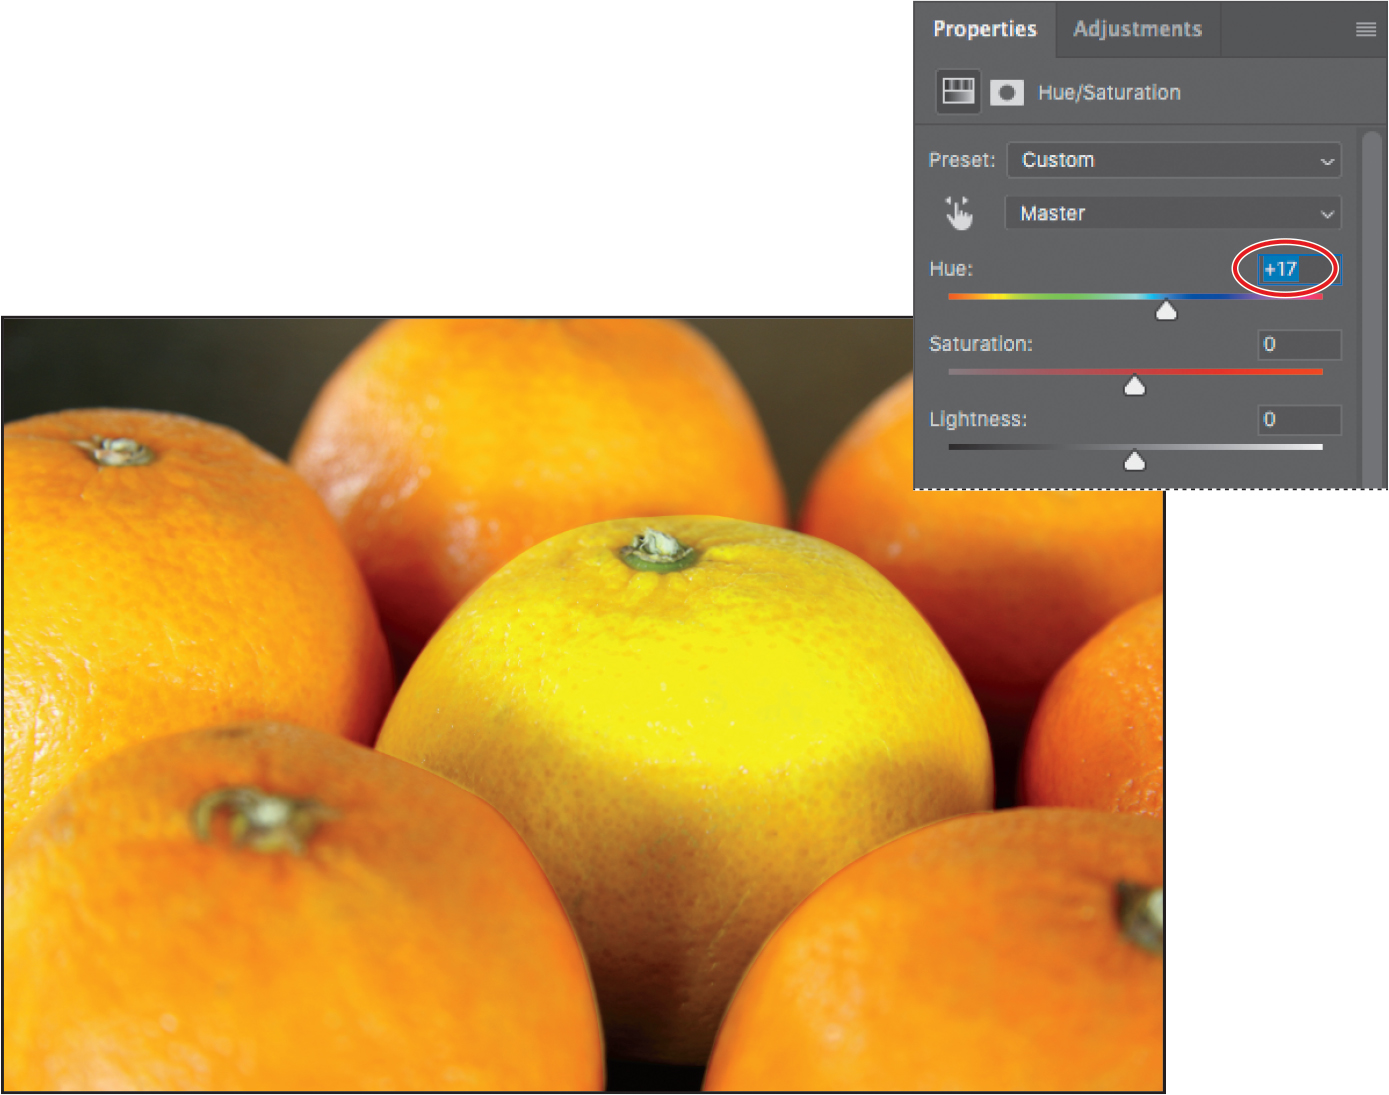
In the Properties panel, change the Hue setting so that the orange in the center changes to a lemon yellow color. We entered a Hue value of +17.
Save the document.
![]() Tip
Tip
After you change the color of the center orange, you may notice minor errors along the edges of the layer mask. Remember that you can edit the mask: Click the layer mask thumbnail in the Layers panel to select it, and then use the Brush tool to paint white where you want the color applied by the adjustment layer to be visible, or paint black where you want the color of the Background layer to be visible.
You used the Pen tool to quickly and precisely draw a path that traces the outline of an object in an image (the orange that now looks like a lemon), you converted the path into a selection, and used that selection to create a layer mask that isolates the subject when applying an adjustment layer.
Creating a logo with text and a custom shape
Now you’ll create a logo that will overlay the image, using text and a shape layer.
If the rulers aren’t visible, choose View > Rulers to display them.
Right-click (Windows) or Control-click (Mac) the rulers, and if they are currently displaying in pixels, choose Inches. This document will become a printed postcard, and Inches is an appropriate unit of measure for print.
In the Layers panel, make sure the Hue/Saturation adjustment layer is selected, so that the layer you’re about to create will be added above it.
Select the Horizontal Type tool (
 ), and, in the options bar, do the following:
Choose a bold or heavy typeface from the Font Family pop-up menu. We used Arial Bold.
Type 55 pt for the Size, and press Enter or Return.
Click the Right Align Text button, because you’ll soon add a graphic element to the left of the text.
Click the color swatch and set the text color to white.

Drag the Horizontal Type tool to create a text layer across the bottom of the canvas, inset about half an inch away from the sides and bottom. Ours is about 9 inches wide by 1 inch tall.
Type Citrus Lane Farms to replace the placeholder text, click the Commit button (
 ) in the options bar, and leave the text layer selected in the Layers panel.
This font looks better with tighter letter spacing, so in the Character or Properties panel, apply a negative Tracking value; we used −25.
Select the All Caps button (
 ) in the Type Options group in the Properties panel. If you don’t see this option, scroll down in the Properties panel.
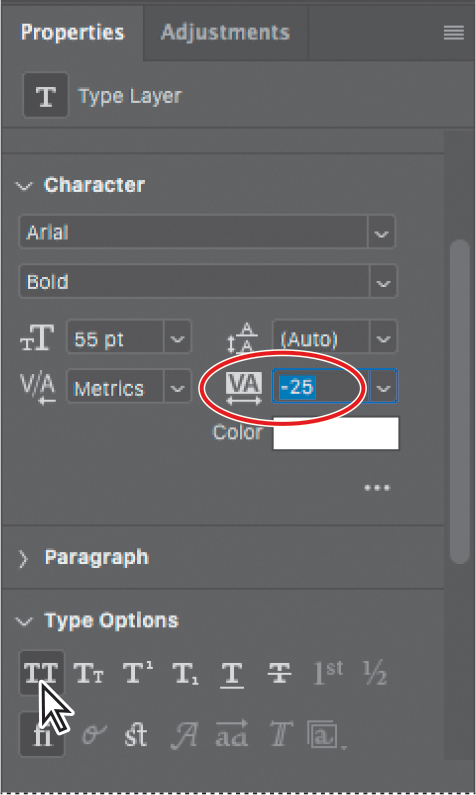
If needed, use the Move tool to reposition the text layer so that it looks better relative to the bottom and right sides. Leave space to the left of the text for a graphic you’re about to add.
Adding a preset shape
When you need a shape such as a symbol or object, one place you can turn to is the Shapes panel, which contains a wide selection of premade graphics. When you add a shape to a document, it becomes a shape layer.
A shape is a vector object drawn using paths, which has two advantages. You can edit it using the same techniques you used to edit the paths you drew earlier in this chapter. Also, like a text layer, a path is resolution-independent, so it will always be as smooth and detailed as the document resolution allows.
![]() Tip
Tip
Photoshop includes more preset groups than you see by default in a presets panel list. In the panel menu, choose Legacy Shapes and More to load additional preset groups, including presets that were available in previous versions of Photoshop.
You find shapes in the Shapes panel. It’s easy to use, because it works like the other Photoshop panels that contain preset effects, such as the Swatches, Gradients, and Brushes panels: You see small visual previews of each preset, you can organize them in groups (folders), and you can create your own.
Choose Window > Shapes to open the Shapes panel. The Shapes panel includes groups of shape presets.
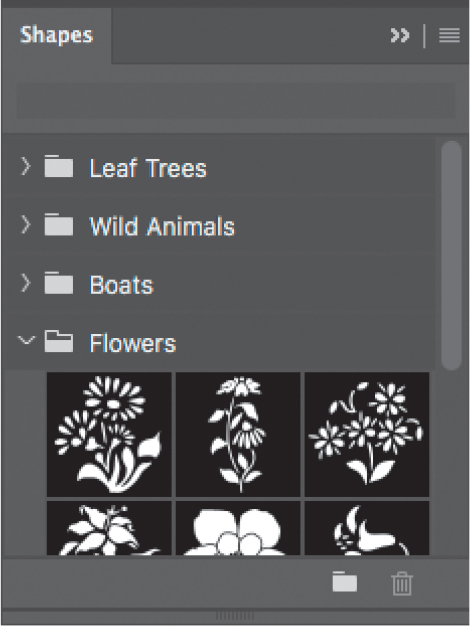
Expand the Flowers presets group.
Extra Credit
Using Creative Cloud Libraries with linked Smart Objects
When you organize and share your design assets using Creative Cloud Libraries, you and your team can use those library items in many Creative Cloud desktop and mobile apps. Let’s take a look:
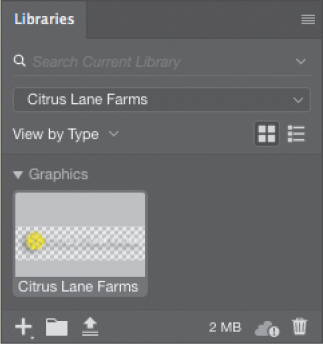
After the Libraries panel finishes syncing the logo to Creative Cloud, it will be available in Creative Cloud applications and mobile apps that use Creative Cloud Libraries.
The appearance of the Citrus Lane Farms text layer was adjusted to look good over the image of the oranges; it should be tested over a wide range of backgrounds and edited as needed for readability. A library item is a Smart Object linked to Creative Cloud, so you can edit it in Photoshop by double-clicking it in the Libraries panel. When you save changes, it updates in all documents that use it.
Adding a color
A library can store colors for use across Adobe applications.
-
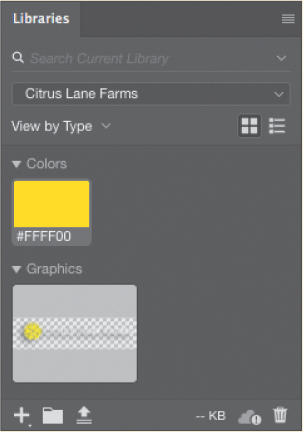
At the bottom of the Libraries panel, click the Add Content button (
 ), and click the Foreground Color swatch, adding it to the current library.
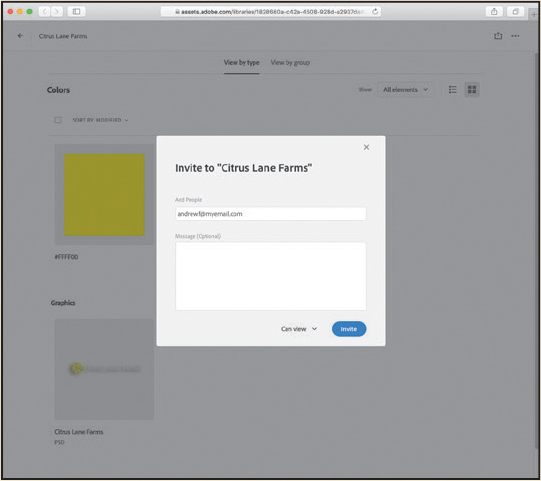
Collaborating
When you share a Creative Cloud Library, your team always has the current version of those assets. In the Libraries panel menu, choose Collaborate, and fill in the Invite screen that appears in your web browser. Collaborators will see the library you shared in their Creative Cloud applications (to use this feature, you must have a Creative Cloud account and be signed in).
Adding assets to libraries using Adobe mobile apps
Use Adobe mobile apps—such as Adobe Capture—to record color themes, shapes, and brushes from real life and add them to your Creative Cloud libraries. Library assets you add with mobile apps automatically sync to your Creative Cloud account, so you’ll see the new assets in your Libraries panel when you return to your computer.
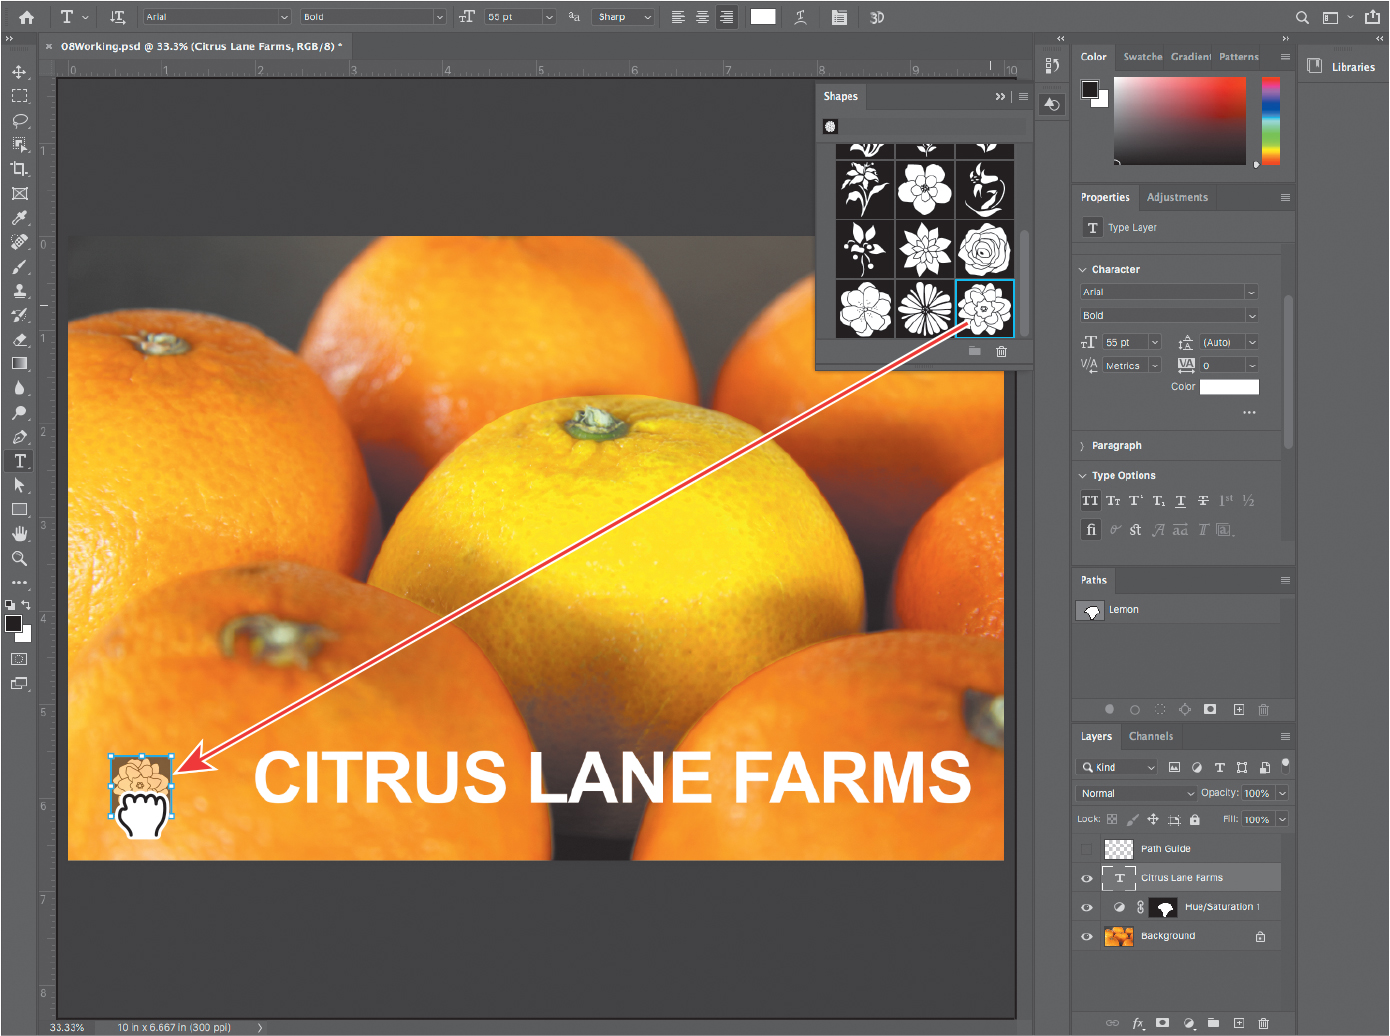
Drag the last shape preset, and drop it to the left of the Citrus Lane Farms logo.
The flower shape now appears in the Layers panel. The shape currently has a transform bounding box around it so that you can make adjustments before committing it to the document. And yes, there are some adjustments to be made.
![]() Tip
Tip
Want to save your own shape preset? Draw a path or shape, select it with the Path Selection tool, choose Edit > Define Custom Shape, name it, and click OK. It’s added to the Shapes panel; if a shape group is active it’s added to that group.
![]() Tip
Tip
If the magenta Smart Guides prevent you from making precise adjustments, hold down the Control key as you drag.
Drag any handle on the shape to resize it to be about 1.5 inches tall.
Drag the flower to position it between the left edge of the document and the Citrus Lane Farms text.
Click the Commit Transform button (
) in the options bar, or press Enter or Return. The transformation bounding box disappears.
![]() Tip
Tip
Do you wish one of the preset shapes was slightly different? All shapes are paths, so after you add a shape to the document, you can edit it by using the Pen tool or any of the tools grouped with it, or the Direct Selection tool.
A shape is added using the current fill and stroke settings for shapes, which were the ones set for the practice shape earlier. The flower shape is intended to have a solid yellow fill. That change could not be done while the bounding box was active, but now that it’s been committed to the document, the colors can be changed.
Make sure the flower shape is still selected in the Layers panel.
In the Layers panel, double-click the name of the shape layer, type Flower, and press Return or Enter to rename the layer.
Select any shape tool, such as the Rectangle tool or any tool grouped with it. The options bar now displays settings for shapes.
In the options bar, click the Fill swatch, expand the RGB swatch presets group that appears in the drop-down menu, and click the yellow swatch.
In the options bar, click the Stroke swatch, and set it to No Color. Close the pop-up menu by pressing Enter or Return.

Choose Select > Deselect Layers. Now you can see the flower shape without its path being highlighted.
If needed, use the Move tool to reposition the flower and text, composing them relative to each other as a logo, and relative to the edges of the document.

Save your file.
You’ve combined an image, a color adjustment layer masked with the help of a path you drew by hand, a pre-made shape, and a text layer. The postcard is ready to go!
Extra credit
Quickly adding color and effects using presets
You can use presets to quickly enhance the look of both the text and the flower in the logo. The way that you do this is similar to how you added the flower shape with the Shapes panel and changed its color using the Swatches panel.

You can apply a preset by dragging and dropping it on a layer, or by clicking a preset when the layer is selected. Either way is fine.
In this example, the Basic style applies a simple stroke and drop shadow. But the possibilities are much wider. Explore your design options by freely editing the presets in the Styles, Gradients, Patterns, and Swatches panels and applying them to layers until you get the look you want. And you can add your own presets to those panels.
You can see that the effects have been applied in the Layers panel, and you can fine-tune those effects in different ways:
Click the eye icon for different layer effects to disable or enable them.
Double-click an effect name to open the Layer Style dialog box, where you can edit effects.
If you try to apply a style and it doesn’t seem to change the layer, you may first need to delete effects already applied to the layer: In the Layers panel, drag that layer’s Effects heading to the Delete (trash can) icon at the bottom of the Layers panel. Note that a preset may also alter a layer’s Opacity and Fill Opacity, so you may have to set those back to the default of 100%.
If you don’t see any effects listed after a layer after applying a style, the preset may have been applied as a fill or stroke instead of a layer style. To edit it, double-click the shape layer thumbnail (not the name).
If you applied a preset to a shape, select any shape tool, such as the Rectangle tool, to display shape options in the options bar. Click the Fill or Stroke swatch to edit the preset.

Extra credit
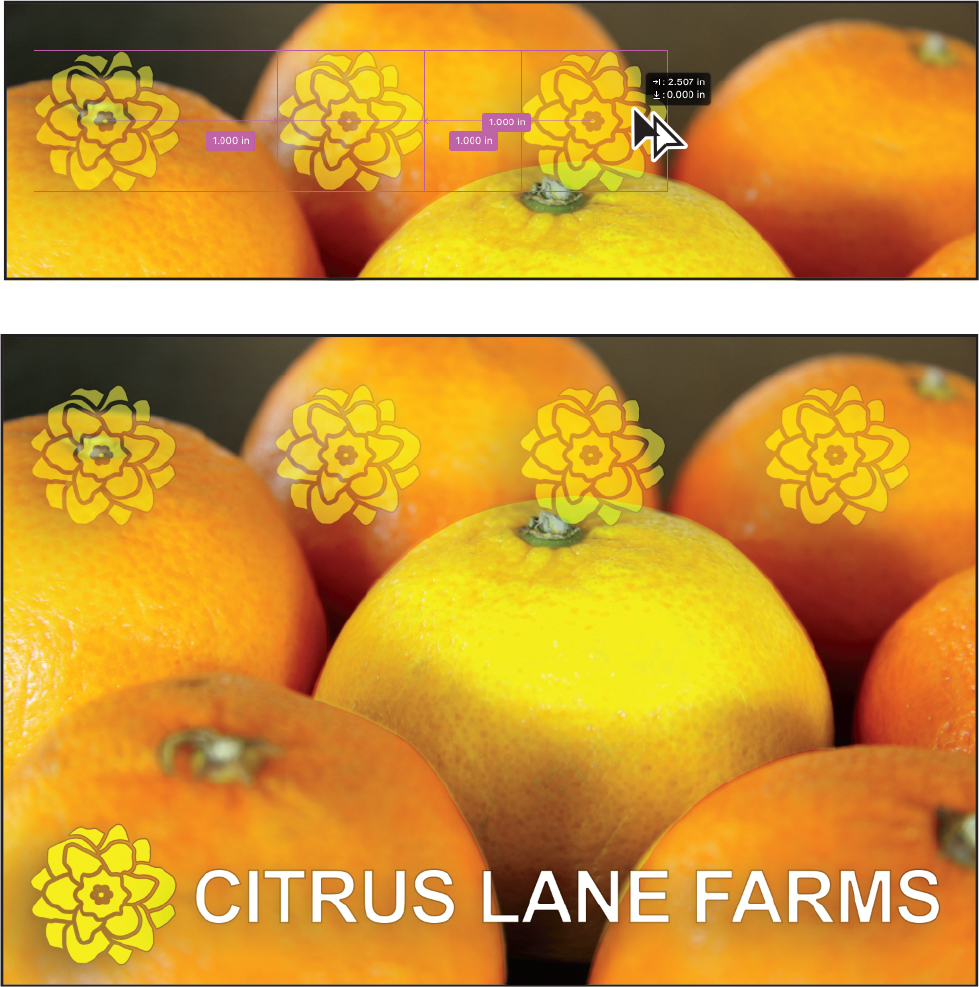
Using Smart Guides to maintain alignment and equal spacing
Let’s take this design to the next level. You can use the Citrus Lane Farms logo to make a repeated motif for packaging or other signage. Smart Guides can help you position the images evenly.
Review questions
1 What is the difference between a bitmap image and a vector graphic?
2 After using the Pen tool to add an anchor point to a path, how do you make sure the next path segment is a curve?
3 How can you add a preset shape to the document?
4 What tool can you use to move and resize paths and shapes?
5 What are some ways to change the shape of a curved path segment?
Review answers
1 Bitmap, or raster, images are based on a grid of pixels and are appropriate for continuous-tone images such as photographs or artwork created in painting programs. Vector graphics are made up of shapes based on mathematical expressions and are appropriate for illustrations, type, and drawings that require clear, smooth lines.
2 Drag the next point with the Pen tool.
3 To add a preset shape, open the Shapes panel, find the shape, and drag it into the document window.
4 You use the Direct Selection tool to move, resize, and edit shapes. You can also modify and scale a selected shape or path by choosing Edit > Free Transform.
5 You can change the shape of a curved path segment by using the Direction Selection tool to drag either of a curved segment’s two anchor points, the direction points for either anchor point, or the curved segment itself.