
Chapter Seven
Library Module—Edit and Export
Recently one of my photography students asked for feedback on a set of images taken on a ski trip to Antarctica. The trip was organized to capture still and video footage for an upcoming Warren Miller ski film. The skiers and scenery were amazing. He asked what he could do to make the images even stronger. My response was simple: “Use Photoshop and send them off!”
My student had already enthusiastically adopted Lightroom and made it his main work-processing tool. In his excitement he’d forgotten that Lightroom works well as a stand-alone application, but even better with Adobe Photoshop. Spending just a few minutes in Photoshop would make his images that much better. The good news is that he took my advice, and the set of photos turned out stunning.
In this chapter we explore exporting our work out of Lightroom and editing the images in Photoshop. By shifting our focus to “leaving” Lightroom, we’ll deepen our postproduction skills and ultimately make better photographs.
There are many reasons to export your images from Lightroom: to email JPEG images to clients or to send them high resolution files—and there is always the need to back up images on a CD or DVD.
To export images from Lightroom select one or more images in the Library module Grid View or in the Filmstrip at the bottom of the Lightroom interface. Next, choose File > Export, or press Shift + Control (Windows) or Command + E (Mac). This will open the Export dialog (Figure 42a). You can either choose one of the presets on the left (these will be discussed in Technique #43) or customize your export options using the menu on the right.
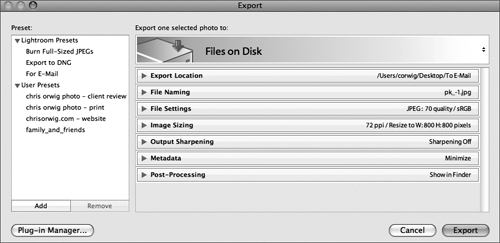
Let’s take a look at a few of the Export menu options. First, opt to export Files on Disk or Files on CD/DVD. To choose between these two options click in either the area that reads Files on Disk or the one that reads Files on CD/DVD. (Figure 42b).

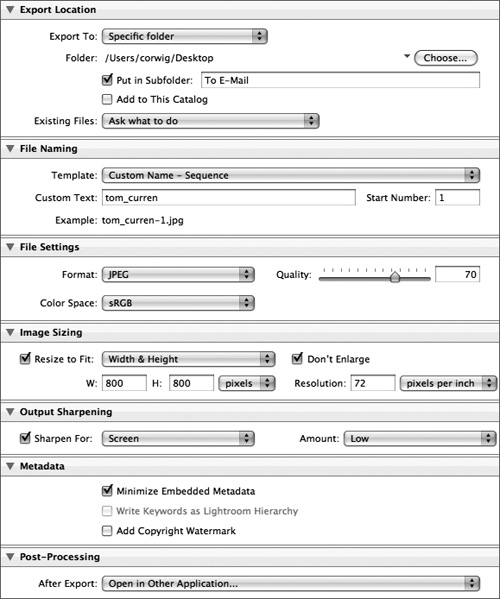
Next, refine the export settings by expanding the various panels (Figure 42c). Here are some highlights of those settings:
• Use the Export Location panel to choose a destination folder. If you need to keep track of the images check Add to This Catalog.
• Select the File Naming panel for a naming convention Template or Custom Text.
• Select the File Settings panel to choose from the file formats PSD, TIF, JPEG, DNG, and Original.
• Open the Image Sizing panel for a resizing option that best suits your workflow. Select Don’t Enlarge and instead use Photoshop to resize the image so that you can see your results immediately. Or select Enlarge so that Lightroom resizes the image. The downside of using Lightroom is that you can’t immediately see the results, but the advantage is that Lightroom uses an interpolation method considered superior to Photoshop’s method.
• Choose Output Sharpening for Screen or Matte or Glossy paper, and from the Amount drop-down menu choose Low, Medium, or High.
• Click the Metadata panel and choose from Minimize Embedded Metadata, Write Keywords as Lightroom Hierarchy (if someone else will import the image into Lightroom) and—if the copyright is critical—Add Copyright Watermark.
• Open the Post-Processing panel and select what should be done after the image has been exported.
Ready! Preset! Go! The more you use Lightroom, the more you will discover that presets enhance and optimize your workflow in subtle yet significant ways.
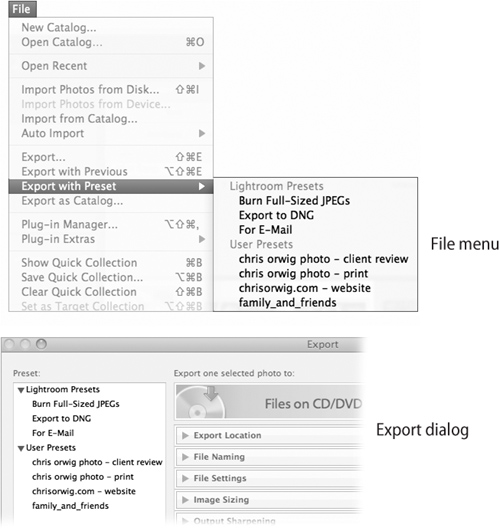
To export with presets choose File > Export with Preset and select the appropriate preset, or choose File > Export to open the Export dialog. From there you can choose a preset (Figure 43a). As you can see, the File pull-down menu will display all of the default Lightroom Presets as well as any custom User Presets you have created.
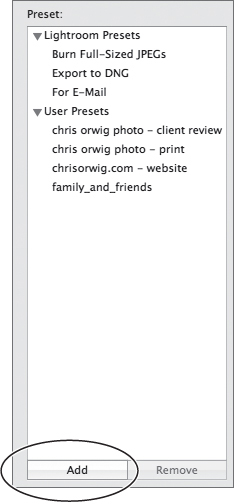
To create your own presets choose File > Export to open the Export dialog. Next, modify the settings in the various panels, as described in Technique #42. Once you have finalized the settings, click the Add button. (Figure 43b) to open the New Preset dialog (Figure 43c). Type in a name for the preset and then click on the pull-down menu to assign the preset to the current folder or to select a different folder.

Photoshop is one of the most powerful, proficient, functional, and creative image-editing tools that exist. Here we begin taking your images to a whole new level—the fun part! First, we will first look at setting the editing preferences, and second, we will examine how to edit.
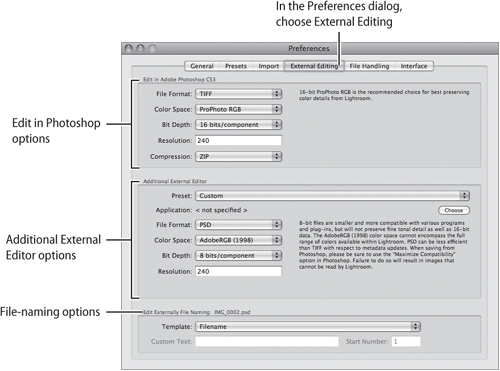
Before we begin, dial in your editing preferences. Choose Edit > Preferences (Windows) or Lightroom > Preferences (Mac) to open the Preferences dialog (Figure 44a). In the dialog, choose File Format, Color Space, Bit Depth and Resolution for the images to be edited in Photoshop. (For more details see “Which Edit Options Are Best?”) You can also define an additional external editor, if you use another program besides Photoshop to edit images. Finally, choose a file-naming convention from one of the Template options.
There are a few different ways of editing images in Photoshop. The simplest technique involves selecting one or more images in the Library module Grid View or in the Filmstrip and then choosing Photo > Edit in Photoshop.
For even more editing options, navigate to the Library module Grid View and select one image. Next, right-click (Windows) or Control-click (Mac) the image(s) and choose Edit in Photoshop or Edit in Photoshop as a Smart Object for even more flexibility. If you choose the Smart Object option, you can make changes to your Lightroom adjustments within Photoshop just by double-clicking the Smart Object layer that contains your raw file.
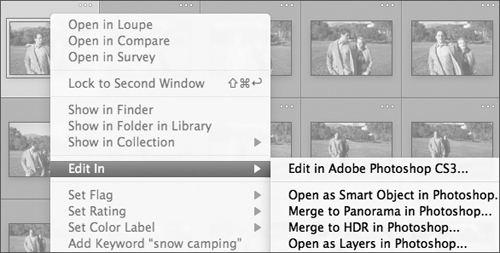
Just when you think you’ve heard everything about editing in Photoshop—there’s more! Again, navigate to the Library module Grid View, except this time select more than one image. Next, right-click (Windows) or Control-click (Mac) the images and choose Edit in Photoshop CS3 (Figure 44b). Then select Open as Smart Object in Photoshop, Merge to Panorama in Photoshop, Merge to HDR in Photoshop, or Open as Layers in Photoshop. For more details see the sidebar “New Editing Options.”
Choose a file-naming convention from one of the template options.