
Chapter Two
Importing Images
As you have now discovered, Lightroom is an application that you can use throughout the entire photographic workflow, from import to output. In this chapter, we will dig into how you can utilize many of Lightroom’s features for importing images.
You may be tempted to skip this chapter and jump ahead to the others, which deal with image processing. The time you spend with this chapter will be well worth it to establish a foundation for the rest of your work in Lightroom. To be an effective and creative photographer, it’s critical that each and every aspect of your workflow be as strong as possible. Because when you stop to think about it, the worst type of photograph is the one you can’t find.
Ultimately, this chapter will help you be at the top of your game. We’ll start off by discussing some basics of digital asset management and file formats. Next, we will cover importing options, converting files, adding metadata, auto-importing, and tethered shooting.
For photographers, few topics are as important yet as overlooked as digital asset management. This is a quite broad term that refers to the process of dealing with digital assets such as images. For photographers, it means image importing, downloading, renaming, rating, grouping, backing up, archiving, browsing, and exporting. In this Technique we’ll cover the basics of image storage on external hard drives.
As mentioned in Technique #9, where and how you store your images is really contingent on how much you shoot. If you take photographs weekly or even monthly, you need a simple yet substantial system for storing and backing up your images. The simplest approach is to use more than one external hard drive.
Many photographers choose this option because it is affordable, flexible, and relatively easy to manage and upgrade. That being said, many photographers blindly buy new hard drives without ever developing a strategic approach to using them.
It is critical to note that hard drives typically “live” for three to five years. Therefore, the question isn’t, “Will the hard drive die?” but, “How much longer until the drive dies?” This may sound pessimistic, but your approach to backup storage needs to be realistic. While three to five years is typical, keep in mind that the life span of the hard drive depends on the amount of usage and other wear and tear factors. The fact that all hard drives will die makes having a solid digital asset management strategy critical.
While different strategies will work for different photographers, here are a few general recommendations for storage and backup:
1. Store the Lightroom database catalog on your internal hard drive. This will improve Lightroom’s performance. Remember to back up frequently.
2. Purchase external hard drives in multiples of three.
3. Store and back up your files to at least three hard drives.
4. Keep one hard drive at another physical location in case of fire or natural disaster.
Lightroom is designed to support a wide range of formats, including RAW, DNG, TIFF, JPEG, and PSD. Before we discuss these specific formats, it is worth discussing how Lightroom deals with files in general. At its core, Lightroom is a raw image processor. What this means is that you are able to make changes to an image without actually changing the image.
When you make changes in Lightroom, the changes are written to a file that is separate from the actual pixels in the original file. Not only is this approach flexible, it generates files that are smaller than other “pixel editing” programs.
Raw file formats are the type most commonly used in Lightroom. These files contain raw, unprocessed data, which comes straight from the camera’s sensor. Because it is unprocessed, the raw data truly is more flexible than and superior to JPEG data, which goes through a series of processing steps that interpret the data within the camera. This means that with raw files you actually have access to more data, and this allows you to make more significant image modifications, like correcting exposure, recovering highlights, and more. At the same time, it is important to realize that the majority of the camera manufacturers save the camera raw data in company-specific proprietary camera raw formats. Fortunately, Lightroom is capable of reading and processing the camera raw data from most cameras.
Adobe has created a unique raw format called the Digital Negative (DNG). This is a publicly available archival format for raw files generated by digital cameras. You can convert any of the supported file types (RAW, DNG, TIFF, JPEG, and PSD) to the DNG format when you import them into Lightroom. Or visit www.adobe.com/products/dng to download the Adobe DNG converter. Ideally, because this format is “open” and not dependent on camera manufacturers, it ensures that photographers will be able to access their files in the future even as formats and cameras change. Of course, it is difficult to envision what the future digital photographic landscape will actually look like, but the DNG format is an appealing solution for those who will need to open and process raw files far in the future.
The Tagged-Image File Format (TIFF) is a widely used unbiased file format. Unbiased means that it works well with other applications and between different computer platforms or operating systems. The format is supported by almost all paint, image-editing, and page-layout applications, including Adobe Creative Suite. One main advantage of using the TIFF format is that it provides greater compression and industry compatibility than the Photoshop format (PSD) and is the recommended format for exchanging files between Lightroom and Photoshop. In fact, the Lightroom default export file format is TIFF. For more on exporting files from Lightroom, see Chapter 8.
JPEG stands for “Joint Photographic Experts Group.” It is the most common format used to display photographs and other continuous-tone images on the Web, in slideshows, presentations, and other interactive media. The main advantage of using it is small file size. The JPEG format allows you to retain important color information in an RGB image by selectively discarding some color and tone data and still maintain a good visual quality. The main disadvantage is that the JPEG file format is compressed; therefore, every time you save a JPEG some data is lost. This means JPEG is definitely not a good archival format.
The standard Photoshop file format is PSD. Although PSD is the default format, if you are going to work with Photoshop it is actually best to use the TIFF format, as it is more flexible and integrates more easily into Lightroom. You may have old PSD files that you want to import into Lightroom. In this case, to import and work with a multilayered PSD file, the file must have been saved in Photoshop with the Maximize PSD and PSB File Compatibility preference turned on. This option is located in the Photoshop file handling preferences.
If you have ever attended a talk or conference session about Lightroom, you’ve probably heard quite a bit about the software’s capabilities to import images into a database. Well, what’s the big deal—is all this importing to database stuff really that important? The answer is a definite yes!
For starters, there are six essential digital photography workflow elements: capture, import, organize, process, archive, and output. Lightroom comes into the equation right after capture. In fact, one of the advantages of using Lightroom is that, unlike with Adobe Bridge or other applications, you have the ability to start off your workflow by importing images straight into a database catalog rather than simply browsing the images in huge batches before trying to organize them. While I will cover the details of working with Lightroom database catalogs in Chapter 16, know for now that the main advantage of importing images into a database is speed.
One of the largest problem areas facing the digital photographer involves how to view, access, and organize the images effectively. The results of over-shooting often leave the photographer immobilized or at least a bit stunned. Therefore, speed becomes a premium worth paying for. Fortunately, Lightroom provides an easy, enjoyable, and inexpensive solution to this problem by importing images into its database catalog.
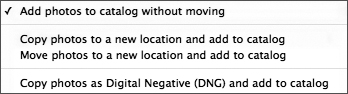
To import your images into Lightroom (and into the Lightroom database catalog) Click the Import button. This will open the Import Photos dialog (Figure 14a). When choosing how to handle the files, you have four importing options (Figure 14b): Keep the files at their current location, copy photos to a new location, move photos, or copy photos as DNG.
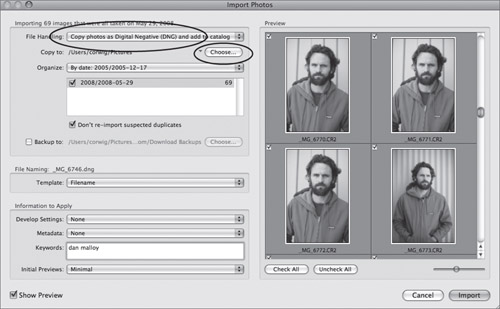
In order to get the most out of the Import Photos dialog (under the File menu) to import your photos, let’s dig a bit deeper into the more important Import dialog options (Figure 15a). This technique is not meant to be exhaustive, but to shed light on the less intuitive and most critical options for your workflow.
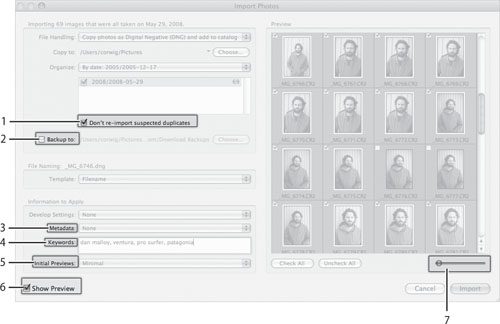
1. Be sure to select Don’t re-import suspected duplicates. This is especially helpful in a couple of scenarios. First, if you have imported images from a compact flash card and then reused the card without deleting the old images, both the images from the previous shoot and the new images are imported into your database. Selecting this option will allow you to ignore duplicate images that have already been imported. Second, you may be uncertain whether you’ve already imported images. This option will prevent you from adding images twice.
2. To back up your images to multiple locations at the time of import select Backup to: and import your images to a secondary location. Ideally, this location is on another external hard drive. Note: The folders and backup files copied to the external drive will have the same naming conventions as the imported files.
3. By adding metadata presets to your images upon import you can have the metadata available and still save time. To create a new preset, click on the Metadata preset drop-down menu and choose New. Then enter important metadata. To apply the preset simply select it from the drop-down menu. Plus, once you’ve created a preset, you can edit it as needed.
4. To manually add keywords to your images inside the Information to Apply area of the Import dialog, simply type the words and separate them by commas. When you add keywords here, it is a good idea to start with general keywords that describe the whole import. Keywords specific to the photo can be added later.
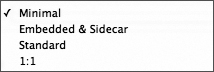
5. By selecting this option in advance, you don’t have to wait for the preview to be generated when browsing or working on the images. Choose whichever one of the four preview options (Figure 15b) that best suits your needs:
Minimal—Small JPEG preview suitable for Grid view mode.
Embedded and Sidecar—Small JPEG preview embedded in the raw or sidecar file. Suitable for Grid or Loupe view mode when you need to quickly preview an image. If you choose this option, Lightroom will render a new preview when the zoom is greater that the embedded preview size.
Standard—Medium JPEG preview suitable for Loupe view mode. These previews are rendered from the raw images during the import process.
1:1—Full size preview, which is rendered using the default sharpen and noise settings. While this is the best preview, it does take longer to render.
6. Select Show Preview in order to see the thumbnails in the Preview pane on the right side of the dialog. By selecting this option you can not only see what images you are importing, but also can determine if any images are not worth importing. To deselect an image so that it is not imported, simply click the check box to the right of the image in the Preview pane.
7. Move the Preview thumbnail slider in order to change the size of the thumbnails in the Preview pane. The maximum viewable size depends on the embedded preview size.
As a teacher and workshop instructor, I am often asked, “What’s the real difference between Lightroom and Adobe Bridge?” While there are many differences, one of the most important is that with Lightroom you can import the photos and store the photos, photo previews, and metadata much more efficiently. Because this is an abstract concept, I usually provide students with this example: “Using Bridge is like going shopping at grocery store without a cart. You can still see everything but it gets a bit cumbersome when you actually want to take something off the shelf.” With Lightroom you are shopping with a cart; importing in Lightroom is like taking an item off the shelf and putting it in your cart. The workflow is simple, fluid, and enjoyable, and you are quickly on your way.
Using Auto Import in Lightroom is like going shopping with a grocery cart and having the items jump automatically into your cart as you walk the aisles of the store. In more technical terms, the Auto Import feature allows you to automatically import photos into the Lightroom database catalog from a predetermined folder. This feature has many uses; for one, it’s a simple way to add images while shooting tethered to your computer.
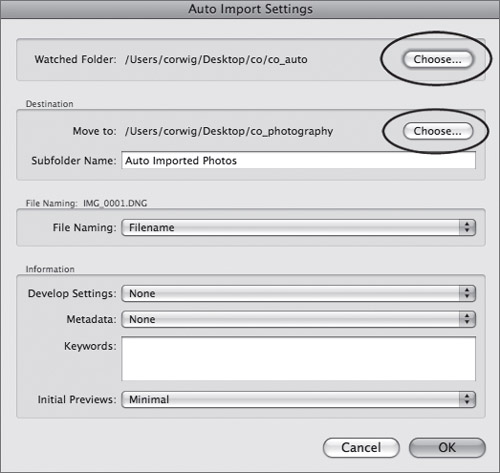
To set up Auto Import, choose File > Auto Import > Auto Import Settings. This will open the Auto Import Settings dialog (Figure 16a). First, define the Watched Folder, which is the folder Lightroom looks at for new images to automatically import. Note that this folder needs to be empty in order for Auto Import to work. Second, select the Destination for the images. This is the folder that Lightroom will move the images into as it imports them. Next, select a choice for each of the following options (which are identical to the Import dialog options): File Naming, Develop Settings, Metadata, Keywords and Initial Previews.
Depending on your workflow, you will find different uses for Auto Import. In some workflows photographers first process their images in the camera manufacturer’s proprietary software. In this case, one practical use of the Auto Import feature is to “finish” the images in the software and then drag them to the Watched Folder in order to import them into Lightroom. Another use is to save files from other programs into the Watched Folder, which can then be auto imported into Lightroom. But the most common use of Auto Import is for tethered shooting, which is discussed in Technique #17.
Typically, when a digital camera takes a photo the image is written onto a memory card. In order to preview the image you have to view it on the small LCD screen on the back of the camera. Tethered shooting allows you to write an image directly to a computer so that you can quickly see a large view of it (Figure 17a). This is especially handy when you’re shooting in a studio (Figure 17b). To shoot tethered, you need a camera and also your camera manufacturer’s software that supports this function. By using the manufacturer’s software you can download photos to a Watched Folder, as we discussed in Technique #16. Next, Lightroom can monitor and automatically import these photos as they are being captured.
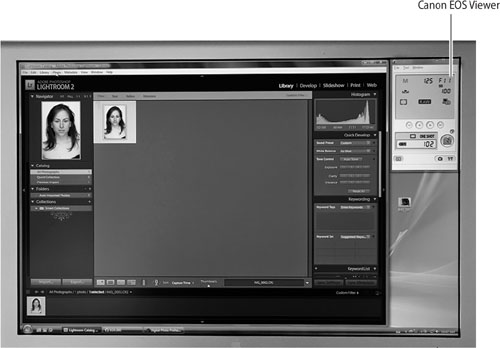

First, install software from your camera manufacturer and modify the settings so the images are downloaded into a specific folder. For example, I have a Canon camera and use the Canon EOS Viewer, which downloads images to a folder called co_watched. Second, connect your camera to your computer via a USB port. Third, in Lightroom, enable Auto Import (see Technique #16) and specify the co_watched folder as the watched folder. Finally, begin shooting—and enjoy the experience of seeing large previews of your images quickly.
Note
When shooting tethered and using Auto Import in Lightroom, make sure to download the images to the main folder. Auto Import does not recognize and import images from a subfolder of a watched folder. In addition, be sure to turn off helper applications to prevent the camera manufacturer’s software from automatically opening them.