
Chapter Three
Library Module Overview
I’ll never forget the time I visited a famous guitar maker at his workshop—the place was immaculate! All of his tools and supplies were organized and easy to access. It wasn’t difficult to understand that the workshop directly enabled him to create beautiful and well-made guitars. And, how does a guitar maker’s workshop relate to Lightroom?
For digital photographers, Lightroom is a workshop where we perform the art and craft of image postproduction. Due to a high volume of shooting, many digital photographers struggle to stay organized. As a result, their productivity, creativity, and enjoyment levels plummet. The good news is that the Lightroom Library module can help to organize, access, and filter your images in unique ways.
Whether you are an old pro or are new to Lightroom, this chapter will provide practical techniques for improving your photographic workflow. In particular, we will examine the interface, shortcuts, various view modes, navigation, toolbar, Filmstrip, and image rating and ranking.
The Library module interface looks a lot like the other Lightroom modules, but its functionality is unique. The panel, toolbar, and Filmstrip layouts are identical to the other modules. Beyond those basics, however, the Library module is quite different. In order to speed up your workflow, it’s important to learn about the interface (this technique) and to learn the most common keyboard shortcuts (next technique).
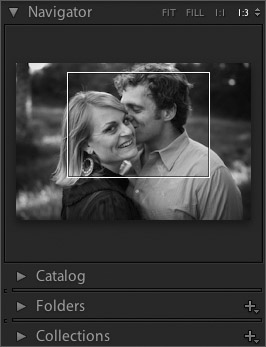
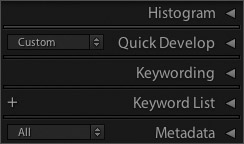
The panels to the left of the interface contain the Navigator, Catalog, Folder, and Collections (Figure 18a). Use these panels to modify how you view and organize images. The panels on the right are the Histogram, Quick Develop, Keywording, Keyword List and Metadata (Figure 18b). Use the panels on the right to view the Histogram, to make simple developing changes, and to add or modify keywords and other metadata.
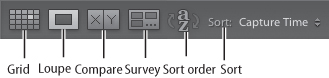
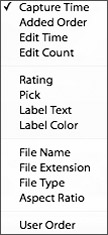
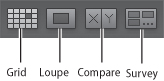
While the toolbar is present in each module, it is most similar in the Library and Develop modules. One of the main differences between the two modules is the unique capability of the Library module to view, compare, and organize images. You can also use the icons in the toolbar to tap into special functionalities of the Library module (Figure 18c). Only in the Library module can you view the images in Grid or Loupe, Compare or Survey the images, and finally, Sort the images by a wide range of criteria (Figure 18d).
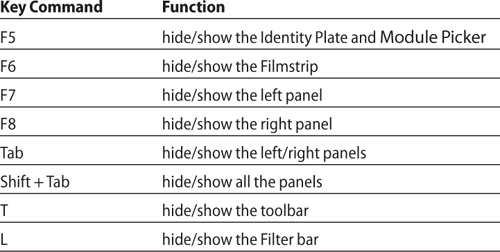
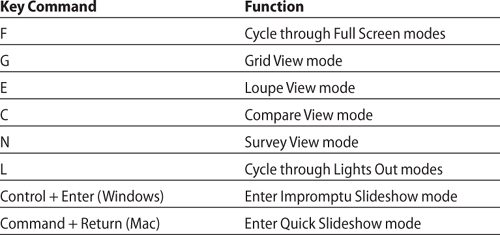
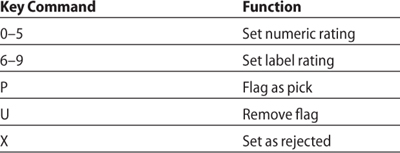
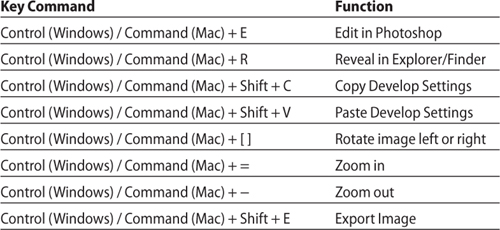
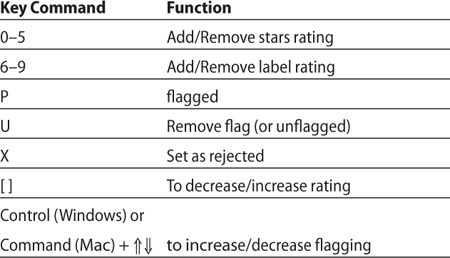
Each module responds to keyboard shortcuts that can help you increase your productivity. As a teacher, I’m aware that certain people like shortcuts about as much as they like going to the dentist. In the tables that follow, I will help you with the experience by highlighting the shortcuts that I find most helpful. As a starting point, try to circle or highlight at least three shortcuts to integrate into your workflow.

The Grid View and Loupe View modes are integral to the Library module. The Grid View mode allows you to see multiple image thumbnails at one time (Figure 20a). The Loupe View mode acts like a traditional photographic loupe, meaning that you can zoom into the grid—or you can just view one large image at a time (Figure 20b). The advantage of both of these view modes is that they enable you to quickly organize and process your images. Use these shortcuts to choose a view mode: G for Grid View and E for Loupe View.
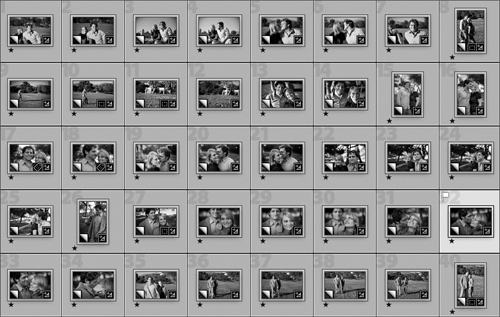

In a typical photographic workflow, you begin by importing your images into Lightroom. Next, you look at the images in the Grid View mode and scroll through the images. This way it is possible to get an overall sense of the set of images. While this may seem like a simple step, it is incredibly important, as it provides a frame of reference for the more detailed steps of organization and editing that come later.
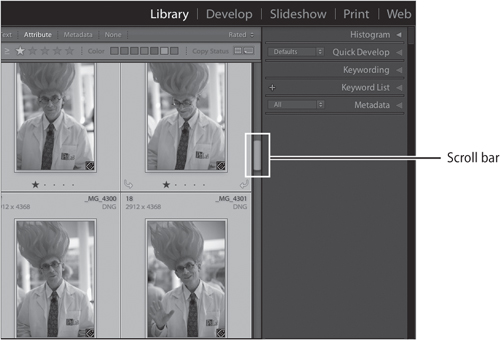
To scroll through the images you can use the scroll bar just to the right of the image thumbnails (Figure 20c). Based on your monitor resolution and viewing preference, be sure to change the size of the thumbnails by using the Thumbnails size slider in the toolbar (Figure 20d).
Because the majority of your organizational work will take place in the Library module, it is worthwhile to learn a few more Grid View and Loupe View options to increase your speed and efficiency.
Let’s begin with the Grid View, where you can make changes to specify other types of information that accompany the thumbnails. (We will cover the Loupe View Options in the next technique.) In order to access the controls to make changes, choose View > View Options or press Control + J (Windows) or Command + J (Mac) to open the Library View Options dialog (Figure 21). Click on the Grid View tab and select Show Grid Extras to view information and icons in the photo thumbnail cells. I don’t recommend this in the Grid View; if you agree with me, you can deselect this option and show only the photo thumbnails, without any additional information.
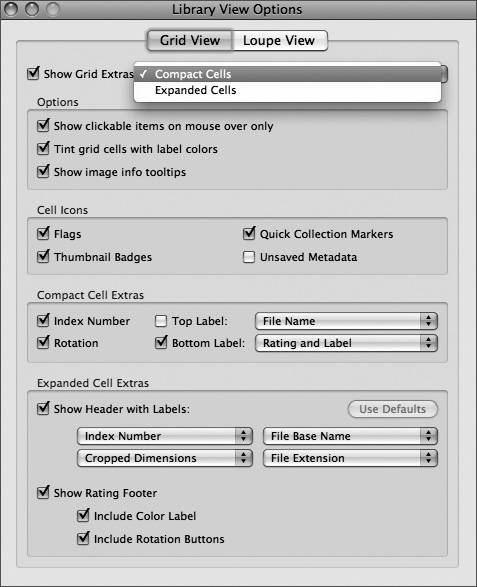
Next, choose Compact Cells or Expanded Cells. As the names imply, Compact allows you to show less information and smaller cells than Expanded, which displays the most photo information available in the Grid View. Once you make a selection you will see a live preview update in the Grid View.
In the Options area of the dialog, I recommend that you select the following items:
• Show clickable items on mouse over only. By choosing this option, clickable items like flags or rotation buttons will appear when the cursor hovers over the thumbnails. This option gives you access to important features without adding more visual clutter to the Grid View.
• Tint grid cells with label color. By choosing this option, the thumbnail cell background will be tinted with the label color you have applied to the image. This option provides you with a nice, subtle way to view labels.
• Show image info tooltips. By choosing this option, tooltips for items (such as a flag rating) will appear when your hover the cursor over the item. Again, this allows you to access helpful information without adding more visual distractions to the Grid View.
I recommend that you select Flags, Quick Collection Markers, and Thumbnail Badges, and deselect Unsaved Metadata in the Cell Icons area of the dialog. Here’s what these icons do:
• Flags The Flag pick will appear in the upper left corner.
• Quick Collection Markers The Quick Collection marker will appear in the upper right corner.
• Thumbnail Badges These will show which photos have keywords, cropping applied, or image adjustments.
• Unsaved Metadata Deselect Unsaved Metadata unless you are going to add metadata with programs other than Lightroom, like Adobe Bridge. If you are going to use other programs, select this option so that an exclamation mark will appear to indicate that metadata has been saved to the file in an external application.
The Compact Cell view is a nice, clean, and simple view that you can customize to show only information that is most relevant to your workflow. Choose the following extras to add more information to the Compact Cell view:
• Index Number Shows the order number of the photo in the Grid View.
• Rotation Makes Rotation buttons available.
• Top and Bottom labels Show the top or bottom label you choose from the menu. Choose from more than 30 options, ranging from File Name to ISO to Camera Serial Number.
The Expanded Cell view lets you see the thumbnails accompanied by as much information as possible. If you are going to use this option at all, you might as well select as many of the following options as are relevant to your workflow in order to add even more information to the Expanded Cell view:
• Show Header with Labels Shows the header area of the thumbnail cell, which can display up to four labels that you apply to the images. Choose from a wide array of label options from any of the drop-down menus.
• Show Rating Footer Shows the footer items you select. I recommend you select Include Color Label and Include Rotation Buttons, as this information and functionality can be helpful.
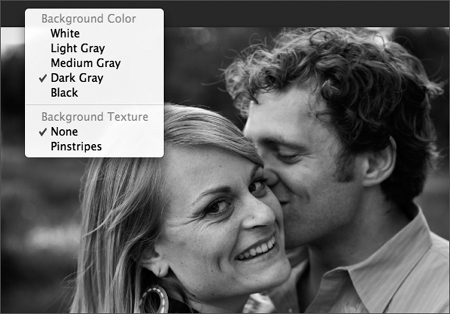
The Loupe View allows you to view a single image at a time. To customize the view options for the Loupe View, choose View > View Options to open the dialog (Figure 22a). As you will notice, here there are fewer options than with the Grid View. This makes sense, as the Loupe View is intended to focus on a single image rather than a group of images.
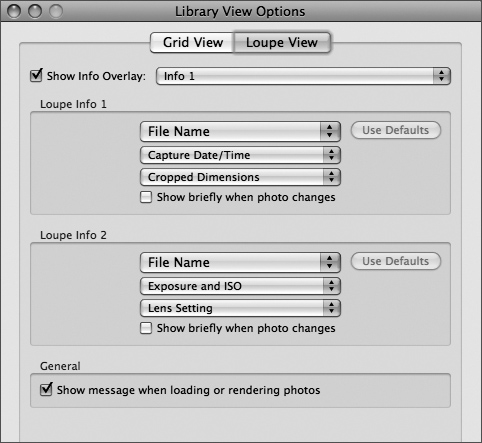
To turn on the Loupe View options, select Show Info Overlay. Next, in Loupe Info 1 and 2, choose the information to be displayed. Choose from over 30 options here, ranging from File Name to Camera Serial Number, for each of the three fields. I recommend you deselect Show briefly when photo changes, as this information becomes distracting. Finally, unless your are a glutton for frustration, select Show message when loading or rendering photos. Otherwise, as a photo is loading or rendering you may be uncertain whether the file is unlinked or even whether your computer is functioning properly.
In your own workflow, I recommend that after importing images into Lightroom, you navigate to the Library module to begin the task of editing. In the Library module, press the G key to choose to the Grid View. Next, scroll through the images to get an overview of the set of images. This gives you insight into the task at hand. Next, scroll back to the top of the set and click on the first image in the set.
Now that you are ready to begin to edit, double-click the image thumbnail (rather than pressing the E key) to navigate to the Loupe module. This will take the image to the Loupe View mode in a much more efficient manner.
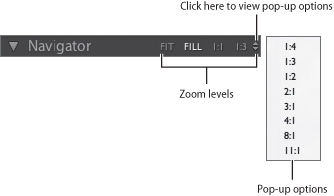
While in the Loupe View mode, click the Navigator buttons to switch between the various zoom levels (Figure 23a). Choose Fit to zoom the image so that it fits in the preview area; choose Fill to zoom the image so that it fills your entire monitor; choose 1:1 to zoom to a 100% view of the actual pixels; or choose an option from the pop-up menu. You can also use the Zoom slider in the toolbar to change the zoom level (Figure 23b).
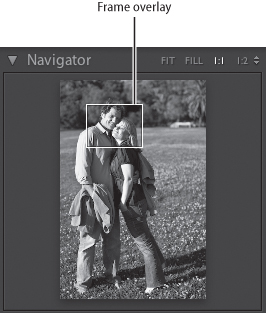
Once you have zoomed in, you can navigate around the image by using the Hand tool or the Navigator panel. When you zoom in to an image, the cursor automatically turns into the Hand tool. To use the Hand tool simply click and drag to reposition the area of the image that is revealed. Otherwise, when you zoom, the Navigator panel displays the entire image with a frame overlay to represent the zoom level of the main view (Figure 23c). To use the Navigator panel, click and drag the frame overlay to view the hidden areas of the image.
There are many different approaches to adding ratings and labels. Some photographers use only a star rating, while others use stars, labels, and flags. Keep in mind that there is no one correct way to use these features. In fact, Lightroom was built to provide you with many options so that you can select one based on your own workflow needs. Whatever you choose, don’t skip this step. It’s essential to your Lightroom workflow.
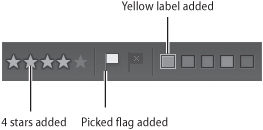
While editing your photos in Library (see Technique #23 for navigating to Grid View and Loupe View after import), you will be adding a star, a flag, or label metadata to your images. The simplest way to add this information is to use the toolbar (Figure 24a). First, click on an image. Next, in the toolbar click the icons for stars, a flag, or labels to add the metadata (Figure 24b). To select another image, click it in the Filmstrip or press the right and left arrow keys. Then add another rating or label.

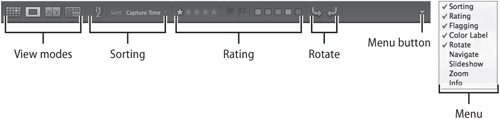
Toolbars are actually a relatively new invention, one that arrived with the advent of computer software and Web browsers. In generic terms, a toolbar is defined as a row or column of on-screen buttons used to activate functions in the application. Most toolbars are customizable, letting you add and delete buttons and functions. This is definitely true with the Lightroom toolbar, which is one of the most customizable aspects of the Lightroom interface.
You can find the toolbar (Figure 25) easily; it is above the Filmstrip and below the work area. To customize the toolbar, click the menu button. Next, select/deselect the items that you want to display. Be sure to note that the toolbar functionality is similar in all the modules, yet each toolbar is module-specific. Therefore, you can customize the toolbars for the different modules—for example, you can customize the Library module toolbar and the Develop module toolbar separately.
In the days of traditional film photography, it was common to evaluate photographs by placing them on a light box. This analog process was actually intriguing and rewarding. In fact, I remember standing over a light box watching one of my photographic heroes edit his work. First, he grouped the photos based on similarity, theme, or some other criteria. Next, he began to work on the smaller groups of images, examining the details and making comparisons to determine which photo was best.
Overall, the process helped the photographer arrive at a group of well-edited images. Now, with the advent of Lightroom, there is a parallel process that can help you discover and define which of your photographs are best.
First, let’s look at how we can “group” or survey images.
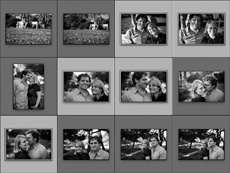
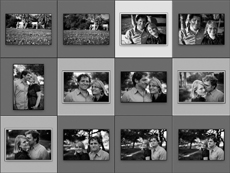
Press the G key to navigate to the Grid View. Select two or more photos. Or select two or more photos from the Filmstrip. Next, press the N key, choose View > Survey or click the Survey View icon in the toolbar (Figure 26a). This will open all of the images in a grid-based layout (Figure 26b).

To begin to work in the Survey View, click a photo in the work area or in the Filmstrip. In order to remove photos, click the Deselect Photo icon (the X) in the lower-right corner of a photo. You can also add rating or label metadata by clicking the rating and metadata icons below the photo (Figure 26c).
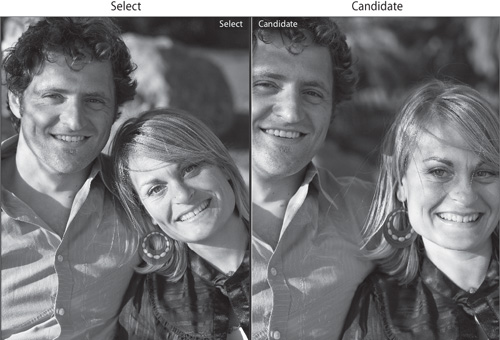
Press the G key to navigate to the Grid View. Select two photos from the Grid or from the Filmstrip. Next, press the C key, choose View > Compare or else click the Compare View icon in the toolbar (Figure 26a). This will open all of the images in a side-by-side comparison layout (Figure 26d).
Although you have entered the Compare View, you can add ratings or label metadata here too, and you can also zoom in on the images. To add rating info, click the icons beneath the image (Figure 26e).

Try using the icons in the toolbar for even more controls (Figure 26f). Let’s first look at zooming in on the images in order to see more details. To zoom both images simultaneously, click on the Link Focus icon and then drag the Zoom slider. Or if you want to zoom in or out on just one photo, click on the Link Focus icon again and then drag the Zoom slider.
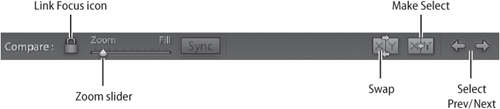
To change the Select photo and the Candidate photo, follow the steps below:
1. In the toolbar, click Swap to reverse the Select and Candidate photos.
2. In the toolbar, click the Select Next Photo icon (or press the right arrow key) to compare subsequent photos with the first selection. Select Previous Photo to compare previous photos with the first selection. Press the up arrow to replace the Select photo with the current selection and replace the Candidate selection with the next image.
3. Click the Deselect Photo icon in the lower right corner below the photo.
4. Select the Candidate photo and then click the Make Select button in the toolbar.
5. Repeat steps 2 through 4 as needed to continually select and swap photos. When you are finished, click Done to exit the Compare View and change back to the Loupe View.
When I first learned Photoshop, back in photography school, my teacher was found of the saying, “You must select before you correct.” While selections in Lightroom are different than in Photoshop, the saying still holds true. In this technique, we will learn how to select images quickly.
Sometimes in Filmstrip and in the Grid View you need to select multiple images at one time; for example, when you want to compare or survey multiple images as described in Technique #26. In order to select multiple images in the Filmstrip or the Grid View, follow the steps below:
1. Click on an image in the Filmstrip or in Grid View.
2. To select contiguous images, press and hold the Shift key and click on another image (Figure 27a). The selected images will be highlighted.
3. To select noncontiguous images, press and hold Control (Windows) or Command (Mac) and click on other images (Figure 27b). The selected images will be highlighted.
For those overachievers who really like keyboard shortcuts, try this one: